Activity modules for Moodle 1.8 - A short summary for the Bielefeld workshop in December 2007
←
→
Page content transcription
If your browser does not render page correctly, please read the page content below
Activity modules for Moodle 1.8
A short summary for the Bielefeld workshop in December 2007

Georg Hartl and Martin Kattmann
Web- and Moodlemasters of PhD-ACT
Preposition
Bielefeld December 2007
Dear Partners
With this handout we want to give you some help for deciding how to manage the Distance
Learning element in the PhD ACT module.
At first we will show you most of the activity modules included at MOODLE 1.8 and give
you a short description of these modules facilities.
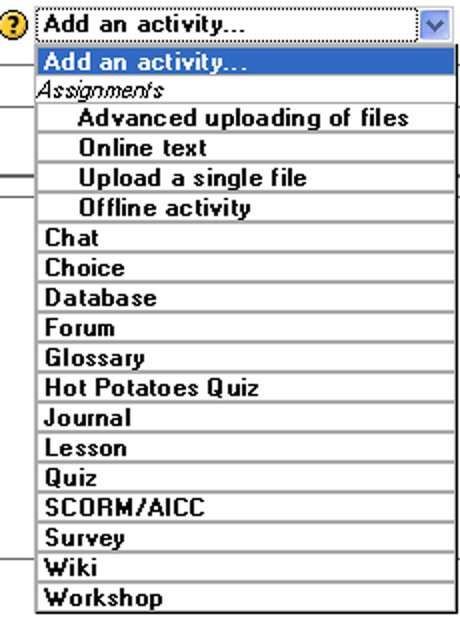
Here is an image of included activity modules:
In a second part we will introduce the most interesting modules for PhD ACT more detailed.
We think the most useful activity modules for graduate students are:
o Assignment
o Chat
o Forum
o Essay
o Glossary
o WIKI
o Workshop
You can find additional information at the official MOODLE website www.moodle.org under
the keyword modules and plugins.
The Url is: http://moodle.org/mod/data/view.php?id=6009
We hope that this little handout is helpful for your further work in this project.
Georg Hartl
Martin Kattmann
2
Index of contents
Part 1 Short overview
Assignments .............................................................................................................................. 5
Chat ........................................................................................................................................... 5
Choice ........................................................................................................................................ 5
Database .................................................................................................................................... 6
Forum ........................................................................................................................................ 6
Glossary..................................................................................................................................... 6
Hot potato quiz ......................................................................................................................... 7
Journal....................................................................................................................................... 7
Lesson ........................................................................................................................................ 7
Quiz............................................................................................................................................ 7
Scorm /Aicc ............................................................................................................................... 7
Survey ........................................................................................................................................ 7
Wiki ........................................................................................................................................... 8
Workshop.................................................................................................................................. 8

Part 2 Elaborated

Assignment module .................................................................................................................. 9
  Assignment Types .................................................................................................................. 9
  Iterative Assignments ............................................................................................................. 9
  Upload a single file assignment ............................................................................................. 9
  Advanced uploading of files assignment ............................................................................. 10
  Online text assignment ......................................................................................................... 11
  Offline activity assignment .................................................................................................. 12
  Adding/editing an assignment .............................................................................................. 13
  Viewing an assignment ........................................................................................................ 15
  Assignment submissions ...................................................................................................... 15
Chat module............................................................................................................................ 16
  Adding/editing a chat ........................................................................................................... 16
  Next chat time ...................................................................................................................... 17
  Viewing a chat...................................................................................................................... 19
  Chat sessions ........................................................................................................................ 19
  Chat reports .......................................................................................................................... 20
Forum module ........................................................................................................................ 20
  Teaching and Learning Forums............................................................................................ 20
  Student Centred Forums....................................................................................................... 21
  Adding/editing a forum ........................................................................................................ 24
  News forum .......................................................................................................................... 26
  Forum permissions ............................................................................................................... 26
  Viewing a forum................................................................................................................... 27
  Viewing a discussion............................................................................................................ 28
  Forum posting ...................................................................................................................... 28
  Forum subscription............................................................................................................... 29
  Forum moderator role........................................................................................................... 29
Essay module .......................................................................................................................... 29

                                                                                                                                                3
Essay question type .............................................................................................................. 29
Glossary module ..................................................................................................................... 30
Collaborative glossaries ....................................................................................................... 30
Adding a glossary................................................................................................................. 31
General options .................................................................................................................... 31
Common module settings..................................................................................................... 33
Glossary permissions............................................................................................................ 34
Viewing a glossary ............................................................................................................... 34
Printing a glossary................................................................................................................ 34
Adding/editing a glossary entry ........................................................................................... 34
Glossary comments .............................................................................................................. 35
Editing glossary categories................................................................................................... 36
Import glossary entries ......................................................................................................... 36
Export glossary entries ......................................................................................................... 37
Wiki module............................................................................................................................ 37
Adding/editing a wiki........................................................................................................... 38
Adding and editing wiki pages............................................................................................. 38
Advanced options ................................................................................................................. 39
Common module settings..................................................................................................... 39
Wiki permissions.................................................................................................................. 39
Viewing a wiki ..................................................................................................................... 40
Overview .............................................................................................................................. 40
Adding a wiki page .............................................................................................................. 40
Editing a wiki page............................................................................................................... 41
Wiki administration.............................................................................................................. 41
Wiki standard index pages ................................................................................................... 42
Export pages ......................................................................................................................... 42
Workshop module ................................................................................................................... 43
How to Create a Workshop.................................................................................................. 43
Creating Scoring Guides ...................................................................................................... 45
Uploading Example Assignments........................................................................................ 49
Managing Workshops .......................................................................................................... 50
Effective Workshop Practices.............................................................................................. 54
Creative Workshop Practices............................................................................................... 55
Literature for Moodle teaching............................................................................................. 56
4Assignments
The assignment module allows teachers to collect work from students, review it and
provide feedback including grades.
Students can submit any digital content (files), including, for example, word-processed
documents, spreadsheets, images, audio and video clips. Assignments don't necessarily have
to consist of file uploads. Alternatively, teachers can ask students to type directly into Moodle
using an online text assignment. There is also an offline activity assignment which can be
used to remind students of 'real-world' assignments they need to complete and to record
grades in Moodle for activities that don't have an online component.
Assignment types
Screenshot 1
There are 4 types of assignments:
Upload a single file
Advanced uploading of files - options include: multiple file submission, allowing students to
type a message alongside their submission & returning a file as feedback.
Online text - students type directly into Moodle, teachers can provide inline feedback.
Offline Activity - teachers provide a description and due date for an assignment outside of
Moodle. A grade & feedback can be recorded in Moodle.
More you find beginning at page 8
Chat
The Chat module allows participants to have a real-time synchronous discussion via the
web. This is a useful way to get a different understanding of each other and the topic being
discussed – the mode of using a chat room is quite different from the asynchronous forums.
The Chat module contains a number of features for managing and reviewing chat discussions.
More you find beginning at page 15
Choice
A choice is very simple – the teacher asks a question and specifies a choice of multiple
responses. It can be useful as a quick poll to stimulate thinking about a topic; to allow the
class to vote on a direction for the course; or to gather research consent.
Choice requires some preparation time for creating your activity and thinking about what
results you would like to achieve, but your participation with activity itself is likely to be
minimal.
5Database
The Database module allows the teacher and/or students to build, display and search a bank
of record entries about any conceivable topic. The format and structure of these entries can be
almost unlimited, including images, files, URLs, numbers and text amongst other things. You
may be familiar with similar technology from building Microsoft Access or Filemaker
databases.
Note: Please don't confuse this activity type with Moodle's underlying SQL database,
which stores all of the information used in Moodle courses and is only of interest to
Moodle Administrators.
Forum
Forums can contribute significantly to successful communication and community building in
an online environment. You can use forums for many innovative purposes in educational
settings, but teaching forums and student forums are arguably the two more significant
distinctions.
Teaching and Learning Forums
When you decide to use a discussion forum as an activity in an e-learning environment it is
important to be aware that your time will be needed in some sense in order to make the
activity successful. If your goal is to encourage discussion, the forum will only work if:
a.) participants feel there is a need/reason to participate and they will gain something from the
experience. Incentives for learning, gathering support, etc. should be explored and encouraged
early on in order to clearly convey the purpose of the forum to others. Anyone considering
offering grades or marks for participation is advised to think very carefully about the
difference between quantity and quality of discussions in forums.
b.) a sense of community and purpose can be fostered amongst participants. This sense of
community can be fostered through tutor/teacher initiative and scaffolding, or primarily
through the students/participants themselves depending on the intentions of the activity.
More you find beginning at page 19
Glossary
While a basic glossary is important, creatively applying the glossary can really make an
impact on your class.
• This activity allows participants to create and maintain a list of definitions, like a
dictionary.
• The entries can be searched or browsed in many different formats. The glossary also
allows teachers to export entries from one glossary to another (the main one) within
the same course.
• If glossary autolinking is enabled by an administrator (see Filters for further details)
then it is possible to automatically create links to these entries from throughout the
course.
More you find beginning at page 28
6Hot potato quiz
The Hotpot module allows teachers to administer Hot Potatoes and Tex Toys quizzes via
Moodle. The quizzes are created on the teacher's computer and then uploaded to the Moodle
course. After students have attempted the quizzes, a number of reports are available which
show how individual questions were answered and some statistical trends in the scores.
Journal
The teacher asks the student to reflect on a particular topic, and the student can edit and refine
their answer over time. This module has been replaced by two things:
1. The Online Assignment submodule (Moodle 1.5 onwards)
2. Blogs which allow ongoing journalling and publishing (Moodle 1.6 onwards)
Lesson
There are two basic types of Lesson pages: Choice and Navigation. Most pages offer the
student choices, "question pages" (related to Quizzes) are the most common. Moodle calls
another type of choice page "branch tables". Navigation pages create additional robust
features that impact a student's choices. "End of Branch", "Start Cluster" and "End Cluster"
are the Navigational pages seen by the teacher but they have no content seen by the student.
More you find at page …
Quiz
A quiz is an activity that presents students with questions and then processes their responses
to give feedback and grades. Quizzes can be used both as a way to aid the learning process
(formative assessment) and as a way of assessing student achievement (summative
assessment). The quiz module allows teachers to assemble quizzes from the questions in the
question bank and to set a variety of options determining how the student interacts with the
quiz (time limit, repeated attempts, level of feedback, ...)
Scorm /Aicc
A module to load and play SCORM -compliant content packages. Currently supports
SCORM 1.2 and AICC.
The SCORM/AICC module is a course activity which allows you (the teacher) to upload any
SCORM or AICC package to include in your course.
SCORM (Sharable Content Object Reference Model) is a collection of specifications that
enable interoperability, accessibility and reusability of web-based learning content.
Survey
The Survey module provides a number of verified survey instruments that have been found
useful in assessing and stimulating learning in online environments.
The Survey module is a course activity that provides a number of verified survey instruments,
including COLLES (Constructivist On-Line Learning Environment Survey) and ATTLS
(Attitudes to Thinking and Learning Survey), which have been found useful in assessing and
stimulating learning in online environments. Teachers can use these to gather data from their
students that will help them learn about their class and reflect on their own teaching
7Wiki
"Wiki wiki" means "super fast" in the Hawaiian language, and it is the speed of creating and
updating pages that is one of the defining aspects of wiki technology. Generally, there is no
prior review before modifications are accepted, and most wikis are open to the general public
or at least to all persons who also have access to the wiki server.
The Moodle wiki module enables participants to work together on web pages to add, expand
and change the content. Old versions are never deleted and can be restored.
A wiki is a collection of collaboratively authored web documents. Basically, a wiki page is a
web page everyone in your class can create together, right in the browser, without needing to
know HTML. A wiki starts with one front page. Each author can add other pages to the wiki
by simply creating a link to a page that doesn't exist yet.
Wikis get their name from the Hawaiian term "wiki wiki," which means "very fast." A wiki is
indeed a fast method for creating content as a group. It's a hugely popular format on the Web
for creating documents as a group. There is usually no central editor of a wiki, no single
person who has final editorial control. Instead, the community edits and develops its own
content. Consensus views emerge from the work of many people on a document.
Moodle's wiki is built atop an older wiki system called Erfurt wiki:
http://erfurtwiki.sourceforge.net.
More you find at page …
Workshop
These are the settings for 1.6 but are similar for 1.8 onward. The settings have help buttons.
The fields or options in settings in Moodle 1.6.include:
Submission Title, Description,
Grade for Assessments, Grade for Submission, Grading Strategy, 'Number of Comments,
Assessment Elements, Grade Bands, Criterion Statements or Categories in a Rubric',
Number of Attachments expected on Submissions, Allow Resubmissions, Number of
Assessments of Examples from Teacher, Comparison of Assessments, Number of
Assessments of Student Submissions, Weight for Teacher Assessments, Over Allocation, Self
Assessment, Assessments must be agreed, Hide Grades before Agreement, League Table of
Submitted Work,
Hide Names from Students, Use Password, Password, Password Maximum Size
Start of submissions, Start of assessments, End of submissions, End of assessments, Release
Teacher Grades, Group mode, Visible to students.
More you find at page …
8Assignment module
The assignment module allows teachers to collect work from students, review it and
provide feedback including grades.
Students can submit any digital content (files), including, for example, word-processed
documents, spreadsheets, images, audio and video clips. Assignments don't necessarily have
to consist of file uploads. Alternatively, teachers can ask students to type directly into Moodle
using an online text assignment. There is also an offline activity assignment which can be
used to remind students of 'real-world' assignments they need to complete and to record
grades in Moodle for activities that don't have an online component.
Assignment Types
There are 4 types of assignments:
1. Upload a single file
2. Advanced uploading of files (1.7 onwards) - options include: multiple file submission,
allowing students to type a message alongside their submission & returning a file as
feedback.
3. Online text - students type directly into Moodle, teachers can provide inline feedback.
4. Offline Activity - teachers provide a description and due date for an assignment
outside of Moodle. A grade & feedback can be recorded in Moodle.
Iterative Assignments
It is possible to create iterative assignments - where the piece of work is graded by the
teacher, re-edited by the student, re-graded and so on using either the single file or the online
text and setting 'Allow resubmitting' to 'Yes' in the assignment settings.
Upload a single file assignment
A student can upload a single file.
This could be a Word document, spreadsheet or anything in digital format. Multiple files may
be zipped and then submitted. After students upload their files, the teacher will be able to
open the submission and use the Moodle interface to assign a grade and offer comments as
feedback.
Settings
These settings are in addition to the general assignment settings outlined on editing an
assignment.
Allow resubmitting
By default, students cannot resubmit assignments once the teacher has graded them. If you
turn this option on, then students will be allowed to resubmit assignments after they have been
graded (for you to re-grade). This may be useful if the teacher wants to encourage students to
do better work in an iterative process.
9Email alerts to teachers
If enabled, then teachers are alerted with a short email whenever students add or update an
assignment submission.
Only teachers who are able to grade the particular submission are notified. So, for example, if
the course uses separate groups, then teachers restricted to particular groups won't receive any
notices about students in other groups.
Maximum Size
This setting specifies the maximum size of the file which the students can upload as their
submission. If your students are uploading word processing documents or spreadsheets,
typically you only need to allow for a few megabytes. If your students are submitting
multimedia projects or other files with many images or audio clips, then the space allowed
will need to be larger.
Advanced uploading of files assignment
This type of assignment allows each student to upload one or more files in any format.
Features
• This type also allows teachers to send files back to students in response to their
submissions. A typical way to use this would be to edit the student's submitted file by
adding comments and/or corrections, and then returning this file back to the student
via the assignment. When a student clicks on the assignment, files sent to him or her
appear as a list of Response files.
Response files can be also uploaded before submission which can be used to give each student
a different file to work with.
• Students may also enter notes describing the submitted files, progress status or any
other text information.
• Submission of this type of assignment must be manually finalized by the student.
• Teachers can review the current status at any time, unfinished assignments are marked
as Draft. Teachers can revert any ungraded assignment back to draft status.
Settings
These settings are in addition to the general assignment settings outlined on editing an
assignment.
Maximum size
This setting specifies the maximum size (in total) of the file which the students can upload as
their submission. If your students are uploading word processing documents or spreadsheets,
typically you only need to allow for a few megabytes. If your students are submitting
multimedia projects or other files with many images or audio clips, then the space allowed
will need to be larger.
10Allow deleting
If enabled, students may delete uploaded files at any time before submitting for grading.
Maximum number of uploaded files
Maximum number of files each participant may upload, this number is not shown to students,
please write the actual number of requested files in assignment description.
Allow notes
If enabled, students may enter notes into text area associated with the assignment.
This text box can be used for communication with the grading person, assignment progress
description or any other written activity.
Hide description before available date
If enabled, assignment description is hidden before the opening date.
Email alerts to teachers
If enabled, then teachers are alerted with a short email whenever students add or update an
assignment submission.
Only teachers who are able to grade the particular submission are notified. So, for example, if
the course uses separate groups, then teachers restricted to particular groups won't receive any
notices about students in other groups.
Online text assignment
This assignment type asks students to submit text, using the normal Moodle editing tools.
Teachers can grade them online, and even add inline comments or changes. Online text
assignments, together with Blogs, have replaced the non-standard Journal module.
Settings
These settings are in addition to the general assignment settings outlined on editing an
assignment.
Allow resubmitting
By default, students cannot resubmit assignments once the teacher has graded them. If you
turn this option on, then students will be allowed to resubmit assignments after they have been
graded (for you to re-grade). This may be useful if the teacher wants to encourage students to
do better work in an iterative process.
11Email alerts to teachers
If enabled, then teachers are alerted with a short email whenever students add or update an
assignment submission.
Only teachers who are able to grade the particular submission are notified. So, for example, if
the course uses separate groups, then teachers restricted to particular groups won't receive any
notices about students in other groups.
Comment Inline
If this option is selected, then the original submission will be copied into the feedback
comment field during grading, making it easier to comment inline (using a different colour,
perhaps) or to edit the original text. Of course even if the teacher makes inline comments and
changes, the student's original submission is kept intact.
If inline comments are not permitted, then the teacher will see the student’s submission and a
separate area for making comments.
Educational Benefits
As reflective learning and formative assessment have a greater presence in education today,
the online text assignment proves a useful way for students to record their thoughts and
feelings about a particular topic or theme within the Moodle environment itself. Tutors can set
up online text activities that ask students to reflect on both rhetorical or assigned questions
depending on the learning outcome or goal.
Online text assignments can also be free spaces set up by the course tutor for students to
reflect at moments of their own choosing within a course. It is perfectly acceptable to make
use of the online text assignment as a private space for personal learning and reflection in
some instances (ie. no tutor feedback) and as a collaborative space between tutor and student
in others (ie. tutor feedback, comments and/or short discussions). Pedagogically, both
methods of using the activity are good learning models for the former allows students a
reflective space of their own to develop their ideas, whilst the latter gives them a space of
private support with you that provides them with reliable feedback.
How you decide to monitor online text activities is, of course, up to you. The most significant
element of monitoring is to provide students with clear guidance of when and how this will
take place. For instance, if you do not plan to monitor the activity at all, be sure to inform the
students that this is a private space for their own personal use (although tutors will be able to
read entries) and be clear that no feedback will be provided. Alternatively, if you wish to
make contributions in the form of feedback, be sure to inform the student that, for example,
they can expect feedback and comments from you once a week or every two weeks. In terms
of feedback and expectation levels, keeping communications between you and students very
clear will ensure a level of trust necessary to build and maintain a community in your e-
learning environment.
Offline activity assignment
This is useful when the assignment is performed outside of Moodle. It could be something
elsewhere on the web or face-to-face. Students can see a description of the assignment, but
12can't upload files or anything. Grading works normally, and students will get notifications of
their grades.
There are no settings specific to offline assignments, just the general assignment settings
outlined on editing an assignment.
Adding/editing an assignment
Assignment name
Give your assignment a name (e.g. “Report on Topic Content”). The name entered here will
be the name that learners see in the course content area. Learners will click on this name to
view the details of the assignment and, if applicable, submit their work.
Description
The description of the assignment, which should include precise instructions for students
regarding the subject of the assignment, the form, in which it should be submitted, the grading
criteria etc.
Use this area to describe the assignment and explain what learners are expected to do to
complete this task. The assignment description can be as brief or as expansive as you feel is
necessary to meet the needs of your learners. However, it is to your benefit to provide as
much detail and information as possible, especially at the start of the course while you are still
establishing procedures. Generally, the more information you are able to provide here the
fewer questions and problems your learners will have completing the task.
The assignment description field can also be used to provide information or resources related
to the assignment. An instructor, for example, could provide some literature, a video clip, an
image, or a link to a webpage, and then ask the learners to use these materials in completing
the task. (Alternatively, the instructor could post these items using the Resource Module and
refer students to them in the assignment details. See the section titled Resource Module for
more information.)
Finally, if you are adding rich content, tables, etc. to your description, it is best to expand the
HTML editor into full screen mode so you can make your webpage document look nice when
participants view it.
Grade
The grade for the assignment is specified here. Choosing a number will become the maximum
grade for this assignment. Apart from the numbers, one of the descriptive grades which have
been defined for this course can also be picked.
If you will not be giving a grade for the assignment, choose No Grade.
Available from
Setting this date prevents students from submitting their assignments before this date.
The Available from date setting allows an instructor to set a day and time at which learners
can begin submitting the assignment. This setting does not, however, hide the activity from
the learners. Instead, the learner will see the activity, be able to view the instructions and use
any materials you have include in the description, but the learner will not be able to submit or
13complete the assignment until the Available from date.
To activate the Available from date, make sure that the check box is marked. Then, use the
drop down menus to choose the day, month and year. You can also set a time with the last two
fields on the line. Note: the time is based on a 24 hour clock or “military time,” so 14:00
refers to 2:00 p.m.
If you do not wish to use the Available from option, just remove the check from the checkbox
by clicking on it; the rest of the field will turn gray and the date will be ignored.
Due date
And this prevents students from submitting their assignments after this date.
The Due date field works in much the same way as the Available from field with a few small
differences. The checkbox activates the Due date option and you have the same ability to
select a day, month, year, and time. If the checkbox is empty, then the due date will be not be
applied.
As with the Available from setting, the Due date defines when learners are able to submit
their assignment. However, with the Due date settings, you also have the Prevent late
submissions option (below the date and time fields). Setting Prevent late submissions to Yes
will prevent learners from being able to submit this assignment after the Due date. If you set
Prevent late submissions to No, then learners can submit the assignment as long as the
assignment is visible or accessible to them.
Both the Available from and Due dates are displayed for learners in the assignment details,
but the Due date is also marked in the course Calendar as a visible reminder for participants.
Furthermore, the indicator on the calendar will actually link learners directly to the activity!
Your use of the Available from and Due date settings will probably be dependent on the
overall structure of your course. If you are facilitating an open ended course or a course with
rolling enrollment, then you might find it easier to not apply the Available from and Due date
settings (uncheck the boxes). This arrangement will allow the learners to access the
assignments according to their own schedule and progress within the course. Alternatively, if
you are working within a more structured format or adhering to a timeline, the Available from
and Due date settings are useful for keeping learners on schedule. Using the Available from
setting will make it possible for learners to preview upcoming activities, while at the same
time, prevent them from finishing the course in the first week and not returning for additional
activities or information. Likewise, the Due dates help keep the learners from lagging too far
behind and decrease the likelihood that the learner will become overwhelmed by having to
complete several weeks worth of work at once.
Prevent late submissions
Set to "No", assignments submitted after the due date will be marked as late, but students will
still be able to submit them. Set to "Yes", assignment submission will be blocked after the due
date.
Settings for specific assignment types (1.7 onwards)
Each assignment type, except offline assignment, has further settings which are detailed on
the relevant assignment type pages:
14• Upload a single file
• Online text
• Advanced uploading of files
Group mode
The group mode can be one of three levels: no groups, separate groups or visible groups.
Visible
Choose whether to Show or Hide the assignment
Tips and tricks
• Copy an assignment by backing up the course and selecting just the assignment, with
or without students and their data. Restore the backup. Move and or edit the
assignment.
Viewing an assignment
Viewing/submitting an assignment you will see the assignment name and its description with
the 'View x submitted assignments' link (where 'x' is the number of assignments submitted)
and the opening/closing dates and hours ('Available from' and 'Due date') of a given
assignment. What's (and if there is anything) below depends on the type of assignment.
• In the Offline activity assignment there are no additional options.
• In the Online text assignment you will also see your assignment submission (if you
have done so) with the Edit my submission option as well as the Feedback from the
Teacher field.
• In the Upload a single file assignment, you can go for the Upload a file option, the
execution of which demands using the Browse link allowing you to choose the file on
your computer you wish to be uploaded.
Assignment submissions
he submissions page contains a table with headings:
1. First name and Surname (along with the photograph)
2. Grade (for the submitted assignment)
3. Comment (the feedback information you have written in the feedback field while
grading the assignment)
4. Last modified (Student) (the date of the last modification of the assignment by the
student)
5. Last modified (Teacher) (the date of the last modification of the assignment by the
student)
6. Status (with which you can move to the page where you grade the submitted
assignment or, in case it's been graded, update the grade and/or the comment)
15Above the table there is an alphabetical index, which helps you narrow down the number of
students shown on one page only to those whose surname (or name) starts with the same
letter. That is particularly helpful in case of a large number of course participants.
The list of submissions may be sorted by clicking on a particular heading. Clicking twice on
the same heading sorts the list in the opposite order. If the table is too large then columns may
be collapsed by clicking on the Hide icon next to a particular column heading.
By default, 10 submissions are shown per page, though this may be changed at the bottom of
the page.
To grade a submission, click on the Grade link opposite a particular student's name. A new
window will open containing a feedback area.
Once you've reviewed the student's assignment, pick the grade for the assignment from the
dropdown list. (You set the scale when you created the assignment.) Below the grade scale,
you can type comments regarding their work. When you're done, click "Save changes" or
"Save and show next".
You may prefer to use "quick grading" by checking the box at the bottom of the submissions
page. This enables you to quickly grade multiple assignments all on one page, rather than one
by one in a new window. Simply add the grades and comments then when you're done, click
"Save all my feedback" at the bottom of the page.
Chat module
The Chat module allows participants to have a real-time synchronous discussion via the
web. This is a useful way to get a different understanding of each other and the topic being
discussed – the mode of using a chat room is quite different from the asynchronous forums.
The Chat module contains a number of features for managing and reviewing chat discussions.
Adding/editing a chat
Name of this chat room
Begin by entering a name for your chat room. The name entered here will be the name that
learners see in the course content area. Learners will click on this name to view the
description of the purpose of the chat room and then to enter the chat. It is useful to name
your chat room with a name that implies its purpose. For example, if you will be using your
chat room for virtual office hours, then you might name your chat room “Virtual Office.”
Alternatively, if the chat room is designed solely to give learners a place to socialize or
discuss class activities, you might name the chat room “Student Lounge.”
16Introduction text
Type the description of the chat here. Include precise instructions for students regarding the
subject of the chat.
The introduction text is designed to welcome learners to the chat and to provide information
regarding the purpose of the chat room. The introduction can be as simple or as complex as
you would like. As an example, you could simply explain that the chat room is being made
available for learners to collaborate on group projects. A chat could also be used for
structured discussions of course content; in that case, the Introduction text might present a
specific list of questions to be addressed or the protocols to be followed.
It might also be beneficial to let the learners know in the Introduction text who will be able to
see the transcripts of the chat sessions. The instructor will be able to see every part of any
conversation that takes place in the chat room. However, you can choose to make these
transcripts visible to all learners as well. When working with younger learners, experience has
revealed that discussions in the chat rooms are more likely to be on-task and appropriate when
the learners are aware that their discussions can be viewed by the instructor and/or other
learners. The same may well be true with adult learners.
Next chat time
The day and hour of the next chat session.
If you wish to schedule chat sessions for or with your learners, then you can use this setting to
publish a time and date for the next chat. The date you select here will be displayed on the
course calendar along with a link to the chat room. Realize that setting a date and time here
will not restrict access to the room at other times, it is merely a tool to communicate with your
learners; to let them know when they can expect to find you or other learners in the chat room.
If you wish to make the chat room unavailable, you must hide it from the learners.
To choose a chat time, use the drop down menus to choose the day, month and year. Then, set
17a time with the last two fields on the line. Note: the time is based on a 24 hour clock or
“military time,” so 14:00 refers to 2:00 p.m.
For courses involving users across different time zones, it is useful to know that the time you
set here will be adjusted to match the time zone of the user viewing it.
If you do not wish to publish chat times, then you can disregard the date and time settings
here and then choose not to publish them in the next step.
Repeat sessions
You can choose any out of four options allowing to schedule the future chat sessions:
1. Don't publish any chat times--If you prefer not to schedule chats for the chat room,
select this setting. This option will cause Moodle to disregard the date and time set
above for the Next chat time. Not publishing chat times could be used to indicate to
learners that the chat room is available at all times for them to use.
2. No repeats - publish the specified time only--This setting will cause only the date
and time selected for the Next chat time to be published. The date and time will be
displayed on the course calendar as well as when the learners click on the title of the
chat room in the course content area. Published chat times could be used to schedule
special events or meetings or simply to help learners identify a common time in which
they can expect to find other learners in the chat room.
3. At the same time every day--In some situations, you may need to schedule a chat
session for the same time every day; this setting allows for this option. The scheduled
chats will then be based on the time of day you selected above for the Next chat time.
Scheduled daily chats are useful for scheduling daily office hours or work sessions
with learners.
4. At the same time every week--To schedule a chat for the same day and time every
week, select this option. When this option, the scheduled chats will be on the same day
of the week at the same time you indicated in the Next chat time area above. If you
regularly give assessments on the same day of the week, this setting could be useful
for scheduling review sessions prior to each assessment. You could also schedule a
weekly chat to meet and review key ideas and questions related to the week’s
content—assessment or not.
Save past sessions
You can determine the number of days.
When users (two or more) participate in a chat session, a record, or complete transcript of the
session is created. As the instructor, you can choose how long these transcripts are saved and
available for viewing. You may wish to never delete the messages from a special chat room
used for discussions between learners and visiting authors, but you may choose to keep
transcripts from an open, informal chat room for only 30 days.
If you have any concerns about discussions that might take place in your chat room, you may
want to keep transcripts for an extended period of time to allow the transcripts to be used for
documentation. Likewise, you may find the documentation provided by the transcript to be
useful for accreditation or evaluative purposes. Another consideration is how long you expect
your learners to need access to the transcript. For instance, if learners are using the chat room
to collaborate on a group project, you won’t want to delete the messages until that project is
completed and assessed.
18Everyone can view past sessions
You can decide here whether or not allow everyone to view past chat sessions.
Instructors in a course can always view transcripts from sessions in the chat rooms. However,
you also have the option to make these chat transcripts available to all of the learners in the
course. If you select Yes for this setting, learners can click on the title of the chat room and
then view past sessions to see any interactions that have taken place in the chat room. If you
select No here, then only the instructors in the course will have access to the transcripts. If
learners need access to a specific transcript though, the instructor can always copy the
transcript and share it with learners in the form of a document.
Visible to students
You can hide the activity from students by selecting "Hide" here. It is useful if you wouldn't
like to make the activity available immediately.
Changing the Visible to students setting is the equivalent of opening or closing the eye on the
course page to hide or display an activity for learners. If you choose Show, then learners in
the course will be able to see this assignment. If you choose Hide, then only the instructor will
be able to see the assignment.
Viewing a chat
You will see the chat name and description as well as the 'Click here to enter the chat now'
link. If the chat has next sessions scheduled, there will also be the information concerning the
time of the next chat session.
If you have set past chat sessions to be archived, you will be able to view them clicking 'View
past chat sessions' on the top right-hand side of the page. You can also add any number of
HTML blocks to the chat using the Add Block field on the left-hand side of the chat page.
Chat sessions
As you access the chat session page, clicking the 'Click here to enter the chat now' link, you
will see it divided into two parts, the left one with the posts that appear during a given chat
session and the right one listing the people in the chat room at the very moment. Underneath
you will find the field, in which you can type the message you wish to appear on the chat
session page.
There are some guidelines you can think of considering while using the chat module.
The chat module contains some features to make chatting a little nicer.
Smilies
Any smiley faces (emoticons) that you can type elsewhere in Moodle can also be
typed in here and they will be displayed correctly.
Links
Internet addresses will be turned into links automatically.
Emoting
You can start a line with /me or : to emote. For example, if your name is Kim and you
type :laughs! or /me laughs! then everyone will see "Kim laughs!"
Beeps
You can send a sound to other people by hitting the "beep" link next to their name. A
useful shortcut to beep all the people in the chat at once is to type "beep all".
HTML
19If you know some HTML code, you can use it in your text to do things like insert
images, play sounds or create different coloured and sized text.
Chat reports
To view previous chats with two or more participants, you need to click on the 'View past
chat sessions' link in the upper right of the chat session page.
This will bring up a listing of each chat session under the current chat topic. The listings
include the time the chat started and ended, which users participated, and how many messages
each user sent. If you are the teacher or an administrator, you will also see a 'See this session'
and a 'Delete this session' link underneath each of the individual listings.
In order to see the past chat sessions as a student, the teacher or an administrator must setup
the chat to allow everyone to view past chat sessions. Please refer to the Everyone can view
past sessions section of the Adding/editing a chat page.
Forum module
Forums can contribute significantly to successful communication and community building in
an online environment. You can use forums for many innovative purposes in educational
settings, but teaching forums and student forums are arguably the two more significant
distinctions.
Teaching and Learning Forums
When you decide to use a discussion forum as an activity in an e-learning environment it is
important to be aware that your time will be needed in some sense in order to make the
activity successful. If your goal is to encourage discussion, the forum will only work if:
a.) participants feel there is a need/reason to participate and they will gain something from the
experience. Incentives for learning, gathering support, etc. should be explored and encouraged
early on in order to clearly convey the purpose of the forum to others. Anyone considering
offering grades or marks for participation is advised to think very carefully about the
difference between quantity and quality of discussions in forums.
20b.) a sense of community and purpose can be fostered amongst participants. This sense of
community can be fostered through tutor/teacher initiative and scaffolding, or primarily
through the students/participants themselves depending on the intentions of the activity.
Participation and Scaffolding
Whilst one of the great advantages of e-learning is the flexibility it affords participants, this
does not mean that days or weeks should pass without response and discussion in a forum
(unless it is appropriate for it to do so). This is perhaps most especially true at the beginning
of a course or programme when students and tutors are new to each other and in need of
welcome messages/encouragement. Whilst e-learning, and discussions in particular, can
support learning that is not always tutor/teacher-centred, your role will be important,
especially as an online community begins to develop. It is during these initial stages of
introductory material that a group of students can become a community of participants who
begin to grow in their understandings of course material and individual contributions to the
knowledge construction process.
As the discussions progress and learners become accustomed to the mechanics and the tone of
the forums then there are key ways in which your input can be reduced, thereby helping to
foster a community that is less dependent on the tutor/teacher. Even then, however, you will
probably want to be a presence in the discussions although you may choose to be one of many
contributors rather than the font of all wisdom.
Committment and Participation
Ask yourself if
1. you wish to have involvement in the forum or if you want the students to lead and own
the space
2. you want the forum to add value to the face to face environment or have a life of its
own in its own right outside the lecture theatre/classroom or seminar room
3. you are prepared to make appropriate contributions to the discussion in order to:
1. encourage discussion if students are quiet
2. help shape ideas if students begin to wander off-task
3. your role will be defined as discussions/a course progresses
4. you will explicitly but gradually relinquish control of the discussions
5. you will encourage and support learners to share control of discussions(for
example you might ask a learner/group of learners to summarise contributions
to a discussion thread/topic or you might ask learners to initiate discussion
topics)
Student Centred Forums
With the growing popularity of social networking software like Facebook, Bebo, MySpace
and the like, students are leaving schools and coming to Higher and Further Education with a
new technological sophistication and with new expectations for communication. And as
school, colleges and universities recognise that reflective and life long learning are significant
goals in education, student centered learning and the creation of student centered spaces
online are also gaining credence in educational settings. We know that effective learning
requires access to social and academic networks for both study material and emotional
21support; as such, online communities can offer a holistic knowledge construction and support
mechanism and recognize that affective activity is effective.
Social forums, often called ‘Virtual Cafes’ or ‘Common Rooms’ can be set up for courses or
for programmes, depending on the student need. Such spaces provide a common area for
students to come together and discuss unlimited topics, including social activities and
educational ideas. They are supportive spaces for students, most successful with large first
and second year courses where students would not otherwise have the opportunity to
communicate with others outside their own tutorial group. It is arguable that students will
experience a greater sense of community within and a sense of belonging to an educational
institution or individual department having had the experience and convenience of the social
forum on their course; this could arguably have implications for retention.
These spaces are typically highly active, especially in first term. Depending on your
institution, they are usually self monitored by students, who understand that the same ‘rules’
and ‘netiquette’ that apply to them within any computing space, also apply in Moodle.
The News Forum
Moodle courses automatically generate a News Forum which defaults to automatically
subscribe all participants in a course. The name of the News Forum can be changed to
something more appropriate, such as ‘Important Announcements’ or the like. This is a useful
feature and many use this forum in a Moodle course to announce exam dates, times or
changes to exams, lectures or seminars, as well as important information about course work
throughout a term or special announcements relating to events.
Teacher/Tutor forums
A teacher/tutor-only forum may be added to a course by creating a hidden forum. Teachers
are able to view hidden course activities whereas students cannot.
How do I know which forum is right for my purpose?
Moodle has four kinds of forums:
1. A single simple discussion
2. Standard forum for general use
3. Each person posts one discussion
4. Q And A Forum
Which of the above will best suit your needs for a particular activity? In order to answer this
question it is useful to think how you might lead such a discussion in a face-to-face
environment. Would you throw the question out to the class and sit back to observe them in
their answers? Or would you break them up into smaller groups first and ask them to have
discussions with a partner before bringing them back to the main group? Or perhaps you
would like to keep them focused on a particular aspect of a question and ensure that they do
not wander away from the topic at hand? All of the above approaches are both valid and
useful, depending on your learning outcomes, and you can replicate all of them in Moodle
forums.
22You can also read