AJA and Adobe Applications - Quick Start Guide Version 15.1 Published February 28, 2019 - AJA Video Systems
←
→
Page content transcription
If your browser does not render page correctly, please read the page content below
       AJA and Adobe Applications

                              Quick Start Guide

Version 15.1
Published February 28, 2019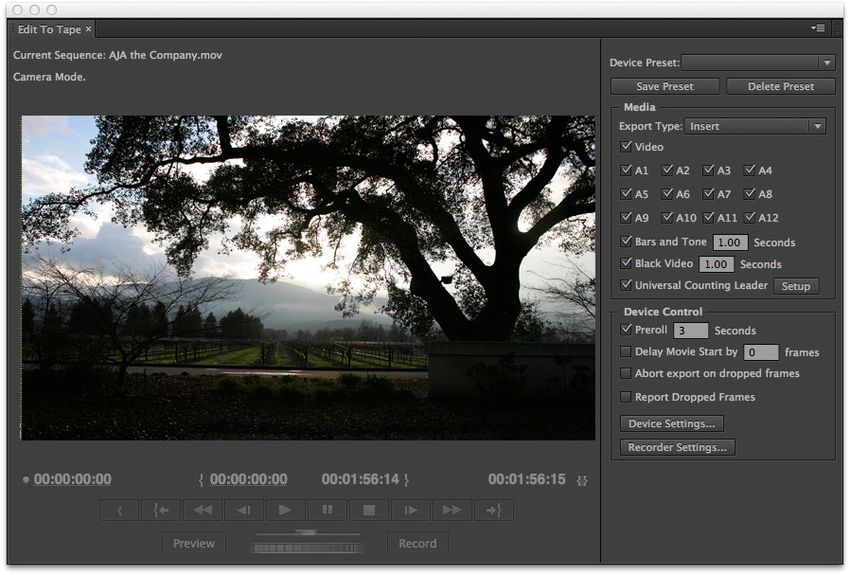
    Notices
                  Trademarks
                      AJA® and Because it matters.® are registered trademarks of AJA Video Systems, Inc.
                      for use with most AJA products. AJA™ is a trademark of AJA Video Systems, Inc. for
                      use with recorder, router, software and camera products. Because it matters.™ is a
                      trademark of AJA Video Systems, Inc. for use with camera products.
                      CION®, Corvid Ultra®, lo®, Ki Pro®, KONA®, KUMO®, ROI® and T-Tap® are registered
                      trademarks of AJA Video Systems, Inc.
                      AJA Control Room™, KiStor™, Science of the Beautiful™, TruScale™, TruZoom™,
                      V2Analog™ and V2Digital™ are trademarks of AJA Video Systems, Inc.
                      All other trademarks are the property of their respective owners.

                  Copyright
                      Copyright © 2019 AJA Video Systems, Inc. All rights reserved. All information in
                      this manual is subject to change without notice. No part of the document may be
                      reproduced or transmitted in any form, or by any means, electronic or mechanical,
                      including photocopying or recording, without the express written permission of AJA
                      Video Systems, Inc.

                  Contacting AJA Support
                      When calling for support, have all information at hand prior to calling. To contact AJA
                      for sales or support, use any of the following methods:

                        Telephone          +1.530.271.3190
                        FAX                +1.530.271.3140
                        Web                https://www.aja.com
                        Support Email      support@aja.com
                        Sales Email        sales@aja.com

AJA and Adobe Applications Quick Start Guide v15.1                    2                                         www.aja.com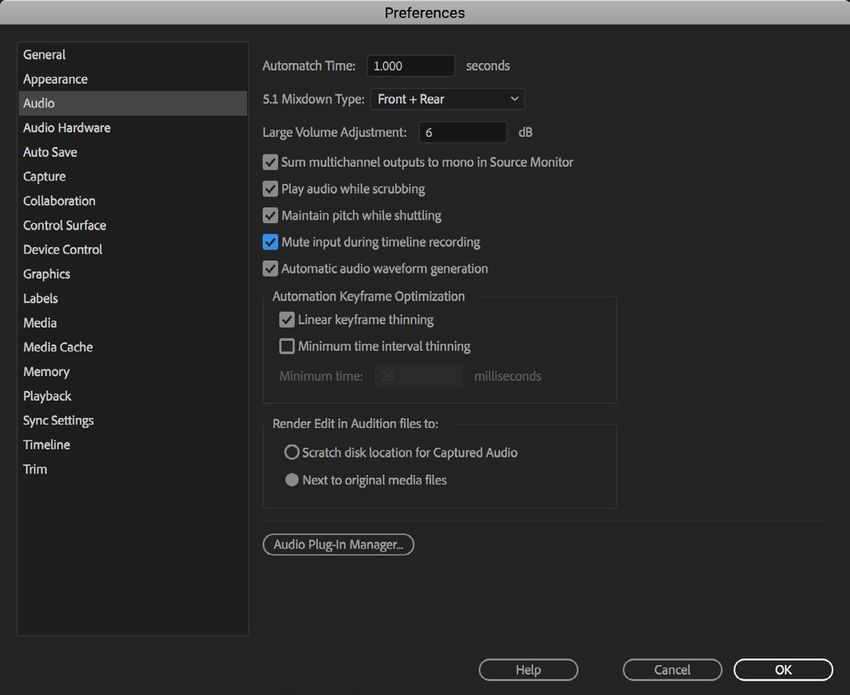
    Contents
                           Notices  .  .  .  .  .  .  .  .  .  .  .  .  .  .  .  .  .  .  .  .  .  .  .  .  .  .  .  .  .  .  .  .  .  .  .  .  .  .  2
                                  Trademarks .  .  .  .  .  .  .  .  .  .  .  .  .  .  .  .  .  .  .  .  .  .  .  .  .  .  .  .  .  .  .  .  .  .  .  .  .  .  .  .  .  .  .  2
                                  Copyright  .  .  .  .  .  .  .  .  .  .  .  .  .  .  .  .  .  .  .  .  .  .  .  .  .  .  .  .  .  .  .  .  .  .  .  .  .  .  .  .  .  .  .  .  2
                                  Contacting AJA Support .  .  .  .  .  .  .  .  .  .  .  .  .  .  .  .  .  .  .  .  .  .  .  .  .  .  .  .  .  .  .  .  .  .  .  2

                           Chapter 1 – AJA and Adobe Overview  .  .  .  .  .  .  .  .  .  .  .  .  .  .  .  .  .  . 5
                                  Adobe Applications Supported  .  .  .  .  .  .  .  .  .  .  .  .  .  .  .  .  .  .  .  .  .  .  .  .  .  .  .  .  .  .  5
                                  Hardware Products Supported  .  .  .  .  .  .  .  .  .  .  .  .  .  .  .  .  .  .  .  .  .  .  .  .  .  .  .  .  .  .  . 5

                           Chapter 2 – AJA and Adobe Installation  .  .  .  .  .  .  .  .  .  .  .  .  .  .  .  .  . 9
                                  Installing AJA Software .  .  .  .  .  .  .  .  .  .  .  .  .  .  .  .  .  .  .  .  .  .  .  .  .  .  .  .  .  .  .  .  .  .  .  . 9
                                     Download  .  .  .  .  .  .  .  .  .  .  .  .  .  .  .  .  .  .  .  .  .  .  .  .  .  .  .  .  .  .  .  .  .  .  .  .  .  .  .  .  .  .  9
                                     Software Package Installation and Re-installation .  .  .  .  .  .  .  .  .  .  .  .  .  .  .  .  .  9
                                     AJA Desktop Software Package Components .  .  .  .  .  .  .  .  .  .  .  .  .  .  .  .  .  .  .  . 9
                                  AJA Hardware Firmware Update  .  .  .  .  .  .  .  .  .  .  .  .  .  .  .  .  .  .  .  .  .  .  .  .  .  .  .  .  . 10
                                  OS Configuration .  .  .  .  .  .  .  .  .  .  .  .  .  .  .  .  .  .  .  .  .  .  .  .  .  .  .  .  .  .  .  .  .  .  .  .  .  .  . 11
                                     Mac OS  .  .  .  .  .  .  .  .  .  .  .  .  .  .  .  .  .  .  .  .  .  .  .  .  .  .  .  .  .  .  .  .  .  .  .  .  .  .  .  .  .  .  .  . 11
                                     Windows OS .  .  .  .  .  .  .  .  .  .  .  .  .  .  .  .  .  .  .  .  .  .  .  .  .  .  .  .  .  .  .  .  .  .  .  .  .  .  .  .  . 11
                                  AJA Control Panel User Interface .  .  .  .  .  .  .  .  .  .  .  .  .  .  .  .  .  .  .  .  .  .  .  .  .  .  .  .  . 12
                                     AJA Presets  .  .  .  .  .  .  .  .  .  .  .  .  .  .  .  .  .  .  .  .  .  .  .  .  .  .  .  .  .  .  .  .  .  .  .  .  .  .  .  .  . 13

                           Chapter 3 – Using Adobe Premiere Pro .  .  .  .  .  .  .  .  .  .  .  .  .  .  .  .  .  14
                                  Playback Resolution  .  .  .  .  .  .  .  .  .  .  .  .  .  .  .  .  .  .  .  .  .  .  .  .  .  .  .  .  .  .  .  .  .  .  .  .  . 14
                                     4K Output in Premiere Pro .  .  .  .  .  .  .  .  .  .  .  .  .  .  .  .  .  .  .  .  .  .  .  .  .  .  .  .  .  .  .  .14
                                  Beginning a Project with Adobe Presets  .  .  .  .  .  .  .  .  .  .  .  .  .  .  .  .  .  .  .  .  .  .  .  .14
                                  Options Set in Premiere Pro Preferences .  .  .  .  .  .  .  .  .  .  .  .  .  .  .  .  .  .  .  .  .  .  .  . 15
                                     Audio Preferences .  .  .  .  .  .  .  .  .  .  .  .  .  .  .  .  .  .  .  .  .  .  .  .  .  .  .  .  .  .  .  .  .  .  .  .  .15
                                     Audio Hardware Preferences  .  .  .  .  .  .  .  .  .  .  .  .  .  .  .  .  .  .  .  .  .  .  .  .  .  .  .  .  .  .15
                                     Playback Preferences  .  .  .  .  .  .  .  .  .  .  .  .  .  .  .  .  .  .  .  .  .  .  .  .  .  .  .  .  .  .  .  .  .  .  .17
                                     Device Control Preferences  .  .  .  .  .  .  .  .  .  .  .  .  .  .  .  .  .  .  .  .  .  .  .  .  .  .  .  .  .  .  .19
                                     Device Control Options .  .  .  .  .  .  .  .  .  .  .  .  .  .  .  .  .  .  .  .  .  .  .  .  .  .  .  .  .  .  .  .  .  .20
                                  Premiere Pro Audio Configurations .  .  .  .  .  .  .  .  .  .  .  .  .  .  .  .  .  .  .  .  .  .  .  .  .  .  .  .21
                                     Example 1: Voice-over with Control Panel Audio Mixer  .  .  .  .  .  .  .  .  .  .  .  .  . 22
                                     Example 2: Voice-over Without Control Panel Audio Mixer .  .  .  .  .  .  .  .  .  .  .23
                                     Example 3: Voice-over with USB Device and Computer Monitoring  .  .  .  .  . 24
                                  Premiere Pro Capture Settings .  .  .  .  .  .  .  .  .  .  .  .  .  .  .  .  .  .  .  .  .  .  .  .  .  .  .  .  .  .  .25
                                     Pixel Format Choices .  .  .  .  .  .  .  .  .  .  .  .  .  .  .  .  .  .  .  .  .  .  .  .  .  .  .  .  .  .  .  .  .  .  . 25
                                     Audio Format .  .  .  .  .  .  .  .  .  .  .  .  .  .  .  .  .  .  .  .  .  .  .  .  .  .  .  .  .  .  .  .  .  .  .  .  .  .  .  .26
                                     Audio Channels .  .  .  .  .  .  .  .  .  .  .  .  .  .  .  .  .  .  .  .  .  .  .  .  .  .  .  .  .  .  .  .  .  .  .  .  .  .  .26
                                     Timecode Source .  .  .  .  .  .  .  .  .  .  .  .  .  .  .  .  .  .  .  .  .  .  .  .  .  .  .  .  .  .  .  .  .  .  .  .  .  .26
                                  AJA Control Room Capture, Premiere Pro Editing .  .  .  .  .  .  .  .  .  .  .  .  .  .  .  .  .  .  .27
                                  Closed Caption Support .  .  .  .  .  .  .  .  .  .  .  .  .  .  .  .  .  .  .  .  .  .  .  .  .  .  .  .  .  .  .  .  .  .  .27
                                     Disable creation of SCC/MCC files from Closed Caption data .  .  .  .  .  .  .  .  .  .27
                                  Export to Tape .  .  .  .  .  .  .  .  .  .  .  .  .  .  .  .  .  .  .  .  .  .  .  .  .  .  .  .  .  .  .  .  .  .  .  .  .  .  .  .  .28
                                     Best Practices for Tape Output Accuracy .  .  .  .  .  .  .  .  .  .  .  .  .  .  .  .  .  .  .  .  .  .  .29

                           Chapter 4 – Using Adobe Photoshop  .  .  .  .  .  .  .  .  .  .  .  .  .  .  .  .  .  .  31
                                  AJA Capture  .  .  .  .  .  .  .  .  .  .  .  .  .  .  .  .  .  .  .  .  .  .  .  .  .  .  .  .  .  .  .  .  .  .  .  .  .  .  .  .  .  . 31
                                  AJA Export .  .  .  .  .  .  .  .  .  .  .  .  .  .  .  .  .  .  .  .  .  .  .  .  .  .  .  .  .  .  .  .  .  .  .  .  .  .  .  .  .  .  . 32

                           Chapter 5 – Using Adobe After Effects .  .  .  .  .  .  .  .  .  .  .  .  .  .  .  .  .  . 33
                                  After Effects Video Preview Preferences .  .  .  .  .  .  .  .  .  .  .  .  .  .  .  .  .  .  .  .  .  .  .  .  .33
                                  After Effects Audio Hardware Preferences .  .  .  .  .  .  .  .  .  .  .  .  .  .  .  .  .  .  .  .  .  .  . 34
                                  After Effects Realtime Performance  .  .  .  .  .  .  .  .  .  .  .  .  .  .  .  .  .  .  .  .  .  .  .  .  .  .  . 34
                                  Legacy AJA Preview Plug-in  .  .  .  .  .  .  .  .  .  .  .  .  .  .  .  .  .  .  .  .  .  .  .  .  .  .  .  .  .  .  .  . 34

                           Chapter 6 – Using Adobe Audition .  .  .  .  .  .  .  .  .  .  .  .  .  .  .  .  .  .  .  .  36
                                  Audition Audio Channel Mapping Preferences .  .  .  .  .  .  .  .  .  .  .  .  .  .  .  .  .  .  .  . 36
                                  Audition Audio Hardware Preferences .  .  .  .  .  .  .  .  .  .  .  .  .  .  .  .  .  .  .  .  .  .  .  .  .  .37

AJA and Adobe Applications Quick Start Guide v15.1                                                      3                                                                            www.aja.com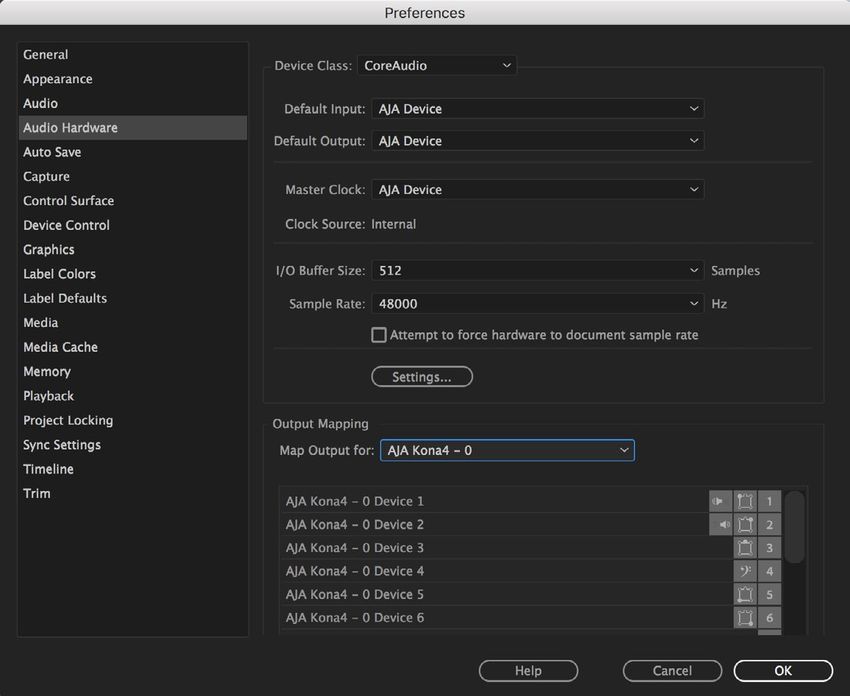
                           SOFTWARE LICENSE AGREEMENT  .  .  .  .  .  .  .  .  .  .  .  .  .  .  .  .  .  .  .  .  . 38
                           Index .  .  .  .  .  .  .  .  .  .  .  .  .  .  .  .  .  .  .  .  .  .  .  .  .  .  .  .  .  .  .  .  .  .  .  .  .  .  . 41

AJA and Adobe Applications Quick Start Guide v15.1                                         4                                                              www.aja.com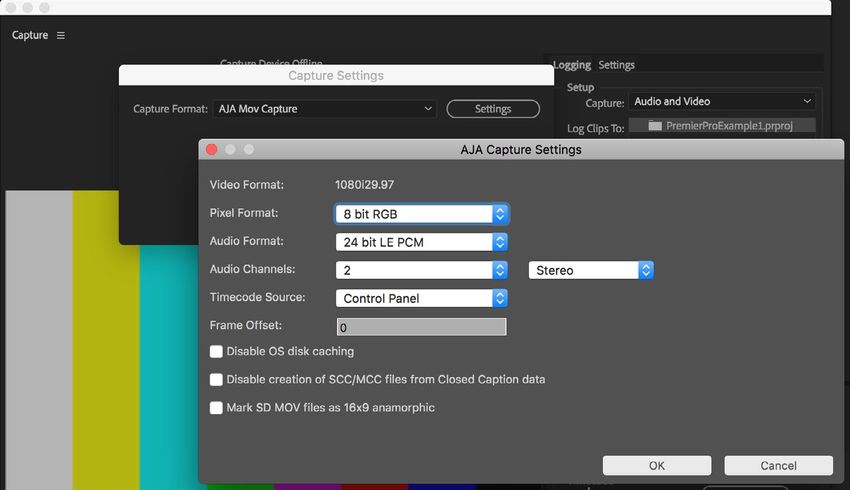
Chapter 1 – AJA and Adobe Overview

Adobe Applications Supported
                      The AJA Desktop Software package is tightly integrated with the following Adobe
                      applications:
                       • Premiere Pro CC
                       • Photoshop CC
                       • After Effects CC
                       • Audition CC
                   NOTE: Adobe SpeedGrade was supported up to CC 2015.1 (Adobe announced
                         SpeedGrade product End Of Life in August 2017).
                      AJA Desktop Software package default installation includes plug-ins for both
                      Mac and Windows versions of the Adobe applications, with their functions being
                      mostly the same.
                      This manual does not provide operational information for Adobe applications
                      except as related to AJA hardware operations. Please read the Adobe user
                      documentation for Adobe application configuration and operation.
                   NOTE: AJA recommends using the latest AJA software in combination with the
                         current version of Adobe Creative Cloud. For demanding workflows, AJA also
                         recommends using the latest OS with up to date high performance host system
                         hardware. See the recommended specs per your AJA hardware device manual.
                      Please be aware that in some cases AJA software may be compatible with
                      macOS or Windows versions that are older than those Adobe recommends.
                      In this case, when working with Adobe CC applications, you should follow the
                      recommendation of Adobe over the recommendation of AJA.
                      AJA makes host system recommendations for using AJA hardware here:
                          https://www.aja.com/support/kona-pc-system-configuration
                          https://www.aja.com/support/kona-system-configuration
                          https://www.aja.com/support/kona-pc-graphics-system-configuration
                          https://www.aja.com/support/legacy-support-systems
                      Adobe also hosts setup guidance here:
                          https://helpx.adobe.com/premiere-pro/using/setting-system.html

Hardware Products Supported
                      AJA in association with Adobe provides a range of hardware that supports Adobe
                      applications courtesy of installing the AJA desktop software package:
                       • Io 4K Plus, Io IP, Io 4K, Io XT, Io Express
                       • KONA 5, KONA 4, KONA IP, KONA 1, KONA HDMI, KONA LHi, KONA LHe Plus
                       • T-TAP
                      AJA desktop software installer, and associated Adobe compatibilities are also
                      available with:
                       • Avid Artist | DNxIV
                       • Avid Artist | DNxIP

AJA and Adobe Applications Quick Start Guide v15.1                5                                     www.aja.com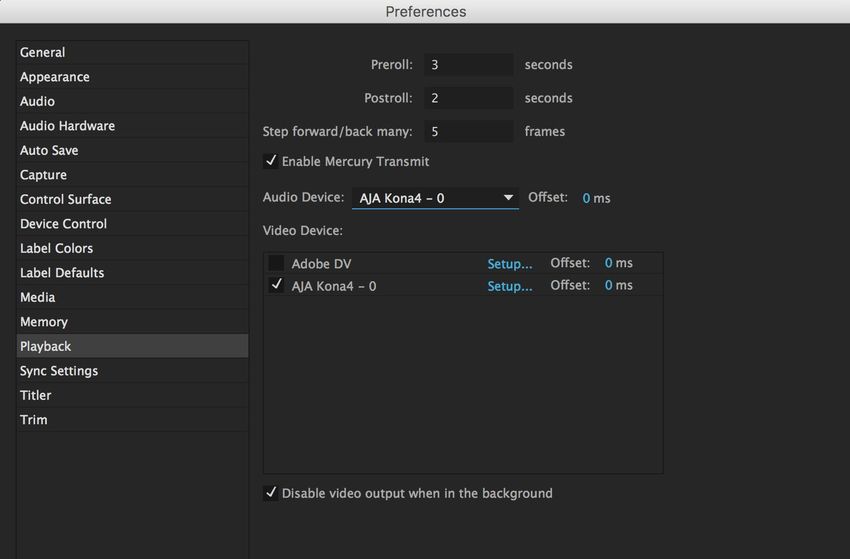
                      Other products may support Adobe Plug-ins in the future. In this manual all
                      supported hardware devices are referred to as "AJA hardware".
                      All features described in this manual may not be available with all AJA hardware.
                      For example, the Audio Mixer functionality introduced to AJA Control Panel with
                      AJA Desktop Software v14, is only available when running Io 4K Plus, Io IP, Io 4K,
                      KONA 4, KONA 1 and KONA IP. It is this Audio Mixer architecture which enables full
                      duplex Voice Over to Timeline inside Adobe Premiere Pro with zero latency. The
                      Audio Mixer also enables access to all audio inputs available on the AJA device,
                      meaning that available inputs for Voice Over to Timeline will vary like so:
                       • Io 4K Plus – Choose between Analog (DB25 line level), SDI or HDMI
                       • Avid Artist | DNxIV – Choose between Mic Input (XLR), Analog (DB25 line level),
                          SDI or HDMI
                       • Io 4K – Choose between SDI or HDMI
                       • KONA 4, KONA 5 – Choose between AES or SDI
                   NOTE: If you wish to execute a Voice Over to Timeline using an analog Mic, but the
                         AJA device you are using only has inputs for audio via SDI embedded, HMDI
                         embedded or AES, then you will likely require an analog audio embedder and / or
                         a digital mixing board, with either having an A to D converter.

AJA and Adobe Applications Quick Start Guide v15.1                 6                                       www.aja.com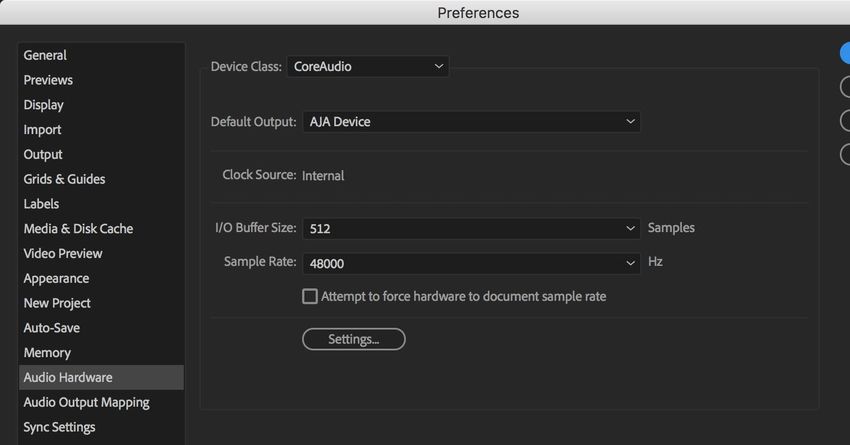
                      Table 1. AJA Hardware Feature Summary, Thunderbolt Devices
                                                                                                                           Avid
                                                                              Io        Io                Avid Artist
                                           Io 4K Plus          Io IP                            T-TAP                     Artist
                                                                              4K        XT                  DNxIV
                                                                                                                          DNxIP
                        Tbolt Ports          Tbolt 3          Tbolt 3       Tbolt 2   Tbolt 1   Tbolt 1     Tbolt 3       Tbolt 3
                        Max Input              4K               HD            4K        2K                    4K            HD
                        Resolution
                        Max Output             4K               HD            4K        2K        2K          4K            HD
                        Resolution
                        SDI In             12G/6G/3G            3G            3G        3G                12G/6G/3G
                        SDI Out            12G/6G/3G        3G (monitor)      3G        3G        3G      12G/6G/3G
                        HDMI In                2.0                            1.4       1.3                   2.0
                        HDMI Out               2.0              2.0          1.4b       1.4       1.3         2.0           2.0
                        HDR                     √                √            √                               √             √
                        Closed                  √                √            √                               √             √
                        Captions
                        SMPTE 2022-6                             √                                                          √
                        (10GbE)
                        SMPTE 2022-7                             √                                                          √
                        (10GbE)
                        IP Video In/Out                          √                                                          √
                        IP Audio in/Out                          √                                                          √
                        Analog
                        Video In
                        Analog                                                          √
                        Video Out
                        Analog                  √                √                                            √             √
                        Audio In
                        Analog                  √                √            √         √                     √             √
                        Audio Out
                        Control Room            √                √            √                               √             √
                        Audio Mixer
                        XLR Mic Input                                                                         √             √
                                           √ = Supported        (blank) = Unsupported

AJA and Adobe Applications Quick Start Guide v15.1                      7                                               www.aja.com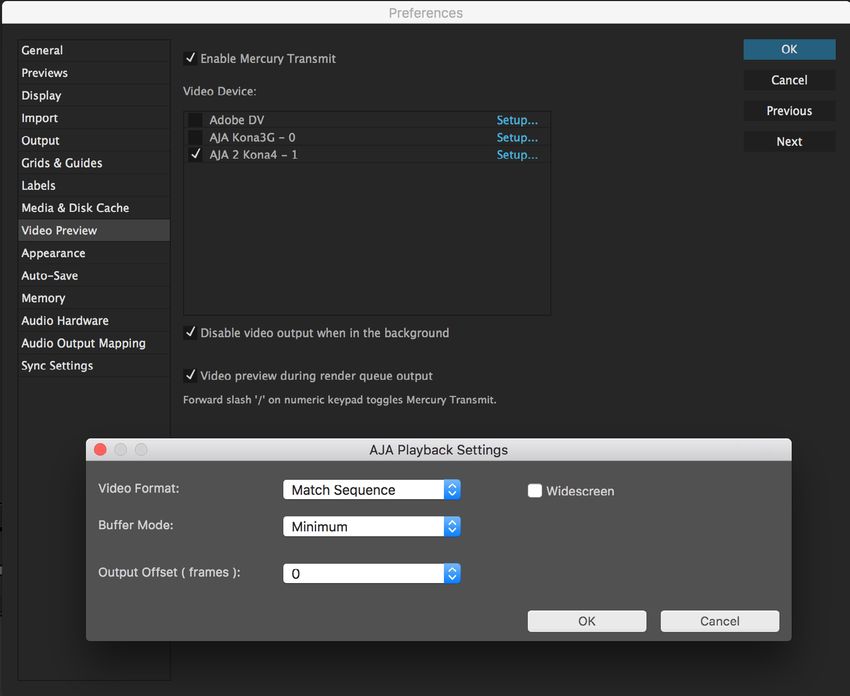
                      Table 2. AJA Hardware Feature Summary, PCIe Devices
                                                                                                           KONA
                                                                    KONA     KONA      KONA       KONA                  Io
                                           KONA 5    KONA 4                                                 LHe
                                                                     IP        1       HDMI        LHi                Express
                                                                                                            Plus
                      PCIe                    3.0         2.0        2.0       2.0      2.0         1.0      1.0        1.0
                                            8-lane       8-lane     8-lane   2-lane    8-lane     4-lane   4-lane     1-lanes
                      Max Input               4K          4K         HD        2K        4K        2K       HD          HD
                      Resolution
                      Max Output              4K          4K         HD        2K                  2K       HD          HD
                      Resolution
                      SDI In             12G/6G/3G        3G                   3G                  3G      1.5G         1.5G
                      SDI Out            12G/6G/3G        3G                   3G                  3G      1.5G         1.5G
                      HDMI In                                                  1.3     2.0/1.4b    1.3                  1.3
                      HDMI Out               2.0         1.4b         1.4      1.3                 1.3                  1.3
                      HDR                     √            √             √
                      Closed                  √            √        s2022
                      Captions                                       only
                      SMPTE 2022-6                                       √
                      (10GbE)
                      SMPTE 2022-7                                       √
                      (10GbE)
                      SMPTE 2022-7                                       √
                      (10GbE)
                      IP Video In/Out                                    √
                      IP Audio in/Out                                    √
                      Analog                                                                        √        √
                      Video In
                      Analog                               √                                        √        √           √
                      Video Out
                      Analog                                                                        √        √
                      Audio In
                      Analog                           with                                         √        √           √
                      Audio Out                      K3G box
                      Control Room            √            √             √     √
                      Audio Mixer
                      XLR Mic Input
                                         √ = Supported         (blank) = Unsupported

AJA and Adobe Applications Quick Start Guide v15.1                   8                                              www.aja.com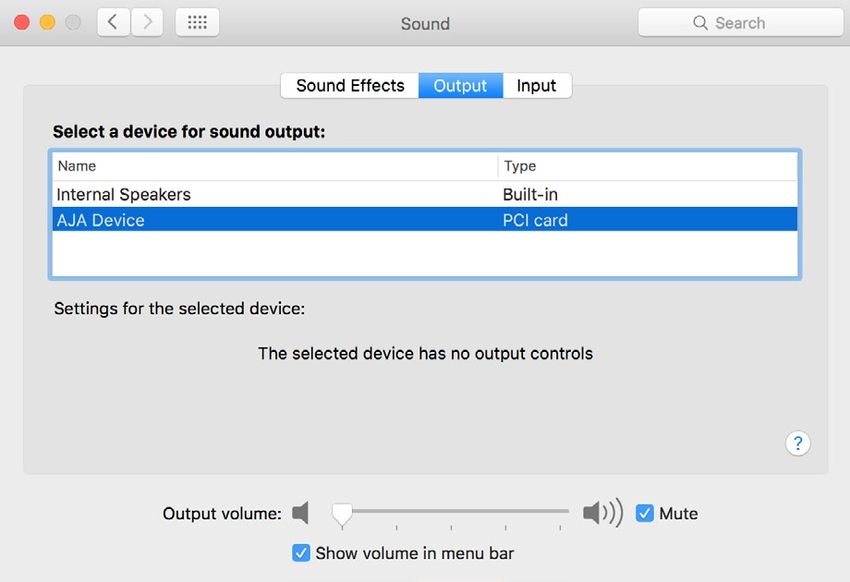
Chapter 2 – AJA and Adobe Installation
                   NOTE: There is no longer any requirement to separately install the AJA Adobe Plug-ins.
                         Performing a Standard Install of AJA Desktop Software, by default, also installs
                         the AJA Adobe Plug-ins.

Installing AJA Software
         Download
                      Go to the AJA website and download the latest AJA Desktop Software package
                      containing the AJA Control Panel application, other related applications, drivers
                      and plug-ins.
                      https://www.aja.com/en/support/downloads/
                      System software updates may occasionally become available to AJA product
                      owners on our website (www.aja.com). We recommend checking occasionally for
                      both software updates and additional product information.
                   NOTE: If your computer has previously had another video capture or multimedia device
                         installed, ensure you uninstall any related software before installing the AJA
                         Desktop Software package. This will prevent any hardware or software conflicts.
                   IMPORTANT: Please read the brief Release Notes PDF file that accompanies your AJA
                         software. The Release Notes describe important features and fixes.

         Software Package Installation and Re-installation
                   NOTE: Always uninstall previous versions of AJA software before updating your
                         computer with new software. Go to your AJA Utilities (on the Mac) or Windows
                         Control Panel to uninstall existing AJA software. This helps prevent hardware/
                         software conflicts.
                   IMPORTANT: If you install AJA software for the first time on a Mac running High Sierra,
                         the application developer must be identified. See the AJA product manuals or
                         Release Notes for specific instructions.
                      You cannot use AJA hardware with Adobe applications until the AJA Desktop
                      software has been installed on your computer. Make sure the Adobe software
                      is installed and launched at least once on your computer before installing AJA
                      Desktop software.
                   IMPORTANT: If you install or update a supported Adobe application at a later date, you
                         must run the AJA installer program again.

         AJA Desktop Software Package Components
                      Drivers
                      AJA device drivers for tightly integrated hardware/software operation.

                      AJA Control Panel
                      The Control Panel provides:
                       • Source selection and control of your AJA hardware.

AJA and Adobe Applications Quick Start Guide v15.1                    9                                      www.aja.com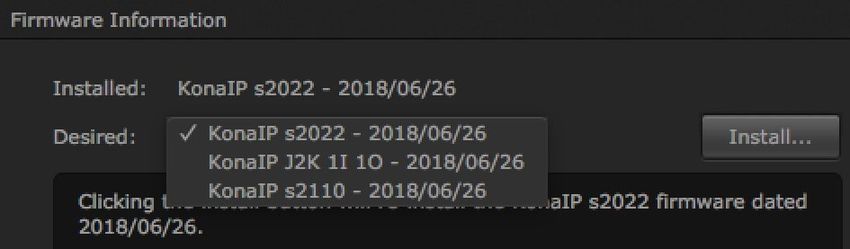
                        • A block diagram to show visually what routing and processing is being
                          performed.

                      AJA Control Room
                      Control Room is a cross-platform software application for capture, playback and
                      output with AJA products. Files captured in AJA Control Room can be used by
                      Adobe applications, in the same way as those files captured directly using Adobe
                      Premiere Pro CC.

                      AJA System Test
                      System Test provides accurate and detailed evaluations of drive and PCIe
                      performance statistics, allowing you to measure the capabilities of your system
                      for recording and playing back various resolutions and codecs.

                      3rd-Party Plugins
                      AJA provided plugins for popular 3rd-party Professional Video Applications from
                      Adobe, Avid, Apple, Telestream, and others.

                Documentation
                      PDFs of AJA hardware and software manuals are also installed (by default) at the
                      following computer locations:
                      Mac - Applications / AJA Utilities / Docs
                      PC - Program Files / AJA / windows / documentation

AJA Hardware Firmware Update
                      After the AJA Software Package has been installed on a computer with your AJA
                      hardware installed, the firmware on that AJA device can be updated if a newer
                      version of firmware is included with that software package.
                      AJA Desktop Software firmware and software versions are tightly integrated. If
                      back-revving to an earlier version for example, then you may be prompted to
                      update your firmware to match; i.e. update to an earlier version of the firmware
                      than you currently have installed. AJA Control Panel firmware update notification
                      language has now changed to reflect this more accurately.
                      1. Open the AJA Control Panel application.
                      2. If more than one AJA device is connected, choose the device you want to
                         update by selecting its name from the drop-down menu at the top of the
                         screen.
                      Figure 1. Control Panel Screen Showing Multiple AJA Devices

                      3. Go to the Control Panel Firmware Screen.
                      4. Select the firmware version (if multiple versions exist) in the Desired
                         dropdown.

AJA and Adobe Applications Quick Start Guide v15.1                 10                                     www.aja.com
                      Figure 2. Control Panel Screen Showing Multiple Firmware Versions

                      5. Click on Install. Messages appear and when finished, firmware update
                         completed messages are shown.
                      6. Click Shutdown to power down the computer.
                      7. Restart the computer.
                      8. Open AJA Control Panel. The AJA hardware with the updated firmware
                         should be recognized by the Control Panel application.

OS Configuration
                      In most cases, using AJA hardware with Adobe applications is set and forget.
                      Simply set your Non Linear Editor (NLE) or other application to point at AJA
                      hardware for all input and output operations and that’s it. No need to switch
                      drivers, switch to desktop audio, etc.
                   NOTE: On first use, you will need to tell your operating system to use AJA hardware as
                         the default Audio Input and Output device.

         Mac OS
                      For Mac go to System Preferences > Sound and select AJA Device for both Input
                      and Output.
                      Figure 3. Mac System Preferences, Sound

         Windows OS
                      For Windows go to Control Panel > Sound and select AJA Audio Interface for
                      playback or output.

AJA and Adobe Applications Quick Start Guide v15.1                   11                                     www.aja.com
                      Figure 4. Windows 7 Control Panel, Sound

                      Figure 5. Windows 10 Control Panel. Sound

AJA Control Panel User Interface
                      The AJA Control Panel user interface includes a visual block diagram of the unit’s
                      current configuration. The current status, input and output settings, and many
                      other details are depicted in the color-coded block diagram. Below this block
                      diagram are various controls for changing operating parameters, which will vary
                      depending on which function screen has been selected.
                      The left side of the AJA Control Panel provides a navigation list of available
                      function screens. Clicking on a link (or alternatively, a related element in the block
                      diagram) displays a function screen corresponding to that topic.
                   NOTE: Although AJA and Adobe Applications are sending and receiving video over IP,
                         once that data is decoded to memory it is governed by the same video menus
                         used for SDI and HDMI based AJA I/O solutions.

AJA and Adobe Applications Quick Start Guide v15.1                  12                                         www.aja.com
                        Figure 6. AJA Control Panel, Block Diagram and Controls
                                                                           Framebuffer Format (Primary)

         Currently
         Selected                                                                                                Controlling
      Function Screen                                                                                            Application

                                                                                                                 Outputs
           Inputs

                                                                                                                 Operating
                                                                                                                  Mode

         Parameter
          Controls

         AJA Presets
                        Setups can be named and saved as a snapshot (Preset) for recall at any time. You
                        can save various AJA device Control Panel configurations associated with your
                        frequent tasks. You don’t have to spend time resetting interface configurations,
                        just load the previously saved Preset for each task.
                        If you work on multiple systems and want to carry your saved setups to another
                        location, you can copy your saved Preset files on to movable storage and load
                        them into any computer running the AJA Control Panel application.

                Saving, Loading and Deleting Presets
                        To save a preset, simply go to the Presets screen and click “Save Preset”. A dialog
                        will be presented asking you for a file name. Enter a meaningful name and click
                        “OK”. Thereafter the preset will be available under the Control Panel “Presets” list.
                        From the Presets screen you can manage your collection of presets easily. To Load
                        or Delete a stored preset, just select it with your mouse and then click the “Load
                        Preset” or “Delete” button respectively .

                Transferring Saved Presets
                        If you want to use a saved Preset on another workstation, you can simply copy
                        the file on removable storage and install it at the new location. The Preset files are
                        stored at:

                        Mac OS Preset Files Storage Location
                         • From the Finder, hold down the Option key (to display the Library directory)
                           and click on Go/Library/Application Support/AJA//Presets/

                        Windows Preset Files Storage Location
                         • c:\Users\\AppData\Local\AJA\Control Panel\\
                           Presets\

AJA and Adobe Applications Quick Start Guide v15.1                    13                                               www.aja.com
Chapter 3 – Using Adobe Premiere Pro

Playback Resolution
                      For best output resolution, use Full as your Playback Resolution setting. Use the
                      fly-down menu in the Premiere Pro Source or Program Sequence to set Playback
                      Resolution.

         4K Output in Premiere Pro
                      If you are using AJA Hardware that supports UltraHD/4K, true UltraHD/4K will be
                      output on the SDI outputs. If the AJA hardware device you are using does not
                      support UltraHD/4K, the AJA hardware in Premiere Pro Match Sequence mode
                      will automatically output the best resolution available.

Beginning a Project with Adobe Presets
                      Opening Adobe Premiere Pro, you will select New Project from the File Menu and
                      choose an AJA Capture Format from the pulldown menu, name the project, and
                      click OK.
                      Figure 7. Adobe Premiere Pro New Project panel

AJA and Adobe Applications Quick Start Guide v15.1                14                                      www.aja.com
Options Set in Premiere Pro Preferences
                      Some settings that determine both capture and playback characteristics for AJA
                      hardware are accessed through Premiere Pro Preferences.
                      In Adobe Premiere Pro Preferences (under Premiere Pro>Preferences for Mac, and
                      under Edit>Preferences for Windows,) you can set up global (default) settings for:
                       • Audio
                       • Audio Hardware
                       • Audio Output mapping
                       • Device Control
                       • Playback Settings
                      Audio for a Premiere Pro session can be configured differently, depending on
                      your AJA hardware and if you will be performing voice-over recordings.

         Audio Preferences
                      In Audio Preferences you control various audio settings, depending on your
                      personal preferences and project requirements.
                      Figure 8. Audio Preferences

                      Mute input during timeline recording
                      If you will be performing voice-overs:
                        • Check this box to prevent audio echo and feedback during voice-over
                          recording using AJA hardware and the AJA Control Panel Audio Mixer.
                        • Uncheck this box so you can hear the audio being recorded if you are using a
                          USB or a built-in microphone for voice-over recording.

         Audio Hardware Preferences
                      The following setups guarantee accurate AV output sync using the AJA hardware
                      for input and output.

AJA and Adobe Applications Quick Start Guide v15.1                15                                       www.aja.com
                Windows Setup
                      In Audio Hardware, Adobe Desktop Audio menu for Windows, select the ASIO
                      Device Class, and the AJA Hardware device.
                      Figure 9. Audio Hardware Preferences, Windows

                Mac Setup
                      On a Mac, in Audio Hardware select Core Audio and the AJA hardware device for
                      input and output (if both are available).
                      Figure 10. Audio Hardware Preferences, Mac

                   NOTE: If you hear static on the AJA hardware output, adjust the audio buffer size in the
                         Audio Hardware Preferences. The optimal size may vary for different systems or
                         different setups based on CPU, RAM, and running applications.

AJA and Adobe Applications Quick Start Guide v15.1                   16                                       www.aja.com
                      Master Clock
                      Ensure AJA Device is selected for Master Clock.

                      Output Mapping
                      In this Preferences window you can also map Stereo or 5.1 audio out channels.
                      With your AJA device selected in the Map Output menu, simply drag and drop
                      the right/left or 5.1 channel icons to the desired AJA hardware channel 1–16.

         Playback Preferences
                      In Playback Preferences you will select your AJA hardware device in the Audio
                      Device menu.
                      Figure 11. Playback Settings Panel in Premiere Pro Preferences

                      Audio Device
                      For Audio Device, select the AJA device you will be using.

                      Enable Mercury Transmit
                      Mercury transmit must be enabled (checked) in order for Premiere Pro to utilize
                      the AJA hardware.
                   NOTE: Turning Enable Mercury Transmit off is a good way to tell if the external device
                         is involved in an issue; if you still have an issue when it is unchecked then the
                         problem is not related to the AJA hardware.
                      See "Premiere Pro Audio Configurations" on page 21 for more information about
                      configuring audio.

                Video Device Setup
                      For Video Device, select the AJA device you are using and click Setup.

AJA and Adobe Applications Quick Start Guide v15.1                   17                                      www.aja.com
                      Figure 12. Premiere Pro Preferences Playback Format Settings

                      Video Format
                      The default setting (expected to be what most users will want and use) is Match
                      Sequence. When Match Sequence is selected, the transmit plug-in will try to put
                      the card in a mode that matches the resolution and frame rate of the timeline
                      you’re working with. Alternatively, you can use Match Control Panel and then
                      select a video format from the AJA Control Panel Format menu. Please refer to the
                      Format Screen section of your AJA hardware's Installation and Operation Guide
                      for additional information.
                   NOTE: Even with Match Sequence selected, it is possible to make other parameter
                         adjustments (such as color space or up/down/cross conversions) using the AJA
                         Control Panel.

                      Buffer Mode
                      Use the Buffer Mode menu to choose Standard, Minimum, or Maximum frame
                      buffering.
                      Figure 13. Premiere Pro Preferences Playback Buffer Modes

                      This mode determines how many frames of buffering are to be used in the AJA
                      hardware:
                       • Standard is 4 frames late, which may be close enough for voice-over.
                       • Maximum will store either the maximum number of frames allowed by the
                         hardware or 14, whichever is smallest. Not recommended for voice-over.
                       • Minimum is 1 frame early. Required for accurate voice-over recording.

                      Minimum vs. Standard Mode
                      The Minimum setting will provide the best scrubbing and JKL keyboard control
                      performance on the timeline. The Standard setting insures that frame drops are
                      less likely by providing more frame buffering. It also allows optimum audio sync
                      for voice-over recording.
                      For editing, use Minimum mode most of the time. Then, when mastering a tape
                      or playing out live (to air or theater) where no scrubbing will occur, you can switch
                      to the Standard mode to avoid frame drops.
                      For T-TAP users, Standard mode is preferred in both cases.

AJA and Adobe Applications Quick Start Guide v15.1                  18                                        www.aja.com
                   NOTE: Use Standard mode for any projects in which the sequence framerate does NOT
                         match the framebuffer framerate. The most common example is using 23.98
                         source material but playing out at 29.97. In this situation a larger than minimum
                         buffer size is required for the added 3:2 frame rate pull up.

                      HDR Color Space
                      This appears when a selected AJA hardware device is running in 4K mode. This
                      setting allows you to define which colorspace Premiere Pro uses for output. See
                      Table 1 on page 7 to identify which AJA hardware devices support HDR.
                      You can select from:
                       • 12bit PQ 709
                       • 12bit PQ P3
                       • 12bit PQ 2020
                       • 10bit HGL
                       • 12bit HGL
                      The setting of this control in the Premiere Pro Plug-in is ignored if the AJA device
                      is not set to 12 bit RGB.

                      Other HDR Settings
                      High Dynamic Range video requires use of supported HDR media files, such as
                      OpenEXR.
                      Control Panel settings required for HDR operation include:
                       • Format: RGB-12
                       • SDI Output: RGB Full (greatest color range) or RGB SMPTE
                      Premiere Pro Sequence Settings recommended for HDR operation are:
                       • Maximum Bit Depth
                       • Maximum Render Quality

                      Widescreen Checkbox
                      Check the Widescreen box if the project is widescreen standard definition NTSC
                      or PAL format.

         Device Control Preferences
                      Device Control Preferences are settings for Export to Tape and Capture functions
                      using the RS-422 machine control interface on AJA hardware (not applicable to
                      T-TAP). Always use the AJA Serial Control setting and the AJA hardware RS-422
                      port for capture. There are two ways to access Device Control in Premiere Pro—in
                      Preferences (shown below) and in the Capture window Settings tab.
                      Figure 14. Preferences > Device Control

                      Enter the desired value for:

AJA and Adobe Applications Quick Start Guide v15.1                  19                                       www.aja.com
                      Preroll
                      0 to 15; the number of seconds required to start the source machine before
                      capture. AJA recommends 4 seconds of preroll for device control.

                      Timecode Offset
                      -30 to +30; timecode adjustment (in seconds) forward or back to compensate for
                      discrepancies between the source’s burned-in timecode and that of the captured
                      sequence.
                      Always verify Premiere Pro and AJA offset settings for Capture and Export are
                      in agreement. Device Control settings made in the Capture window or Export
                      window menus may override Preference settings.

         Device Control Options
                      Click on the Options button to pull up the AJA Device Control window.
                      Figure 15. Preferences > Device Control > Options

                      Board
                      This menu allows you to select from multiple AJA hardware devices if you have
                      them installed in your system.

                      Timebase
                      Use this pull-down to select the timecode base supported by your VTR.
                       • Match Deck–this is the AJA default setting. It accesses the connected VTR deck
                         to get the current framerate of the tape.
                       • Base 24
                       • Base 25
                       • Base 29.97 NDF (no drop frame)
                       • Base 29.97 DF (drop frame)
                       • Base 30

AJA and Adobe Applications Quick Start Guide v15.1                20                                      www.aja.com
                      The timecode format is used for both monitoring the RP-188 timecode embedded
                      in the digital data stream and for selecting a timecode offset (if required) for the
                      attached VTR (connected to the AJA hardware’s RS-422 port).
                   NOTE: Not all decks support the default Match Deck function. If you are using a
                         Panasonic deck (especially a D5) you should set the frame rate match manually.

                      Timecode Source
                      Choose between a separate-channel Longitudinal Timecode (LTC) or Vertical
                      Interval Timecode (VITC) transported in the video signal’s vertical interval or
                      include both (LTC + VITC).

                      Optional Layoff Adjustments
                      The fractional frames settings (1/10 frame increments) are available as
                      optional offset adjustments that can be applied in situations where layoffs are
                      intermittently off by a frame. For example, if a layoff deck is missing its edit in
                      point 1 out of 10 times, try adjusting the layoff by .1 frames and see if it locks in
                      the accuracy.
                   NOTE: If you find an adjustment that works consistently with your deck, reporting that
                         information to AJA support can allow AJA to hard code that adjustment for that
                         specific deck into future versions of the plug-in.

                      Optional Capture Adjustments
                      Same as above, but applies to adjusting fractional frames for capture.

Premiere Pro Audio Configurations
                      A Premiere Pro session can be configured for audio in different ways. Which
                      method you use depends on the audio task at hand, the AJA hardware's audio
                      capabilities, and the audio sources to be used. Some example configurations are:
                      Example 1 - If your AJA hardware supports the AJA Control Panel Audio
                         Mixer, you can use the AJA hardware for video and audio input and output
                         with optimum A/V sync, including zero latency voice-over recording and
                         monitoring. Leaving your system configured this way maintains A/V sync in
                         your entire video editing session.
                   NOTE: In the three examples below, after completing the voice-over you will need to re-
                         configure your system away from using Adobe Desktop Audio to restore proper
                         A/V sync for the remainder of your video editing session.
                      Example 2 - If your AJA hardware does not support the Control Panel Audio
                         Mixer (for example, LHe Plus and LHi), you can still use the AJA hardware
                         for video and audio input and output, including audio monitoring using
                         Adobe Desktop Audio. However, zero latency voice-over recording and audio
                         monitoring is not available.
                      Example 3 - You can also completely bypass the AJA hardware for audio input
                         and monitoring, using your host computer's audio system and Adobe Desktop
                         Audio. The AJA hardware is only used for video, and zero latency voice-over
                         recording and audio monitoring is not available.

AJA and Adobe Applications Quick Start Guide v15.1                   21                                       www.aja.com
Example 1: Voice-over with Control Panel Audio Mixer
If your AJA hardware supports the Audio Mixer feature you can use one of the AJA
hardware audio inputs (selected in AJA Control Panel) to add an ultra-low latency
voice-over track to your project timeline. For example, when using the AJA Io 4K
Plus, Voice Over to Timeline can make use of Analog Audio In (DB25 Line Level),
embedded HDMI Audio In, or embedded SDI Audio In. On the Avid Artist | DNxIV
there is additional support for an Analog Mic input via the front panel (Line, Mic,
Phantom 48V).
Recommended settings for Adobe Premiere Pro when using AJA hardware for
voice-over using the AJA Control Panel Audio Mixer are:
1. Mac or Win OS: Set the Audio / Sound to default to using AJA device for
both input and output (see "OS Configuration" on page 11).
2. Premiere Pro Audio Hardware Preferences (Windows OS only): Set Device
Class to ASIO.
3. Premiere Pro Audio Hardware Preferences: Set AJA Device for Default Input,
Default Output and Master Clock.
4. Premiere Pro Audio Preferences: Check Mute input during timeline
recording. This prevents monitoring echos of the voice-over being
recorded.
5. Premiere Pro Playback Preferences: Select the AJA Device for both the Audio
Device and Video Device.
6. Premiere Pro Playback Preferences/Video Device Setup: Set Buffer Mode to
Minimum.
7. Premiere Pro Timeline: Right click on the microphone Voice-over record
icon on the desired track on the timeline and choose Voice Over Record
Settings. Select the AJA Device as the source (see Figure 16). You can see the
voice-over input levels on the meter, and you can adjust them up or down
externally from Premiere Pro and AJA Control Panel, using an external mixer
(or the mic gain knob on a DNxIV).
Figure 16. Premiere Pro Voice-Over Record Settings
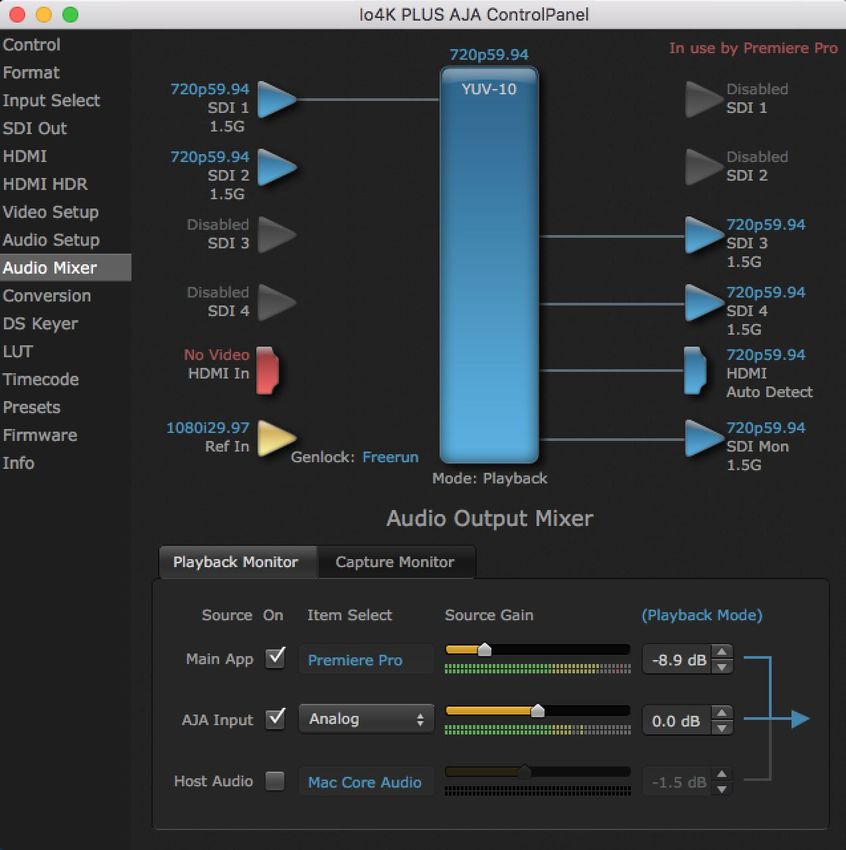
8. AJA Control Panel: Audio Mixer Screen/Playback Monitor: Check AJA
Input, choose from Item Select the AJA device's input to be used, if desired
check the Main App to hear the already recorded session audio, and adjust
monitoring levels (see Figure 17). This Control Room screen is active even
when controlled by an external application.
AJA and Adobe Applications Quick Start Guide v15.1 22 www.aja.com
                      Figure 17. AJA Control Panel Audio Mixer Screen

                      9. In the Premiere Pro timeline, place the cursor on the timeline where you
                         wish to begin the voice-over recording, then click on the microphone Voice-
                         over record icon for the track and record your audio.
                      These settings simultaneously provide Premiere Pro Voice Over to Timeline with
                      full-duplex zero latency monitoring and capture to the timeline.

         Example 2: Voice-over Without Control Panel Audio Mixer
                      Some KONA and Io devices do not support the Control Panel Audio Mixer. You
                      can use one of the these device's audio inputs (selected on the AJA Control Panel)
                      to add a voice-over track to your project timeline. For example, if your device
                      supports analog audio input your source could be a microphone connected to an
                      audio mixer, with the line-level mixer output connected to a KONA/Io breakout
                      audio input.
                   NOTE: This method should not be used when precise A/V sync is required on the output.
                         A slight, measurable delay may be induced.
                      The settings below are intended for use with an audio input connected to an AJA
                      hardware device to perform a voice-over recording without using the AJA Control
                      Panel Audio Mixer.
                      1. Mac or Win OS: Set the Audio / Sound to default to use the AJA device for
                         both input and output (see "OS Configuration" on page 11).
                      2. Premiere Pro Audio Hardware Preferences (Windows OS only): Set Device
                         Class to ASIO.
                      3. Premiere Pro Audio Hardware Preferences: Set AJA Device for Default Input,
                         Default Output and Master Clock.

AJA and Adobe Applications Quick Start Guide v15.1                 23                                      www.aja.com
                      4. Premiere Pro Audio Preferences: Uncheck Mute input during record. This
                         allows you to listen to the voice-over recording as it happens, but there may
                         be a delay.
                      5. Premiere Pro Playback Preferences: Select Adobe Desktop Audio as the
                         Audio Device. This lets you use the current selection in the Audio Hardware
                         preferences for monitoring.
                      6. Premiere Pro Timeline: Right click on the microphone Voice-over record icon
                         on the desired track on the timeline and choose Voice Over Record Settings.
                         Select the AJA Device as the source (see Figure 16 on page 22). You can
                         see the voice-over input levels on the meter, and you can adjust them up or
                         down externally from Premiere Pro and AJA Control Panel, using an external
                         mixer.
                      7. Premiere Pro Timeline: Place the cursor on the timeline where you wish to
                         begin the voice-over recording, then click on the microphone Voice-over
                         record icon for that track and record your audio.
                      These settings provide voice-over record and audio monitoring on the timeline,
                      but exact A/V sync is not guaranteed.
                   IMPORTANT: When finished with the voice-over recording, return the Premiere Pro
                         Preferences (see Step 5 on page 22 above) to use AJA hardware as the playback
                         device, to ensure the remainder of your work in the session has the proper A/V
                         sync.

         Example 3: Voice-over with USB Device and Computer
         Monitoring
                      If you wish to use a USB mic or computer audio source and monitor through the
                      computer, you can use Adobe Desktop Audio for voice-over and monitoring,
                      using use the AJA hardware only for video.
                   NOTE: This method should not be used when precise A/V sync is required on the output.
                         A slight, measurable delay may be induced.
                      The settings below are intended for use with a USB headset Mic and headphones
                      (Logitech headset, for example) to perform a voice-over recording.
                      1. Mac or Win OS: Set the Audio / Sound to default to use the AJA device for
                         both input and output.
                      2. Premiere Pro Audio Hardware Preferences (Windows OS only): Set Device
                         Class to MME.
                      3. Premiere Pro Audio Preferences: Uncheck Mute input during record.
                      4. Premiere Pro Audio Hardware Preferences: Set Logitech Headset for Default
                         Input, Default Output, and Master Clock.
                      5. Premiere Pro Playback Preferences: Select Adobe Desktop Audio for the
                         Audio Device and AJA Device for the Video Device.
                      6. Premiere Pro Timeline: Right click on the microphone Voice-over record icon
                         on the desired track on the timeline and choose Voice Over Record Settings.
                         Select Logitech Headset as the source. You can see the voice-over input
                         levels on the meter, and you will adjust them up or down externally from
                         Premiere Pro and AJA Control Panel (possibly on the USB mic itself).
                      7. Premiere Pro Timeline: Place the cursor on the timeline where you wish to
                         begin the voice-over recording, then click on the microphone Voice-over
                         record icon for that track and record your audio.
                      These settings provide voice-over record and audio monitoring on the timeline,
                      but exact A/V sync is not guaranteed.

AJA and Adobe Applications Quick Start Guide v15.1                 24                                      www.aja.com
                   IMPORTANT: When finished with the voice-over recording, return the Audio Hardware
                         and Playback Preferences to use AJA hardware, to ensure the remainder of your
                         work in the session has the proper A/V sync.

Premiere Pro Capture Settings
                      In Premiere Pro you can access Capture settings in a number of ways. For initial
                      project settings, go to File> Project Settings> General and set AJA Capture
                      Format and settings.
                      To access the Adobe Capture Settings panel, do one of the following:
                       • Go to Window>Capture (or F5 function key) to launch the Capture Window
                         and click on the Settings tab>Edit
                       • Use the Flydown menu >Capture Settings
                       • Right-click in the Capture window for context-sensitive menu.
                      In the Capture settings, you can select either AJA Dpx, AJA Mov or AJA MXF file
                      format for the capture. Click on Settings to see that Premiere Pro detects the
                      current video input format and then allows you to set:
                       • Pixel Format
                       • Audio Format
                       • Audio Channels (number, and whether mono or stereo)
                       • Timecode Source
                       • Frame Offset
                       • Disable creation of SCC/MCC files from Closed Caption data
                       • Mark SD MOV files as 16:9 anamorphic
                      Figure 18. AJA Capture Settings Panel

         Pixel Format Choices
                      Supported pixel formats vary depending on the video input format. Available
                      Pixel Format will vary according to the video input resolution. For example, if the
                      AJA device has an HD input, the DV/DVCPro formats won’t be displayed but the
                      DVCProHD formats will. All pixel formats are listed in the following table.

AJA and Adobe Applications Quick Start Guide v15.1                 25                                       www.aja.com
                      Table 3. Available Pixel Formats
                        DPX format
                        10-Bit BE (big endian) RGB
                        Mov formats
                        8-Bit RGB                                          Avid DNxHD HQX
                        8-Bit RGBA                                         Avid DNxHD HQ
                        10-Bit BE RGB                                      Avid DNxHD SQ
                        8-Bit Uncompressed                                 Avid DNxHD LB
                        10-Bit Uncompressed                                Avid DNxHD 444
                        MC DV25                                            Avid DNxHR HQX
                        MC DVCPRO50                                        Avid DNxHR HQ
                        MC DVCPRO HD                                       Avid DNxHR SQ
                        Apple ProRes 4444                                  Avid DNxHR LB
                        Apple ProRes 422 (HQ)                              Avid DNxHR 444
                        Apple ProRes 422                                   Avid DNxHR 444 12bit
                        Apple ProRes 422 (LT)                              Note: Apple ProRes capture available
                        Apple ProRes 422 (Proxy)                           on Mac OS only
                        MXF formats
                        Avid DNxHD HQX                                     Avid DNxHR 444
                        Avid DNxHD HQ                                      Avid DNxHR 444 12bit
                        Avid DNxHD SQ                                      Avid DNxHR HQ
                                                                           Avid DNxHR HQX
                                                                           Avid DNxHD LB
                                                                           Avid DNxHD SQ

         Audio Format
                      Use the Audio Formats pull-down menu to select the appropriate signal type for
                      your input.
                       • 16-bit LE (little-endian) PCM (audio compression)
                       • 24-bit LE PCM
                       • 32-bit LE PCM
                       • 32-bit LE float PCM

         Audio Channels
                      Select the number of audio channels to be captured. AJA hardware devices vary
                      in the number of audio channels they support. Audio channels can be captured
                      as discrete mono channels or stereo pairs.

         Timecode Source
                      This setting tells the Adobe Premiere Pro Capture plug-in where to get the
                      timecode information for insertion into the file.
                        • Control Panel–(default setting) uses the user-defined setting in the AJA
                          Control Panel
                        • Device Control–uses the timecode from the RS-422 port
                        • Time of Day–use the computer time of day information
                        • Premiere–asks Premiere for timecode information

AJA and Adobe Applications Quick Start Guide v15.1                 26                                             www.aja.com
AJA Control Room Capture, Premiere Pro Editing
                      Alternatively, instead of using Premiere Pro, you can use AJA Control Room for
                      capture. This lets you stay in the Premiere Pro editing environment.
                      1. Launch AJA Control Room.
                      2. In the Control Room Device drop-down menu, select the AJA device
                         configured for operation with Control Room.
                      3. In Control Room Preferences > Capture choose a capture path.
                      4. Click the Capture tab.
                      5. Enter the file name and any other information desired for the captured clip.
                      6. Play the source material.
                      7. Click the AJA Control Room red record button to start and stop the capture.

Closed Caption Support
                      To capture and output Closed Captions:
                      1. Click on the wrench icon on the lower right of the Program Monitor.
                      2. Select Enable for Closed Captions Display. This enables closed captioning
                         output from any file type that Premiere Pro can read.
                      Figure 19. Closed Captions Display Enable

                      3. Click on Settings... for Closed Captions Display and select CEA-608 or CEA-
                         708 captions for display.
                      By default, if closed captions are present in the Ancillary Data, the AJA capture
                      plug-in in Premiere Pro will detect them, and automatically write them into a file.
                      For QuickTime capture, the captions will be written into the clcp track in a MOV
                      file, and .scc and .mcc files will also be created. For DPX capture, only .mcc and
                      .scc files will be created.
                   NOTE: Newer AJA hardware devices (for example, KONA 4 or Io 4K) Closed Captions
                         will always be active for capture and playback. If, however, you are using earlier
                         AJA hardware models, you must enable vertical ancillary data (VANC) using AJA
                         Control Panel.

         Disable creation of SCC/MCC files from Closed Caption data
                      You can override this automatic file writing behavior if you wish. This option, in
                      Adobe Premiere Pro CC 2018 onwards, gives you the ability to not automatically
                      generate SCC/MCC Closed Caption files when capturing a signal with the data
                      present. Default setting is OFF (files are automatically created).
                      Disabling the creation of files does not prevent the recorded media from
                      encoding the Closed Caption data. If the data is present in the captured signal,
                      then it will be retained.

AJA and Adobe Applications Quick Start Guide v15.1                   27                                       www.aja.com
Export to Tape
                   NOTE: Adobe has worked closely with AJA to identify, test and fix some accuracy
                         issues when outputting to tape with specific VTRs. Significant performance
                         improvements have been made which should result in almost full eradication of
                         errors when delivering on tape. We believe that the interaction between Adobe
                         Premiere Pro CC and AJA Hardware is now tuned to the best interoperability
                         possible given current OS, Adobe Software versions and AJA Software versions. As
                         is standard for any software and / or hardware manufacturer though, we cannot
                         make a 100% guarantee of perfection for all operations at all times.”
                      To setup an Export to Tape, select (make active) the desired sequence in Premiere
                      Pro and then go to File>Export>Tape (Serial Device). This will bring up the
                      following Premiere Pro Serial Device panel which allows you to interface with the
                      target tape machine through AJA serial control.
                      Figure 20. Edit to Tape Screen

                      In this window you will set up the following:

                      Export Type
                        • Insert–add new material from the timeline to tape with existing content,
                          Video and Audio tracks are selectable and no timecode is written.
                        • Assemble–requires deck in regeneration mode, uses existing timecode from
                          the tape to begin lay down, and generates new timecode from that point on
                          using the deck’s timecode clock.
                        • Print to Tape–outputs directly to tape without regard to existing timecode.
                      You also have access to these AJA device settings:
                       • Device Control Settings–AJA Device Control (see "Device Control Preferences"
                         on page 19).
                       • Recorder Setting– AJA Capture Settings (see "Playback Preferences" on page
                         17). Premiere Pro uses the AJA Capture plug-in to display video from the
                         tape deck.

AJA and Adobe Applications Quick Start Guide v15.1                    28                                    www.aja.com
                   NOTE: For precise A/V sync accuracy your audio setup should be in Standard
                         configuration (see "Video Device Setup" on page 17).
                        • In Point, Out Point, and Duration when in applicable print mode
                        • Standard tape machine function controls

         Best Practices for Tape Output Accuracy
                   IMPORTANT: AJA recommends you perform two or three test insert edits to establish a
                         frame offset BEFORE doing a real insert. The frame offset may differ for different
                         decks and even for different resolutions and frame rates on the same deck. You
                         should test this before setting the offset. Also, note that the capture frame offset
                         may not be identical to the layoff frame offset (refer to your AJA Mac or Windows
                         release notes for the latest information).

                Software Best Practice Checklist by AJA
                        • Adobe Software: Follow Adobe best practices in accord with the advice of
                          your Adobe representative(s), when it comes to Adobe software versions,
                          media storage, cache files, graphic cards, graphic card drivers, etc. Likewise,
                          please follow Adobe best practices when it comes to rendering effects and /
                          or dealing with source clips that may be utilizing a “heavy” codec; i.e. a codec
                          which significantly taxes your CPU and GPU resources.
                        • AJA Software: Keep AJA software versions up to date, including device
                          firmware. AJA device firmware is supplied within the main software package
                          – if you are prompted to update your firmware please do so. Running
                          mismatched firmware and software versions is not recommended.
                        • AJA Control Panel: Make sure you are familiar with AJA Control Panel and
                          understand how to use it to get the most out of Adobe Premiere Pro CC.
                          When editing using Adobe Premiere Pro CC and AJA hardware, it is highly
                          recommended to always have AJA Control Panel open and set up before
                          launching Adobe applications, and to leave AJA Control Panel open until you
                          have finished editing / are ready to shut down the system.
                        • AJA Devices: If you believe you are troubleshooting an issue or behavior that
                          is not expected, please always start by resetting the device and erasing all
                          preferences using AJA Control Panel.
                        • Host System: Please follow Adobe guidelines when it comes to the minimum
                          system specifications required for optimal performance based on the raster
                          sizes and media types you predominately work with. AJA also provides slot
                          recommendations for those systems we have tested in-house:
                          • https://www.aja.com/support/kona-pc-system-configuration
                          • https://www.aja.com/support/kona-system-configuration
                          • https://www.aja.com/support/kona-pc-graphics-system-configuration
                          • https://www.aja.com/support/legacy-support-systems
                        • OS: Use either Windows 10 with all updates, or else macOS 10.14, 10.13 or 10.12.
                          Please also stay up to date with the latest OS recommendations from Adobe
                          and AJA in accord with the advice of your Adobe representative(s). Periodic
                          rebuilds of fresh system images may be necessary depending on how long
                          host systems are kept in service.
                        • Performance inhibitors: Be aware of any potential resource hogs on your host
                          system. For example, it is possible that running virus protection software
                          could be causing the host CPU to slow down, which can then cascade
                          into system wide issues affecting combined AJA and Adobe performance.
                          Likewise, ensure you keep an eye on applications or devices that editors may
                          be running simultaneously that may be restricting the amount of RAM or GPU
                          processing power available for editing and playback / monitoring.

AJA and Adobe Applications Quick Start Guide v15.1                   29                                         www.aja.com
                        • Vigilance should also be extended to storage performance. If media storage
                          bandwidth is either inadequate or else fluctuating, this can have a significant
                          impact on editing system / software performance.
                        • Additionally, a full shut down and restart of the host computer is
                          recommended at least twice during every 24 hour period and / or at the
                          beginning of each 8-10 hour shift.
                        • Sleep/Wake: Avoid and / or disable any and all power save settings on the host
                          connected to your AJA hardware.
                        • BIOS: For PC systems, keep the BIOS and systems drivers up to date.
                        • VTR: Ensure VTRs are in good working order with regular ongoing
                          maintenance and cleaning. Also where firmware is applicable, make sure to be
                          using the latest available VTR firmware from the manufacturer. Additionally,
                          please take care to store both the tape stock and VTR in a temperature and
                          humidity controlled environment according to manufacturer’s specifications.
                          Additionally, please ensure you are familiar with the VTR set up, operation and
                          available controls.
                        • Reference: When capturing from tape, AJA recommends using AJA Control
                          Panel to set Reference to follow Video In. When outputting to tape, AJA
                          recommends using a common external reference signal (analog black burst or
                          Tri-Level, depending on device) for both the VTR and AJA hardware. You can
                          choose Reference In to utilize the incoming reference input source within AJA
                          Control Panel.
                        • Software vs. System: Be aware of the difference between running Adobe
                          Premiere Pro CC in “software only mode”, vs. using as a “system” in
                          conjunction with AJA hardware. For example, your host system is doing a lot
                          less heavy lifting when you are only painting the video onto the application
                          display (GUI). Once you begin to utilize hardware with your Adobe software,
                          the advantage is that you get properly timed full broadcast quality outputs,
                          but this does require pushing all of the data through your host architecture –
                          something that is not happening to anywhere near the same extent as when
                          you are not utilizing hardware. As such, comparisons between “software only”
                          and “system” performance should be treated with an abundance of caution,
                          and a clear appreciation that any such comparison is not comparing like with
                          like.

                Adobe Best Practice Recommendations
                      In addition, the Premiere Pro team strongly recommends following these steps to
                      assure success with SDI tape exports.
                       • Ensure the media storage has a continuous read/write speed of at least 120
                          MB/sec – a lower rate may result in occasional dropped frames in insert to tape
                          operations. Continuous rates of 220 MB/sec or higher are virtually assured of
                          expected performance. AJA comes with speed tests as part of the software
                          deployment.
                       • All timelines must be fully rendered or show native timeline support (no
                          yellow or red bar in render indication). The advantage to rendering a timeline
                          over full export is that simple changes require only a simple re-render of the
                          changed segment, rather than a full re-export.
                       • Make sure to consult the manuals for the AJA solution, to track changes in
                          settings for new versions of their drivers.
                       • To minimize the chance of tape export errors, it is best to use the standard
                          Editing or Assemble workspaces, and ensure that Lumetri Scopes and Lumetri
                          Color panels are closed. These panels can tax the ability to play back frames at
                          highest efficiency.
                       • To assure maximum accuracy of insert In-Point edits, Premiere has found that
                          using a Sequence timeline Start Time of 01;00;00;00 or 01:00:00:00 leads to the
                          greatest accuracy across a variety of tape devices.

AJA and Adobe Applications Quick Start Guide v15.1                 30                                        www.aja.com
Chapter 4 – Using Adobe Photoshop
                      Adobe Photoshop accepts Adobe plug-ins and drivers to closely integrate the
                      AJA hardware Export function into the application.
                   NOTE: Setup of Input and Output formats for AJA hardware are now performed using
                         the AJA Control Panel rather than menus within the Adobe Plug-ins.

AJA Capture
                      With Photoshop open, go to the File pull-down menu and select Import>AJA
                      Capture. Selecting AJA Capture performs an immediate capture of the current
                      frame in the AJA hardware frame buffer.
                      Figure 21. AJA Image Capture in Photoshop, File>Import Menu

                      If you use the capture function regularly, we recommend that you set up a
                      Keyboard Shortcut to trigger the capture (see Photoshop documentation).

AJA and Adobe Applications Quick Start Guide v15.1               31                                   www.aja.com
AJA Export
                      To use the AJA Preview function, go to Export and choose AJA Export.
                      Figure 22. AJA Image Export in Photoshop, File>Export Menu

                      The specific options available to you are determined by the AJA hardware device
                      that is installed in your workstation that you are currently controlling.
                      Use the AJA Control Panel to set Video Format and Pixel Format for your desired
                      output.

                Source Frame Setting
                      To setup Preview options, go to the Window menu and select AJA Preview. Select
                      a Source Frame mode to define the video interlace for your image. Progressive is
                      the default.
                   NOTE: If your source video is interlaced, you may select the appropriate (lower or upper)
                         initial field to maximize AJA hardware output performance. This setting tells the
                         AJA hardware which type of frame format it is receiving.

                      Figure 23. AJA Photoshop Export Setting Menu

                      In Fit To Screen mode, the AJA hardware automatically scales the image geometry
                      until one of its borders fills the monitor screen. No cropping or distortion occurs.
                      When your Export Settings are selected, click on the Export button to output
                      your image through the AJA hardware.
                   NOTE: When you output in Video + Key mode (set in AJA Control Panel), Video is output
                         via SDI 1 and the Key channel is output on SDI 2. (This does not apply to KONA 4K
                         Mode operation, see the KONA manual.)

AJA and Adobe Applications Quick Start Guide v15.1                   32                                        www.aja.com
Chapter 5 – Using Adobe After Effects
                   NOTE: Beginning with AJA’s v12.4 Retail Software package, support for Adobe After
                         Effects has changed. Previously two different plug-ins were being installed. The
                         ‘Blithook’ plug-in is the legacy plug-in and is no longer installed by default. It
                         must be deliberately chosen as an option in both the Mac and Windows installer.
                         The Transmit plug-in is installed with the default installation options.

After Effects Video Preview Preferences
                      Figure 24. AJA After Effects Video Preview Settings Menu, Transmit Plug-in

                      The After Effects Video Preview Preferences are similar to the Premiere Pro
                      Playback Preferences. See "Playback Preferences" on page 17 for more
                      information.

                      Enable Mercury Transmit
                      Mercury Transmit must be enabled in order for the AJA Plugin to interface
                      between Adobe Premiere and AJA Hardware. Disabling Mercury Transmit will
                      disable ("eject") your AJA hardware until Mercury transmit is re-enabled.

AJA and Adobe Applications Quick Start Guide v15.1                  33                                        www.aja.com
After Effects Audio Hardware Preferences

                      The After Effects Audio Hardware Preferences are similar to the Premiere Pro
                      Audio Hardware Preferences. See "Audio Hardware Preferences" on page 15 for
                      more information.

After Effects Realtime Performance
                      RAM Preview should be realtime for HD in After Effects. 4K RAM preview may
                      even be possible with a high performance workstation. Please ensure you have
                      the following settings for proper RT RAM preview.
                      1. Make sure that the frame buffer format of the AJA Control Panel matches
                         the resolution and frame rate of your After Effects Composition. This can
                         be set by launching AJA Control Panel, clicking on ‘Format’ in the left hand
                         column, and selecting the correct resolution and framerate in the ‘format’
                         drop down menu.
                      2. Next, please ensure that the “Resolution” setting for “Time Controls” is set
                         to “Full” in After Effects. If not set to “Full”, the image that the AJA Preview
                         Panel receives and sends to the AJA hardware during RAM Preview will not
                         be sent at “Full Resolution” and thus will either be software resized to Full
                         Resolution before sending to the AJA hardware for display, or will be center
                         cropped before sending.
                      3. If RAM Preview is still not realtime, you can try some of the following –
                         setting your Zoom to “100%” in your AE Composition, making sure the
                         “Frame Rate” of the AE Time Controls” matches the frame rate of the
                         “Primary Format” in the AJA Preview Panel, and muting audio in the AE
                         Time Controls.
                   NOTE: In some cases the available bandwidth of the motherboard limits the cards ability
                         to output realtime video. AJA tech support can show you how to use AJA System
                         Test to test the bandwidth you are getting between the card and motherboard.

Legacy AJA Preview Plug-in
                      The Legacy Preview plug-in allows you to view the current frame of your working
                      timeline in various formats on a monitor connected to an AJA hardware output.

AJA and Adobe Applications Quick Start Guide v15.1                  34                                       www.aja.com
You can also read