AMERICAN MUSCLE GRILL - MODEL# AMG36-NG AMG36-LP
←
→
Page content transcription
If your browser does not render page correctly, please read the page content below
AMERICAN
MUSCLE GRILL
   INSTRUCTION MANUAL

MODEL# AMG36-NG AMG36-LP
      A P R O D UCT OF S UM M ERS ET GRILLS
Congratulations and thank you for choosing the American Muscle Grill!

Serious grillers like you know there is no substitute for the savory flavors you can only create by smok-
ing and grilling with charcoal and wood. At the same time you appreciate the undeniable convenience,
control and efficiency of gas. AMG artfully combines the best features of both technologies to create an
efficient, solid, and really cool design.

AMG represents the latest in high performance grill design and technology together with the finest
quality and craftsmanship. The extreme performance and temperature capabilities of your grill make
it particularly important that you study this guide and your grill before installation and use. It contains
important safety information as well as helpful installation and outdoor cooking tips that will enhance
your entire grilling experience and ensure many years of enjoyment for you, your family and friends.

                                         American Muscle Grill ...

To better help you in the future, please copy the following information below from the grill rating plate
which is located on the left side (facing) of the grill.
                                                       Contact information
          AMG Grill Identification
                                                        AMERICAN MUSCLE GRILL
 Model No.:                                             17192 Daimler St. Irvine, CA 92614
                                                        Toll Free: 1-800-966-8126
 Seriel No.:                                            Fax: 1-714-966-9331
  Fuel Type:                                            www.americanmusclegrill.com

 2
Contents
Contact information..................................................2
                                                                                    Cooking with your AMG grill............................... 13
Before you begin........................................................4
                                                                                    Preheating................................................................. 13
Important safety information.................................4
                                                                                    Cooking options...................................................... 13
Preparation..................................................................5
                                                                                    Gas-fired cooking.................................................... 14
Choosing your location............................................5
                                                                                    Charcoal briquette-fired cooking:....................... 14
Prevailing wind...........................................................5
                                                                                    Natural (lump) charcoal-fired cooking.............. 15
Clearances to combustibles.....................................5
                                                                                    Wood-fired cooking............................................... 15
Proper ventilation......................................................5
                                                                                    Combination-fired cooking.................................. 16
Keep it level.................................................................5
                                                                                    Managing solid fuel................................................ 16
Protection from weather..........................................5
                                                                                    Maintenance & care............................................... 17
Easy access...................................................................5
                                                                                    Cleaning your AMG grill........................................ 17
Built-in installations...................................................5
                                                                                    Exterior surfaces cleaning..................................... 17
Stand-alone (cart) installations..............................6
                                                                                    Grilling grates........................................................... 17
NG requirements........................................................6
                                                                                    Drip pan..................................................................... 17
LP gas requirements..................................................7
                                                                                    Burner performance & care.................................. 18
Inspecting your grill..................................................7
                                                                                    Illustrated parts: AMG 36..................................... 21
Concealed loss or damage.......................................7
                                                                                    Wiring diagram: AMG 36..................................... 22
Getting to know your grill.......................................7
Dimensions..................................................................7
Operating controls.....................................................7
Standard features and controls..............................8
Available options & accessories.............................9
Installation...................................................................9
Unpacking the carton...............................................9
Connecting the gas................................................. 10
Natural gas (NG)..................................................... 10
Liquid propane (LP) gas......................................... 10
Electrical connection.............................................. 10
Leak testing.............................................................. 10
Operation.................................................................. 11
Refilling propane (LP) tanks................................. 12
Lighting your AMG grill......................................... 12
Standard lighting procedure:............................... 12
Match lighting procedure:.................................... 12
Break in...................................................................... 12
Tune up...................................................................... 13
Tuning the burners (primary air)......................... 13
Before you cook...................................................... 13

                                                                                                                                                                       3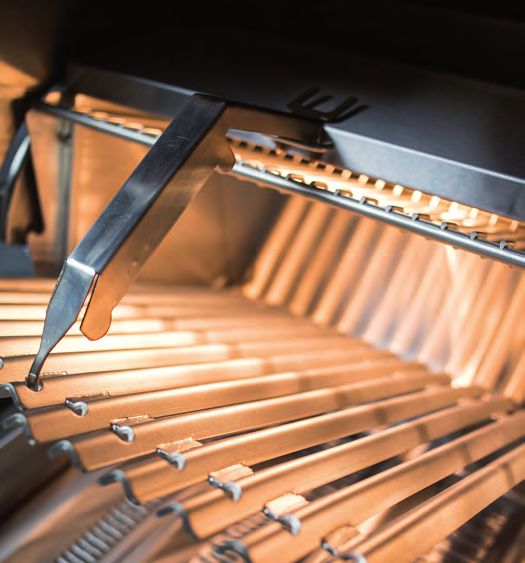
BEFORE YOU BEGIN                                                                           WARNING!
                                                                   •   Improper installation, adjustment, alteration, service or
                                                                       maintenance can cause injury or property damage. Read
Important Safety Information                                           these Installation, Operating & Maintenance Instruc-
                                                                       tions thoroughly before installing or servicing this
Before installing your American Muscle Grill, please read and          equipment.
follow these important precautions:                                •   Never move the grill when hot. During and after use,
                                                                       portions of the grill are hot enough to cause severe
                          Attention:                                   burns.

 •    This gas grill must be installed in accordance with all      •   Always maintain the required clearances from combusti-
      local codes.                                                     bles as detailed in the following section.

 •    If installation is planned in an area with no local codes,   •   Always have an ABC Fire Extinguisher accessible —
      the gas grill must be installed in accordance with the           never attempt to extinguish a grease fire with water or
      National Fuel Gas Code ANSI Z223.1 and storage and               other liquids.
      handling of liquefied petroleum gases, ANSI/NFPA 58 or       •   Store your grill in a well-ventilated area. If stored in-
      CSA B149.1 natural gas and propane installation code.            doors, detach and leave any LP cylinders outdoors in a
                                                                       secure, well-ventilated area away from heat and away
                                                                       from anywhere children may tamper with it.
               DANGER - If You Smell Gas
                                                                   •   Keep any electrical supply cord and fuel supply hose
 1.   Shut off the gas supply to the appliance at its source.          away from any heated surfaces. Electrical cords should
 2.   Extinguish any open flames.                                      be placed away from walkways to avoid a tripping
 3.   Open grill hood to release any accumulation of gas               hazard.
      vapor.                                                       •   If the grill is installed by a professional installer or
 4.   If a gas odor persists, keep away from your appliance            technician, be sure that he/she shows you where your
      contact your gas supplier and/ or fire department im-            gas supply shut-off is located. All gas lines must have a
      mediately.                                                       shut-off that is readily and easily accessible. If you smell
                                                                       gas, check for gas leaks immediately. Check only with a
                          DANGER !                                     soap and water solution. Never check for gas leaks with
                                                                       open flame.
               EXPLOSION HAZARD.
               Do not use the gas grill as storage area for        •   Installation must conform with local codes or, in the
               flammable materials. Keep area free and clear           absence of local codes, with either the National Fuel Gas
               from combustible materials, gasoline, and               Code, ANSI Z223.1/NFPA 54, Natural Gas and propane
               other flammable vapors and liquids. Failure to          Installation Code, CSA B149.1, or Propane Storage and
               do so can result in death, explosion, or fire.          Handling Code, B149.2, in Canada.

                         WARNING !
 •    Do not store or use gasoline or other flammable liquids
      or vapor in the vicinity of this or any other appliances
 •    An LP cylinder not connected for use shall not be stored
      in the vicinity of this or any other appliances.

                   !!! WARNING !!!
             CALIFORNIA PROPOSITION 65
 •    The burning of gas and solid cooking fuels generates
      some by-products known to the State of California
      to cause cancer or reproductive harm. California law
      requires businesses to warn customers of potential ex-
      posure to such substances. To minimize your exposures
      to such substances, always operate the unit as outlined
      in these instructions, ensuring that you provide good
      ventilation while cooking.

                         WARNING !
 To reduce the risk of fire, electric shock or injury, read and
 follow these basic precautions before operating your gas
 grill or side burners.

  4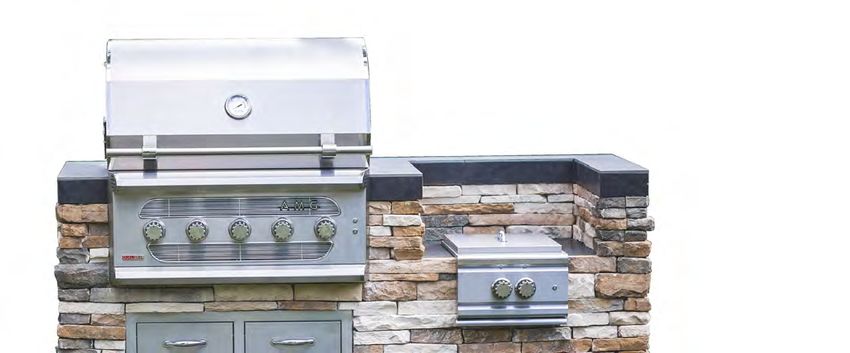
Clearances to Combustibles
 PREPARATION
                                                                                            IMPORTANT!
Choosing Your Location                                               •   Never install this product in a combustible enclosure
                                                                         without an accessory grill liner. Doing so could result in
Your AMG grill has been carefully designed for easy placement            fire, property damage, and personal injury.
and operation on your outdoor room, patio or deck.                   •   Maintain at least 15 inches of clearance between the
                                                                         sides and back of the grill and any combustible surface
Before installation, it is important to carefully select, plan,          or material.
and prepare the location of your new grill. When selecting a
location, consider important factors such as gas line access,        •   Maintain at least 6 inches of clearance between the
exposure to wind and foot-traffic, and areas where people                sides and back of the grill and any non-combustible
congregate. Avoid locating the grill in areas where it may be            surface or material.
accidentally touched or bumped. Most importantly, this is an         •   Do not locate the grill under any overhead combustible
outdoor appliance. Ensure your barbecue is positioned safely             construction
away from anything that can catch fire. Under no circum-
stance is this grill to be used indoors. This includes garages or        Proper Ventilation
any other enclosed area.
                                                                    Ensure there is adequate fresh air ventilation for both the
                                                                    barbecue and cylinder if your grill operates on LP gas. This is
                         WARNING!                                   required not only for proper combustion, but also to prevent
 •   Never locate the grill under a roof or overhang, in a          gas buildup and a possible explosion.
     building, garage, shed or other such enclosed area.
 •   Never locate the grill under combustible construction.
                                                                         Keep it Level
 •   Never locate the grill where the gas hose could create a       Use your barbecue only on a firm level surface. Proper leveling
     safety hazard, or be exposed to damage.                        during installation is critical both front-to-back and side-to-
 •   Gas grills are not designed or certified for and are not       side. A grill that is out of level will experience erratic burner
     to be installed in or on recreational vehicles, portable       combustion and inefficient, uneven heating.
     trailers, boats or any other moving installation.
                                                                         Protection from Weather
 •   Children should never be left unattended in an area
     where a grill is located. Place your grill well away from      Keep the barbecue protected from adverse weather, includ-
     areas where children play. Do not store items that may         ing rain and high winds. A Polyvinyl cover is included that has
     interest children in or around the grill, in the cart, or in   been custom designed for your AMG grill. Always keep your
     the masonry enclosure.                                         grill covered when not in use.
                           NOTE !
                     Partial Enclosures:                                                     WARNING !
 •   Many backyards have areas that are partially enclosed           If your grill includes the optional rotisserie kit and you store
     such as balconies and pergolas. In some cases, it is hard       the rotisserie rod at the back of the grill, always remove the
     to determine whether these areas should be classi-              rear of the cover first, carefully avoiding the rotisserie rod so
     fied as indoor areas, particularly in terms of permanent        it doesn’t fall from the grill. The rotisserie rod is very heavy
     (non-closable) ventilation. If you are uncertain how to         and sharp and can cause severe personal injury.
     categorize a partial enclosure, contact the authority hav-
     ing jurisdiction for help describing the space.                     Easy Access

     Prevailing Wind                                                Allow clear access to the gas supply hose and regulator. When
                                                                    your grill is installed, you should be able to access the gas sup-
The American Muscle Grill design includes a wind deflecting         ply line, including the gas piping or hose, gas regulator, gas
spoiler at the rear of the grill, however winds blowing directly    cylinder and any shut off valves.
in the back of the grill can still affect burner performance and
proper air flow which may cause overheating.                        Keep all gas supply lines as short as possible because gas lines
                                                                    lose pressure over distance and with each elbow and tee that
If you have a freestanding grill, position it so the prevailing     is added. This drop in pressure affects grill performance.
wind blows toward the front control panel (at your back when
grilling) for the proper front-to-rear airflow. Built-in grills
located in areas with prevailing winds should be protected by            Built-In Installations
a wind barrier.
                                                                    The AMG is designed for easy installation into built-in mason-
                                                                    ry enclosures constructed of non-combustible materials, or in
                                                                    a builtin enclosure constructed of combustible material when
                                                                    installed with a grill liner.

                                                                                                                                      5
Before installing a grill in any island or cut out, make sure that
the opening is not bigger than the outside frame of the grill              Built-In Installation Cut-Out Dimensions
unit. The grill should rest on the entire lip of the frame. Refer                          WIDTH           DEPTH           HEIGHT
to figure 1. and table 1. below for proper dimensions.                 AMG 3.6               35”             25”              15”

Be sure the planned location’s prevailing wind doesn’t blow            AMG 5.4               52”             25”              15”
toward the hood gap at the back of the grill. This can cause                                                                   table 1.
poor grill performance as well as overheating.
                                                                           Stand-Alone (Cart) Installations
Pay careful attention to the location of the gas line. It should
be routed away from sources of heat and should make as few            AMG offers an optional, custom grill cart for stand-alone
bends as possible.                                                    installations that utilize a standard 20 lb. propane tank. Please
                                                                      note the requirements below regarding propane tank us-
Check to see if the gas line connection will be accessible when       age and handling, and check the dimensions in the following
grill is installed. If the gas line connection is not easily acces-   section for proper clearances in your installation planning
sible when the grill is installed, support the grill above counter    process.
level and attach the gas line to the grill. When the gas connec-
tion is made and has been checked for leaks, slide the grill into                               Important!
the cutout. If the gas line connection is accessible when the
grill is installed, slide the grill into the cutout and then attach    •    The self-contained LP system barbeque grill is design
the gas line.                                                               certified to be used with a standard 20 lb, 12 1/4” di-
                                                                            ameter, 18” high cylinder with right handed connection
Be very careful not to kink the gas line when lowering the grill            threads. This is the maximum size LP tank to be used.
into the cutout.                                                       •    The cylinder must be constructed and marked in accord-
                                                                            ance with the latest U.S. Department of Transportation
Keep your fingers away from where the grill will be supported               specifications for LP gas cylinders. (DOT. CFR49 or
on counter. Your fingers could become trapped and serious                   National Standards Of Canada CAN/CSA-B359 Cyl-
injury could occur.                                                         inders, Spheres and Tubes for the Transportation of
                                                                            Dangerous Goods).
Check to make sure the grill is level and is supported around
                                                                       •   The cylinder must be provided with a shut-off valve
the entire outside edge. If the grill is not level or is unstable,
                                                                           terminating in an LP gas supply cylinder valve outlet
use non-combustible shims under the outside lip to stabilize it.
                                                                           specified, as applicable, for connection Number QCC-1.
You will need a second person to help you avoid damaging the
grill or your barbecue island.                                         •    Your LP tank must include a collar to protect the cylin-
                                                                            der threads.
You may want to use cardboard strips under the outside edges           •    Your LP tank must include a safety relief device hav-
of the grill to protect the finish of the island.                           ing direct communication with the vapor space of the
                                                                            cylinder.
The deck ledges and counter should be flat and level. (refer
to ANSI Z21.58 Standard for Outdoor Cooking Gas Appli-
                                                                       •    The tank location must include a method of secure
                                                                            mounting.
ances, Section 1.7 Enclosures For Self Contained LP-Gas Supply
Systems)                                                               •    Only a Propane Tank with an ODP ) Overfill Prevention
                                                                            Device) may be used.
This grill requires that a 120 volt, 60 hertz, 15 amp GFI certi-       •    When the grill is not in use, the tank shut off valve
fied outlet be installed by a qualified electrician.                        should be turned OFF.
                                                                       •    LP CYLINDERS MUST NEVER BE STORED INDOORS. If
                                                                            your grill is stored indoors, the cylinder must be discon-
                                                                            nected and removed.
       Depth                                                               NG Requirements

                                                                                               WARNING!
                                                                       •    All natural gas connections must be performed by a
                                                                            licensed contractor or the local gas company

                                                     Height            •    The gas line must be appropriately sized and installed to
                                                                            supply the maximum demand of the grill without loss of
                                                                            pressure.
                                                                       •    A gas shut-off valve must be installed by a qualified
                                                                            plumber in an easily accessible location.
                         Width
                                                                       •    IMPORTANT: Never connect the grill to an unregulated
                                                                            gas supply.
                                                        figure 1.

  6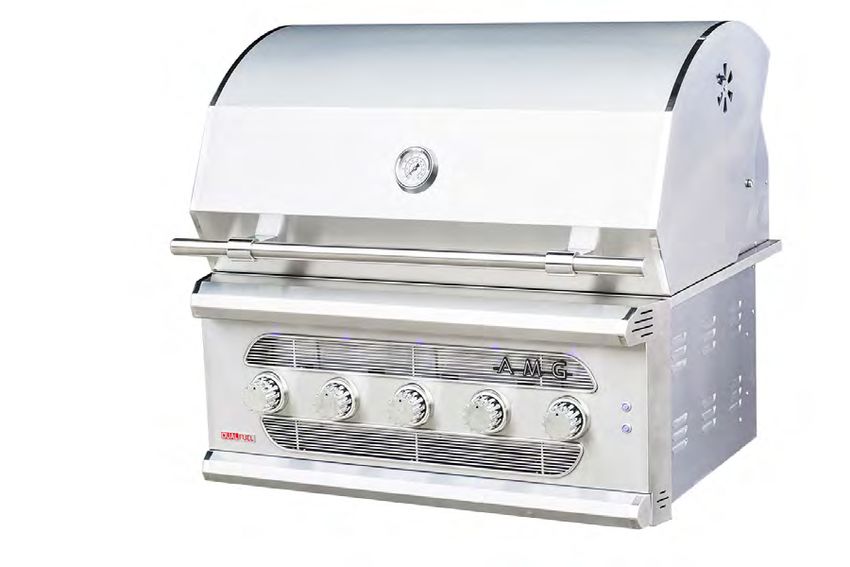
WARNING!                                        Concealed Loss Or Damage
 •   The installation of this appliance must conform with          If damage is unnoticed until the grill is unpacked, notify the
     local codes or in the absence of local codes, to the na-      transportation company or carrier immediately and file a “con-
     tional fuel gas code, ANSI Z223.1a-1998. Installation in      cealed damage” claim with them. This should be done within
     Canada must be in accordance with the standard CAN/           (15) days of the date delivery is made to you. Be sure to hold
     CGA-B149.2, Propane Installation Code.                        on to the container for inspection. We cannot assume respon-
 •   The grill must be isolated from the gas supply piping         sibility for damage or loss incurred in transit.
     system by closing its individual manual shutoff valve
     during any pressure testing of the gas supply piping          Getting to Know Your Grill
     system at test pressures equal to or less than 0.5 psi (3.5
     kPa).                                                              Dimensions
 •   The grill and its individual shutoff valve must be discon-
     nected from the gas supply piping system during any
     pressure testing of that system at test pressure in excess
     of 0.5 psi (3.5 kPa).

                                                                                                       Height
     LP Gas Requirements

                           NOTE !
 •   For you to truly enjoy the experience of cooking on your
     AMG high performance grill, we recommend connecting
     it to a bulk fuel supply if possible. A standard 20-pound
     liquid propane cylinder cannot supply enough gas for                      Width                                 Depth
     extended cooking with gas. If you choose to run your
     AMG system off propane cylinders, we recommend                                                                           figure 2.
     keeping a spare, full cylinder available.
                                                                                      Product Dimensions
                        WARNING!                                                    Width       Depth           Height     Weight
 •   All propane gas connections must be performed by a             AMG 3.6          37”       33 1/4”          33 1/8”   235 lbs.
     licensed contractor or the local gas company
                                                                    AMG 5.4          55”       33 1/4”          33 1/8”
 •   The gas line must be appropriately sized and installed to
                                                                                                                              table 2.
     supply the maximum demand of the grill without loss of
     pressure.
                                                                        Operating Controls
 •   The sealant used on threaded connections must be
     resistant to the action of propane gas.
 •   A gas shut-off valve must be installed by a qualified
     plumber in an easily accessible location.                                                                            5
 •   IMPORTANT: Never connect the grill to an unregulated
                                                                                                   4
     gas supply.
 •   The installation of this appliance must conform with
     local codes or in the absence of local codes, to the na-
     tional fuel gas code, ANSI Z223.1a-1998. Installation in
     Canada must be in accordance with the standard CAN/
     CGA-B149.2, Propane Installation Code.                                                                     3

 •   The grill must be isolated from the gas supply piping
     system by closing its individual manual shutoff valve                                                      2
     during any pressure testing of the gas supply piping
                                                                                1
     system at test pressures equal to or less than 0.5 psi (3.5
     kPa).                                                                                                               image 1.
 •   The grill and its individual shutoff valve must be discon-    1.   Burner Controls: Each burner is controlled by a separate
     nected from the gas supply piping system during any                gas control valve and igniter. The ignition systems are
     pressure testing of that system at test pressure in excess         a two stage, direct spark design that does not require
     of 0.5 psi (3.5 kPa).                                              batteries or any assisting powered components. The gas
                                                                        control features variable flame height from low through
     Inspecting Your Grill                                              high.
                                                                   2.   Control Panel Light Switch: On/Off control switch for
Be certain any visible damage to the carton is noted on freight         LED lighting above each control knob.
bill or express receipt and signed by the person making deliv-     3.   Cooking Light Switch: On/Off control switch for cooking
ery. FILE CLAIM FOR DAMAGES IMMEDIATELY, regardless of                  lamps located in the rear hood.
extent of damage.                                                  4.   Temperature Gauge: Measures the air temperature un-

                                                                                                                                     7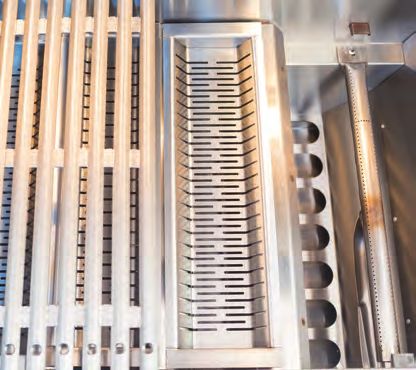
der the hood. The cooking surface temperature is signifi-
         cantly greater than the temperature of the air as read by                    10              11          12       13
         the hood thermometer.
5.       Hood Vents: Operable hood vents adjusts air flow for
         smoking, and for charcoal and wood cooking. Wear a
         protective grilling glove to operate the hood vent as it can
         become quite hot.

Standard Features and Controls

                                    6                  7

                                                   8
                                                                                                                             image 3.

                                        10                              11. Charcoal Trays: The AMG charcoal tray is a unique,
                                                                            patent-pending design crucial for gas as well as solid fuel
                                                                            cooking. They are laser crafted using heavy, 12-gauge,
                                                                            #430 stainless steel. When cooking with gas and the
                                                                            trays are empty, they absorb and radiate intense heat at a
                                                           9
                                                                            steady temperature. When using solid fuel, NEVER FILL
                                                       image 2.             THE TRAYS BEYOND THE MAXIMUM LEVEL INDICATED
6.  Grill Hood: Your AMG hood is a double-wall design with                  ON THE TRAYS. THE GRILL WILL OVERHEAT WHICH MAY
    internal, spring assist system. Always open the grill hood              CAUSE DAMAGE NOT COVERED IN YOUR WARRANTY.
    before lighting the grill. Keep the hood open when start-           12. Burner Covers: The AMG burner cover is another innova-
    ing a charcoal or wood fire and when the hood thermom-                  tive, patent-pending, component built of 14-gauge, #430
    eter temperature reads greater than 600°F.                              stainless steel. While protecting the burners from falling
7. Full Length Handle: The heavy-duty, full length handle                   grease and debris, they also prevent burner ports from
    enables you to open the hood from either side to avoid                  becoming clogged. The burner covers also manage the
    the blast of heat that releases from a grill when the hood              flame with a steady burn and minimum impingement for
    is opened.                                                              exceptionally clean, efficient combustion.
8. Warming Rack: The removable warming rack can be used                 13. Main Burners: Your AMG grill uses heavy, 1 inch diame-
    for warming food or for cooking food more slowly than                   ter, 14 gauge, #304 stainless burners with a lower adjust-
    on the primary cooking grates. The warming rack flips up                able venturi for long life and solid performance. Each
    out of the way for convenience while using the optional                 burner is 20,000 BTUs for plenty of gas cooking power.
    rotisserie system.                                                      The burners are also used for quick and easy lighting of
9. Drip Tray: The removable AMG drip tray features easy,                    solid fuels in the charcoal trays. Optional plug-and-play
    roller bearing operation with close, drain, and fully open              sear burners are also available which can be interchanged
    positioning. AMG features a unique drain plug which                     with any of the standard tube burners.
    allows you to drain oils and liquids from the tray before           14. Power Cord (not shown): The power cord connects the
    removing it for thorough cleaning.                                      control panel lighting and cooking lights. Use a customer-
10. Cooking Grates: The standard grill grates are a custom                  supplied single-outlet outdoor-rated extension cord to
    cast stainless design that maximizes rapid cooking heat                 connect this short cord provided to an outdoor-rated GFI
    absorption while minimizing infrared heat exposure to the               outlet.
    chef. The grates are reversible for a variety of cooking op-        15. Lifting Tool: Cooking with solid fuels is more interactive
    tions. Generally, the convex side (peak) of the grate is for            than simple gas grilling. With the grill in operation, you
    cooking meat while the concave (valley) side of the grate               may want to access or move some components of the grill
    is used for fish and vegetables.                                        that will be hot and dangerous. For this reason, AMG has
                                                                            created a custom, multi-purpose tool that allows you to
                                                                            lift and secure the cooking grates in an open position, and
                                                                            also to move and remove the charcoal trays.
                                                                        16. Hi-temp Cooking Gloves: AMG recommends you always
                                                                            wear your protective gloves while using the grill or any
                                                                            time you come into contact with the grill while it is hot.
                                                                            Never use the lifting tool without your protective grilling
                                                                            gloves.

     8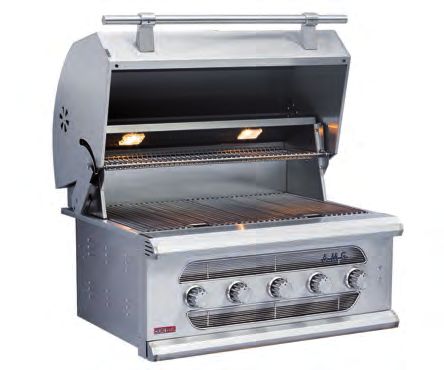
WARNING !                                 INSTALLATION
 Wear your protective gloves while using the grill or any time
 you come into contact with the grill while it is hot. Never                 Important Installation Warnings
 use the lifting tool without your protective grilling gloves.    •    Please read all instructions before installing or operating
                                                                       your gas grill to prevent injury and appliance damage.

Available Options & Accessories                                   •    Never test the grill for gas leaks using a lighted match
                                                                       or any other open flame; see “Leak Testing” procedures
1.  Fully welded stainless steel grill cart                            using soap/water solutions included in following pages
2.  100 lb. Commercial quality rotisserie kit                          of this manual.
3.  Professional plug and play sear burner                        •    The use of accessories, regulators, or components
4.  Side power burner                                                  not recommended by the appliance manufacturer
5.  Masonry stainless steel sealed fuel storage bin/access             may cause injuries and will void warranty.
    door combo                                                    •    Be sure that the gas supplied to the grill conforms
6. Sealed stainless steel masonry double vertical drawer kit           to the model you purchased. A Natural Gas grill re-
7. Masonry stainless steel LP tank/dual trash receptical               quires natural gas to operate; an LP grill requires liquid
    pullout                                                            propane gas to operate. Check the rating label on the
8. Masonry stainless steel double access door                          left hand side of the unit to be certain of the gas type
9. Large stainless steel single access door                            intended for this grill.
10. Propane (LP) conversion kit
11. Natural gas (NG) conversion kit                               •    Your AMG grill is equipped with a convertible gas regu-
                                                                       lator that is set at our factory for the type of gas indicat-
                                                                       ed on the rating plate. Never connect the appliance to
                                                                       an unregulated gas supply line. Grills operated without
                                                                       a regulator are unsafe and will not be serviced until
                                                                       installed properly and safely. Unsafe operation without
                                                                       a gas regulator will void warranty of the grill.
                                                                  •    Grills operated with NG (natural gas) must be installed
                                                                       with the regulator supplied with the unit and set to 4.0”
                                                                       water column pressure.
                                                                  •    Grills operated with LP (liquid propane) gas must be
                                                                       installed with the regulator supplied with the unit and
                                                                       set to 11” water column pressure.
                                                                  •    The gas valves used in the grills are preset at the factory
                                                                       for Natural Gas or Liquid Propane operation. Please
                                                                       contact your dealer and use a licensed contractor or
                                                                       installer to convert your grill to a different gas type.
                                                                  •    Never locate the grill under combustible construction.

                                                                                           WARNING !
                                                                                   Use your Head not your Back.
                                                                  The shipping weight of your American Muscle Grill is at least
                                                                  250 pounds. Larger units may weigh over 400 pounds. Use
                                                                  two or more people to move or install this unit. Failure to
                                                                  follow this instruction can result in back or other personal
                                                                  injuries.

                                                                 Unpacking the Carton
                                                                 1.   Cut the strapping that secures the grill to the pallet.
                                                                 2.   Remove the staples on the lower sides of the carton.
                                                                      Note: It is not necessary to remove the staples at the top
                                                                      of the carton.
                                                                 3.   Slide the carton over the top of the grill and set aside.
                                                                 4.   Remove all LOOSE interior packaging and paperwork from
                                                                      the grill and set safely aside. Be careful to keep all impor-
                                                                      tant documentation for future reference.
                                                                 5.   Open the hood and remove all accessories and packaging
                                                                      from inside the grill.
                                                                 6.   Carefully remove all the screws securing the grill to the
                                                                      pallet and remove the wood bracing.
                                                                 7.   Carefully cut the strapping that secures the grates in posi-
                                                                      tion.
                                                                                                                                    9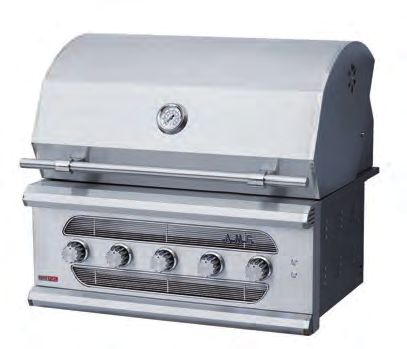
•   AMG uses sturdy tie-down cables and straps to                            Liquid Propane LP Gas
          ensure your grill arrives at your home in showroom
          condition. BE SURE YOU HAVE REMOVED ALL TIE                         1.   Turn the LP tank gas supply valve to the OFF position.
          DOWNS BEFORE ATTEMPTING TO LIFT THE GRILL.                          2.   Turn all grill control knobs to the OFF position.
8.    With at least 1 buddy, lift the grill from the pallet and               3.   Connect a suitable Propane (LP) gas hose from the pro-
      place in it’s final location.                                                pane tank to the regulator at the rear of the grill.
Connecting the Gas
                                                                              Electrical Connection
                                WARNING!
                                                                              Your AMG grill uses AC power for the control panel lighting,
 •        A manual, gas shut-off valve must be installed in the gas           cooking lights and optional rotisserie motor operation.
          supply line ahead of the gas regulator. Be sure the valve
          is installed in an easily accessable location.
 •        Never connect a gas line directly to the grill. A pressure
                                                                                                           NOTE !
          regulator must be installed on all gas equipment. All lo-            •    The grill must be electrically grounded in accordance
          cal codes require it and AMG supplies the correct regu-                   with local codes, or, in the absence of local codes, with
          lator with your grill. Removing or failing to install the                 the National Electical Code, ANSI/NFPA 70, or the Cana-
          pressure regulator can result in fire and serious personal                dian Electical Code, CSA C22.1.
          injury and will void the warranty.
 •        The grill is factory set to use either propane (LP) or nat-         Leak Testing
          ural gas (NG). It is critical that the gas you use matches
          that which the grill was set up for. You can verify that            All AMG gas grills are assembled and tested for leaks at our
          by checking the rating plate located on the left hand               factory in Irvine, California prior to shipment. However a
          side of the grill. Converting to a different gas requires           complete leak test must be performed after installation due to
          a gas conversion kit available from AMG or from your                possible mishandling during shipping or installation. Periodic
          dealer and must be installed by a qualified technician.             leak tests are recommended for safety.
 •        Installation must conform with local codes or, in the
          absence of local codes, with either the National Fuel Gas
          Code, ANSI Z223.1/NFPA 54, Natural Gas and propane                                               NOTE !
          Installation Code, CSA B149.1, or Propane Storage and                •    All gas piping and connections must be tested for leaks
          Handling Code, B149.2, in Canada.                                         after installation or service. All leaks must be corrected
 •        Do not operate the grill on any gas other than that for                   immediately.
          which the grill has been set.                                        •    Homeowners should only check for gas leaks in the ex-
                                                                                    ternal gas piping system from the gas supply to the gas
                                                                                    regulator. Leak testing of the gas valves or interior gas
1.    Verify that the fuel type that the grill has been configured                  connections must be tested by a qualified technician.
      for matches the fuel supply.
2.    Ensure that the gas supply meets with the following mini-
                                                                                                         DANGER !
      mum and maximum pressure requirements.
                                                                                    NEVER USE AN OPEN FLAME TO CHECK FOR LEAKS.

           Minimum and Maximum Gas Pressures                                  As a safety precaution, remember to always leak test your
 Fuel                           Max. Inlet            Min. Inlet              grill outdoors in a well ventilated area. Never smoke or permit
 Natural Gas                    7.0 In. W.C.          4.0 In. W.C.            sources of ignition in the area while performing a leak test.

 Propane                        14.0 In. W.C.         11.0 In. W.C.           1.    Prepare a leak testing solution of soapy water by mixing
                                                                   table 3.         in a spray bottle one part liquid soap to one part water.
                                                                              2.   Open the valve (shut-off or LP tank).
                     Maximum Gas Capacity                                     3.   Apply liquid soapy solution to all joints and connections
                   Main Burners        BTU/ Burner         Total BTU               using a spray bottle or brush.
                                                                              4.   Observe all joints for the presence of bubbles. Bubbles
 AMG 3.6                5 ea.                20,000         100,000                forming indicate a gas leak.
 AMG 5.4                8 ea.                20,000         160,000           5.   If there are no bubbles (leaks) in the gas delivery system,
                                                                table 4.           close the gas supply valve. Your grill is ready to use.

      Natural Gas                                                             If you observe bubbles forming at any gas connection:

1.    Turn the gas supply valve to the OFF position.                          6.   Retighten the connection(s) where bubbles are forming.
2.    Turn all grill control knobs to the OFF position.                       7.   Repeat steps 3-5 above.
3.    Connect a suitable natural gas flex connector from the gas
      supply to the regulator at the rear of the grill.                       If you cannot repair the leak:

                                                                              8.   Make sure all control knobs are in the full OFF position.

     10
9. Shut off the gas supply to the grill and release pressure in
the hose and manifold by pushing in and turning any of OPERATION
the control valves one quarter turn counter-clockwise.
10. On LP systems, disconnect the cylinder from the grill. WARNING!
11. Call an authorized gas appliance service technician or an
LP gas dealer. • When cooking using solid fuels such as charcoal in this
12. Do not use the appliance until the leak is corrected. grill, DO NOT FILL THE CHARCOAL TRAYS ABOVE THE
INDICATED MAXIMUM LEVEL. Overfilling WILL result
in overheating of the grill and can result in death, explo-
sion, or fire.
• All gas grills will get hot during use. Use extreme cau-
tion when operating the grill. Do not touch hot surfaces
without your protective hi-temp gloves.
• Always use the handle to open or close the grill.
• Never light the grill with the hood closed and be certain
that the burners are positioned and seated over the gas
valves and on the burner support.
• Never lean over the cooking surface when lighting or
operating the grill.
• Always use your hi-temp grilling gloves when operating
the grill.
• Close supervision is necessary when this or any appli-
ance is used near children. Keep children away from the
grill during operation and until the grill has cooled off.
• Do not store any LP cylinder or tank not connected for
use with the grill in the area of this grill or any other
appliance. Never store an LP cylinder or tank indoors or
within the reach of children.
• Keep any electrical supply cord and fuel supply hose
away from any heated surfaces and dripping grease.
• Do not twist the gas supply hose.
• Before each use, visually inspect the gas supply hose
for cracks, cuts or excessive wear. Replace the hose if
necessary.
• Children should never be left alone or unattended in an
area where a grill is located. Place your grill well away
from areas where children play. Do not store items that
may interest children in or around the grill, in the cart,
or in the masonry enclosure.
• Never move the grill when hot. When in use, portions
of the grill are hot enough to cause severe burns.
• Gas grills are not designed or certified for, and are not
to be installed in or on recreational vehicles, portable
trailers, boats or any other moving installation.
• Always have an ABC Fire Extinguisher accessible —
never attempt to extinguish a grease fire with water or
other liquids.
• Store your grill in a well-ventilated area. If stored in-
doors, detach and leave L.P. cylinder outdoors in a well-
ventilated area away from heat and away from where
children may tamper with it.
• Keep any electrical supply cord and the fuel supply hose
away from any heated surfaces. Electrical cords should
be placed away from walkways to avoid tripping hazard.
• Do not store spare LP gas cylinders under or near this
appliance.
• Be sure that you know where your gas supply shut-off is
located. All gas lines must have a shutoff that is readily
and easily accessible.
11• Inspect the LP gas supply hose prior to each use of the Lighting Your AMG Grill
grill. If there is evidence of excessive abrasion or wear,
or the hose is cut, it must be replaced before using the
grill. Standard Lighting Procedure:
• Never remove the grounding prong from the plug or Each of the burners on your AMG operate independently and
use this product with an ungrounded, 2-prong adapter. must be lit, adjusted, and shut down separately.
ATTENTION: Transporting WARNING !
and Storing LP Gas Before lighting your grill, be sure that you are familiar with,
Transport only one cylinder at a time. Ensure the cylinder is and have followed all instructions and warnings in this
secured in an upright position with the control valve turned manual regarding proper setup, installation, leak testing and
off and the dust cap in place. Store cylinders outdoors and operation.
out of reach of children. Do not store cylinders in a building,
garage, or any other enclosed area. 1. Open the grill hood.
2. Make sure all the control knobs are in the OFF position.
Refilling Propane (LP) Tanks 3. Turn on the main gas supply.
4. Push in any knob until fully depressed and hold in while
WARNING: LP Gas Cylinders. you rotate it counterclockwise (left). You will feel and
hear 2 noticable “clicks” as the ignition system sparks.
Filling, Refilling and Use Release the knob in the HIGH position. The burner should
ignite within 2-3 seconds. You will see, hear and feel the
• All purging and refilling of LP gas cylinders must be burner flash upon ignition. If the burner fails to ignite
performed by qualified personnel in the LP gas industry. within 5 seconds, depress the knob fully and rotate it
Never store a spare LP gas cylinder under or near this clockwise (right) back to the off position.
appliance. 5. Wait 5 minutes for the gas to fully clear and try again.
• Never fill the LP gas cylinder beyond 80 percent full. Fail-
ure to follow these instructions may result in explosion,
personal injury or death. Match Lighting Procedure:
• Remember-before exchanging an empty bottle for a
Whenever possible, AMG recommends using the Standard
new one, make sure all control valves are in the “OFF”
Lighting Proceedure above. In the event the grill will not
position.
light using this process, it is possible to light the grill using a
• Never use dented, rusty or damaged propane cylinders. lighted match.
Never store additional or empty propane cylinders in
the grill cabinet or in the vicinity of this or any other 1. Open the grill hood.
appliance. Do not store propane cylinders indoors or on 2. Make sure all the control knobs are in the OFF position.
their sides 3. Turn on the main gas supply.
• Do not subject your LP gas cylinder to excessive heat, 4. Push in the knob on the furthest, right side of the grill
and always store the cylinder in an upright position. until fully depressed and hold in while you rotate it coun-
Never store your LP cylinders indoors. terclockwise (left) and past the 2 ignition “clicks”. Release
the knob in the HIGH position. Drop a lighted match
• Make sure that when attaching components, all connec-
down the ignition tube. The burner should ignite within
tions are secured and fully tightened to prevent leakage.
2-3 seconds. You will see, hear and feel the burner flash
• If one is not already available, it is recommended that upon ignition. If the burner fails to ignite within 5 sec-
an ON-OFF shutoff valve be installed at the gas sup- onds, depress the knob fully and rotate it clockwise (right)
ply source, and that the gas supply be turned off when back to the off position.
either Natural Gas or LP Gas grills are not in use. 5. Wait 5 minutes for the gas to fully clear and try again.
1. Turn control knobs and cylinder valve to the OFF position.
2. Unscrew valve. Break in.
3. Remove cylinder and have it filled at your local qualified
propane dealer. When lighting the grill for the first time, you will likely notice
4. Once filled, carefully connect the valve and make sure it is a moderate amount of smoke and fumes coming from the
secure and not leaking. burners, burner covers and charcoal trays as the components
5. With the grill control knobs in the OFF position, turn on heat up. This is caused by oils that are used in the manufac-
the cylinder valve. ture of these components and should only last a few minutes.
6. If you smell gas or hear a hiss of gas escaping from the AMG recommends that you burn the grill with all burners on
tank, turn the the cylinder valve OFF, get away from the high for at least 30 minutes before using the grill for cooking.
tank and do not attempt to correct the problem yourself. When the smoke clears, note the appearance of the flames
Call the Fire Department immediately. and check for the presence of any sooting accumulating on
7. If your grill has no leak at the cylinder, then re-check for the burner covers, charcoal trays, or grates.
loose connections and retest for leaks using the method
detailed in the following pages with soapy solution.
12Tune Up. Cooking With Your AMG Grill
Each burner is tested and adjusted before leaving our fac-
tory in Irvine, California. However they may lose adjustment
WARNING!
during shipping and installation. Performance characteristics • Your AMG grill is a high-performance cooking appliance
may also change with altitude and gas characteristics based on that gets very hot. Use caution when operating the grill
your local area. Each burner should produce a steady burning and do not leave it unattended.
blue flame with little, if any orange at the tips. To check for • Never move the grill while it is in use or still hot.
proper burner operation:
• Do not touch the grill hood or any surfaces in or around
the cooking surface and grill basin while the grill is hot.
1. Remove the grates and charcoal baskets, from inside the
grill. Do not remove the burner covers, and this will affect • Do not wear loose-fitting clothing, or long sleeves while
the combustion characteristics of the burner. using your AMG grill as some fabrics can be highly
2. Individually light the burners and observe the flame one flammable. Do not place clothing or other flammable
burner at a time. Only light the burner being checked. material on or near the grill.
Each burner port on the tube should produce similar, • Never cover the cooking grates or the drip tray with
steady blue tongues of flame with little or no orange at aluminum foil. This will alter the airflow and combus-
the tips. The flames should not lift off the burner. If the tion properties of the grill and will cause it to overheat.
flame is excessively orange or yellow, it usually means the This will cause damage to your grill not covered under
burner needs more primary air and the shutter needs to your warranty.
be opened. If the flames are lifting, the burner is getting
too much air and the shutter needs to be closed. The goal • Never leave your AMG grill unattended while in use.
is to find the bluest possible flame with no lifting off the • Do not block or obstruct airflow to the vents at the
burner. You may need to test burn the grill to find this front of your grill.
sweet spot. • Always keep your grill clean and maintained according
to these instructions. Failing to maintain your grill can
Tuning the Burners (Primary Air) result in a grease fire.
The main burner air shutters are easily accessed by carefully • Alway use your hi-temp, protective gloves to prevent
removing the burners. burns to your hands and forearms.
1. Ensure all of the control knobs on the grill are in the NOTE !
“OFF” position. • Become familiar with all the information in this Manual
2. Remove the grates, charcoal baskets, and burner covers regarding safe operation of your grill.
from inside the grill and set carefully aside.
3. Remove the screw and washers at the far, “squashed” end
of the burner. Preheating
4. Using both hands, hold the burner level and slide it care-
fully toward the back of the grill until the venturi is free Always preheat the grill before beginning to cook. When
from the gas valve nozzle. cooking with gas, preheat the grill with the hood closed. Keep
5. Remove the burner. the hood open when starting a charcoal or wood fire.
6. Loosen, but don’t remove the shutter set screw.
7. Rotate the shutter to allow more, or less primary air
through the openings on the end of the burner venturi. Cooking Options
8. Tighten the shutter set screw to retain the new position.
Which type of grilling is the best? It all depends on individual
tastes, what type of food you’re preparing, and the occasion
Before You Cook that has you grilling in the first place. Your AMG is designed
to support the full range of outdoor cooking for all occasions.
Before each use, perform a quick safety check of the grill and Direct grilling, searing, indirect cooking or roasting, smoking,
grilling area. rotisserie cooking and traditional barbecue are all possible.
1. Clean and inspect the gas hose. If there are signs of abra- The most common type of outdoor cooking, direct grilling,
sion, cuts, wear, abuse or leaks, do not operate the grill. places the food on the grill grate directly above the fire. While
Remove and replace the hose using only the type speci- direct grilling, the hood thermometer won’t tell you what the
fied by the manufacturer. temperature is at the grilling surface (exactly), but it is usually
2. Make sure that the hose is clear of the grill. about 25% greater than the thermometer reading. The food
3. Make sure the area around the grill is clean, and clear of is cooked for a relatively short period of time, usually less than
any combustible materials and vapors including alcohol, 20 minutes. The temperatures used typically range between
gasoline, aerosol cans and gas lighters. 350˚ and 600°F, and the technique is generally appropriate for
4. Make sure any electrical cords are clear, and not in contact food that is less than 2 inches in thickness.
with any surfaces of the grill.
Searing is a type of direct grilling using more extreme heat.
A grill must be able to reach at least 700°F at the cooking
surface for good searing. Searing is done quickly and is often
13followed by continued cooking at lower temperatures. temperatures in this range be used in only a single zone of the
grill and not for the entire cooking area.
Indirect grilling places the food next to the fire rather than
above the fire. This technique is used for larger foods with You can also create direct/ indirect cooking zones using solid
longer cooking times, typically more than 20 minutes. While fuels, and temperatures as low as 200ºF can be maintained
roasting food, the grill hood should remain closed as much as with a charcoal fire by adding just a couple of briquettes at
possible, and you should be able to rely on the hood ther- a time to the stable fire in order to maintain the heat at the
mometer for accurate cooking temperature readings. Indirect desired level.
cooking using wood chips and/or chunks can create flavoring
smoke and this can add much more flavor. Preheat the entire
grill and then turn some of the burners off for the indirect
WARNING !
zone before putting the food on the grill. The grill hood must remain open any time the hood ther-
mometer is reading temperatures at or above 700ºF.
Smoking might be considered seasoning as opposed to cook-
ing, and wood smoke flavor can be added to food cooked
on a grill in a number of ways. Generally, however, when us- Gas-fired Cooking
ing smoke on a grill, place the meat in an indirect zone, and
keep the hood closed as much as possible and give the smoke 1. Follow the lighting instructions on page 9.
time to permeate the food. Wet wood chips can be scattered 2. Light all main burners on HIGH and close the hood.
over a charcoal fire once the coals are ashed over and ready 3. The thermometer should read above 500ºF within 10
for cooking. Smoke can be produced in this manner for both minutes.
direct and indirect grilling techniques. 4. Adjust or turn off individual main burners as needed for
the desired cooking temperature after the first 5-10 min-
Rotisserie cooking on a spit bastes food in its own juices. The utes have elapsed.
only difference between roasting and rotisserie cooking is the
use of the spinning spit. Rotisserie is generally done with indi- Charcoal Briquette-fired Cooking:
rect heat, but can also be done directly above the fire. Most
food that is typically cooked on a rotisserie, such as whole WARNING !
chickens or turkeys, can also be cooked with indirect grilling
NEVER FILL THE TRAYS BEYOND THE MAXIMUM LEVEL
techniques
INDICATED ON THE TRAYS. THE GRILL WILL OVERHEAT
WHICH MAY CAUSE DAMAGE NOT COVERED IN YOUR WAR-
Barbeque is a popular form of indirect grilling. Low heat and
RANTY.
long cooking times with the use of wood smoke are the key
characteristics to success. Temperatures as low as 200°F are
used for as long as 24 hours. Barbecue techniques are often
used for meats that may otherwise be undesirable or a tough
cut, such as beef brisket. The longer cooking times and lower
temperatures will render the fat into the muscle to deliver
more tender results.
Gas-Fired Grilling:
A gas fire offers more convenience than wood or charcoal
cooking, and the food can indeed taste great. Gas cooking is
cleaner and less time consuming but also a little less fun. Gas
fires also produce more water vapor than solid fuels, and will
not produce the seasoned flavors that some solid fuels are
capable of. The main burners are capable of heating the grill
to about 700ºF with all burners firing. Remember, the cooking
surface is probably 200ºF or so hotter than the reading on the
grill thermometer.
You can create indirect cooking zones at temperatures be-
tween 250ºF and 500ºF for slowly or quickly roasting foods by
leaving at least one or more burners turned off and adjusting
the control valves on the remaining burners. We recommend
that you pre-heat the grill with all main burners on and the
hood closed for at least 10 minutes before adjusting the grill
for indirect cooking. We also recommend that the indirect
zone (the burners that are off) be the far right or the far left of
the grilling area.
Charcoal or Wood Fire:
Image 4.
A charcoal or wood fire produces a drier heat than a gas fire,
1. Place an even, single layer of charcoal briquettes up to, or
and intense, searing heat in excess of 1,000ºF grilling surface
below the maximum level indicated on the fuel trays you
temperature can be achieved. We strongly recommend that
14will be using. Image 4. above shows an example of the proceeding with cooking on the grill. Generally, charcoal
MAXIMUM allowable level. You’ll be surprised how much grilling is done over coals that show little visible flame but
heat is generated by this amount of briquettes. are glowing red underneath a layer of white ash.
2. Light the main burners to the left and right sides of each
tray and leave in the HIGH position. LEAVE THE HOOD Wood-Fired Cooking
OPEN while the gas is on and the charcoal begins to burn.
3. Once the charcoal is burning at a sufficient level (5-10 WARNING !
min.), you may turn off the main burners.
4. The charcoal fire will go through an intense burning cycle NEVER FILL THE TRAYS BEYOND THE MAXIMUM LEVEL
before it is ready to be used for cooking. Leave the hood INDICATED ON THE TRAYS. THE GRILL WILL OVERHEAT
open while this occurs. Wait until the fire has burned WHICH MAY CAUSE DAMAGE NOT COVERED IN YOUR WAR-
down to an appropriate level before closing the hood and RANTY.
proceeding with cooking on the grill. Generally, charcoal
grilling is done over coals that show little visible flame but
are glowing red underneath a layer of white ash.
Natural (Lump) Charcoal-Fired Cooking
WARNING !
NEVER FILL THE TRAYS BEYOND THE MAXIMUM LEVEL
INDICATED ON THE TRAYS. THE GRILL WILL OVERHEAT
WHICH MAY CAUSE DAMAGE NOT COVERED IN YOUR WAR-
RANTY.
Image 6.
1. Place a single layer of properly seasoned, cooking wood
chunks up to or below the maximum level indicated on
the fuel trays you will be using. Image 6. above shows the
MAXIMUM allowable level to use in your grill.
2. Light the main burners to the left and right sides of each
tray and leave in the HIGH position. LEAVE THE HOOD
OPEN while the wood begins to burn.
Image 5. 3. Once the wood is burning at a proper level, you may turn
1. Place an even, single layer of charcoal up to, or below the off the main burners and close the hood if you wish.
maximum level indicated on the fuel trays you will be us- 4. The wood fire will go through an intense burning cycle
ing. Image 5. above shows the MAXIMUM allowable level before it is ready to be used for cooking. Leave the hood
to use in your grill. You’ll be amazed how much heat is open while this occurs. Wait until the fire has burned
generated by this amount of lump charcoal. down to an appropriate level before closing the hood and
2. Light the main burners to the left and right sides of each proceeding with cooking on the grill. Generally, wood
tray and leave in the HIGH position. LEAVE THE HOOD grilling is done over a low and even flame that does not
OPEN while the gas is on and the charcoal begins to burn. reach the height of the cooking surface.
3. Once the charcoal is burning at a sufficient level (5-10
min.), you may turn off the main burners.
4. The charcoal fire will go through an intense burning cycle
before it is ready to be used for cooking. Leave the hood
open while this occurs. Wait until the fire has burned
down to an appropriate level before closing the hood and
15Combination-Fired Cooking Adding Solid Fuels:
WARNING ! WARNING !
NEVER FILL THE TRAYS BEYOND THE MAXIMUM LEVEL • Always wear your protective gloves while using the
INDICATED ON THE TRAYS. THE GRILL WILL OVERHEAT grill or any time you come into contact with the grill
WHICH MAY CAUSE DAMAGE NOT COVERED IN YOUR WAR- while it is hot. Never use the lifting tool without your
RANTY. protective grilling gloves.
• When cooking over a combination (solid fuel and gas) • The back of the grate is secured using 2 positioning
fire, use less charcoal or wood than you would if the pins. Be careful not to lift the rear of the grate off of
burners were turned off to avoid overheating the grill. the pins when raising it to the open position.
The beauty of your AMG grill is that you have so many grilling NOTE !
choices. You can go the easy route for a quick meal by cooking • Your grill is designed so that you can lift and secure the
with pure gas; you can turn the gas off and cook with char- grates with the warming rack in either the up or down
coal, lump coal, wood or whatever combination of fuels you position, however you may want to put it in the up posi-
wish. You can also use the burners to kick the heat up as your tition before lifting the cooking grate.
solid fuel is burning down to complete your cooking session.
Experiment. By using different solid fuels you will change the
flavors and characters of the food. 1. Insert the tailhook at the heel of the tool securely and
fully in the hole at the front of the center grate finger (the
short one) as shown in image 8.
2. Carefully lift the front of the grate up and backward
toward the rear hood. Keep pressure on the hook to pre-
vent it from coming out of the hole.
3. Carefully secure the two downward-facing pins at the
front of the tool through the bracket on the front of the
rear hood as shown in image 8.
4. Release the handle.
5. Take care to avoid hot metal parts of the grill while add-
ing fuel to the baskets.
6. When finished adding solid fuel, carefully disengage the
nose pins from the bracket by lifting the front of the tool
upward without releasing the tail hook.
7. Lower the cooking grate back to it’s working position.
Image 7.
Managing Solid Fuel
Cooking with solid fuels over an extended period of time
requires more interaction than simple gas grilling. Depend-
ing on how much cooking you’re planning, you may need to
occasionally add additional fuel. You may also want to move
charcoal trays to different areas of the grill to create direct and
indirect zones as well as intense or milder heat areas. For this
reason, we’ve included a specialized, custom tool and a pair of
high temperature protective leather gloves. The tool enables
you to lift and maintain the cooking grates in an open position
to access the fuel baskets.
Image 8.
16bristle painter’s brush, or vacuum with a brush attach-
MAINTENANCE & CARE ment.
4. Next, remove the charcoal trays and empty, or
vacuum them clean.
Your AMG Combination Grill is made from heavy gauge, high- 5. Use the brush or vacuum to remove all ash from the
quality stainless steel and engineered for extreme durability. burner covers, then remove them.
It is also a uniquely beautiful grill with design character and 6. Brush or vacuum all ash from the burner surfaces.
quality you will want to maintain. Simple care and cleaning Check the burner ports on the sides of the burners to
will provide a lifetime of service. make sure they are all clear. Clean any blocked ports
with a small modified paper clip or other suitable
Cleaning Your AMG Grill
tool.
7. Finally, sweep or vacuum the remaining ash from the
WARNING! bottom of the firebox basin.
• Never use metallic abrasives or brushes to clean your 8. Empty the cleanout pan again.
stainless surfaces.
• Always rub in the direction of the grain.
Grilling Grates
Exterior Surfaces Cleaning
NOTE !
1. After each use wipe down the exterior of the grill to re-
move grease and splatters.
• Use only a stainless steel or brass bristle brush for clean-
ing your cooking grates. Never use a steel wire brush
2. Use a commercially available Stainless Steel cleaner to
or steel wool on your grates. It will leave small amounts
regularly clean and polish the exterior surfaces.
of mild carbon steel behind, embedded into the grain of
the stainless steel that will cause rust.
• The most difficult part of cleaning your grill is removing
burnt-on food and grease.
• Before each cooking session, after the grill has pre-
heated, use a stiff stainless steel grill brush to clean the
3. Using a citrus-based or organic degreaser to remove eve-
cooking grates.
rything that isn’t burnt-on.
4. Next, use powdered Bar Keepers Friend with a terrycloth
• After each cooking session, run the main burners on high
with the hood closed for 10 minutes before shutting it
rag to remove the bulk of stubborn stains and discolora-
down. This will help burn away drippings and residue on
tion. Be careful to follow the grain direction of the stain-
the grate surface and in the basin.
less steel to avoid scratches.
5. For real problem areas, a Scratch-B-Gone kit can be used
• The front of your AMG lifting tool can be used to scrape
off chunks of debris that gather between fingers of the
to restore the factory finish.
grilling grates. You can use the tool for this rough clean-
6. Rinse off all cleaners, wait for the grill to dry, and then ap-
ing before or after cooking.
ply stainless steel polish.
• NEVER use chemicals to clean your grilling grate surface.
Interior Cleaning Drip Pan
• The more you use sauces or grill fatty foods, and the WARNING!
more solid fuels you use with the hood closed, the more
• The drip tray gets extremely hot when the grill is
frequently It is highly recommended to occasionally burn
operating. Empty the drip tray only when the grill and
off residue in your grill. Most of the cooking residue will
tray are completely cool.
be on the cooking grates or caught in the charcoal trays.
This is particularly true the more you cook with solid fuels.
Run the grill with the main burners on high with the hood NOTE !
closed for at least 30 minutes to burn off accumulated • Rainwater can accumulate in the drip pan if the grill
residue and dry everything out. is not covered. If you suspect the tray has water in it,
• Most of the solid fuel ash that falls through the trays will take care opening the tray to avoid spilling the water on
pass through directly through the basin to the drip tray. yourself
To remove ash from the drip tray, you can easily remove
it by pulling all the way out the front of the grill to empty. 1. Carefully pull open the drip tray to it’s first open position.
You can also use a shop vac to simply vacuum ash out of 2. If the tray has water in it, place a bucket under the drain
the drip tray if you prefer. plug large enough to hold the water. If there is no water
• Occasionally, you will want to be more thorough remov- in the tray, proceed to step #6 below.
ing ash from the inside of the grill. 3. Remove the drain plug by turning counter clockwise and
set aside.
1. Perform a “Burn off” cleaning as described above to 4. Once the water has drained, open the tray all the way.
remove as much cooking residue as possible. 5. Clean out the rest of the loose debris with clean water.
2. Wait until the grill is completely cool, then empty the 6. If the drip pan is dry, you can clean out the ash either us-
drip pan as described above. ing a vacuum, or by removing the pan by pulling the tray
3. Remove the cooking grates, and then sweep ash off all the way out the front and dumping.
all the interior surfaces of your grill using a natural
17You can also read