An affordable VR environment - JMU Scholarly Commons
←
→
Page content transcription
If your browser does not render page correctly, please read the page content below
James Madison University
JMU Scholarly Commons
Senior Honors Projects, 2010-current                                                                                               Honors College

Spring 2017

An affordable VR environment
Matthew R. Petty
James Madison University

Follow this and additional works at: https://commons.lib.jmu.edu/honors201019
  Part of the Graphics and Human Computer Interfaces Commons, and the Software Engineering
Commons

Recommended Citation
Petty, Matthew R., "An affordable VR environment" (2017). Senior Honors Projects, 2010-current. 271.
https://commons.lib.jmu.edu/honors201019/271

This Thesis is brought to you for free and open access by the Honors College at JMU Scholarly Commons. It has been accepted for inclusion in Senior
Honors Projects, 2010-current by an authorized administrator of JMU Scholarly Commons. For more information, please contact
dc_admin@jmu.edu.
An Affordable VR Environment

                                         _______________________

                                  An Honors College Project Presented to

                                      the Faculty of the Undergraduate

                              College of Integrated Science and Engineering

                                          James Madison University
                                         _______________________

                                            by Matthew Ryan Petty

Accepted by the faculty of the Department of Computer Science, James Madison University, in partial fulfillment of
the requirements for the Honors College.

FACULTY COMMITTEE:                                            HONORS COLLEGE APPROVAL:

Project Advisor: John Bowers, Ph.D.                           Bradley R. Newcomer, Ph.D.,
Assistant Professor, Computer Science                         Dean, Honors College

Reader: David Bernstein, Ph.D.
Professor, Computer Science

Reader: Christopher Mayfield, Ph.D.
Assistant Professor, Computer Science

Reader: Farzana Rahman, Ph.D.
Assistant Professor, Computer Science

PUBLIC PRESENTATION

This work is accepted for presentation, in part or in full, at Senior Honors Symposium on April 21, 2017.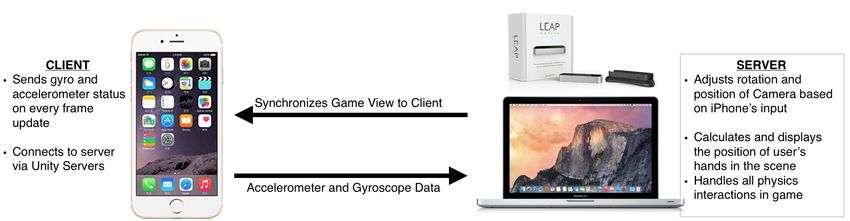
Contents

1   Introduction/Problem Motivation                                                                  5

    1.1   Lack of Tactile Component . . . . . . . . . . . . . . . . . . . . . . . . . . . . . .       6

    1.2   Price and Availability . . . . . . . . . . . . . . . . . . . . . . . . . . . . . . . . .    6

    1.3   Cumbersome, Stationary Equipment . . . . . . . . . . . . . . . . . . . . . . . . .          6

2   What is on the Market Right Now?                                                                  8

    2.1   GoogleVR: Cardboard and Daydream . . . . . . . . . . . . . . . . . . . . . . . .            8

    2.2   Oculus and Vive . . . . . . . . . . . . . . . . . . . . . . . . . . . . . . . . . . . .     9

    2.3   LeapMotion and SteamVR . . . . . . . . . . . . . . . . . . . . . . . . . . . . . . 10

3   Our Solution                                                                                     11

    3.1   Overview . . . . . . . . . . . . . . . . . . . . . . . . . . . . . . . . . . . . . . . 11

    3.2   Design Problems and their solutions . . . . . . . . . . . . . . . . . . . . . . . . . 13

4   Technical Guide                                                                                  17

    4.1   Lobby . . . . . . . . . . . . . . . . . . . . . . . . . . . . . . . . . . . . . . . . . 17

    4.2   Prefabs . . . . . . . . . . . . . . . . . . . . . . . . . . . . . . . . . . . . . . . . 19

    4.3   Network Manager . . . . . . . . . . . . . . . . . . . . . . . . . . . . . . . . . . . 20

    4.4   Game Manager . . . . . . . . . . . . . . . . . . . . . . . . . . . . . . . . . . . . 22

    4.5   LMHeadMountedRig . . . . . . . . . . . . . . . . . . . . . . . . . . . . . . . . . 22

    4.6   Scripts . . . . . . . . . . . . . . . . . . . . . . . . . . . . . . . . . . . . . . . . . 24

                                                  2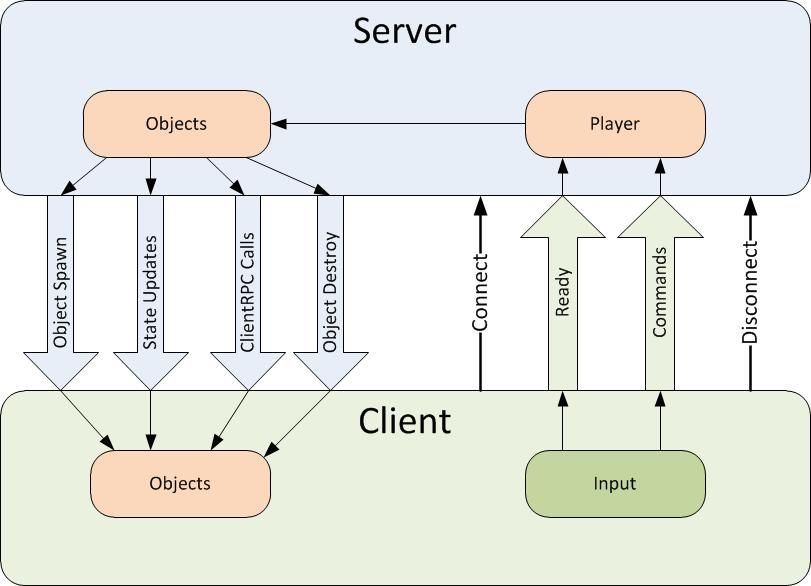
5   Future Work                                                                                 26

    5.1   More Polished Demonstration Environment . . . . . . . . . . . . . . . . . . . . . 26

    5.2   Better Hand Tracking . . . . . . . . . . . . . . . . . . . . . . . . . . . . . . . . . 27

    5.3   Larger Server Size . . . . . . . . . . . . . . . . . . . . . . . . . . . . . . . . . . 27

6   Conclusion                                                                                  28

                                                 3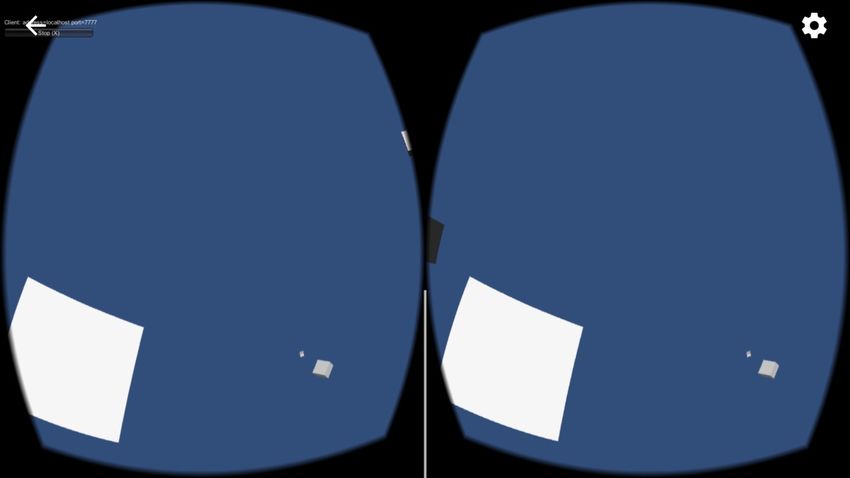
List of Figures

1    Laptop and Headset . . . . . . . . . . . . . . . . . . . . . . . . . . . . . . . . . . 11

2    Illustration of Solution . . . . . . . . . . . . . . . . . . . . . . . . . . . . . . . . 13

3    An overview of the levels of the Unity Networking High Level API . . . . . . . . . 13

4    Control Flow for Networked Unity Applications using Remote Actions . . . . . . 14

5    Headset view created by using the Google VR scripts . . . . . . . . . . . . . . . . 15

6    Adding the LobbyManager to the Scene Heirarchy . . . . . . . . . . . . . . . . . 17

7    The finished Network Lobby Manager component . . . . . . . . . . . . . . . . . . 18

8    The complete list of necessary components in the LobbyPlayer prefab . . . . . . . 19

9    The complete list of necessary components in the PlayerOne prefab . . . . . . . . 20

10   The finished Network Manager component . . . . . . . . . . . . . . . . . . . . . 21

11   The full object tree that constitutes the LMHeadMountedRig prefab. . . . . . . . . 22

12   The finished HandController component. . . . . . . . . . . . . . . . . . . . . . . . 23

13   The LMHeadMountedRig object tagged as ”Rig”. . . . . . . . . . . . . . . . . . . 24

                                            4
Introduction/Problem Motivation
As Merriam-Webster defines Virtual Reality, it is “an artificial environment which is experienced
through sensory stimuli (such as sights and sounds) provided by a computer and in which one’s
actions partially determine what happens in the environment. [1]” With research going back to the
1950s, Virtual Reality has come a very long way in past few decades.
Virtual reality (VR) is poised to become a much more lucrative market in the next decade or so;
some estimates place the market at close to $25 billion for VR alone by 2021 [2]. Major industry
leaders such as Google, Microsoft, Samsung, etc. have developed their own headsets, libraries,
and applications to further the field. We saw the release of many of these items to mixed acclaim
in 2016 [3]. However, its future as a tool for more than just entertainment will be the focus of this
paper.
While the novelty of VR lends itself towards entertainment, recent research suggests that it
can be extremely useful in education as well [4].This application for the technology was the main
motivation behind our proposed solution. In a field as fluid as computer science, it is hard to tell
what the enduring issues within a particular subject will be, since progress moves so quickly that a
roadblock today might be a paved road tomorrow. The main roadblocks with moving VR into an
education setting are the high cost of the equipment, the practicality of its setup needs, and the last
component of the definition described above: user interaction. As we discuss in the next section,
these issues must be addressed for VR to be applicable in a classroom.
51.1 Lack of Tactile Component
For all its advances in visual quality and fidelity, virtual reality still suffers from a video- or
audio/video-only immersion. The visuals are amazing and uncannily well-adapted to the human
perspective, and the things that can be done with sound in a headset are fantastic; but attempting to
interact with anything in the scene takes you out of the fantasy in an instant. To address this, some
companies have created controllers and remotes for use with VR, and these systems receive a lot
of praise for going the extra mile, but at the end of the day, you are still using a remote control.
In a classroom setting, the ability to use your own hands would have a few benefits. Students
having the ability to simply control the scene with their hands makes for a lot less work and effort
in a classroom. In other words, the teacher does not need to keep track of a class’s worth of remote
controls (or twice that number if you use a controller for each hand).
1.2 Price and Availability
As will be discussed later, the more high-end VR headsets cost hundreds of dollars more than most
consumers are willing to pay. This makes them especially difficult to use in a classroom setting,
where teachers will likely need multiple headsets to have a class set. Since most schools have to
work with very limited budgets, the cost for supplies for projects like this usually gets passed on
to the teachers [5]. Simply put, VR needs to become a lot cheaper to be used in most classrooms.
1.3 Cumbersome, Stationary Equipment
Most virtual reality headsets are large and must be tethered to a desktop computer by a multitude
of wires (admittedly, they have gotten more compact over the years). This limits the potential
6applications, since there are a finite number of places you can use a desktop computer. Many
of the more expensive headsets that utilize mobile technology can change this, but as previously
mentioned, the price on such mobility can be prohibitive.
Our solution attempts to address this problem with several different choices:
1. Use the Leap Motion Hand Tracker to track a user’s hands inside the scene. As a bonus,
the Leap motion tracker already has publicly-available, open source development libraries,
making it the perfect place to start with tactile interaction.
2. Build the VR application to run on a smartphone: an existing product that most consumers
already know and have accepted. Over 200 million people in the United States own a smart-
phone [6]. In particular, we will be developing for an iOS-compatible phone. While the
power of the phone is not strictly necessary for our implementation, the prevalence of these
devices makes for a short list of required items in a do-it-yourself guide to this solution for
those not of the technical persuasion.
3. Use the inexpensive Cardboard headset to cut down on weight and size. This mount is
minimalist by design, and so fits perfectly with our goal of create a more flexible, mobile
VR system. In addition, this mount cuts down on cost of the overall design.
7What is on the Market Right Now?
Virtual reality has come a very long way in recent years, and a number of the industry giants have
dipped their feet into the metaphorical pond. The technologies we are about to discuss represent
the most polished and mainstream applications of VR currently on the market, and should not be
considered to be a complete list. These technologies relate to or inspired our solution to the issues
described previously.
2.1 GoogleVR: Cardboard and Daydream
Google’s foray into virtual reality started a few years ago with its release of Cardboard, a do-
it-yourself headset literally made of cardboard. Not only was this technology extremely simple
to use, but its low cost allowed many people to experience VR for the first time. Up until its
creation, VR headsets were extremely bulky, expensive to buy and use, and generally required a lot
of technical knowledge to use or program. Cardboard, while not the most comfortable or usable
platform, drew thousands of developers to VR, broadening the pool of creators from a niche group
to a mainstream development sector [7].
Last year, Google unveiled their newest VR platform, Daydream. An improvement in quality
and design, the Daydream headset is meant to accommodate only a select number of phones at
present, likely due to its young age of 5 months. This headset offers a more ergonomic design, and
the phones it is meant to be used with are built for Virtual Reality: namely Google’s Pixel phone,
and Motorola’s Moto Z. Little can be said about the impact of this item yet, but it appears to be
more specialized to the Google brand, as it is currently only compatible with Android phones, and
8is heavily advertised with Google’s other mobile products. The increase in price still puts it well
under some of the high-end VR headsets at around $80 [8].
2.2 Oculus and Vive
Oculus might be the most well-known company in the VR world, given all the press it received
after being unveiled at a popular technology and gaming convention, E3. Their first development
kit was released in 2012, with relative success. One of the main issues they came across was the
nausea induced by wearing the headset for too long [9]. Due to the limits in tracking and frame
rate of the first development kit, users often felt nauseous after using the headset. Oculus corrected
many of these issues with their second release, and many other companies have been trying to
emulate their success since [10]. The main hurdle for potential users of Oculus is the price: the
Rift will cost about $600 to buy. This does not take into account the expense for a computer able
to keep up with the demands for high-quality VR, either. Another limit for Oculus is that it is not
able to be used as a mobile apparatus, which severely hampers its portability and usability.
HTC’s Vive headset is a competitor to Oculus’s Rift headset, with a few notable differences.
The HTC Vive comes equipped with two remotes that offer haptic feedback and interaction with
the scene. The main benefit to this is that VR games often have very little in the way of immersion
outside of the visual or auditory. In addition, Vive is compatible with SteamVR, which will be
discussed in the next section. They also have the Vive Tracker, which can be attached to real-world
objects, turning anything into a prop in the VR world. However, much like Oculus Rift, the Vive
is expensive with a price of $800 [11].
92.3 LeapMotion and SteamVR
The technologies in this section have focused on broadening the capabilities of VR by addressing
the problem of real-world interaction. There is a tradeoff between safety and immersion for any
mobile or semi-mobile VR system. On one hand, being able to walk around a scene and inter-
act with things in the space increases immersion. On the other, the potential to break a family
heirloom increases dramatically when you walk around with what is essentially a very expensive
blindfold. Safety must be taken into account, and these technologies attempt to balance this with
the immersion previously discussed.
The LeapMotion system was originally an infrared sensor developed to simulate a touchscreen
experience for a user with a regular screen. By detecting the user’s hands and doing some fancy
position interpolation calculations, the system is able to guess where your hand was, and activate
the appropriate part of the screen. In recent years, however, the company has transitioned into ap-
plications for virtual reality. LeapMotion released their newest development library, Orion, which
is compatible with any major VR headset system producer (Oculus, HTC, Samsung, etc.), as a
means of bringing haptic control to VR. The sensor mounts onto the front of the headset, and will
track your hands as they move throughout the scene [12]. While the range on hand detection is
limited, and the calculations are not perfect, Orion represents a large step forward for immersion
in virtual reality.
In a similar vein, SteamVR deals with the physical space around the user. Special tracking
cameras mounted in strategic locations around the room detect the location of the headset in re-
lation to the rest of the room, and alert the user when they are close to running into something.
Currently, SteamVR is made to work only with Vive [13].
10Our Solution
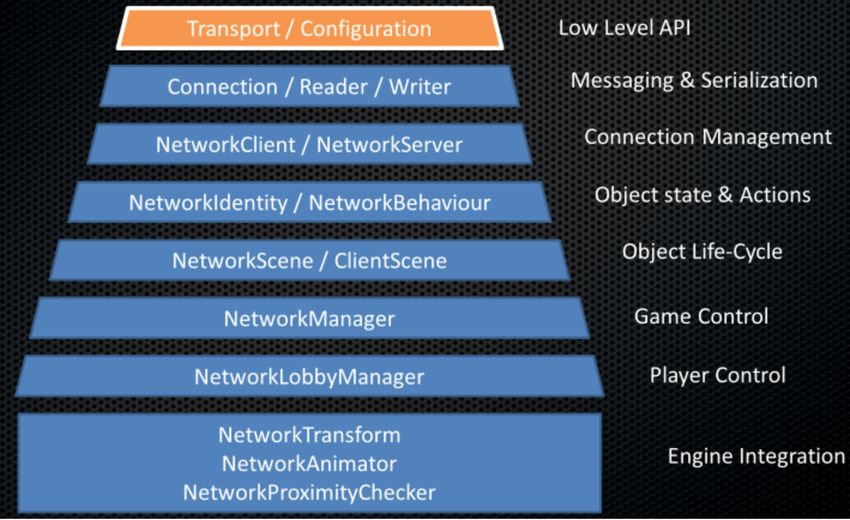
Figure 1: Laptop and Headset
At a high level, this application is a skeleton around which another developer could create a
VR scene (the environment a user experiences, also the name of a particular game environment
in Unity) to interact with. All the details for synchronizing camera movement and allowing for
hand-tracking have been taken care of. All development was done in Unity, with the code being
loaded onto the iPhone in Xcode. This section details many of the design decisions we made and
many of the hurdles that informed the design of the final solution.
3.1 Overview
Since the Leap Motion Tracker has no way to connect to the phone, we decided that it would make
the project much less complicated if the libraries for hand-tracking ran on a computer and the
11information was sent over a network to the phone. The solution we developed is a Unity program
that runs on both an iPhone and a Mac laptop, and takes on different responsibilities depending on
which platform it is running on. To simplify the system a bit, both the phone and the computer
run the same application, it is simply compiled differently depending on the device. Essentially,
the phone communicates its gyroscope rotational data to the computer, and in return, the computer
application uses the libraries for hand-tracking to detect the user’s hands and interact with the
scene.
Unity uses a server-authoritative model for networking, meaning that the server handles all
major objects and events in the scene, and tells the clients what they can and cannot see. In this
case, the server is responsible for:
• Synchronizing object data from server to client (i.e. where every object controlled by the
server is in the scene)
• Creating the camera’s stereo offset to mimic a VR headset view.
• Rotating the VR Rig (called LMHeadMountedRig in the scene) using the gyro data passed
by the iPhone client.
• Tracking the users’ hands in the space in front of the headset and responding to the effects
on the scene appropriately
All of this information boils down to a view that the main camera of the “scene” sees and that the
phone is synchronized with. This information is sent back to the phone, and displayed for the user.
Notably, these features are built in such a way that standard libraries are used where possible. This
is because the progam was designed as a skeleton upon which other developers could build their
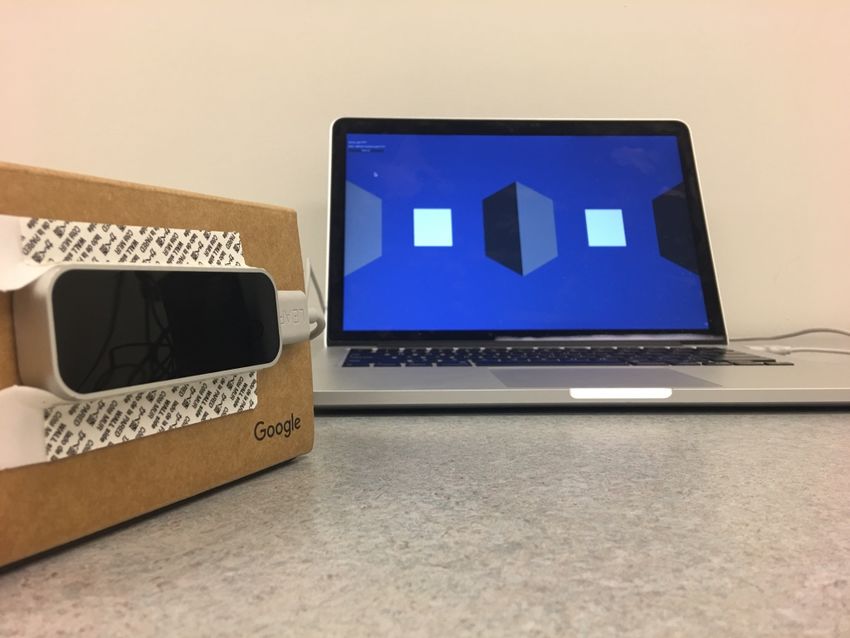
12Figure 2: Illustration of Solution
VR applications. It provides everything needed to start with a tactile, mobile VR experience. If
Leap develops a newer version of their Mac libraries, it will be an easy transition.
3.2 Design Problems and their solutions
1. Managing communication between the phone and laptop. After reviewing several op-
tions, including direct TCP and UDP message transfer, we settled on a library in Unity
traditionally used for multiplayer games. Unity’s Networking and Multiplayer libraries pro-
vide a high-level way to interact with the transport layer through various components added
to game object. Underneath these components, it is still all TCP and UDP messages, but this
information is abstracted, allowing someone new to Unity to stick to the basics.
Figure 3: An overview of the levels of the Unity Networking High Level API
13This proved to be a much better solution because of the server-authoritative architecture em-
ployed by Unity (see “Overview” section for definition of “server-authoritative”). In our
case, the laptop acts as the server, while the phone acts as the remote client. With this setup,
the Multiplayer and Networking libraries in Unity provided us with a method to send data
back and forth.
Figure 4: Control Flow for Networked Unity Applications using Remote Actions
Every time a frame is updated in the game, the client is sharing its position and orienta-
tion with the server, which controls the actual camera through which the user actually sees
the scene. After starting the server as the computer, the phone simply connects through an
identical in-game menu. When both programs are ready, the scene begins.
2. Choosing the proper libraries for the platform. The new Orion libraries for motion track-
ing with the Leap are not Mac-compatible, which was an issue for us since we developed
the project on a Mac machine. As a result, we decided to use some legacy libraries from
the company to serve the purpose instead. After comparing the documentation, it should be
an easy port when the libraries for Orion are compatible with Mac. We could have simply
started development on a Windows machine, but we had ready access to a Mac laptop for
14development. In addition, implementing the libraries in this fashion means that anyone who
wants to run this on a Windows machine can do so with Orion without much editing of the
original code.
3. Creating the stereo camera view. Initially, we tried to recreate the stereo camera with the
tools afforded by the standard Unity camera. Originally, the design involved two cameras
computed at an offset, which would represent the right and left eyes. Each would feed its
information to a different half of the screen on the phone, simulating a VR headset splitting
the image. This proved extremely disorienting, so to fix this, we used some libraries that
had already done the majority of the work. Cardboard, the application platform that Google
released for VR development on iOS (not to be confused with the headset), seemed to be
the best candidate for a solution. The Google VR libraries (GvR for short) already included
a headset view script that would compute the offsets and send the stereo view to the main
camera. This alleviated a lot of the issues we were having, and turned out to be the most
effective solution.
Figure 5: Headset view created by using the Google VR scripts
4. Reacting to the gyroscope on the server’s end Tracking and acting on head movement
15proved more straightforward in concept than reality. The camera needed to be updated as
quickly as possible, so as not to cause nausea for the user. However, giving the camera ac-
curate data is quite tricky when that information is coming from the phone’s gyroscope. For
instance, passing the information in vector form would be acceptable until it encountered
gimbal lock. Gimbal lock occurs when two axis of a a gyroscope rotate in synchronicity,
causing the gyroscope to lose a degree of freedom. To fix this, we modified the script to
send a quaternion across the network due to its small size and acceptable accuracy in most
situations. Quaternions are beyond the scope of this paper. As these constructs are Unity’s
method of storing rotational data in the first place, it ended up being a smooth transforma-
tion. Once we gathered this gyropscope data, we used commands from the Remote Actions
section described above to send and receive the data on the server, changing the rotation of
the rig (the collection of objects that creates the headset object in the scene).
5. Synchronizing the start of the game between server and client Problems with synchro-
nization when a player joined mid-game ended up motivating a different networking struc-
ture. Similar to some popular games online, this application includes a lobby from which the
actual scene is launched when both players, the client and the host have declared themselves
ready. This fixed a few issues with synchronization, and proved to be an effective proof of
concept for a classroom setting.
16Technical Guide
This section is currently written as a guide for a new user and assumes a rudimentary understanding
of Unity.
4.1 Lobby
The Lobby is a small but necessary component for this application. In multiplayer games, the
lobby is a way to synchronize players both technically and socially. Players must ”ready up” to
signal that they are ready to play; when all players are ready, they enter the game at relatively the
same time. This decision allows the game to synchronize object movement more easily.
Figure 6: Adding the LobbyManager to the Scene Heirarchy
To create the Lobby, we need another scene entirely. In Figure 5, we have the basic new scene with
its default objects. To make this a multiplayer lobby, we need to add a certain component to one
of the root level objects in the scene. In this case, we will create a new empty game object called
LobbyManager (the Name convention denotes an object that we create for the sole purpose of
managing some element in the scene; this will come up later). Now that we have this object, we
will add the Network Lobby Manager component directly to the LobbyManager. In addition,
17we add the Network Manager HUD. We do not need to change anything on this component at all;
it handles our ability to connect to a Unity Matchmaking server when playing our game.
Figure 7: The finished Network Lobby Manager component
To set up our Network Lobby Manager, we need to be aware of a few different fields. Lobby
Scene is the scene in which this lobby will function, so we drag our current Lobby scene into this
slot. The Play Scene is the scene that is loaded once all players have indicated that they are ready.
To this, we add the 500 Blocks scene that we construct later in the paper. Lobby Player Prefab is
the template used to spawn a player when they connect to the lobby. Game Player Prefab is the
template used to spawn a player in the game scene. We discuss how to build both of these in the
Prefabs section. When this is finished, you have a component that looks like the one below.
184.2 Prefabs
LobbyPlayer. Previously, we discussed the prefabs that needed to go into our Network Lobby
Manager component. To make this Prefab, we create another empty game object and add to it the
Network Lobby Player and the Network Identity components (neither one needs to be modified
in any way for this scene to function). The Network Lobby Player handles how the client that
connects to the server interacts in the lobby, while the Network Identity is required for any object
in the game that is managed over a network. We are not worried about authority in the lobby, as
it is simply a staging area before the game. This finished prefab goes in the previously mentioned
Lobby Player Prefab slot of the LobbyManager object.
Figure 8: The complete list of necessary components in the LobbyPlayer prefab
PlayerOne. This prefab has more to do with the Game scene, but we will finish it and add it to
the Lobby so that we do not need to change anything else in the Lobby scene later. The purpose of
this prefab is to run any scripts we need to interact with the scene, since Player objects are one of
the only ways the server allows the client to make changes in the server-authoritative architecture
of Unity Networking. Specifically, we need to add several components to our prefab: Network
Identity, and then the scripts Player, PlayerSetup, and MoveRig. The exact functions of these
19scripts are addressed in a later section. Now that we are in the actual game scene, the Network
Identity component needs to have the Local Player Authority box checked in order for our Player
to have authority to change/access things relating to itself.
Figure 9: The complete list of necessary components in the PlayerOne prefab
Hands. This prefab is more a blanket category that involves all of the hand models in the Leap-
Motion Assets. Essentially, whichever hand you choose can used immediately with the addition of
a Network Identity and a Network Transform component. This latter component is used on all
objects in the scene that require synchronization with the client. Anything affected by physics or
that affects the players themselves usually needs it as part of the component list.
4.3 Network Manager
The NetworkManager object is responsible for dealing with any networking work once the game
scene starts. To build it, we create another empty game object and add a few components: Network
20Manager and Network Manager HUD (useful for shutting down the server when we need to
restart the game). The Network Manager component is the workhorse of this object, and deals
with spawning prefabs and synchronizing various game attributes.
As seen in Figure 9, there are a few notable attributes for this component. The Online Scene
field holds the scene in which the game takes place. This one is easy, it is the scene we are currently
building in! The Player Prefab holds the PlayerOne prefab that we created earlier. This prefab
is created when a new player connects to the scene. The Player Spawn Method varies depending
on what kind of game you build, so we will leave that to the reader. The Registered Spawnable
Prefabs list is also an important part of this scene. This is the list of prefabs that the manager is
able to spawn over a network on behalf of the server. These are not player objects, they are simply
game objects that need to be synchronized for clients. In our case, we will need to register the hand
graphics and physics model in this list in order for them to behave correctly over a network.
Figure 10: The finished Network Manager component
214.4 Game Manager
The GameManager object is fairly straightforward. This object is just a container for the Game-
Manager script, and has more impact as a utility than as something that affects the scene directly.
Basically, it handles all miscellaneous functions that one might want to create in the scene, but do
not really fit into another of the predefined objects. For now, it maintains a dictionary of connected
players for easy access.
4.5 LMHeadMountedRig
This object in our game scene handles the hand tracking, the stereo camera view, and the render-
ing that makes this VR application possible. As such, it is pretty in-depth, and we go layer-by-layer
from the bottom to the top. As a note, this prefab can be found under Assets/LeapMotionVR/Prefabs/
LMHeadMountedRig if you are using the project associated with this paper.
Figure 11: The full object tree that constitutes the LMHeadMountedRig prefab.
• QuadBackground. We do not need to change anything here, it just provides a frame of
reference for the Leap tracking software.
22• LeapHandController. This object handles detection of hands and triggers their spawning in
the game scene. All changes in hand placement come from readings from this object, so it is
an integral part of our rig. In particular, it accomplishes all of this with the HandController
script. Several modifications need to be made to this object. Specifically, we need to add
a Network Identity component, as well as a NetworkTransform component (described
earlier in the Prefabs section). In addition, since we are using the Leap in a headset format,
Is Head Mounted needs to be checked, as this will give us the proper orientation of the
readings we receive from the Leap sensor.
Figure 12: The finished HandController component.
• LeapSpace. This object acts as the parent for the previously mentioned items, and its only
script, LeapVRTemporalWarping, helps to interpolate the differences between Unity’s up-
date cycle and the framerate from the Leap sensor. It is not necessary to change anything on
this object for our purposes.
• CenterEyeAnchor. This object (also the parent of the previously mentioned items) holds
23our camera, and is ultimately how we can actually see what happens in the scene. In the
default version of this prefab, this object holds the Enable Depth Buffer, Leap Image
Retriever, Leap VR Camera Controller. These components are a bit more advanced than
we really need to understand to make this scene work. The only component we really need
to know anything about is the StereoController since it splits the camera into a stereo setup,
the necessary view for a headset. This must be added to the object if it is not already present.
• LMHeadMountedRig. As the root object of this prefab, the /textbfLMHeadMountedRig is
where we make our changes using the scripts we mentioned earlier. The object only needs
the Network Transform and the Network Identity components to be added to function
properly. The Network Identity component must have Local Player Authority checked in
order to allow our MoveRig script to change it. We also need to mark the object with the
Rig tag in order to find it.
Figure 13: The LMHeadMountedRig object tagged as ”Rig”.
4.6 Scripts
• Player. This script is attached as a component to the PlayerOne prefab. Its purpose is to
hold the variables that are accessed by the PlayerSetup script to set up the dictionary. In
addition, this script enables the gyroscope on the client only if it is the phone, and sends a
log message that it has connected.
24• PlayerSetup. This script functions as a utility if we want to add more spectators in the future.
Essentially, it allows us to disable any components on the PlayerOne prefab. For example,
if we wanted to add more spectators, any user connecting from a phone would be sending
gyroscope information to the server. To stop this, we can use a conditional to turn off that
functionality unless that player was the first to connect. This is accomplished by keeping
a list of components, which can then be disabled as a group based on specific conditions.
In addiiton, this script registers the player in the dictionary created by the GameManager
script.
• MoveRig. This script takes care of all gyroscope-related information and functions in this
scene. Taking in the gyroscope data, it sends a Command to the server to find the object
tagged as Rig (this should be our LMHeadMountedRig if we set it up correctly). After
finding this object, it then calls a ClientRPC (Client Remote Procedure Call) that changes
the transform of the object to whatever quaternion data that we got from the gyroscope for
that frame. This quaternion is modified from its original form since Unity and the iPhone
have different coordinate system orientations (left-hand vs. right-hand).
• GameManager. The purpose of this script is to make it very simple to refer to players
when needed. While not strictly necessary for this project, it will make building on top
of this application much simpler. Essentially, players are kept in a dictionary, indexed by
their netIDs. This makes finding players extremely easy, and eliminates a lot of verbose
statements to find a player. Whenever a player enters the scene, they are registered in this
dicitonary for later retrieval. In addition, log messages are sent whenever a player joins or
leaves the game, and the player is deleted from the dictionary upon the latter event.
25Future Work
The program that this project has produced is meant to be a skeleton around which a VR game or
other presentation can be built, and as such, there are many things that could be accomplished if
this project is continued. As mentioned, the PlayerOne prefab will be our actor in the game scene.
5.1 More Polished Demonstration Environment
Despite the progress made in expanding the capabilities of VR on a phone, we were not able to
finish any kind of polished demo for the technology. If this project were to be continued, we would
endeavor to produe more user-friendly examples to display the technology. This would include
building some of the features from the original proposal:
• Graph interaction: Originally, this project centered around creating a VR system for vi-
sualizing the creation and manipulation of graphs. For instance, drawing a graph on paper
usually takes far more time, especially when illustrating an algorithm that involves edge
deletion, contraction, or manipulation. Our VR program could be adapted to a classroom
tool used for manipulation graphs in real time. This would allow students to watch the graph
change from one state to the next.
• Visualizations of Quick Sort, Merge Sort, etc: Another aspect that had to be scrapped in
this iteration of the design was the ability to experience algorithms as they happen. While
some versions of visualizations exist on the Internet, most are simply videos and are non-
interactive. It would be interesting to actually pick up objects and deposit them in sorted
order exactly how an algorithm depicts the process.
26There are other applications for this technology, most of which are visualizations. It is not
hard to see how useful this would be in a field like computational geometry which relies on easy
manipulation of difficult-to-represent objects. In fact, nearly any complex system that can be
slowed down or made step-wise could be simulated by this apparatus. Thanks to the networked
nature of this application, this creates endless opportunities for educators.
5.2 Better Hand Tracking
Currently, Leap does not have plans to release a Mac version of their Orion libraries available for
Windows. If this should change at a later date, these new libraries could be incorporated into the
existing program for Mac users. We would simply need to replace the objects from the v2 libraries
with the Orion objects, and the fidelity for the motion tracking would most certainly improve for
Mac users. Other technologies are currently being developed that may supercede Leap in the
future, and we would take advantage of those as well.
5.3 Larger Server Size
If future funds were allocated to procuring one of Unity’s dedicated servers for larger group sizes, it
would be possible to test the effectiveness of the application with multiple clients, in a presentation
mode. This would more closely simulate a classroom experience.
27Conclusion
Virtual reality has made significant progress within the last decade and will continue to be a promi-
nent part of popular culture for the foreseeable future.
The shortcomings of current VR systems include price and availability. With most of the best VR
equipment behind a high cost barrier, they tend to be most used among early adopters and those
with disposable income. In addition, these headsets tend to be fairly large and heavy, also requiring
a powerful computer to make the experience as realistic as possible. Another major issue is the
lack of realistic interaction with a VR scene, mostly limited to controllers.
Our solution addresses the issue of pricing by providing a headset that is lightweight and cheap.
The headset is easily available to any consumer, and is structured enough to support most phones
and the Leap sensor. To decrease the amount of equipment required to run the VR system, we
have designed our program to run on a laptop and phone combination, meaning that a user will no
longer have to be tied to a desktop if they want high-quality VR. Finally, to increase the immersion
for the user, hand-tracking was added to the framework program, allowing a user to actually use
their hands to interact with things in the VR environment. Our hope is that this work is continued
so that virtual reality can become more available to consumers as a whole, not simply to those with
Android phones and powerful desktops.
28References
[1] “Virtual Reality,” 2017. [Online]. Available: https://www.merriam-
webster.com/dictionary/virtual reality
[2] “After mixed year, mobile AR to drive $108 billion VR/AR market by 2021,” 2017.
[Online]. Available: http://www.digi-capital.com/news/2017/01/after-mixed-year-mobile-ar-
to-drive-108-billion-vrar-market-by-2021/#.WP6b21eqRcZ
[3] “The State Of Virtual Reality In 2016,” 2016. [Online]. Available: http://kotaku.com/the-
state-of-virtual-reality-in-2016-1790201426
[4] M. Hussein and C. Nätterdal, “The Benefits of Virtual Reality in Education-A comparision
Study,” 2015.
[5] “SheerID.” [Online]. Available: https://www.sheerid.com/sheerid-agile-teacher-survey/
[6] “Number of smartphone users in the United States from 2010 to 2021 (in mil-
lions)*,” 2017. [Online]. Available: https://www.statista.com/statistics/201182/forecast-of-
smartphone-users-in-the-us/
[7] D. Pierce, “Inside Google’s Plan to Make VR Amazing for Absolutely, Positively Everyone,”
2016. [Online]. Available: https://www.wired.com/2016/04/google-vr-clay-bavor/
[8] “Daydream,” 2017. [Online]. Available: https://vr.google.com/daydream/
[9] L. Orsini, “How Oculus Rift Intends To Solve Simulator Sickness,” 2014. [Online]. Available:
http://readwrite.com/2014/03/28/oculus-rift-motion-simulator-simulation-sickness/
29[10] G. Kumparak, “A Brief History Of Oculus,” 2014. [Online]. Available:
https://techcrunch.com/2014/03/26/a-brief-history-of-oculus/
[11] “Vive,” 2017. [Online]. Available: https://www.vive.com/us/
[12] “Leap Motion.” [Online]. Available: https://www.leapmotion.com/#112
[13] “SteamVR: How It Works.” [Online]. Available:
http://store.steampowered.com/steamvr#HowItWorks
30You can also read