Arcadia Series Cabinetry - INSTALLATION GUIDE
←
→
Page content transcription
If your browser does not render page correctly, please read the page content below

Arcadia Series Cabinetry
                  I N S T A L L A T I O N   G U I D E

+1.800.868.1699                                         1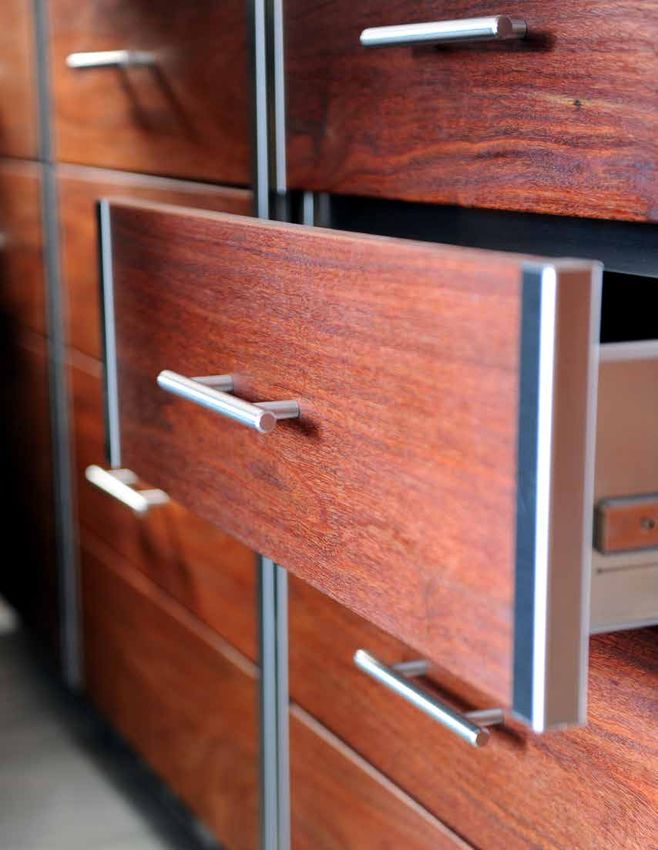
2 KalamazooGourmet.com
Before Your Kitchen
                      is Delivered

+1.800.868.1699                         1
Review the Owner’s Manuals for all Appliances
Kalamazoo Outdoor Gourmet Arcadia Series cabinets can be installed indoors or out, without regard
to combustibility of surrounding materials. However, our gas and live-fire appliances have very
specific restrictions for safe installation and use. Review the owner’s manual for any gas appliance in
detail before installation. For your convenience, clearances for some of our most popular outdoor
cooking appliances are listed below.

      Hybrid Fire Grills require 6 inches of clearance between the grill and any combustible surface to the
      sides and back of the grill. Additionally, any overhead combustible surface must be protected by a
      properly engineered ventilation hood, no matter how much clearance there is above the grill. NEVER
      place the grill underneath an overhead combustible structure or surface.
      Gaucho Grills require 36 inches of clearance between the sides and back of the grill and any
      combustible surface. Additionally, any overhead combustible surface must be protected by a properly
      engineered ventilation hood, no matter how much clearance there is above the grill. NEVER place the
      grill underneath an overhead combustible structure or surface.
      The countertop Artisan Fire Pizza Oven requires 6 inches of clearance around the sides and back of
      the pizza oven to any surface for proper operation. 12 inches clearance is required above the top to any
      non-combustible surface. Never place the pizza oven underneath an overhead combustible surface. Do
      not obstruct the open space below the pizza oven. The pizza oven must be placed on top of a non-
      combustible surface.
      Cooktops require 9 inches from the sides and back of the unit to adjacent vertical combustible
      construction (combustible wall).

Kalamazoo Outdoor Gourmet grills, pizza ovens, cooktops and smokers are not for use indoors, in enclosed
areas or breezeways, beneath overhead combustible structures, or on recreational vehicles.

For some installations, a properly engineered and installed ventilation hood system may
adequately protect an otherwise combustible overhead structure. We recommend working
with a licensed architect to ensure a safe installation and comply with local codes.

Prepare the Site
The patio surface should be as near to level as drainage requirements permit. Although all Kalamazoo kitchen
components include stainless-steel leveling legs, installation will go more smoothly on a level surface. For
extremely large kitchens, a sloping surface may exceed the adjustability range of the legs from one end of the
kitchen to the other. In these instances, footings under the equipment may be needed to compensate.

To avoid settling, never install the kitchen on an unstable surface. If the kitchen is being installed on a deck,
roof or balcony, please have your engineer or contractor ensure the area is designed to support the weight of
the kitchen and the people who will be enjoying it.

2                                                                                             KalamazooGourmet.com
Plan for Proper Plumbing
Kalamazoo Outdoor Gourmet gas-fired equipment exceeds industry standard performance by a wide margin. Your
plumber or contractor must account for the total BTUs of all the gas equipment when determining the proper size
for the gas line. The total BTUs in conjunction with the length of the gas line will determine the proper diameter for
the pipe. The gas pipe supplying a Kalamazoo kitchen is typically greater than 1" in diameter. The pressure must be
7 inches water column for natural gas or 11 inches water column for bulk propane (LP).

Install a separate shutoff valve for each piece of equipment in addition to a main shutoff valve for the entire
kitchen. For safety, the shutoff valve should be easily accessible.

Bulk LP and natural gas connections for grills should be 1/2" NPT. Bulk LP and natural gas connections for
pizza ovens and cooktops should be 3/8" NPT. For more information, please contact Kalamazoo Outdoor
Gourmet customer service at +1.800.868.1699.

Plan for Proper Electrical
All exterior outlets must be wired with a ground fault interrupt circuit. Subject to local code compliance,
Kalamazoo recommends using GFI breakers in the home’s electrical panel to power the entire outdoor
kitchen rather than installing individual GFI outlets outdoors. If undercounter refrigeration were to trip a GFI
outlet under the counter, it would be very difficult to reset. By putting a GFI breaker in the panel, it is easy to
reset the kitchen. Of course, you should consult your electrician who should be familiar with local codes and
requirements.

Kalamazoo Outdoor Gourmet appliance cabinets and back panels include an electrical box inside for the
appliance. There is also an electrical face plate on the front of appliance cabinets, just below the counter on
the left or right side. Neither of these electrical boxes is wired. Your custom kitchen drawing from Kalamazoo
will show the location for electrical connections on these units.

Plan for proper lighting. Your designer or contractor should help ensure you have adequate task lighting for
the grill and all other work centers planned for the kitchen. Additionally, it is nice to plan ambient lighting
for the space that is controlled separately from the task lighting. For safety, all paths leading to and from the
kitchen should be lit.

Planning for the Countertops
Although we typically provide countertop dimensions with our kitchen
drawings, it is best to have your countertop supplier measure the
kitchen to create a template after everything but the countertop has
been installed.                                                                                  DRIP EDGE
Kalamazoo Outdoor Gourmet recommends having a 1/8" groove cut
into the underside of counter overhangs to serve as a drip edge. This
can help keep cabinets looking cleaner as environmental water will be
less likely to flow down the outsides of the units.
Kitchens that have a back splash and are exposed to the elements may
benefit from having the counter slope slightly downward at the front to
help reduce rainwater accumulation.

+1.800.868.1699                                                                                                       3
4 KalamazooGourmet.com
When Your Kitchen
                    is Delivered

+1.800.868.1699                       5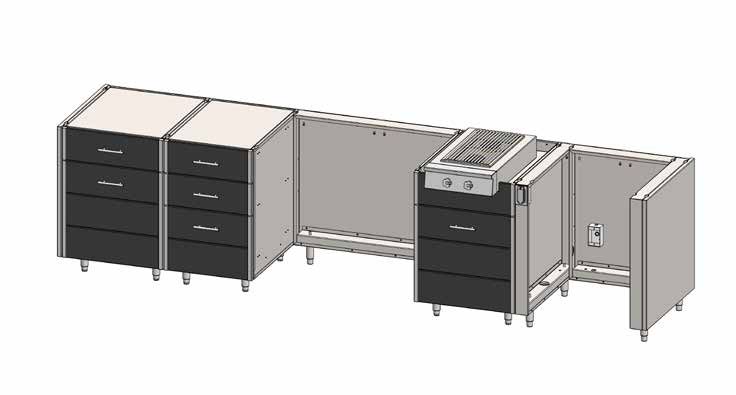
Accepting Delivery
Your order will arrive in sturdy packaging on wooden pallets. Please inspect all packaging immediately upon
receipt for any visible signs of damage. Make detailed notes of any damage directly on the bill of lading and
have the delivery driver sign the notes. In worst case scenarios, it may be best to refuse delivery. Please call us
at 800.868.1699 if you have any questions or concerns about your delivery.

BRONZE LEVEL OR CURBSIDE DELIVERY: This basic level of delivery service means the driver will leave your
pallets at “the first dry area” on the property. Please note each pallet can weigh hundreds of pounds. If you are
in the midst of a large home project when your kitchen is delivered, you may have a crew available to handle
receiving and moving the kitchen. However, if you do not have the ability to move the pallets and lift heavy
products, you may wish to consider using the White Glove Delivery service.

WHITE GLOVE DELIVERY: This enhanced level of delivery service requires advanced arrangements and
detailed information. The driver and delivery crew will place the pallets at the chosen installation site, remove
the products from the pallets and take the pallets and other packaging away. The cost of White Glove
Delivery varies greatly by the distance pallets have to be moved, the accessibility of the location and a host
of other factors. Detailed information is required before we can accurately quote this delivery service. Lack of
information can result in additional charges and/or failed delivery attempts.

6                                                                                              KalamazooGourmet.com
Unpacking Your Kitchen
Many Kalamazoo products ship with accessories and smaller pieces that can easily be lost on a busy job site.
We recommend consulting the line items on the sales order as well as the packing list in the owner’s manual
for each grill, smoker cabinet, pizza oven or other appliance to take inventory of the various parts before any
packaging is discarded. Parts that can be lost in the shuffle include:
Toe kicks
Owner's manuals
Appliance covers
Pizza oven stones
Pizza oven manual ignition wand
Grill grates and surface removal tool
Gas hoses
Ash bins
Rotisserie forks
Control knobs
WARNING:
The clear plastic wrapping that protects your shipment should be removed
shortly after delivery. If left on the products for extended periods, it can leave
residue that can be difficult to clean off, as well as collect construction dust
and environmental debris.
WARNING:
The protective film we place on various areas of the stainless steel must be
removed shortly after delivery. Film and tape left on products for too long
can become very difficult to remove, especially if exposed to direct sunlight.
+1.800.868.1699 7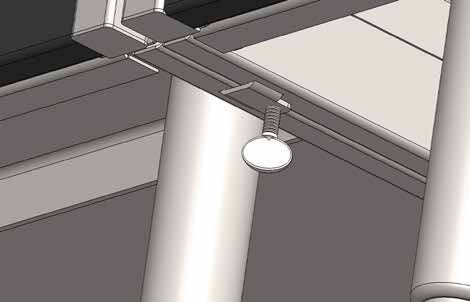
8 KalamazooGourmet.com
Installing Your
Outdoor Kitchen
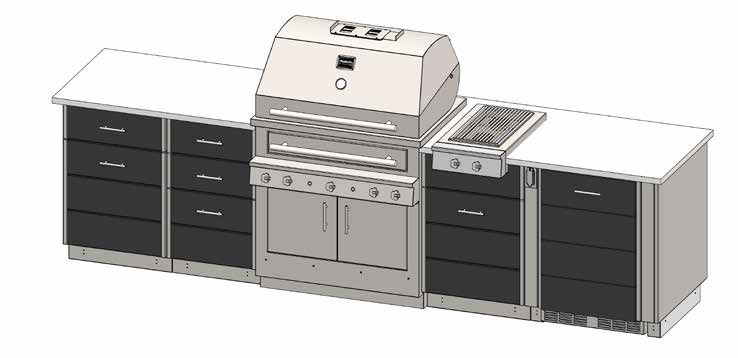
+1.800.868.1699 9Example Outdoor Kitchen
These instructions will detail the installation steps for the representative outdoor kitchen below.
GRILL BACK PANEL
(BEHIND GRILL)
COOKTOP
END PANELS
STORAGE
CABINETS TOE KICKS
GRILL
COOKTOP CABINET
BEVERAGE CENTER
APPLIANCE CABINET
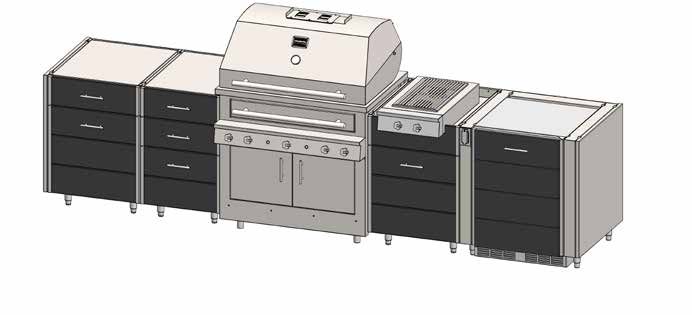
Installation Sequence
1. Unpack the outdoor kitchen components near the chosen installation site.
2. Roughly position all cabinets, side by side, in order. Do not position the grills or other appliances just
yet. Use Kalamazoo Speed Clips (see step 7) to hold back panels upright and in position temporarily.
3. Identify the highest and lowest parts of the patio, and the height difference between these parts of the
patio. The maximum leveling adjustment of outdoor kitchen cabinets, in ideal conditions, is 1 1/2".
Grills have a greater adjustment range. Refrigeration has less adjustment. Concrete leveling pads may
be required to address patio slopes greater than 1 1/2"
4. Determine the finished counter height. Standard counters are 36" tall. Factoring in the countertop
thickness and the finished countertop height desired, level the units at the highest and lowest parts
of the patio to immediately identify any potential problems. Adjust the desired countertop height, if
necessary, to address the patio slope.
5. Once all the cabinets and back panels are in position, level, square and plumb each component.
6. Proper leveling will create a flat surface for countertop installation. It will also create even gaps
between adjacent doors and drawers. Cabinet bodies must touch neighboring cabinets at the front
and back from top to bottom. If there are uneven gaps, the cabinets are not yet properly leveled.
10 KalamazooGourmet.comALL CABINETS AND BACK PANELS ARE
POSITIONED AND LEVELED
A
SPEED CLIP
7. The tops of each cabinet and filler panel
connect to adjacent units at the tops using
the included Kalamazoo Speed Clips. These
clips make installation easier. The unique B
design allows you to use the “ears” to draw
together two units and ensure a snug fit.
A. Position the clip at an angle on top of
the two layers of steel.
B. Rotate the clip to leverage the two
layers of steel together.
C. Push the clip down fully into position.
Storage cabinets and appliance cabinets C
connect at four corners of the top. Back filler
panels connect at the back of the top only.
Do not install speed clips in the front slots if
you are not joining two units together there.
8. Make all electrical connections for appliance
back panels and appliance cabinets.
+1.800.868.1699 119. The bottoms of adjacent cabinets connect together with clips that secure with the included
thumb screws.
First, insert the thumb screw into the clip until the end of the screw is flush with the inner surface
of the clip (not protruding). Clips pivot into the matching slots under the front and rear of each
cabinet junction (appliance back panels and grill back panels only clip at the rear).
NOTE: The clips should slide in easily. If they do not, there is likely a problem with the cabinet
alignment. Refine the alignment, both vertically and laterally, until the clip slides in easily.
Tighten the thumb screw once the clip has been fully inserted.
BOTTOM CLIP WITH THUMB SCREW
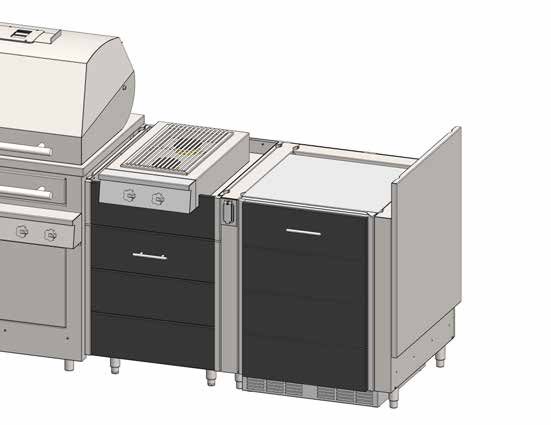
12 KalamazooGourmet.com10. If applicable, carefully place the cooktop onto the top of the cooktop cabinet. The cooktop will set
down into the opening in the front of the cabinet and over the two posts that extend up from the top
of the cabinet. When positioned correctly, the cooktop will protrude from the front of the cabinet a few
inches and it will not be able to slide forwards or backwards.
Run the gas hose along the top of the cabinet towards either the left or right hole near the back of the
unit. Thread the gas hose through the hole so that it runs down through the gas line channel on the
side of the cabinet and out the hole in the cabinet floor.
Connect the gas line to the gas supply before installing any toe kicks that may impede access.
POSITION THE COOKTOP OVER THE ROUTE THE GAS HOSE DOWN THROUGH REPLACE GAS LINE COVER. SECURE WITH
PINS ON TOP OF THE CABINET THE CABINET OUT THE BOTTOM HOLE SCREW AT TOP
11. The grill height should be adjusted for the proper clearance for the countertop thickness that has been
selected. The countertop will slide between the cabinet tops and the bottom of the hood base on the
built-in grills. Please allow 1/8" clearance between the bottom of this flange around the grill and the
top of the finished countertop.
Carefully slide the grill(s) into the opening so that the face of the grill sits 1" forward of the cabinet
doors. Refrigeration height should be adjusted to sit nearly level with, but just below, the tops of the
cabinets. The weight of the countertop (once installed) should not rest on the refrigeration.
12. Make all gas connections and test for leaks.
13. Plug in all electrical cords, including the grill and refrigeration.
ALL APPLIANCES ARE INSTALLED AND CONNECTED TO UTILITIES
+1.800.868.1699 1314. Install the front and back toe kicks by clipping them on to the cabinet legs. Toe kicks are adjustable in
height. Loosen the screws slightly to slide the rear layer upward to contact then bottom of the cabinet.
Then re-tighten the screws.
15. Side toe kicks connect in one of two ways, depending on the kitchen design. For island kitchens, the
side toe kicks connect to the front and rear toe kicks. For kitchens against a wall, the side toe kicks
connect to the front toe kick and the rear leg.
A. Install screw and spacer assemblies on the ends of front toe kicks (and rear toe kicks, if applicable).
B. The slots on the side toe kicks slide over the spacers behind the screw heads. Slide the side toe
kicks in and downward until they are flush. If this installation is against a wall, the front of the
side toe kicks slides over the spacers, and the rear snaps on to the rear leg of the cabinet with a
plastic C-clip.
A B
C
SIDE TOE KICKS CONNECT TO FRONT AND REAR TOE KICKS, OR TO FRONT TOE KICK AND REAR LEG
14 KalamazooGourmet.com16. If you are installing end finishing panels on your kitchen, install screws with spacers and flange nuts to
the holes at the bottom-front and bottom-rear of the end cabinet side. The spacer and screw should
be positioned on the outside of the cabinet. See below.
INSTALL THE SCREWS, SPACERS AND NUTS FOR
MOUNTING THE END FINISHING PANELS
17. The end finishing panel drops over the spacers and on to the screws. Ensure the end panel is snug
against the cabinet and properly seated on the spacers. Install speed clips (SEE STEP 7) to fasten the
top of the panel to the cabinet.
INSTALL THE END FINISHING PANELS
+1.800.868.1699 1518. The back finishing panels have spacer screws that match up with corresponding slots on the rear of the
cabinet. Align back finishing panel against cabinet and slide down into slots.
INSTALL THE BACK FINISHING PANELS
16 KalamazooGourmet.com19. Test all appliances for proper operation before installing the countertops.
20. Install the countertops. Dry fit all pieces first to ensure proper alignment. Remove the counter and
then, working one section at a time, lay a bead of silicone around the top perimeter of each cabinet,
appliance cabinet and back filler panel. DO NOT silicone the tops of any appliances. Install the
counter and let the silicone set for the proper amount of time according to the manufacturer’s
instructions.
A SILICONE BEAD AROUND THE TOP OF EACH CABINET SECURES THE COUNTERTOP
21. Seal the seam between any cooktops and the countertop with clear silicone, or a silicone that matches
your countertop. Do not silicone the front section of the cooktop. This is the control panel. The control
panel should be extended beyond the front edge of the countertop in its entirety. It must be able to
be removed in order to change the batteries and for service. Do not silicone around the grill.
SEAL THE GAP BETWEEN THE COUNTERTOP AND THE SIDES AND BACK OF THE COOKTOP
22. Install sinks, faucets and any other additional features to complete the outdoor kitchen.
23. Enjoy!
+1.800.868.1699 17Caring for Natural Ipe Wood Cabinetry
The ipe wood used on Arcadia cabinetry is pre-treated with Penofin oil. To maintain the rich,
dark color, periodic treatment with more Penofin oil will be necessary. In most environments,
treating the wood once or twice each year is all that is necessary to maintain the factory
appearance. Your installation may require more frequent oiling.
Oiling the ipe wood is purely an aesthetic decision. If you prefer a natural, gray, weathered
appearance, then you can simply let this occur naturally.
Do not use a pressure washer to clean your cabinets.
Caring for Powder Coated Cabinetry
The durable powder coated panels on Arcadia cabinetry is polyester-based for the best
durability and fade resistance available. To clean the coating, Kalamazoo recommends a mild
soapy solution. Rinse well, then clean the stainless steel portions of your cabinetry with a
nontoxic stainless steel polish.
Caring for Stainless Steel
The stainless steel accents on Arcadia cabinetry are best polished using a clean micro fiber
towel and a nontoxic stainless steel polish. Kalamazoo recommends spraying the polish directly
on the towel, then wiping the stainless steel. Always try to polish with a motion in the same
direction of the stainless steel grain. Spraying directly onto the towel minimizes the amount of
polish that may get on the wood or powder coated panels. Polishing with the grain minimizes
scratches.
18 KalamazooGourmet.comAll specifications and other information contained in this Installation Guide are based on the latest product information available at the time of printing. Because Kalamazoo Outdoor Gourmet is always focused on product improvement, we reserve the right to make changes at any time. This includes all specifications of the product. © 2017 Kalamazoo Outdoor Gourmet, LLC. Not to be reproduced wholly or in part without specific written permission from Kalamazoo Outdoor Gourmet, LLC. Kalamazoo Outdoor Gourmet Chicago Headquarters 810 West Washington Boulevard Chicago, IL 60607 Kalamazoo Plant 8566 Krum Avenue Galesburg, MI 49053 +1.800.868.1699 KalamazooGourmet.com +1.800.868.1699 19
20 KalamazooGourmet.com
+1.800.868.1699 21
22 KalamazooGourmet.com
You can also read