Basic Rigging Workbook - Brookhaven National ...
←
→
Page content transcription
If your browser does not render page correctly, please read the page content below
Basic Rigging Workbook

  Training and Qualifications Program Office
-2-
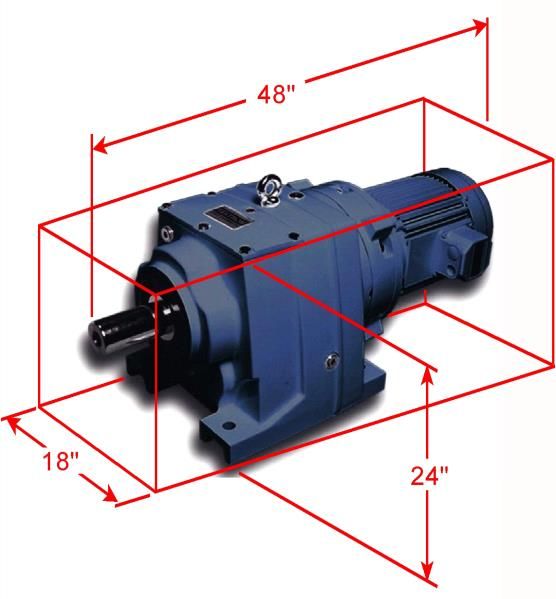
Table of Contents

Determine Task and Job-Site Requirements................................................................... 4
Characterize the Load ..................................................................................................... 7
Specify, Select, and Inspect Rigging Equipment ........................................................... 15
    Wire Rope Slings ..................................................................................................... 15
    Synthetic Slings ....................................................................................................... 18
    Hooks....................................................................................................................... 21
    Shackles .................................................................................................................. 22
    Eye Bolts .................................................................................................................. 24
    Hoist Rings .............................................................................................................. 26
    Turnbuckles ............................................................................................................. 28
    Using Rope in Rigging Applications ......................................................................... 29
Lift, Maneuver, and Move Load ..................................................................................... 31
    Handling Symmetrical Loads ................................................................................... 31
    Handling Asymmetrical Loads ................................................................................. 32
    Moving Loads through Vertical Openings ................................................................ 33
    Moving Loads through Horizontal Openings ............................................................ 34
    Moving Loads around or over Obstacles ................................................................. 35
    Moving Loads in Close Proximities .......................................................................... 36
    Upending, Inverting, and Rolling Loads ................................................................... 38
Lifting with Hand-Operated Chain Hoists ...................................................................... 39
Appendices ................................................................................................................... 42
Carbon Steel Pipe Size Chart ....................................................................................... 43
    Weight of Common Materials ................................................................................... 44
    Hand Signals ........................................................................................................... 45

                                                              -3-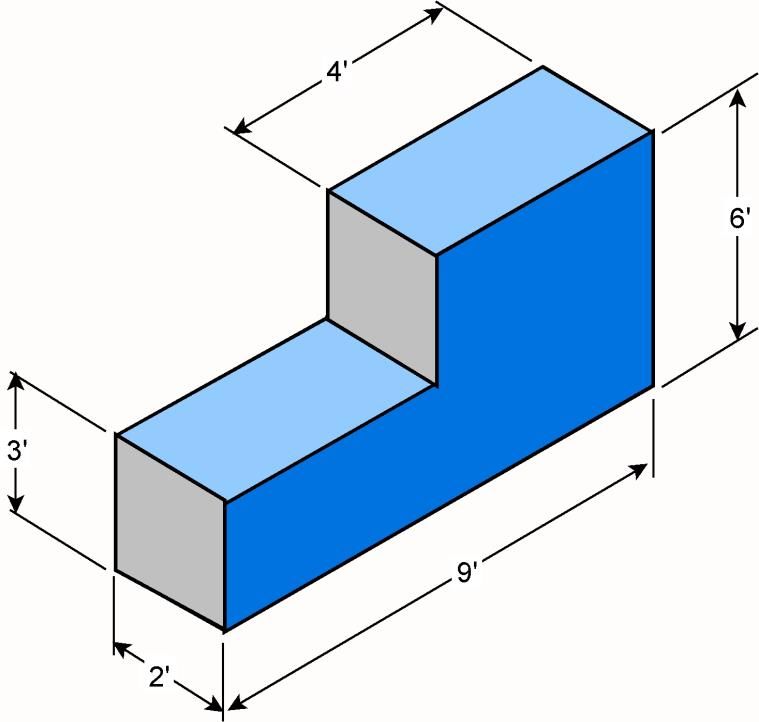
Determine Task and Job-Site Requirements

In order to ensure the safety of workers and the equipment involved, any operation
involving the use of a crane to lift items must be planned thoroughly before being
carried out. The purpose of this document is to discuss the requirements for planning
and performing an incidental lift using an overhead crane and commonly available
rigging components, such as slings, shackles, eye bolts, and turnbuckles.

The "Lifting Safety" Subject Area, found in the Brookhaven National Laboratory (BNL)
Standards-Based Management System (SBMS), governs all lifts conducted at BNL.
The Subject Area contains guidance that must be used in order to plan and perform a
lift safely. This instructor handbook incorporates the Subject Area's requirements, as
well as information from the Department of Energy's (DOE's) Hoisting and Rigging
Manual and ANSI B30.9.

Definitions

Asymmetrical load. An object with an off-center center of gravity due to the object's
irregular shape and/or composition.

Critical lifts require confirmation of engineering, or merit additional engineering input
because of an item's or location's size, weight, close-tolerance installation, or high
susceptibility to damage. These lifts could be either ordinary lifts or pre-engineered lifts,
but with additional hazards that could result in significant delays to a program,
undetectable damage resulting in future operational or safety problems, a significant
release of radioactivity or other hazardous material, present a risk of injury personnel.
Critical lifts must be made by Facilities & Operations riggers or by approved contractors,
and as such are not covered in this program.

Incidental or ordinary lifts involve the use of basic hoisting equipment directly above the
load. The load must also have certified lifting points or be relatively easy to sling.

Person-in-charge. Person appointed by the responsible manager or designee to direct
critical or pre-engineered lifts. The person-in-charge must be present during the entire
lifting operation and must have experience in handling similar types of equipment. The
designated person-in-charge may be either a supervisor familiar with critical lift
operations, or a person with special knowledge of the equipment and handling.

Pre-engineered lifts are repetitive lifts that meet the definition of a critical lift, defined
below. If, however, the BNL Lifting Safety Committee determines that through the use
of tooling, fixtures, sketches, analyses, and written procedures, the possibility of
dropping, upset, or collision is reduced to an acceptable level, the lift may be designated
as a pre-engineered lift.

Symmetrical load. An object that, because of its uniform shape and composition, has its
center of gravity located exactly in its middle.

                                             -4-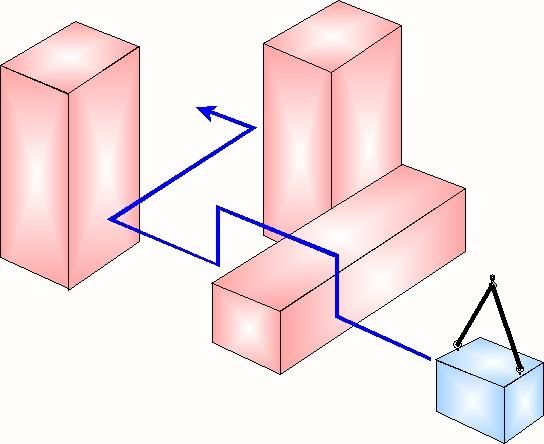
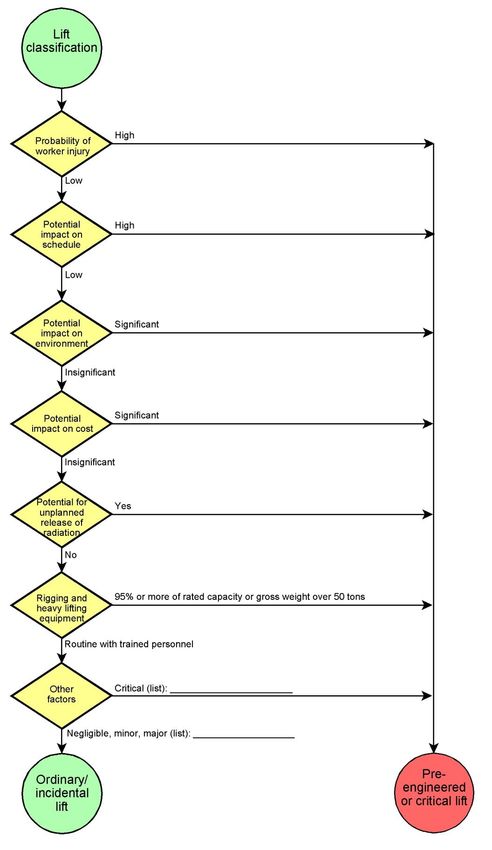
Classifying Lifts

Before a lift can be
planned, it must be
analyzed to determine
the     lift's   category.
There are three lift
categories at BNL:
incidental or ordinary
lifts,    pre-engineered
lifts, and critical lifts.
The            responsible
manager or designee
determines the type of
lift by conducting a lift
assessment.

The flow chart here,
adapted    from     the
SBMS Lifting Safety
Subject Area, will help
to determine if a lift
should be classified as
incidental (ordinary),
pre-engineered,      or
critical.

Refer to the Subject
Area for additional
guidance.

                             -5-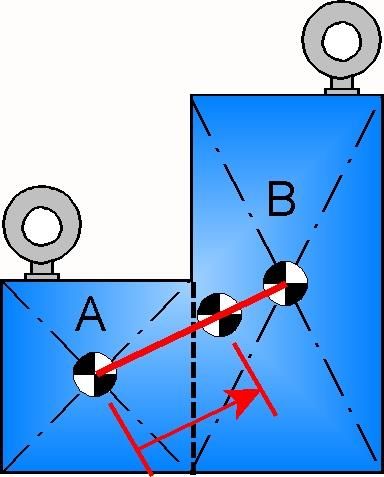
If the lift has been classified as a pre-engineered lift, then additional criteria must be met
prior to operation. If determined to be a critical lift, Facilities & Operations riggers or an
approved contractor must be used.

Once the lift has been classified and determined to be an ordinary or incidental lift, use
the Checklist for Lift Planning and Weather Factors exhibits, found in the Lifting Safety
Subject Area, as tools for evaluating the area of operation and potential.

Ordinary Lift Plan Elements

Once a lift has been planned and approved, the appropriate rigging equipment,
including slings, shackles, turnbuckles, and the crane itself, must be selected, inspected,
and connected correctly prior to beginning the lift itself.

The following items must be checked and confirmed before selecting rigging
components:

•   Weight of lift                                   •   Sharp corners and angles on load

•   Center of Gravity                                •   Sling angles

•   Lift points                                      •   Load angle factor

•   Crane capacity                                   •   Travel route clearance

•   Speed, height, width, and length of lift         •   Floor loading capacity

•   Wind, temperature, and visibility                •   Work zone safety

•   Crane and Load foundation ratings

Planning and Performing Pre-Engineered Lifts

Pre-engineered lifts are repetitive lifts that meet the definition of a critical lift, defined
below. If, however, the BNL Lifting Safety Committee determines that through the use
of tooling, fixtures, sketches, analyses, and written procedures, the possibility of
dropping, upset, or collision is reduced to an acceptable level, the lift may be designated
as a pre-engineered lift.

A Pre-Engineered Lift Plan must be completed and submitted to the Lifting Safety
Committee chair prior to any work being performed. The Plan consists of as many
drawings, specifications, and procedures as necessary to assess all important load
factors and site factors relating to the lift. For further details, consult the Pre-engineered
Lift Procedure found in the Lifting Safety Subject Area.

                                               -6-
Characterize the Load
Calculating Weight of Load

Step 1: Determine volume
• Measure the object to get dimensions (length, width, and height) and determine
   volume.

   Volume formulas:
   • Rectangle/square: Volume = Length x Width x Height
   • Hollow cylinder: Volume = 3.14 x Length x Wall thickness x (Diameter wall
      thickness)
   • Complex shapes
      – In some cases, it’s best to imagine that the whole object is enclosed by a
          rectangle and calculate the volume of that rectangle.
      – In other cases, break the object into two
          or more smaller rectangles
          • Calculate the weight of each part and
             add them
             -or-
          • Look up weight per foot for structural
             shapes in Steel Handbook
      – For concrete reinforcing rod, calculate as
          a cylinder.

Pipe
   •   Pipe calculations require actual measurements
       of diameter and wall thickness for accuracy
           – Pipe sizes below 14 inches are given as
               nominal dimensions
                  • Example: 6-inch pipe is actually
                      6.75 inches in diameter
           – Need to know actual wall thickness
               dimension
   •   Recommendation: use a table instead of
       calculations
   •   Typical pipe weight table is shown on page 32.

                                            -7-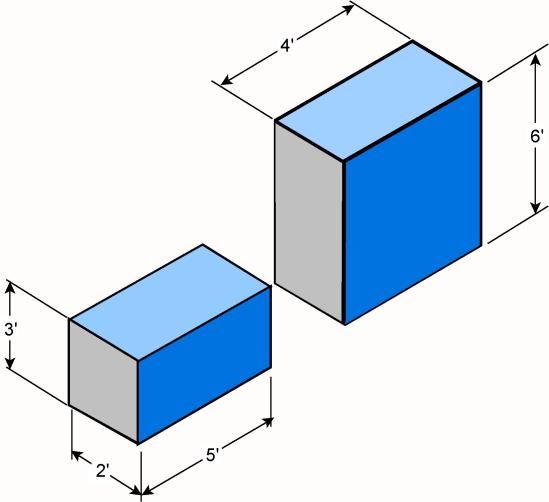
Step 2: Determine what material the object is made of

•   Look up the weight per unit volume for that material.

                       Material              Pounds per cubic
                                             foot
                       Aluminum              165
                       Concrete              150
                       Copper                560
                       Lead                  710
                       Paper                 60
                       Steel                 490
                       Water                 65
                       Wood, pine            40

Step 3: Determine weight of object
• Multiply the weight per unit volume times the calculated volume to get the calculated
   weight of the object.
                         -------------------------------------------------

Example #1: Rectangular Load

Object to be lifted: Concrete block, 8 feet long x 4 feet
wide x 6 feet high.

•   Volume of a rectangle is its length times its width times
    its height:

    V = L x W x H = 8 ft x 4 ft x 6 ft = 192 cu ft

•   Since concrete weighs 150 pounds per cu ft (see table
    on previous page), the load will weigh approximately:

    Block weight = 192 cu ft x 150 lbs/cu ft = 28,800 lbs

                                             -8-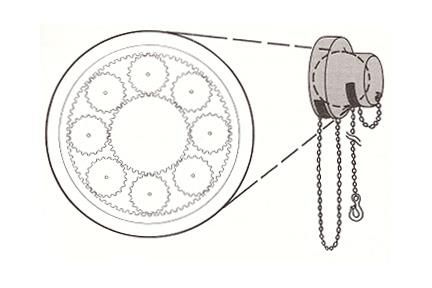
Example #2: Pipe

Object to be lifted: Hollow steel pipe, 8 ft. long x
3 ft outside diameter; wall thickness is 1.5
inches.

•   Using the formula:
    V = 3.14 x L x T x (D - T)
       = 3.14 x 8 ft x 1.5 in x (3 ft - 1.5 in)

               Caution: Units not all the same: Need to convert inches to feet

    V = 3.14 x 8 ft x 0.125 ft x (3 ft - 0.125 ft) = 9.03 cu ft

•   From the table, steel weighs 490 lbs/cu ft

    Tube weight = 9.03 cu ft x 490 lbs/cu ft = 4,425 lbs

Example #3: Complex Shapes

Object to be lifted: Concrete widget shown at right

•   Cut the object into rectangles, and then calculate the
    weight of each section, as shown below.

•   Top section
              Vtop = 2 ft x 3 ft x 4 ft = 24 cu ft
•   Bottom section
              Vbottom = 2 ft x 3 ft x 9 ft = 54 cu ft

•   Total volume
              Vtotal= 24+54 = 78 cu ft

If this object were made of concrete, could it be safely
lifted by a 5-ton hoist?

                                                  -9-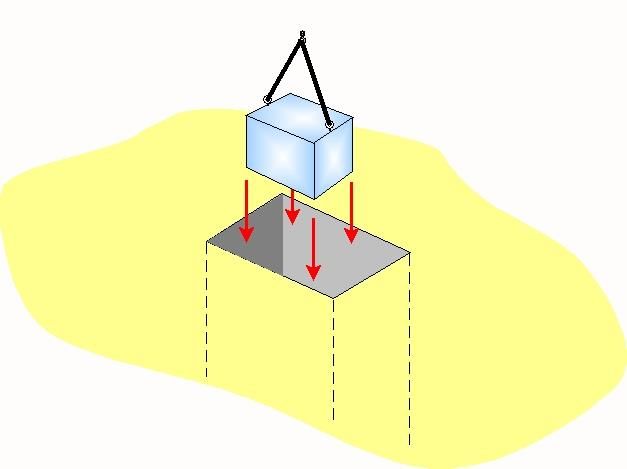
Calculating Weight Exercises

   1. Use weights of common materials table on
      page 4 of this workbook to calculate the
      weight of a steel plate 4 ft wide x 10 ft long
      x 1/2 inch thick.

   2. Use the weight table for pipe on page 32 to
      calculate the weight of a nominal 6-inch
      seamless steel pipe, Schedule 120, 20 ft
      long.

   3. Using the formula for hollow cylinders,
      calculate the weight of an open-ended
      aluminum cylinder that is 20 ft long, 10 ft in
      diameter and with 3/4 (0.75) inch wall
      thickness.

                                            - 10 -
4. Calculate the weight of the motor shown at
right.
- 11 -Calculating the Center of Gravity
A. Symmetrical loads
• The center of gravity of a rectangular, symmetrical
load can be found by inspection.
• Measure each side of the rectangle.
• Divide each side in half to locate the center of gravity
for that side.
• After, combine the results to determine the overall
center of gravity.
B. Asymmetric loads
• The easiest method for finding the center of gravity of an
asymmetrical load is to divide the object into rectangles
and determine the center of gravity for each first, as
shown at right.
• For the example here, the left rectangle measures 5 feet by 5
feet, while the right-side rectangle measures 5 feet by 10 feet.
• Since the right-hand rectangle is twice as large as the smaller
on the left, and since both are made of the same material, we
can tell that 1/3 of the object's weight is concentrated at the
left center of gravity (labeled "A"), while 2/3 is concentrated at
the right (labeled "B").
• Draw a line connecting the two centers of gravity a shown
and measure 2/3 of the way from center of gravity A to center
of gravity B, as shown by the red line at right. That is the
location of the final, combined center of gravity for the block.
- 12 -C. Other shapes
• To find the center of gravity of a triangle, measure
1/3 the height from the base as well as 1/3 of the
base from the steepest angle, as shown at right.
• The center of gravity of a circle of uniform weight is
located exactly at the center.
• The center of gravity of a semi-circle may be
determined as shown at right.
Example #4: Rectangular Load
Calculate the center of gravity of a steel plate 4 ft wide x 10 ft long x 1/2 inch thick.
A. Measure "h"
h1 = 10 feet
CG = 5 feet
B. h2 = 4 feet
CG = 2 feet
- 13 -Center of Gravity Exercise
5. Calculate the center of gravity of this
concrete block.
- 14 -Specify, Select, and Inspect Rigging Equipment
Wire Rope Slings Wire Rope Components
Pre-Use Inspection Checklist
• Inspect daily before use and frequently
wire
during use
• Slings must be removed from service
strand
when any of the below listed substandard center core
conditions exist. Wire rope wire
• Shock loading is prohibited
• Ten (10) randomly distributed broken
wires in one (1) rope lay, or five (5) broken wires in one (1) strand in one (1) rope lay
• More than one broken wire at an end connection
• Reduction in rope diameter (1/3 or more of the original wire diameter)
• Severe localized wear, abrasion, or scraping
• Kinking, crushing, under-stranding, bird-caging, core protrusion, and any other
damage resulting in distortion of the rope structure
• Evidence of heat damage
• End attachments that are cracked, deformed, or worn
• Hooks or latches deformed or damaged
• Corrosion of the rope or end attachments
• Each wire rope sling shall be marked to show:
– Name or trademark of manufacturer
– Rated load capacity for the types of hitches, and the angle upon which it is based
– Diameter or size
– BNL color-coded inspection tag or tape
• 2017: Red • 2020: Green
• 2018: Blue • 2021: Red
• 2019: Orange • 2022: Blue
- 15 -Sling Angle Factor
Sling Angle Sling Angle Factor
The Sling Angle Factor is a multiplier used to
determine the required sling size when the angle 90° 1.000
formed between sling and load is less than 90°.
60° 1.155
Avoid rigging loads where angle is less than 45°
45° 1.414
30° 2.000
Example
Suppose the symmetrically distributed load below weighs 2,000 pounds. The load is
equally distributed between the two pick points. What is the effective stress on each
sling at the angles shown?
Load x Sling Angle Factor Load x Sling Angle Factor Load x Sling Angle Factor
= 1,000 x 1.000 = 1,000 x 1.155 = 1,000 x 1.414
= 1,000 lb. per sling = 1,155 lb. per sling = 1,414 lb. per sling
- 16 -- 17 -
D/d Ratio

When a wire rope sling is used in a basket hitch, the diameter
of the load where the sling contacts the load can reduce sling
capacity. The method used to determine the loss of strength or
efficiency is referred to as the D/d Ratio.

The "D" refers to the diameter of the object being lifted, while
the "d" refers to the diameter of the wire rope sling, as shown in
the figure at the upper right. For example, when a 1-inch wire
rope sling is used to lift an object that measures 25 inches in
diameter, the D/d Ratio is 25-to-1 (written 25/1).

Alternatively, the "D" can refer to the cross-sectional diameter of the eye,
hook, or other object being used to hoist the load, as shown in the figure
at right.

In both cases, the effective strength of the sling results. The table below
shows the D/d Ratio and corresponding efficiency percentage.

                                            - 18 -
Synthetic Slings
Synthetic Web Slings – 1 Ply
Rated Capacities in Pounds
Sling 1 Leg Vertical
Width Basket
(Inches) Vertical Choker
1 1000 750 2000
2 2000 1500 4000
3 3000 2200 6000
4 4000 3000 8000
5 5000 3700 10000
6 6000 4500 12000
Synthetic Web Sling Pre-Use Inspection Checklist
Inspect slings daily before use and frequently during use. Slings must be removed from
service when any of the following substandard conditions exist.
• Knots, snags, holes, tears, or cuts
• Extensive abrasive wear
• Melting or charring of any part of the sling surface
• Visible red yarns or threads indicate
excessive wear
• Broken or worn stitches
• Chemical damage including acid or
caustic burns, brittle or stiff areas, and
discoloration of any kind
• Corrosive discoloration, or other
damage to fittings
• Missing, illegible, or incomplete sling
identification
• Synthetic web slings must have tags
marked with the information shown at
right as well as a BNL color-coded
inspection tag
- 19 -Synthetic Web Slings
Endless and Eye-and Eye
Rated Capacities in Pounds
Sling 1 Leg Vertical
Width Basket
(Inches) Vertical Choker
1 2600 2100 5200
2 5300 4200 10600
3 6400 6700 16800
4 10600 8500 21200
5 13200 10600 26400
6 16800 13400 33600
7 21200 17000 42400
8 25000 20000 50000
9 31000 24800 62000
10 40000 32000 80000
11 53000 42800 106000
12 66000 52800 132000
13 90000 72000 180000
Endless and Eye-and Eye Synthetic Web Sling Pre-Use Inspection Checklist
Inspect slings daily before use and frequently during use. Slings must be removed from
service when any of the following substandard conditions exist.
• Chemical damage including acid or caustic burns, brittle or stiff areas, and
discoloration of any kind
• Melting, charring or weld spatter on any part of the fittings
• Holes, tears, cuts, snags, broken or worn stitching, or any abrasion in the sling cover
that exposes the core yarns
• Knots in the sling
• Extensive abrasive wear
• Stretching, cracking, pitting, distortion, or any other damage to the fittings
• Other visible damage that could affect ling strength
• Sling identification missing, illegible, or incomplete (required: manufacturer ID, code
or stock number, rated capacity for hitches, core and cover material)
- 20 -Hooks
Eye Hook Rated Capacity Table Incorrect Hook Connections
(Forged Alloy Steel)
Throat Opening Safe Working Limit
(SWL, in pounds) Side load
5/8 600
11/16 800
1 1500
1-1/16 2000 Back load
1-1/4 4000
1-3/8 4500
1-13/32 5000
1-1/2 5500 Point load
1-17/32 6000
Hook Pre-Use Inspection Checklist
Inspect hooks daily before use and frequently during use. Remove from service when
any of the following conditions exist:
• Missing or illegible manufacturer identification
• Cracks, nicks, or gouges
• Damage from heat
• Unauthorized repairs
• Improper operation and locking of self-locking
hooks
• Any twist from plane of un bent hook
• Distortion or wear – any increase in throat
opening of 5% not to exceed ¼ inch, or wear
exceeding 10% of original dimension
For added safety, hooks must be equipped with a latch or the
throat opening closed-off/secured with a mouse. The latch or
mouse is not intended to support the load.
- 21 -Shackles
Shackle Capacity Table
(Forged with Alloy Pins)
Nominal Shackle Rated Capacity
Size (Pounds)
3/16 660
1/4 1000
5/16 1500
3/8 2000
7/16 3000
1/2 4000
5/8 6500
3/4 9500
7/8 13000
1 17000
1 1/8 19000
1 1/4 24000
1 3/8 27000
1 1/2 34000
2 1/2 110000
• If different from capacities listed above, use
rated capacity marked on the shackle.
• If capacity marking is absent, shackle should
be removed form service.
- 22 -Shackle Pre-Use Inspection Checklist
Inspect shackles daily before use and frequently during use.
• Each shackle body shall have forged, cast, or die stamped markings by the
manufacture showing: name or trademark of the manufacturer, rated load/capacity
(WLL or SWL), and size. This information shall not be missing and must be legible.
Remove from service when any of the following conditions exist:
• Indications of heat damage including weld spatter or arc strikes
• Excessive pitting or corrosion
• 10% reduction of the original or catalog dimension at any point around the body or pin
• Body spread including: bent, twisted, distorted, stretched, elongated, cracked, or broken load-bearing
components
• Excessive nicks or gouges
• Incomplete pin engagement, shoulder of pin is not flush with shackle body
• Excessive thread damage
• Evidence of unauthorized welding
Side Loading Reduction Factors
Screw Pin and Bolt Type Shackles
Angle of Side Load Percent Rated
from Vertical In-Line of Load Reduction
Shackle
0° - 5° 0%
5°- 45° 30%
Incorrect
46°-90° 50%
Over 90° Avoid
Applications
The rated capacity of shackles only applies when
they are symmetrically loaded and the included angle
between two sling legs is a maximum of 120°.
Shackle capacity must be reduced when the angle is
greater than 120°.
- 23 -Eye Bolts
Forged Eye bolts – Shoulder Type Types of Eye Bolts
Rated Capacity Table in Pounds
Nominal Eye
Bolt Size 90° 60° 30°
(Inches)
1/4 400 75 NR
5/16 680 210 NR
3/8 1000 400 220
7/16 1380 530 330
1/2 1840 850 520 Angle Loading Factors
9/16 2370 1160 700
5/8 2940 1410 890
3/4 4340 2230 1310
7/8 6000 2960 1910
1 7880 3850 2630
1 1/8 9920 4790 3840
1 1/4 12600 6200 4125
1 1/2 18260 9010 6040
1 3/4 24700 12100 8250
2 32500 15970 10910
Eye Bolt Pre-Use Inspection Checklist
All eye bolts must be forged, cast, or die stamped with the name or
trademark of the manufacturer, size or capacity, and grade (alloy
eye bolts only). This information shall not be missing and must be
legible.
Inspect eye bolts daily before use and frequently during use.
Remove from service if any of the following conditions exist:
• Nicks, gouges, bent or distorted eye, or shank
• Obvious wear (10% reduction of original/catalog dimension at
any point)
• Worn, corroded and/or distorted threads
• Indications of heat damage including weld spatter or arc strikes
• Any alteration or repair to eye bolts, such as grinding,
machining, welding, notching, stamping, etc.
is not permissible.
Tapped receiving holes must be cleaned and
inspected for thread wear and deterioration.
- 24 -Eye Bolt Installation and Applications
• Shoulder eye bolts must always be positioned to take the load in the
plane of the eye. An eye bolt that is “turned to the side” will have less
capacity and may experience damage and failure when a load is lifted.
• Shoulder eye bolts should not be loaded at angles below 30 unless
approved by the manufacturer.
• Non-shoulder eye bolts are only designed for vertical loads. When
loaded at angles, a non-shoulder eye bolt will bend or break.
• Eye bolts must be tightened securely, torqued to spec if required by
the manufacturer.
For angular lifts, the shoulder must be flush, making full contact with the
load. Otherwise, only vertical lifts are allowed.
If the nut cannot be
tightened securely against
the load, washers can be Only one nut is Two hex nuts Only one hex nut
used to take up excess required when there must be used is required when at
space between the load and is more than one eye when one eye least twice the eye
nut. bolt diameter of bolt diameter of bolt diameter of
threads engaging the threads or less the threaded
To ensure that the nut load. engages the portion engages
tightens securely, spacers load. the load.
must extend beyond the
threaded portion of the eye
bolt.
Resultant
load
Do not use the point of a Use Do not lift or pull loads with slings
a shackle reeved from one eye bolt to another.
hook in an eye bolt. instead to attach the This will change the angle of loading
sling to the eye bolt. on the eye bolts and create added
tension.
- 25 -Hoist Rings
UNC Threads – Hoist Rings
Rated Capacity Table in Pounds Installation
Bolt Bolt Ring Torque Working
Diameter Length Diameter (ft-lbs) Load The following instructions
(inches) (inches) (inches) Limits must be followed when
(pounds) installing hoist rings,
5/16 1.50 0.38 7 800 including any instructions
3/8 1.50 0.38 12 1000 provided by the
1/2 2.00 0.75 28 2500 manufacturer:
1/2 2.50 0.75 28 2500
5/8 2.00 0.75 60 4000
• Retention nuts, when used, must have
5/8 2.75 0.75 60 4000
full thread engagement. For the rated
3/4 2.25 0.75 100 5000
capacity to apply, SAE 8 standard hex
3/4 2.75 0.75 100 5000
3/4 2.75 1.00 100 7000
or equivalent must be used.
3/4 3.50 1.00 100 7000
3/4 2.25 0.75 100 5000 • Spacers must not be used between the
7/8 2.75 1.00 160 8000 bushing flange and the mounting
7/8 3.50 1.00 160 8000 surface.
1 4.00 1.00 230 10000
1 1/4 4.50 1.25 470 15000 • Contact must be flush and in full contact
1 1/2 6.50 1.75 800 24000 with the hoisting ring, bushing mating,
2 6.50 1.75 1100 30000 surface.
• Tightening torque values shown are based upon
threads being clean, dry and free of lubrication. • Drilled and tapped hole must be 90° to
• Long bolts are designed for use with soft metal the load surface.
(i.e., aluminum) work pieces. While long bolts may
be used with ferrous metal (i.e., steel and iron) • Using a torque wrench, install hoist ring
work pieces, short bolts are designed for ferrous to the torque value recommended and
metal work pieces only.
provided by the manufacturer.
Incorrect Applications • Drilled holes must
be correct
diameter. Depth
must be threaded
shank length plus
one-half the
threaded shank
diameter.
- 26 -Hoist Rings Pre-Use Inspection Checklist
Inspect daily before use and frequently
during use. Remove from service if
any of the following conditions exist:
• Missing or illegible manufacturer’s
name or trademark, capacity and
torque values
• Bail is bent, twisted, or elongated
• Threads on the shank and
receiving holes are unclean,
damaged, or do not fit properly
• Corrosion, wear, or damage
• Tapped receiving holes must be
cleaned and inspected for tread
wear and deterioration
• Any evidence of alteration or repair • Bail must move freely (it should pivot 180
to hoist rings, such as grinding, and swivel 360)
machining, welding, notching,
stamping, etc.
• Indications of heat damage
including weld spatter or arc strikes
Application
Unlike eye bolts, the rated capacity of hoist rings is not reduced when loaded at angles.
It is important to remember that when hoist rings are loaded at angles (see illustration
below) additional tension is created. This tension plus the actual load weight must not
exceed the rated capacity of the hoist rings.
- 27 -Turnbuckles
Turnbuckle Capacity Table
Alloy Steel or Equivalent
Hook-style Turnbuckles End Fitting Types
Size Rated
(Inches) Capacity
(Pounds)
1/4 400
5/16 700
3/8 1000
1/2 1500
5/8 2250
3/4 3000
7/8 4000
1 5000
1 1/4 6500
1 1/2 7500
Jaw-style and Eye-style Securing Turnbuckle End Fittings
Turnbuckles End Fittings must be secured to prevent rotation
Size Rated
(Inches) Capacity Do not use jam nuts
(Pounds)
1/4 500
5/16 800
3/8 1200
1/2 2200
5/8 3500
3/4 5200 Instead, use a lock wire
7/8 7200
1 10000
1 1/4 15200
1 1/2 21400
1 3/4 28000
2 37000
2 1/2 60000
2 3/4 75000
Applications
• Turnbuckles can be used to level and distribute the load
among the sling.
• When used in hoisting and rigging applications, turnbuckles
should be made from alloy steel or the equivalent, and not
welded.
• Turnbuckles must be used in a straight or in-line pull only.
- 28 -Using Rope in Rigging Applications
• Allowable uses:
– Hand hoisting of objects to elevated
positions
– Tag lines
– Other acceptable uses
• Requires
– Knowledge of knots
– Knowledge of rope strength
Fiber or Synthetic Rope Strength
• Rule of Thumb used to calculate safe
working load in pounds
1. Change rope diameter into 8ths of an inch
2. Square the numerator of the fraction
3. Multiply the result by N
a. N = 20 for manila
b. N = 60 for nylon and polyester
Example: 3/4 inch manila rope
• Convert to 8ths: 3/4 = 6/8
• Square the numerator: 62 = 36
• Multiply the result by N: 36 x 20 = 720 lbs
• Calculated safe working load applies to straight length of new rope
– Additional reductions are required for knots, age, and condition
Knots, Bends, and Hitches
• Knots, bends, and hitches reduce the working strength of a rope.
– Knot 50%
– Bend 50%
– Hitch 75%
Rope Condition
• Manila rope is affected by age.
– Safe working load decreases 1% per year.
• All rope is to be removed from service if any of the following
conditions are present:
– Abnormal wear
– Powder or grit between strands
– Broken or cut fibers
– Variations in size or roundness
– Discoloration or rotting
- 29 -Useful Knots
• Figure-Eight Knot
– at end to prevent from passing
through object
• Reef or Square Knot
– join two ropes of same size
• Round turn and two half hitches
– secure tag line to object
• Bowline
– most widely used knot
– will not slip, jam, or fail
• Timber Hitch
– used for hoisting planks or pipe
– holds without slipping or jamming
- 30 -Lift, Maneuver, and Move Load
Handling Symmetrical Loads
1. Check the following to ensure that all are up-to-date and in
proper working condition prior to crane operation:
a. Annual BNL overhead crane inspection tag
b. Crane main disconnect switch
c. Supporting structure and rails for loose fasteners or
unusual wear
d. Controls and operating mechanism (feeder cable strain
relief, loose fasteners and damage to pendant controls)
e. Block for wear and lubrication
f. Hooks for cracks, throat spread, deformation, damage,
wear and safety latch
g. Hoist rope for significant wear, kinks, broken wires,
crushing, bird-caging, and corrosion
h. Hoist chain for nicks, gouges, distortion, wear, corrosion, and arc strikes
i. Hook latch for proper operation
j. Fluid leaks on floor, excess grease
k. Any other deficiency that may constitute a hazard
l. Main hoisting gear system for noise
m. Hoist upper-limit switch
n. Proper spooling of drums
o. Auxiliary hoist
p. Bridge travel - both directions
q. Bridge limit switch, or mechanical stop (both directions)
r. Bridge brakes
s. Trolley travel - both directions
t. Trolley limit switch, or mechanical stop - both directions
u. Load brakes
v. Any other deficiency that may constitute a hazard
2. Check the travel route to ensure there is sufficient clearance for the load.
3. Check the destination area for adequate clearance as well as for adequate floor
strength to support the load safely once it is placed down.
4. Attach slings/chains/wire ropes to the load above the center of gravity as
specified on the Lift Plan.
a. If the only available attachment points are below the center of gravity,
stabilize the load using taglines.
5. Equalize loading on multiple leg slings and maintain a balanced load.
6. Protect rigging equipment and the load from sharp surfaces and damage.
- 31 -7. Slowly lift the load until it just begins to rise off the ground. Stop to see if load will
rise evenly or if it will tilt.
a. If the load tilts, lower immediately and reposition rigging components to
prevent the load from listing.
b. Repeat the test lift. If problem recurs, stop the lift and reexamine the Lift
Plan's recommendations for rigging equipment as well as the location of
the load's center of gravity.
8. After the load is balanced correctly, warn everyone in the area of the impending
lift by using the facility's notification system (sounding an alarm, etc.).
9. Proceed by lifting the load slowly and moving the load slowly to its destination.
a. Keep load as low to ground as possible.
b. Use attendants to walk with the load if needed to keep it from impacting
surrounding objects.
10. Lower the load slowly, making sure that it lines up correctly with any blocks,
timbers, or other support devices that might be needed.
11. Detach the rigging and secure the equipment.
Handling Asymmetrical Loads
1. Check that all crane systems are up-to-date and in proper
working condition prior to crane operation.
2. Check the travel route to ensure there is sufficient clearance
for the load.
3. Check the destination area for adequate clearance as well as
for adequate floor strength to support the load safely once it
is placed down.
4. Determine and identify the location of the load's center of
gravity.
5. Attach slings/chains/wire ropes to the load above the center
of gravity as specified on the Lift Plan.
a. If the only available attachment points are below the
center of gravity, stabilize the load using taglines.
6. Equalize loading on multiple leg slings and maintain a
balanced load.
7. Protect rigging equipment and the load from sharp surfaces and damage.
8. Slowly lift the load until it just begins to rise off the ground. Stop to see if load will
rise evenly or if it will tilt.
- 32 -a. If the load tilts, lower immediately and reposition rigging components to
prevent the load from listing.
b. Repeat the test lift. If problem recurs, stop the lift and reexamine the Lift
Plan's recommendations for rigging equipment as well as the location of
the load's center of gravity.
9. After the load is balanced correctly, warn everyone in the area of the impending
lift by using the facility's notification system (sounding an alarm, etc.).
10. Proceed by lifting the load slowly and moving the load slowly to its destination.
a. Keep load as low to ground as possible.
b. Use attendants to walk with the load if needed to keep it from impacting
surrounding objects.
11. Lower the load slowly, making sure that it lines up correctly with any blocks,
timbers, or other support devices that might be needed.
12. Detach the rigging and secure the equipment.
Moving Loads through Vertical Openings
Passing a load through a shaft, floor hole, or other vertical opening presents many
challenges to the rigger. Often, because of tight clearances or the length of the opening,
it is not practical to have an assistant help guide the load as it passes through. As a
result, determining the size of the opening, the exact balance point, and the overall load
footprint is the key to a successful operation.
1. Check that all crane systems are up-to-
date and in proper working condition prior
to crane operation.
2. Check the opening to ensure there is
sufficient clearance for the load.
3. Check the destination area for adequate
clearance as well as for adequate floor
strength to support the load safely once it
is placed down.
4. Determine and identify the location of the
load's center of gravity.
5. Attach slings/chains/wire ropes to the load above the center of gravity as
specified on the Lift Plan.
a. If the only available attachment points are below the center of gravity,
stabilize the load using taglines.
- 33 -6. Equalize loading on multiple leg slings and maintain a balanced load.
7. Protect rigging equipment and the load from sharp surfaces and damage.
8. Slowly lift the load until it just begins to rise off the ground. Stop to see if load will
rise evenly or if it will tilt.
a. If the load tilts, lower immediately and reposition rigging components to
prevent the load from listing.
b. Repeat the test lift. If problem recurs, stop the lift and reexamine the Lift
Plan's recommendations for rigging equipment as well as the location of
the load's center of gravity.
9. After the load is balanced correctly, warn everyone in the area of the impending
lift by using the facility's notification system (sounding an alarm, etc.).
10. Proceed by lifting the load slowly and lowering the load slowly to its destination.
a. Keep load as low to ground as possible.
b. Use attendants to guide the load if needed to keep it from impacting the
walls of the opening.
11. Lower the load slowly, making sure that it lines up correctly with any blocks,
timbers, or other support devices that might be needed.
12. Detach the rigging and secure the equipment.
Moving Loads through Horizontal Openings
1. Check that all crane systems are up-to-date and in
proper working condition prior to crane operation.
2. Check the opening to ensure there is sufficient
clearance for the load.
3. Check the destination area for adequate clearance as
well as for adequate floor strength to support the load
safely once it is placed down.
4. Determine and identify the location of the load's center
of gravity.
5. Attach slings/chains/wire ropes to the load above the center of gravity as
specified on the Lift Plan.
a. If the only available attachment points are below the center of gravity,
stabilize the load using taglines.
6. Equalize loading on multiple leg slings and maintain a balanced load.
7. Protect rigging equipment and the load from sharp surfaces and damage.
8. Position any catch equipment, such as rollers or a second crane, on the receiving
side of the wall hole.
- 34 -9. Slowly lift the load until it just begins to rise off the ground. Stop to see if load will
rise evenly or if it will tilt.
a. If the load tilts, lower immediately and reposition rigging components to
prevent the load from listing.
b. Repeat the test lift. If problem recurs, stop the lift and reexamine the Lift
Plan's recommendations for rigging equipment as well as the location of
the load's center of gravity.
10. After the load is balanced correctly, warn everyone in the area of the impending
lift by using the facility's notification system (sounding an alarm, etc.).
11. Proceed by lifting the load slowly and lowering the load slowly to its destination.
a. Keep load as low to ground as possible.
b. Use attendants to guide the load if needed to keep it from impacting the
walls of the opening.
12. Once the load is partially through the wall opening, have an assistant ensure that
it is lined up correctly with the receiving device.
13. Depending on the load's shape and center of gravity, stop the lift as needed to
attach rigging devices on the receiving side.
14. Continue the lift until the load is on the receiving side of the wall opening, when it
can be supported and controlled by that side's rigging apparatus.
15. Move the load to its final position.
Moving Loads around or over Obstacles
Depending on the work location, it may be necessary to lift a load around or over an
obstacle that is blocking the travel path. When this happens, it is especially important to
determine the potential effect of the load being dropped or otherwise damaged as a
result of a fall or collision. Factors to consider include, but are not limited to, the nature
of the obstacle and the item being lifted, cost, programmatic impact, safety hazard, and
environmental impact.
If, by the nature of the work being performed, the lift is
elevated to "critical," contact the BNL Riggers in the
Facilities & Operations to perform the lift.
If the lift is considered incidental or pre-engineered
after careful analysis, then proceed as follows:
1. Check that all crane systems are up-to-date
and in proper working condition prior to crane
operation.
2. Check the opening to ensure there is sufficient
clearance for the load.
- 35 -3. Check the destination area for adequate clearance as well as for adequate floor
strength to support the load safely once it is placed down.
4. Determine and identify the location of the load's center of gravity.
5. Attach slings/chains/wire ropes to the load above the center of gravity as
specified on the Lift Plan.
a. If the only available attachment points are below the center of gravity,
stabilize the load using taglines.
6. Equalize loading on multiple leg slings and maintain a balanced load.
7. Protect rigging equipment and the load from sharp surfaces and damage.
8. Slowly lift the load until it just begins to rise off the ground. Stop to see if load will
rise evenly or if it will tilt.
a. If the load tilts, lower immediately and reposition components to prevent
the load from listing.
b. Repeat the test lift. If problem recurs, stop the lift and reexamine the Lift
Plan's recommendations for rigging equipment as well as the location of
the load's center of gravity.
9. After the load is balanced correctly, warn everyone in the area of the impending
lift by using the facility's notification system (sounding an alarm, etc.).
10. Proceed by lifting the load slowly and lowering the load slowly to its destination.
a. Keep load as low to ground as possible. Only raise the load when it
becomes necessary to move around or over an obstacle.
b. Use attendants and tag lines to guide the load if needed to keep it from
impacting walls or other equipment.
11. Once the load is partially through the wall opening, have an assistant ensure that
it is lined up correctly with the receiving device.
12. Lower the load as soon as the obstacle is cleared.
13. When the load is in its final location, lower it slowly, making sure that it lines up
correctly with any blocks, timbers, or other support devices that might be needed.
14. Move the load to its final.
Moving Loads in Close Proximities
Depending on the work location, it may be necessary to pass a load very near to
stationary objects along the travel path. When this happens, it is especially important to
determine the potential for damage to the load or nearby equipment as a result of a fall
or collision. Factors to consider include, but are not limited to, the nature of the obstacle
and the item being lifted, cost, programmatic impact, safety hazard, and environmental
- 36 -impact. If, by the nature of the work being performed, the lift is elevated to "critical,"
contact the BNL Riggers in Facilities & Operations to perform the lift.
If the lift is considered incidental or pre-engineered after careful analysis, then proceed
as follows:
1. Check that all crane systems are up-to-date and in
proper working condition prior to crane operation.
2. Check the clearance along the travel path to ensure
there is sufficient clearance for the load.
3. Check the destination area for adequate clearance as
well as for adequate floor strength to support the load
safely once it is placed down.
4. Determine and identify the location of the load's center
of gravity.
5. Attach slings/chains/wire ropes to the load above the center of gravity as
specified on the Lift Plan.
6. If the only available attachment points are below the center of gravity, stabilize
the load using taglines.
7. Equalize loading on multiple leg slings and maintain a balanced load.
8. Protect rigging equipment and the load from sharp surfaces and damage.
9. Slowly lift the load until it just begins to rise off the ground. Stop to see if load will
rise evenly or if it will tilt.
10. If the load tilts, lower immediately and reposition components to prevent the load
from listing.
11. Repeat the test lift. If problem recurs, stop the lift and reexamine the Lift Plan's
recommendations for rigging equipment as well as the location of the load's
center of gravity.
12. After the load is balanced correctly, warn everyone in the area of the impending
lift by using the facility's notification system (sounding an alarm, etc.).
13. Proceed by lifting the load slowly and lowering the load slowly to its destination.
a. Keep load as low to ground as possible.
b. Proceed very slowly when passing close to other equipment.
c. Use attendants and tag lines to guide the load if needed to keep it from
impacting walls or other equipment.
14. When the load is in its final location, lower it slowly, making sure that it lines up
correctly with any blocks, timbers, or other support devices that might be needed.
- 37 -Upending, Inverting, and Rolling Loads
Upending a load refers to the process of rotating an object so
that it rests on its side or end. Overhead cranes and hoists
can be used to upend and invert loads, but before such an
operation can be attempted, it is absolutely essential to know
the load's weight, center of gravity, and tip point. A load’s tip
point is the corner on which it will pivot when upended. Only
with these three facts known can rigging be selected and
placed correctly to invert a load safely without shock loading.
When upending a load, the optimum lift/hitch point is just
below a line extending through the tip point and the load’s
center of gravity, as shown at right. After attaching at the
lift/hitch point, a load can be tilted on its side by raising the hoist and providing a slight
amount of travel.
When tipping a load, be sure to move the hoist both vertically and
horizontally. If the hoist is moved vertically only, the tip point will
drag across the floor, possibly damaging the load or floor as it slides.
When loads must be upended without hoist travel, the tip point must
be protected by placing the load on a skid or a dolly. This way, the
skid or dolly slides on the floor until the load is fully raised. The skid
or dolly can then be removed and the load set down.
The tip point and lift point must be located precisely to prevent the
load from raising and flipping uncontrollably. If the lift point is above
the line extending from the tip point through the center of gravity, the
load will flip and rise off the floor, causing it to swing uncontrollably,
as shown at right.
At the same time, if the lift point is too low, the wire rope will not be
held in tension, and so cannot restrain the load as it tips. When this
happens, the wire rope will go slack, allowing the load to tip over
suddenly and crash onto the floor. A load upended in this fashion
may be damaged as it falls over and may cause collateral damage
to property or personnel.
- 38 -Lifting with Hand-Operated Chain Hoists
• Hand-operated chain hoists come in a variety of types, shapes, sizes, lifting
capacities, and diverse features/controls.
• These manually operated hoisting devices enable one person to lift heavy loads
(multiple tons) by using a series of reduction gears to provide a mechanical
advantage and thereby reduce the amount of effort (muscle energy) needed to lift a
load.
• There are 3 common types of hand-operated chain hoists used in rigging, shown
below. Each operates on a different principle, and each has its own advantages and
disadvantages to consider during the selection process.
Operating Principle
Differential Hoist • Operates with multiple sheaves, each with pockets cut out to fit chain
links. One sheave has more pockets than the other so as it rotates of
the same shaft it take up chain faster.
Advantages
• Relatively inexpensive
• Simple to operate
Disadvantages
• Least efficient hand-operated chain hoist
• Will slip when hand loop is released
• If load/hoist are jarred the load may fall
Operating Principle
Screw-Gear Hoist • The mechanism inside the block is a worm and pinion arrangement.
The hand chain is an endless loop that rotates the mechanism. The
load chain descends directly from the block.
Advantages
• More efficient than differential hoists
• Can safely suspend a load when the hand chain is released because
the worm gear cannot be driven by its pinion.
Disadvantages
• Less efficient than a spur-gear hoist
Operating Principle
• Uses a gear arrangement called a sun and planetary gear set. The
Spur-Gear Hoist hand wheel is coupled to the sun gear. As the sun gear turns, the
entire group of planetary gears slowly revolves. The load wheel
rotates much more slowly than the sun gear, providing the reduction in
speed necessary for the hoist to operate.
Advantages
• Most efficient hand-operated chain hoist
• Incorporates a clutch that slips if the hoist is overload beyond its safe
lifting capacity to keep the load from being raised
Disadvantages
• Requires a friction brake (usually an automatic feature/some have a
manual brake release) to hold a load aloft when the hand chain is
released because of the reduced amount of friction.
• If improperly used or abused, hand-operated hoists can cause
major production loss, and serious injury.
• Safe and sound rigging practices shall be used to conjunction with
hoisting operations.
- 39 -Hoisting Guidance
Operation of a hand operated chain hoist involves more than pulling the hand chain.
The use of these hoists is subject to certain hazards that cannot be met by mechanical
means, but only by the exercise of intelligence, care, common sense, and experience in
anticipating the motions that will occur as a result of operating the hoists.
Pre-Use Inspection Requirements
• Pre-use inspections are to be conducted by a designated person who shall
determine whether conditions found constitute a hazard and whether a more
detailed inspection is necessary.
• Records not required for frequent inspections
• Inspect daily before use and frequently during use
Identification
• The hoist shall be marked with the manufacturer’s name, model, serial number, and
rated load capacity attached on a plate or label, or cast, forged, or stamped on the
hoist or load block
Warnings and Labels
• Warnings shall be affixed to the hoist or block with labels displaying information
concerning operating procedures
• Labels shall be in compliance with ANSI Z535.4 and include cautionary language
against:
o Lifting more than rated load capacity
o Operating hoist with twisted, kinked, or damaged chain
o Operating damaged or malfunctioning hoist
o Lifting people or lifting loads over people
o Operating hoist other than with human power
o Removing or obscuring labels
Pre-Use Inspection Checklist
The following items shall be inspected:
• Operating mechanism for proper operation, proper adjustment, and unusual sounds
• Hoist braking system for proper operation
• Hook, & latches if used, for ASME B30.10 compliance
• Hoist load chain, reeving, and hoist rope for compliance with manufacturer
recommendations
Pre-Hoist Operations
The operator must:
• Be trained
• Not make adjustments or repairs unless qualified
• Report substandard conditions
• Not operate a hoist that is tagged out of-service
• Not use the chain or rope as a welding ground
• Not allow welding electrodes to contact the hoist
• Operate only manually (hand power) by one operator
- 40 -Hoist Operations
• Hoist rope or chain shall not be wrapped around a load
• Before load movement, the operator shall be sure chains are not kinked or twisted
around each other
• The hoist shall not be operated unless rope or chain is seated properly on the drum,
sheaves, or sprockets
• The hoist shall not be operated unless centered over the load, except when
authorized by a qualified person
• The operator shall not pick up a load in excess of the rated load bearing capacity on
the hoist or load block, except during authorized tests or pre-engineered lifts
• A hoist overload limiting devices shall not be used to measure the maximum load to
be lifted
• Each time a load approaching load capacity is handled, the operator shall check
hoist brake action by lifting the load just clear of supports and continuing only after
verifying the brake system is operating properly
• Unless a lower limit device is provided, the load shall not be lowered below the point
where less than two wraps of rope remain on the anchorage of the hoist drum
- 41 -Appendices
- 42 -Carbon Steel Pipe Size Chart1
Nom. Size O.D. Schedule Number Wall Thickness Inside Diameter Pipe Weight
(in) (in) or Weight (in) (in) (lbs/ft)
1/4 0.540 40ST 0.088 0.364 0.424
1/4 0.540 80XS 0.119 0.302 0.535
3/8 0.675 40ST 0.091 0.493 0.567
3/8 0.675 80XS 0.126 0.423 0.738
1/2 0.840 40ST 0.109 0.622 0.850
1/2 0.840 80XS 0.147 0.546 1.087
3/4 1.050 40ST 0.113 0.824 1.13
3/4 1.050 80XS 0.154 0.742 1.47
1 1.315 40ST 0.133 1.049 1.68
1 1.315 80XS 0.179 0.957 2.17
1-1/4 1.660 40ST 0.140 1.380 2.27
1-1/4 1.660 80XS 0.191 1.278 2.99
1-1/2 1.900 40ST 0.145 1.610 2.72
1-1/2 1.900 80XS 0.200 1.500 3.63
2 2.375 40ST 0.154 2.067 3.65
2 2.375 80XS 0.218 1.939 5.02
2-1/2 2.875 40ST 0.203 2.469 5.79
2-1/2 2.875 80XS 0.276 2.323 7.66
3 3.500 40ST 0.216 3.068 7.57
3 3.500 80XS 0.300 2.900 10.25
4 4.500 40ST 0.237 4.026 10.78
4 4.500 80XS 0.337 3.826 14.97
6 6.625 40ST 0.280 6.065 18.96
6 6.625 80XS 0.432 5.761 28.55
8 8.625 30 0.277 8.071 24.68
8 8.625 40ST 0.322 7.981 28.53
8 8.625 80XS 0.500 7.625 43.35
10 10.75 30 0.307 10.136 34.21
10 10.75 40ST 0.365 10.202 40.45
10 10.75 XS 0.500 9.750 54.69
10 10.75 80 0.593 9.564 64.28
12 12.75 30 0.330 12.090 43.74
12 12.75 ST 0.375 12.000 49.52
12 12.75 40 0.406 11.938 53.48
12 12.75 XS 0.500 11.750 65.37
12 12.75 80 0.687 11.376 88.44
14 14.00 30ST 0.375 13.250 54.53
14 14.00 40 0.437 13.126 63.25
14 14.00 XS 0.500 13.000 72.04
14 14.00 80 0.750 12.500 106.05
16 16.00 30ST 0.375 15.250 62.53
16 16.00 40XS 0.500 15.000 82.71
18 18.00 ST 0.375 17.250 70.54
18 18.00 30 0.437 17.126 81.91
18 18.00 XS 0.500 17.000 93.38
18 18.00 40 0.562 16.876 104.59
20 20.00 20ST 0.375 19.250 78.54
20 20.00 30XS 0.500 19.000 104.05
20 20.00 40 0.593 18.814 122.82
1
Based on ANSI B 36.10 and ANSI B 36.19
- 43 -Weight of Common Materials2
Material lb. per Material lb. per
cu. ft. cu. ft.
Aluminum 165 Lumber: Douglas fir 34
Asbestos, solid 153 Lumber: Oak 62
Asphalt 81 Lumber: Pine 30
Brass 524 Lumber: Poplar 30
Brick, soft 110 Lumber: Spruce 28
Brick, common red 125 Lumber: Railroad ties 50
Brick, pressed 140 Marble 98
Bronze 534 Motor oil 60
Coal 56 Paper 58
Concrete, slag 130 Petroleum: Crude 55
Concrete, reinforced 150 Petroleum: Gasoline 45
Copper 556 Portland cement (loose) 94
Diesel fuel 52 Portland cement (set) 183
Crushed rock 95 River sand 120
Earth, dry, loose 75 Rubber 94
Earth, dry, packed 95 Sand, wet 120
Earth, wet 100 Sand, dry 105
Glass 160 Sand, loose 90
Granite 96 Steel 490
Ice, solid 56 Tar 75
Iron 485 Tin 460
Lead 710 Water 63
Lime (Gypsum) 58 Zinc 437
Limestone 95
Weights of Steel and Aluminum Plates
(pounds per square foot)
plate size
(inches) steel aluminum
1/8 5 1.75
1/4 10 3.50
1/2 20 7.00
3/4 30 10.50
1 40 14.00
2
Values taken from Rigging by James Headley, Crane Institute of America, 2007 edition.
- 44 -Hand Signals
- 45 -You can also read