Become a Minecraft Master - Student's Guide July 2019 - Thierry Karsenti
←
→
Page content transcription
If your browser does not render page correctly, please read the page content below
Become a Minecraft Master
Student's Guide    Thierry KARSENTI
                   Pierre-Luc TRAHAN
                   Simon PARENT

                   July 2019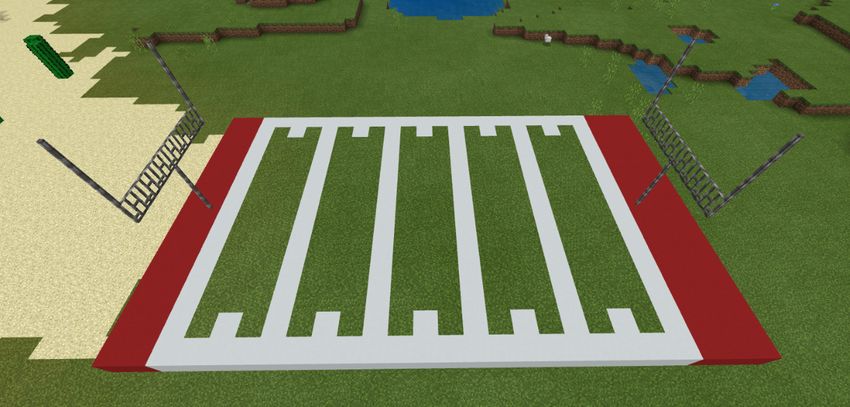
Become a MINECRAFT MASTER
Level                          Challenge                    Level                             Challenge
        •    Customize your character                                 •     Tunnel into the ground and emerge somewhere else

 1      ••   Create a world or join a world
                                                             6        ••    Tunnel into the ground and pass under a lake

        ••• Configure game settings                                   ••• Build or find an underground cavern

                                                                            Switch to Creative mode for the following levels
        •    Explore your world
                                                                      •     Build a house

 2      ••   Jump into water and get out again               7        ••    Create a treehouse

        ••• Break a block of material                                 ••• Connect your treehouse to another treehouse
                                                           BRONZE

        •    Pick up an item                                          •     Create a garden

 3      ••   Gather wood                                     8        ••    Tame an animal

        ••• Move items from/to your hotbar and inventory              ••• Breed animals
                                                            SILVER
        •    Make wooden planks                                       •     Build a road with a bridge

 4      ••   Make a wooden crafting table                    9        ••    Build a car

        ••• Make a wooden pickaxe                                     ••• Build a football stadium
                                                            GOLD
        •    Gather cobblestone                                             You can work as a team for this level on a LAN

 5      ••   Make a furnace                                 10        •••
                                                                            Build a realistic school (classrooms, building,
                                                                            schoolyard, etc.)
        ••• Make a torch
                                                           PLATINUM
Attestation
 Progression
  in levels

      01

      02

      03

      04

      05

      06

      07

      08

      09

      10       @thierryUdM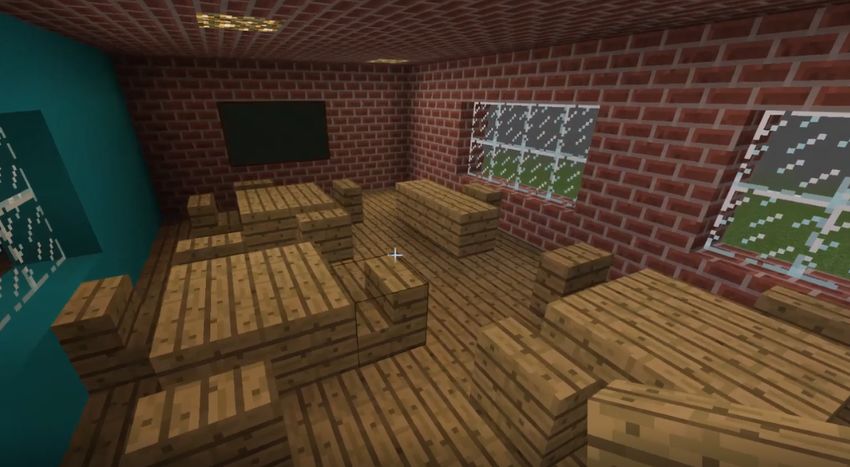
Karsenti, T., Trahan, P.-L., and Parent, S. (2019). Minecraft Master – Student Guide. Montreal, QC : Canada Research Chair on Technologies in
Education.

This document is published under the Creative Commons Attribution 4.0 International License (the least restrictive).

To learn more about this type of license, please visit the following website: creativecommons.ca.

To cite this document:
Karsenti, T., Trahan, P.-L., and Parent, S. (2019). Minecraft Master – Student Guide. Montreal, QC : Canada Research Chair on
Technologies in Education.

French-language editing and proofreading: Valérie Drouin
Graphic editing: Simon Parent
Cover page: Sylvie Côté
Contributors: Gabriel Tétreault

Guide available on: karsenti.ca/chaire

Minecraft Master: Student Guide – Canada Research Chair on Technologies in Education (2019)                                                3
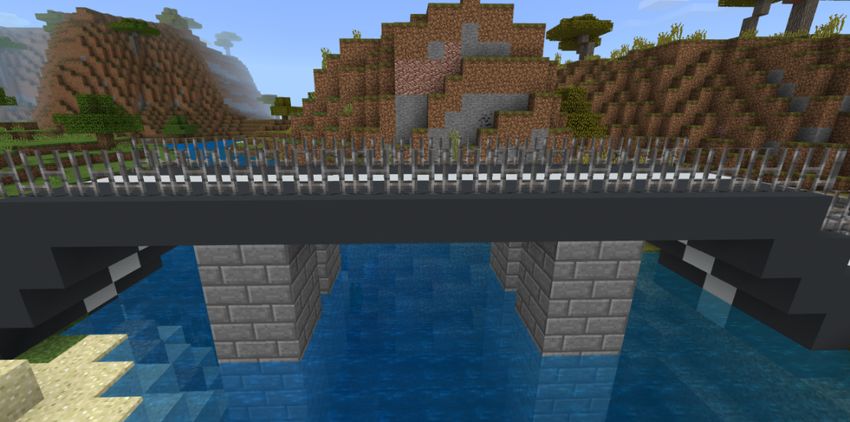
Table of Contents
MINECRAFT EDUCATION ................................................................................................................................... 6
    MINECRAFT: THE GAME .................................................................................................................................................................. 6
    KEYBOARD AND MOUSE CONTROLS FOR MINECRAFT EDUCATION EDITION .................................................................................................... 7
LEVEL 1 .......................................................................................................................................................... 9
    CUSTOMIZE YOUR CHARACTER ........................................................................................................................................................... 9
    CREATE A WORLD ........................................................................................................................................................................ 10
    CONFIGURE THE OPTIONS FOR YOUR WORLD........................................................................................................................................ 10
LEVEL 2 ........................................................................................................................................................ 11
    EXPLORE YOUR WORLD ................................................................................................................................................................. 11
    JUMP INTO WATER AND GET OUT AGAIN ............................................................................................................................................. 11
    BREAK A BLOCK OF MATERIAL ......................................................................................................................................................... 12
LEVEL 3 ........................................................................................................................................................ 13
    PICK UP AN ITEM ......................................................................................................................................................................... 13
    GATHER WOOD ........................................................................................................................................................................... 13
    MOVE ITEMS FROM/TO YOUR HOTBAR AND INVENTORY .......................................................................................................................... 14
LEVEL 4 ........................................................................................................................................................ 15
    MAKE WOODEN PLANKS ................................................................................................................................................................ 15
    MAKE A WOODEN CRAFTING TABLE................................................................................................................................................... 16
    MAKE A WOODEN PICKAXE ............................................................................................................................................................. 16
LEVEL 5 ........................................................................................................................................................ 17
    GATHER COBBLESTONE.................................................................................................................................................................. 17
    MAKE A FURNACE ........................................................................................................................................................................ 17
    MAKE A TORCH ........................................................................................................................................................................... 18
LEVEL 6 ........................................................................................................................................................ 19
    TUNNEL INTO THE GROUND AND EMERGE SOMEWHERE ELSE .................................................................................................................... 19
    TUNNEL INTO THE GROUND AND PASS UNDER A LAKE ............................................................................................................................. 19
    BUILD OR FIND AN UNDERGROUND CAVERN ........................................................................................................................................ 20
TUTORIAL .................................................................................................................................................... 21
    CREATIVE MODE: ACTIVATION AND FUNCTIONS ................................................................................................................................... 21
LEVEL 7 ........................................................................................................................................................ 22
    BUILD A HOUSE ........................................................................................................................................................................... 22
    CREATE A TREEHOUSE ................................................................................................................................................................... 23
    CONNECT YOUR TREEHOUSE TO ANOTHER TREEHOUSE ............................................................................................................................ 23

Minecraft Master: Student Guide – Canada Research Chair on Technologies in Education (2019)                                                                                                   4
LEVEL 8 ........................................................................................................................................................ 24
    CREATE A GARDEN ....................................................................................................................................................................... 24
    TAME AN ANIMAL ........................................................................................................................................................................ 25
    BREED ANIMALS.......................................................................................................................................................................... 26
LEVEL 9 ........................................................................................................................................................ 27
    BUILD A ROAD WITH A BRIDGE ........................................................................................................................................................ 27
    BUILD A CAR .............................................................................................................................................................................. 28
    BUILD A FOOTBALL STADIUM .......................................................................................................................................................... 29
TUTORIAL .................................................................................................................................................... 30
    MULTIPLAYER MODE ................................................................................................................................................................... 30
LEVEL 10 ...................................................................................................................................................... 31
    BUILD A REALISTIC SCHOOL (CLASSROOMS, BUILDING, SCHOOLYARD, ETC.) ................................................................................................. 31

Minecraft Master: Student Guide – Canada Research Chair on Technologies in Education (2019)                                                                                                    5
Minecraft Education
Minecraft: The game
Cave Game, which preceded Minecraft, was originally created in 2009. A small, independent publisher called Mojang went on to
improve the game and develop the first full version of Minecraft in 2011. Microsoft bought the brand in 2014 and has released
regularly updates since then. With over 150 million game licenses sold to date, Minecraft is among the world’s top selling video
games.

Minecraft presents a simple, block-based visual environment. Players design a virtual world and construct everything from blocks
of material. Everything in that world is block-shaped, including dirt, trees, water and animals. The overall effect gives Minecraft
an enchanted, cartoon-like ambiance.

But Minecraft is also an environment in which players evolve. Whereas most games have a story line to guide players, Minecraft
offers a different experience. Players generate their own world, without any preset objectives.

In Survival mode, players must gather the supplies or resources they need to survive. They use these resources (wood, dirt, coal,
stone, etc.) to build a shelter, craft tools for resource gathering, make weapons and armor, and so on. Although getting around
during the day is no problem, the night brings deadly monsters. Players also have to feed themselves, either by working the land
to harvest produce or by breeding farm animals. Once survival is ensured, players can set their own goals. They can explore their
new world and develop it by building all sorts of structures, or they can explore the two other modes (Creative and Hardcore).

In Creative mode, players are invincible (monsters cannot kill them). Players also have complete access to all the building blocks,
and they can break any block with a single click. They don’t need to gather resources or craft tools in order to survive. Players are
given free rein to design completely new worlds. They can also create imaginative structures and pixelated artwork.

This Guide describes the functions of two modes through various levels. In Survival mode, users will learn how to gather blocks
in order to craft tools and build a house. They can then switch to Creative mode in order to create different structures, like a
town or an Incan city.

Minecraft Master: Student Guide – Canada Research Chair on Technologies in Education (2019)                                        6
Keyboard and Mouse Controls for Minecraft Education Edition
When playing Minecraft Education Edition on a computer, use your keyboard and mouse (or touchpad).
Remember that to use the commands in this Guide, you will need a QWERTY keyboard.

 Movement                                                                          Keyboard commands
 W: Forward. Double-tap to sprint.                      E: Open your inventory.
 S: Backward                                            F: Swap the items in your Main Hand and Off Hand.
 A: Left                                                Q: Drop the item in your hand to the ground.
 D: Right                                               Esc: Show the menu (this pauses a single-player game). The
 Spacebar: Jump. Allows you to swim upward in water. In mouse can now be used to select items from your hotbar.
 Creative mode, double-tap to fly.                      Enter: Show the text bar. The mouse can now be used to
 Shift: Sneak. Allows you to swim downward in water.    select items from your hotbar.
                                                        TAB + CTRL (or TAB + CMD on Mac): Toggle to another
                                                        application.

 Mouse controls
 Mouse movement: Controls turning and aiming.
 Left-click: Use to break blocks and attack enemies.
 Right-click: Use to place blocks, use items, interact with
 chests, etc.
 Mouse wheel: Select items from the hotbar (or change
 items using the numbers associated with the slots).

Minecraft Master: Student Guide – Canada Research Chair on Technologies in Education (2019)                          7
Levels (Solutions)
Become a Minecraft Master

Image source: RealGameMedia (https://realgamemedia.com/wp-content/uploads/2015/07/minecraft.png

Minecraft Master: Student Guide – Canada Research Chair on Technologies in Education (2019)       8

Level 1
 •        Customize your character
          Level description
          Before starting to play, you can customize your character. Minecraft Education Edition provides a series of characters or skins to
          choose from.

          This is the main menu screen. To the lower left, click the button with the speech icon to set the language. Select the Play button
          to access your game or the Settings button to choose your options. The two other buttons (Library and Quick Play) are
          Minecraft Education Edition functions that will not be used in this Guide.

          On the main menu screen, click the Hanger button. You
          will see it below the character at the bottom right of the
          screen.

          The Choose Skin dialog box opens. Select any skin you
          like. You can change your skin at any time by returning to
          the main menu screen.

          Click the + button (framed in red) to view all choices for
          each category.

Minecraft Master: Student Guide – Canada Research Chair on Technologies in Education (2019)                                                    9
•• Create a world
Level description
In any video game, the first step is to create a game, and Minecraft is no exception to this rule. First, you have to set up your world
so you can advance through the levels.
On the main menu screen, click Play.
The Worlds page opens. Click Create New.
Next, click Create New World.
In the World Name section, enter a name for your world.
Then click Create.
••• Configure the options for your world
Level description
Now that you have created your world, you can choose certain settings. For example, you can choose the game mode and the
difficulty level. You can also activate certain options.
Press the Esc key on your keyboard to open the menu.
Then select Settings.
Under Settings, make sure the Default Game Mode is
Survival. If another game mode is selected, click that
mode and then select Survival mode.
Set the difficulty level to Peaceful. This will prevent
monsters from bothering you.
From the Settings menu, click Cheats. Select Activate
Permanent Day.
Minecraft Master: Student Guide – Canada Research Chair on Technologies in Education (2019) 10Level 2
• Explore your world
Level description
Now that you’ve created your world and chosen its settings, it’s time to take your first steps into the Minecraft universe.
For controls, refer to the section of this Guide titled
Keyboard and Mouse Controls for Minecraft
Education Edition. Move your mouse cursor to change
your direction and discover all the parts of the landscape.
In this level, try to find a river. This will help you complete
the next level.
•• Jump into water and get out again
Level description
In Minecraft, there are a lot of rivers. Once submerged in water, your character will sink and—just as in real life—you will have
to resurface in order to breathe. That’s why you need to learn how to swim in Minecraft.
Start by finding a river that you can swim in. It must be at
least two cubes of water deep for your character to be
submerged.
When you get to the river, jump in and let yourself sink to
the bottom. To sink faster, press the Shift key. To swim
around, use the W, A, S, and D keys. Use the Spacebar to
swim upward.
Keep an eye on your bubbles (above your Hunger Bar),
which appear as soon as you enter the water. When all ten
bubbles have burst, you run out of oxygen and drown!
Minecraft Master: Student Guide – Canada Research Chair on Technologies in Education (2019) 11••• Break a block of material
Level description
Now it’s time to gather your first block of material. You can collect the blocks that you see around you. You will use them later to
build a shelter and craft tools.
In this level, gather a block of dirt or sand.
To gather a block, first stand next to it. When you place your
cursor on the block, it will be clearly outlined with black lines.
To break the block, place your cursor on the block, then left-click
and hold. Your character will scrape the block and the block will
show cracks. If you let go of your left mouse button before the
block is completely broken up, the cracks will disappear and
you’ll have to start over.
Minecraft Master: Student Guide – Canada Research Chair on Technologies in Education (2019) 12Level 3
• Pick up an item
Level description
You have just broken up a block. Now you have to pick it up so you can use it.
Once a block is broken, it shrinks and hovers above the
ground. Move close to the block. When you are close
enough, your character will automatically gather it.
You’ll then see the block in your hotbar.
•• Gather wood
Level description
For the next levels, you’ll need wood. Wood is a basic resource, because you need it to build your crafting table and your basic
tools (as we’ll see in the next level).
Find a nearby tree. Trees are usually at least three blocks
tall, but you can choose a taller one if you prefer.
Just as you did in Level 2.3, break all the logs in the tree
you selected.
Note: When all a tree’s logs have been broken, the leaves
begin to disappear. That is when you can gather resources
like saplings, sticks and apples.
Minecraft Master: Student Guide – Canada Research Chair on Technologies in Education (2019) 13••• Move items from/to your hotbar and inventory
Level description
Now you have several items in your hotbar (at least one block and several logs). Managing your inventory is an important task in
Minecraft because your inventory has a limited number of slots. Here you’ll discover how to select an item, then move it into your
hotbar or your inventory.
To access the inventory, press the E key on your keyboard.
Now you can see all the items you are carrying. You can
also use it to store armor and to access your crafting table
(discussed in the next levels). Opening your inventory
allows you to view your hotbar (at the bottom, framed in
red).
To manage the item selected in your hand (framed by a
grey rectangle), use the numbers 1 to 9 on your keyboard
or use the mouse wheel.
Press the E key to open your inventory. To move an item
from your hotbar to the inventory, place your cursor on
the block and left-click it, then move your cursor toward
the inventory. When a slot turns green, left-click to place
the block. Use this process to move the block you picked
up in level 3.1 into the inventory.
Minecraft Master: Student Guide – Canada Research Chair on Technologies in Education (2019) 14Level 4
• Make wooden planks
Level description
Earlier we gathered logs. But before you can use the logs to make items, they must be turned into planks. To do this, use the
crafting grid in your inventory.
Place your cursor on the logs, then left-click and hold to place
the logs on the crafting grid. Left-click to deposit all the
selected logs, or right-click to deposit a single log.
Once the logs are placed, the planks should appear in the grid
to the right of the arrow. Left-click to create a batch of planks
(4). To transform all the planks deposited, hold down the
Shift key and left-click.
Another way to make items is to use the recipe book. Activate
the recipe book by clicking the icon that depicts a chest and
a book. A new interface will appear to the left of your
inventory. Click the wooden planks; the logs will
automatically be placed in the crafting grid.
Minecraft Master: Student Guide – Canada Research Chair on Technologies in Education (2019) 15•• Make a wooden crafting table
Level description
There are only four slots available in your inventory for crafting items (crafting grid). However, a lot of recipes require more than
four slots. You will now build a crafting table using the planks you created earlier. This will give you more room for more complex
recipes.
In your inventory, fill in the crafting grid with four planks
(use the recipe book if you like). Right-click to place a plank
in a slot.
••• Make a wooden pickaxe
Level description
Now that you have a crafting table, you can create tools like a wooden pickaxe. A pickaxe is used to mine stone blocks. The first
step is to create sticks (if you did not gather any when you cut down the tree).
Place the crafting table in your hotbar. Select the hotbar using
the number for its position in the hotbar or using the mouse
wheel. Right-click the crafting table to place it on the ground.
To use the table, point your cursor and right-click. You now
have nine slots in your crafting grid.
To create sticks, stack two planks.
Note: The planks can be placed anywhere in the crafting grid.
To craft the pickaxe, you need two sticks and three planks.
Place the three wooden planks so as to fill the top row. Place
the two sticks in the middle column.
Minecraft Master: Student Guide – Canada Research Chair on Technologies in Education (2019) 16Level 5
• Gather cobblestone
Level description
Now you have a pickaxe you can use to mine cobblestone, among other materials. Before, had you tried to scrape cobblestone, you
would not have been able to recover it. You need a pickaxe to gather cobblestone, which can then be used for new recipes. To
successfully complete this level, you must recover at least eight cobblestones.
Start by finding stone. If you are near a mountain, you can
often see uncovered cobblestone. If not, just dig into the
ground a little to uncover some.
Use the wooden pickaxe to mine the cobblestone, the same
way you did in levels 2.3 and 3.2.
•• Make a furnace
Level description
In Minecraft, a furnace can be used for several purposes. You can use it to cook meat, smelt metal like iron and gold, make glass
from sand, and so on. That makes a furnace very useful!
To make a furnace, you will need your crafting table and
eight cobblestones. Place the cobblestones around the
perimeter of the crafting grid (only the middle slot will be
empty).
Tip: A right-click will deposit a single cobblestone. You can
also left-click and hold to trace the shape; the number of
cobblestones will be distributed based on the number of slots
selected.
Minecraft Master: Student Guide – Canada Research Chair on Technologies in Education (2019) 17••• Make a torch
Level description
Torches are used to light dark places like underground caverns. Because monsters cannot appear where there is light, torches are
also good for protection against nighttime dangers.
To craft a torch, you will need coal. There are two ways to get
coal:
1. The easiest way is to mine it. Coal blocks look like
stone, but have black spots.
2. You can also create coal using a furnace. Cooking a
wood log gives charcoal. Furnaces need fuel1 (lower
box) to cook the material (upper box). You can use
another log, wooden planks, or sticks.
Note: Two sticks are needed to cook a log.
Once you have coal or charcoal, you’re ready to craft a torch.
Place the material on top of a stick, either in the crafting grid
of your inventory or using your crafting table.
1
Fuel: material that is burned to generate heat.
Minecraft Master: Student Guide – Canada Research Chair on Technologies in Education (2019) 18Level 6
• Tunnel into the ground and emerge somewhere else
Level description
For this level, you must dig a tunnel that you will then use to move from one location to another. You must emerge from the tunnel
to the surface. Remember that your character is two cubes tall. It is easier to successfully complete this level if you find a flat
location.
Note: If you gathered more cobblestone than you needed to make the furnace, you can make a stone pickaxe. This type of pickaxe
is more durable and mines blocks faster than a wooden pickaxe.
Start by digging stairs: mine a block on the ground, then
move down. Mine the block in front of you, then the one
beneath you, and move down. Mine the two blocks in front
of you, then the one beneath you, and move down.
Now you only have to mine the blocks in front of you (two
blocks high). The tunnel must be at least five blocks long
from this point. Use a torch to light your tunnel. Finally,
mine stairs to exit the tunnel.
•• Tunnel into the ground and pass under a lake
Level description
To successfully complete this level, you must dig a tunnel that passes under a lake and exit the tunnel on the opposite shore. Start
by finding a lake that you will tunnel under. Be careful: the blocks of sand often found at the bottom of lakes can fall and cause
your tunnel to flood. That means you’ll have to dig deep enough to avoid this problem.
Tip: When you tunnel under the water, the blocks above
your head will leak (you’ll see water drops forming). Don’t
break these blocks, or else your tunnel will be flooded.
This tip will help you figure out if you should keep
tunnelling a bit farther before coming back up to the
surface.
Minecraft Master: Student Guide – Canada Research Chair on Technologies in Education (2019) 19••• Build or find an underground cavern
Level description
When you generate your world, a number of underground caverns automatically form. The entrances are sometimes found on the
surface, in which case they are easy to enter.
If you don’t find an underground cavern, you can build one yourself.
Dig down to a depth of 15 blocks. At this depth, you can
create a cavern. You can make your cavern either linear or
circular. However, it must be at least 15 blocks long and
four blocks high.
Minecraft Master: Student Guide – Canada Research Chair on Technologies in Education (2019) 20TUTORIAL
Creative Mode: Activation and Functions
*A must-do before moving on to Level 7
To make it easier for you to gather the resources you need for the next levels, you must now switch to the Creative game mode. This
will give you access to all Minecraft blocks. You’ll be able to fly (by double-tapping the Spacebar) and break blocks with a single left-
click.
To switch to this mode, open the Options menu, then press the
Esc key on your keyboard. Then click Settings.
In the Game section, change the Personal/Custom Game
Mode.
Click Survival, then select Creative.
Close Options. You are now ready to play in Creative mode.
To fly, double-tap the Spacebar. As when you’re swimming, hold down the Spacebar to fly upward and the Shift key to fly downward.
You can also double-tap the W key to fly faster.
Note that when you open your inventory, the window will look
different than in Survival mode. You can now access all the game
blocks. There is a search bar you can use to find specific blocks.
Otherwise, to the upper left, the blocks are broken down into four
categories:
• building blocks;
• tools and armor;
• decoration blocks;
• natural blocks (dirt, cobblestone, flowers).
To the upper right, you can access different inventory
configurations, like the ones you had in Survival mode.
Minecraft Master: Student Guide – Canada Research Chair on Technologies in Education (2019) 21Level 7
• Build a house
Level description
For this level, you’ll need to build a house. It must consist of a single storey and four walls. In Creative mode, you have access to
all Minecraft blocks. Take advantage of this to decorate your house with doors, windows (glass blocks), carpet, and so on. Use
your imagination.
Start by laying the foundations of your house.
These will determine the footprint of your
house.
Second, erect the walls and lay the floor.
These can be made of materials other than
that used for the foundations.
Next, add a roof. The roof can be flat or
inclined—use stairs to make this part easier!
And finally, it’s time to decorate your house.
Take a look at this example.
Minecraft Master: Student Guide – Canada Research Chair on Technologies in Education (2019) 22•• Create a treehouse
Level description
For this level, you need to build a treehouse. It must be big enough for you to move around in, but not too big. Use ladders to
access your treehouse. If possible, build your treehouse near another tree; this will make the next level easier.
Find a tree that is tall enough. Another option
is to build your own tree in the exact size you
like.
Once you have your tree, get rid of the
unnecessary foliage (leaves) and logs.
Build a cabin around the tree trunk. You can
use any materials you like to build your
treehouse. Finally, add ladders so that you can
get in and out of your treehouse.
••• Connect your treehouse to another treehouse
Level description
To successfully complete this level, you must connect two treehouses that you have built. You’ll need to build a second treehouse,
then create a bridge between them.
Build your second treehouse. It should be
fairly close to the first one.
Next, build a bridge between the two
treehouses using the material of your choice.
If you like, add guardrails to your bridge.
Minecraft Master: Student Guide – Canada Research Chair on Technologies in Education (2019) 23Level 8
• Create a garden
Level description
Now that you have built a home (Level 7.1), you’ll need a source of food. One Minecraft strategy is to make a garden. Cultivating
produce will give you a regular source of food. You’ll need to gather some seeds and plant them in tilled soil. However, this tilled
soil must be irrigated (supplied with water) from a water source that is within four blocks. After you plant your seeds, set up
fencing around your garden to ward off animals.
Prepare a water source to irrigate your land. Make sure it is within
four blocks of the land you want to irrigate.
Use a hoe to work the soil around your water sources. Make sure your
soil has enough moisture (framed in red). If the soil dries up, take
the time to set up a new water source nearby.
Next, right-click to plant seeds in the soil (the seeds must be selected in your inventory). You can grow several types of produce:
carrots, potatoes, beets, etc.
Finally, build a fence around your garden to ward off animals. Add a gate to the fence so you can enter your garden to harvest
your food.
Minecraft Master: Student Guide – Canada Research Chair on Technologies in Education (2019) 24•• Tame an animal
Level description
Animal farming is another source of food. This will provide you with meat, which is far more nourishing than the foods from your
garden. Your garden is still a critical step because you will need food to tame the animals.
To tame an animal, you’ll need to have food that will attract that animal. Refer to the list below for the animals’ food preferences.
The animal will follow you, as long as you move slowly. This is how you lead them into enclosures or pens. For this level, you must
tame at least two animals of the same kind.
Here is what the animals prefer to eat:
• Chickens prefer grains and seeds (wheat, pumpkin, etc.).
• Rabbits prefer carrots or dandelion plants.
• Pigs prefer carrots, potatoes, and beets.
• Sheep prefer wheat.
• Cows prefer wheat.
Start by building a pen for your animals using fences (it is impossible
to jump over fence blocks). Remember to include a space through
which your animals can enter.
Note: Pens must usually be lit to prevent monsters from appearing.
Because you are in the Peaceful difficulty level, there is no need for
lighting.
Tame an animal using its favorite food. Once it follows you, move
toward your pen. Keep checking to make sure your animal is still
following you. Once the animal is inside the pen, close the fence
gate.
Minecraft Master: Student Guide – Canada Research Chair on Technologies in Education (2019) 25••• Breed animals
Level description
Now that you have two animals in your pen, it is time to breed them.
When you feed an animal its favorite food (see the list in the previous level), it will switch to Love mode. If two animals next to
each other are in Love mode, they will reproduce. Offspring (a baby animal) will appear. After a while, it will become an adult
and will also be able to reproduce.
Feed the two animals by right-clicking the animal with its favorite
food. They will switch to Love mode.
The animals will then reproduce and give birth to offspring.
Minecraft Master: Student Guide – Canada Research Chair on Technologies in Education (2019) 26Level 9
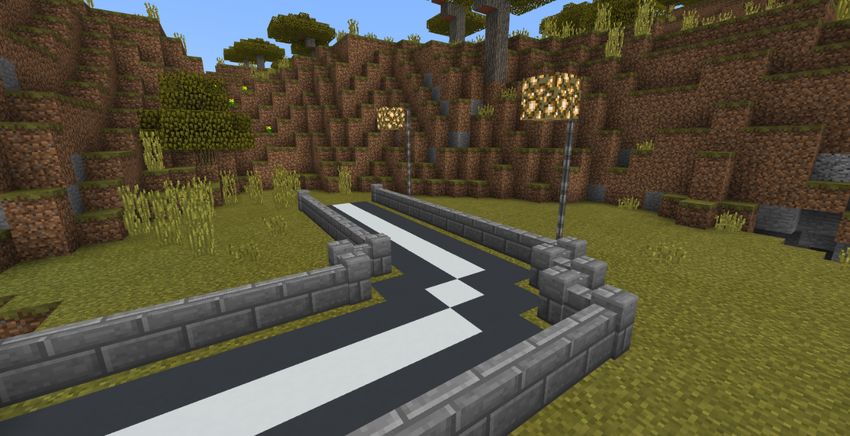
• Build a road with a bridge
Level description
This level involves two steps: first you will have to build a road, then build a bridge across a river. Your road and your bridge must
be at least three blocks wide.
Use whatever material you like to build a road. Place low walls, fences or iron bars along the road. Illuminate your road so that
you can use it at night.
Build your bridge across a river. The bridge can either be suspended over the water or be built on the water’s surface. As you did
with the road, place low walls, fences or iron bars along the bridge to prevent you from falling into the water.
Minecraft Master: Student Guide – Canada Research Chair on Technologies in Education (2019) 27•• Build a car
Level description
For this level, you will need to build a car. Of course, your car must have at least four wheels. But it must also have a windshield
built using glass blocks or panels. You are not required to climb inside the car to successfully complete this level.
Minecraft Master: Student Guide – Canada Research Chair on Technologies in Education (2019) 28••• Build a football stadium
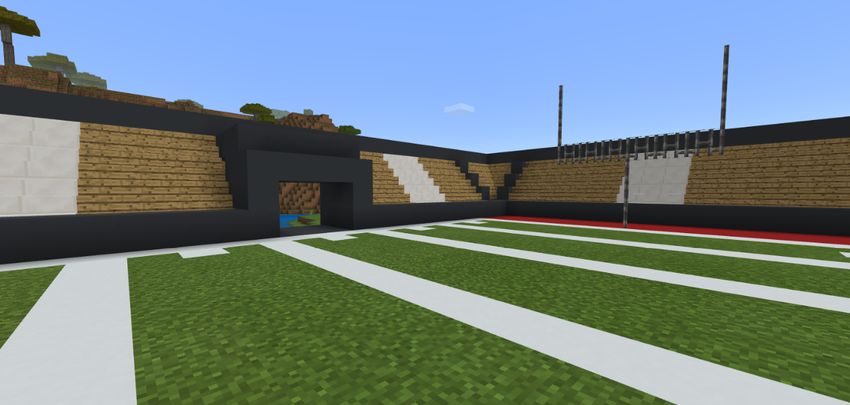
Level description
Next you will have to build an American football stadium. It can be helpful to conduct a Google search for images. The stadium
must have two end zones in a different color than the rest of the football field. Build Y-shaped posts in both end zones. You must
also create zone boundaries using white blocks. Finally, place stadium seating around the field for spectators.
Start by preparing the football field. Place a post and an end zone. Then mark the boundaries of the play areas. Note that halfway
point of an area is marked by a single white block, while the end of the area is marked by a white line. You must create at least
five play areas. Place the second post and the second end zone.
Build the stadium around the football field. Place an entrance for players in the middle of the field. Build stadium seating around
the field.
Minecraft Master: Student Guide – Canada Research Chair on Technologies in Education (2019) 29Tutorial
Multiplayer Mode
*A must-do before moving on to Level 10
For the next levels, you have the option to work with a team. To do so, you’ll need to connect to the world of one of the players. There are
two roles: host and guest. Guests join the host’s world.
HOST Guests
Hosts must make sure that their game is open to all. From the Guests must join the host’s world. From the main menu screen,
main menu screen, click Play. click Play.
Under Worlds, click the pencil icon to the right of the world in Under Worlds, click the Friends tab in the upper middle.
which you wish to host your guests.
Go to the Multiplayer section. Click the host’s name to join his or her world.
Make sure both options are activated so that guests can find your If you’re not on the same network as the host, click the Servers
world. tab.
If your guest is not on the same network, you will need to give him Click Add a Server.
or her an IP address. In your world, press the Esc key. The IP
address is located to the upper right.
Under Server Address, enter the host’s IP address. Click Play.
Minecraft Master: Student Guide – Canada Research Chair on Technologies in Education (2019) 30Level 10
••• Build a realistic school (classrooms, building, schoolyard, etc.)
Level description
As a team, your task is to recreate your school. Reproduce your school’s outside appearance, its schoolyard, classrooms (their
location), and so on. Break down the tasks among the team members: one person can create the schoolyard while another
builds the school. Then, break the school down as well: for instance, one person can create the gym, cafeteria and auditorium,
while the other can create the classrooms, the principal’s office, the secretary’s office, etc.
Here is an example of a classroom:
Here is an example of a cafeteria:
Minecraft Master: Student Guide – Canada Research Chair on Technologies in Education (2019) 31You can also read