BRUTE KIT 01. Preparation of the Jeep Body Tub - Installation Guide Page 1 of 15
←
→
Page content transcription
If your browser does not render page correctly, please read the page content below
BRUTE KIT
01. Preparation of the Jeep Body Tub

           Installation Guide

               Page 1 of 15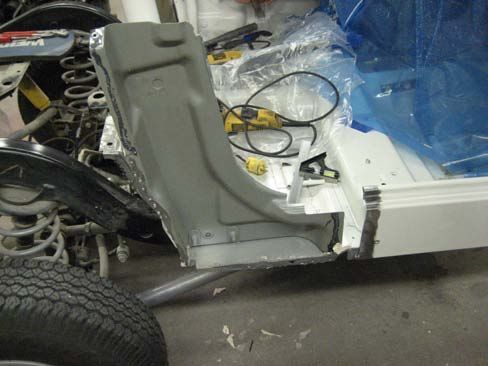
PLEASE READ BEFORE YOU START
TO GUARANTEE A QUALITY INSTALLATION, WE RECOMMEND READING THESE
INSTRUCTIONS THOROUGHLY BEFORE BEGINNING ANY WORK. THESE
INSTRUCTIONS ASSUME A CERTAIN AMOUNT OF MECHANICAL ABILITY AND ARE
NOT WRITTEN OR INTENDED FOR SOMEONE NOT FAMILIAR WITH AUTO BODY
REPAIR.

Required Tools
4” Grinder w/                                        Tape Measure
   - 80 Grit Sanding Discs                           Appropriate Safety Equipment
   - Wire Wheel                                      Common Hand Tools
   - Med ScotchBright Pads (Red)                     Spring Loaded Center Punch or Equivalent
Sawzall with long metal cutting Blade                Thin Stainless Steel Putty Knife
Drill Motor                                          Hammer and Body Dolly
Pilot Point Drill Bit (or) Spot Weld Cutter          Transfer Punches
   we recommend:                                     File or Die grinder
   - DeWalt 27/64 Pilot Point DW1927
Combination Square and Scribe

                                              Page 2 of 15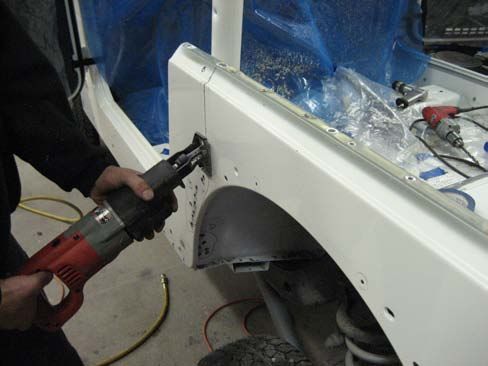
OVERVIEW

Preparing the Jeep is one of the most important aspects of the Brute Conversion. Time spent at
this stage will make the rest of the conversion process go smoothly and assure your Brute
comes out perfect. Take your time and work in a clean efficient manner. If you take the time to
clean and organize everything as it comes apart, reassembly will be much easier in the end.
We recommend using zip lock bags and labeling everything so that you don’t end up short on
bolts or worse yet, have extra bolts in the end.

The basic preparation steps are:

   •   Clean the Jeep underneath, inside and outside. The cleaner it is, the easier the entire
       conversion will be. You may even think about having the Jeep fully detailed before you
       start.
   •   Check the alignment of the door gaps and windshield frame. This is the time to adjust
       anything. What you start with is what you’ll end up with.
   •   Remove the interior and any associated parts.
   •   Remove the rear of the Jeep body
   •   Prepare the front half of the Jeep body to accept the Brute closeout.
   •   Remove the front half of the Jeep body from the frame and set aside.

You’ll need to decide now if you’re planning on removing the tub (once you cut it in half) to make
the frame work more accessible, its not necessary, but it will make the project a little easier
overall. The only reason the body wouldn’t be removed is on Jeeps that have extensive
modifications that make it difficult at best to remove the tub. Examples are where owners have
performed an engine conversion improperly without an easy way to disconnect the powertrain
from the body, incorrect installation of on-board air systems, etc. Basically you’ll need to weigh
the alternatives of your particular application to see which way is better. If you choose to
remove the body (the way AEV does it) you’ll need to have the AC system evacuated and
recovered before you start.

                                          Page 3 of 15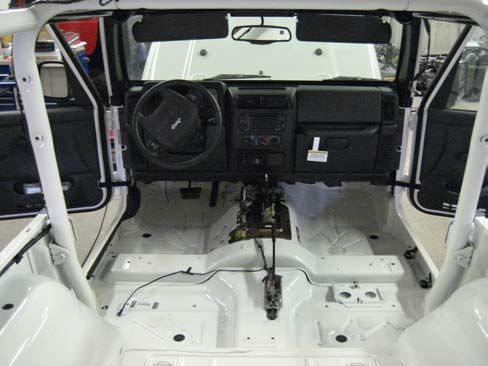
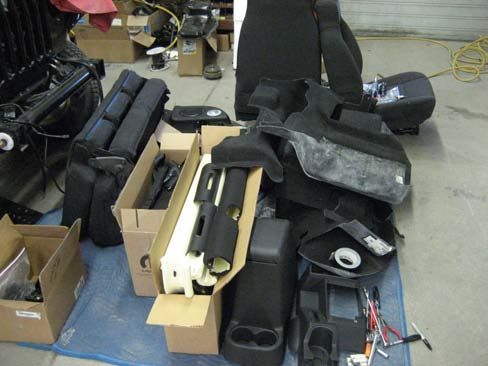
A. PREPARATION OF THE JEEP BODY TUB
1. Clean the vehicle thoroughly. You will be spending a lot of time in, around, under and on top
   of the Jeep. Spend the extra time, you’ll appreciate it later.

2. Align the doors, top, and windshield frame. This is the most important step in the
   preparation process. (If you are starting with a tub or a wrecked vehicle, you WILL need to
   install the sport bar, windshield frame, doors and top at this time.) Start with the top and full
   doors on (soft top door surrounds are OK if the Jeep started out as a soft top), be sure the
   sport bar is in the vehicle and everything is tight. What you start with is what you will end up
   with. Take a measurement across the top of the tub at the front corner using a tape
   measure and two straight edges. Write this measurement down. Check the door gaps from
   the door to the body, the door to the windshield frame and the door to the top. If anything is
   not parallel, flush or even, NOW is the time to correct it. Some builders find it is helpful to
   visit a body shop prior to performing the conversion. This is especially true if the Jeep was
   ever rebuilt, wrecked or uses doors that did not come with the vehicle originally. This is the
   first step and perhaps the most tedious but also the most important, do not let your
   excitement stand in the way of a quality job.

3. Remove the interior and other related parts. Mask the windshield, any sparks that hit the
   windshield will leave a permanent mark and will ruin the glass. Remove the interior of the
   vehicle; it’s not necessary to remove the instrument panel, shifter assembly or emergency
   brake lever. Pull the wiring harness inside the body back to where it is located under the
   driver’s door. Remove all the seatbelts and sport bar padding, speakers, rear fender flares,
   wheel house liners, taillights, fuel filler, and anything else that’s in the way like body mounted
   rocker guards. Remove the door strikers and the nut plates using a small screwdriver, you
   will be reusing the nut plates later. DO NOT REMOVE THE SPORT BAR. It can also make
   it easier if you can install stock size wheels and tires.

   Your Jeep will look like this:          Page 4 of 15
Your Jeep will look like this:

You should have a pile of parts like this:

                                         Page 5 of 15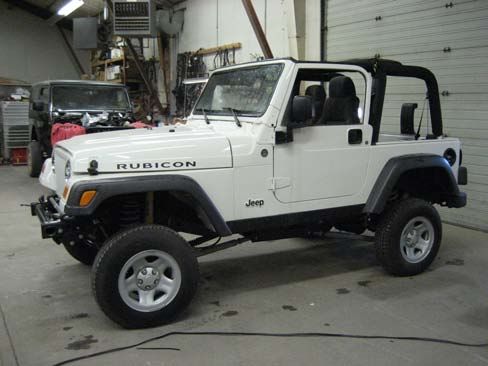
4. Remove the seam sealer. Using the four inch angle grinder with a wire wheel (wear some
   heavy gloves and appropriate safety equipment) remove the seam sealer where the wheel
   houses join the floor pan and across the Jeep where the rear floor meets the waterfall (the
   ~4.5” tall piece that runs across the back). Use the wire wheel to remove the paint as well,
   exposing all of the factory spot welds.

5. Cut the rear seatbelt supports off of the sport bar. Unbolt the rear and discard. Using a
   grinder, sanding disc and ScotchBright pad, clean up the intersection of the sport bar and
   rear seatbelt support bar to a polished finish.

                                          Page 6 of 15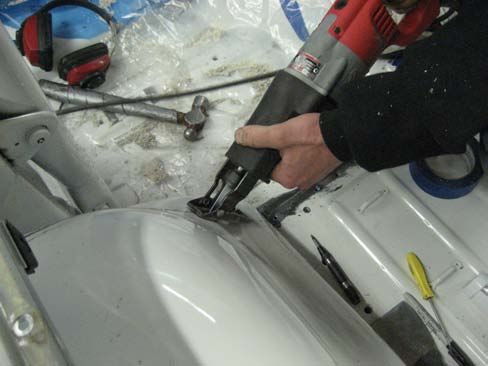
6. Mark all the spot welds to be cut. Use a spring loaded punch, carefully mark the center of
   each spot weld. This is another area where taking your time will save you aggravation later.
   Precisely marking the center will ensure that you cut the entire spot weld out in step 7. If you
   do step 6 and 7 accurately, the panels will separate cleanly and easily. Mark the welds in
   areas A,B,C,D,E.

                                          Page 7 of 15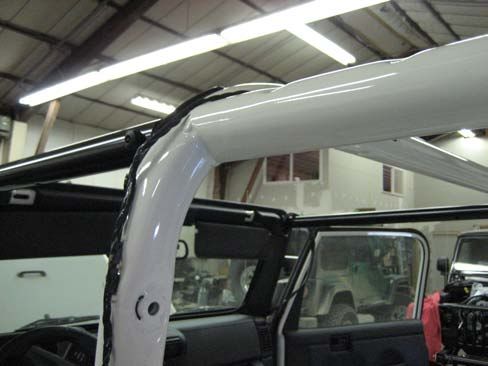
Page 8 of 15
7. You’ll be removing the J-Rails (what the soft top slides under) and re-using them later. The
   other areas that spot welds need to be removed are: A,B,C,D,E. Practice using the bit on a
   scrap part of the tub. Once you get the hang of it, you can cut through the outer layer
   without damaging the inner minus a small pilot hole. The cleaner you can perform this task,
   the easier the install will be in following steps. The J-Rails are a good place to practice.
   Once all the spot welds have been drilled out, gently use the putty knife to pry the J-rails off
   (they have a small amount of seam sealer under them that acts a bit like glue) If you are
   using more that vary moderate pressure on the putty knife or are bending the parts you are
   trying to remove, you need to re-examine your spot weld cutting. Remove the rest of the
   spot welds in areas B,C,D,E. You won’t be able to separate these just yet, but know is the
   time to use the putty knife and a small hammer to separate the seam sealer between the
   rear floor and the waterfall.

8. Remove the rear half of the tub using the Sawzall. You will only need to cut the tub in one
   area under the door with the Sawzall (step 9), however, most builders find it helpful to use
   the Sawzall on the rear wheel houses as well in order to access the spot welds on the
   pinchweld located where the wheelhouse meets the floorplan. Using this technique, pick
   some point on the bodyside and make a cut down to the intersection of the waterfall, rear
   floor and wheel house. If you did a good job in step 7, you’ll now be able to remove the rear
   half of the tub. Once the rear half is out of the way, you can use the Sawzall to remove
   what’s left of the wheel houses and drill the spot welds out so that you are left with what’s
   shown below.

                                           Page 9 of 15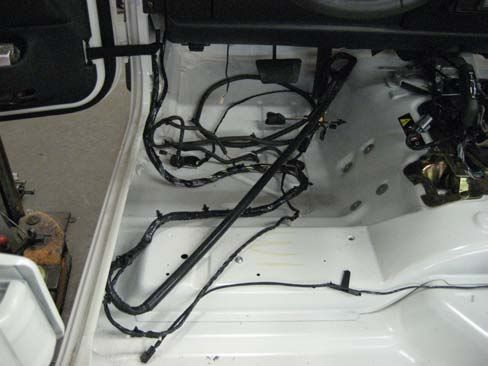
Page 10 of 15
9. Cut the bodyside using the Sawzall. If they are not already removed, loosen the front
fenders from the firewall enough that you can slip a tape measure in the gap and hook it to
the front of the Jeep tub. Carefully mark and scribe a vertical line exactly 35” from the front
of the cab. Measure at the bottom and the top to be sure your line is vertical. Using the
combination square, transfer the vertical like up through the door opening. Use the Sawzall
to carefully cut along this line. Do not cut into the Floor Pan. Once this is complete, you
may carefully remove what is left of the bodyside. Sometimes a razor blade is helpful here
to cut through any excess seem sealer. If the bodyside is not easy to remove, something is
wrong, go back and check all your spot weld cuts.
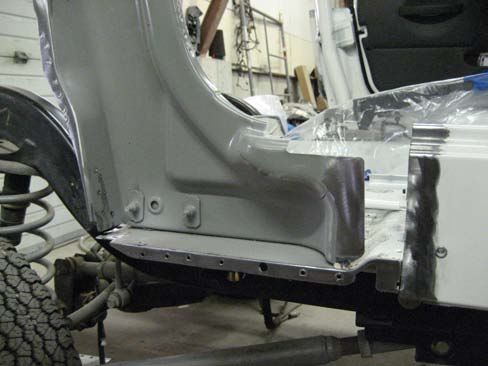
Page 11 of 1510. Clean up the tub. Using a hammer and dolly along with the wire brush and sanding discs,
clean up all the separated areas. Remove all paint and excess seam sealer. Straighten any
bent edges and remove any burs leftover from drilling the spot welds out. You are now done
with the Body tub preparation.
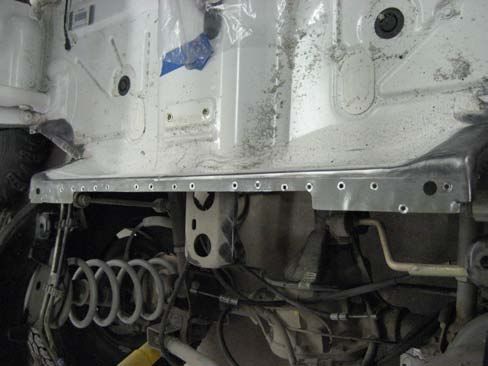
Page 12 of 1511. Remove the front half of the Jeep body from the frame and set it aside. Its time to prepare
the frame.
Page 13 of 15Page 14 of 15
COMMENTS OR QUESTIONS?
American Expedition Vehicles
Phone: 406.251.2100
Email: tech@aev-conversions.com
Website: http://www.aev-conversions.com

                                      Page 15 of 15
You can also read