California Department of Education 1430 N Street Sacramento, CA 95814-5901 April 2019 - A Guide for Vision Screening in California Public Schools ...
←
→
Page content transcription
If your browser does not render page correctly, please read the page content below
A Guide for Vision Screening in California Public Schools

        California Department of Education
                   1430 N Street
            Sacramento, CA 95814-5901

                      April 2019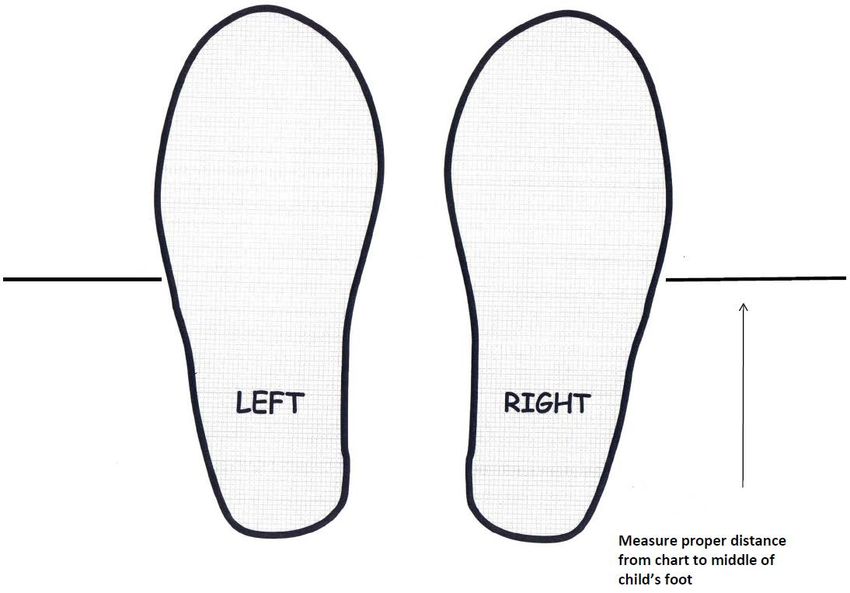
Table of Contents

A GUIDE FOR VISION SCREENING IN CALIFORNIA PUBLIC SCHOOLS .................... I

Acknowledgements....................................................................................................... 3

Section 1: Introduction ................................................................................................. 5
  Objectives of the Vision Screening Program ............................................................... 5
  Legal Basis for Vision Screening ................................................................................. 6
  Minimum Requirements for a Vision Screening Program ............................................ 6
  Table 1: Legal Requirements for Periodicity of the School Screening Program .......... 6
  Early Vision Screening Interventions ........................................................................... 7
  Personnel Authorized to Conduct Screening ............................................................... 7
  Preparation of the Student for Vision Screening .......................................................... 8
  Observation of the Student .......................................................................................... 8
  Screening Procedure Considerations for Non-literate, Non-verbal, Non-English-
  Speaking, and/or Very Young Students and/or Students with Special Needs ....... 8
  Principles of Vision Screening ..................................................................................... 9
  Visual Acuity ................................................................................................................ 9
  Visual Acuity Screening ............................................................................................. 10
  Basic Principles ......................................................................................................... 10
  Table 2: Evidence-Based Pediatric Optotypes .......................................................... 10
  Instrument-Based Screening ..................................................................................... 11

Section 2: Vision Screening Procedures .................................................................. 13
  External Observations ............................................................................................... 13
  Distance Visual Acuity Optotype-Based Screening ................................................... 13
  Critical Line and Threshold Screening ....................................................................... 19
  Near Visual Acuity Optotype-Based Screening ......................................................... 22
  Color Vision Deficiency Screening ............................................................................. 24
  Instrument-Based Screening ..................................................................................... 26
  Functional Vision Screening for Students with Special Needs................................... 27
  Optional Tests ........................................................................................................... 27
  Near Point of Convergence ....................................................................................... 27
  Stereopsis .................................................................................................................. 30

Section 3: Planning and Follow-Up Procedures for Vision Screening ................... 33
  Checklists for Implementation of a Vision Screening Program .................................. 33
  Follow-Up Procedures ............................................................................................... 37
  Follow-Up for Students with Glasses or a Known Vision Disorder ............................. 38

Appendix A .................................................................................................................. 41
 Legal and Administrative Provisions for School-Based Vision Assessments............. 41

                                                                i
California Code of Regulations .................................................................................. 41
   California Education Code ......................................................................................... 41
   Supervision of Health................................................................................................. 41
   Employment ............................................................................................................... 42
   General Powers—School Boards .............................................................................. 42
   Employment of Medical Personnel ............................................................................ 43
   Physical Examinations ............................................................................................... 43
   Solicitations ............................................................................................................... 43

Appendix B .................................................................................................................. 44
 Notifications and Form Templates ............................................................................. 44
 Vision Screening Report ............................................................................................ 45
 Report of Eye Examination Results to the School ..................................................... 46
 Color Vision Screening Results .................................................................................. 47
 Memorandum of Understanding (Sample) ................................................................. 48

Appendix C .................................................................................................................. 50
 Frequently Asked Questions ...................................................................................... 50

Appendix D .................................................................................................................. 54
 Glossary .................................................................................................................... 54

                                                                ii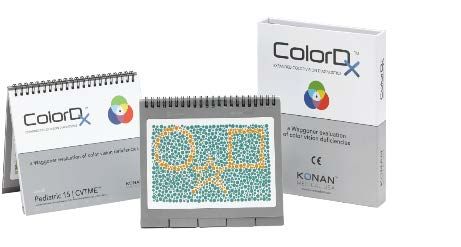
Acknowledgements

This edition of A Guide for Vision Screening in California Public Schools (2018 edition)
is the result of collaborative efforts focused on children’s health. A sincere appreciation
to the following individuals and organizations for their concerted efforts:

Kira Baldonado, BA, Director of the National Center of Children’s Vision and Eye Health

Lydia C. Bourne, MA, BSN, RN, PHN, Legislative Advocate, Bourne, and Associates

Susie Brown, MSN, RN, Credentialed School Nurse, San Lorenzo Unfired School
District

Cheryl Burden, MSN, RN, PHN, NP, Program Manager Nursing Services, Oakland
Unified School District

Sheri E. Coburn, EdD, MS, RN, Director of Comprehensive Health Programs, San
Joaquin County Office of Education

Joyce Cox, BSN, MPH, RN, Program Specialist, Long Beach Unified School District

Vincent J. Cianci, OD, Pediatric Optometrist, Department of Pediatric Eye Services,
Neuro-ophthalmology, Binocular Vision and Strabismus, Kaiser Permanente

Angela M. Chen, OD, MS, Pediatric Optometrist, Southern California College of
Optometry at Marshall B. Ketchum University

Sue Cotter, OD, MS, FAAO, Professor, Southern California College of Optometry
Marshall B. Ketchum University

Anne DeJarnatt, BA, BSN, MSN, Credentialed School Nurse, Jefferson Elementary
School District

Joan D. Donofrio, MSN, Credentialed School Nurse, Folsom Cordova Unified School
District

Bob Garr, PDG 4C1, Sight Preservation and Awareness Volunteer, Lions Club

Helen Garr, MD4, Sight Preservation and Awareness Chair, MD4 Lions Club

Elise Harb, OD, MS, FAAO, Clinician Scientist, University of California, Berkeley,
School of Optometry

Kristine Huang, OD, MPH, Southern California College of Optometry at Marshall B
Ketchum University

Pamela Kahn, MPH, RN, Coordinator, Health and Wellness, Orange Department of
Education

                                             3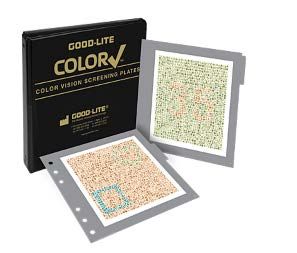
Melinda B. Landau, RN, MS, Manager, Health and Family Support Programs, San Jose
Unified School District

John Lagomarsino, School Health Education Consultant, California Department of
Education

Yolanda Lasmarias, MA, MBA, RN, Administrator, Nursing Services, Los Angeles
Unified School District

Rachel McClanahan, DNP, RN, NCSN, Assistant Professor of Nursing, California State
University Fullerton.

Luisa Monson, MEd, BSN, RN, PHN, Vision Program Coordinator, Credentialed School
Nurse, San Diego Unified School District

April Nakayoshi, MPH, CHES, Vice President of Programs and Evaluation, Prevent
Blindness Northern California

P. Kay Nottingham Chaplin, EdD, Advisory Committee to the National Center for
Children’s Vision and Eye Health at Prevent Blindness, Good-Lite, School Health
Corporation, and Consultant to the Vision Screening Committee of the American
Association for Pediatric Ophthalmology and Strabismus

Mary O’Hara, MD, Professor of Ophthalmology and Pediatrics, University of California,
Davis.

Deborah Orel-Bixler, PhD, OD, Professor of Clinical Optometry, University of California,
Berkeley School of Optometry

Reena Patel, OD, Pediatric Optometrist, Southern California College of Optometry,
Marshall B Ketchum University

Susan E. Proctor, PhD, RN, FNASN, Professor Emerita, Community Health & School
Nursing, California State University, Sacramento

Kathy Ryan, MS, RN, FNP, President, California School Nurses Organization

James B. Ruben, MD, FAAP, Pediatric Ophthalmologist, The Permanente Medical
Group

Anne Deem Saitofi, MSN, RN, NCSN, Credentialed School Nurse, Fontana Unified
School District

Sharyn W. Turner, RN, MA, PHN, President, California School Nurses of California
Foundation

                                           4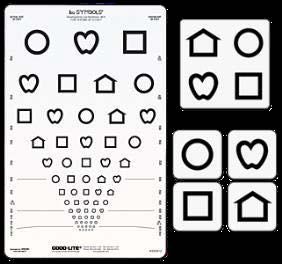
Section 1: Introduction

The California Department of Education (CDE) is pleased to provide these vision
screening guidelines for students in California’s public schools. The CDE, working in
collaboration with representatives from the ophthalmology and optometry professions,
credentialed school nurses, educational leaders, and community-based organizations
specializing in vision screening, has established these standardized vision screening
guidelines to update the current school screening practice. The guidelines described in
this manual represent evidence-based methodology and current best practice in the
field of vision screening. They are intended to facilitate the identification of students with
common vision problems as early as possible, when treatment is most effective, to
support academic success.

California public schools are committed to providing equal educational opportunities to
all students. The school vision screening program has a vital role in the early
identification of serious vision problems that may contribute to academic disparities. To
fulfill this commitment, schools need to identify students with vision deficits that could
adversely affect learning so that the students can receive timely and appropriate care.

This publication is divided into three sections: (1) Introduction; (2) Vision Screening
Procedures that includes procedures for vision screening of students who are non-
literate, nonverbal, non-English-speaking, and/or very young students and/or students
with special needs; and (3) Planning and Follow-up. Forms related to vision screening
and applicable provisions from the California Code of Regulations (5 CCR) and the
California Education Code (EC) are included in the appendices. In addition, a glossary
of technical terms and a list of selected references are provided.

Objectives of the Vision Screening Program

A vision screening program meets state requirements when it is provided under the
direction of qualified personnel. The major objectives of the vision screening program
are to:

   1. Identify students with potential vision deficits through:

          a. Administration of selected vision screening tools
          b. Planned procedures of observation

   2. Notify parents of each student identified as having a possible vision deficit and
       to encourage further examination through a professional comprehensive eye
       and vision evaluation.

   3. Establish follow-up procedures that will ensure that each identified student
       receives appropriate follow-up care.

   4. Inform teachers of students who have vision deficits about vision eye care

                                              5
professional’s recommendations and assist them in planning for needed
      adjustments in the educational program.

Legal Basis for Vision Screening

The 5 CCR and EC provide the legal basis for vision screening in California public
schools. Hyperlinks to pertinent sections of the EC and 5 CCR may be found in
Appendix A.

Minimum Requirements for a Vision Screening Program

Table 1 shows the legal requirements for periodicity of the school vision screening
program. Specific guidelines for screening procedures can be found in Section 2 of this
document.

Table 1: Legal Requirements for Periodicity of the School Screening Program

      Grade Level        Distance Vision       Near Vision    Color Vision Deficiency
      Transitional
     Kindergarten/           Required           Required           Not Required
     Kindergarten
                                                  Not
        Grade 1            Not Required                              Required
                                                Required
                                                              Required in subsequent
        Grade 2              Required           Required     years only if not screened
                                                                    in grade 1
       Grade 5               Required           Required            See Above
       Grade 8               Required           Required            See Above
   Special Education         Required           Required             Required

Early screening for Color Vision Deficiency is recommended. Since Transitional
Kindergarten and Kindergarten (TK/K) are not compensatory grades in California, and in
accordance with EC Section 49455, color vision deficiency screening appraisal need not
begin until the male pupil has reached the first grade. Color vision deficiency screening
is conducted once.

Vision screening initial assessment for special education students should occur with the
establishment of the Individualized Education Plan (IEP) and at each triennial review.

In addition, the vision screening program requirements should include the following:

   1. Using evidence-based and/or best-practice screening procedures as outlined in
      Section 2 of this document.

                                           6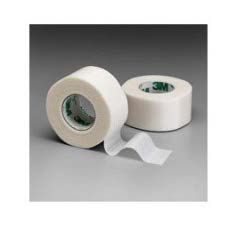
2. Recording vision screening results on the student’s permanent health record.

   3. Having teachers continuously observe students for signs and symptoms that may
      indicate possible eye or vision problems.

   4. Conducting vision screening with students whose school performance indicates a
      suspected vision problem.

   5. Rescreening all students who fail the initial screening. If a student fails a vision
      screening that is conducted by a credentialed school nurse, physician or
      surgeon, osteopath, or optometrist, a rescreen is not required.

   6. Notifying parents/guardians of students who fail the second vision screening.

   7. When necessary, assisting parents/guardians of students who fail the second
      vision screening with obtaining follow-up care.

Early Vision Screening Interventions

While the EC does not require vision screening of preschool students, the National
Expert Panel to the National Center for Children’s Vision recommends vision screening
children ages three, four, and five years for eye and visual system disorders (Cotter,
Cyert, Miller, and Quinn, 2014). Best practice for this age group is screening at least
once (accepted minimum standard) or optimally, annually. Preschoolers at risk for vision
disorders and those with noticeable eye abnormalities, i.e., strabismus, ptosis, should
be referred directly to an eye care professional. Since children with neurodevelopmental
disorders, i.e., cerebral palsy, hearing impairment, Down syndrome, cognitive
impairment, autism spectrum disorders, or speech delay, have a higher rate of vision
problems than those without neurodevelopmental abnormalities, they should also be
referred directly to an ophthalmologist or optometrist for a comprehensive eye
examination. Additionally, when a parent or guardian believes his or her child may have
a vision-related problem, an eye care professional should examine that child.

Personnel Authorized to Conduct Screening

Personnel in a school district or county offices of education (COE) who may be required
or permitted to screen vision shall be qualified to conduct such tests (EC Section 49452
and the 5 CCR, Section 591).

Only the following persons shall conduct vision screening:

   1. Duly qualified supervisors of health employed by the school district or COE.

   2. A registered nurse who holds both (1) a license from the appropriate California
      board or agency; and (2) a health and development credential, a standard
      designated service credential with a specialization in health, a health services

                                             7
credential as a school nurse, or a school nurse services credential.
3. Certificated school district or county employees who hold a teaching credential
and are qualified by training, including satisfactory completion of (1) six (6) hours
of vision screening (5 CCR, EC Section 592); or (2) an accredited college or
university course in vision screening of at least one semester unit.
4. Contracting agents who have met the requirements noted above and who have
been authorized by the County Superintendent of Schools in which the district is
located to perform tests.
Preparation of the Student for Vision Screening
All students should be educated in an age and developmentally specific manner so that
they understand the purpose of vision screening and their role. For example, when
preparing to screen preschool, kindergarten or younger primary students, the school
nurse should plan time to demonstrate screening procedures to the students and/or
practice optotype matching.
Observation of the Student
The teacher plays a key role in detecting suspected vision problems by observing a
student in classroom activities. A teacher’s observations of a student’s behavior and
appraisal of a student’s achievement throughout the year are exceedingly important
because unusual behavior and/or poor school performance may indicate health
problems, including eye or vision problems. Any student suspected of having a vision
problem, regardless of whether they are due for a screening, should be referred to the
school nurse for screening. Signs and symptoms of eye or vision problems may be
found in Section 2.
Screening Procedure Considerations for Non-literate, Non-verbal, Non-
English-Speaking, and/or Very Young Students and/or Students with Special
Needs
Personnel conducting vision screenings need to be aware of the following
considerations when screening students in preschool, TK/K, and special education
programs, as well as non-English speaking students. Students may have:
1. Short attention spans
2. Limited receptive and/or expressive language
3. English as a second language
4. Partially developed eye–hand coordination
5. Fear of new experiences and unfamiliar people
6. Disabilities that hinder their responses
8Young students and students with special needs require particular attention. The
cooperation of parents/guardians, teachers, teacher aides, and other school personnel
in ancillary services is critical for a successful outcome. Adults need to be sensitive to
the student’s actions and reactions to new experiences by:
1. Understanding the student’s fear of examiners and examinations.
2. Avoiding the use of terms such as nurse, examination, and testing.
3. Establishing rapport with the student.
4. Having personnel familiar to the student accompany the student to the vision
screening.
5. Conducting screening in familiar surroundings.
6. Presenting screening as a game.
7. Orienting students to screening by storytelling or other innovative
methods.
Planning, organizing, and implementing a vision screening program for students in need
of special care parallel the steps in the regular screening program and processes
described earlier. The exact type of vision screening equipment and supplies used
should remain open as new ones may be developed in the future. The addition of
instrument-based equipment for vision screening may be particularly applicable in this
more difficult to screen population.
Principles of Vision Screening
The rationale for school-based vision screening is for early identification of visual
problems that can impact a student’s ability to learn. These visual conditions include
amblyopia, strabismus, significant refractive errors, and/or eye pathology. Risk factors
include significant refractive errors, eye misalignment and/or media opacity in younger
students and myopia in older students. Standardized and efficient evidence-based
and/or best practice vision screening procedures, proper equipment, tools, and suitable
physical environment must be considered when vision screening students. Section 2
outlines equipment needs, room requirements, arrangement of equipment, screening
procedures, recording of results, referral procedures for optotype-based screening and
color deficiency screening, and additional procedures.
Visual Acuity
Good visual acuity is a strong indicator that the visual system is functioning normally.
Normal eye and brain anatomy and communication, appropriate correction of significant
refractive error or absence of significant refractive error, and normal brain interpretation
9of visual information are prerequisites for good visual acuity. While screening for visual
acuity is critical because it evaluates major aspects of the visual system, it is important
to realize that it does not appraise all aspects of cognitive processing, which could affect
a student’s ability to learn (e.g., learning disabilities such as dyslexia).
Visual Acuity Screening
Per mandated screening requirements, distance and near visual acuity screening must
be performed. Careful attention must be paid to the screening distance for both distance
and near vision screening; therefore, all acuity screening procedures should follow
manufacturer’s guidelines. Please refer to the California School Nurses Organization
(CSNO) website at https://www.csno.org/ for tips regarding visual acuity screening.
Basic Principles
1. Regardless of vision screening results, if the school nurse or screener has
professional concerns that the student may have a vision problem, refer the
student to an eye care professional.
2. Distance vision should be screened for each eye independently (monocularly)
using appropriate occlusion methods that control for peeking (i.e., monocularly-
occluded screening glasses). Appropriate occlusion methods are discussed in
Section 2.
3. Evidence-based pediatric optotypes should be employed for screening, with
matching, if necessary, for younger students (Table 2). According to the
American Academy of Pediatrics, American Association for Pediatric
Ophthalmology and Strabismus, and the American Academy of Ophthalmology,
“Sloan letter charts present letters in a standardized fashion and should be used
for acuity testing if they are available.”
Table 2: Evidence-Based Pediatric Optotypes
Currently Acceptable Optotypes Not Acceptable Optotypes
LEA SYMBOLS® Allen pictures
HOTV Tumbling E
Sloan Letters* Blackbird
LEA NUMBERS®* Landolt C
Patti Pics “Sailboat” or Kindergarten Chart
Snellen* Wright figures©
N/A “House, Apple, Umbrella” or Lighthouse
symbols
*Indicated in children seven years and older
104. Optotype screening should utilize crowding to screen for amblyopia. For
example:
a. Isolated optotypes with contour interaction/surround bars for younger
students.
b. Line of optotypes on a multiple lined chart for older students.
5. Vision screening protocols should minimize opportunities for the students to
memorize answers. For example:
a. Computer-based optotype software with optotype randomization.
b. Printed optotypes with multiple optotype choices at a given screening
acuity level.
c. Identifying optotypes from left to right with first eye and right to left with
second eye.
6. Following any necessary practice/orientation with younger students, present age-
specific critical acuity level optotypes for screening.
a. To pass a line, a student must correctly identify at least 51 percent (e.g.,
3/5) of the optotypes correct at that particular acuity level.
b. If performing critical screening (as recommended in Table 6), there is no
need to record threshold visual acuity. Instead, record pass or fail at age-
specific critical visual acuity level.
7. Perform near visual acuity binocularly.
a. The critical line visual acuity level to pass for all ages is 20/32.
Instrument-Based Screening
Instrument-based technologies, such as photoscreeners or handheld auto-refractors, do
not assess visual acuity, but rather identify amblyopia risk factors, primarily refractive
error. The use of instrument-based screening under an agreement with, or the
supervision of, an optometrist or ophthalmologist has been approved by the California
Legislature (EC Section 49455). A sample Memorandum of Understanding may be
found in Appendix B. Instrument-based (photoscreening) uses optical images of the
eye’s red reflex to estimate refractive error, eye gaze, and identify media opacity as well
as other visual conditions, such as ocular adnexal deformities (e.g., ptosis), all of which
put students at risk for developing amblyopia (American Academy of Pediatrics, 2016).
Best practices for instrument-based screening should be evidence-based, also referred
to as scientifically validated, and will evolve as technology changes. Screening devices
11require instrument- and age-specific pass/fail refractive error criteria. For a listing of
recommended instrument-based screening protocols by the National Center for
Children’s Vision and Eye Health, visit the CSNO website at https://www.csno.org/. In
addition, up-to-date scientific evidence on instrument-based screening may also be
found at https://www.csno.org/. Evidenced-based, instrument-based screening is
particularly useful as an alternative to optotype-based screening for:
1. Students with developmental disabilities.
2. Students who are younger (e.g., preschool or kindergarten) or pre-literate.
3. Students who are unable to be screened with traditional optotype-based
screening.
For students who are unable to complete visual acuity screening, instrument-based
(photoscreening) may detect the risk factors for amblyopia; including refractive error,
strabismus and media opacities.
1. Show the instrument (photoscreener) to the student and tell them that you will be
taking their picture. If, during screening, they do not look directly at the device,
re-screening is suggested.
2. Adjust room lighting to avoid glare into the instrument.
3. High refractive error may exceed the measurement range of the instrument
(photoscreener). If results cannot be obtained after three attempts, the student
should be referred for a comprehensive eye examination by a professional.
4. Be aware that the cut-off for clinically significant refractive error varies with age
(from infants, preschoolers, and elementary school-age students). Most
instruments (photoscreeners) have different cut-off criteria for children versus
adults. Use the age-appropriate referral criteria.
12Section 2: Vision Screening Procedures
External Observations
School nurses, teachers, and other personnel should observe students for signs and
symptoms that may indicate a possible eye or vision problem. Various eye or vision
problem signs and symptoms are included below (Table 3). Observations should be
made throughout the year as students use varied types of materials, i.e., books,
whiteboards, and computer screens. If the student begins to frequently and or
consistently exhibit signs or symptoms, a referral should be made to the school nurse
for screening or to an eye care professional.
Table 3: Signs and Symptoms of a Possible Eye or Vision Problem
Student Signs Student Symptoms
• Eye turns in or out at any time • Double vision
• Pupils/eyes appear to be different sizes • Blurry vision
• Red eyes and/or swollen eyelids • Hazy vision
• Excessive tearing • Difficulty seeing small print
• Droopy eyelids • Eye pain
• Discharge from the eyes
• Sensitivity to light
• Excessive Blinking
• Squints, closes, or covers one eye
• Squints to see board or far away
• Frequent headaches
• Abnormal head posture or head tilt
Distance Visual Acuity Optotype-Based Screening
Distance visual acuity screening is considered the recommended practice for detecting
a vision problem for school-aged students in a vision screening setting.
The American Association for Pediatric Ophthalmology and Strabismus, American
Academy of Pediatrics, National Center for Children’s Vision and Eye Health, American
Academy of Ophthalmology and American Association of Certified Orthoptists
recommend attempting distance visual acuity screening of preschool students starting
at age three.
Screening should be done with the use of furniture appropriate to the student’s size and
equipment suggested by the manufacturer for a particular screening method. For more
details on room environment and arrangement of equipment, refer to Section 2
Recommendations for Screening for Visual Acuity, Recommendations for
Photoscreening, and Recommendations for Testing Color Vision Deficiency
Screening.
13Grades:
1. TK/K or upon first enrollment or entry into a California school.
2. Grades two, five, and eight.
3. Students being assessed for, or currently enrolled in, special education services
for the purposes of reporting on the IEP.
Room Requirements:
1. Adequate distance for screening chart (e.g., if screening with a 10-foot chart,
available space should be at least 12 feet).
2. Relatively quiet.
3. Normal classroom lighting.
4. Avoid glare on the chart surface or into the student’s eyes.
Equipment:
Visual Acuity Charts
Tests of visual acuity have an inverted pyramid or triangle format when visualizing a
drawn line around the outside of the opotypes and should meet national and
international eye chart design guidelines (Nottingham Chaplin & Bradford, 2011).
Examples of evidence-based, developmentally appropriate optotypes are pictured
below.
1. Optotypes should be of approximate equal legibility.
2. Each line should have five optotypes per line, unless the test of visual acuity
is 9 x 14 inches, where chart size will not accommodate five optotypes on
the top two lines.
3. Horizontal spacing between optotypes should be equal to the width of the
optotypes on that line.
4. Vertical spacing between lines should be the height of the optotypes in the
next line down.
5. Opotype size should progress geometrically up or down the chart by
approximately 0.1 log units, which lists 20/32 instead of 20/30.
6. Optotypes should be high-contrast black on a white background and good
lighting conditions should be present.
14Examples of evidence-based developmentally appropriate optotypes:
a. For Use with Students in Preschool
EyE Check Screener with LEA SYMBOLS®
b. For Use with Students in Transitional Kindergarten, Kindergarten, or
Grade 1
HOTV LEA SYMBOLS®
c. For Use with Students in Grades 2–12
LEA NUMBERS® Sloan Letters
1. Digital/Computer-Based Optotypes
Digital or computer-based optotypes, like acuity charts, are designed to identify
student’s visual abilities. Digital or computer-based systems feature an array of
screening tools that can be used among multi-age student populations. Some
digital/computer-based systems allow for randomization, thereby minimizing
memorization of the screening tool. Electronic optotypes can be presented
following a predetermined screening algorithm. Instead of a long instruction
manual telling thousands of screening personnel how to present different size
15optotypes on a wall chart, the electronic system can be programmed to present
age appropriate optotypes according to pre-established screening
algorithms. There is less dependence on the examiner subjectively determining
what optotype to pick next as the software will independently choose the next
optotype size based upon response (correct vs incorrect) from the prior
optotype. Additionally, digital/computer-based systems minimize screener bias
by providing results based upon the student’s response.
Make sure the chart selected is developmentally appropriate and meets
national chart design guidelines. For example, many TK, K or non-English
speaking students may not know their alphabet, thus the LEA SYMBOLS® chart
with matching card would be an appropriate chart to use with those students.
Please visit the CSNO website at https://www.csno.org/ for updated information
on technological evidence-based practices for visual acuity screening.
2. Occluders
Occuding one eye is necessary to obtain accurate monocular measures of
visual acuity; the eye not being tested needs to be covered completely. Holding
a hand, tissue or paper/plastic cup over the eye is not acceptable and not best
practice because students can easily peek. Additionally, students may have an
increased risk of exposure to bacteria or viral pathogens by covering their eye
with their bare hand. Patching one with 2-inch surgical tape or adhesive patch
is a recommended best practice as it assures complete eye coverage.
Examples of acceptable forms of occluder (patch) options are identified below.
Examples of developmentally appropriate forms of occluders:
a. For Use with Students in Preschool –Grade 1
Adhesive Eye Patch 2-in Hypoallergenic Surgical Tape
• Use the same patch/tape to occlude each eye of an individual student,
unless the student has visible crusty eye drainage.
16• Use a new patch/tape for each student.
Occluder Glasses
• Clean occluder glasses between students with 70 percent isopropyl
alcohol.
• Tip: Have more than one pair of occlude glasses for each screener to
allow alcohol to dry fully between students.
b. For Use with Students in Grades 2–12
Paddle Occluder Mask Occluder
• Clean occluder between students with 70 percent isopropyl alcohol.
• Tip: Have more than one occluder for each screener to allow alcohol
to dry fully between students.
Positioning of Chart and Student
1. Students who are waiting to be screened should not be able to see the chart
or hear the responses of other students being screened.
2. Place the chart at the approximate eye level of the students to be screened.
3. If using a 10-foot chart, place a piece of tape on the floor to mark a 10-foot
(3 meter) distance between the chart and the student’s eyes. (10-foot
distance better captures the student’s attention compared with 20 feet).
4. If screening a preschool student, place a piece of tape on the floor to mark a
5-foot (1.5 meter) distance between the chart and the student’s eyes or use
the cord accompanying many 5-foot tools.
5. Have the student stand with the measurement line midfoot (arch of foot)
(Figure 1).
17Figure 1: Recommended tape placement with midfoot measurement
Procedure
1. Screen with glasses on if student normally wears glasses for distance
viewing. If the student shares they have left their glasses at home, flag the
student’s file/name so that you may try again when rescreening is done.
Keep the student’s contact information so you may contact the
student/parent the evening before to remind them to bring their glasses to
school.
2. Screen right eye first (occlude left eye) then screen left eye (occlude right
eye).
3. Carefully observe student during procedure to ensure there is no peeking,
squinting, leaning forward, turning of the head or other signs and symptoms
related to visual problems (Table 3).
4. Encourage the student to guess if the student is unsure, but do not provide
sample answers (e.g., does that look like a circle?) and do not coach the
student (e.g., are you sure?).
5. Do not rush the student.
18Critical Line and Threshold Screening
Visual acuity referral criteria can be based on critical line or threshold screening
criteria. Critical line screening requires the student to correctly identify 3 of 5 optotypes
on a particular line based upon their age. Threshold screening requires the student to
start at the top of the eye chart and read down until they miss 3 of the 5 optotypes.
Table 6 identifies developmentally recommended approaches to vision screening.
Table 7 identifies the recommended pass/fail criteria for respective age groups.
Table 6: Developmentally Recommended Approaches to Vision Screening
Preschool, Transitional Kindergarten and First Grades 1 and Up
Kindergarten Entry
(Critical Line Screening) (Threshold Screening) (Critical Line Screening)
Use a matching card for Start with the top line Familiarize the student
students who are shy, and ask the student to with optotypes by having
nonverbal, or do not know identify the first the student identify
their letters or shapes. letter/symbol of each optotypes on the top line,
line until the student if needed.
misses a letter/symbol.
Familiarize the student with If the student misses a Have the student identify
optotypes by having the letter/symbol on a line, optotypes across the
student identify optotypes on go to the line above 20/32 critical line.
the top line, if needed. and ask the student to
identify optotypes
across the line.
Have the three year-old The last line on which The student must
students identify optotypes the student correctly correctly identify at least 3
across the 20/50 critical line identifies 3 of 5 out of 5 optotypes to pass
and the four year-old optotypes is the visual the critical line.
students identify optotypes acuity value for that
across the 20/40 critical line. eye.
No further screening is Attempt to screen to the No further screening is
necessary if the student is 20/20 line. necessary if the student is
unable to pass the critical unable to pass the critical
line. Refer this student for an line. Refer this student for
eye examination. an eye examination.
19Referral Criteria:
During student screening, results will indicate a pass or fail response. Below, in
Table 7, are the developmentally appropriate visual acuity criteria that indicate a
referral to an eye care professional.
Table 7: Developmentally Appropriate Referral Criteria
Group Threshold Screening Referral Critical Line Screening
Criteria Referral Criteria
(Refer if miss 3 or
more optotypes on
line)
Preschool (Age Three) 20/60 or worse in either eye Distance 20/50 line
Preschool/Transitional Distance 20/40 line
20/50 or worse in either eye
Kindergarten (Age Four)
Transitional Recommend threshold
Kindergarten/Kindergarten 20/40 or worse in either eye or photoscreen
(Age Five)
Grades One and up Acuity 20/40 or worse in either Distance 20/32 line
eye
All age groups Greater than or equal to two Near 20/32 line
line difference between eyes
(e.g., 20/20, 20/32). Students who cannot
be screened are
Students who cannot be considered an
screened are considered an automatic fail and
automatic fail and should be should be referred for
referred for comprehensive comprehensive eye
eye examination. examination.
*Referral criteria are based upon evidenced-base practices as recommended by the
Vision Screening Taskforce. School districts and county offices of education may do
more, but not less than the statue requires.
Students who cannot be screened should be referred for a comprehensive eye
examination (e.g., student will not tolerate patch or tape, will not wear occluder
glasses, refuses to identify optotypes, has variability in responses, etc.). These
students are at a higher risk of having vision problems. If students are unable to be
screened (untestable) they should be considered an automatic fail and referred to an
eye care professional for further evaluation.
Rescreening:
If a student fails a vision screening that is conducted by a credentialed school nurse,
physician or surgeon, osteopath, or optometrist, a rescreen is not required (EC
sections 49591, 49455, 49594). A rescreen is required if initial screening is done by
20someone other than those listed here and should be done prior to the vision screening
results report being given to the student’s family.
Recording:
Districts should record results based on specific documentation systems. The results
may be recorded as pass (P) or fail (F). An example for recording results is:
Distance: Right Pass/Fail
Left Pass/Fail
Two-Line Difference Pass/Fail/Not Tested
A two-line difference will not be tested if:
1. The failure criterion was already met for either eye, and
2. Critical line screening was done.
Visual Acuity Screening Considerations for Students with Special Needs
Vision screening of preschool students or students with special needs should be
conducted by using methods and equipment suitable to the student’s developmental
level. The use of isolated optotype tests are to be avoided as they may fail to detect
amblyopia. For students who are unable to perform screening with letter visual acuity
screening charts (Sloan Letters), more appropriate tools include the LEA SYMBOLS®
(apple/heart, house, circle, and square shapes) or HOTV optotypes. Instrument-based
screening procedures can also be used. The following accommodations are presently
considered best practice for visual acuity screening of students aged three, four, and
five years:
1. Decreasing the screening distance from 10 feet (3 m) to 5 feet (1.5 m) improves
testability and sensitivity in detecting vision problems in preschoolers. Do not,
however, use a tool at 5 feet that is calibrated for a 10-foot distance.
2. A training card within arms’ reach is used to teach the student to point to the
matching symbol on a lap card.
3. The student should wear occluder glasses (fun frames with an opaque
occlude/frosted lens for each eye) rather than hands, tissues, or cups.
4. The student is first screened on either the 20/200 or 20/80 line (depending on
the chart version) to get them familiar with the task and then at the critical line
for their age (20/50 for age three and 20/40 for ages four and five years).
5. Prescreening activities may be carried out in regular classrooms to familiarize
the student with the English names of the symbols or the act of pointing to the
matching card.
21Near Visual Acuity Optotype-Based Screening
Near vision screening is an assessment that determines the student’s ability to see up
close.
Grades:
1. TK/K or upon first enrollment or entry into a California school district
2. Grades 2, 5, and 8
3. Students being assessed for or currently enrolled in special education services
for the purposes of reporting on the IEP.
Room Requirements:
1. Relatively quiet
2. Normal classroom lighting
3. Avoid glare on the chart surface or into the student’s eyes
Equipment:
1. Visual Acuity Cards
Age-appropriate near vision cards that meet national and international eye chart
design guidelines as detailed under “Distance Visual Acuity Optotype-Based
Screening” are recommended (see below). Cards with an attached string are
preferred to help maintain the screening distance of 16 inches (40 cm).
Examples of Grade Level Appropriate Charts for Near Visual Acuity Optotype-
Based Screening
For Use with Students in TK/K—Grade 1
LEA SYMBOLS® LEA NUMBERS HOTV
22For Use with Students in Grades 2–12
Sloan Letters
Procedure:
1. Screen with glasses on if student normally wears glasses for distance viewing. If
the student shares they have left their glasses at home, ask the runner or have
the student go to the office and ask a parent/caregiver or emergency contact to
bring the student’s glasses to school so they may be screened. If unable to
screen the student with glasses on, flag the student’s file/name so that you may
try again when rescreening is done. Keep the student’s contact information so
you may contact the student/parent the evening before to remind them to bring
their glasses to school.
2. Screen with both eyes open.
3. Hold card at 16" (40 cm) screening distance.
4. If using a chart with a string, place the string at the temple near the eye and
ensure string is taut.
5. Do not allow the student to lean forward.
6. Familiarize the student with optotypes by asking the student to identify large
optotypes, if needed.
7. Ask the student to identify optotypes on the 20/32 critical line.
8. The student must correctly identify at least 3 out of 5 optotypes to pass that line.
9. No further screening is necessary if the student is unable to pass the critical line.
Referral Criteria:
Refer if the student is unable to pass the 20/32 line with both eyes open.
23Recording:
Districts should record results based on specific documentation systems. The
results may be recorded as Pass or Fail:
Near Both eyes Pass/Fail
Color Vision Deficiency Screening
Color vision deficiency is the inability to discern certain shades of color. The term color
blindness is incorrectly used to describe this visual condition. Most people with color
vision deficiency are able to see colors, but they have difficulty differentiating between
certain colors:
1. Shades of reds and greens (most common)
2. Shades of blues and yellows (less common).
People who are totally color blind, a condition called achromatopsia, can only see
things as black and white or in shades of gray. Depending on the cause, color vision
deficiency can range from mild to severe. It affects both eyes if it is inherited and
usually just one eye if it is caused by injury or disease. Color vision is possible due to
photoreceptors in the retina of the eye known as cones. These cones have light-
sensitive pigments that enable us to recognize color. Found in the macula (the central
part of the retina), each cone is sensitive to red, green, or blue light. The cones
recognize these lights based on their wavelengths.
Normally, the pigments inside the cones register different colors and send that
information through the optic nerve to the brain. This enables a person to distinguish
countless shades of color. However, if the cones don't have one or more light-sensitive
pigments, then a person will be unable to see one or more of the three primary colors.
Grades:
1. Early screening for color vision deficiency is recommended, since TK/K are not
compensatory grades in California and in accordance with EC Section 49455,
color vision deficiency screening appraisal need not begin until the male pupil
has reached the first grade. Color vision deficiency screening is conducted
once.
Room Requirements:
1. Relatively quiet
2. Normal classroom lighting
3. Avoid glare on the chart surface or into the student’s eyes
24Equipment:
There are a few currently acceptable color vision deficiency screening books that may
be used in the educational setting (Table 9).
Table 9: Examples of Color Vision Deficiency Screening Tools.
Color Check Ishihara Color Color Dx Pediatric HRR
Complete Vision Deficiency Pseudoisochromatic
Screener Plates Plates
Procedure:
1. Follow the manufacturer’s instructions regarding procedures for screening and
scoring.
2. Screening should be done with both eyes open.
3. For students who are shy, nonverbal, or do not know their shapes or numbers,
show the student how to use a clean, soft paint brush or cotton swab to
point/trace targets on the color plates (do not allow use of fingers to trace
because oil on the skin can cause color changes to the plates).
Referral Criteria:
No referral needed. If the student does not pass the color vision deficiency screening,
inform the parents and advise them to consult with their eye care professional for
additional information on color vision deficiency. Inform the teachers and counselors so
they may adjust educational materials that require color discrimination.
Recording:
Districts should record results based on specific documentation systems. The results
should be recorded as Pass (P) or Fail (F). An example for recording results is:
Color Vision PASS/FAIL
25Color Vision Deficiency Screening for Students with Special Needs
The prevalence of color vision deficiencies in boys is 8 percent whereas, it is only 0.5
percent in girls; therefore, only boys are screened and need to be tested for color
vision deficiencies. Color vision deficiencies are inherited on the X-chromosome.
Both X-chromosomes need to be affected for a girl to have a color vision deficiency,
whereas boys inherit the affected X-chromosome from their mother (not their father).
Good lighting (illuminant-C or natural sunlight) is important. Follow the color vision
deficiency screening tool manufacturers’ instructions.
Instrument-Based Screening
Automated devices estimate refractive error and sometimes eye misalignment; they do
not measure visual acuity. Distance visual acuity screening is considered the preferred
practice for detecting a vision problem in school-age students in a vision screening
setting (American Academy of Pediatrics Section on Ophthalmology and Committee on
Practice and Ambulatory Medicine; American Academy of Ophthalmology; American
Association for Pediatric Ophthalmology and Strabismus; and American Association of
Certified Orthoptists, 2012). However, instrument-based screening is quick and it
requires minimal cooperation of the student; therefore it is useful in students who are
preverbal, preliterate, or developmentally delayed.
Grades:
1. Students who are younger (e.g., preschool) or pre-literate
2. Students with special needs
3. Students who are unable to be screened with traditional optotype-based visual
acuity screening
Equipment:
Since technology is constantly evolving, check CSNO’s website at
https://www.csno.org/ for updated recommendations and referral criteria for instrument-
based screening tools. Follow manufacturer’s guidelines for all instrument-based vision
screeners.
For students who are unable to complete visual acuity screening, instrument-based
photoscreening may be done to detect the risk factors for amblyopia and reduced
vision; including refractive error, eye alignment, and anisocoria (unequal pupil gaze.)
Procedure:
1. Show the photoscreener instrument to the student and tell them that you will be
26taking their picture. If they do not look directly at the device during screening,
screen again, directing the student’s attention to the front of the device.
2. Adjust room lighting to avoid glare into the instrument.
3. High refractive errors may exceed the measurement range of the instrument. If
results cannot be obtained after three attempts, the student should be referred
for significant refractive error.
4. Be aware that the cutoff for clinically significant refractive error varies with age
(from infants, preschoolers, and elementary school-age students). Most
instruments have different cut-off criteria for students versus adults. Use the
age-appropriate referral criteria.
Functional Vision Screening for Students with Special Needs
For students who are untestable during in the vision screening (visual acuity, color
vision deficiency screening, photoscreening), Functional Vision Screening may be
considered. As a minimum, this includes:
1. A review of the medical record
2. Consultation with the parent and teacher
3. Classroom observation
If based on the above functional vision screening results, no impact on classroom
participation is noted or anticipated, then a referral may not be needed. Remember that
referral for a comprehensive eye examination is appropriate due to the high prevalence
of vision disorders in the population of students with special needs. Preschoolers, that
are unable to complete screening, are twice more likely to have vision problems than
their peers who completed screening. Re-screening within six months or referral for a
comprehensive eye examination are recommendation actions when initial screening
efforts are not incomplete.
Optional Tests
Near Point of Convergence
This screening evaluates the student’s ability to converge their eyes to a near target.
Poor convergence ability may cause symptoms such as double vision, headaches,
eyestrain, or loss of place when reading.
Grades:
1. Grades One through Twelve
27Room Requirements:
1. Relatively quiet
2. Normal classroom lighting
Equipment:
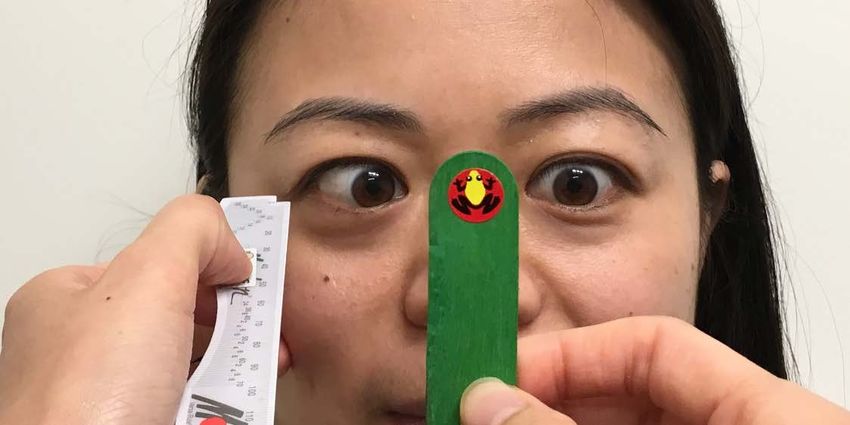
1. A small hand-held fixation target with details (e.g., tongue depressor with a
picture sticker) (Figure 2)
2. Ruler
Figure 2: Examples of Small Hand-Held Fixation Target
28Procedure:
1. Screen with glasses on if student normally wears glasses for reading or near
work.
2. Screen with both eyes open.
3. Hold fixation target approximately 16 inches (40 cm) away from the student’s
eyes and instruct the student by saying, “Focus on this target and keep on it as
long as you can, but tell me if it becomes two.”
4. Slowly move the target toward the student’s eyes until the student sees two
(double) or the examiner observes a loss of fusion (e.g., one eye moves
outward). Figure 3.
5. If double is reported, ask the student if the target stays two or if it goes back into
one; if it becomes one within 1–2 seconds, continue moving the target toward
the student’s eyes until the target becomes double and stays double.
6. Measure the distance from the temple near the eye to the point where the target
was double (break point).
Figure 3: Tool Used to Move Toward the Student’s Eyes.
29Referral Criteria:
Refer if break point is ≥ 2.5 inches (6 cm).
Recording:
Point of Convergence PASS/FAIL
Stereopsis
Stereopsis screening evaluates how well the eyes work together to achieve depth
perception. Poor depth perception can be found in those with amblyopia, strabismus,
or other ocular pathologies.
Grades:
1. Preschool–Grade Twelve
Room Requirements:
1. Relatively quiet
2. Normal classroom lighting
3. Avoid glare on the card surface or into the student’s eyes
Equipment:
1. Stereopsis Screening
A screening for stereopsis that uses random dot stereograms is recommended.
The Preschool Assessment of Stereopsis with a Smile (PASS 2) uses random
dot stereograms and can easily be used with preschool-age students (Table 10.)
Table 10: Preschool Assessment of Stereopsis with a Smile (PASS 2)
Picture of Kit and Contents Description of Kit Contents
• Card A: Demonstration Card
• Card B: 480 seconds of arc for students in
preschool and TK
• Card C: 240 seconds of arc for students in
Kindergarten through Grade Twelve
• Blank Card
Procedures:
1. Screen with glasses on if student normally wears glasses.
302. Have the student wear the polarized glasses (over glasses, if worn).
3. Hold cards at 16 inches (40 cm) with the top of cards slightly tilted back towards
the screener at about 10 degrees.
4. For Preschool/TK:
• Show card A (demo card) and the blank card and ask the student to point
to the card with the smiley face to ensure that the student can identify the
figure.
• If the student is unable to identify the demo card when presented with the
blank card, stop screening and refer.
• Show card B and the blank card and ask the student to point to the
smiley face.
• Shuffle the cards behind your back to change the position of the smiley
face and present the cards again; Repeat 5 times.
• Student must correctly identify at least 4 out of 5 presentations to pass.
5. For Kindergarten–Grade Twelve:
• Show card A (demo card) and the blank card and ask the student to point
to the card with the smiley face to ensure that the student can identify the
figure.
• If the student is unable to identify the demo card when presented with the
blank card, stop screening and refer. Show card C and the blank card
and ask the student to point to the smiley face.
• Shuffle the cards behind your back to change the position of the smiley
face and present the cards again.
• Repeat 5 times.
• Student must correctly identify at least 4 out of 5 presentations to pass.
31You can also read