CAMP COOKING WILD GAME AND FISH - www.wildharvesttable.com - Cornell blogs
←
→
Page content transcription
If your browser does not render page correctly, please read the page content below
CAMP COOKING
                                                                                         WILD GAME AND FISH

                        www.wildharvesttable.com

                                                                                     Photo source: ADK Mountain Club

                 Building Strong and Vibrant New York Communities
Cornell Cooperative Extension provides equal program and employment opportunities.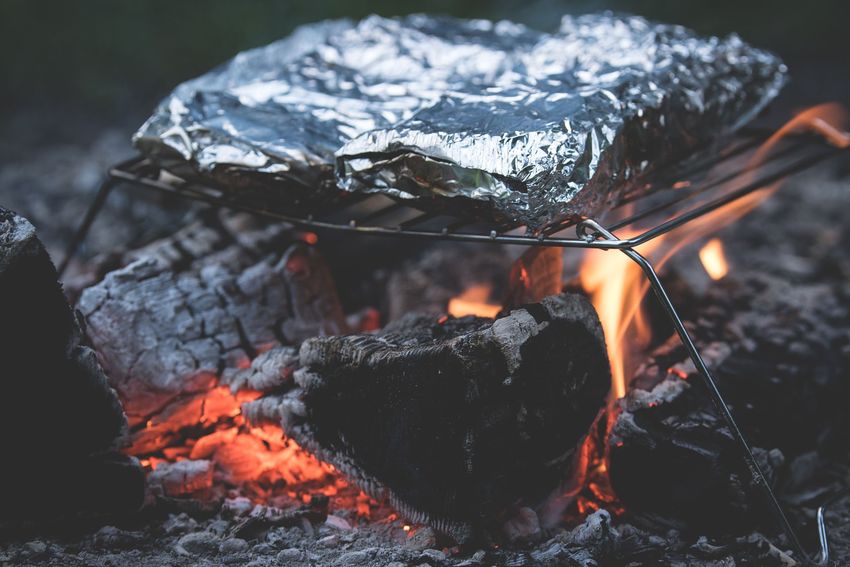
This guide is produced in partnership with Wild Harvest Table, NYS 4-H Shooting
Sports, Seneca County Cornell Cooperative Extension, and Cornell University DISCO/PLOW DISK
Department of Natural Resources and Environment.
Red Enchilada Sauce Ingredients:
6 Tbsp. mild olive oil
6 Tbsp. flour
2-4 Tbsp. ground chili powder, to taste
2 tsp. ground cumin
1-2 cloves fresh garlic, minced or 1 tsp. garlic
powder
1 tsp. dried oregano
Pinch of cinnamon
4 Tbsp. tomato paste
4 cups beef or vegetable broth
Freshly ground black pepper and salt, to taste
Directions:
1. In a medium-sized saucepan over medium heat,
heat the oil and whisk in the flour and spices until
fragrant, slightly deepened in color, and thickened,
about 1 minute (a roux).
2. Whisk the tomato paste into the mixture, then
slowly pour in the broth while whisking constantly
Edited and Compiled by: Moira Tidball and Keith G. Tidball until smooth and evenly blended.
Graphic Design by: Christie Brewer
3. Simmer the sauce, whisking often, for about 5 until
the sauce has thickened a bit.
4. Remove from heat and season to taste with salt
and freshly ground black pepper.
5. Sauce is best used fresh, but stores in the fridge
Acknowledgment: This work was supported by the USDA National Institute of Food and for a few days.
Agriculture, Multistate Hatch and Smith-Lever projects 2013-14-380. 34
updated 05/2021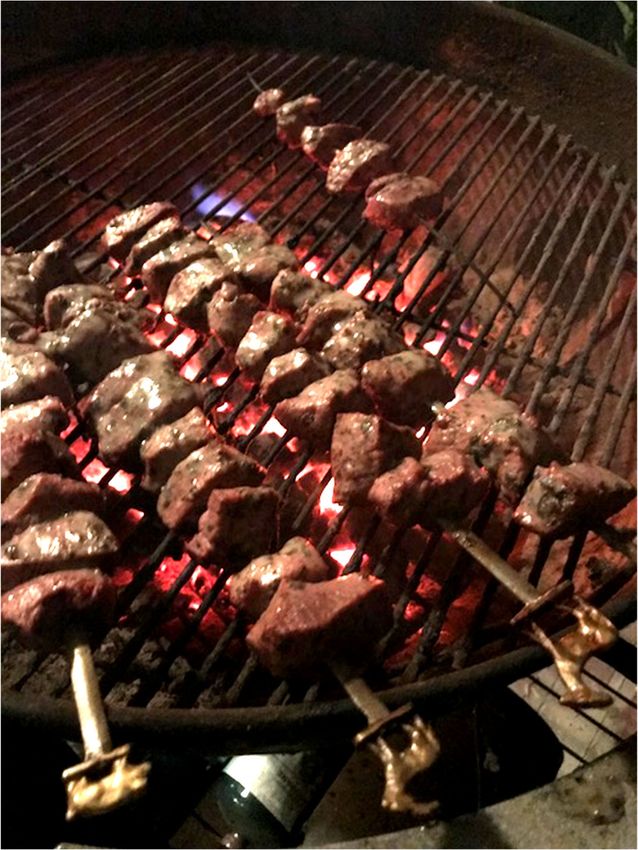
Enchilada Casserole This booklet offers tips and recipes for different styles of outdoor cooking of wild game
and wild-caught fish wherever you have set up camp. This could include hiking or
boating into the back country with minimal gear or having many of the niceties of home
Ingredients: that can come with a hunting cabin or car camping, such as a charcoal grill or heavy
2 lb. venison, ground meat Dutch oven. Cooking outside is a great way to celebrate the hunt, the beast, and the
1 onion, chopped feast!
salt and pepper to taste
4 cups red enchilada sauce (can make your own, recipe follows)*
Small, 4 oz., can chiles (green or chipotle) or use fresh
Corn tortilla chips
2 cups shredded Mexican cheese blend
Cilantro or sour cream for garnish, if available
Directions:
1. Heat discada plow disk cooker over medium high flame.
2. Add the ground meat and onion and season with salt and pepper. Cook, stirring
with a long handled spatula or spoon, until the meat is browned. Push the meat
mixture up to the sides of the pan, making a “bowl” in the middle of the pan and the
meat. Add the enchilada sauce and “get to bubbling”.
3. Pour the bag of corn tortilla chip into the bubbling sauce and coat gentle until the
chips start to soften. Gentle fold the meat back into the sauce and cook until the
mixture thickens a bit.
4. Spread the cheese over the top and let melt. Turn the heat off and serve. Garnish
with sour cream and chopped cilantro if available.
*Variation—use ground wild turkey meat and a green enchilada sauce
33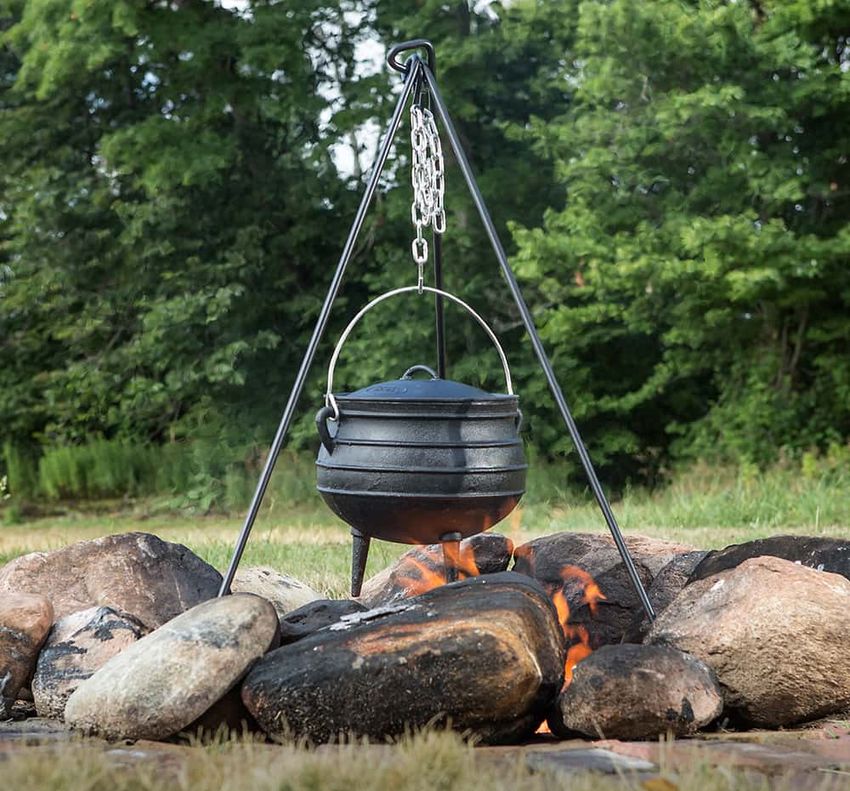
Table of Contents                                            DUTCH

Introduction to Cooking Outdoors — 1
Different Styles of Outdoor Cooking and Camping
      Backcountry — 2
      Cabin or car-camping — 3
Cooking on a Wood Campfire
Best Woods to use (and avoid) — 4
      Equipment — 4
      How to set it up — 5
      When to cook (know coals are ready) — 6
      Recipes for Wood Campfire — 7
             Foil Packets in the Coals (“hobo packs”) — 8
             Sticks, skewers and spits — 9
             Indirect heat– tri-pods, grates, and hangers — 6
             Skillet cooking — 6
Cooking with Charcoal Briquettes
           Dutch Oven Cooking — 17
             Equipment- sizes and types, foil liners, safety items — 17
             How to use on wood fire — 19
             How to use with charcoal — 19
             Recipes for a Dutch Oven —21
           Turkey in a Can — 27
             Equipment and set-up — 27
             Recipe — 28
‘Cooking with Propane
      Using a Plow Disk/Disco over a propane burner — 29

                                                                          32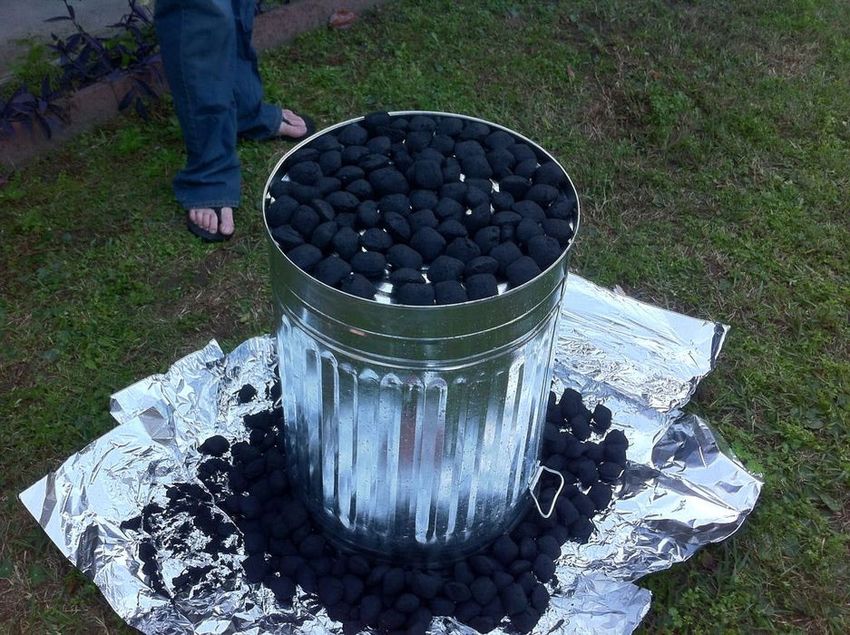
Cowboy Spaghetti Recipes
Ingredients:
3 lbs. ground venison Fish
3 (24oz) jars tomato pasta sauce Fish Chowder in a Dutch Oven — 25
2 qt. Water (maybe more) Fish in Foil Packets — 11
2 lb. pasta, spaghetti Grilled or Pan seared whole fish — 11
Directions: Fowl
1. Heat disco/plow disk on propane burner to medium high heat. Disco Enchiladas (Turkey) — 33
2. Brown the ground venison, stirring with a long metal spoon or spatula to evenly Marsh n’ Meadow Chili — 21
brown Turkey in a Can — 28
3. Add 2 jars of favorite tomato pasta sauce and 2 jars of water. Upland Gamebirds in Foil Packets — 9
4. Stir and bring up to a simmer/low boil Pan-seared duck breast with garlic — 14
5. Break pasta into smaller lengths and add to the disco. Stir to cover the pasta in
liquid. Venison
6. Stir and simmer until the pasta is cooked through. You may need to add a bit more Cowboy Spaghetti — 31
water. Disco Enchiladas (venison) — 11
7. Serve with some sprinkled Parmesan cheese. Marsh n’ Meadow Chili — 11
Mediterranean Game Stew — 11
Venison in Foil Packets — 10
Venison Shish kabobs — 15
Venison hotdog or sausage roasted on a stick — 13
31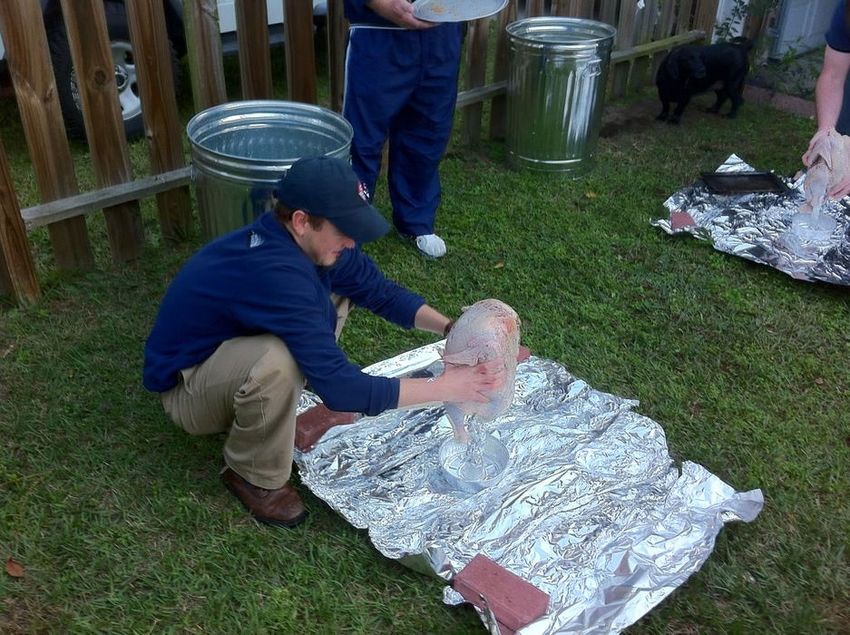
Cooking Outdoors
Since early humans discovered how to control fire, we have been cooking hunted meat
outdoors. Archaeologists have found evidence of butchery and stone tools dating back
over two million years ago. This introduction of meat and fish into early human diets,
along with the ability to cook food, are two hypothesis of brain growth and our evolution
into modern humans. And, there remains something deeply satisfying about cooking
over an open flame with the glowing coals and aroma of roasting meat.
Just as our early hunting methods and tools have evolved over time to include modern
firearms, we now have many different methods for cooking outdoors and using “fire”.
Propane camp stoves weigh as little as 5 ounces and fit in a daypack for back country
cooking or can be larger pieces of equipment with multiple burners. Charcoal grills,
Dutch ovens, and Discos can all be part of the outdoor cooking repertoire along with a
good, old wood campfire.
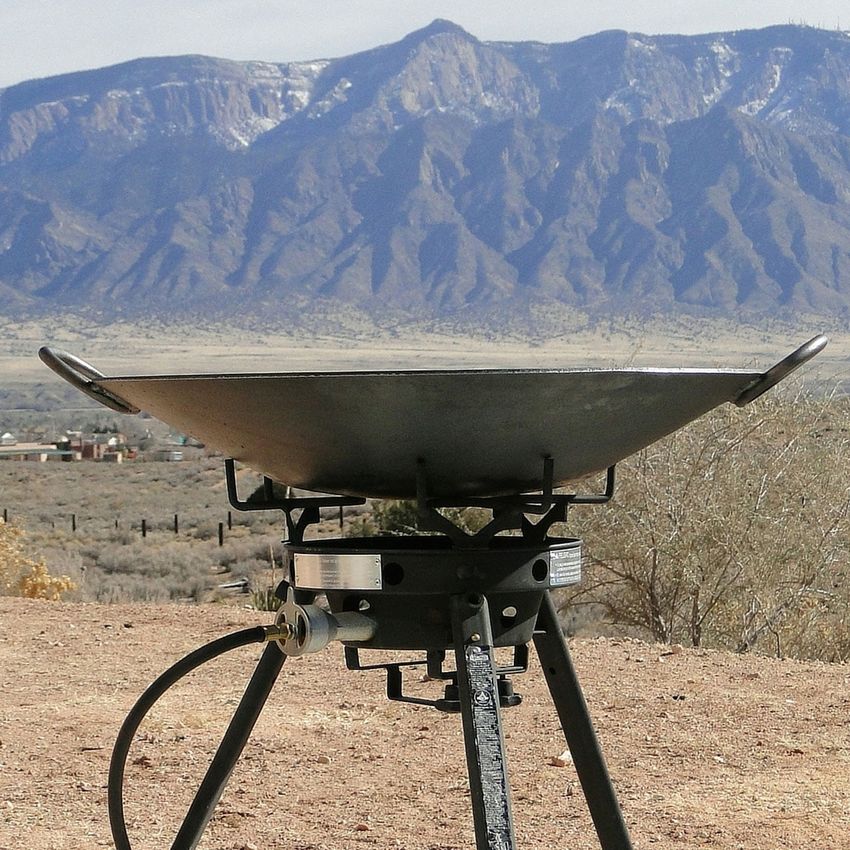
Photo credit: Southwestdisk.com
1 30
Cooking with a Plow Disc                                                                 Different Styles of Outdoor
                                        History                                                        Cooking and Camping
Plow disc cooking started in the Southwest regions of United State more than a century
ago with much of the lore reaching back to the construction of the railroads in the late
                                                                                                               Hunting and Cooking in the Backcountry
1800s. Many of the railroad workers coming through New Mexico and Texas were
                                                                                            If you are planning to hike or canoe into the backcountry to set up camp, you will need
Chinese and cooked their lunches using a wok. This may have been the inspiration for
                                                                                            to pack lightweight foods and cooking materials. There are many different light-weight
converting agricultural plow disc harrows into wok-style cookers by cleaning them,
                                                                                            propane, butane, or white gas cooking stoves available, some weighing just a few
filling in the hole(s) on the disc, and even adding handles. In parts of New Mexico this
                                                                                            ounces, that pack down into a small case. These stoves can be used to rehydrate
style cooker is nicknamed a ‘disco”. “Discada” is a mixed meat dish popular in northern
                                                                                            dehydrated foods and soups and cook small meals and side dishes. Small, lightweight
Mexico and includes a mixture of grilled meats cooked on an agricultural plow disc, so
                                                                                            cooking pans, skillets, and
sometimes the cooking disc is referred to as discada. Others refer to it as a cowboy
                                                                                            utensils are also available
wok. Whatever you choose to call it, this style of cooking is great for cooking meats
                                                                                            specifically for
outside!
                                                                                            backcountry cooking. It is
                                                                                            also very useful to know
                               Equipment and Tips                                           how to build a cooking fire
A large outdoor propane burner on a stand, such as for a turkey fryer or clam boil,         efficiently and safely in the
works well for disco cooking . Be sure to have some heavy duty pot holders as the           backcountry and to carry
handles can get hot and long handled utensils for moving the food around. The discos        dry fire starting materials,
are thick, solid metal and require an active style of cooking to keep foods from burning.   such as matches, flints,
The middle can get very hot and the edges work well to keep foods warm or cooking           and/or lighters in
more slowly. The flame and heat can be adjusted with the propane burner to find the         waterproof containers. Be sure to check on fire regulations for where you are intending
desired temperature of the cooking surface. The disco can be used to cook over coals        to camp. Freshly caught fish, small game, and birds can be cooked with a lightweight
or even suspended over a campfire for cooking, but it’s a bit heavy for that and would      stove or with a cooking fire. Packing in rice and/or pasta with dehydrated vegetables
need to be well secured.                                                                    can create a nice meal by adding wild game or fish, and if the fish and game don’t
                                                                                            come to hand, you can still eat well in a remote campsite.

                                                                                            For additional information on outdoor cooking , see CCE Warren County’s 4-H Outdoor
                                                                                            Cooking booklet.
                                            29                                                                                         2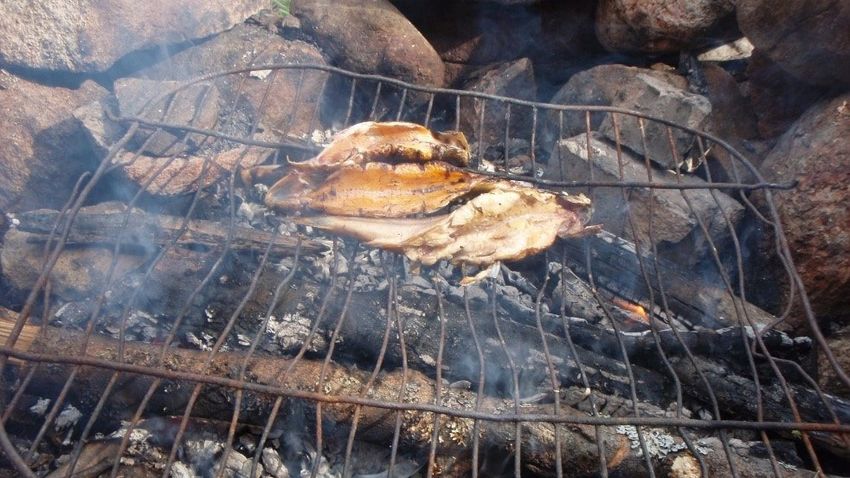
Hunting and Cooking at a Cabin or Car Camping                                                                                                                    CHARCOAL
A hunting/fishing camp with a cabin or campsite that you drive to, can accommodate
heavier cooking equipment, such as Dutch ovens, large propane burners, plow disc
                                                                                                 2. Place the whole turkey (thawed of course) onto the stake, legs down. Rub with oil
cookers, grills, and cast iron skillets. Many camps and campsites have an established
                                                                                                    (optional) and seasonings. Turn the garbage can upside down, and place carefully
fire pit often with cooking grates and heavy grilling utensils can be used. Some
                                                                                                    over the turkey. Place piles of charcoal on the top of the
campgrounds have established grills for using charcoal or wood. Being able to use
                                                                                                    can, and around the sides of the can. Light the charcoal.
heavier equipment and ingredients, plus have refrigeration or a cooler, opens up more
options for camp meals as opposed to only what you can carry into the backcountry.

Cooking with a Dutch oven, large pots over a propane burner, and/or with a plow disc
are great ways to feed large numbers of people at camp.

The Dutch oven recipes in this booklet have multiple ingredients for rich flavors, but
simpler stews, chili, and soups can be made, along with some infamous Dutch oven
desserts.

                                                                                                 3. Cook for at least 1 1/2 hours, or keep going until
                                                                                                    coals go out. Do not lift can during cooking.
                                                                                                    Carefully brush the charcoal away from the
                                                                                                    bottom and top of the can and lift off carefully as
                                                                                                    some heat may rush out when you lift the can.
                                                                                                    Try not to hit the turkey or get coals on the bird.
                                                                                                    The internal temperature of the turkey should be
                                                                                                    at least 180 degrees F (83 degrees C) when
                                                                                                    taken in the thickest part of the thigh.

                                                                                                                                      Photo source: https://www.instructables.com/id/Turkey-in-a-Trash-Can/-
       Photo Source: www.fieldandstream.com/blogs/the-wild-chef/seven-tips-for-campsite-chefs/
                                                      3                                                                                        28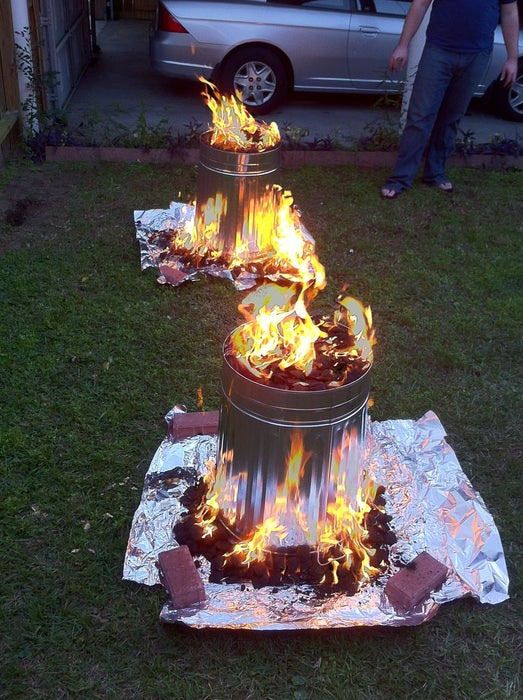
Turkey in a Can Cooking on a Wood Campfire
Best Woods to use (and avoid)
Ingredients and supplies: A hot, clean burning campfire is needed to successfully cook over and it requires dry,
Aluminum foil seasoned firewood. Hardwoods such as maple, birch, oak, and hickory burn nicely.
2 ft. metal rod with 4-6” “T” on top or metal or wooden pole and a metal can Green wood, such as cutting a branch from a live tree will not burn properly for a cook
Clean 15 gallon metal garbage can, NOT galvanized fire, nor will wet or punky wood. Also be sure to avoid wood that has poison ivy vines on
Large aluminum foil roasting pan it or summac! High flames can burn your food without cooking through, so you will want
2 bags of charcoal to light your fire a good hour before cooking so that it has more charcoal-like qualities.
1 whole turkey, neck and giblets removed
Olive oil or butter (optional)
Equipment
Seasonings to taste, such as salt, pepper, poultry seasoning
Having fireproof mitts or gripping tool, such as long tongs, to retrieve a pan or foil packet
Directions: from the fire are nice to have. You will also want a fire-prod of some sort, such as a
1. Lay about 3 long sheets of heavy duty sturdy long stick or metal
aluminum foil out on the grass to make a rod to adjust your logs and
square about 3 x 3 feet. The grass will get create nice, even coals. If
burned in this spot, so use care in choosing a you are backcountry
cooking location. Place a large foil roasting camping you can likely find
tray in the center of the aluminum foil square what you need to make a
and pound the metal stake into the ground in cooking fire at your
the center of the foil tray until about 18” is campsite, but check with
above ground with T on top. If using a straight local regulation about the
stake, place a metal vegetable can or 12 oz. use of campfires and
aluminum can on top of the stake. collecting wood.
You can used tri-pods to cook over an open campfire or iron grill grates over campfires
to be able to use skillets and other heavy pots and pans for cooking.
27 4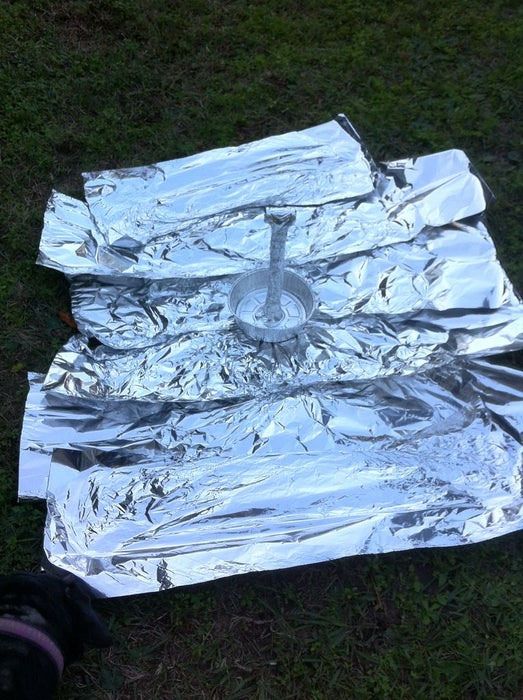
How to set it up
                                                                                   DUTCH

Prepare the Site:
1. Select a fire site at least 8′ from bushes or any
    combustibles. Be sure no tree branches
    overhang the site.
2. Make a U-shaped perimeter using large rocks or
    green logs. If using logs, they’ll need to be wet
    down from time to time. If breezy, have back of
    firepit face the wind.
3. Put a large flat rock at the rear of the firepit to act
4. as a chimney. The “chimney rock” will help direct the smoke up and away.

Lay the Kindling:
1. Fill the fire area with crumpled paper or tinder.
2. Lay kindling over paper in layers, alternating
    direction with each layer. Use thin splits of wood
    or small dead branches. Do not put kindling
    down “teepee style”. The whole fire area should
    be covered with the kindling stack.
3. Set a bucket of water near the fire area. Light
    the paper to start your fire.

Build the Fire, Grade the Coals:
1. When kindling is ablaze, add firewood. The
    wood should be all the same size, as much as
    possible. Use hardwood or hardwood
    branches if available. Distribute wood evenly
    over fire bed.

                                               5                              26
2. As soon as the last flames die down leaving mostly white coals, use a stick to push
Fish Chowder the coals into a higher level at the back end and lower level at the front. This will give
you the equivalent of ‘Hi’, ‘Med’ and ‘Low’ cook settings. Or, level the coals to your
Ingredients: preference.
4 slices bacon cut into 1 inch (could substitute 2 tablespoons olive oil)
2/3 cup chopped onion
1/2 cup chopped celery
When to cook (know coals are ready)
3 medium potatoes, cubed
1. Set the grill on rocks or wetted green logs. Put food directly on grill or in cookware
3 cups fish stock* (can substitute chicken stock, clam juice, or vegetable broth)
and prepare your meal. If cooking directly on the grill, a small spray bottle or squirt
1/2 cup chopped carrots or sweet corn kernels
gun is handy for shooting down any rogue flames, usually caused by food drippings.
2 tablespoons fresh parsley, minced
2. As the fire diminishes, bank the coals to get the most heat from them.
1 tablespoon lemon juice
3. After cooking, add wood for your evening campfire. Before retiring, extinguish
1/2 teaspoon dill weed or 1 Tbsp. fresh, minced dill
thoroughly and soak with water. Turn rocks in on fire bed. It will be easy to
1 tsp. Old Bay-type seasoning
reassemble the next day if required.
salt and pepper to taste
1 pound boneless, skinless pan fish fillets: perch, sunfish, crappie or pickerel, cut
into 1 inch chunks
1 can evaporated skim milk or 1 cup light cream (half n half)
Directions:
1. In a Dutch oven, cook the bacon until crisp. Remove bacon, and set aside; discard
all but 2 tablespoons of drippings. If using olive oil instead of bacon, just add olive
oil to pot and proceed to next step.
2. Saute onion and celery in drippings until tender. Add potatoes, fish stock, carrots or
corn, parsley, lemon juice and seasonings. Simmer until vegetables are tender,
about 30 minutes.
3. Add fish and cooked bacon and simmer for 5 minutes, or until fish flakes with a
fork. Add cream, and heat through, being careful not to boil the chowder once the
cream is added. Ladle into serving bowls and garnish with a sprinkle of smoked
paprika or Old Bay seasoning and a sprig of parsley.
Source: https://learn.eartheasy.com/guides/campfire-cooking/
25 6Recipes for Wood Campfire DUTCH
S'mores are a favorite treat cooked over a campfire and simply require a stick for
Directions:
roasting the marshmallow, some graham crackers, and chocolate. Another favorite, is
1. Heat oil in large Dutch oven over medium-high
simply roasting a hotdog or sausage (made from game meat if you have it) near the
heat.
coals of the fire.
2. Add game meat with rub and cook for 5 minutes,
browning all sides.
Aluminum foil is handy to have when cooking over a campfire. It helps keep food moist,
3. Remove meat from pan.
ensures food cooks evenly, lightweight for backpacking in, and serves multiple
4. Add mushrooms, carrots, onion, celery and garlic
purposes. You can wrap a baking potato in heavy duty foil and nestle it into the
to the pan.
ashened coals while preparing your meats for a nice side dish. Aluminum foils is also
5. Cook 5 minutes, stirring occasionally.
excellent for making “hobo packs”.
6. Return meat to the pan.
7. Stir in water, and all the
rest of the ingredients
except the olives, red
wine vinegar and parsley.
8. Bring to a boil.
9. Cover, reduce heat and
simmer for 1 hour.
10. Stir in olives and cook for
30 minutes or until meat is
tender.
11. The longer you simmer at
this point, the better.
12. Discard the bay leaves.
13. Stir in vinegar and
sprinkle with parsley.
7 24Mediterranean Game Stew Foil Packets in the Coals
Ingredients:
“hobo packs”
1 ½ teaspoons olive oil
1 ½ lbs game stew meat, cut into 1 inch pieces Basic Recipes
3 ½ cups halved mushrooms (about 8 ounces)
2 cups diagonally sliced carrots
Ingredients:
1 ½ cups chopped onions
1 lb. meat, such as venison, small game, fish, or wild poultry
1 ½ cups sliced celery
2 garlic cloves, minced 4 cups veggies, such as chopped onion, potato, mushroom, pepper, broccoli, etc
1 ½ cups water (or beef stock for a richer stew) 2 T. olive oil or butter
1 cup dry red wine, such as cabernet sauv1gnon 1-4 clove garlic, roughly chopped
½ teaspoon dried thyme
1/2-1 cup of liquid such as juice, wine, stock or beer
11/4 teaspoons kosher salt
Salt, pepper, seasoning to taste
1/4 teaspoon fresh coarse ground black pepper
2 (14 ½ ounce) cans no-salt-added stewed tomatoes, undrained
2 bay leaves Directions:
1(2 1/4 ounce) can sliced ripe black olives, drained Lay out 4 large squares of heavy duty aluminum foil (12”x12”). Mix ingredients together
2 tablespoons red wine vinegar and divide by placing into 4 equal portions in the middle of each piece of foil. Place
1/4 cup chopped fresh flat-leaf parsley
another square of foil on top and fold up all four sides a few times to seal. You may
want to double wrap the foil packs with another layer of foil to avoid burning or tearing.
Mediterranean spice rub ingredients:
3 tablespoons dried rosemary Place directly in the coals or on a grill grate over medium high heat for about 40
2 tablespoons ground cumin minutes, turning occasionally. Listen for a bit of a sizzle to know it is cooking, but not
2 tablespoons ground coriander too much to indicate the heat is too high and possibly burning the veggies.2. Carefully
1 tablespoon dried oregano
remove the packet from the fire or off the grill grate and be very careful when opening
2 teaspoons ground cinnamon
the foil packet as the contents will be hot and steamy.
½ teaspoon salt
1 clove garlic, minced
Mix all ingredients in a bowl. Sprinkle (to taste) on your meat. A tbsp of olive oil can Note: you can make the packets up ahead of time at home and pack them into camp
be used to help the rub adhere to meat. premade.
23 8Upland Game Bird Packets DUTCH
Ingredients: Toppings:
1lb. cubed wild turkey, grouse or pheasant, breast Sour cream
meat or ~ 1lb. wild rabbit or squirrel meat cut into Cheddar cheese, shredded
Green onion or chopped chives
quarters
Guacamole
4 smallish potatoes, cut into bite size pieces
½ red onion or 1 large shallot, diced
Directions:
1 large head of broccoli, ~2 cups fresh florets
1. Brown ground and
2 large carrots, in large chunks, ~ 1 cup
chopped meats with
2-4 cloves of fresh garlic, minced
onions and peppers in a
Juice from 1-2 lemons Dutch oven., place on or
2 Tbsp Olive oil above hot coals. Add the
1/2 cup of apple juice, white wine, water, our chicken garlic and sauté an
stock additional 30 seconds.
1 tsp poultry seasoning (if available) 2. Add tomatoes and
Dash of salt and pepper seasonings. Lower Dutch
Chopped fresh parsley and/or thyme if available oven close to the heat or
add more coals to create a
Directions:
medium-high temperature
1. Lay out 4 large squares of heavy duty aluminum foil (12”x12”). Mix ingredients
and bring to a boil. Stir.
together and divide by placing into 4 equal portions in the middle of each piece of
3. Add beans and lime juice,
foil. Place another square of foil on top and fold up all four sides a few times to
reduce the heat by raising
seal. You may want to double wrap the foil packs with another layer of foil to avoid
the Dutch oven or by
burning or tearing. Place directly in the coals or on a grill grate over medium high
moving coals. Cover and
heat for about 40 minutes, turning occasionally. Listen for a bit of a sizzle to know it
simmer for 1 to 2 hours.
is cooking, but not too much to indicate the heat is too high and possibly burning
4. Adjust seasonings to your
the veggies.
taste and serve with
toppings.
9 22‘’Marsh & Meadow’’ Chili Venison Packets
The following three recipes are meant for Stewing and Simmering, like would be done
Ingredients:
on a stove top This can be achieved by placing the Dutch oven on a grate directly over
1lb. cubed venison meat
the coals or suspending the Dutch oven over the coals. You can also cook directly with
4 smallish potatoes, cut into bite size pieces
charcoals, keeping most of the heat coming from the bottom. Place the coals under
1 cup sweet onion large shallot, diced
and on the oven at a 4 to 1 ratio with more underneath than on the lid.
1 cup sliced mushrooms
2 large carrots, in large chunks, ~ 1 cup
Ingredients:
2 lb. ground venison 2-4 cloves of fresh garlic, minced
1 lb. smoked goose or duck breast, chopped 1 Tbsp. Olive oil
2 onions, diced 2 tsp. steak seasoning or Italian seasoning
1 red pepper, diced Dash of salt and pepper
1 Chili pepper, finely chopped
1/2 cup of red wine, beer, or cranberry juice
1 jalapeno, finely chopped
2-3 cloves of garlic, minced
Directions:
1 (14 ounce) can Mexican-style tomatoes
2 (8 ounce) cans tomato sauce
1. Lay out 4 large squares of heavy duty aluminum foil
1 (16 oz.) jar home canned tomatoes (if unavailable, add a second can of Mexican- (12”x12”). Mix all ingredients together, except the
style tomatoes) liquid, and divide by placing into 4 equal portions in
2 Tablespoons cumin powder the middle of each piece of foil. Pour about 2 Tbsp. of wine/beer/or juice over the
2 Tablespoons chili powder
mixture. Place another square of foil on top and fold up all four sides a few times to
1 teaspoon salt
seal. You may want to double wrap the foil packs with another layer of foil to avoid
1/2 teaspoon cayenne pepper
1/2 teaspoon paprika (smoked, if you can find it) burning or tearing. Place directly in the coals or on a grill grate over medium high
2 Tablespoons brown sugar heat for about 40 minutes, turning occasionally. Listen for a bit of a sizzle to know it
1 Lime - juiced (save juice in a bowl) is cooking, but not too much to indicate the heat is too high and possibly burning
1 (14 ounce) can kidney beans, drained and rinsed the veggies.
1 (14 ounce) can black beans, drained and rinsed
2. Carefully remove the packet from the fire or off the grill grate and be very careful
1 (14 ounce) can pinto beans, drained and rinsed
when opening the foil packet as the contents will be hot and steamy.
21 10Fish in a Foil Packet
Dutch oven sources:
University of Idaho Extension -
https://www.extension.uidaho.edu/publishing/pdf/BUL/BUL939.pdf
Ingredients:
North Dakota State University Extension Service -
4 skinless fish fillets, such as fresh trout, bass, pike,
https://www.ndsu.edu/fileadmin/4h/OutdoorSkills/DutchOvenCooking.pdf
or salmon (boneless preferred)
Utah State University Summit County Extension -
1 lb. asparagus or leaks (white and light green part)
or broccoli flowerets or sliced zucchini
4 tsp. olive oil or butter
2 cloves garlic, minced (or 2-3 teaspoons minced
garlic)
Salt and freshly ground black pepper, 1 tsp Old Bay
or other fish seasoning if desired
1 lemon thinly sliced
Fresh dill sprigs or parsley
Directions:
1. Lay out 4 large squares of heavy duty aluminum foil
(12”x12”). Divide veggies into 4 equal portions and
lay in center of each length of foil. Divide half of garlic evenly on veggies (reserve
other half of garlic), sprinkle with salt and pepper. Place fish on vegetables, and
drizzle top of each fish fillet with 1 tsp. oil or butter, remaining garlic, salt and
pepper, and any additional seasoning you like. Top each with lemon slices and
herbs. Place another square of foil on top and fold up all four sides a few times to
seal. You may want to double wrap the foil packs with another layer of foil to avoid
burning or tearing. Place directly in the coals or on a grill grate over medium high
heat for about 15– 20minutes, turning occasionally. Listen for a bit of a sizzle to
know it is cooking, but not too much to indicate the heat is too high and possibly
burning the veggies. Fish should be opaque and flaky when cooked.
11 20Cooking with a Dutch oven COALS
A Dutch oven is very durable and can be nestled directly into wood coals for cooking,
can be placed on a grill grate above coals or hung from a tri-pod above heat just as
2. Carefully remove the packet from the fire or off the grill grate and be very careful
easily as it can be used inside in an oven or on a stove top. Just consider what you are
when opening the foil packet as the contents will be hot and steamy.
cooking and the heat required. Charcoal is popular for Dutch oven cooking
How to use with Charcoal Briquettes
You can place the Dutch oven on a grate over the coals, or directly on the coals. You
can also line the Dutch oven with tinfoil, or purchase tin foil liners for your oven size to
aid with cleanup.
Once the briquettes are lit, wait until they are grey. Grey briquettes indicate that they
Grilled Whole Fish or Pan
are hot enough to be used. A good tip for the number of briquettes to use is based on
the size. For example, a 12-inch Dutch oven should have 12 -14 hot briquettes placed
on top, and 6-8 placed on the bottom. For stewing or simmering you want to place more
coals on the bottom than on top. For this you want a 4 to 1 ratio. For example, 16 coals Seared Directly over Coals
on the bottom and 4 on top. Freshly caught whole fish can be cleaned, seasoned, and cooked directly on a grill
grate over hot coals or pan fried in a cast iron set over the coals. Keep the skin on and
To quickly check the temperature of your oven, place you palm 6-8 inches above the cook it until the meat turns opaque and flakes with a fork, turning it at least once. A little
top. Depending on how many seconds you can hold your palm there tells you the pad of butter or a drizzle of olive oil in the cleaned cavity can keep the meat moist and
temperature. One second is very hot around 450°F-500°F, five seconds is moderate flavorful. The meat should separate easily from the bones and the skin after it’s cooked.
heat around 350°F-400°F. Use a food grade thermometer to check the internal
temperature of the food before consuming.
19 12Venison Hotdog or Sausage Ensure the lid fits properly and does not wiggle around. A seal needs to be able to
form between the lid and the pan to create internal pressure. The sides and bottom
roasted on a stick should be of uniform thickness to have even heat distribution.
Tools:
Ingredients:
Leather gloves
Hotdogs and or premade sausage*
Dutch oven stand
A long stick, either green wood or soaked in water with one end sharpened or a
Briquette lighter
long skewer*
Long handled pliers
*amounts depend on how many people would like to cook their own and how many
Long handled hook
people
Directions: Seasoning the Dutch oven
1. Once you have established a nice bed of coals in your fire that are glowing a deep With a new Dutch oven, thoroughly wash with hot water. Next, place on a fire or stove
orange color but not flaming too much, place your hotdog or sausage on the top to dry off any water. Coat the inner and outer surfaces with vegetable oil or food-
pointed end of your stick or skewer and hold it near the coals. Turn the hotdog as it grade mineral oil. Absorb any excess with a clean paper towel. Place the Dutch oven
starts to slightly brown, cooking on all sides, being careful not to char it with flames and the lid in an unheated conventional oven (do not put the lid on the Dutch oven,
that are too hot. Hotdogs are already cooked, so the idea is to thoroughly heat the leave it separate). One they are in, begin to heat the conventional oven to 300°F-350°F
hotdog all the way through to an internal temperature of 160ºF. Some sausages are and bake for 30-60 minutes. Lastly, take out and allow the Dutch oven to cool to room
not precooked so be temperature. Repeat this process about 5 times, beginning with a new coat of oil, DO
extra careful that your NOT wash with soap.
sausage is turned and
thoroughly cooked
Cleaning and Storing
throughout to a
Use a plastic scraper, or clean sponge with warm water to get off any food remnants,
temperature of 160ºF.
DO NOT use soap. Once cleaned put on a fire or stove top on medium heat to dry off
Venison any water. Or for the purists, use coarse salt and a paper towel with oil on it to rub off
any food particles and no water. Once clean, with a paper towel rub a thin coat of
Shish vegetable oil on the inside. Place a clean, dry paper towel on the inside to absorb any
moisture and store in a cool dry place.
13 18Cooking using a Dutch Oven Pan Seared Duck Breast with
History Garlic
Dutch ovens have been utilized since the colonies were settled. They were
indispensable in every camp kitchen, hunting camps in the wilderness, and home Ingredients:
kitchens. Dutch ovens have multiple purposes which is what makes them great for Duck breast meat, skinless, boneless (2 halves–
everyday use. 1 duck)
6-8 cloves of garlic, slightly crushed and peeled
Equipment- sizes and Types, foil liners, other handy gadgets 2 Tbsp. of olive oil
Optional brie or other cheese, a few slices
Dutch ovens are either cast iron, aluminum, or ceramic. The one used most commonly in
outdoor cooking is cast iron, which needs to be “seasoned” and cared for properly.
Directions:
Sizes vary from 8-inches to 16-inches, holding 2-quarts and 12 quarts respectively with
1. Slice the duck breasts in half lengthwise/
other sizes in between. The most widely used is a 12-inch which holds 6 quarts and
horizontally so you have four 1/4’ to 1/2” thick
feeds 8-12 people. Mostl are 4 inches deep.
pieces.
2. Place a cast iron skillet over coals on a grate or
propped up above the coals slightly. If coals are
well cooked down the pan can go directly on the
coals. You want a medium heat. Add the oil.
Then add the garlic cloves. Cook until the garlic
is golden brown in color and softened. Do not
let the garlic burn or it will be bitter. Stir or move
pan around so they don’t burn. Slightly smash
the garlic with a utensil once it is softened.
3. Lay the duck breast meat on the garlic, season
lightly with salt & pepper, and cook 4-8 minutes
until you can see the bottom is browned. Flip the
duck breast and cook a few minutes more until
desired doneness. You can add a piece of cheese
to melt on the top. Serve the duck breast with the
garlic cloves.
Photo source: coolofthewild.com
17 14Kabobs CHARCOAL
Ingredients: Preheat your grill and cook the meat and
1lb venison, 1” cubes veggies for about 4 to 5 minutes per side
1 small onion, quartered rotating to not burn the veggies until the meat
1 zucchini or yellow squash, cut in 1” slices reaches at least 145ºF. You can baste them
8-12 grape or cherry tomatoes
8 button mushrooms
1 bottle Italian or Spiedie dressing
4 long wooden or metal skewers
Preparation:
At least a day or two before serving, trim all of the sinew and silver skin from your
venison steaks or roast and cut into cubes. This is easiest to do when the meat is
still slightly frozen.
Place the cubed meat into a non-reactive pan that is easy to take to camp, such as
a plastic or glass container with a lid or ziplock bag to marinate the meat.
Add enough dressing to thoroughly coat the meat. Stir to combine and place in
the refrigerator.
Leave the meat in the marinade for at least 24 hours up to 48 hours or even 3 days,
stirring every now and then to make sure meat is covered and flavors are mixed.
Place the vegetables in a plastic bag or non-reactive container and cover with
dressing, stirring to coat, at least half an hour before cooking or can be done the
day before to transport them to camp that way.
Remove the meat from the marinade (discard the dressing marinade) and place
onto skewers, either metal or wooden skewers that have been soaked in water,
alternating with the vegetables, being careful to not pack too tightly to allow for even
cooking.
15 16You can also read