Cell-ID 20-Plex Pd Barcoding Kit - USER GUIDE - Fluidigm
←
→
Page content transcription
If your browser does not render page correctly, please read the page content below
PN PRD023 B1

Cell-ID 20-Plex Pd Barcoding Kit
USER GUIDE
For Research Use Only. Not for use in diagnostic procedures.

Information in this publication is subject to change without notice.
It is Fluidigm policy to improve products as new techniques and
components become available. Therefore, Fluidigm reserves the
right to change specifications at any time. Every effort has been
made to avoid errors in the text, diagrams, illustrations, figures, and
screen captures. However, Fluidigm assumes no responsibility for
any errors or omissions. In no event shall Fluidigm be liable for any
damages in connection with or arising from the use of this
publication.

Patent and Limited License Information
Fluidigm products are covered by issued and pending patents in
the United States and other countries. Patent and limited license
information is available at fluidigm.com/legalnotices.

Trademarks
Fluidigm, the Fluidigm logo, Cell-ID, CyTOF, EQ, Helios, and
Maxpar are trademarks or registered trademarks of Fluidigm
Corporation in the United States and/or other countries. All other
trademarks are the sole property of their respective owners.

For EU's WEEE directive information, go to
fluidigm.com/compliance.

© 2019 Fluidigm Corporation. All rights reserved. 05/2019

PRD023 A3

QPulse MP-UM-01

For technical support visit fluidigm.com/support.
North America +1 650 266 6100 | Toll-free (US/CAN): 866 358 4354 | techsupport@fluidigm.com
Latin America +1 650 266 6100 | techsupportlatam@fluidigm.com
Europe/Middle East/Africa/Russia +44 1223 859941 | techsupporteurope@fluidigm.com
Japan +81 3 3662 2150 | techsupportjapan@fluidigm.com
China (excluding Hong Kong) +86 21 3255 8368 | techsupportchina@fluidigm.com
All other Asian countries/India/Australia +1 650 266 6100 | techsupportasia@fluidigm.com

2                                                                                    Cell-ID 20-Plex Pd Barcoding Kit: User Guide
Contents About This Guide Safety Data Sheets Introduction Kit Contents and Storage Conditions Barcoding Protocol Required Reagents, Equipment, and Materials not Supplied in Kit Solutions to Prepare in Advance: Important Notes before Starting: Tips and Tricks Barcoding Workflow Barcoding Protocol Steps Prepare Samples (Optional) Cell-ID Cisplatin Viability Staining Fix and Permeabilize Barcode Antibody Staining Cell-ID Intercalator-Ir Staining Acquire Data Debarcoding Barcode Separation Mahalanobis Distance Debarcoding Protocol Download and Install the Debarcoder Debarcoding Example References Cell-ID 20-Plex Pd Barcoding Kit: User Guide 3
About This Guide

Safety Data Sheets
Read and understand the safety data sheet (SDS) before handling chemicals. To obtain the SDS for a
chemical ordered from Fluidigm Corporation, either alone or as part of this system, go to fluidigm.com/sds
and search for the SDS using either the product name or the part number.

Some chemicals referred to in this user guide may not have been provided with your system. Obtain the
SDSs for chemicals provided by other manufacturers from those manufacturers.

4                                                                       Cell-ID 20-Plex Pd Barcoding Kit User Guide
Introduction
The Cell-ID™ 20-Plex Pd Barcoding Kit enables unique barcoding of 20 samples so they can
be combined and subsequently stained and acquired as one multiplexed sample, followed
by software debarcoding and individual sample analysis. Multiplexing samples improves
data quality because the 20 samples are stained, processed, and acquired as one sample,
eliminating sample-specific staining and data collection variation.

This user guide includes protocols for barcoding samples and for debarcoding multiplexed
files.

Kit Contents and Storage Conditions
 Contents                                                 Volume            Storage Temperature

 3 sets of 20 barcodes in PCR tubes                       10 µL each        –20 ºC

 Maxpar® Fix I Buffer (5X)                                15 mL             4 ºC

 Maxpar Cell Staining Buffer                              500 mL            4 ºC

 Maxpar 10X Barcode Perm Buffer                           50 mL             4 ºC

 Maxpar PBS                                               500 mL            4 ºC

Figure 1 Schematic representation of the barcoding patterns of 20 samples barcoded with six different
Palladium isotopes. Each barcode consists of a unique combination of the three palladium isotopes.

Cell-ID 20-Plex Pd Barcoding Kit User Guide                                                             5

Barcoding Protocol
                                                            Required Reagents, Equipment, and Materials not Supplied in Kit

Barcoding Protocol
The barcoding protocol employs fixation and gentle permeabilization to ensure uniform cell
labeling with the palladium (Pd) barcode while preserving cellular epitopes. After samples
are barcoded and combined, proceed with the appropriate downstream protocol for your
assay.

Required Reagents, Equipment, and Materials not
Supplied in Kit
    Product Name                             Company Name               Part Number
    Centrifuge rotor that holds PCR plates   Various                    Various

    BD Falcon™12 x 75 mm tubes,              BD                         352002
    polypropylene, 5 mL

    Cell-ID Cisplatin                        Fluidigm                   201064

    Cell-ID Intercalator-Ir                                             201192A/201192B

    EQ™ Four Element Calibration Beads       Fluidigm                   201078

Solutions to Prepare in Advance:
•      Barcode Perm Buffer: Prepare 4 mL for each sample to barcode by mixing 1 part
       Maxpar 10X Barcode Perm Buffer with 9 parts Maxpar PBS. Store at 4 ºC for up to one
       week.

•      Fix I Buffer: Prepare 1 mL for each sample to barcode by mixing 1 part Maxpar Fix I (5X)
       buffer with 4 parts Maxpar PBS. Store at 4 ºC for up to one week.

•      Intercalation Solution: Prepare 1 mL of intercalation solution for each sample to
       barcode by adding 1 µL of 125 µM Cell-ID Intercalator-Ir into 1 mL of Maxpar Fix and
       Perm Buffer to a final concentration of 125 nM (a 1,000X dilution of the 125 µM stock
       solution) and mix by vortexing.

NOTE Cell-ID Intercalator-Ir concentration can be titrated for individual cell types and
experiments for optimal Cell-ID Intercalator-Ir staining. It is recommended that the Cell-ID
Intercalator-Ir concentration in the staining solution not exceed 1 µM.

Important Notes before Starting:
•      Fix- and perm-sensitive surface epitopes: The barcoding protocol involves fixation and
       partial permeabilization of cells. Consequently, the ability to recognize and bind to

6                                                                              Cell-ID 20-Plex Pd Barcoding Kit: User Guide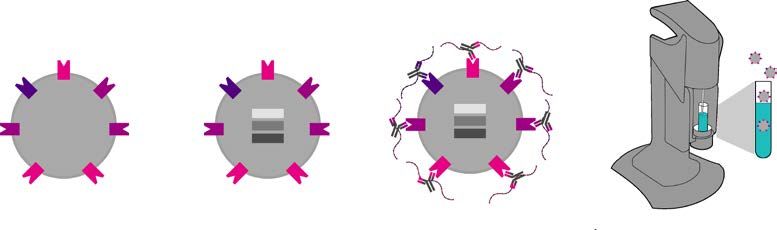
Barcoding Protocol
Important Notes before Starting:

     target proteins may be altered for certain antibody clones. It is known that fixation tends
     to decrease the signal (though in rare cases it can increase the signal), while
     permeabilization can either decrease or increase the signal. To determine the
     compatibility of desired clones of surface antibodies with barcoding, it is important to
     perform a small, preliminary experiment, with and without barcoding, using noncritical
     samples. For instance, compare surface marker staining profiles of a sample stained in
     three ways: live-cell-stained, fix-cell-stained, and barcoded and stained. If the amount of
     available barcodes limits performance of the preliminary experiment, follow through
     with the barcoding protocol using Fix I Buffer and Barcode Perm Buffer, but without
     adding the barcodes. In cases where signal is adversely affected and antibody clones
     against surface epitopes that are not fixative-sensitive are unavailable, surface staining
     with fix- and perm-sensitive antibodies on the individual samples may be done prior to
     the fix and partial permeabilization step for barcoding.

     NOTE As a point of reference, large antibody production companies have established
     lists of antibodies and clones that have been tested and demonstrated to be sensitive
     to fixation and/or permeabilization. Refer to their websites for more information.

•    Centrifugation speeds: For cell centrifugation steps, centrifugation should be
     performed for 5 minutes at 300 x g before cell fixation, and for 5 minutes at 800 x g
     after cell fixation. The increased centrifugation speed after cell fixation results in greater
     cell recovery.

•    Number of cells per barcode: Barcode signal intensity is inversely proportional to cell
     concentration. The barcodes in each tube have been pre-optimized to stain 1–3 million
     cells in 1 mL. In order to ensure consistent barcode staining intensity, count cells prior to
     barcoding and adjust so that 1–3 million cells will be stained for each sample.

     NOTE The presence of unwanted cells such as red blood cells (RBCs), or of platelets,
     debris, etc., will impact the barcode signal intensity of the sample. To achieve the best-
     quality barcode staining it is important to minimize and/or account for unwanted cells
     and debris when barcoding samples. See Sample Validation recommendations under
     Tips and Tricks for staining less common sample preparations.

     NOTE For barcoding small sample sizes that are less than 1 million cells, scale down the
     amount of barcode and barcode staining volume. Perform a pilot experiment to validate
     this protocol change on samples and panels using noncritical samples. Make aliquots of
     the remaining barcode and store at –20 ºC for one-time future use.

•    Thawing barcodes: Immediately before beginning the protocol, obtain the necessary
     barcodes and return the remaining kit components to the –20 ºC freezer. Allow 10
     minutes for the barcodes to warm up, then briefly centrifuge to ensure that all liquid
     reaches the bottom of the tube.

•    Mass range on first-generation CyTOF® instrument: The mass range on the first-
     generation CyTOF instrument must be adjusted to 102–192 to accommodate the
     barcoding channels. Due to the limited mass range on the first-generation CyTOF

Cell-ID 20-Plex Pd Barcoding Kit: User Guide                                                          7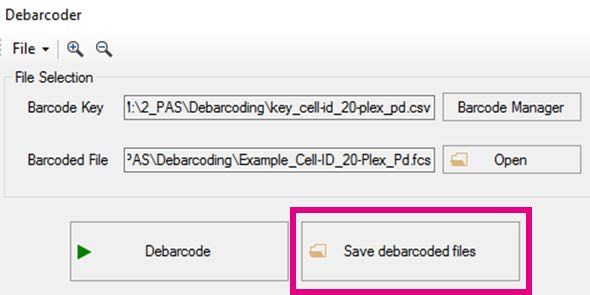
Barcoding Protocol
                                                                                                           Tips and Tricks

    instrument, Cell-ID Interacalator-103Rh is the only viability stain available for use with
    barcoding. In addition, 191Ir is the only channel available for use with Cell-ID Intercalator-
    Ir, which has both 191Ir and 193Ir. Contact your Fluidigm technical support specialist and
    field application scientists for assistance when performing barcoding experiments on a
    first-generation CyTOF instrument.

•   Viability staining: It is recommended that Cell-ID Cisplatin, instead of Cell-ID
    Intercalator-103Rh be used as a viability stain for barcoding experiments on CyTOF 2 and
    Helios™ instruments. Refer to (Optional) Cell-ID Cisplatin Viability Staining.

NOTE Samples resuspended in serum-containing media, e.g. complete RPMI with FBS,
should be washed in serum-free media before beginning viability staining with Cell-ID
Cisplatin.

•   Quantum dots (Qdots): Qdots labeled with antibodies are often used to boost signal for
    a particular antigen of interest. Most commercial Qdots contain natural abundance
    cadmium, which has eight naturally occurring isotopes of masses 106–116 that fall within
    the detectable range of a mass cytometer. These cadmium isotopes overlap with the
    mass range for the palladium barcodes and therefore cannot be used together for
    barcoding.

•   Troubleshooting: If you experience low barcoding staining or efficiency or other
    difficulties, contact your local field application scientist for assistance.

Tips and Tricks
•   Multiwell handling: The barcoding protocol is amenable to multiwell pipetting and
    aspiration. Instead of individual 5 mL tubes, users may barcode cells in a deep V bottom
    96-well plate (Corning Product No. 3961) or other multiwell polypropylene plate or tube
    with a minimum 2 mL volume capacity. Take care when aspirating to ensure that the
    pellet is not disrupted or lost and that consistent residual volumes of supernatant
    remain in the well or tube. The careful use of a multiwell aspiration apparatus is
    recommended.

•   Antibody usage: Maxpar metal-conjugated antibodies have been optimized to stain up
    to 3 million live cells with 1 µL of antibody in 100 µL of staining volume. Staining less
    than 3 million cells individually will use the same amount of antibody as staining 3
    million cells. For example, staining three individual samples with 1 million cells would
    require 1 µL of antibody, whereas with barcoding, 3 barcoded samples with 1 million
    cells per sample would require 1 µL of antibody. Therefore, barcoding offers the
    potential for reagent savings. After 20-plex barcoding, cell staining is done in a single
    tube that may contain up to 60 million cells in a 2 mL volume, maintaining the maximum
    cell staining concentration of 30 million cells per mL (or 3 million cells per 100 µL).
    Based on this, it has been found that barcoded samples may require less antibody per
    sample than individually stained samples to achieve the same level of staining intensity.

8                                                                             Cell-ID 20-Plex Pd Barcoding Kit: User Guide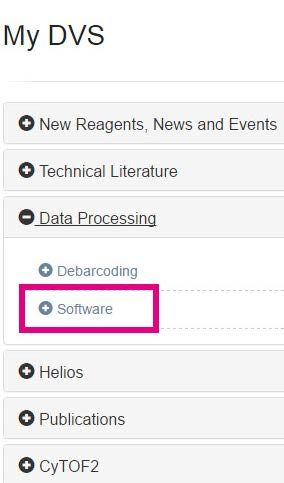
Barcoding Protocol
Tips and Tricks

     Users should perform a titration of cells with their antibody panel to assess whether a
     higher concentration of cells (up to 30 million cells/mL) may be used to achieve optimal
     staining performance. If a higher concentration of cells may be used, less antibody is
     required and the final staining volume of the barcoded cells should be adjusted
     accordingly.

•    Sample validation: It is recommended that users with less common sample
     preparations/cell types validate their samples for use with the barcoding reagent. For
     instance, samples with a high degree of unwanted cells (for example, RBCs and
     platelets) or debris may demonstrate diminished barcoding efficiency with the described
     protocol. It is recommended that users perform a pilot experiment to ensure effective
     barcoding.

Cell-ID 20-Plex Pd Barcoding Kit: User Guide                                                    9
Barcoding Protocol
                                                                                                 Barcoding Workflow

Barcoding Workflow

1    Fix             2   Barcode          3   Stain               4   Acquisition         5    Debarcode
`

Samples are fixed.   Samples are          Samples in a single     CyTOF®/CyTOF
                     barcoded by adding   tube are stained with   2/Helios™ Acquisition
                     three unique metal   metal-conjugated
                     isotopes.            antibodies/panels.

10                                                                       Cell-ID 20-Plex Pd Barcoding Kit: User Guide
Barcoding Protocol
Barcoding Protocol Steps
Barcoding Protocol Steps
Prepare Samples
Prepare 1–3 million cells resuspended in Maxpar Cell Staining Buffer into individual 5 mL
tubes for each sample to be barcoded.
Centrifuge each sample at 300 x g, carefully aspirate supernatant, and gently vortex.
(Optional) Cell-ID Cisplatin Viability Staining
NOTE If not performing viability stain, proceed to Fix and Permeabilize.
Resuspend cells to 20 x 106/mL in PBS.
Prepare a working solution of 10 µM Cell-ID Cisplatin by diluting in PBS (500X dilution
from stock).
Add an equal volume of 10 µM Cell-ID Cisplatin to cell suspension from Step 1 (for
example, 500 uL 10 uM Cell-ID solution added to 500 uL cell suspension gives a final
concentration of 5 µM cisplatin).
Mix well and incubate at room temperature for 5 minutes.
Quench cisplatin staining by washing with Maxpar Cell Staining Buffer using
5–10X the volume of the stained cells. Centrifuge at 300 x g, aspirate supernatant, and
gently vortex.
If Cell-ID was performed with all the cells in one tube, add enough CSB to be able to
split cells into 1–3 x 10⁶ cells per tube. Centrifuge at 300 x g for 5 min, aspirate
supernatant, and gently vortex.
NOTE If cisplatin staining is poor, wash cells in PBS prior to cisplatin staining.
Fix and Permeabilize
Resuspend samples completely in 1 mL of 1X Fix I Buffer and incubate for 10 minutes at
room temperature.
Centrifuge each sample at 800 x g for 5 minutes, carefully aspirate supernatant, gently
vortex, and wash twice with 1 mL of 1X Barcode Perm Buffer.
Barcode
Resuspend each sample to be barcoded completely in 800 µL of 1X Barcode Perm
Buffer.
Cell-ID 20-Plex Pd Barcoding Kit: User Guide 11Barcoding Protocol
Barcoding Protocol Steps
Resuspend each barcode completely in 100 µL of 1X Barcode Perm Buffer and transfer
them to the appropriate samples. Pipette to mix the sample immediately and
completely.
Incubate samples for 30 minutes at room temperature. Gently tap tube to mix after 15
minutes.
Centrifuge each sample at 800 x g for 5 minutes, carefully aspirate supernatant, gently
vortex, and wash twice with 2 mL of Maxpar Cell Staining Buffer.
Resuspend each sample completely in 100 µL of Maxpar Cell Staining Buffer.
Combine all barcoded samples into one 5 mL tube.
Rinse sample tubes an additional 2 x with 100 µL each and combine with tube from step
6 to maximize cell recovery. Centrifuge cells at 800 x g for 5 minutes, carefully aspirate
supernatant, and gently vortex. If volume is too large for tube, combine and centrifuge
in two batches.
Antibody Staining
Proceed with the staining protocol appropriate for your antibody panel. Scale, stain and
wash volumes to accommodate the number of cells in the multiplexed sample.
NOTE See Antibody usage under Tips and Tricks to learn how to effectively scale your
antibody panel on barcoded samples.
NOTE Perform centrifugation at 800 x g during antibody staining steps.
Cell-ID Intercalator-Ir Staining
Add 2 mL of the intercalation solution to the cells and gently vortex. Ensure cells are
resuspended well.
Incubate for 1 hour at room temperature or leave overnight at 4 ºC.
NOTE Cells can be left at 4 ºC in the intercalation solution for up to 48 hours.
Wash cells by adding 2 mL of Maxpar Cell Staining Buffer. Centrifuge at 800 x g for 5
minutes, carefully aspirate supernatant, and resuspend cells in residual volume by
gently vortexing. Repeat for a total of two washes.
Wash cells with 2 mL of PBS. Centrifuge at 800 x g and carefully aspirate supernatant.
Take an aliquot of cells in between water washes for a cell count.
NOTE Cell loss during wash steps will lead to a lower cell concentration than 10 million
cells per mL.
12 Cell-ID 20-Plex Pd Barcoding Kit: User GuideBarcoding Protocol
Barcoding Protocol Steps
Centrifuge at 800 x g for 5 minutes and carefully aspirate supernatant. Leave cells
pelleted at 4 ºC.
Prepare a sufficient volume of 0.1X EQ Four Element Calibration Beads in Maxpar Water
to completely resuspend cells to a recommended cell concentration for acquisition:
• CyTOF and CyTOF 2: 0.25–0.5 x 10⁶ cells/mL
• Helios: 0.5–1 x 10⁶ cells/mL
Immediately prior to data acquisition, resuspend cells in 0.1X EQ Four Element
Calibration Beads and filter sample through appropriately sized cell strainers (for
example, 35 to 45 μm mesh).
Acquire Data
Acquire barcoded sample on a CyTOF, CyTOF 2 or Helios instrument.
Collect the following channels in addition to the channels corresponding to the antibody
panel:
• Barcodes (102Pd, 104Pd, 105Pd, 106Pd, 108Pd, and 110Pd)
• EQ beads (140Ce, 151Eu, 153Eu, 165Ho, and 175Lu)
• Cell-ID (dead cells) (195Pt for cisplatin)
• Cell-ID Intercalator-Ir (191Ir and 193Ir)
• Common environmental contaminants (120Sn, 127I, 131Xe, 133Cs, 138Ba, 190Os, and 208Pb)
Cell-ID 20-Plex Pd Barcoding Kit: User Guide 13Debarcoding
Barcode Separation
Debarcoding
The collected file contains combined data for all multiplexed samples and therefore must be
debarcoded in order to perform downstream analysis of the individual samples. The
Debarcoder application assigns each event in the multiplexed file to the barcode population
matching its Pd isotope labeling pattern, performs filtering to eliminate uncertain events, and
creates separate flow cytometry standard (FCS) files for each barcoded sample for
downstream analysis.
The multiplexed file contains a mixture of desirable single-cell events and undesirable
events such as debris, cross-sample aggregates, and cross-sample ion cloud fusions.
Optimal debarcoding results in accurate assignment of the maximum number of desirable
single-cell events with minimal inclusion of undesired or uncertain events in the debarcoded
output files.
When a file is loaded into the Debarcoder, each event is assigned to a barcode population
by matching the identities of its three brightest Pd isotopes to the corresponding barcode
key. Any events with fewer than three Pd stains or with poor correlation to any other events
in the file are removed from the data. The Debarcoder provides two calculated parameters
that are used to eliminate undesired events from the debarcoded populations: Barcode
Separation (BcS) and Mahalanobis Distance (MD). It is best to perform primary filtering using
BcS, and use MD as a secondary filter only when debarcoding samples with a high
incidence of cross-sample aggregates, such as cell-debris aggregates.
Barcode Separation
Barcode Separation (BcS) is a measure of the rescaled intensity difference between the
isotopes with the third- and fourth-highest intensities. Rescaling is done by dividing each Pd
intensity by the Mean + 2 SD value for the brightest Pd in the barcode. This corrects for
differences in overall staining intensities that may result from cell-specific variation in Pd
uptake or variations in cell number among the barcoded samples. The BcS value is low for
debris events that have low intensity values for all Pd isotopes and for cross-sample cell
aggregates that have high intensity values for four or more Pd isotopes. By applying a
minimum BcS filter, these undesired events are filtered out of the barcoding results.
Mahalanobis Distance
Mahalanobis Distance (MD) quantifies the distance, in six-dimensional Pd intensity space,
between an event and the distribution of its assigned barcode population. Cross-sample
aggregates, including cell-debris aggregates, have higher intensities in at least one Pd
isotope than the average single cell in the population and stray from the center of the
14 Cell-ID 20-Plex Pd Barcoding Kit: User GuideDebarcoding
Debarcoding Protocol
single-cell cluster in Pd intensity space, resulting in higher MD values. Therefore, application
of a lower MD value permits removal of events with inconsistent Pd intensities. These
undesired events can be excluded by reducing the maximum MD filter value. However,
barcoded samples may contain valid cells that differ in Pd uptake from the majority of the
events in the sample, and such events will be eliminated with a stringent MD filter. As a
result, MD should be used cautiously as a secondary filter in experiments that do not contain
significant cell-specific variations in Pd uptake in any of the barcoded samples.
Debarcoding Protocol
Download and Install the Debarcoder
IMPORTANT The Debarcoder is a feature within CyTOF software v6.7.1014 It must be
installed on a stand-alone Windows® 7 64-bit computer workstation. This software should
not be installed on first-generation CyTOF or CyTOF 2 instrument workstations.
Login to the Fluidigm Proteomics Portal by control-clicking this link.
Select Data Processing > Software. Download the Software Package for Stand-alone
Workstations.
Cell-ID 20-Plex Pd Barcoding Kit: User Guide 15Debarcoding
Debarcoding Protocol
Double-click the installer and follow installation instructions.
IMPORTANT Download the CyTOF Software 6.7 Release Notes (PN 400314) from the Portal
and follow the installation instructions.
Click the icon to launch the CyTOF software.
Log in to Administrator mode.
16 Cell-ID 20-Plex Pd Barcoding Kit: User GuideDebarcoding
Debarcoding Protocol
The Helios software interface opens.
Under the Process tab, click the Debarcoder icon to launch the program.
Debarcode the File
NOTE Read the introductions to Debarcoding and Example Data sections for important
guidance on use of the debarcoding filters.
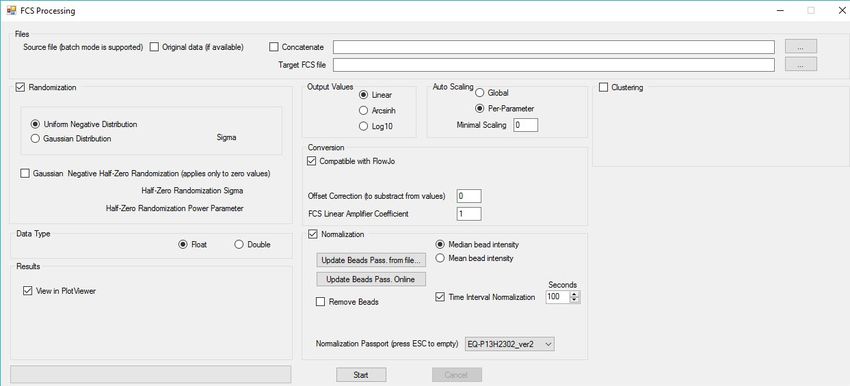
Perform normalization on the barcoded file.
Cell-ID 20-Plex Pd Barcoding Kit: User Guide 17Debarcoding
Debarcoding Protocol
NOTE If the same barcoded sample is acquired over multiple barcoded files, they should be
normalized first and then concatenated.
NOTE Refer to Normalization of Mass Cytometry Data Using EQ Four Element Beads
(PN UG13-02_150501) for more information.
18 Cell-ID 20-Plex Pd Barcoding Kit: User GuideDebarcoding
Debarcoding Protocol
In the Process tab, open the Debarcoder and click Barcode Manager.
Open the barcode key file (Key_Cell-ID_20-Plex_Pd.csv) and modify the file. This file
indicates the masses of the six Pd isotopes. The three-digit Pd isotope combinations
correspond to the code numbers found on the tubes in the kit. The Output Path
represents the names of the files that will be generated when debarcoding is
completed.
In the Filters box there is a feature Apply minimum signal threshold for barcodes which is
checked by default. This threshold is applied to remove events with signals lower than
35 dual counts per barcode channel. However, if the barcoding intensity or efficiency is
low, unchecking this enables the feature to increase recovery of low intensity events by
removing the lower signal threshold for barcodes.
Cell-ID 20-Plex Pd Barcoding Kit: User Guide 19Debarcoding
Debarcoding Protocol
Modify the file:
a Enter unique sample names in the Sample column.
NOTE Uncheck the unused barcodes.
b Uncheck any barcodes that are not used in the experiment.
c Click SaveAs. Save the resulting barcode key with a unique name.
d Click OK to apply changes and close the Barcode Manager window.
Click Open to browse for the normalized barcoded FCS file, then click Debarcode.
20 Cell-ID 20-Plex Pd Barcoding Kit: User GuideDebarcoding
Debarcoding Protocol
Filter barcode assignments by choosing optimal minimum Barcode Separation (BcS) and
maximum Mahalanobis Distance (MD) values. Refer to the introduction to Barcoding
section above.
Choose a minimum BcS:
a In the Separation tab, observe the barcode separation plots and choose a minimum
BcS value just before the event yield dramatically drops. The minimum BcS value is
displayed as a vertical dotted red line on the plots.
Cell-ID 20-Plex Pd Barcoding Kit: User Guide 21Debarcoding
Debarcoding Protocol
b In the Event tab, magnify the event plot by using the zoom icon at top-left in the
Debarcoder until individual events are visible.
c In the Event plot, if there are events with poor intensity separation between the third
and fourth isotopes, consider increasing the minimum BcS value.
22 Cell-ID 20-Plex Pd Barcoding Kit: User GuideDebarcoding
Debarcoding Example
(Optional) Choose a maximum MD:
a In the Single Biax or All Biax tab, color by MD.
b Observe each code.
c Choose a maximum MD value that eliminates outliers.
Click Save debarcoded files to generate and save FCS files for each debarcoded
sample.
NOTE Save a screenshot of your debarcoding parameters for future reference or data
validation.
After debarcoding, remove bead-cell doublet events prior to data analysis by gating on
140Ce-negative events.
Debarcoding Example
Download the example data file (Example_Cell-ID_20-Plex_Pd.fcs) from the Data
Processing tray in the Fluidigm Proteomics portal. For this experiment, 10 samples
containing the same number of cells were barcoded with unique barcodes and
combined into one tube. Data for 160,000 events were acquired on the CyTOF 2
instrument.
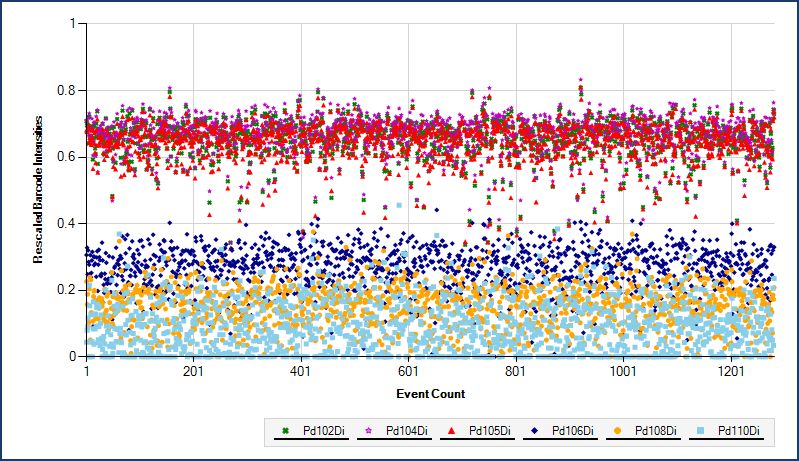
Looking at the BcS vs. Debarcoded Event Yield plot in the Separation tab in Figure 1, a
minimum BcS value of 0.24 can be set without negatively impacting yield in any of the
samples.
Cell-ID 20-Plex Pd Barcoding Kit: User Guide 23Debarcoding
Debarcoding Example
Figure 1. The BcS vs. Debarcoded Event Yield plot in the Plot Separation tab of the Debarcoder.
24 Cell-ID 20-Plex Pd Barcoding Kit: User GuideDebarcoding Debarcoding Example Figure 2. The Event plot in the Debarcoder. The Event plot for barcode population 1 (Figure 2) shows clear separation between the three positive Pd isotopes and the three negative Pd isotopes, with very few events appearing in the gap. This is expected, since events with BcS values less than 0.24 are eliminated by the filter. Examination of the All Biax plots for c01 reveals some outliers with high MD values, heat- mapped blue or green (Figure 3, above). NOTE Most of these outliers have low intensities for the Pd isotopes in the code (102, 104, 105) and are therefore likely debris events. These events were excluded by lowering the MD filter from 10 to 5 with minimal impact on barcode yields (Figure 3, below). Cell-ID 20-Plex Pd Barcoding Kit: User Guide 25
Debarcoding
                                                                                                   Debarcoding Example

                                                                                      MD=10

                                                                                    MD=5

Figure 3. Upper bar graphs: The Event count plots for the samples in the Debarcoder. Lower biaxial
plots: Sample c01 datapoints are heat-mapped according to MD values and the scale indicated to the
right of each plot set. Debris events were removed by lowering the MD filter (lower).

26                                                                           Cell-ID 20-Plex Pd Barcoding Kit: User Guide
Debarcoding Debarcoding Example The Event plots in Figures 4–6, magnified using the zoom icon (at top-left in the Debarcoder), show events with the maximum MD filter set to 10 (Figure 4), 5 (Figure 5), or 4 (Figure 6). Event 269 is likely debris because its positive Pd intensities are similar in value to the background in the other events. Event 286 is less clearly debris, so it should be included (because it can be analyzed more completely after debarcoding). As a result, we chose an MD filter value of 5. Figure 4. Magnified Event plots in the Debarcoder. The MD filter is set to 10. Figure 5. Magnified Event plots in the Debarcoder. The MD filter is set to 5. Event 269, seen in Figure 4 (MD=10), has been removed when the MD filter is set to 5. Cell-ID 20-Plex Pd Barcoding Kit: User Guide 27
Debarcoding
                                                                                                                References

Figure 6. Magnified Event plots in the Debarcoding software. The MD filter is set to 4. Events 269 and
286, seen in Figure 4 (MD=10), have been removed when the MD filter is set to 4.

References
Tordesillas, L. et al. “Mass cytometry profiling the response of basophils and the complete
peripheral blood compartment to peanut.” Journal of Allergy and Clinical Immunology
(2016): 1,741–1,744.

Wang, Y.J. et al. “Single-cell mass cytometry analysis of the human endocrine pancreas.”
Cell Metabolism 24 (2016): 616–626.

Sulen, A. et al. “Signaling effects of sodium hydrosulfide in healthy donor peripheral blood
mononuclear cells.” Pharmacological Research 113 (2016): 216–227.

Rubić-Schneider, T. et al. “GPR91 deficiency exacerbates allergic contact dermatitis while
reducing arthritic disease in mice.” Allergy 72 (2016): 444–452.Lowther D.E. et al. “PD-1
marks dysfunctional regulatory T cells in malignant gliomas.” JCI Insight 1 (2016): e85935.

Abraham, Y. et al. “Exploring Glucocorticoid Receptor Agonists Mechanism of Action
Through Mass Cytometry and Radial Visualizations.” Cytometry B Clin Cytom 92 (2017): 42–
56.

Chiang, N. et al. “Novel resolvin D2 receptor axis in infectious inflammation.” Journal of
Immunology 198 (2017): 842–851.

28                                                                              Cell-ID 20-Plex Pd Barcoding Kit: User Guide
For technical support visit fluidigm.com/support.
You can also read