COMMERCIAL FREEZER/REFRIGERATOR GLASS DOOR REFRIGERATOR
←
→
Page content transcription
If your browser does not render page correctly, please read the page content below
COMMERCIAL FREEZER/REFRIGERATOR
      GLASS DOOR REFRIGERATOR

                               TABLE OF CONTENTS
             Product Registration………………………………….…..... 2
             Important Safety Instructions……………………….…..... 2
             Electrical Information…………………………………........ 3
             Caster Installation and Setup (Glass Door)................... 3-4
             Caster Installation and Setup (Non-Glass Door).......... 5-6
             Appliance Start-up…………………………………............. 6
             Features……………………………………………………..... 6-7
             Routine Maintenance……………………………………..… 7
             Energy Conservation Measures………………………...... 7
             Troubleshooting Guide…………………………………...... 8-9
             Wiring Diagram……………………………………………....10

READ AND SAVE THESE INSTRUCTIONS                                            Electrolux Major Appliances
                                                                               297147600A (July 2007)
Product Registration                                                      Important Safety Instructions
                                                                          Read all instructions before using this appliance

                                                                                              For Your Safety
                                                                          Do not store or use gasoline or other flammable vapors and
                                                                          liquids in the vicinity of this unit or any other appliance. Read
                                                                          product labels for flammability and other warnings.

                                                                                              Child Safety
                                                                          • Destroy carton, plastic bags, and any exterior wrapping material
                                                                            immediately after the appliance is unpacked. Children should
                                                                            never use these items for play. Cartons covered with rugs,
                                                                            bedspreads, plastic sheets or stretch wrap may become airtight
These instructions include information which is intended to                 chambers and can quickly cause suffocation.
assure the operator of correct installation, operation and service.       • A child might suffocate if he crawls into the appliance to hide
Before attempting installation, adjustment or maintenance, be               or play. Remove the door/lid of the appliance when not in use,
certain of the following:                                                   even if you plan to discard the appliance. Many communities
                                                                            have laws requiring you to take this safety precaution.
• That you have read and fully understand the instructions.
                                                                          Proper Disposal of Appliance
• That you have all the tools required and are trained to use
  them.
                                                                                              Risk of Child Entrapment
• That you have met all installation and usage restrictions and
                                                                          Child entrapment and suffocation are not problems of the past.
  are familiar with the functions and operations of the unit.
                                                                          Junked or abandoned refrigerators or freezers are still dangerous
• That you follow all instructions exactly as given.
                                                                          – even if they will sit for “just a few days”. If you are getting rid of
                                                                          your old refrigerator or freezer, please follow the instructions
                                                                          below to help prevent accidents:
All the fittings, measurements, recommendations and procedures
are significant. Substitutions and approximations must be
                                                                          • Remove the door.
avoided. Improper handling, maintenance, installation and
                                                                          • Leave shelves in place so children may not easily climb
adjustment, or service attempted by anyone other than a qualified
                                                                            inside.
technician, may void the future warranty claims and cause
                                                                          • Have the refrigerant removed by a qualified technician.
damage to the unit and/or result in injury to the operator and/or
bystanders.

Record your Model and Serial Numbers
Record the model number and serial number of this appliance
in the space provided below (the serial plate is located inside
the cabinet compartment).

    Model No.
    Serial No.
    Installation Date
    Invoice Date
    Start-up Date
    Telephone for Service

Register Your Product
The self-addressed PRODUCT REGISTRATION CARD (shown
above) should be filled in completely, signed and returned to the
address provided.

                                                                      2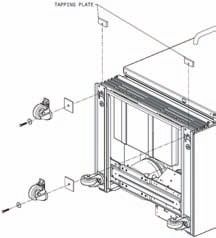
Electrical Information CASTER INSTALLATION AND SET-UP
These guidelines must be followed to ensure that safety (Glass Door Only)
mechanisms in the design of this appliance will operate Inspect the underside of the cabinet and packaging for damage
properly. such as a fork truck can cause. If hidden damage is found after
uncrating, immediately call the delivery carrier and request an
inspection. Retain all packaging and crating materials until the
Avoid fire hazard or
inspection is complete.
electric shock. Do not use an extension cord
or an adapter plug. Do not remove any PARTS AND ACCESSORIES
prong from the power cord. Check to make sure that you have received the box containing
all of the components listed below.
A C E G
D
F
B H
A CASTER RAIL (2) E WASHER (4)
B LOCKING NUT (8) F SPACER PLATE (2)
C CARRIAGE BOLT (8) G SWIVEL CASTER (2)
D BOLT (4) H FIXED CASTER W/ BRAKE (2)
TOOLS NEEDED
You will need the following tools to assemble and install the
casters to the unit.
• Refer to the serial plate for correct electrical rating. The
power cord of the appliance is equipped with a three-prong
grounding plug for protection against shock hazards. It must
be plugged directly into its own properly grounded three-prong
receptacle, protected with a 15 amp time delay fuse or circuit 3/8” AND 1/2” INCH ADJUSTABLE WRENCH 1/2” INCH FIXED
breaker. The receptacle must be installed in accordance with SOCKET WRENCH OR PLIERS WRENCH
the local codes and ordinances. Consult a qualified electrician.
Receptacles with Ground Fault Circuit Interrupters (GFCI) are UNCRATING AND SET-UP
NOT RECOMMENDED. DO NOT USE AN EXTENSION • Remove carton and all loose parts from inside of the unit.
CORD OR AN ADAPTER PLUG. • Carefully tip the unit onto its back with the help of an assistant.
• If the voltage varies by 10 percent or more, appliance Lay the unit gently to rest on blocks to avoid damaging the
performance may be affected. Operating the appliance with condensate drain hose and the plastic raceway that covers
insufficient power can damage the motor. Such damage is the evaporator tubing on the back of the cabinet.
not covered under the warranty. If you suspect your voltage is • Remove and discard the wood skid from the bottom and the
high or low, consult your power company for testing. four (4) screws using a 3/8" socket wrench (see Fig. 1).
• To prevent the appliance from being turned off accidentally, • Using a large adjustable wrench, remove and discard the two
do not plug the unit into an outlet controlled by a wall switch (2) black plastic leg levelers by turning it counterclockwise (see
or pull cord. Fig. 2).
• DO NOT pinch, knot, or bend the power cord in any manner.
SCREWS
Other Precautions LEG LEVELER
• NEVER unplug the appliance by pulling on the power cord.
Always grip the plug firmly and pull straight out from the
receptacle.
• To avoid electrical shock, unplug the appliance before
cleaning.
NOTE: Turning the control to “OFF” turns off the compressor
but does not disconnect power to other electrical components. WOOD SKID
Figure 2
Figure 1
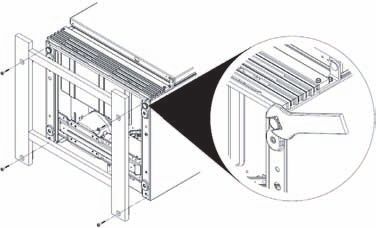
3• Remove bottom door support bracket and screw opposite the REAR SWIVEL CASTER INSTALLATION
door hinge using a 3/8" socket wrench (see Fig. 3). • Place a washer on one of the four long bolts and then feed the
bolt through the hole in one of the swivel casters (see Fig. 6).
• Next, insert that same caster bolt through the hole on the metal
DOOR spacer plate and then thru the rear hole of the caster rail (see
SUPPORT Fig. 7).
BRACKET
• Thread the caster bolt into the hole in the bottom-most foot
pad on the unit.
• Tighten both top and bottom bolts securely using a 1/2 inch
fixed or socket wrench.
• Repeat the same procedure on the left hand side. After
installation, carefully tip the unit up with the help of an assistant.
Figure 3
Bolt
SPACER
FRONT FIXED CASTER INSTALLATION PLATE
• Put two (2) carriage bolts through the rear (non-brake) side of
the fixed caster and hold the carriage bolts loosely in place by Washer
threading several turns on each of the locking nuts. Do not
tighten the bolts yet.
• Hold the caster in position, insert the carriage bolt heads into Swivel
Caster
slots A & B near the front of the caster rail and slide the caster
back.
• Insert the two (2) front carriage bolts thru the top side of the Figure 6 Figure 7
caster rail and then thru the front holes on the caster. Attach
locking nuts to each.
• Tighten all locking nuts securely using a 1/2 inch wrench (see
Fig. 4).
• Repeat the same procedure for the other fixed caster.
BRAKE
FRONT OF LOCKING NUTS
CASTER RAIL
FIXED CASTER
Figure 4
CARRIAGE CARRIAGE BOLTS
BOLTS
SLOTS A&B
CASTER RAIL INSTALLATION
• Place a washer onto one of the four long bolts and slide bolt
through the hole located just behind the fixed caster at the
front of caster rail.
• Align the caster rail assembly with the right hand side of the
unit. Make sure the fixed caster is positioned toward the front
of the unit.
• Align the bolt with the threaded hole in the front right foot pad
of the unit. Thread the bolt into the hole until finger tight (see
Fig. 5).
W ASHER
BOLT
W ASHER
Figure 5
BOLT
4CASTER INSTALLATION AND SET-UP (NON-GLASS DOOR)
INSPECTION FOR DAMAGE CASTER RAIL INSTALLATION
Inspect the underside of the cabinet and packaging for damage such as a x Place a washer onto one of the six long bolts and slide bolt through the
fork truck can cause. If hidden damage is found after uncrating, hole located at the front of caster rail.
immediately call the delivery carrier and request an inspection. Retain all x Align the caster rail assembly with the right hand side of the unit.
packaging and crating materials until the inspection is complete. x Align the bolt with the threaded hole in the front right foot pad of the
unit. Thread the bolt into the hole until finger tight (see Fig. 3).
PARTS AND ACCESSORIES
Check to make sure that you have received the box containing all of the
components listed below.
D F
A
B Figure 3
C
E G
REAR SWIVEL CASTER INSTALLATION
x Place a washer on one of the six long bolts and then feed the bolt
A CASTER RAIL (2) E SWIVEL CASTER (2) through the hole in one of the swivel casters (see Fig. 4).
B TAPPING PLATE (2 ) F SPACER PLATE (4)
x Next, insert that same caster bolt through the hole on the metal spacer
C BOLT (6) G SWIVEL CASTER W/ BRAKE (2)
plate and then thru the rear hole of the caster rail (see Fig. 5).
D WASHER (6)
x Thread the caster bolt into the hole in the bottom-most foot pad on the
TOOLS NEEDED unit.
You will need the following tools to assemble and install the casters to the x Tighten both top and bottom bolts securely using a 1/2 inch fixed or
unit. socket wrench.
x Repeat the same procedure on the left hand side.
3/8” AND 1/2” INCH ADJUSTABLE WRENCH 1/2” INCH FIXED
SOCKET WRENCH OR PLIERS WRENCH
BOLT
UNCRATING AND SET-UP W ASHER
x Remove carton and all loose parts from inside of the unit.
x Carefully tip the unit onto its back with the help of an assistant. Lay the SW IVEL
CASTER
unit gently to rest on blocks to avoid damaging the condensate drain
hose and the plastic raceway that covers the evaporator tubing on the
back of the cabinet.
x Remove and discard the wood skid from the bottom and the four (4)
screws using a 3/8” socket wrench (see Fig. 1). Figure 4 Figure 5
x Using a large adjustable wrench, remove and discard the two (2) black
plastic leg levelers by turning it counterclockwise (see Fig. 2).
FRONT SWIVEL CASTER INSTALLATION
x Place the tapping plate between the front bottom of the cabinet and
SCREWS caster rails as depicted in Figure 6. Make sure the tapped holes in the
LEG LEVELER
tapping plate align with the center slot in the caster rail.
x Next, place a washer on one of the six long bolts and then feed the bolt
through the hole in one of the swivel casters (see Fig. 4).
x Then, place the spacer plate on the caster and thread the caster bolt
into the hole in the tapping plate.
x Tighten securely using ½” fixed or socket wrench.
x Repeat the same procedure on the left hand side. After installation,
carefully tip the unit up with the help of an assistant.
WOOD SKID Tapping Plate
Figure 2
Figure 1
Figure 6
5Appliance Placement Features
Leave a one (1) inch space on all sides and the back of the NSF and FDA Approved Adjustable Shelving
cabinet for ease of installation, proper air circulation and electrical
This appliance is provided with NSF and FDA approved heavy
connections. DO NOT block the front grill on the lower front
duty epoxy powder coated adjustable shelves. The one with the
of your appliance. Sufficient air circulation is essential for the
wires that are angled on the front and back goes on the floor of
proper operation of your appliance. Choose a place that is near
the cabinet. The others are placed in the adjustable stainless
a grounded electrical outlet. For the most efficient operation,
steel shelf supports that clip into the shelf support strips on each
the appliance should be located where surrounding temperatures
side of the interior. Make sure to place the shallow shelf in the
will not drop below 40ºF (5ºC) or exceed 110ºF (43ºC). Additional
upper-most position.
compressor heaters are not recommended.
Insulation
The insulated space of this cabinet is sealed to maintain peak
efficiency. Holes drilled in the cabinet may destroy that seal and
damage electrical wiring located in the insulated space.
DAMANGED ELECTRICAL WIRING OR WET INSULATION
CAUSED BY DRILLING WILL VOID THE WARRANTY.
Appliance Start-up
Once the appliance has been located in its permanent location
and the proper power and grounding has been provided, the
following items must be checked or completed:
Front Fixed and Rear Swivel Casters
Cool Down Period Glass door unit come with two (2) front fixed casters with
For safe food storage, allow 24 hours for the appliance to cool brakes and two (2) rear swivel casters. Non-glass door unit
down completely before loading with food. The appliance will comes with two (2) front swivel casters with brakes and two (2)
run continuously for the first several hours. Do not place any rear swivel casters. The casters allow the appliance to be
food in the appliance until after the first 24 hours of operation. moved with ease and then locked in position at its desired
location.
Thermostat Setting
The appliance is shipped from the factory
with the thermostat set at about the mid-
point of the operating range. Adjustments
colder or warmer can be made after the
appliance has been running for at least
8 hours. Allow at least 8 hours for
temperature stabilization before re-
adjusting the thermostat.
Defrost Setting
The appliance is designed to defrost automatically every 12 Adjustable Temperature Control
hours. To set the time of defrost, wait until the desired time to
The adjustable cold control is located on the top left side of the
defrost. With the notch on the timer knob aligned with the line
evaporator housing inside the unit. “5” is the medium
on the bracket (Fig. A), turn the defrost timer knob clockwise
(recommended) setting and “9” is the coldest setting.
slowly. The timer will click several times, then once loudly, at
which point the defrost cycle begins. The timer knob will advance
through the defrost cycle, then click loudly at the end of the cycle
(Fig. B). The appliance will defrost automatically every 12 hours
after the first defrost cycle.
Fig. A Fig. B
Position of knob before Position of knob at end
turning clockwise to start of defrost cycle (Second
defrost cycle (First click) click)
6scratch the appliance surface when removing adhesive labels.
NSF Certified Temperature Gauge Any glue left from the tape can be removed with a mixture of
warm water and mild detergent or touch the residue with the
This appliance is equipped with an NSF certified temperature
sticky side of tape already removed. DO NOT REMOVE THE
gauge to display cabinet internal temperature. The temperature
SERIAL PLATE.
gauge is located on the top right side of the evaporator housing
inside the unit.
Condensate Pan
Some models have a condensate pan in a fixed position located
behind the toe grill. This must not be removed from under the
cabinet. If the pan is removed, condensate will drop onto the
floor.
POWER FAILURE
DO NOT open the appliance lid unnecessarily if the
appliance is off for several hours.
If a power failure occurs, pack seven or eight pounds of dry ice
Fluorescent Lamp (Glass Door Models) into the appliance every 24 hours. Look in the Yellow Pages
The Glass Door Refrigerator is equipped with a 17 watt under “Dry Ice”, “Dairies”, or “Ice Cream Manufacturers” for local
fluorescent lamp. A ballast – lamp mismatch may result in poor dry ice suppliers. Always wear gloves and use caution when
or no lighting. handling dry ice.
If the lamp fails, replace with a lamp of the same type and Energy Conservation Measures
wattage. Also, replace a lamp that flickers continuously. This
could damage the ballast.
This appliance is designed for efficiency with heavy foam
insulation. However, there are things that the user can do to
Turning the light off, when not in use, will save energy. However,
maintain the appliance in operating condition.
frequent ON-OFF cycling will reduce the lamp life.
• Do not operate the appliance any colder than necessary to
Use only NSF certified lamp which can be ordered from your
maintain safe, product storage temperatures.
Frigidaire Commercial Service Center by calling 1-866-738-1640.
• Make sure the appliance is located to prevent direct exposure
to sunlight, air ducts, etc.
Interior Light (Stainless Steel Door Models) • Keep the door closed except for normal use. Inspect the door
The Stainless Steel Door models are equipped with a 40 watt often to see that it self-closes and the gaskets are in good
bulb that lights up when the door is opened. If the bulb goes condition.
bad, replace with bulb of the same type and wattage. This is a • Do not overstock the product in the cabinet because it will
special bulb with a shatterproof coating. Use only an NSF certified block the normal air flow.
bulb of the same type and wattage which can be ordered from • Have at least annual inspections by a qualified service
your Frigidaire Commercial Service Center by calling 1-866-738- company to see that the refrigerant charge is correct.
1640. • This appliance operates more efficiently in a cooler ambient
than in a hot ambient. Try to maintain an ambient below 80ºF
Other Features (27ºC) and 65% RH (Relative Humidity) for maximum efficiency.
• NSF Certified top mounted evaporator.
• 2 ½ thick urethane foam cabinet insulation. Periods of Non-use and Moving Tips
• Torsion spring door closer (Glass Door models). Leave the appliance operating during periods of non-use of less
• Stainless steel evaporator housing. than three (3) weeks.
• Removable stainless steel drain cover.
• Heavy duty front grill. Long Periods of Non-use
• Heavy duty commercially rated electrical harness. If the appliance will not be used for several months:
• Heavy duty removable stainless steel shelf supports. • Remove all food and unplug the power cord.
• Clean and dry the interior thoroughly.
Routine Maintenance • Leave the appliance door open slightly, blocking it open if
necessary, to prevent odor and mold growth.
Cleaning the Interior
Moving
Be sure to turn the temperature control to “OFF” and unplug the
electrical cord. Wash the inside surface of the storage area with When moving the appliance , follow these guidelines to prevent
warm water and baking soda solution (about one tablespoon of damage:
baking soda per quart of warm water). Rinse thoroughly with • Disconnect the power cord plug from the wall outlet.
clean, warm water and wipe dry. • Remove foods, then defrost, and clean the appliance .
• Secure all loose items such as base panel, baskets, and
Cleaning the Exterior shelves by taping them securely in place to prevent damage.
• In the moving vehicle, secure appliance in an upright position
Wipe the cabinet exterior occasionally with a cloth dampened in to prevent movement. Also, protect outside of appliance with
mild detergent and water. Rinse and wipe dry with a soft cloth. a blanket or similar item.
Do not use razor blades or other sharp instruments that can
7Before calling for s ervice, review this lis t. It m ay s ave you tim e and expens e. This lis t
TROUBLESHOOTING
includes com m on occurrences that are not the res ult of defective workm ans hip or
GUIDE
m aterials in this appliance.
PROBLEM CAUSE CORRECTION
APPLIANCE OPERATION
Appliance does not run. * Appliance is plugged into a * Us e another circuit. If you are uns ure about the
circuit that has a ground fault outlet, have it checked by a certified technician.
* Tem perature control is in the * See Therm os tat Setting.
"OFF" pos ition.
* Appliance m ay not be plugged in, * Ens ure plug is tightly pus hed into outlet.
or plug m ay be loos e.
* Hous e fus e blown or tripped * Check/replace fus e with a 15 am p tim e delay
circuit breaker. fus e. Res et circuit breaker.
* Power outage * Check hous e lights . Call local Electric Com pany.
Appliance runs too m uch * Room or outs ide weather is hot. * It's norm al for the appliance to work harder under
or too long. thes e conditions .
* Appliance has recently been * It takes 24 hours for the appliance to cool down
dis connected for a period of tim e. com pletely.
* Large am ount of warm or hot * Warm food will caus e appliance to run m ore until
food have been s tored recently. the des ired tem perature is reached.
* Door is opened too frequently or * Warm air entering the appliance caus es it to run
kept open too long. m ore. Open the door les s often.
* Appliance door m ay be s lightly * See "Door Problem s ".
* Tem perature control is s et too * Turn control knob to a warm er s etting. Allow
low. s everal hours for the tem perature to s tabilize.
* Appliance gas kets are dirty, * Clean or change gas ket. Leaks in the lid s eal will
worn, cracked or poorly fitted. caus e appliance to run longer in order to m aintain
des ired tem perature.
Interior appliance * Tem perature control is s et too * Turn control knob to a warm er s etting. Allow
tem perature is too cold. low. s everal hours for the tem perature to s tabilize.
Interior appliance * Tem perature control is s et too * Turn control knob to a colder s etting. Allow s everal
tem perature is too warm . warm . hours for the tem perature to s tabilize.
* Door is opened too frequently or * Warm air entering the appliance caus es it to run
kept open too long. m ore. Open the door les s often.
* Appliance door m ay be s lightly * See "Door Problem s ".
* Large am ount of warm or hot * Wait until the appliance has had a chance to
food have been s tored recently. reach its s elected tem perature.
* Appliance has recently been * appliance requires 24 hours to cool down
dis connected for a period of tim e. com pletely.
Appliance external * The external appliance walls can * This is norm al while the com pres s or works to
s urface tem perature is be as m uch as 30ºF warm er than trans fer heat from ins ide the appliance cabinet.
warm . room tem perature.
SOUND AND NOISE
Louder s ound levels * Modern appliances have * This is norm al. When the s urrounding nois e level
whenever appliance is increas ed s torage capacity and is low, you m ight hear the com pres s or running
on. m ore s table tem peratures . They while it cools the interior.
require heavy duty com pres s ors .
Louder s ound levels * Appliance operates at higher * This is norm al. Sound will level off or dis appear
when com pres s or pres s ures during the s tart of the as appliance continues to run.
com es on. ON cycle.
Popping or cracking * Metal parts undergo expans ion * This is norm al. Sound will level off or dis appear
s ound when com pres s or and contraction, as in hot water as appliance continues to run.
com es on. pipes .
8PROBLEM CAUSE CORRECTION
SOUND AND NOISE (Cont.)
Bubbling or gurgling s oun * Refrigerant (us ed to cool * This is norm al.
appliance) is circulating
Vibrating or rattling nois e. * Appliance is not level. It rocks on * Level the appliance by putting wood or m etal
the floor when it is m oved s him s under part of the appliance.
* Floor is uneven or weak. * Ens ure floor can adequately s upport appliance.
Level the appliance by putting wood or m etal
s him s under part of the appliance.
* appliance is touching the wall. * Re-level appliance or m ove appliance s lightly.
WATER / M OISTURE / FROST INSIDE APPLIANCE
Mois ture form s on ins ide * Weather is hot and hum id, which * This is norm al.
appliance walls . increas es internal rate of fros t
build-up.
* Door is s lightly open. * See "Door Problem s ".
* Door is kept open too long or is * Open the door les s often.
opened too frequently.
ODOR IN APPLIANCE
Odors in appliance. * Interior needs to be cleaned. * Clean interior with s ponge, warm water, and
baking s oda.
* Foods with s trong odors are in * Cover the food tightly.
the appliance.
DOOR PROBLEM S
Door will not clos e. * Appliance is not level. It rocks on * Level the appliance by putting wood or m etal
the floor when it is m oved s him s under part of the appliance.
s lightly.
* Floor is uneven or weak. * Ens ure floor can adequately s upport appliance.
Level the appliance by putting wood or m etal
s him s under part of the appliance.
LIGHTING PROBLEM S
Light bulb is not on. * The fluores cent lam p or light * See "Fluores cent Lam p" or "Interior Light" on
bulb is burned out. Features Section.
* No electric current is reaching * See "appliance Does Not Run".
the appliance.
9IMPORTANT SAFETY NOTICE
The information provided herein is designed to assist qualified repair personnel only. Untrained
persons should not attempt to make repairs due to the possibility of electrical shock. Disconnect
the power cord before servicing.
ELECTRICAL CIRCUIT
STAINLESS STEEL DOOR STAINLESS STEEL DOOR GLASS DOOR
REFRIGERATOR FREEZER REFRIGERATOR
IMPORTANT
IF ANY GREEN GROUNDING WIRES ARE REMOVED DURING SERVICING, THEY MUST BE
RETURNED TO THEIR ORIGINAL POSITION AND PROPERLY SECURED.
10CONGELADOR/REFRIGERADOR COMERCIAL
REFRIGERADOR CON PUERTA DE VIDRIO
TABLA DE CONTENIDO
Registro del producto. ...................................................... 2
Instrucciones importantes de seguridad ........................ 2
Información eléctrica ......................................................... 3
Instalación y configuración de las ruedas
(con puerta de vidrio) ..................................................... 3-4
Instalación y configuración de las ruedas
(sin puerta de vidrio) ......................................................... 5
Encendido del electrodoméstico ..................................... 6
Características ................................................................ 6-7
Mantenimiento de rutina ................................................... 7
Medidas de conservación de energía .............................. 8
Guía de localización y solución de averías ................ 9-10
Diagrama de cableado ..................................................... 11
LEA Y CONSERVE ESTAS INSTRUCCIONES Electrolux Major Appliances
297147600 (Julio 2007)Registro del producto Instrucciones importantes sobre
seguridad
Lea todas las instrucciones antes de usar este
electrodoméstico.
WARNING: Para su seguridad
No almacene ni utilice gasolina ni otros líquidos o vapores
; inflamables cerca de éste o cualquier otro electrodoméstico.
Lea las etiquetas de los productos sobre la inflamabilidad y
otros peligros.
WARNING: Seguridad de los niños
Estas instrucciones incluyen información proporcionada con
el fin de asegurarle al usuario una instalación, funcionamiento • Destruya inmediatamente la caja de cartón, las bolsas de
y servicio correctos. Antes de intentar realizar la instalación, plástico y cualquier otro material de empaque exterior
ajuste o mantenimiento, asegúrese de: después de que el electrodoméstico sea desempacado. Los
niños nunca deben jugar con estos artículos. Las cajas de
cartón cubiertas con alfombras, colchas, hojas de plástico o
• Haber leído y comprendido completamente las instrucciones. envolturas elastizadas y cualquier otro material de empaque
• Tener todas las herramientas requeridas y el entrenamiento pueden convertirse en cámaras herméticas y causar asfixia
necesario para utilizarlas. rápidamente.
• Haber cumplido con todas las restricciones de instalación y • Un niño podría asfixiarse si entra en el electrodoméstico
uso y esté familiarizado con las funciones y el funcionamiento para esconderse o para jugar. Retire la puerta/tapa del
de la unidad. electrodoméstico cuando no esté en uso, incluso si piensa
deshacerse del electrodoméstico. Muchas comunidades
• Seguir todas las instrucciones exactamente como se indica.
cuentan con leyes que lo obligan a tomar esta precaución de
seguridad.
Todos los ajustes, medidas, recomendaciones y
Eliminación adecuada del congelador
procedimientos son importantes. Evite realizar sustituciones
o aproximaciones. La manipulación, instalación, ajuste o
servicio inadecuados realizados por cualquier persona que WARNING: Riesgo de atrapamiento de niños.
no sea un técnico calificado puede anular los posibles El atrapamiento y asfixia de niños no son problemas del
reclamos de garantía futuros y causar daños a la unidad y/o pasado. Los refrigeradores o congeladores desechados o
causar lesiones al operador y/o a otras personas. abandonados todavía son peligrosos — incluso si se dejan
abandonados “sólo por algunos días”. Si se va a deshacer de
su refrigerador o congelador usado, siga las instrucciones a
Registre su modelo y números de serie continuación para ayudar a prevenir accidentes:
Registre los números de modelo y de serie de este
electrodoméstico en el espacio que se proporciona a • Retire la puerta.
continuación (la placa de serie está ubicada en el interior del • Deje las bandejas en su lugar de modo que los niños no
congelador). puedan entrar con facilidad.
• Solicite a un técnico calificado que retire el refrigerante.
N.º de modelo
N.º de serie
Fecha de instalación
Fecha de compra
Fecha de inicio
Número de teléfono
para obtener servicio
Registre su producto
La TARJETA DE REGISTRO DEL PRODUCTO dirigida a sí mismo,
debe ser llenada en su totalidad, firmada y enviada a la
dirección proporcionada.
2WARNING: Información eléctrica INSTALACIÓN Y CONFIGURACIÓN DE LAS RUEDAS
Se deben seguir estas instrucciones para asegurarse de (sólo con puerta de vidrio)
que los mecanismos de seguridad diseñados para este
electrodoméstico funcionen correctamente. Inspeccione por debajo del gabinete y el empaque en busca
de daños como los que puede causar un montacargas. Si
encuentra daños ocultos después de desempacar el producto,
WARNING: Evite el peligro de llame inmediatamente a la empresa de transporte y solicite
incendio o de descarga eléctrica. No use una inspección. Conserve todos los materiales de empaque y
un cordón de extensión ni un adaptador. No las cajas de transporte hasta que la inspección haya
retire ninguna clavija del cordón eléctrico. terminado.
Tomacorriente con PIEZAS Y ACCESORIOS
puesta a tierra Asegúrese de haber recibido la caja y que esta contenga todas
Bajo ninguna las piezas que se indican a continuación.
circunstancia debe
cortar, quitar o evitar
la clavija de conexión A C E G
a tierra de este
enchufe.
D
F
B H
A RIEL PARA RUEDAS (2) E ARANDELA (4)
Cordón eléctrico de 3 clavijas B TUERCA DE BLOQUEO (8) F PLACA ESPACIADORA (2)
con puesta a tierra
C PERNO DE CARRUAJE (8) G RUEDA LIBRE (2)
D PERNO (4) H RUEDA FIJA C/FRENO (2)
• Consulte la placa de serie para obtener la información
eléctrica correcta. El cordón eléctrico está equipado con HERRAMIENTAS NECESARIAS
un enchufe de tres clavijas con puesta a tierra para su Necesitará las siguientes herramientas para ensamblar e
protección contra riesgos de choque eléctrico. El mismo instalar las ruedas en la unidad.
debe ser enchufado directamente a su propio tomacorriente
de tres alvéolos con puesta a tierra protegido por un fusible
de acción retardada o disyuntor de 15 amp. El tomacorriente
debe ser instalado de acuerdo con los códigos y reglamentos
locales. Consulte a un electricista calificado. NO SE
3/8” AND
LLAVE DE1/2”
CUBOINCHDE ADJUSTABLE WRENCH
LLAVE AJUSTABLE 1/2” INCH FIXED
LLAVE FIJA
RECOMIENDA el uso de tomacorrientes con interruptores SOCKET
de falla de conexión a tierra (GFCI). NO USE UN CORDÓN DE 3/8" Y WRENCH
DE 1/2" OR PLIERS
O ALICATE WRENCH
DE 1/4"
EXTENSIÓN NI UN ADAPTADOR.
DESEMPAQUE E INSTALACIÓN
• Si el voltaje varía en un 10 por ciento o más, el electrodoméstico
• Retire la caja de cartón y todas las piezas sueltas del interior
puede verse afectado. Si el electrodoméstico funciona con
de la unidad.
energía insuficiente se puede dañar el motor. Este daño no
• Acueste cuidadosamente la unidad sobre su parte posterior
está cubierto por la garantía. Si sospecha que el voltaje del
con la ayuda de otra persona. Descanse la unidad
suministro es demasiado alto o bajo, consulte a su
cuidadosamente sobre bloques para evitar dañar la
compañía eléctrica para que realicen pruebas.
manguera de desagüe de condensación y la cubierta plástica
• No enchufe el electrodoméstico a un tomacorriente
de las tuberías del evaporador en la parte trasera del gabinete.
controlado por un interruptor de pared o por un interruptor
• Retire y deseche la paleta de madera de la base y los cuatro
de cordón para evitar que el refrigerador sea apagado
(4) tornillos usando una llave de cubo de 3/8" (vea la Fig. 1).
accidentalmente.
Usando una llave ajustable grande, retire y deseche las dos
• NO presione, anude o doble el cordón eléctrico de ninguna
(2) patas niveladoras de plástico negro girándolas a la
manera.
izquierda (vea la Fig. 2).
WARNING: Precauciones adicionales
TORNILLOS PATA
• NUNCA desenchufe el electrodoméstico tirando del cordón SCREWS NIVELADORA
eléctrico. Siempre sostenga firmemente el enchufe y tire LEG LEVELER
derecho hacia afuera.
• Para evitar choques eléctricos, desenchufe el
electrodoméstico antes de limpiarlo.
NOTA: Si gira el control a la posición “OFF” (apagado), se
apagará el compresor, pero no desconectará la corriente a
otros componentes eléctricos. PALETA DE
WOOD SKID
MADERA Figura
Figure 2
Figura 11
Figure
3Para los modelos con puerta de vidrio solamente: retire el INSTALACIÓN DE LAS RUEDAS LIBRES TRASERAS
soporte inferior de la puerta y atorníllelo en el lado opuesto • Coloque una arandela en uno de los cuatro pernos largos y
de la bisagra de la puerta usando una llave de cubo de 3/8" luego inserte el perno en el agujero de la rueda libre (vea la
(vea la FIg. 3). Fig. 6).
• Luego inserte el mismo perno de la rueda a través del
DOOR
SOPORTE DE
SUPPORT
LA PUERTA
agujero del espaciador de metal y luego a través del agujero
BRACKET trasero del riel de las ruedas (vea la Fig. 7).
• Enrosque el perno de la rueda en el agujero en la pata inferior
de la unidad.
• Apriete firmemente los pernos superior e inferior usando
una llave fija o de cubo de 1/2".
• Repita el mismo procedimiento con el lado izquierdo.
Figura
Figure 33 Después de la instalación, coloque cuidadosamente la
unidad en posición vertical con la ayuda de un asistente.
INSTALACIÓN DE LAS RUEDAS FRONTALES FIJAS Perno
Bolt
• Coloque dos (2) pernos de carruaje a través del lado trasero PLACA
SPACER
ESPACIADORA
PLATE
(sin freno) de la rueda fija y sostenga los pernos de carruaje
holgadamente en su lugar enroscándolos varias vueltas en
Arandela
Washer
las tuercas de bloqueo. No apriete los pernos todavía.
• Sostenga la rueda en su lugar, inserte las cabezas de los
pernos de carruaje en las ranuras A y B cercanas a la parte Swivel
delantera del riel de las ruedas y deslice la rueda hacia atrás. Rueda
Caster
• Inserte los dos (2) pernos de carruaje delanteros a través libre
del lado superior del riel de las ruedas y luego a través de Figure 77
Figura
los agujeros delanteros de la rueda. Fije las tuercas de Figura 6
bloqueo a cada perno.
Apriete firmemente todas las tuercas de bloqueo usando
una llave de 1/2" (vea la Fig. 4).
• Repita el mismo procedimiento para la otra rueda fija.
FRENO
BRAKE
PARTE
FRONTFRONTAL
OF TUERCASNUTS
LOCKING DE
DEL RIELRAIL
CASTER DE BLOQUEO
LAS RUEDAS
FIXED
RUEDACASTER
FIJA
PERNOS DE PERNOS DE Figura
Figure 4
CARRIAGE
CARRUAJE CARRIAGE
CARRUAJEBOLTS
BOLTS
SLOTS A&B
RANURAS AYB
INSTALACIÓN DEL RIEL PARA LAS RUEDAS
• Coloque la arandela en uno de los cuatro pernos largos y
deslice el perno a través del agujero ubicado justo detrás de
la rueda fija en la parte delantera del riel de las ruedas.
• Alinee el conjunto del riel de las ruedas con el lado derecho
de la unidad Asegúrese de que la rueda fija esté orientada
hacia la parte delantera de la unidad.
• Alinee el perno con el agujero con rosca en la almohadilla
de la pata delantera derecha de la unidad. Usando sus
manos, enrosque el perno en el agujero hasta que quede
apretado (vea la Fig. 5).
ARANDELA
W ASHER
BOLT
PERNO
W ASHER
ARANDELA
Figura
Figure 5
BOLT
PERNO
4INSTALACIÓN Y CONFIGURACIÓN DE LAS RUEDAS (SIN PUERTA DE VIDRIO)
INSPECCIÓN EN BUSCA DE DAÑOS INSTALACIÓN DEL RIEL PARA LAS RUEDAS
Inspeccione por debajo del gabinete y el empaque en busca • Coloque una arandela en uno de los seis pernos largos y
de daños como los que puede causar un montacargas. Si deslice el perno a través del agujero ubicado delante del riel
encuentra daños ocultos después de desempacar el producto, de las ruedas.
llame inmediatamente a la empresa de transporte y solicite • Alinee el conjunto de rieles de las ruedas con el lado derecho
una inspección. Conserve todos los materiales de empaque y de la unidad.
las cajas de transporte hasta que la inspección haya • Alinee el perno con el agujero con rosca en la almohadilla de
terminado. la pata delantera derecha de la unidad. Usando sus manos,
PIEZAS Y ACCESORIOS enrosque el perno en el agujero hasta que quede apretado
Asegúrese de haber recibido la caja y que ésta contenga (vea la Fig. 3).
ARANDELA
todas las piezas que se indican a continuación.
D F PERNO
A
ARANDELA
PERNO
B Figura 3
C INSTALACIÓN DE LAS RUEDAS LIBRES TRASERAS
E G • Coloque una arandela en uno de los seis pernos largos y
luego inserte el perno en el agujero de una de las ruedas
libres (vea la Fig. 4).
A RIEL PARA LAS RUEDAS (2) E RUEDA LIBRE (2) • A continuación, inserte el mismo perno de la rueda a través
B PLACA ROSCADA (2) F PLACA ESPACIADORA (4) del agujero del espaciador de metal y luego a través del
C PERNO (6) G RUEDA LIBRE CON agujero trasero del riel de las ruedas (vea la Fig. 5).
D ARANDELA (6) FRENO (2) • Enrosque el perno de la rueda en el agujero en la pata inferior
de la unidad.
HERRAMIENTAS NECESARIAS
Necesitará las siguientes herramientas para ensamblar e • Apriete firmemente los pernos superior e inferior usando una
instalar las ruedas en la unidad. llave fija o de cubo de 1/2".
• Repita el mismo procedimiento con el lado izquierdo.
PLACA
ESPACIADORA
PERNO
LLAVE DE CUBO DE LLAVE AJUSTABLE LLAVE FIJA ARANDELLA
3/8" Y DE 1/2" O ALICATE DE 1/2"
RUEDA
DESEMPAQUE E INSTALACIÓN LIBRE
• Retire la caja de cartón y todas las piezas sueltas del interior
de la unidad.
• Incline cuidadosamente la unidad sobre su parte posterior Figura 4 Figura 5
con la ayuda de otra persona. Acueste la unidad
cuidadosamente sobre bloques para evitar dañar la INSTALACIÓN DE LAS RUEDAS LIBRES FRONTALES
manguera de desagüe de condensación y la cubierta plástica • Coloque la placa roscada entre la parte inferior delantera del
de las tuberías del evaporador en la parte trasera del gabinete. gabinete y los rieles de las ruedas, como se muestra en la
• Retire y deseche la paleta de madera de la base y los cuatro figura 6. Asegúrese de que los agujeros de la placa roscada
(4) tornillos usando una llave de cubo de 3/8" (vea la Fig. 1). se alineen con la ranura del centro del riel de la rueda.
• Usando una llave ajustable grande, retire y deseche las dos • A continuación, coloque una arandela en uno de los seis
(2) patas niveladoras de plástico negro girándolas a la pernos largos y luego inserte el perno en el agujero de la
izquierda (vea la Fig. 2). rueda libre (vea la Fig. 4).
• Coloque la placa espaciadora en la rueda y enrosque el perno
TORNILLOS PATA de la rueda en el agujero de la placa roscada.
NIVELADORA • Apriete firmemente usando una llave fija o de cubo de ½”.
• Repita el mismo procedimiento en el lado izquierdo. Después
de la instalación, coloque cuidadosamente la unidad en
posición vertical con la ayuda de un asistente.
Placa roscada
PALETA Figura 2
DE MADERA
Figura 1
Figura 6
5Colocación del electrodoméstico que el ciclo de descongelación comienza. La perilla del
temporizador avanzará a lo largo del ciclo de descongelación y
Deje un espacio de una (1) pulgada (2,54 cm) en todos los
luego emitirá un chasquido fuerte al final del ciclo (Fig. B). El
lados y en la parte trasera del gabinete para facilitar la
electrodoméstico se descongelará automáticamente cada
instalación, la conexión del suministro eléctrico y la circulación
12 horas después del primer ciclo de descongelación.
adecuada del aire. NO bloquee la rejilla delantera en la parte
inferior de la base del electrodoméstico. Se necesita una
circulación adecuada del aire para asegurar un funcionamiento
adecuado del electrodoméstico. Elija un lugar que se encuentre
próximo a un tomacorriente con conexión a tierra. Para un
funcionamiento más eficiente, el electrodoméstico debe ser
ubicado donde las temperaturas ambiente no caigan por
debajo de los 40ºF (5ºC) o excedan los 110ºF (43ºC). No se
recomienda el uso de calentadores adicionales para
compresores.
Aislamiento
El espacio de aislamiento en el gabinete está sellado para
mantener la mejor eficiencia. Los agujeros taladrados en el
gabinete pueden destruir ese sello y dañar el cableado eléctrico
ubicado en el espacio de aislamiento.
LOS DAÑOS CAUSADOS AL CABLEADO O AL AISLAMIENTO
POR TALADRADO ANULARÁN LA GARANTÍA.
Fig. A Fig. B
Aislamiento Position
Posición de of knob before
la perilla antes Positionde
Posición of laknob at al
perilla endfinal
El espacio de aislamiento en el gabinete está sellado para turning clockwise
de girarla to start
a la derecha deldefrost
of ciclo decycle
descongelación
(Second
para iniciar el ciclo (segundo tope)
mantener la mejor eficiencia. Los agujeros taladrados en el defrost cycle (Firstdeclick) click)
descongelación (primer tope)
gabinete puede destruir ese sello y dañar el cableado eléctrico
ubicado en el espacio de aislamiento.
Características
LOS DAÑOS CAUSADOS AL CABLEADO O AL AISLAMIENTO
POR TALADRADO ANULARÁN LA GARANTÍA. Estantes ajustables aprobados por la NSF y la FDA
Este electrodoméstico incluye estantes ajustables de alta
Encendido del electrodoméstico resistencia recubiertos de epoxi rociado aprobados por la NSF
Una vez que el electrodoméstico haya sido colocado en su y la FDA. El estante con los alambres en ángulo en la parte
ubicación permanente y se haya proporcionado el suministro delantera y trasera se debe colocar en el piso del gabinete.
y puesta a tierra adecuados, verifique o complete lo siguiente: Los otros estantes se colocan en los soportes ajustables de
acero inoxidable que se enganchan en las cintas de soporte
de estantes a cada lado del interior del compartimiento.
Período de enfriamiento
Asegúrese de colocar el estante llano en la posición superior.
Para un almacenamiento seguro de los alimentos, espere
24 horas hasta que el electrodoméstico se enfríe
completamente antes de colcar alimentos en su interior. El Estante llano
electrodoméstico funcionará continuamente durante las
primeras horas. No coloque alimentos en el electrodoméstico Estantes
sino hasta después de las primeras 24 horas de normales
funcionamiento.
Estante
Ajuste del termostato inferior te
El electrodoméstico es enviado de la fábrica con un termostato bine
Ga
ajustado aproximadamente en el punto medio del rango de
funcionamiento. Puede reducir o Ruedas delanteras fijas y traseras libres
aumentar la temperatura después La unidad con puerta de vidrio cuenta con dos (2) ruedas
de que el electrodoméstico haya delanteras fijas con freno y dos (2) ruedas libres traseras. La
funcionado durante al menos 8 unidad sin puerta de vidrio cuenta con dos (2) ruedas delanteras
horas. Espere por lo menos 8 libres con freno y dos (2) ruedas libres traseras. Las ruedas
horas hasta que la temperatura se permiten mover el electrodoméstico con facilidad y luego ser
estabilice antes de ajustar el fijadas en su lugar en la ubicación final.
termostato. EMPUJE PARA
FIJAR EN
Ajuste de descongelación SU LUGAR
Este electrodoméstico está diseñado para descongelarse cada
12 horas. Para programar la activación de la descongelación,
espere hasta el momento en que desee descogelar el
electrodoméstico. Con la muesca de la perilla del temporizador
alineada con la línea del soporte (Fig. A), gire la perilla del
temporizador de descongelación lentamente hacia la derecha.
El temporizador emitirá varios chasquidos y luego emitirá un
chasquido fuerte. Este último chasquido marca el punto en el FIXED CASTER
RUEDA FIJA SWIVEL CASTER
RUEDA LIBRE
6Control de temperatura ajustable Otras características
El control de frío ajustable está ubicado en la parte superior • Evaporador de instalación superior certificado por la NSF.
izquierda del alojamiento del evaporador en el interior de la • Gabinete con aislamiento de espuma de uretano de 2-1/2"
unidad. La posición “5” es el ajuste intermedio (recomendado) de grosor.
y “9” es el ajuste más frío. • Cerrador de puerta a resorte de torsión (modelos con
puertas de vidrio).
• Alojamiento de acero inoxidable para el evaporador.
• Tapa de desgüe removible de acero inoxidable.
• Rejilla delantera de alta resistencia.
• Enchufe eléctrico preformado de alta resistencia de
calidad comercial.
• Soportes removibles de alta resistencia de acero
inoxidable para estantes.
Mantenimiento de rutina
Medidor de temperatura certificado por la NSF
Limpieza del interior
Este electrodoméstico viene equipado con un medidor de
Asegúrese de girar el control de temperatura a la posición
temperatura certificado por la NSF para mostrar la temperatura
“OFF” (apagado) y desenchufe el cordón eléctrico. Lave la
interna del gabinete. El medidor de temperatura está ubicado
superficie interior del área de almacenamiento usando agua
en la parte superior derecha del alojamiento del evaporador
tibia y una solución de bicarbonato de sodio (aproximadamente
en el interior de la unidad.
una cucharada de bicarbonato de sodio por cada litro de agua
tibia). Enjuague bien con agua tibia limpia y seque con un
paño. Este procedimiento también puede ser usado para
limpiar las juntas de la puerta. Limpie las placas de acero
inoxidable usando el limpiador de acero inoxidable (Magic
Clean), pieza número 218490900, el cual puede obtener de su
centro de servicio Frigidaire Commercial llamando al
1-866-738-1640, o usando cualquier otro limpiador de acero
inoxidable.
Limpieza del exterior
Limpie ocasionalmente el exterior del gabinete usando un paño
Lámpara fluorescente (modelos con puerta de vidrio) humedecido en detergente suave con agua. Enjuague y seque
con un paño suave. Limpie la rejilla inferior y la puerta de acero
El refrigerador con puerta de vidrio viene equipado con una
inoxidable usando el limpiador de acero inoxidable (Magic
lámpara fluorescente de 17 vatios. Si el balastro y la bombilla
Clean) o cualquier otro limpiador de acero inoxidable. No use
no concuerdan, el resultado podría ser una iluminación baja o
hojas de afeitar ni ningún otro instrumento afilado que pueda
inexistente.
rayar la superficie del electrodoméstico cuando retire las
etiquetas adhesivas. Cualquier residuo de goma que quede
Si la bombilla falla, reemplácela con una bombilla del mismo
de la cinta adhesiva puede ser removido usando una mezcla
tipo y vatiaje. También reemplace bombillas que destellan
de agua tibia y detergente suave. También puede tocar el
continuamente. Esto podría dañar el balastro.
residuo de goma con el lado adhesivo de la cinta que haya
retirado. NO RETIRE LA PLACA DE SERIE.
Si apaga la lámpara cuando no esté en uso ahorrará energía.
Sin embargo, si se enciende y se apaga la bombilla con
frecuencia se reducirá su vida útil.
Bandeja de condensación
Sólo utilice bombillas certificadas por la NSF. Puede obtener Algunos modelos cuentan con una bandeja de condensación
estas bombillas de su centro de servicio Frigidaire Commercial en una posición fija detrás de la rejilla inferior. Esta bandeja no
llamando al 1-866-738-1640. debe ser removida de debajo del gabinete. Si se retira la
bandeja, la condensación caerá sobre el piso.
Luz interior (modelos con puerta de acero
inoxidable) FALLA ELÉCTRICA
NO abra la tapa del congelador sin necesidad si el
Los modelos de acero inoxidable vienen equipados con una
congelador permanece apagado por varias horas.
bombilla de 40 vatios que se enciende cuando se abre la puerta.
Si se daña la bombilla, reemplácela con una bombilla del
Si ocurre una falla eléctrica, coloque siete u ocho libras
mismo tipo y potencia. Esta bombilla es de un tipo especial y
(3 o 3,5 kilos) de hielo seco en el congelador cada 24 horas.
está recubierta con una capa a prueba de fracturas. Sólo utilice
Puede buscar proveedores de hielo seco en las páginas
bombillas del mismo tipo y vatiaje certificadas por la NSF. Puede
amarillas bajo “hielo seco”, “lecherías” o “heladerías”. Siempre
obtener estas bombillas de su centro de servicio Frigidaire
use guantes y tenga cuidado cuando manipule hielo seco.
Commercial llamando al 1-866-738-1640.
7Medidas de conservación de energía
Este electrodoméstico está diseñado para una gran eficiencia
utilizando aislamiento de espuma pesada. Sin embargo, hay
ciertas cosas que el usuario puede hacer para mantener el
electrodoméstico en buenas condiciones de funcionamiento.
• No haga funcionar el electrodoméstico a una temperatura
más fría de lo necesario para mantener temperaturas
seguras para el almacenamiento de alimentos.
• Asegúrese de que el electrodoméstico esté instalado en un
lugar alejado de los rayos directos del sol, conductos de
ventilación, etc.
• Mantenga la puerta cerrada excepto para el uso normal.
Inspeccione la puerta con frecuencia para asegurarse de
que cierre por sí sola y que las juntas estén en buenas
condiciones.
• No sobrecargue el gabinete con productos ya que puede
interferir con el flujo normal de aire.
• Haga inspeccionar el producto cada año por una compañía
de servicio calificado para asegurarse de que la carga de
refrigerante sea la correcta.
• Este electrodoméstico funciona con mayor eficiencia en un
ambiente frío que en uno caliente. Trate de mantener una
temperatura ambiente por debajo de 80ºF (27ºC) y 65% de
humedad relativa para una máxima eficiencia.
Períodos de inactividad y sugerencias para la mudanza
Deje el congelador en funcionamiento durante los períodos
de inactividad menores de tres (3) semanas.
Períodos prolongados de inactividad
Si no se va a utilizar el congelador por algunos meses:
• Retire todos los alimentos del refrigerador y desenchufe el
cordón eléctrico.
• Limpie y seque el interior del refrigerador completamente.
• Deje la puerta del congelador levemente abierta (y bloquéela
de ser necesario) para evitar la acumulación de olores y de
moho.
Mudanza
Cuando mueva el congelador, siga las siguientes
recomendaciones para evitar daños:
• Desconecte el enchufe del cordón eléctrico del tomacorriente.
• Retire los alimentos del congelador, luego descongélelo y
límpielo.
• Asegure todos los artículos sueltos como el panel de la base,
las cestas y los estantes fijándolos con cinta adhesiva para
evitar daños.
• En el vehículo de mudanza, asegure el congelador en
posición vertical para evitar movimiento. Además, proteja el
exterior del congelador con una frazada o un artículo similar.
8Antes de solicitar s ervicio, revise esta lis ta. Puede ahorrarle tiem po y dinero. Esta lista incluye los
GUÍA DE LOCALIZACIÓN Y
incidentes m ás com unes que no s on originados por m ano de obra o m ateriales defectuosos en
SOLUCIÓN DE AVERÍAS
este electrodom éstico.
PROBLEMA CAUSA CORRECCIÓN
FUNCIONAM IENTO DEL CONGELADOR
El congelador no funciona. * El congelador está enchufado a un circuito * Use otro circuito. Si no está seguro sobre el tomacorriente,
de interruptor de falla de conexión a tierra. hágalo revisar por un técnico certificado.
* El control de temperatura está en la * Vea la sección de ajuste del termostato.
posición "OFF" (apagado).
* Es posible que el congelador no esté * Asegúrese de que el enchufe esté firmemente conectado al
enchufado o que el enchufe esté flojo. tomacorriente.
* Se quemó un fusible de la casa o se * Verifique o reemplace el fusible con un fusible de acción
disparó el disyuntor. retardada de 15 amp. Restablezca el disyuntor.
* Interrupción del suministro eléctrico. * Verifique las luces del hogar. Llame a su compañía eléctrica.
El congelador funciona demasiado o * La temperatura de la habitación o del * Es normal que el congelador funcione más bajo estas
por demasiado tiempo. ambiente es caliente. condiciones.
* El congelador fue desconectado * Toma 24 horas para que el congelador se enfríe
recientemente por un período de tiempo. completamente.
* Se almacenaron grandes cantidades de * Los alimentos tibios harán que el congelador funcione más
alimentos tibios o calientes recientemente. hasta que se alcance la temperatura deseada.
* La puerta se mantiene abierta demasiado * El aire caliente que entra en el congelador lo hace funcionar
tiempo o se abre con demasiada más. Abra la puerta con menor frecuencia.
frecuencia.
* La puerta del congelador puede estar * Vea el apartado "problemas de la puerta".
levemente abierta.
* El control de la temperatura está en un * Gire la perilla a un ajuste más tibio. Espere varias horas
ajuste demasiado bajo. hasta que la temperatura se estabilice.
* Las juntas del congelador están sucias, * Limpie o cambie la junta. Los escapes en el sello de la tapa
gastadas, agrietadas o mal ajustadas. harán que el congelador funcione más para mantener la
temperatura deseada.
La temperatura interna del congelador * El control de la temperatura está en un * Gire la perilla a un ajuste más tibio. Espere varias horas
es demasiado fría. ajuste demasiado bajo. hasta que la temperatura se estabilice.
La temperatura interna del congelador * El control de la temperatura está en un * Gire la perilla a un ajuste más frío. Espere varias horas hasta
es demasiado caliente. ajuste demasiado tibio. que la temperatura se estabilice.
* La puerta se mantiene abierta demasiado * El aire caliente que entra en el congelador lo hace funcionar
tiempo o se abre con demasiada más. Abra la puerta con menor frecuencia.
frecuencia.
* La puerta del congelador puede estar * Vea el apartado "problemas de la puerta".
levemente abierta.
* Se almacenaron grandes cantidades de * Espere hasta que el congelador haya tenido la oportunidad
alimentos tibios o calientes recientemente. de alcanzar la temperatura seleccionada.
* El congelador fue desconectado * El congelador requiere 24 horas para enfriarse
recientemente por un período de tiempo. completamente.
La superficie exterior del congelador * Las paredes externas del congelador * Esto es normal mientras el compresor funciona para
está tibia. pueden estar hasta 30º F (16º C) más transferir el calor desde el interior del gabinete del
calientes que la temperatura ambiente. congelador.
SONIDOS Y RUIDOS
Niveles de sonido más altos cuando el * Los congeladores modernos han * Esto es normal. Cuando el ruido del ambiente es bajo, es
congelador está encendido. aumentado la capacidad de posible escuchar el compresor en funcionamiento mientras
almacenamiento y la estabilidad de las enfría el interior del refrigerador.
temperaturas. Estos electrodomésticos
requieren compresores de alta capacidad.
Sonidos más duros cuando se * El congelador funciona a presiones * Esto es normal. El sonido se estabilizará o desaparecerá a
enciende el compresor. mayores durante el inicio del ciclo de medida que el congelador siga funcionando.
ENCENDIDO.
Se escuchan ruidos de golpes o * Las piezas de metal se expanden y * Esto es normal. El sonido se estabilizará o desaparecerá a
chasquidos cuando se enciende el contraen al igual que en las tuberías de medida que el congelador siga funcionando.
compresor. agua caliente.
9You can also read