Deploying Cisco Catalyst 8000V Edge Software on Amazon Web Services
←
→
Page content transcription
If your browser does not render page correctly, please read the page content below

Deploying Cisco Catalyst 8000V Edge Software on Amazon Web
Services
First Published: 2021-01-30

Americas Headquarters
Cisco Systems, Inc.
170 West Tasman Drive
San Jose, CA 95134-1706
USA
http://www.cisco.com
Tel: 408 526-4000
     800 553-NETS (6387)
Fax: 408 527-0883
CHAPTER                 1
          Overview of Cisco Catalyst 8000V Edge Software
          on Amazon Web Services
          Cisco Catalyst 8000V Edge Software is a virtual router that offers routing, security, and network management
          functionalities as cloud services with multitenancy.
          This guide specifies the deployment options, procedures, and the configurations for Cisco Catalyst 8000V
          running on Amazon Web Services (AWS) for public and private cloud solutions. Note that the implementation
          and installation of Cisco Catalyst 8000V on AWS is different than the implementation on the other supported
          hypervisors.
          Cisco Catalyst 8000V is supported on the Amazon Virtual Private Cloud (Amazon VPC). Cisco Catalyst
          8000V has the ability to boot in either the autonomous or the controller mode. By default,Cisco Catalyst
          8000V boots in the autonomous mode. For Cisco SD-WAN deployments, you must boot the Cisco Catalyst
          8000Vdevice in the controller mode. For more information on deploying Cisco Catalyst 8000V in the controller
          mode, see the Getting Started With the Cisco SD-WAN guide.
          To know more about the Amazon Virtual Private Cloud, see the AWS VPC documentation.
             • Deployment Options for Cisco Catalyst 8000V Running on Amazon Web Services, on page 1
             • Licensing, on page 2
             • Pay As You Go Licensing, on page 2
             • Cisco IOS XE Technologies Not Supported, on page 3

Deployment Options for Cisco Catalyst 8000V Running on
Amazon Web Services
          To use Cisco Catalyst 8000V on Amazon Web Services (AWS), purchase and launch the Cisco Catalyst
          8000V instance as an Amazon Machine Image (AMI) on AWS Marketplace.
          An Amazon Machine Image (AMI) provides the information required to launch your instance. You need to
          specify an AMI when you launch an instance. Note that you can launch as many instances from the AMI as
          you need.
          Choose one of the following deployment options from the AWS Marketplace:
             • Cisco Catalyst 8000V - Advantage PAYG
             • Cisco Catalyst 8000V - Essentials PAYG

                                          Deploying Cisco Catalyst 8000V Edge Software on Amazon Web Services
                                                                                                                1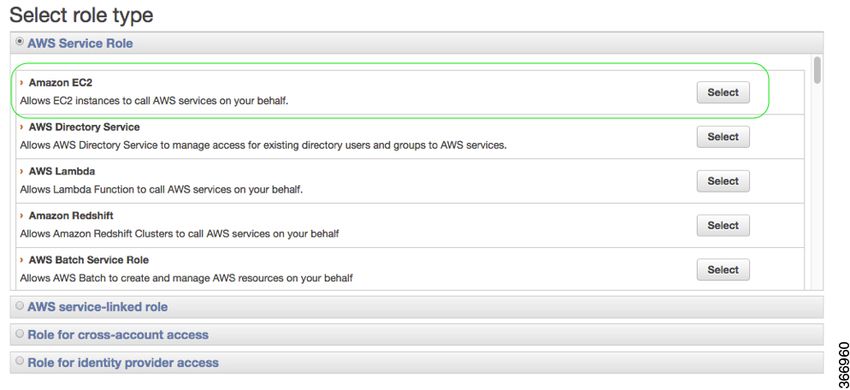
Overview of Cisco Catalyst 8000V Edge Software on Amazon Web Services
 Licensing

                       • Cisco Catalyst 8000V - BYOL
                       • Cisco Catalyst 8000V - BYOL For SDWAN

                    If you choose one of the first three options, proceed to licensing after choosing your deployment option. If
                    you choose the Cisco SD-WAN option, see the Getting Started with Cisco SD-WAN guide.

             Note   If you are upgrading from an earlier version, use the Cisco Catalyst 8000V .bin file to upgrade the version of
                    the Cisco Catalyst 8000V instance without having to recreate an AWS EC2 instance from a new AMI.

Licensing
                    After you visit the AWS Marketplace, purchase and launch the Cisco Catalyst 8000V device as an Amazon
                    Machine Image (AMI) on the AWS Marketplace.
                    To use the Cisco Catalyst 8000V device, first choose the image or solution listing, purchase the image, and
                    deploy the AMI. The next step is to either purchase the Cisco Catalyst 8000V software license(s) directly
                    from Cisco, or use a Pay As You Go (PAYG) license that is already embedded with the image.
                    If you are using the Bring Your Own license (BYOL) licensing model,continue reading this section. Else, see
                    the Pay As You Go section in this guide.

                    Bring Your Own Licensing Model
                    Bring Your Own License is the model where you buy a license from Cisco or a partner and install the license
                    on the Cisco Catalyst 8000V device. If you choose the BYOL licensing model, after you deploy the Cisco
                    Catalyst 8000V AMI from the AWS Marketplace and launch the instance, you must install the licenses using
                    Cisco Smart Licensing Usage Policy.
                    Cisco Smart Licensing Usage Policy is an evolved version of the existing Smart Licensing model with the
                    overarching objective of providing a licensing solution that does not interrupt the operations of your network.
                    Rather, this model enables a compliance relationship to account for the hardware and software licenses you
                    purchase and use.
                    After you purchase a license, no preliminary steps, such as registration or generation of keys etc., are required
                    unless you use an export-controlled or enfored license. These licenses require authorization before use. For
                    all the other licenses, you can configure the product features on the device right-away.
                    For more information about the Cisco Catalyst 8000V software licenses and the process for rehosting a license,
                    see the Cisco Catalyst 8000V Edge Software Configuration Guide. For a list of license SKUs, see the latest
                    Cisco Catalyst 8000V Release Notes.

Pay As You Go Licensing
                    To use Cisco Catalyst 8000V on AWS, you must purchase and launch Cisco Catalyst 8000V as an Amazon
                    Machine Image (AMI) on the AWS Marketplace. Further, you must choose either the BYOL or the Pay As
                    You Go (PAYG) licensing model.
                    If you have chosen the BYOL model, go to the Licensing section in this guide. If you have chosen the PAYG
                    licensing model, continue to read this section.

                Deploying Cisco Catalyst 8000V Edge Software on Amazon Web Services
      2
Overview of Cisco Catalyst 8000V Edge Software on Amazon Web Services
                                                                                                         Cisco IOS XE Technologies Not Supported

                          The Cisco Catalyst 8000V hourly-billed AMI or Pay As You Go licensing model allows you to consume an
                          instance for a defined period of time. In this licensing model, you can directly launch the instance from the
                          AWS Marketplace and start using the instances. The licenses are embedded in the image.
                          The following Cisco IOS XE Technology Packages are available in this licensing model: Cisco Catalyst
                          8000V - Essentials PAYG and Cisco Catalyst 8000V - Advantage PAYG.
                          PAYG is subject to the following conditions:
                              • You are billed hourly by Amazon Web Services (AWS) for using the Cisco Catalyst 8000V AMI. This
                                hourly usage fee is in addition to the VPC usage fees charged by AWS.
                              • You do not purchase the licenses directly from Cisco for Cisco Catalyst 8000V.
                              • You do not install the Cisco licenses on the router.
                              • You cannot rehost hourly-billed AMIs.

                          For more information about the features contained in the Cisco Catalyst 8000V technology packages, see the
                          Cisco Catalyst 8000V Edge Software Configuration Guide.

Cisco IOS XE Technologies Not Supported
                          When you deploy your Cisco Catalyst 8000V instance on an AWS instance, Cisco Catalyst 8000V supports
                          fewer Cisco IOS XE technologies than are supported by other hypervisors. Some technologies might not be
                          available because they are not supported in an Amazon cloud.
                          The following restrictions apply when you deploy Cisco Catalyst 8000V on an AWS instance:
                              • Although CLI commands for unsupported features may be visible on Cisco Catalyst 8000V, testing by
                                Cisco has determined that the unsupported features (mentioned in the table in this section) do not work
                                in AWS deployments.
                              • Routing protocols are supported over a tunnel only.
                              • The Cisco Catalyst 8000V AMI does not support remote management of the router using Cisco Prime
                                Network Services Controller.

                          The following table lists the Cisco IOS XE technologies that are not supported when deploying Cisco Catalyst
                          8000V on an AWS instance.

Table 1: Cisco IOS XE Technologies Not Supported on AWS Deployments

Technology                    Non-Supported Features

Basic Routing                 OSPF

IP Multicast                  IGMP and PIM

Data Center Interconnect OTV, VxLAN and WCCPv2.

MPLS                          MPLS, EoMPLS, VRF and VPLS.

Redundancy                    HSRP

WAAS                          Integrated AppNav-XE

                                                                Deploying Cisco Catalyst 8000V Edge Software on Amazon Web Services
                                                                                                                                             3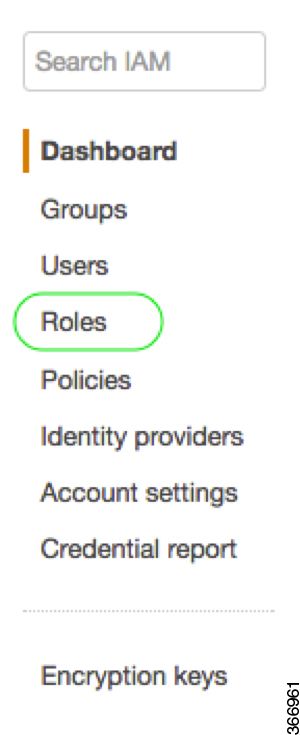
Overview of Cisco Catalyst 8000V Edge Software on Amazon Web Services
Cisco IOS XE Technologies Not Supported

                     The following caveats apply to the Cisco IOS XE technology support on AWS deployments:
                         • You can configure only one interface with the ip address dhcp command.
                         • You cannot apply NAT PAT on the same interface that is configured with a crypto map. The workaround
                           is to use a different IP Security feature such as SVTI or DMVPN, or you can configure a two-router
                           solution with one router for NAT and another router for the IP Security crypto map.
                         • You cannot configure HSRP between the Cisco Catalyst 8000V nodes in an Amazon cloud. Amazon
                           does not allow running HSRP on the hosts in the VPC. Amazon AWS blocks all broadcast and multicast
                           traffic in a VPC.
                         • It is recommended that you disable the Source/Destination check on the Cisco Catalyst 8000V interfaces.
                         • EtherChannel is not supported.

                 Deploying Cisco Catalyst 8000V Edge Software on Amazon Web Services
     4
CHAPTER 2
Deploy Cisco Catalyst 8000V on Amazon Web
Services
Launching a Cisco Catalyst 8000V AMI occurs directly from the AWS Marketplace. To launch an Cisco
Catalyst 8000V instance on AWS, perform the steps as described in the Launching the Cisco Catalyst 8000V
AMI section.
For more information on zones and regions in Amazon EC2, see: Regions and Availability Zones.
Encrypted Elastic Block Storage (EBS)
When you launch a Cisco Catalyst 8000V instance from the AWS marketplace, you cannot select encrypted
Elastic Block Storage (EBS). This is because encryption is not enabled on Cisco Catalyst 8000V in the AMI
that is available in the AWS marketplace. To launch a Cisco Catalyst 8000V instance see the summarized
steps mentioned in the Launching the Cisco Catalyst 8000V AMI section in this chapter.
Note that the jumbo frames in a VPC have limitations. For more information, see this document: Network
Maximum Transmission Unit (MTU) for Your EC2 Instance.
• Supported Instance Types, on page 5
• Prerequisites, on page 6
• Restrictions, on page 6
• Launching the Cisco Catalyst 8000V AMI, on page 6
Supported Instance Types
The Amazon Machine Image supports different instance types which determine the size of the instance and
the required amount of memory. The following are the supported instance types for Cisco Catalyst 8000V:
• c5.large
• c5.xlarge
• c5.2xlarge
• c5.4xlarge
• c5.9xlarge
• c5n.large
• c5n.xlarge
Deploying Cisco Catalyst 8000V Edge Software on Amazon Web Services
5Deploy Cisco Catalyst 8000V on Amazon Web Services
Prerequisites
• c5n.2xlarge
• c5n.4xlarge
• c5n.9xlarge
• t3.medium
For more information about the instance types, see Amazon EC2 Instance Types.
Note To determine the maximum number of network interfaces supported per instance, see this Amazon Web
Services documentation: Private IP Addresses Per Network Interface Per Instance Type
Prerequisites
Before you launch Cisco Catalyst 8000V on AWS, the following prerequisites apply:
• You must have an Amazon Web Services account.
• You require an SSH client such as Putty on Windows or Terminal on Macintosh to access the Cisco
Catalyst 8000V console.
• Determine the instance type that you want to deploy for Cisco Catalyst 8000V.
• If you are planning to launch the AMI using the 1-Click Launch, you must first create a Virtual Private
Cloud (VPC). For more information, see Amazon Virtual Private Cloud (VPC).
Restrictions
The following are the restrictions when you launch Cisco Catalyst 8000V on AWS:
Launching the Cisco Catalyst 8000V AMI
To launch the Cisco Catalyst 8000V AMI, perform the steps as described in the following sections:
• Selecting the Cisco Catalyst 8000V AMI.
• Launching the Cisco Catalyst 8000V AMI Using the 1-Click Launch.
• Associating the Public IP Address with Cisco Catalyst 8000V Instance and Connecting to the Cisco
Catalyst 8000V Instance Using SSH.
Note If you are using a BYOL AMI, see Bring Your Own License and Downloading and Installing the License
(BYOL AMI Only).
Deploying Cisco Catalyst 8000V Edge Software on Amazon Web Services
6Deploy Cisco Catalyst 8000V on Amazon Web Services
Selecting the Cisco Catalyst 8000V Marketplace Offer
Selecting the Cisco Catalyst 8000V Marketplace Offer
Step 1 Log in to the Amazon Web Services Marketplace.
Step 2 Search the AWS Marketplace for: “Cisco Catalyst 8000V”. the system displays the following offers:
• Cisco Catalyst 8000V - Advantage PAYG
• Cisco Catalyst 8000V - Essentials PAYG
• Cisco Catalyst 8000V - BYOL
Step 3 Select the Cisco Catalyst 8000V AMI that you are planning to deploy.
The marketplace displays the product information such as the supported instance types, pricing, and support details.
Launching the Cisco Catalyst 8000V AMI
Before you begin
If you launch the AMI using the 1-Click Launch, you must first create a Virtual Private Cloud (VPC). For
more information, see the appropriate AWS documentation.
Step 1 Navigate to https://aws.amazon.com/marketplace and search for Cisco Catalyst 8000V. The system displays a list of all
the Cisco Catalyst 8000V Marketplace product offers.
Step 2 Select the offer that you want to launch. On this page, the system displays the offer details such as product features,
supported instance types, region, and pricing.
Step 3 Click Continue to Subscribe. After the subscription to the offer is complete, click Continue to Configuration.
Step 4 From the Delivery Method field, select a fulfillment option. The possible values include Amazon Machine Image or
Cloudformation Template. In either case, you can select the version of the software and the region for launching Cisco
Catalyst 8000V. Click Continue to Launch.
Step 5 On the Launch This Software page, select either Launch through EC2 Console or Launch from Website.
Step 6 If you select the Launch From Website option, the system displays a set of additional fields. Select the EC2 Instance
Type, VPC, Subnet, Security Group and Key Pair settings from the drop-down list.
To view the newly launched instance, click Launch and navigate to https://console.aws.amazon.com/ec2/. Ensure Status
Check displays the 2/2 checks passed message before you try to SSH into the instance.
Step 7 If you select the Launch Through EC2 Console option, perform the following steps:
a) Click Launch to go to the EC2 Console.
b) Click Configuration Instance Details.
c) Configure the instance details. Select the network from the network drop-down list. Select a VPC subnet into which
you want to deploy the Cisco Catalyst 8000V instance from the drop-down menu. This setting determines the
availability zone of your instance.
d) You can initially create two interfaces on the Instance Details screen. To add more interfaces, click Network Interfaces.
The maximum number of interfaces that are supported depends on the instance type.
e) From the drop-down menu, select the availability zone.
Deploying Cisco Catalyst 8000V Edge Software on Amazon Web Services
7Deploy Cisco Catalyst 8000V on Amazon Web Services
Associating the Public IP Address with the Cisco Catalyst 8000V Instance
f) Configure the additional options available from AWS.
g) Configure the bootstrap properties by specifying the bootstrap options in the Metadata Accesible field.
Note You must enable the Metadata Accessible field. If you do not enable this field, the credentials and the
other metadata for the instance is not available, and you cannot access the instance.
You can also provide bootstrap properties in custom data format using the User Data field. See the Cisco
Catalyst 8000V Installation and Upgrade Guide for the supported custom data format
h) Click Next: Add Storage. Retain the default hard drive setting.
Note When you use the Cisco Catalyst 8000V instance in AWS, you cannot change the (16 GB) size of virtual
hard drives.
i) Click Next: Tag Instance, and enter the tag information. Click Next: Configure Security Groups.
j) Create a new Security Group or select an existing Security Group.
Cisco Catalyst 8000V requires SSH for console access. Cisco Catalyst 8000V also requires that the Security Group,
at a minimum, does not block TCP/22. These settings are used to manage the Cisco Catalyst 8000V instance.
k) Click Review and Launch. Review the Cisco Catalyst 8000V instance information, and click Launch.
l) Choose an existing Key Pair or create a new key by uploading your own public key. Create a new key pair on AWS
by clicking Create Key Pair. Enter the key pair name, and click Create. After the key pair is created, ensure that
you have downloaded the private key from Amazon before continuing. A newly created private key can only be
accessed once. After the key pair is downloaded, click Close.
Note AWS security policies require that the private key permission level be set to 400. To set this value for the
.pem file, open a UNIX shell terminal screen and enter the chmod 400 pem-file-name command.
m) Click Launch Instance.
After the AMI instance is deployed, you can view the status by clicking Instances link on the menu. The status
changes from Running to Passed. At this point, the Cisco Catalyst 8000V instance is booted and ready for software
configuration.
What to do next
• Associate the Public IP Address with the Cisco Catalyst 8000V Instance.
• Connect to the Cisco Catalyst 8000V Using SSH.
Associating the Public IP Address with the Cisco Catalyst 8000V Instance
Before you can access the management console using an SSH connection, you must associate an interface on
the Cisco Catalyst 8000V instance with the Public IP address created with the VPC.
Step 1 Click Services > EC2 > Instances, and select the Cisco Catalyst 8000V instance.
Step 2 In the displayed Network interfaces, click eth0.
Step 3 A popup window displays showing detailed information about the “eth0” interface. Note the interface’s private IP address.
Deploying Cisco Catalyst 8000V Edge Software on Amazon Web Services
8Deploy Cisco Catalyst 8000V on Amazon Web Services
Connecting to the Instance using SSH
Step 4 Click Interface ID Value.
Step 5 From the address drop-down menu, select the public IP address that you want the VM to use.
Step 6 Click Allow Reassociation if you are reassigning a public IP address that is currently in use and mapped to another elastic
network interface (ENI).
Step 7 Validate that the selected private IP address matches the one that you noted in step 3.
Step 8 Click Associate Address.
This action associates the public IP address (Amazon elastic IP) with the private IP address of the network interface. You
can now use this interface to access the management console. For more information, see the Connecting to the Cisco
Catalyst 8000V Instance Using SSH section.
Connecting to the Instance using SSH
The Cisco Catalyst 8000V instance on AWS requires SSH for console access. To access the Cisco Catalyst
8000V AMI, perform the following steps:
Step 1 After the Cisco Catalyst 8000V status shows that is it is running, select the instance.
Step 2 Enter the following UNIX shell command to connect to the Cisco Catalyst 8000V console using SSH:
ssh -i pem-file-name ec2-user@[public-ipaddress | DNS-name]
Note You must log in as ec2-user the first time you access the instance. This is the default user name for your
AMI.
The private key stored in the .pem file is used to authenticate access to the Cisco Catalyst 8000V instance.
Step 3 Start configuring the Cisco Catalyst 8000V instance. For information on downloading and activating the license for the
BYOL AMI, see the Downloading and Installing the License (BYOL AMI Only) section.
Creating an AMI with Encrypted Elastic Block Storage
To create a Cisco Catalyst 8000V AMI with encrypted Elastic Block Storage(EBS), perform the following
steps.
Before you begin
Create a Cisco Catalyst 8000V instance in AWS.
Deploying Cisco Catalyst 8000V Edge Software on Amazon Web Services
9Deploy Cisco Catalyst 8000V on Amazon Web Services
Creating an AMI with Encrypted Elastic Block Storage
Note When you create a Cisco Catalyst 8000V instance, use one of the instance sizes shown in the following list:
• c5.large
• c5.xlarge
• c5.2xlarge
• c5.4xlarge
• c5.9xlarge
• c5n.large
• c5n.xlarge
• c5n.2xlarge
• c5n.4xlarge
• c5n.9xlarge
• t3.medium
Step 1 View the list of instances in Services > EC2 > Instances.
Step 2 Select the name of an instance that you will use as the basis of a new AMI using encrypted EBS. For example,
"C8000V-1". Ensure that the instance state is Stopped.
Step 3 Take a snapshot of this instance by following steps a to f mentioned below.
a) Click on the Root device. For example, "/dev/xvda/".
The system displays the Block Device dialog box.
b) Click the EBS ID. For example, vol-08350aa2).
The volume for this snapshot is displayed under ELASTIC BLOCK STORE > Volumes
c) Click Actions > Create Snapshot.
The system displays the Create Snapshot dialog box.
d) Click Create.
e) In the Create Image from EBS pane, enter a name for the snapshot. For example, "unencrypted-C8000V-1".
f) From the Virtualization type field, select Hardware-assisted virtualization.
The system displays the Snapshot Creation Started message in the Create Snapshot dialog box. The snapshot is
created after several minutes.
Under ELASTIC BLOCK STORE > Snapshots, the new snapshot is listed, with the status Completed.
Step 4 Start creating a private AMI by clicking EC2 > IMAGES > AMIs.
The name of the snapshot instance that you created earlier appears in the list of AMIs.
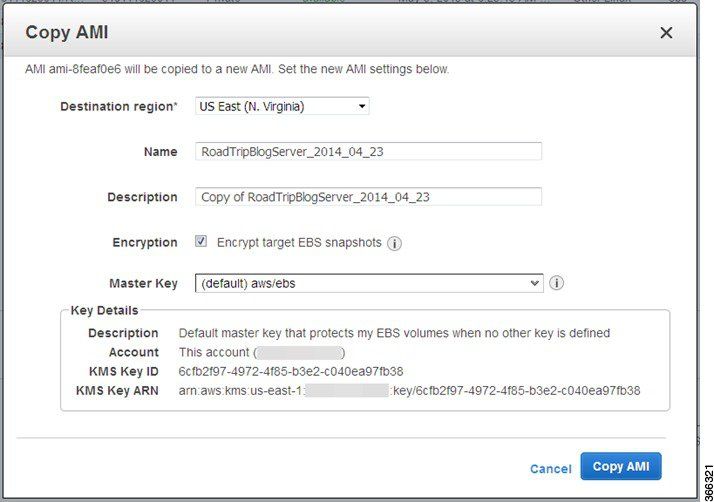
Step 5 Select the snapshot instance and click Actions > Copy AMI.
Deploying Cisco Catalyst 8000V Edge Software on Amazon Web Services
10Deploy Cisco Catalyst 8000V on Amazon Web Services
Creating an AMI with Encrypted Elastic Block Storage
The Copy AMI dialog box appears with input fields for Destination region, Name, Description, Encryption, Master
Key and Key details.
Step 6 Select a Destination region, for example, US East, and enter a Name. For example, encrypted-C8000V-1.
Step 7 Enter a Description.
Step 8 For Encryption, select the Encrypt target EBS snapshots checkbox.
Step 9 For Master Key, you can select the default value; for example, default( aws/ebs).
Step 10 Click Copy AMI.
The new AMI, with encrypted EBS, is created after several minutes.
Step 11 To verify, go to EC2 > IMAGES > AMIs where the new AMI is listed.
Deploying Cisco Catalyst 8000V Edge Software on Amazon Web Services
11Deploy Cisco Catalyst 8000V on Amazon Web Services
Creating an AMI with Encrypted Elastic Block Storage
Deploying Cisco Catalyst 8000V Edge Software on Amazon Web Services
12CHAPTER 3
Enable the Guest Shell
• Enabling the Guest Shell, on page 13
• Create an IAM Instance Role, on page 13
• Assign an IAM Instance Role to a Cisco Catalyst 8000V Instance, on page 15
• Assign an IAM Instance Role to a New Instance, on page 16
• Examples of Guest Shell, on page 16
Enabling the Guest Shell
To enable the guest shell on Cisco Catalyst 8000V running on AWS, create an IAM instance role and establish
trust with an EC2 service. You have a choice of either assigning the IAM instance role to a preexisting Cisco
Catalyst 8000V instance or assigning the IAM instance role to a new Cisco Catalyst 8000V instance.
For more information on how to perform these tasks, see Assign an IAM Instance Role to a Cisco Catalyst
8000V and Assign an IAM Instance Role to a New Cisco Catalyst 8000V.
Then, perform further configuration steps on Cisco Catalyst 8000V and enter the guest shell.
Create an IAM Instance Role
1. Sign into AWS, as an administrator with permissions to create an IAM Role
2. Click EC2 to enter the EC2 console.
3. Click IAM to enter the IAM console.
4. Click Roles.
Deploying Cisco Catalyst 8000V Edge Software on Amazon Web Services
13Enable the Guest Shell
Create an IAM Instance Role
Figure 1: IAM Instance Roles
5. Click Create new Role.
6. Enter a name for your app's role.
7. Click Continue.
8. Select a Role Type.
Deploying Cisco Catalyst 8000V Edge Software on Amazon Web Services
14Enable the Guest Shell
Assign an IAM Instance Role to a Cisco Catalyst 8000V Instance
Figure 2: IAM Instance Role Types
9. For the Amazon EC2 role type, click Select.
This establishes trust with an EC2 service.
10. From Set Permissions, click Select Policy Template.
11. Select a template (for example, "Amazon S3 Full Access") by clicking Select. You can select multiple
services. Use this option to specify the access in further detail. For example, you can allow an IAM
instance role to read from an S3 bucket but not write to an S3 bucket.
12. Enter the role name.
13. Click Create Role.
Assign an IAM Instance Role to a Cisco Catalyst 8000V Instance
Specifying an IAM instance role is not a mandatory for accessing the guest shell. However, it will later allow
you to access specific entities in the AWS account using a key or a password that eliminates the need to save
account information on the Cisco Catalyst 8000V instance.
Step 1 Click EC2 to enter the EC2 dashboard.
Step 2 Select one of your listed Cisco Catalyst 8000V instances, right-click and select Instance Setup. Then, select
Attach/Replace IAM Role.
Step 3 From the drop-down list, select an IAM instance role that you created previously.
Step 4 Enter the following CLI configuration commands on Cisco Catalyst 8000V and relaunch Cisco Catalyst 8000V.
Router(config)# interface GigabitEthernet1
Router(config-if)# ip address dhcp
Router(config-if)# ip nat outside
Router(config-if)# exit
Router(config)# interface VirtualPortGroup0
Router(config-if)# ip address 192.168.35.1 255.255.255.0
Router(config-if)# ip nat inside
Router(config-if)# exit
Router(config)# ip nat inside source list GS_NAT_ACL interface GigabitEthernet1 overload
Deploying Cisco Catalyst 8000V Edge Software on Amazon Web Services
15Enable the Guest Shell
Assign an IAM Instance Role to a New Instance
Router(config)# ip access-list standard GS_NAT_ACL
Router(config)# permit 192.168.0.0 0.0.255.255
Router(config)# app-hosting appid guestshell
Router(config-app-hosting)# vnic gateway1 virtualportgroup 0 guest-interface 0 guest-ipaddress
192.168.35.2 netmask 255.255.255.0 gateway 192.168.35.1 name-server 8.8.8.8 default
Router(config-app-hosting)# resource profile custom cpu 1500 memory 512
Router(config-app-hosting)# exit
Router(config)# exit
Router# guestshell enable
Router# guestshell run python
Assign an IAM Instance Role to a New Instance
The following procedure shows how to assign an IAM Instance Role to Cisco Catalyst 8000V during the
creation of a new Cisco Catalyst 8000V instance.
Step 1 Launch a new Cisco Catalyst 8000V as an EC2 instance, and choose an instance type.
Step 2 Click Next: Configure Instance Details.
Step 3 Perform one of the following two steps:
a) Click the IAM role text box to select an existing IAM instance role from the dropdown list.
b) Click Create new IAM role to create a new IAM instance role.
Step 4 Enter the following CLI configuration commands on the Cisco Catalyst 8000V instance and relaunch the instance.
Router(config)# interface GigabitEthernet1
Router(config-if)# ip address dhcp
Router(config-if)# ip nat outside
Router(config-if)# exit
Router(config)# interface VirtualPortGroup0
Router(config-if)# ip address 192.168.35.1 255.255.255.0
Router(config-if)# ip nat inside
Router(config-if)# exit
Router(config)# ip nat inside source list GS_NAT_ACL interface GigabitEthernet1 overload
Router(config)# ip access-list standard GS_NAT_ACL
Router(config)# permit 192.168.0.0 0.0.255.255
Router(config)# app-hosting appid guestshell
Router(config-app-hosting)# vnic gateway1 virtualportgroup 0 guest-interface 0 guest-ipaddress
192.168.35.2 netmask 255.255.255.0 gateway 192.168.35.1 name-server 8.8.8.8 default
Router(config-app-hosting)# resource profile custom cpu 1500 memory 512
Router(config-app-hosting)# exit
Router(config)# exit
Router# guestshell enable
Router# guestshell run python
Examples of Guest Shell
The following examples show how to download packages in the Guest Shell on a Cisco Catalyst 8000V
instance, and a few other useful guest shell commands.
Deploying Cisco Catalyst 8000V Edge Software on Amazon Web Services
16Enable the Guest Shell
Examples of Guest Shell
1. Install packages using the yum or pip3 commands. For example, enter the [guestshell@guestshell ~]
sudo pip3 install awscli command to install the AWS CLI and Amazon SDK.
[guestshell@guestshell ~]$ sudo pip3 install awscli
WARNING: Running pip install with root privileges is generally not a good idea. Try `pip3
install --user` instead.
Collecting awscli
Downloading
https://files.pythonhosted.org/packages/ce/38/6f2b06f0f00e6b381ad4741d0bf97eb2e3faa23238a2dfe31577154a207c/awscli-1.18.157-py2.py3-none-any.whl
(3.4MB)
100% |################################| 3.4MB 369kB/s
Collecting colorama=0.2.5; python_version != "3.4" (from awscli)
Downloading
https://files.pythonhosted.org/packages/c9/dc/45cdef1b4d119eb96316b3117e6d5708a08029992b2fee2c143c7a0a5cc5/colorama-0.4.3-py2.py3-none-any.whl
Collecting s3transfer=0.3.0 (from awscli)
Downloading
https://files.pythonhosted.org/packages/69/79/e6afb3d8b0b4e96cefbdc690f741d7dd24547ff1f94240c997a26fa908d3/s3transfer-0.3.3-py2.py3-none-any.whl
(69kB)
100% |################################| 71kB 7.3MB/s
Collecting docutils=0.10 (from awscli)
Downloading
https://files.pythonhosted.org/packages/22/cd/a6aa959dca619918ccb55023b4cb151949c64d4d5d55b3f4ffd7eee0c6e8/docutils-0.15.2-py3-none-any.whl
(547kB)
100% |################################| 552kB 2.1MB/s
Collecting PyYAML=3.10; python_version != "3.4" (from awscli)
Downloading
https://files.pythonhosted.org/packages/64/c2/b80047c7ac2478f9501676c988a5411ed5572f35d1beff9cae07d321512c/PyYAML-5.3.1.tar.gz
(269kB)
100% |################################| 276kB 3.6MB/s
Collecting rsa=3.1.2; python_version != "3.4" (from awscli)
Downloading
https://files.pythonhosted.org/packages/26/f8/8127fdda0294f044121d20aac7785feb810e159098447967a6103dedfb96/rsa-4.5-py2.py3-none-any.whl
Collecting botocore==1.18.16 (from awscli)
Downloading
https://files.pythonhosted.org/packages/2d/9e/afa41db0cd911869305bb783b9b021be67ea23c8b7b317caa46632dbf3cf/botocore-1.18.16-py2.py3-none-any.whl
(6.7MB)
100% |################################| 6.7MB 173kB/s
Collecting pyasn1>=0.1.3 (from rsa=3.1.2; python_version != "3.4"->awscli)
Downloading
https://files.pythonhosted.org/packages/62/1e/a94a8d635fa3ce4cfc7f506003548d0a2447ae76fd5ca53932970fe3053f/pyasn1-0.4.8-py2.py3-none-any.whl
(77kB)
100% |################################| 81kB 7.5MB/s
Collecting urllib3=1.20; python_version != "3.4" (from botocore==1.18.16->awscli)
Downloading
https://files.pythonhosted.org/packages/9f/f0/a391d1463ebb1b233795cabfc0ef38d3db4442339de68f847026199e69d7/urllib3-1.25.10-py2.py3-none-any.whl
(127kB)
100% |################################| 133kB 6.1MB/s
Collecting python-dateutil=2.1 (from botocore==1.18.16->awscli)
Downloading
https://files.pythonhosted.org/packages/d4/70/d60450c3dd48ef87586924207ae8907090de0b306af2bce5d134d78615cb/python_dateutil-2.8.1-py2.py3-none-any.whl
(227kB)
100% |################################| 235kB 4.0MB/s
Collecting jmespath=0.7.1 (from botocore==1.18.16->awscli)
Downloading
https://files.pythonhosted.org/packages/07/cb/5f001272b6faeb23c1c9e0acc04d48eaaf5c862c17709d20e3469c6e0139/jmespath-0.10.0-py2.py3-none-any.whl
Collecting six>=1.5 (from python-dateutil=2.1->botocore==1.18.16->awscli)
Downloading
https://files.pythonhosted.org/packages/ee/ff/48bde5c0f013094d729fe4b0316ba2a24774b3ff1c52d924a8a4cb04078a/six-1.15.0-py2.py3-none-any.whl
Installing collected packages: colorama, urllib3, six, python-dateutil, jmespath,
botocore, s3transfer, docutils, PyYAML, pyasn1, rsa, awscli
Running setup.py install for PyYAML ... done
Successfully installed PyYAML-5.3.1 awscli-1.18.157 botocore-1.18.16 colorama-0.4.3
docutils-0.15.2 jmespath-0.10.0 pyasn1-0.4.8 python-dateutil-2.8.1 rsa-4.5
Deploying Cisco Catalyst 8000V Edge Software on Amazon Web Services
17Enable the Guest Shell
Examples of Guest Shell
s3transfer-0.3.3 six-1.15.0 urllib3-1.25.10
[guestshell@guestshell ~]$ aws s3 ls c8kv
Unable to locate credentials. You can configure credentials by running "aws configure"
2. Having installed the AWS CLI, enter the aws s3 command such as aws s3 ls.
[guestshell@guestshell ~]$ aws s3 ls c8kv
2020-10-14 19:44:08 433546509 upgrade.bin
[guestshell@guestshell ~]$
3. You can download a Cisco Catalyst 8000V AWS package containing sample scripts using the sudo pip3
install csr_aws_guestshell command.
Example:
[guestshell@guestshell ~]$ sudo pip3 install csr_aws_guestshell
WARNING: Running pip install with root privileges is generally not a good idea. Try `pip3
install --user` instead.
Collecting csr_aws_guestshell
Downloading
https://files.pythonhosted.org/packages/42/a7/c772726166f809d9223ef448f5d7fa2cfb8a809525a11991612d81dd080a/csr_aws_guestshell-0.0.17.dev.tar.gz
Collecting awscli (from csr_aws_guestshell)
Downloading
https://files.pythonhosted.org/packages/23/1b/2b65ddc4e18ab8b232d413b75591ccd22021233fb3c3fd1ddd099d0170ce/awscli-1.18.162-py2.py3-none-any.whl
(3.4MB)
100% |################################| 3.4MB 352kB/s
Collecting boto (from csr_aws_guestshell)
Downloading
https://files.pythonhosted.org/packages/23/10/c0b78c27298029e4454a472a1919bde20cb182dab1662cec7f2ca1dcc523/boto-2.49.0-py2.py3-none-any.whl
(1.4MB)
100% |################################| 1.4MB 794kB/s
Collecting boto3 (from csr_aws_guestshell)
Downloading
https://files.pythonhosted.org/packages/30/3c/c9b65c398de6589c93b3c65aa27a695a6cdf7588c50a7934ad3ac6599a8a/boto3-1.16.2-py2.py3-none-any.whl
(129kB)
100% |################################| 133kB 7.2MB/s
Collecting rsa=3.1.2; python_version != "3.4" (from awscli->csr_aws_guestshell)
Downloading
https://files.pythonhosted.org/packages/26/f8/8127fdda0294f044121d20aac7785feb810e159098447967a6103dedfb96/rsa-4.5-py2.py3-none-any.whl
Collecting botocore==1.19.2 (from awscli->csr_aws_guestshell)
Downloading
https://files.pythonhosted.org/packages/1f/96/35fa364675cf17e3a190ae08716ac4b078ca86a62ef071d32cd8b86d52bc/botocore-1.19.2-py2.py3-none-any.whl
(6.7MB)
100% |################################| 6.7MB 164kB/s
Collecting PyYAML=3.10; python_version != "3.4" (from awscli->csr_aws_guestshell)
Downloading
https://files.pythonhosted.org/packages/64/c2/b80047c7ac2478f9501676c988a5411ed5572f35d1beff9cae07d321512c/PyYAML-5.3.1.tar.gz
(269kB)
100% |################################| 276kB 3.6MB/s
Collecting s3transfer=0.3.0 (from awscli->csr_aws_guestshell)
Downloading
https://files.pythonhosted.org/packages/69/79/e6afb3d8b0b4e96cefbdc690f741d7dd24547ff1f94240c997a26fa908d3/s3transfer-0.3.3-py2.py3-none-any.whl
(69kB)
100% |################################| 71kB 7.6MB/s
Collecting docutils=0.10 (from awscli->csr_aws_guestshell)
Downloading
https://files.pythonhosted.org/packages/22/cd/a6aa959dca619918ccb55023b4cb151949c64d4d5d55b3f4ffd7eee0c6e8/docutils-0.15.2-py3-none-any.whl
(547kB)
100% |################################| 552kB 1.9MB/s
Collecting colorama=0.2.5; python_version != "3.4" (from
awscli->csr_aws_guestshell)
Downloading
https://files.pythonhosted.org/packages/c9/dc/45cdef1b4d119eb96316b3117e6d5708a08029992b2fee2c143c7a0a5cc5/colorama-0.4.3-py2.py3-none-any.whl
Collecting jmespath=0.7.1 (from boto3->csr_aws_guestshell)
Downloading
Deploying Cisco Catalyst 8000V Edge Software on Amazon Web Services
18Enable the Guest Shell
Examples of Guest Shell
https://files.pythonhosted.org/packages/07/cb/5f001272b6faeb23c1c9e0acc04d48eaaf5c862c17709d20e3469c6e0139/jmespath-0.10.0-py2.py3-none-any.whl
Collecting pyasn1>=0.1.3 (from rsa=3.1.2; python_version !=
"3.4"->awscli->csr_aws_guestshell)
Downloading
https://files.pythonhosted.org/packages/62/1e/a94a8d635fa3ce4cfc7f506003548d0a2447ae76fd5ca53932970fe3053f/pyasn1-0.4.8-py2.py3-none-any.whl
(77kB)
100% |################################| 81kB 9.4MB/s
Collecting urllib3=1.25.4; python_version != "3.4" (from
botocore==1.19.2->awscli->csr_aws_guestshell)
Downloading
https://files.pythonhosted.org/packages/56/aa/4ef5aa67a9a62505db124a5cb5262332d1d4153462eb8fd89c9fa41e5d92/urllib3-1.25.11-py2.py3-none-any.whl
(127kB)
100% |################################| 133kB 6.5MB/s
Collecting python-dateutil=2.1 (from botocore==1.19.2->awscli->csr_aws_guestshell)
Downloading
https://files.pythonhosted.org/packages/d4/70/d60450c3dd48ef87586924207ae8907090de0b306af2bce5d134d78615cb/python_dateutil-2.8.1-py2.py3-none-any.whl
(227kB)
100% |################################| 235kB 4.6MB/s
Collecting six>=1.5 (from
python-dateutil=2.1->botocore==1.19.2->awscli->csr_aws_guestshell)
Downloading
https://files.pythonhosted.org/packages/ee/ff/48bde5c0f013094d729fe4b0316ba2a24774b3ff1c52d924a8a4cb04078a/six-1.15.0-py2.py3-none-any.whl
Installing collected packages: pyasn1, rsa, urllib3, six, python-dateutil, jmespath,
botocore, PyYAML, s3transfer, docutils, colorama, awscli, boto, boto3, csr-aws-guestshell
Running setup.py install for PyYAML ... done
Running setup.py install for csr-aws-guestshell ... done
Successfully installed PyYAML-5.3.1 awscli-1.18.162 boto-2.49.0 boto3-1.16.2
botocore-1.19.2 colorama-0.4.3 csr-aws-guestshell-0.0.17.dev0 docutils-0.15.2
jmespath-0.10.0 pyasn1-0.4.8 python-dateutil-2.8.1 rsa-4.5 s3transfer-0.3.3 six-1.15.0
urllib3-1.25.11
The following scripts are included in the csr_aws_guestshell package:
get-metadata.py - retrieves and prints instance metadata from AWS.
get-route-table.py - retrieves instances in VPC along with routes, route tables, and associations.
save-config-to-s3.py - saves the Cisco IOS XE CLI commands to an S3 bucket.
save-tech-support-to-s3.py - saves the tech support output to an S3 bucket.
load-bin-from-s3.py - downloads a .bin file for Cisco Catalyst 8000V and reloads.
get-stat-drop.py - retrieves the CLI statistics and pushes them to cloudwatch.
capture-interface.py - sets the Cisco IOS XE CLI commands to monitor and captures packets for a period
of time, then uploads the file to S3.
4. In the following example, the load-bin-from-s3.py script loads a binary from S3 and boots a Cisco Catalyst
8000V image:
[guestshell@guestshell ~]$ load-bin-from-s3.py csr1kv ultra_167.bin
/bootflash/ultra_167.bin 446866343 / 446866343 (100.00%)
Download Complete
Note The csr_aws_guestshell package will continue to work with Cisco Catalyst 8000V.
Deploying Cisco Catalyst 8000V Edge Software on Amazon Web Services
19Enable the Guest Shell
Examples of Guest Shell
Deploying Cisco Catalyst 8000V Edge Software on Amazon Web Services
20CHAPTER 4
Configure L2 Extension for Public Cloud
This chapter describes how to enable enterprise and cloud providers to configure an L2 extension for public
clouds with Cisco Catalyst 8000V instances using LISP. Use the command-line interface to extend a layer 2
domain between your public cloud network and the enterprise network.
The following are some of the terminologies and concepts that you should be aware before you configure the
LISP Layer 2 Extension:
• Locator/ID Separation Protocol (LISP): LISP is a network architecture and protocol that implements
the use of two namespaces instead of a single IP address:
• Endpoint identifiers (EIDs) - assigned to end hosts.
• Routing locators (RLOCs) - assigned to devices (primarily routers) that make up the global routing
system.
• LISP-enabled virtualized router: A virtual machine or appliance that supports routing and LISP
functions, including host mobility.
• Endpoint ID (EID): An EID is an IPv4 or IPv6 address used in the source and destination address fields
of the first (most inner) LISP header of a packet.
• Routing locator (RLOC): The IPv4 or IPv6 addresses that are used to encapsulate and transport the
flow between the LISP nodes. An RLOC is the output of an EID-to-RLOC mapping lookup.
• Egress Tunnel Router (ETR): An ETR is a device that is the tunnel endpoint and connects a site to the
LISP-capable part of a core network (such as the Internet), publishes EID-to-RLOC mappings for the
site, responds to Map-Request messages, and decapsulates and delivers LISP-encapsulated user data to
the end systems at the site. During operation, an ETR sends periodic Map-Register messages to all its
configured map servers. These Map-Register messages contain all the EID-to-RLOC entries for the
EID-numbered networks that are connected to the ETR’s site.
• Ingress Tunnel Router (ITR): An ITR is a device that is the tunnel start point. An ITR is responsible
for finding EID-to-RLOC mappings for all traffic destined for LISP-capable sites. When the ITR receives
a packet destined for an EID, it first looks for the EID in its mapping cache. If the ITR finds a match, it
encapsulates the packet inside a LISP header with one of its RLOCs as the IP source address and one of
the RLOCs from the mapping cache entry as the IP destination. The ITR then routes the packet normally.
• xTR: A generic name for a device performing both Ingress Tunnel Router (ITR) and Egress Tunnel
Router (ETR) functions.
Deploying Cisco Catalyst 8000V Edge Software on Amazon Web Services
21Configure L2 Extension for Public Cloud
Configure LISP Layer 2 Extension
• PxTR: The point of interconnection between an IP network and a LISP network, playing the role of ITR
and ETR at this peering point.
• Map-Server (MS): An MS is a LISP Infrastructure device that LISP site ETRs register to with their EID
prefixes. An MS implements part of the distributed LISP mapping database by accepting registration
requests from its client egress tunnel routers (ETRs), aggregating the successfully registered EID prefixes
of those ETRs, and advertising the aggregated prefixes into the alternative logical topology (ALT) with
border gateway protocol (BGP).
In a small private mapping system deployment, an MS may be configured to stand alone (or there may
be several MSs) with all ETRs configured to register to each MS. If more than one, all MSs have full
knowledge of the mapping system in a private deployment.
In a larger or public mapping system deployment, an MS is configured with a partial mesh of generic
routing encapsulation (GRE) tunnels and BGP sessions to other map server systems
• Map-Resolver (MR): An MR is a LISP Infrastructure device to which the ITRs send LISP Map-Request
queries when resolving EID-to-RLOC mappings. MRs receive the request and select the appropriate map
server
For detailed overview information on LISP and the terminologies, see Locator ID Separation Protocol Overview.
• Configure LISP Layer 2 Extension, on page 22
• Prerequisites for configuring LISP Layer 2 Extension, on page 23
• Restrictions for configuring LISP Layer 2 Extension, on page 23
• Configure LISP Layer 2 Extension, on page 23
• Verify the LISP Layer 2 Traffic between Cisco Catalyst 8000V on AWS and Cisco Catalyst 8000V on
the Enterprise System, on page 27
Configure LISP Layer 2 Extension
You can deploy Cisco Catalyst 8000V on public, private, and hybrid clouds. When enterprises move to a
hybrid cloud, they need to migrate the servers to the cloud without making any changes to the servers.
Enterprises may want to use the same server IP address, subnet mask, and default gateway configurations.
They might want to use their own IP addressing scheme in the cloud, and not be limited by the addressing
scheme of the cloud provider infrastructure.
To fulfill this requirement, Cisco offers the LISP Layer 2 Extension to Cisco Catalyst 8000V running on
Amazon Web Services (AWS), where the Cisco Catalyst 8000V instance acts as the bridge between the
enterprise data center and the public cloud. By configuring the LISP Layer 2 Extension, you can extend your
Layer 2 networks in the private data center to a public cloud to achieve host reachability between your site
and the public cloud. You can also enable the migration of your application workload between the data center
and the public cloud.
Benefits
• Carry out data migration with ease and optimize the workload IP address or the firewall rules in your
network. Thereby, you can ensure subnet continuity with no broadcast domain extension.
• Virtually add a VM that is on the provider site to facilitate leverage cloud bursting to virtually insert a
VM in the Enterprise server while the VM runs on the provider site.
• Provide backup services for partial disaster recovery and disaster avoidance.
Deploying Cisco Catalyst 8000V Edge Software on Amazon Web Services
22Configure L2 Extension for Public Cloud
Prerequisites for configuring LISP Layer 2 Extension
Prerequisites for configuring LISP Layer 2 Extension
You must configure each Cisco Catalyst 8000V routerwith one external IP address. In this case, an IPsec
tunnel is built between the IP addresses of the two Cisco Catalyst 8000V intances, and the IPsec tunnel has
a private address.
Restrictions for configuring LISP Layer 2 Extension
• Enterprise VRF number and VM address numbers are limited on an AWS ECS subnet.
• IPv6 address format is not supported in a Cisco Catalyst 8000V Amazon Machine Image (AMI).
Configure LISP Layer 2 Extension
To configure the L2 extension functionality, you must first deploy the Cisco Catalyst 8000V instance on AWS
and configure the instance as an xTR. You must then configure the mapping system to complete the deployment.
The LISP site uses the Cisco Catalyst 8000V instance configured as both an ITR and an ETR (also known as
an xTR) with two connections to upstream providers. The LISP site then registers to the standalone device
that you have configured as the map resolver/map server (MR/MS) in the network core. The mapping system
performs LISP encapsulation and de-encapsulation of the packets that are going to the migrated public IPs.
Optionally, for traffic that is leaving AWS, whenever a route to the destination is not found on the routing
table, the Cisco Catalyst 8000V instance routes that traffic through the PxTR at the enterprise data center.
Perform the following steps to enable and configure the LISP xTR functionality when using a LISP map
server and map resolver for mapping services:
Creating a Cisco Catalyst 8000V instance on AWS
Step 1 Log in to Amazon Web Services. In the left navigation pane, click VPC.
Step 2 Click the Start VPC Wizard, and select VPC with Single Public Subnet from the left pane.
Step 3 Click Select.
Step 4 Create the subnet in the Virtual Private Cloud. Use the following properties:
a) Default Subnet-10.0.0.0/24 (mapped to public IP).
b) Additional subnets-0.0.1.0/24 and 1.0.0.2.0/24. These are private IP addresses and might be internal for the Cisco
Catalyst 8000V instance.
Step 5 Select Create VPC.
Step 6 Select Security > Network ACLs.
Step 7 Click Create Security Group to create a security group for the Cisco Catalyst 8000V instance. Configure the following
properties:
a) Name-SSH-Access
b) TCP Port 22 traffic-Permitted inbound
c) SSH access to C8000V for management-Enabled
Deploying Cisco Catalyst 8000V Edge Software on Amazon Web Services
23Configure L2 Extension for Public Cloud
Configure subnets
Step 8 To create additional security groups, perform step 6.
Step 9 Go to the Cisco Catalyst 8000V product page, and click Continue.
Step 10 Click Launch with E2 Console to launch the Cisco Catalyst 8000V in accordance with your geographical region.
Step 11 Choose the appropriate instance type. Refer tables 2-1 and 2-2 for supported instance types.
The minimum memory requirement for a medium instance type (m1.medium) is 10Mbps; large instance type (m1.large)
is 50Mbps.
ECU stands for Elastic Compute Unit. ECU is Amazon’s proprietary way of measuring the CPU capacity.
All the EC2 instances are hyperthreaded.
Step 12 Launch the Cisco Catalyst 8000V instance in the VPC that you created. Use the following properties:
a) Set the Shutdown behaviour to Stop.
b) Set the Tenancy to Shared. Choose the Shared option to run a shared hardware instance.
Step 13 Associate the instance with a security group (SSH-ACCESS). The security rules enable you to configure firewall rules
to control traffic for your Cisco Catalyst 8000V instance.
Step 14 Associate a private key with the Cisco Catalyst 8000V instance. A key pair is a private key and a public key. You must
provide the private key to authenticate and connect to the Cisco Catalyst 8000V instance. The public key is stored on
AWS. If required, you can create a new key pair.
Step 15 Click Launch Instances.
Step 16 Verify whether the Cisco Catalyst 8000V instance is deployed on AWS.
After successful deployment, the status changes to 2/2/ checks passed.
Configure subnets
Step 1 Select the Cisco Catalyst 8000V instance.
Step 2 Select Actions > Networking > Manage IP Addresses.
Step 3 Specify the enterprise host address. This IP address is the secondary address of eth1.
Step 4 Click Yes, Update.
Configure a tunnel between Cisco Catalyst 8000V on AWS and Cisco Catalyst
8000V on the Enterprise System
The communication between the Cisco Catalyst 8000V instance deployed within the enterprise data center
and the Cisco Catalyst 8000V instance deployed within the public cloud is secured by an IP Security (IPsec)
tunnel established between them. The LISP-encapsulated traffic is protected with the IPsec tunnel that provides
data origin authentication, integrity protection, anti-reply protection, and confidentiality between the public
cloud and the enterprise.
Step 1 Configure a Cisco Catalyst 8000V instance on AWS.
Deploying Cisco Catalyst 8000V Edge Software on Amazon Web Services
24Configure L2 Extension for Public Cloud
Configure LISP xTR on the Instance Running on AWS
interface Loopback1
ip address 33.33.33.33 255.255.255.255
!
interface Tunnel2
ip address 30.0.0.2 255.255.255.0
tunnel source GigabitEthernet1
tunnel mode ipsec ipv4
tunnel destination 173.39.145.79
tunnel protection ipsec profile p2p_pf1
!
interface GigabitEthernet2
ip address 10.10.10.140 255.255.255.0
negotiation auto
lisp mobility subnet1 nbr-proxy-reply requests 3
no mop enabled
no mop sysid
!
Step 2 Configure a second Cisco Catalyst 8000V instance on the enterprise site.
interface Loopback1
ip address 11.11.11.11 255.255.255.255
interface Tunnel2
ip address 30.0.0.1 255.255.255.0
tunnel source GigabitEthernet2
tunnel mode ipsec ipv4
tunnel destination 52.14.116.161
tunnel protection ipsec profile p2p_pf1
!
!
interface GigabitEthernet3
ip address 10.10.10.2 255.255.255.0
negotiation auto
lisp mobility subnet1 nbr-proxy-reply requests 3
no mop enabled
no mop sysid
!
Configure LISP xTR on the Instance Running on AWS
To configure LISP xTR on the Cisco Catalyst 8000V instance running on AWS, follow the configuration steps in the
Configuring LISP (Location ID Separation Protocol) section.
Example:
router lisp
locator-set aws
33.33.33.33 priority 1 weight 100
exit-locator-set
!
service ipv4
itr map-resolver 11.11.11.11
itr
etr map-server 11.11.11.11 key cisco
etr
use-petr 11.11.11.11
exit-service-ipv4
!
Deploying Cisco Catalyst 8000V Edge Software on Amazon Web Services
25Configure L2 Extension for Public Cloud
Configure LISP xTR on the Instance Running on AWS
instance-id 0
dynamic-eid subnet1
database-mapping 10.10.10.0/24 locator-set aws
map-notify-group 239.0.0.1
exit-dynamic-eid
!
service ipv4
eid-table default
exit-service-ipv4
!
exit-instance-id
!
exit-router-lisp
!
router ospf 11
network 30.0.0.2 0.0.0.0 area 11
network 33.33.33.33 0.0.0.0 area 11
!
router lisp
locator-set dmz
11.11.11.11 priority 1 weight 100
exit-locator-set
!
service ipv4
itr map-resolver 11.11.11.11
etr map-server 11.11.11.11 key cisco
etr
proxy-etr
proxy-itr 11.11.11.11
map-server
map-resolver
exit-service-ipv4
!
instance-id 0
dynamic-eid subnet1
database-mapping 10.10.10.0/24 locator-set dmz
map-notify-group 239.0.0.1
exit-dynamic-eid
!
service ipv4
eid-table default
exit-service-ipv4
!
exit-instance-id
!
site DATA_CENTER
authentication-key cisco
eid-record 10.10.10.0/24 accept-more-specifics
exit-site
!
exit-router-lisp
!
router ospf 11
network 11.11.11.11 0.0.0.0 area 11
network 30.0.0.1 0.0.0.0 area 11
!
!
!
Deploying Cisco Catalyst 8000V Edge Software on Amazon Web Services
26Configure L2 Extension for Public Cloud
Verify the LISP Layer 2 Traffic between Cisco Catalyst 8000V on AWS and Cisco Catalyst 8000V on the Enterprise System
Verify the LISP Layer 2 Traffic between Cisco Catalyst 8000V on
AWS and Cisco Catalyst 8000V on the Enterprise System
Perform the following steps to verify the LISP Layer 2 traffic:
Example:
Router#show ip lisp database
LISP ETR IPv4 Mapping Database for EID-table default (IID 0), LSBs: 0x1
Entries total 2, no-route 0, inactive 0
10.0.1.1/32, dynamic-eid subnet1, inherited from default locator-set aws
Locator Pri/Wgt Source State
33.33.33.33 1/100 cfg-addr site-self, reachable
10.0.1.20/32, dynamic-eid subnet1, inherited from default locator-set aws
Locator Pri/Wgt Source State
33.33.33.33 1/100 cfg-addr site-self, reachable
Router#show ip lisp map-cache
LISP IPv4 Mapping Cache for EID-table default (IID 0), 4 entries
0.0.0.0/0, uptime: 00:09:49, expires: never, via static-send-map-request
Negative cache entry, action: send-map-request
10.0.1.0/24, uptime: 00:09:49, expires: never, via dynamic-EID, send-map-request
Negative cache entry, action: send-map-request
10.0.1.4/30, uptime: 00:00:55, expires: 00:00:57, via map-reply, forward-native
Encapsulating to proxy ETR
10.0.1.100/32, uptime: 00:01:34, expires: 23:58:26, via map-reply, complete
Locator Uptime State Pri/Wgt Encap-IID
11.11.11.11 00:01:34 up 1/100 -
Router#show lisp dynamic-eid detail
% Command accepted but obsolete, unreleased or unsupported; see documentation.
LISP Dynamic EID Information for VRF "default"
Dynamic-EID name: subnet1
Database-mapping EID-prefix: 10.0.1.0/24, locator-set aws
Registering more-specific dynamic-EIDs
Map-Server(s): none configured, use global Map-Server
Site-based multicast Map-Notify group: 239.0.0.1
Number of roaming dynamic-EIDs discovered: 2
Last dynamic-EID discovered: 10.0.1.20, 00:01:37 ago
10.0.1.1, GigabitEthernet2, uptime: 00:09:23
last activity: 00:00:42, discovered by: Packet Reception
10.0.1.20, GigabitEthernet2, uptime: 00:01:37
last activity: 00:00:40, discovered by: Packet Reception
Router-DC#show ip lisp
Router-DC#show ip lisp data
Router-DC#show ip lisp database
LISP ETR IPv4 Mapping Database for EID-table default (IID 0), LSBs: 0x1
Entries total 1, no-route 0, inactive 0
10.0.1.100/32, dynamic-eid subnet1, inherited from default locator-set dc
Locator Pri/Wgt Source State
11.11.11.11 1/100 cfg-addr site-self, reachable
Router-DC#show ip lisp
Router-DC#show ip lisp map
Router-DC#show ip lisp map-cache
LISP IPv4 Mapping Cache for EID-table default (IID 0), 2 entries
Deploying Cisco Catalyst 8000V Edge Software on Amazon Web Services
27Configure L2 Extension for Public Cloud
Verify the LISP Layer 2 Traffic between Cisco Catalyst 8000V on AWS and Cisco Catalyst 8000V on the Enterprise System
10.0.1.0/24, uptime: 1d08h, expires: never, via dynamic-EID, send-map-request
Negative cache entry, action: send-map-request
10.0.1.20/32, uptime: 00:00:35, expires: 23:59:24, via map-reply, complete
Locator Uptime State Pri/Wgt Encap-IID
33.33.33.33 00:00:35 up 1/100
Router-DC#show lisp dynamic-eid detail
% Command accepted but obsolete, unreleased or unsupported; see documentation.
LISP Dynamic EID Information for VRF "default"
Dynamic-EID name: subnet1
Database-mapping EID-prefix: 10.0.1.0/24, locator-set dc
Registering more-specific dynamic-EIDs
Map-Server(s): none configured, use global Map-Server
Site-based multicast Map-Notify group: 239.0.0.1
Number of roaming dynamic-EIDs discovered: 1
Last dynamic-EID discovered: 10.0.1.100, 1d08h ago
10.0.1.100, GigabitEthernet2, uptime: 1d08h
last activity: 00:00:47, discovered by: Packet Reception
Router-DC#show lisp site
LISP Site Registration Information
* = Some locators are down or unreachable
# = Some registrations are sourced by reliable transport
Site Name Last Up Who Last Inst EID Prefix
Register Registered ID
dc never no -- 10.0.1.0/24
00:08:41 yes# 33.33.33.33 10.0.1.1/32
00:01:00 yes# 33.33.33.33 10.0.1.20/32
1d08h yes# 11.11.11.11 10.0.1.100/32
Router-DC#show ip cef 10.0.1.20
10.0.1.20/32
nexthop 33.33.33.33 LISP0
Router-DC#
Deploying Cisco Catalyst 8000V Edge Software on Amazon Web Services
28You can also read