Design and Technology Graphic Design 2018
←
→
Page content transcription
If your browser does not render page correctly, please read the page content below
Design and Technology
     Graphic Design 2018
                             Useful Revision Websites:
Do not be put off by the welsh files. There are 2 versions of each file. Look for the
                                   English titles.

                                  Product Design
              http://www.14-19nw.org.uk/course/view.php?id=347
                                 Graphic Products
              http://www.14-19nw.org.uk/course/view.php?id=206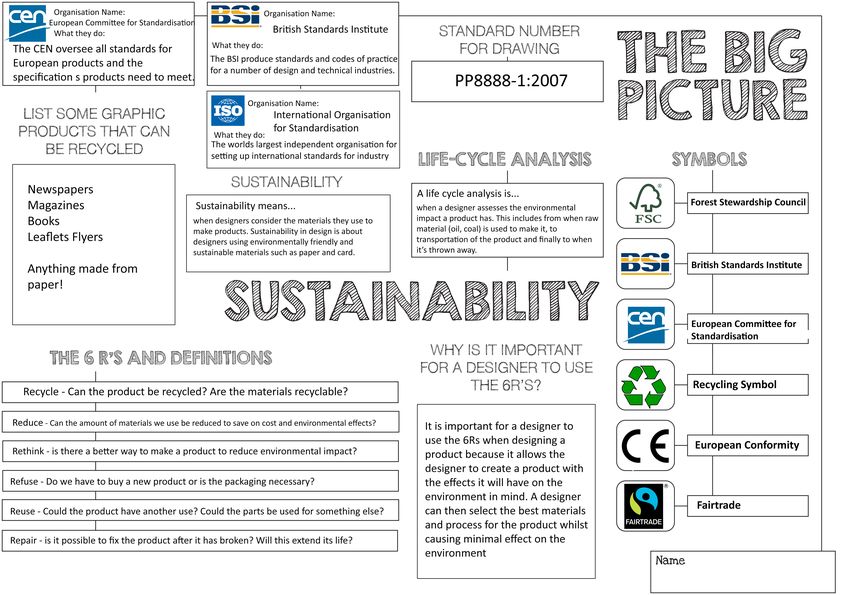
General Advice
When completing your design and technology exam it is always important to remember to read
the questions carefully and highlight the key things.

Remember that the questions get harder as you progress through them e.g q1a will be the easiest
and they will get progressively more difficult with the last part of the question being the A* part.

If ever you are unsure about an answer do not panic, move past the question and then come back
to it at a later point, if still unsure make a guess as you never know it could be correct. Try not to
leave any answer blank if you can help it.

If a question carrys 2 or more marks it is important to justify your answer just like you are used to
doing in your CAT.

Each question has a standard topic and it is important to plan your revision in topics so that the
exam makes more sense to you. Remember section A is the easier of the two sections so
section b will need more time dedicated to when revising.
Section A
Question 1 will always be a product analysis so it is important that you understand how to write a specification
point. It is also the part of the exam that will test your maths skills.

Question 2 is all about general issues within Design and Technology and usually focuses on sustainability and
the life cycle of a product.

Question 3 is the designer’s question. It is a guaranteed 10 mark question if you prepare well and learn at least
8 facts about each designer.

Question 4 will always ask you about the design process and then ask you to design something to a given
specification. Remember to read this specification and highlight the key parts of it and then use the
specification as a tick list to check your design once complete. Use the Marks for each part as a guide to how
much work is expected and how long to spend on it.
Section B
Question 5 is all about commercial manufacturing processes; occasionally it links back to question one.

Question 6 is the easiest question in section B and is all about materials and components, try to think back to
CAT page 6 when answering this question.

Question 7 is all about tools and equipment, sometimes the answers seem too simple but the simple answers
are usually correct so do not doubt yourself.

Question 8 is usually the hardest question on the paper and is all about ICT CAD/CAM and systems and
processes. Try your best on this question but do not worry if you find some of the questions too hard, this is
usually the question that the exam board will put in a curve ball question.
Command Words
Outline of Lessons
                                Design and Technology Graphics 2018

Week Beginning   Lesson Focus         Theory Focus (biweekly)         Afterschool    Homework Focus
 15/01/2018         Page 8                  Question 1                CAT Catch up
 22/01/2018         Page 9                                            CAT Catch up
 29/01/2018        Page 10                  Question 2                CAT Catch up
 05/02/2018        Page 11                                            CAT Catch up
 12/02/2018        Page 12                  Question 3                CAT Catch up
 19/02/2018
 26/02/2018        Making                   Question 4                CAT Catch up
 05/03/2018        Making                   Question 5                CAT Catch up
 12/03/2018        Page 13                  Question 6                CAT Catch up
 19/03/2018        Page 14                  Question 7                CAT Catch up
 26/03/2018      Final Tweaks               Question 8                CAT Catch up
 02/04/2018
 09/04/2018
 16/04/2018      Question 1+2                                           Revision
 23/04/2018      Question 3+4                                           Revision
 30/04/2018      Question 5+6                                           Revision
 07/05/2018      Question 7+8                                           Revision
 14/05/2018                                                             Revision
 21/05/2018      Exam Week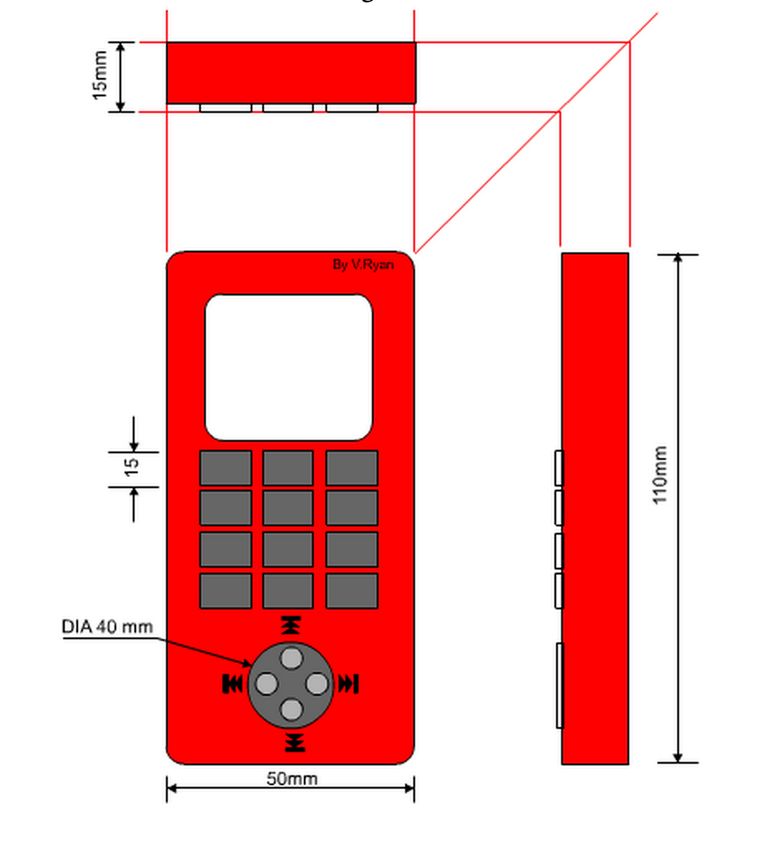
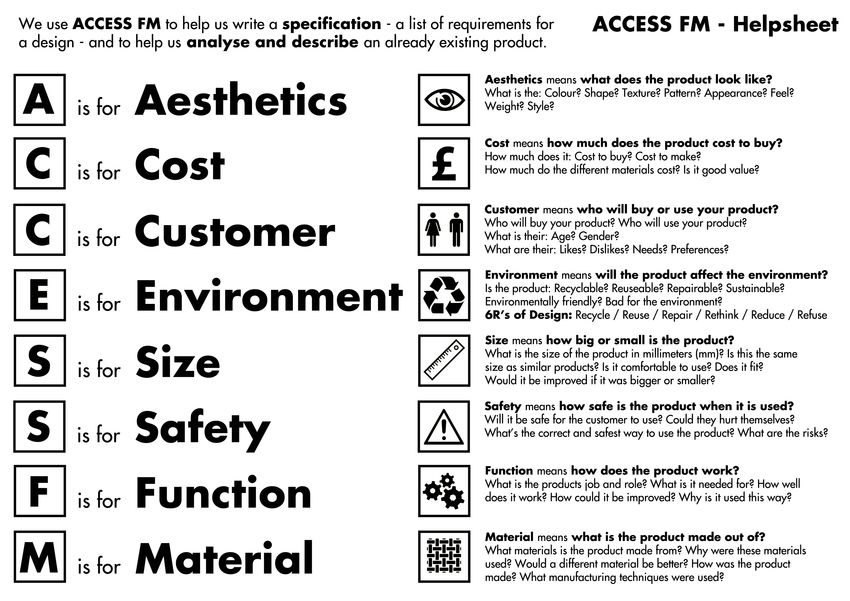
Question 1
                     (15 marks)

        Product Analysis
             Costs
 You will be asked to analyse a product so you need to
know the different points of ACCESS FM and what they
         mean so you can apply it to a product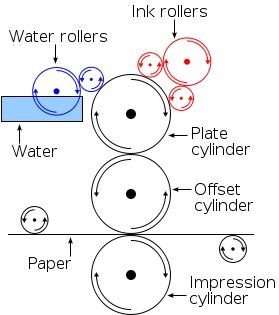
Question 2
      (10 marks)

Sustainability and
Legislative Issues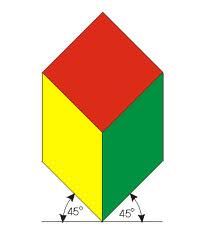
10
Question 3
(10 marks)
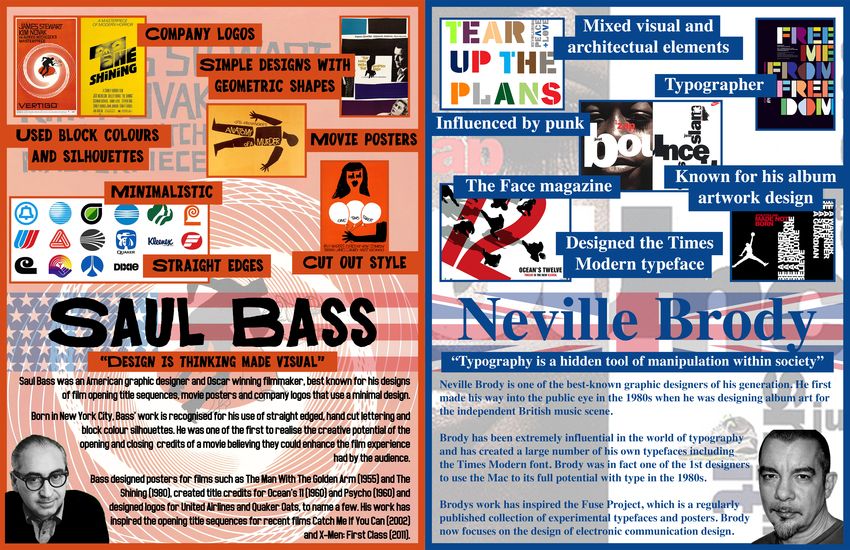
Designers Question
Saul Bass vs Neville Brody
Explain one of the designers work
or
compare the work of bothQuestion 4
(25 marks overall)
Design Process
(7marks)
Design Task Question
(18marks)
The exam board give you the mark scheme for the design
task question so read it and make sure you do everything
they ask forThe Design Process 1. Analysis of the task 2. Design specification 3. Generate ideas / initial design ideas 4. Development and modelling 5. Final solution - graphical presentation 6. Final solution - technical details 7. Planning the make 8. Making 9. Evaluation 10.Improvements
Question 5
    (10 marks)

 Commercial
Manufacturing
  Processes
Process Diagram of process Description of process Advantages Disadvantages Uses
Offset 1. The printing plate has the image to - Consistent high image - Slightly inferior - Magazines
be printed, in relief, on its surface (the quality. image quality - Books
Lithography image stands out slightly from the - Quick and easy compared to - Posters
printing plate surface). production of printing rotogravure or - Packaging
2. The printing plate is kept dampened. - Offset lithography photogravure
Ink is applied to the plate but it is printing is the printing.
repelled from the dampened surfaces cheapest method to - Smaller quantity
which are the non-image areas. produce high quality printing jobs
3. As the printing cylinder rotates the printing in commercial impractical
ink is transferred to the rubber blanket printing quantities. - Expensive to set
cylinder. - Good for printing large up
4. The ink, now on the rubber blanket quantities of the same
cylinder, is pressed onto the paper or item
card as it is pulled through the
machine. (The paper is trapped
between the blanket cylinder and the
impression cylinder - these pull the
paper through the machine)
Image is engraved on to a printing plate - Printing cylinders that - High start up - Magazines
Rotogravure which is then pressed on to the paper. can last through large costs - Catalogues
volume runs without - Wallpaper
In rotogravure printing, the image is the image degrading
made up of small holes sunk in the - Good quality image
surface of the printing plate. The holes reproduction
are filled with ink and any excess is - Low per-unit costs
removed. Paper comes into contact running high volume
with the ink in the holes when it is production
pressed against the plate.Process Diagram of process Description of process Advantages Disadvantages Uses
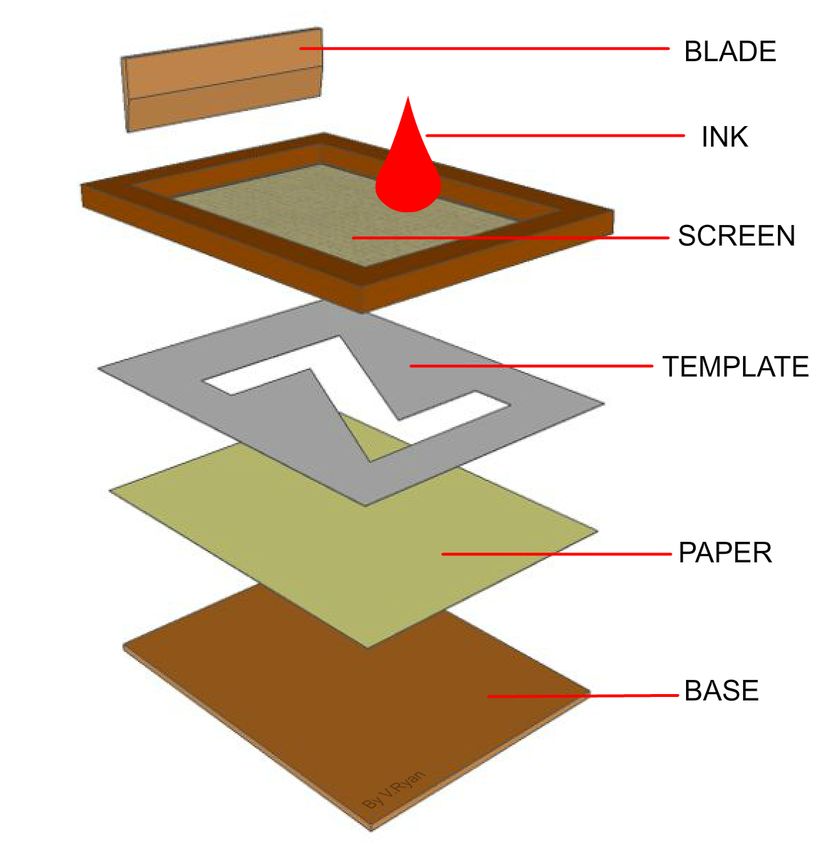
1. The material to be printed on is - High quality and long - High set up cost - T-shirts
Screen Printing placed on top of the base. In the lasting finish - Takes a long time - Posters
example, paper is being used. - Can print on almost any to print many
2. A template made from card, material items
with the required shape cut out of - Images can be scaled up - Multistep process
it, is placed on top of the paper. to almost any size and that can be
3. A screen is placed on top of printed complicated
the template. The screen is made - difficult to print
of stretched nylon fabric and has more than a few
a wood frame to hold it in place. colours
4. Ink is then squeezed through
the nylon fabric.
5. A blade is used to spread the
ink out and push it through the
fabric, through the template, and
onto the paper.
6. The paper is taken out of the
screen printing equipment and
the printed pattern can clearly be
seen.
Flexography Flexography uses a relief image - Variety of inks can be - Print can fade - Shopping
on thin, flexible printing plates used over time bags
made of rubber. - there is little or no drying - Not good for small
Flexography can be used to print time quantities
on materials such as cellophane, - Can print millions of
polythene and metallic films, so it images on one template
is often used to print plastic
shopping bags. It is also used to
print newspapers and paperback
books.The manufacturing process has three stages:
1st Stage: Pre-Press ————————> 2nd Stage: On-Press ————————> 3rd Stage: Finishing
1. Pre-Press
This is the stage before any actual printing takes place. Documents and files are checked for quality and that they’re in the correct
format for printing (JPEG, PDF etc.)
Files are also checked for high resolution, CMYK colour is correctly set up and that any margins, bleeds and crop marks are
included.
Processes at the Pre-Press stage (definitions)
Imposition: the combination of many pages in to one single document
Separation: The process of dividing (separating) a colour image into four separate components for printing (cyan, magenta, yellow
and black)
Typesetting: adding type to a document ready for print. Type can be added (set) by hand, by typewriter or by computer keyboard
2. On-Press
The on-press stage is the actual printing stage. Offset lithography, rotogravure, screen printing, flexography and their processes are
all examples of on-press methods.
3. Finishing
Finishing is the final stage of the printing process. Finishing processes include:
Die Cutting: The process of sharp knives cutting large quantities of patterns or shapes out of material. Works like a cookie cutter! -
used especially for stickers
Laminating: Covering a print in a thin plastic cover - strengthens the design and protects the image
Embossing: Process in which images or patterns (usually logos) are pressed into a material - the image will be raised against the
surface
Debossing: Opposite of embossing - debating presses a logo into the surface of a material so it is sunkenQuestion 6
(15 marks)
Materials and
ComponentsMaterials:
Part of a design specification for a product will be the consideration in the choice of material. Common considerations for graphic products will
be a materials weight, density, strength, ease of printing, flexibility and quality . Below is a table of the most commonly used material for
graphic products.
Material Advantages Used for
Newsprint Lightweight, excepts all types of ink. Newspapers
Cardboard Cheap, rigid, good printing surface, widely Packaging, cartons and boxes
and easily recycled.
Whiteboard Bleached surface, very strong, excellent for Book covers, quality packaging
printing.
Duplex board Cheaper than solid white board, provides and Food packaging
alternative textured surface for printing.
Paper: A4 is usually used for business stationery, brochures, booklets etc.
A5 is commonly used for smaller items such as leaflets/flyers etc. Foam board:
A6 is the international postcard size. A lightweight as easily printed material used
A7 for labels etc. most commonly for mounting photographic
A8 for business cards work. It is widely available, easily cut and
cheap/
Corrugated plastic:
A lightweight, strong and durable material
used in packaging delicate products or used
as a storage component.
Styrofoam
A lightweight, buoyant and insulated material used for
packaging, modelling and packing.Typography and font families.
The anatomy of type –
Distinguishable features between font families:
• Based on hand lettering . • Based on hand lettering.
• Always has SERIFS. • Never has SERIFS.
• Based on hand lettering with a pen, brush,
Lowercase serifs always at an angle. • Often available ‘extended’ & ‘condensed’.
• pencil or technical pen. Can use connected
Thick and Thin parts to letters. • No thick and thin parts to letters.
or unconnected lettering.
Typography terminology:
• Kerning – moving the letter to make them
easier to read by putting them into
• Vertical stress, cold & elegant. proportion with each other.
• Always has SERIFS. Easy to identify. They are so distinctive that • Leading – the space between the lines.
• Serifs always thin & horizontal. their use is limited. Often only available as • Tracking – spacing between the letters.
• Thick and Thin parts to letters. uppercase and only work well when bigger (Do not confuse with kerning)
than 36pts.22
Question 7
       (15 marks)

Tools, Equipment and
        Making
Types of production:
All aspects of production are directly affected by the number of products needing to be produced. When a graphic product is industrially
produced, part of the product specification will be the quantity and someone, more likely the designer, will need to make decision on the most cost
effective way to produce the product to the expected standard. Below is a chart detailing the three main types of production:
One of production Batch production Mass/Continuous
+ Can product tailor-made products. - Involves a high degree of planning between + High volume of production means products
batches. are produced more cheaply.
- Requires highly skilled workers and a - Requires a range of different skills and + Needs one set of machines to produce
range of machines. machines for different batches. standardised products.
+ Very flexible process. + Quite flexible – changes easy to make. - Inflexible – changes are difficult to make
once production starts.
- Labour intensive. - Expensive to set up + Few workers required but machinery
intensive.Question 8
(15 marks)
ICT, CAD, CAM, Systems
and ProcessesKey Terms Duplex Printing: This is when a printer can automatically print on both sides of a sheet of paper. Printers without this capability would only be able to print on one side of the paper. ________________________________________________________________________________________________________ CAD: Computer Aided Design - this means computer programmes or software that help in the design process and make the design process easier. Examples of CAD are: Adobe Photoshop, Adobe Illustrator, 2D Design and SketchUp. Advantages - Can be more accurate than hand-drawn designs - it reduces human error. - You can save and edit ideas, which makes it easier and cheaper to modify your design as you go along. - You can modify existing ideas, which saves time. Disadvantages - The software itself can be expensive so initial costs are high. There are free software packages though. - Staff need to be trained how to use the software, which also adds to costs. - Requires a PC. ________________________________________________________________________________________________________ CAM: Computer Aided Manufacture - this means machines that create or make products for you with an input from a computer or Computer Aided Design software. Examples of CAM are: vinyl cutters, laser cutters and 3D printers. Advantages - In large-scale production, the results are consistent (always the same). - Enables very high accuracy levels in large-scale production. - Usually speeds up production of low-volume products. Disadvantages - The software itself is expensive so initial costs are high. - Can be slower than traditional methods for one-off or low-volume production. - Staff need to be trained how to use the software and machinery, which adds to costs.
Computer Aided Design (CAD)
CAD Package           Type of          Used for                 Advantages of            Disadvantages of
                      Software                                  CAD                      CAD
Adobe Photoshop,      Image            - Changing/editing       - Can be more            - The software itself
Microsoft Paint       manipulation       photographs              accurate than            can be expensive so
                                       - Made up of pixels        hand-drawn               initial costs are
                                       - Produce bitmap           designs - it reduces     high. There are free
                                         images                   human error.             software packages
                                                                                           though.
Adobe Illustrator     Vector Drawing   - Illustrations          - You can save and
                                       - Drawings from scratch    edit ideas, which      - Staff need to be
                                       - Produce vector           makes it easier and      trained how to use
                                         images                   cheaper to modify        the software, which
                                                                  your design as you       also adds to costs.
                                                                  go along.
Adobe InDesign,       Page Layout      - Layout of magazines                             - Requires a PC.
Microsoft Publisher                      and newspapers         - You can modify
                                       - Allows for consistency   existing ideas,
                                         on pages in a            which saves time.
                                         document
                                       - Several people can
                                         edit at the same time

Adobe                 Web Creation     - Creating webpages
Dreamweaver                              without the need for
                                         coding
Computer Aided Manufacture (CAM)
CAM Equipment Used for Set Up Advantages of Disadvantages of
CAD CAD
Flat Bed Scanner - Transferring drawn - Place document into - In large-scale - The software
images onto a scanner production, the needed to run
computer for - Import scan to the results are CAM equipment
editing computer at high consistent (always itself is expensive
- importing images in resolution the same). so initial costs are
to a computer - Edit/finish scan on CAD high.
software - Enables very high
accuracy levels in - Can be slower than
Digital Camera - Taking photographs - Turn on camera large-scale traditional
of products - Adjust settings production. methods for one-
- importing depending on light off or low-volume
photographs on to - Adjust zoom depending - Usually speeds up production.
the computer for on subject distance production of low-
editing - Take photograph volume products. - Staff need to be
- import into computer trained how to use
for edit/print the software and
machinery, which
Printer - Printing images or - Ensure printer has
adds to costs.
documents out on paper
to paper - Send document to
printer
- Take physical copy
- Finish if necessaryFile Formats
File Format Name Description Usually Used For
.JPG - To save and compress bitmap files - Saving images or documents ready for
- Collection of images or a design print
will be compressed into the same
file
.GIF - To preserve transparency in an - Creating moving images/‘mini videos’ for
image and for animation uploading to the web
- Gif files are a set of moving images - Generally used on blog sites such as
Tumblr
.DXF - Used to save and transfer CAD files - Taking a file from a CAD software like
ready for use on CAM equipment Sketchup/Illustrator ready to print on a
such as vinyl cutter or laser cutter piece of CAM equipment
.PDF - Used to make transferable - Important documents that you don’t want
documents using Vector and easily edited
Bitmap and text elements. - Very high quality print files
.HTML - Used for saving images in this - Web images saved at a small file size so
format so they can be uploaded to they load on the web quickly
the web at a small file size
.MPEG - Used to save videos to so they can - Movies/videos
be viewed on different computersOrthographic Drawing Orthographic drawing is a method of drawing a three dimensional object at different angles. Normally three views are drawn. These are a view from the front, a view from the side and also one from above (called the plan view). The front view has been drawn first because it has most of the detail and the side view is drawn next. Last the plan view is drawn directly above the front view. This style of orthographic drawing is called THIRD ANGLE ORTHOGRAPHIC DRAWING. This system of orthographic drawing is used around the world and is the standard for designers
Drawing styles:
As a basis for your understanding of drawing styles you will need to be able to answer the following questions about each:
• What are the key features of this drawing style?
• Where is this style of drawing ordinarily used?

        Isometric projection                                                    Perspective projection
                                                                                                     Horizon Line

        The large angle is 60°. The small angle is 30°.                          Vanishing point 1                      Vanishing point 2
        Notice that the two angles together add to a right angle (90°).
        Three sides of the object can be seen, giving a realistic
                                                                                • Both sets of horizontal lines go to the vanishing points
        impression.
                                                                                  giving a more realistic project of an object.
                                                                                • Use to give accurate prospective of products during
                                                                                  design stages.
        Perspective projection                                                  Planometric projection
                                                  Horizon Line

                                       Vanishing point

        •   One set of horizontal lines goes to a vanishing point.
        •   The other set remain horizontal                                     • Used by architects and interior designers as they are based on
        •   Vertical lines remain vertical.                                       accurate 2D plans.
        •   Often used to given artistic impression of interiors.               • All measurements are true or scaled equally.
Drawing styles:
As a basis for your understanding of drawing styles you will need to be able to answer the following questions about each:
• What are the key features of this drawing style?
• Where is this style of drawing ordinarily used?
Sectional drawing:
Assembly drawing:
• Section or cross section drawings show a product as if it has
been sliced in half. The imaginary cut is called a section plane
which is sometimes represented by a line consisting of long
and short dashes.
• An exploded drawing shows the parts separated, but in the correct relationship
for fitting together. Exploded views are usually drawn in 3D, as illustrated.
• An assembly drawing shows how parts of a product fit together. They are often
used to show how to assemble parts of model kits and flat-pack furniture.Remember… 1. Keep calm - you know the answers! 2. Don’t question yourself - if you’re not sure go with your gut instinct 3. Answer every question even if it’s just an educated guess - leaving it blank will get you zero - an attempt may get you a mark! 4. Be confident in your own ability
You can also read