Designing Lively Presentations using Prezi - by: Charina Ong Centre for Development of Teaching and Learning National University of Singapore
←
→
Page content transcription
If your browser does not render page correctly, please read the page content below
[   Designing Lively Presentations
                        using Prezi               ]

                                       by: Charina Ong
      Centre for Development of Teaching and Learning
                       National University of Singapore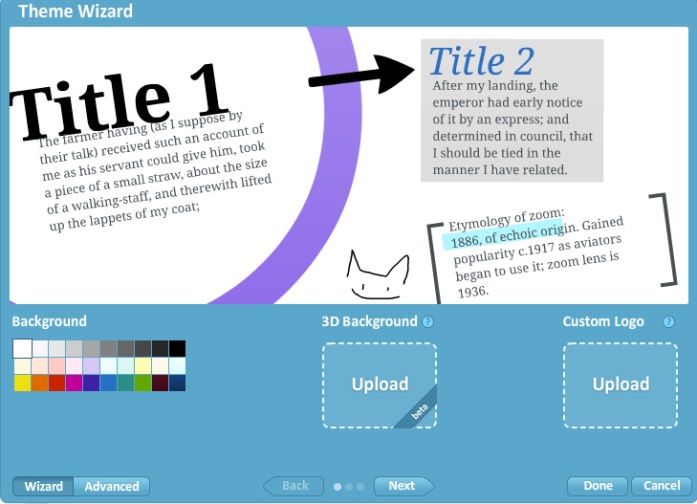
Table of Contents
    About the Workshop....................................................................................................i
    Workshop Objectives ...................................................................................................i
    Session Prerequisites ...................................................................................................i
    What is Prezi? .............................................................................................................1
    How is Prezi different from PowerPoint? .....................................................................1
    Getting Started with Prezi ...........................................................................................1
    Creating New Presentation .........................................................................................2
    Exploring the Prezi Interface .......................................................................................3
    Inserting Content ........................................................................................................4
    Inserting Media into your presentation .......................................................................5
    Media Formats to Use......................................................................................................... 5

    Editing Content with the Transformation Tool .............................................................6
    Using the Transformation tool to edit frames: ................................................................... 6
    Using the Transformation tool to edit text boxes: ............................................................. 6
    Rotating Objects.................................................................................................................. 7
    Cropping Images ................................................................................................................. 7

    Grouping Content .......................................................................................................7
    Importing PowerPoint Presentation ............................................................................8
    Setting your Presentation Path....................................................................................8
    Creating/Editing a Path ....................................................................................................... 8
    Rearranging the order of the Path ...................................................................................... 9
    Deleting Path Points............................................................................................................ 9

    Customizing a Theme ..................................................................................................9
    Viewing the Presentation .......................................................................................... 10
    Saving your Presentation .......................................................................................... 10
    Downloading a Portable Prezi........................................................................................... 10
    Exporting Presentation as PDF.......................................................................................... 10

    Sharing your Presentation ......................................................................................... 11
    Changing the Privacy Settings ........................................................................................... 11

    Prezi Update ............................................................................................................. 11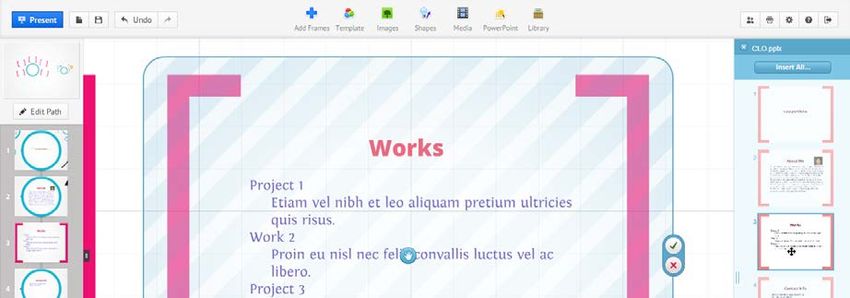
About the Workshop
Are you looking for a tool to create engaging presentations? Can you imagine creating a
presentation that doesn’t include slides? This hands-on workshop provides an introduction to
Prezi, an online, flash-based presentation tool that uses “zooming canvas” which allows you to
easily focus on the big picture while being able to zoom in on the details; create a path through
different objects and frames to represent the order of the information to be presented; and
view your presentation in either a browser window or download to show it without an Internet
connection.

Workshop Objectives
By the end of this workshop, participants should be able to:
    1. Be familiarized with Prezi interface and functions
    2. Create an engaging presentation
    3. Import files into the presentation (text, shapes, images, videos)
    4. Create a path for the presentation
    5. View the finished presentation online/offline
    6. Invite participants to join your presentation

Session Prerequisites
There is no prerequisite skill required for this workshop; however, it would be better if
participants are comfortable with browsing the Internet and using computers to create
presentations.

                                                                                                    i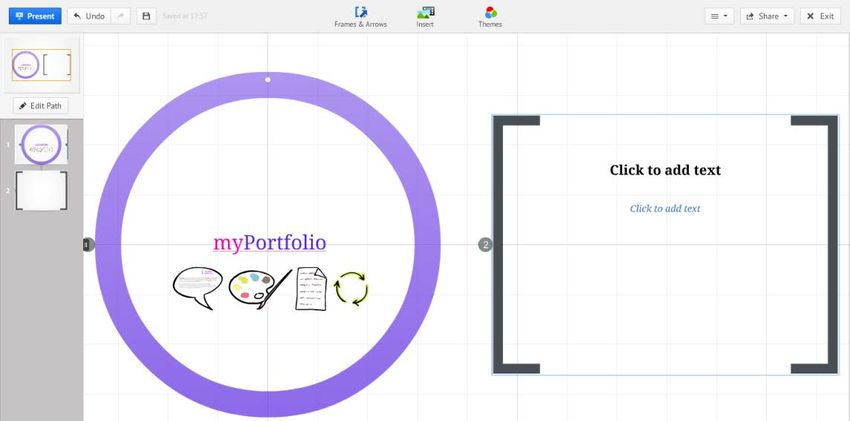
What is Prezi?
Prezi offers a way to create presentations that engage the audience in an interesting and
nontraditional way. It is a virtual whiteboard that transforms presentations from monologues
into conversation: enabling people to see, understand, and remember ideas. The application
allows you to zoom out to see the bigger picture and zoom in to see the details. The 3-
dimensional canvas is a virtual space that allows you to delve deeper and pan wider to broaden
the conversation.

In the article “Understand more, Remember better: Learning to use Prezi in the 21st century” by
Joseph Perkins, he mentioned that the advantage of this canvas approach is that it enables the
audience to see the big picture and make more meaningful connections between ideas and
concepts.

How is Prezi different from PowerPoint?
The table below shows the comparison of Prezi and PowerPoint:
 PowerPoint                   Prezi
 Computer based                  Web based
 Linear navigation               Non-linear navigation
 Functions found on tabs         Functions found on the Editing wheel
 Multiple printing options       Limited printing options

Getting Started with Prezi
The first step to get started is to sign up for an account. All teaching staff and students can
enjoy the educational version of Prezi for free. It includes 500MB space; you can share your
presentation with your peers; and set the privacy settings of your presentation.

   1. Go to https://prezi.com and click the Sign up button.

   2.   Select Student and Teacher Licenses.
   3.   Click the Enjoy Edu button.
   4.   Enter a valid institutional email address and then click Continue.
   5.   Enter your personal details.
   6.   Click the box beside I agree to the terms and use and click Sign up.

                                                                                                  1
7. You will be then taken to the home page where you can see the main navigation.
See the prezi Watch Prezi’s Browse through a
presentations instructional videos collection of public
that you have and documentation presentations to get
ideas and inspiration This is where you
can edit your
account settings,
view your profile
page, or log out.
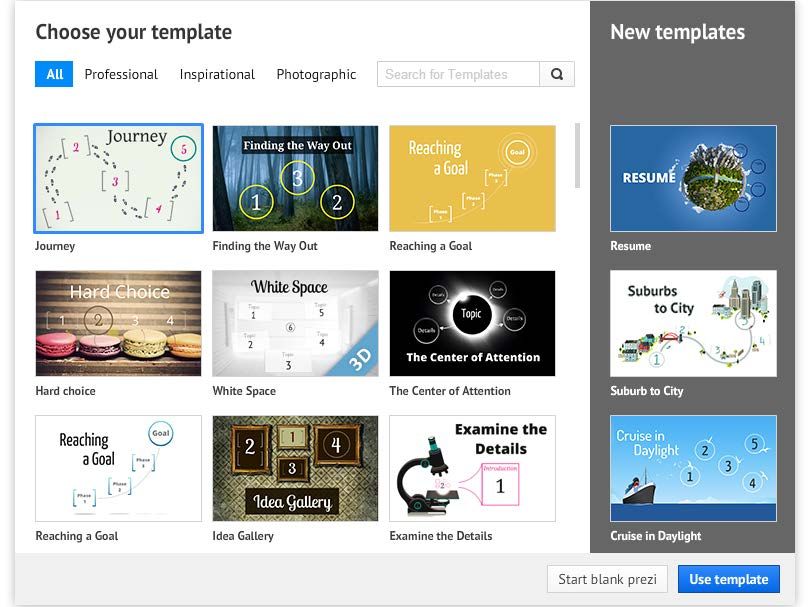
Creating New Presentation
1. Click to launch the Prezi editor.
2. Various design templates will be displayed on screen. You can choose a design that
matches your presentation by clicking Choose template, or you can also create a
presentation from scratch.
3. Click Start blank prezi for now.
2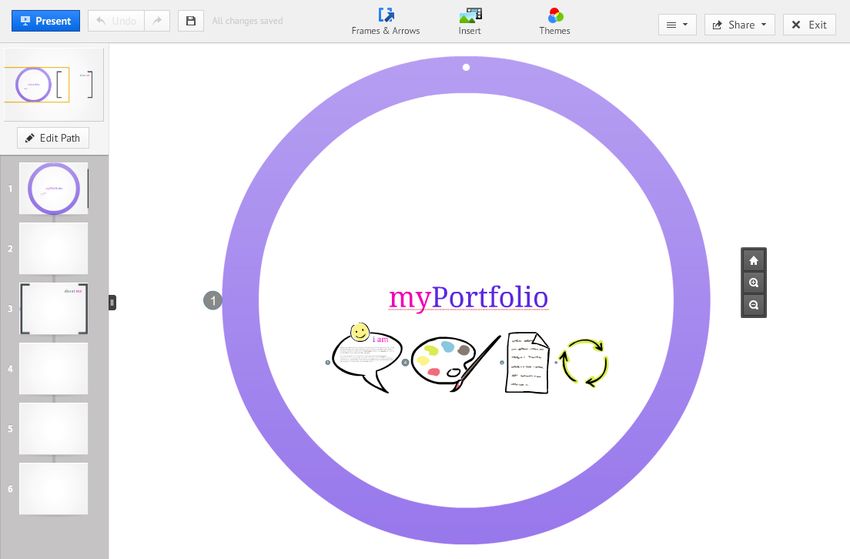
Exploring the Prezi Interface
         The Prezi editor is the very heart of the Prezi experience. It allows you to create wonderful
         zooming presentations. The key components of Prezi include:

Preview how       To undo                                                          Invite others to        To save and
                              To save your                                         view or edit your       exit your
your Prezi will   changes     prezi file                                           presentation            prezi file
look when         made
you present it

                                                 These 3 icons make up the
                                                                                               Click here to reset
                                                 navigation menu, in which you
                                                                                               your view of your
                                                 can add elements to your Prezi.
                                                                                               Prezi to show the
                                                                                               overall view of your
                                                                                               Prezi.

                                                                                                       To zoom in and
                                                                                                       out the
                                                                                                       presentation

                  Tip: You can use the scrolling wheel of your mouse to zoom in and out of your Prezi.
                  Also, you can quickly create a text box by double clicking anywhere on the page.

                                                                                                                      3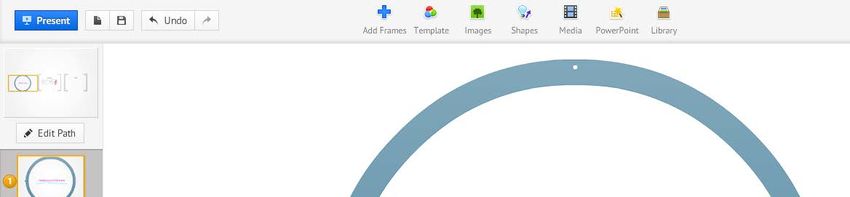
Inserting Content
Contents such as text, shapes, images, and other media can be directly inserted into the canvas.
These objects are usually placed inside a frame. A frame allows you to group objects together.

To insert a frame:
    1. Click Frames and arrows on the top menu.
    2. Select a frame from the list.

                                                                  Creates circles, brackets, and
                                                                  squares to use as frames for the
                                                                  information that will be included in
                                                                  your Prezi (what would traditionally
                                                                  be “slides” in a PowerPoint).

                                                                  “Invisible Frames” comes into play
                                                                  when you are making paths.

   3. An additional slide has been created on the left sidebar.

   4. You can start typing the text or add any content inside the frame.

To insert a shape:
    1. Click on the frame where you want to insert a shape.
    2. Click the Shapes button on the top menu.
    3. Select a shape or a symbol to insert.
    4. Draw the shape on the canvas.

                                                                                                   4
Inserting Media into your presentation
Prezi allows you to include a variety of media to make your presentations really
stand out from the usual boring slide shows. You can use custom video you have
created, audio, or photos and sketches.

Media Formats to Use

Below is a list of the media formats you can upload to Prezi:
   • Any image in a Vector, JPG, PNG or GIF format: Maximum size for an uploaded image is
       2880 x 2880 pixels.
   • Video: FLV or F4V
   • Audio: You need to convert your audio file into an FLV format.
   • Images, charts, spreadsheets, graphs and any content that can be converted to a PDF
       and uploaded to Prezi: For example, you can take an Excel spreadsheet and convert it to
       a PDF and upload it.
   • YouTube Videos: Cut and paste the URL of the video into a text box and the video will
       play within Prezi as long as you are connected to the Internet.

To insert an image into your presentation:
    1. Click the Images button on the top menu.
    2. Specify the location of the file, either from your local machine or Google.
    3. Specify the filename and click Open.
    4. Click and drag the picture to change its position.

To insert a video:
    1. Click the Media button on the top menu.
    2. Specify the location of the file, either from your local machine or Youtube.
    3. Specify the filename and click Open.
    4. Click and drag the object to change its position.

To add a background music:
    1. Click Insert > Add background music.
    2. Locate the music file from your local machine and click Open.
    3. The music will play on Present mode.

To add voice-over to your presentation:
    1. You need pre-record the voice over to go along with your presentation.
    2. Select a slide from the sidebar and then click Insert> Add voice over to path.
    3. Locate the audio file from your local machine and click Open.
    4. Click the Play button beside the slide on the sidebar to listen to the file. The audio will
       automatically play on Present mode.

                                                                                                     5
Editing Content with the Transformation Tool
Manipulating content is done using a simple set of controls called the Transformation Tool.
To edit the content:
1. Click on any object on your Prezi canvas to bring up the
Transformation Tool.
Using the Transformation tool to edit frames:
1. Click on a frame to display all the editing options for that frame.
Increase image size
Drag to move the image
Use the corner Decrease image size
points to resize or
rotate the image
Using the Transformation tool to edit text boxes:
1. Click on any text on your canvas to display all the editing options for that text box.
Delete text
Write and
format text
Use the corner
points to resize or
rotate the image
6Rotating Objects
1. To rotate any object on your presentation canvas, simply click
on it to bring up the Transformation Tool and then hover your
mouse pointer over one of the four corners. You will see your
pointer change to an arrow icon, if you move your mouse away
from the object you have selected, you will see the straight
arrow change to a curved one. This means you are ready to
rotate your object.
2. Click and drag when you see the curved arrow icon to rotate
the object.
Cropping Images
1. To crop an image, simply click on the picture and
select Crop Image. This will bring up the image
cropping tool.
2. From here you can drag anyone of the four
corners to crop your image. When you are
happy click away from the image and you will
see the changes take effect.
Grouping Content
Multiple objects can be easily grouped together in your presentation. This allows you to select
objects regardless of their position within your canvas, which is particularly useful when you
want to edit the position of content that is in different frames.
To group content:
1. Select an object you wish to add to a group, then hold down
the CTRL key and click on all other objects you wish to add
to the group. Alternatively, you can select all of the content
in a certain area by holding the SHIFT key and then dragging
around the objects you wish to group together.
2. Click the padlock icon to group the objects.
To ungroup the objects:
1. Select the group, then click the unlock symbol or right click and select Ungroup.
7Importing PowerPoint Presentation
You can import any existing PowerPoint presentation into Prezi.
1. Click the Powerpoint button on the top center menu.
2. Click on Select File and choose the ppt or pptx file to import.
3. A preview of the slides will appear on the right side of the screen.
4. Drag your slides from the sidebar to the canvas, or click Insert all. You can also choose to
add a path between them.
5. Click the check (√) button to confirm.
Setting your Presentation Path
When you are presenting on stage, it would be helpful to have a narrative that carries your
audience through your presentation. With the Path tool, you can present the elements in your
presentation in an order that you set.
Creating/Editing a Path
1. In the Edit mode, zoom out until you see the objects you wish to add to the path.
2. Click Edit Path on the left sidebar.
3. Click on the objects in the order you wish to present them.
4. A thumbnail will be added to the Left Sidebar each time that you click on something.
8Rearranging the order of the Path
1. Drag and drop your thumbnails within the sidebar to rearrange the order of your path.
Deleting Path Points
1. Hover over the top right edge of a
thumbnail to bring up a red "X" button.
Click on it to remove a path point.
2. Select Clear all to remove all path points from your narrative.
Customizing a Theme
You can easily customize the theme you use for your presentation. This includes colour scheme,
fonts, and background.
1. Click the Template button on the top menu.
2. Click Customize current theme.
3. Decide whether you want to use a background colour or image.
4. To change the default background colour, simply select a colour from the list.
5. To change the background to an image, click Upload and choose the file that you want
to use as your background.
6. You can also specify whether you want to include a logo into your presentation.
BG image
BG colour
logo
7. To change the colours of your text and other elements, click Advanced.
8. Specify the properties below:
9. Click Done. Changes will appear on screen.
9Viewing the Presentation
1. Click Present to view your presentation.
2. Use the left and right arrows that appear at the bottom of your screen in the Present
mode. You may also use the left and right arrows on your keyboard, to move back and
forth through your presentation.
Saving your Presentation
1. Click the Save button on the top menu to save the changes made to your presentation.
Downloading a Portable Prezi
A portable prezi is a downloaded version of your presentation, which you can view offline. You
can use it to present in a setting where you do not have access to the internet. It contains a
non-editable version of your prezi, as well as software for Windows and Mac that will play your
presentation.
To download offline version of your presentation:
1. Select your presentation file from the Prezi library and then click Download.
2. Choose a format and click Download.
Exporting Presentation as PDF
To export a prezi into a PDF file:
1. Click the printer icon located at the upper-right corner of
the editor window.
2. It will take a few seconds for Prezi to convert the path
steps into pages. When it is ready, you will be prompted
to save your prezi as a PDF file.
3. Specify where you want to save your file.
10Sharing your Presentation
By default, presentations made in Prezi will always be available for others to view online. You
can also choose to make a prezi available for others to reuse. This means that anyone can use
the content in your prezi for themselves.
To share your presentation:
1. Select your presentation from the Prezi library and then click the Share button.
2. Select your desired option: viewing or embedding the presentation to a blog or
website).
Changing the Privacy Settings
Prezi allows you to specify whether you want to make the content of your presentation
available to the public or you could set it to private.
To change the privacy settings of your presentation:
1. Select your presentation from the Prezi library and then click the Private button.
2. Choose the privacy state.
Prezi Update
With the new version of Prezi, you can brainstorm
and co-create a presentation with your group
members at the same time. You can opt to work
separately or in real time so you can see others'
edits instantly.
To learn more, visit:
http://prezi.com/manual/collaboration-tutorial/
11You can also read