Digital Video Production + Movie Making
←
→
Page content transcription
If your browser does not render page correctly, please read the page content below
Digital Video Production + Movie Making
              Interactive Technology in Education Conference 2007

                       Location: SW Innovation Centre, UOIT

Presented by Lesley Adams, Fred Cho, Sasha Geukjian & Marta Sobczak

  UOIT ITEC Conference 2007 | L. Adams, F. Cho, S. Geukjian & M. Sobczak | Page 1 of 12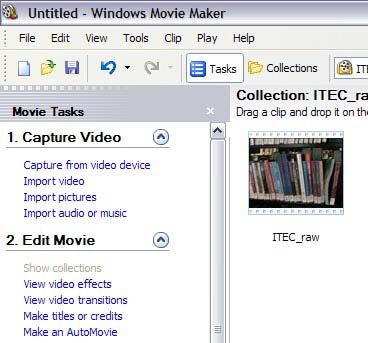
Windows Movie Maker Environment – Overview

     Overview
     The main components and functions of Movie Maker are labeled in the following diagram:

                                                                                                                      Preview
                                                                                                                      Monitor
                                                                                                                      – previews
                                                                                                                      movie clip
                                                                                                                      effects and
                                                                                                                      transitions

                                                                                                                     Take Picture
                                                                                                                     – takes a
                                                                                                                     snapshot of
                                                                                                                     the current
                                                                                                                     frame
   Toolbar
                 Movie Tasks             Collections Pane          Movie Task and               Previous/         Clip Splitter
Menu Bar                                                           Collections Buttons          Next Frame        – splits a clip
                 Pane – shortcuts        – displays video or
                 to movie task           audio clips you have      – toggles between task       Buttons – sets    into 2 clips at
                 tools                   imported                  options and collections      video to an       the current
                                                                   display                      approx. time      frame

     Timeline/Storyboard
     There are two different views to choose from when displaying your movie clips for editing. The views can be
     changed by toggling between the “Show Storyboard” and “Show Timeline” buttons. Audio can only be added in
     the “Timeline” view.

 Video clip
 and effect
 drop area                                                                                               Timeline View – shows
                                                                                                         a timeline of the movie

                                                                                                         Show
                                                                                                         Storyboard/Timeline
                                                                                                         Button

                                                                                                         Storyboard View – shows
                                                                                                         a storyline of the movie

              Zoom Timeline In/Out – allows you to view                 Video clip transition
              your project in greater or less detail for editing        drop area

                   UOIT ITEC Conference 2007 | L. Adams, F. Cho, S. Geukjian & M. Sobczak | Page 2 of 12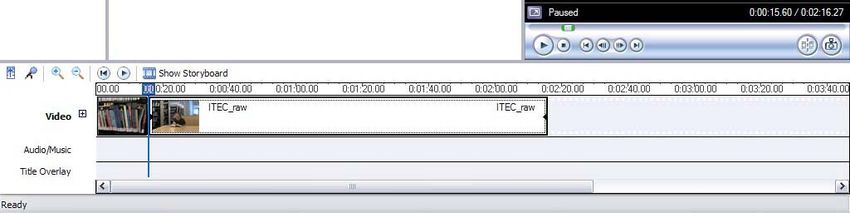
Windows Movie Maker – Instructional Guide

1. Capture Video
A capture device is a type of hardware that transfers video to the computer
Audio, video, and image files can be imported into Movie Maker                                       Expand/
                                                                                                     Collapse
Click on the expand/collapse button to the right of the Capture Video
title in the Movie Tasks pane to show the variety of options available.

To Capture Video from a Video Camera:

    1. Connect video device to computer through USB or Firewire
       cable.
    2. Select Capture from video device form the options listed.
       (Note: if the computer has not yet detected the video device or
       the video device is not plugged in properly, a window will pop
       up with an error message saying no device was detected. If this
    occurs, you may need to wait longer while the computer configures,
    and restart movie maker)
    3. Once the device is detected, Movie Maker will guide you
       through a series of steps to capture and determine the quality
       using a Video Capture Wizard.
    4. Once the video is captured it will appear in your collection pane and you can now drag it to the timeline
       for editing.

To Import Video:
This refers to importing video already stored on your computer or storage device such as a jump drive.

    1. Select Import Video from the options listed.
    2. A window will appear. Select the video you want to import from the location where it is being stored.
       (Note: you cannot import video directly from video device; you must capture the video using the steps
       listed above. Not all video formats are compatible)
    3. Once the video is selected it will appear in your collection pane and you can now drag it to the timeline for
       editing.

To Import Pictures:

    1. Select Import Pictures from the options listed.
    2. A window will appear. Select the picture(s) you want to import from the location where it is being stored.
    3. Once the pictures are selected they will appear in your collection pane and you can now drag it to the
       timeline for editing.

To Import Audio or Music:
Note: audio can be added overtop of music

    1. Select Import audio or music from the options listed.
    2. A window will appear. Select the audio or music track you want to import form the location where it is
       being stored.
    3. The audio or music track will appear in the collections pane. Drag and drop it into the timeline where you
       would like it played.

To Split Video Clips:
Note: Video clips can be split into an unlimited amount
of individual clips including still images

    1. Select the video clip you wish to split. You can split video in the timeline or from the collection pane.

           UOIT ITEC Conference 2007 | L. Adams, F. Cho, S. Geukjian & M. Sobczak | Page 3 of 12
2. Play the video clip to the desired location you
       want to split, and click the Split button located on
       the right hand side of the monitor.
    3. The new clip will appear in the collections pane or                                                              Split
       on the timeline. In the collection pane you can
       Right click the clip and rename the clip.
    4. Drag and drop the clip into the timeline when you
       have obtained the desired clip.

To Make a Picture from a Running Video:

    1. Select the video clip you wish to obtain
       the picture from by selecting it from the
       timeline or collections pane.
    2. Play the video clip and click the Take
       Picture button located on the right hand
       side of the monitor. You may play the
       video clip frame by frame by using the
       slow play buttons in the toolbar of the
       monitor.
    3. Once you take the picture, it will appear in the collections pane.                                      Take
    4. Right click the picture and rename it an appropriate name.                                             Picture

2. Edit Movie

Click on the expand/collapse button to the right of the Edit Video title in the Movie Tasks pane to show the
variety of options available.

To Add Video Effects:
Video effect – a special effect added to a video clip that will remain for the entire play time of the clip

    1. Select View Video Effects from the options listed.
    2. A variety of options will become available and listed in the
       collections pane.
    3. To view the effect, select the effect by clicking on it once
       and click the play button on the monitor. This will preview
       the effect.
    4. To add the effect to a clip, click and hold the effect, drag
       and drop it over the clip in the timeline.
    5. To delete the effect from the movie, click on the effect in
       the timeline and click delete on the keyboard.

To Add Video Transitions:
Video transition – controls how the movie plays from one clip to the next
    1. Select View Video Transitions from the options listed.
    2. A variety of options will become available and be listed in the collections pane.
    3. To view a transition, select the effect by clicking on it once and click the play button on the monitor. This
        will preview the transition.
    4. To add a transition between clips, click and hold the transition, drag and drop it over the clip in the
        timeline.
    5. To delete a transition, click the transition in the timeline and click delete on the keyboard.

            UOIT ITEC Conference 2007 | L. Adams, F. Cho, S. Geukjian & M. Sobczak | Page 4 of 12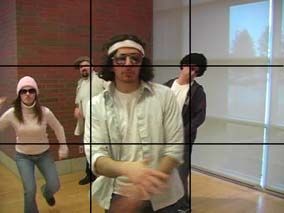
To Add Titles:

   1. Select Make Titles or Credits from the options listed.
   2. A variety of options will become available and listed beside the monitor.

To add a title at the beginning of the movie:      To add a title before, on, or after a selected clip:

   3. Select Add title at the beginning of the          4. Select the clip where you want to add the
      movie.                                               title.
   4. Type in the title for the movie. It will          5. Select the option (title before, on, or after)
      automatically preview on the monitor.             6. Type in the title. It will automatically preview
   5. The title animation, text font and colour            on the monitor.
      can be changed by selecting these                 7. The title animation, text font and colour can
      options below the More Options title.                be changed by selecting these options
   6. Once you are finished, select Done, add              below the More Options title.
      title to movie.                                   8. Once you are finished, select Done, add
                                                           title to movie.

To Add Credits:

   1. Select Make Titles or Credits from the
      options listed.
   2. A variety of options will become available
      and listed beside the monitor.
   3. Select Add credits at the end of the movie.
   4. You will see a table with two columns. Text
      may be written in both columns, however
      their format differs. The column on the right
      will contain text that will appear larger than
      the column on the left. The text in the left
      column will appear above the text in the right
      column. Text does not need to be entered in
      both columns – if you wish to have all the
      credits appear as the same size font and the
      first and last name appear next to each other
      instead of below each other, simply enter the text in the left column only and leave the right column blank.
   5. Type in the credits for the movie. It will automatically preview on the monitor.

           UOIT ITEC Conference 2007 | L. Adams, F. Cho, S. Geukjian & M. Sobczak | Page 5 of 12
6. The animation, text font and colour can be changed by selecting these options below the More Options
       title.
    7. Once you are finished, select Done, add title to movie.

3. Finish Movie

To Save Your Movie to Your Computer:

    1. Click on the down arrow to the right of the
       Finish Movie title in the Movie Tasks pane. A
       variety of options become available.
    2. Select Save to my Computer.
    3. A window will appear allowing you to type in a
       name for your movie and a location on your
       computer where the movie will be saved.
    4. Click Next.
    5. A window will appear allowing you to choose a
       specific format in which to save your movie.
       The same window will also tell you how much
       room the particular format will require to save
       your video and how much room is available on
       your computer.

Making Minor Changes in the Timeline

•   To lengthen or shorten the playtime of a clip, picture, title, effect, transition, or audio track, select the
    component from the timeline. A black-coloured box will appear around the selected component. At the right-
    hand side of the box a small arrow will appear. When the cursor is placed on the black arrow, a red double-
    sided arrow appears, by clicking and holding it, you can lengthen or shorten its play length.

           UOIT ITEC Conference 2007 | L. Adams, F. Cho, S. Geukjian & M. Sobczak | Page 6 of 12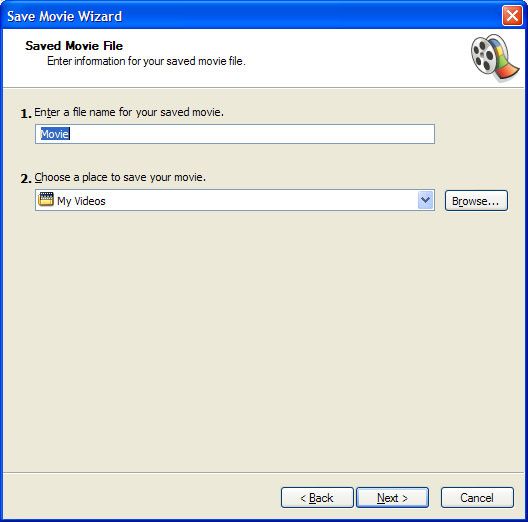
Producing the Video
Importing Media
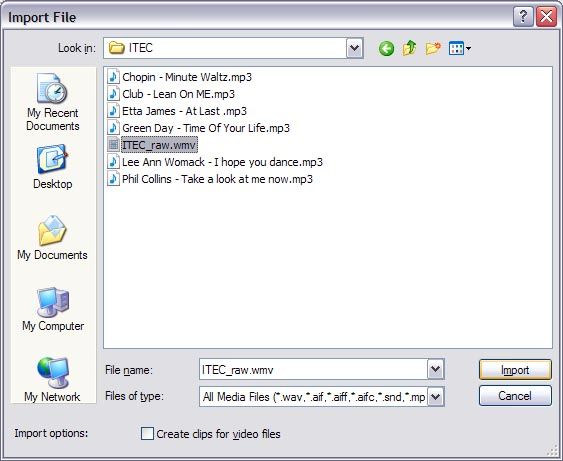
1. Open the File menu and select Import into
Collections. Open the ITEC folder located on
the Desktop.
2. Click once on ITEC_raw.wmv to select it.
Make sure Create clips for video files is
unchecked.
3. You should now see an icon of the clip in
the Collections pane. Click and drag the icon
down to the Timeline.
Cutting the raw video
4. Click the Play button on the Timeline/Storyboard. Stop the video at approximately 0:15.
5. Using the Previous/Next Frame buttons on the Monitor, set the time to approximately 0:15.60. Split the clip at
this point using the Split Clip button on the Monitor. You should now have two clips on the Timeline or
Storyboard.
1 2
6. Continue through the raw video, splitting the clip at approximately the following points: 0:19.33, 0:50.27,
0:53.35, 1:07.27, 1:32.80, 2:00.7.
7. There should now be nine separate clips in the Timeline/Storyboard. Edit out the unwanted clips by selecting
the clip in the Timeline/Storyboard and hitting the Delete key on the keyboard.
UOIT ITEC Conference 2007 | L. Adams, F. Cho, S. Geukjian & M. Sobczak | Page 7 of 12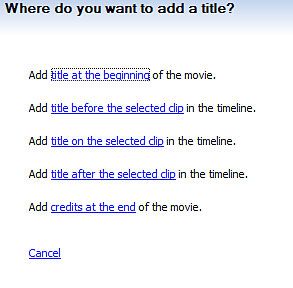
8. Delete the following unwanted clips:
    • The short clip (about 3 sec) of Lesley at the desk.
    • The next short clip (about 3 sec) of Marta fixing her hair.
    • The fourth clip of Marta entering the room with outtakes (about 25 sec).
    • The second last clip of Marta and Lesley at the desk with the outtake (about 19 sec).

***There should now be FIVE clips totalling a time of about 1:24.

Adding Transitions

9. Click the Tasks Button on the toolbar to show the Tasks pane.
Under Edit Movie, select View video transitions.

10. Fade In: Right-click on the first clip and select Fade In. Rewind
the Timeline and click play to preview the fade.

11. Wipe: Scroll down to the bottom of the Video Transitions pane. Click and drag the Wipe, Normal Right to the
Timeline/Storyboard, positioning it between the clips where the transition is wanted.
A dark blue line appears between the clips when it is in the correct position.

12. Reveal: Select the Reveal Down transition and drag between the second and third clips. Click and drag the
third clip to the left to increase the transition time. A blue block and triangle will appear indicating the transition
time.

13. Fade: Select the Fade transition and drag it between the third and fourth clips.

14. Circle: Select the Circle transition and drag it between the fourth and fifth clips.

15. Fade Out: Right-click on the fifth clip and choose Fade Out.

            UOIT ITEC Conference 2007 | L. Adams, F. Cho, S. Geukjian & M. Sobczak | Page 8 of 12
Adding Titles

16. Click the Tasks Button on the toolbar to show the Tasks pane. Under Edit Movie, select Make Titles or
Credits. Select the first clip in the Timeline/Storyboard.

17. Click Add title on the selected clip in the
timeline. Type “Plagiarism” in the upper box and “A
Public Service Announcement” in the lower box.

18. Click Done, add title to movie when finished.

19. Click Make titles or credits in the Tasks pane.

20. Click on Add credits at the end of the movie.
Type “The End” in the top row. In each of the
columns and rows below type: Teacher, Marta;
Student, Lesley; Camera, Fred. Right-click on the
credits clip and Choose Fade Out.

Adding Music

21. Open the File menu, and select Import into Collections.

22. Open the ITEC folder on the
desktop and choose the Phil Collins
music file. This file should now show
up in the Collections pane. Drag this
file to the beginning of the credits clip
in the Timeline/Storyboard. The blue
cursor should “snap” to the beginning
of the clip.

23. The audio is too long, but it can be trimmed. Scroll to the
right to find the end of the audio clip. Point the cursor to the
end of the audio clip until a red cursor with arrows appears.

24. Click and drag left with this cursor until it snaps to the end of the credits clip.

25. Right click on the music clip and choose Fade Out.

26. Adjust the volume of the audio by right-clicking on the clip and choosing Volume.

Finishing the Movie

27. Open the File menu and choose Save Movie File…

28. Depending on the intended audience, you can choose one of several different formats. For our purposes, we
will use My Computer. Click Next.

29. Type “Plagiarism” for the filename and choose the Desktop as the save location. Keep “Best quality…” and
click Next. Movie Maker will now render the video. This may take a few minutes.

30. Click Finish to watch the video (movie will automatically play in Windows Media Player).

            UOIT ITEC Conference 2007 | L. Adams, F. Cho, S. Geukjian & M. Sobczak | Page 9 of 12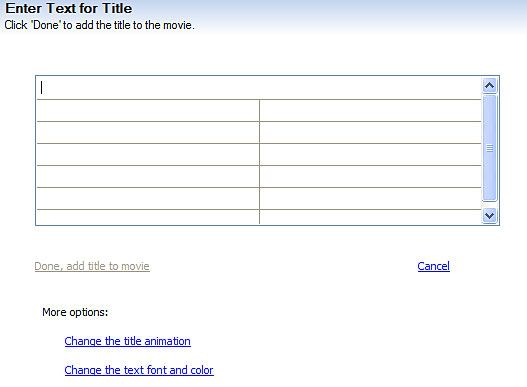
Video Techniques

Smooth, Steady, and Straight

Digital video cameras get smaller each year. As a result, they become harder and harder to stabilize by hand
because they have very little weight of their own. Trying to shoot footage by handholding causes the “shaky cam”
effect where the image jumps around in short jerks or wobbles back and forth in time with the camera operator’s
steps. This is a dead giveaway of an amateur production. You should always strive to keep your image straight so
that the horizon is level, steady so the image is not jumping around, and smooth so that camera movement is not
jerky and distracting.

                  To produce a stable and smooth picture, you must brace your arm or use a tripod. Bracing your
                  arm could mean leaning against a wall or resting your elbow on your knee or a table. The best
                  way to ensure a stable and straight shot, however, is to use a tripod. By mounting a camera on a
                  tripod, you eliminate jerky hand motions. Most tripods also have a ball level which will tell you if
                  the camera is level or straight.

                  Whatever you do, keep your image as straight, steady, and smooth as possible to make it look
                  as professional as possible.

Lighting

Lighting is difficult to get right. You can be out on location and shoot footage that looks fine as you shoot it, but
when you dump the video on the computer, you notice that many of the details you were able to see while
shooting are not there in the footage on the computer because they either washed out in white or were obscured
by darkness. Although experience is the best teacher, read and follow these few simple rules while learning the
techniques.

1. Position the subjects with the light source in front of them.

Make sure that the subjects have light bouncing off of them into the camera and
that the background is not too bright. As you can see in the figure to the right,
the background is so bright that the camera is darkening the picture to the point
that the subjects become silhouettes. There has to be more light on their faces
or they need to stand against a darker background for the camera to be able
record more facial details. A simple solution to this problem would be to put the
camera on the other side of the subjects and allow the light to bounce off the
subjects into the camera.

2. Try to shoot in the shade on bright sunny days

Direct sunlight on a bright day causes a subject to have deep shadows. The sun can cause a hot spot on the
subject and as a result cause the camera to let in less light. This will cause deeper shadows on the subject,
especially around the eyes. The use of a reflector can reflect some light back into the shadowy areas. Probably
the best solution to this lighting problem is to shoot in the shade. In the shade, the camera is not struggling to deal
with the hot spot and can let in more detail about things that are not as well lit.

3. White balance your camera when shooting indoors

Light bulbs give off light in a certain color. We are often not aware of this because our eyes and brains quickly
compensate for the different color lights we are subjected to. Cameras however do not adjust as well as humans,
and you will notice that footage shot in a gym or indoors often looks orange, yellow, or some other off color. To
counteract this problem, all cameras have a white balance. Basically, when you white balance a camera, you are
telling it what is white in a given lighting situation. However, the automatic white balance is frequently not as good
as what you can achieve manually. Not all cameras will let you manually white balance, but if your camera has
this feature, you should do it in extreme lighting situations, such as in a gym.

           UOIT ITEC Conference 2007 | L. Adams, F. Cho, S. Geukjian & M. Sobczak | Page 10 of 12
Framing
The camera operator is responsible for making constant adjustments so
that the subjects in a movie are placed in the proper position on the film.
Placing subjects or figuring out what should be in the picture is called
framing.
Framing a stationary subject
Centering every subject all the time is not very interesting. By using the
Rule of Thirds, you can make your productions more appealing to watch.
Divide your picture into thirds. Interesting elements of a picture should be
placed on those lines or at their intersections.
Framing a moving subject
Framing a moving subject is a difficult task for a camera operator. It
requires that the camera operator know where the subject is going so that
space can be created in front of the subject. The Rule of Thirds places the
moving subject on the back-third line moving toward the open third.
Ideas for Using Digital Video in the Classroom
• School tours – creating a video that helps a new student become familiar with the school
• Campaign ad – promoting a product, service, or public service announcement
• Storytelling – narrate a story and film it; students can use themselves as actors, narrators, or use props to
tell the story (i.e. puppets, Play-Doh, create a shadow-story, drawings, etc.)
• Documentary/Newscast – report on an important event related to current issues or the curriculum being
studied; students may role-play different characters
• Point of view – a video filmed from a particular point of view (i.e. shooting from the ground to represent the
viewpoint of an insect, a particular animal’s perspective, etc.)
• Educational movie – present a particular curriculum topic to represent the lesson (i.e. each student makes a
video of a specific concept and a handout that goes along with it – students then watch each video and
complete a set of handouts related to the main topic)
• How to… - a video showing a demonstration or steps to creating something
• Music video – create a music video using a karaoke version of a song and make-up your own lyrics related
to the curriculum
• Claymation/Stop Frame Animation – a frame-by-frame animation (i.e. Lego, Play-Doh, etc.)
•
•
•
•
•
•
•
UOIT ITEC Conference 2007 | L. Adams, F. Cho, S. Geukjian & M. Sobczak | Page 11 of 12Resources
The following list of resources will help guide you through the video editing process and Windows Movie
Maker atmosphere. Additional links are provided that include advanced video editing techniques and
software.
Basic Video Editing
WINDOWS USERS
Atomic Learning – Includes free tutorials on the many features of Windows Movie Maker and additional
information and techniques involved in video editing.
http://www.atomiclearning.com/moviemaker2
ITEC Web Site – Contains information about the Interactive Technology Education Conference held at UOIT as
well as extra handouts and web links.
http://education.uoit.ca/lordec/conference.html
Windows Movie Maker – FREE download/update of Windows Movie Maker for Windows XP users.
http://www.microsoft.com/windowsxp/downloads/updates/moviemaker2.mspx
Windows Movie Maker: Making Movies – Includes sample videos created using Windows Movie Maker and
information about getting started using the movie editing program.
http://www.microsoft.com/windowsxp/using/moviemaker/getstarted/possibilities.mspx
MAC USERS
Apple iMovie HD – Entry-level, full-featured standard and high definition video editing. FREE with new Macs, or
$69 (educator).
http://www.apple.com/ca/ilife/imovie/
Apple iMovie Tutorial – An 11-page tutorial that includes instructions, helpful tips, and the basics of iMovie.
http://www.apple.com/support/imovie/tutorial/
Advanced Video Editing
WINDOWS USERS
Adobe Premiere Pro 2.0 – Contains information on advanced Adobe software programs, articles and tutorials on
product use and helpful tips when using the software. More advanced video editing.
http://www.adobe.com/designcenter/tutorials/prp2it_cibexceprts/
Adobe Premiere Pro 2.0 Video Tutorials – FREE Adobe video tutorials on how to add special effects and
perform editing functions to a piece of video. More advanced video editing.
http://www.video-tutes.com/packages/Premiere.php
MAC USERS
Apple Final Cut Express HD – A more advanced video editing program than iMovie, that can be purchased for
$199 (educator). Site contains product information, training and resources.
http://www.apple.com/ca/finalcutexpress/
Apple Final Cut Pro – A professional video editing tool that costs $879 (educator). Site includes training
resources to use the program and system requirements.
http://www.apple.com/ca/finalcutstudio/finalcutpro/
UOIT ITEC Conference 2007 | L. Adams, F. Cho, S. Geukjian & M. Sobczak | Page 12 of 12Storyboard Names_____________________________ Date_________ Period______ __________________________________________________ __________________________________________________ __________________________________________________ _________________________________________ _________________________________________ _________________________________________ _________________________________________ _________________________________________ _________________________________________ _________________________________________ _________________________________________ _________________________________________ ___________________________________________ ___________________________________________ ___________________________________________ __________________________________________ __________________________________________ __________________________________________ __________________________________________________ __________________________________________________ __________________________________________________ _________________________________________ _________________________________________ _________________________________________ _________________________________________ _________________________________________ _________________________________________ _________________________________________ _________________________________________ _________________________________________ ___________________________________________ ___________________________________________ ___________________________________________ __________________________________________ __________________________________________ __________________________________________
You can also read