QUICK START GUIDE - www.dishtv.co.nz - Dish TV
←
→
Page content transcription
If your browser does not render page correctly, please read the page content below
QUICK START GUIDE

     www.dishtv.co.nz
Notes

01
Contents
Contents.............................................................................................................................
                                                                                                                               02

What’s in the Box?..........................................................................................................
                                                                                                                        03

Product Overview..............................................................................................................
                                                                                                                           04
                                                                                                                           04
Front/Back View..................................................................................................................
                                                                                                                           05
Remote Control...................................................................................................................

Getting Connected........................................................................................................
                                                                                                                       07

First Time Installation.....................................................................................................
                                                                                                                          08
Connecting the Bluetooth Remote...................................................................................        08
Why Connect to the Internet?............................................................................................  09
Select Tuning Type........................................................................................................10

Home Hub Menu..............................................................................................................       11
Mini Guide & TV Guide......................................................................................................       12
Freeview On Demand......................................................................................................          13
Android TV Apps............................................................................................................13
Audio & Subtitles................................................................................................................ 14
Settings..........................................................................................................................15

Settings..........................................................................................................................
                                                                                                                                15
Advanced Settings........................................................................................................ 16

Troubleshooting...............................................................................................................
                                                                                                                         17

Placement Tips.............................................................................................................20

Contact Us....................................................................................................................21

Warranty Information.....................................................................................................
                                                                                                                      22

                                                                                                                                02
What’s in the Box?
Please check you have all of the following in your box:
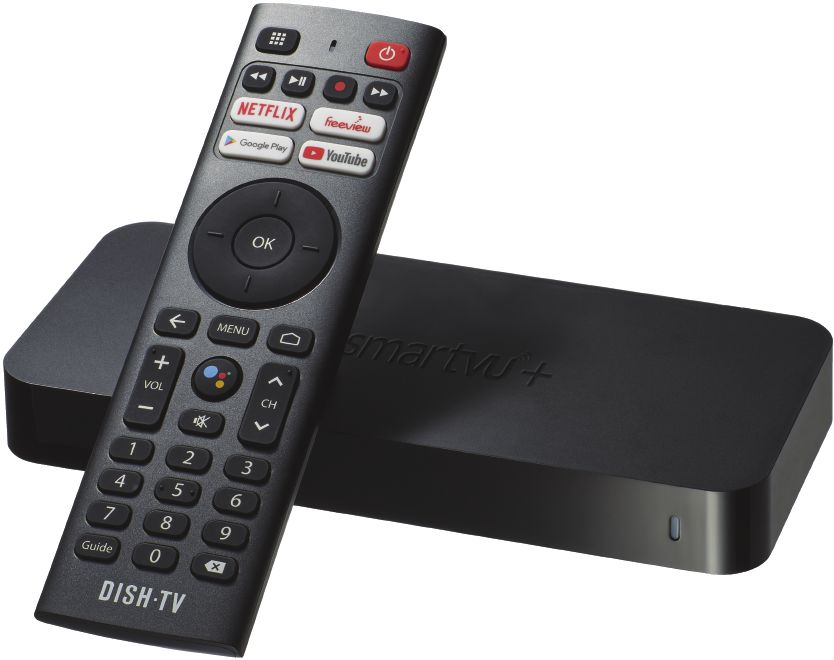
SmartVU+ (A7070)
Bluetooth Remote HDMI Cable Power Supply
Items missing? Please contact the retailer or store you purchased this from.
03Your SmartVU+ (A7070)
Front Panel
01
1. LED STATUS
RED: Standby. BLUE: Power On.
Back Panel
01 02 07
RF IN LNB IN LAN HDMI TF CARD AV USB USB 12V 1.5A
03 04 05 06 08
1. RF IN 5. TF CARD
Connect to UHF Aerial cable. Storage, etc.
2. LNB IN 6. AV-OUT¹
Connect to Satellite Dish cable. Standard Definition output to TV.
3. ETHERNET 7. USB
Wired Internet Connectivity. Firmware Update, Storage, etc.
4. HDMI 8. DC 12V
High Definition output for HDTV. Connect the Power Adapter.
¹Requires use of an AV Adapter Cable (not supplied).
04Bluetooth Remote
01 02
03
04 05
06 07
08
09
10 11
12
14
13 16
15
17
18 19
This Remote requires 2x AAA Batteries to operate. Insert the batteries, ensuring they
correctly align with the polarity (+/-) markings found inside the battery compartment.
05Bluetooth Remote
BUTTONS DESCRIPTION
Apps
Power On/Off
Play/Pause, Fast Forward, Rewind
Start Netflix
Start Freeview
Open the Play Store
Start YouTube
Navigation Arrows
OK/Confirm Selection
Back/Return
Home Hub Menu
Android TV Home
Volume Up/Down
Google Assistant
Mute
Channel Up/Down
Numeric Keys
Freeview TV Guide
Delete
Google, Google Play, YouTube, Android TV, Chromecast and other related marks and logos are trademarks of Google LLC.
06Getting Connected
01. 02. 03.
RF IN LNB IN LAN HDMI TF CARD AV USB USB 12V 1.5A
1. Connect the UHF Aerial or Satellite cable from your wall port to the SmartVU+.
2. Connect the HDMI cable from the SmartVU+ to an HDMI port on your TV.
3. Plug the SmartVU+ into a power socket and switch on at the wall.
4. Insert the batteries into the Bluetooth Remote.
5. Follow the on-screen instructions.
TIP: If you have an Ethernet cable handy, connect your SmartVU+ directly to your
Modem/Router for a reliable broadband connection.
07Connecting the Bluetooth Remote
When prompted on-screen, please stand about 20cm away from the SmartVU+, to
connect the Bluetooth Remote.
20cm
1. Press and hold the and buttons together.
2. When in pairing mode the LED indicator on the Remote will start flashing.
3. Release both buttons when the LED starts flashing.
4. Once the Remote has paired successfully, the LED turns off.
TIP: Thanks to Bluetooth, you don’t have to point your Remote at the SmartVU+.
It will pick up your commands from anywhere in the room!
08Why connect to the Internet? To ensure you are getting the most out of your SmartVU+, please connect the SmartVU+ to the Internet. This is critical to the correct operation of your SmartVU+. Once connected to the Internet, the SmartVU+ will receive automatic software updates and the following benefits, to ensure you are getting the best Freeview experience! • Access to Freeview On Demand. • Stream Freeview Live TV. • Over 5000 apps to explore and download on Google Play. • Stream content to your TV with Chromecast built-in. How do I connect to the Internet? If you’ve connected an Ethernet cable to your SmartVU+, this will happen automatically. Alternatively, connect to a WiFi Network when prompted as part of the initial set up. If you skipped connecting to a WiFi Network, or would like to connect to another WiFi Network, go to Home > Settings > Network & Internet. Will I be using my data? You will not be using data for Watching Live TV through your SmartVU+, if done via a Satellite Dish or UHF Aerial. When you are streaming Freeview Live TV or On Demand, these will typically use data, exactly how much will depend on the quality of the video offered by each broadcaster’s service. The higher the video quality (indicated by a higher bit rate), the higher your data usage. Typically, one hour of video at medium quality will use about 750MB of data. When connected to the Internet, browsing and searching the TV Guide in Freeview On Demand will use a very small amount of data. If you browsed an hour a day for a month, it'll add up to about 600MB (that's about 6% of a very modest 10GB per month plan). How do I track my data use? Your Internet Service Provider (ISP) may have some tools to help you track how much data you use, some also offer alerts when you're about to exceed your plan. So check with your ISP if you'd like more detailed tracking on how much data you use. 09
Select Tuning Type
Your SmartVU+ works with both a UHF Aerial OR Satellite Dish. During the initial setup
you will be prompted to tune in your SmartVU+

      Installation
                                    Select Tuning Type

                                     Satellite

                                     UHF Aerial

                                     Internet only

                                            Up         Down         Next        Select

Use the ▲ UP or ▼ DOWN navigation arrows on the Bluetooth Remote, to select
one of the following:

• Select Satellite, if using a Satellite Dish.

• Select UHF Aerial, if using a UHF Aerial.

• Select Internet Only, if using the Internet only.

To re-tune the channels or change the tuning type at a later stage, go to:
Menu → Settings → Advanced Settings → Select Signal Type.

             The SmartVU+ is not able to access both the Satellite and UHF Aerial (Antenna) Tuners simultaneously.

                                                                                                                     10
Home Hub Menu
The Home Hub brings everything together in one place.
While watching Live TV, press the MENU button to open the Home Hub Menu.
Live TV: Access Freeview Live TV channels.
TV Guide: Browse what’s on across the next eight days.
On Demand: Access content from TVNZ, ThreeNow and Māori TV.
Apps: Access apps from Android TV home.
Search: Find Live TV & On Demand content.
Settings: Broadcast settings and help.
Just below the Home Hub icons, is a belt for Featured Shows on Freeview On Demand,
which are free to view.
Below that is a Featured Apps belt, with Apps you can choose to subscribe to.
Lastly, there is a Help belt that includes popular settings and queries.
11Mini Guide & TV Guide
Mini Guide
While watching Live TV, press the OK button to open the Mini Guide, displaying
what’s on now and coming up next.
Use the Mini Guide to quickly browse through channels, or go directly to a channel.
Press ◄ LEFT for the TV Guide and Freeview On Demand.
Press ▲ UP or ▼ DOWN to explore other channels.
Select a TV show that’s on now to change the channel, or one that’s on later
to see more information, and access On Demand content or that TV show.
TV Guide
The TV Guide provides schedules for the next eight days, with detailed show information.
A preview of what’s currently playing on Live TV, will display on the TV Guide while you
browse.
Press the GUIDE button to open the TV Guide, or access it via the Mini Guide
or Home Hub.
Press ▲ UP or ▼ DOWN to explore other channels.
Select a TV show that’s on now to change the channel.
Select a TV show that’s on later to see more information, and access On
Demand content for that TV show.
12Freeview On Demand
Select On Demand on the Home Hub, or press the ◄ LEFT arrow on the Mini Guide to
access Freeview On Demand.
When you first open Freeview On Demand, you will receive a tutorial to help. This will
provide you with the tools required to get the most from Freeview On Demand.
Sign in to your Freeview Account to browse the latest and greatest content from TVNZ,
ThreeNow, and Māori TV.
Android TV Apps
Select Apps on the Home Hub, or press the Google Home button to access the
Android TV Home screen.
Sign-in with your Google Account to get the most out of Android TV.
Android TV offers thousands of movies, shows, and games from Google Play, YouTube
and your favourite apps*.
Streaming Freeview On Demand requires a good Internet connection. ISP charges apply. App terms and charges apply.
13Audio & Subtitles
Broadcasters work with organisations such as Able NZ to make the content you find on
Freeview as accessible as possible for all. This means they provide Audio Descriptions
as well as Subtitles for selected Movies and TV shows.
Audio Description
Audio Descriptions are helpful for those who are visually impaired, narrating the selected
Movie/TV show with what’s happening on screen in between spoken dialogue.
1. Press the MENU button to display
the Home Hub Menu.
2. Scroll ▼ DOWN to the Help section. Audio Description
OFF
3. Select Audio Description, it will be OFF
by default.
4. Press OK to toggle Audio Description ON
and OFF.
Also see: Menu → Settings → Advanced Settings → Audio → Audio Description.
Subtitles
This feature is helpful to those who are hearing impaired, often a written rendering of the
dialog, displayed at the bottom of the screen.
1. Press the MENU button to display
the Home Hub Menu.
2. Scroll ▼ DOWN to the Help section.
3. Select Subtitles, it will be OFF by default.
4. Press OK to toggle Subtitles ON and OFF.
Also see: Menu → Settings → Advanced Settings → Video → Subtitles.
14Settings Log In • Log In to On Demand. To watch On Demand, you’ll need to a Freeview On Demand account. It’s free to sign up and you only need to do it once. So you can get started watching the latest free TV Shows and Movies, any time. History • Clear Watch History. Freeview On Demand can provide viewers with their viewing history, to resume viewing easily across sessions. Because the SmartVU+ is a shared device, anyone with access to the SmartVU+ in your home would be able to view your viewing history. Mini-Guide Timeout • HDMI Output Mode. Select between PCM (Standard Stereo Sound), or AC3 (Dolby Digital) where available. If you have no Audio, select PCM, as the connected equipment may not support AC3. Parental Lock • Limit Content Shown. Turn this ON to limit the content shown by the A7070 based on the Rating selected, the Parental Lock will be ALLOW ALL by default. But can be set to G, PG, and AO. So content with the rating selected will be locked until the PIN/Password is entered. Help • Support. Help has Frequently Asked Questions, and Tutorials such as “How to use the Freeview Home Hub Menu” available. More Settings • Advanced Settings. Advanced Settings has system information, user settings and tuning options available. You will need to access Advanced Settings any time you decide to change the PIN, or Re-tune Channels. See Page 16 for more information. 15
Advanced Settings
Press the MENU           button to open the Home Hub Menu, then go to: Settings →
Advanced Settings.

ADMIN
• Change Password.
  To adjust settings, you are often required to enter the PIN (Password). Here you can
  change the Default PIN (000000).

VIDEO
• Aspect Ratio.
  Adjust the Aspect Ratio to change how the screen fits your TV. Select between 16:9
  (Widescreen) or 4:3 (Traditional).
• Subtitle.
  Toggle ON/OFF to display Subtitles for selected programmes, where available. See
  Page 14 for more information.

AUDIO
• HDMI Output Mode.
  Select between PCM (Standard Stereo Sound), or AC3 (Dolby Digital) where available.
  If you have no Audio, select PCM, as the connected equipment may not support AC3.
• Audio Description.
  Toggle ON/OFF to enable Audio Descriptions for selected programmes, where
  available. See Page 14 for more information.

OSD
• Menu Timeout.
  Adjust the length of time the Home Hub is displayed on-screen before it’s hidden,
  Menu Timeout will be OFF by default. But can be set to 5, 10, 15 or 20 seconds.

SELECT SIGNAL TYPE
• Re-tune Channels.
  Change how you tune Freeview Channels on the SmartVU+. You can select Satellite if
  you have a Satellite Dish connected, or UHF Aerial if you have a UHF Aerial connected.

SYSTEM INFO
• The System Info page provides information on the current Software Version, Contact
  Details and Model Number.

 This is useful information if you experience an issue, and are speaking with Technical
 Support. Supplying a screenshot of these details can help diagnose the issue.

                                                                                       16
Troubleshooting Tips
No Power Indicator on the Front Panel
Possible Cause: Unplugged/Switched OFF.
Solution 1: Check the Power Supply is plugged into both the SmartVU+ and Wall
Socket correctly.
Solution 2: Ensure the Wall Socket is switched ON and there is power available.
No Channels
Solution 1: If the Satellite or UHF Aerial cable is NOT connected correctly, such as the
cable from your UHF Aerial is connected to the LNB IN. The SmartVU+ will be unable to
scan. Ensure the UHF Aerial/Satellite cable is connected correctly.
Solution 2: Perform a re-scan of the Channels.
1. Ensure the UHF Aerial/Satellite cable is connected.
2. Press the MENU button and select the Settings icon.
3. Move down and select Advanced Settings.
4. Select Signal Type.
5. Select YES to re-scan Channels.
SmartVU+ is not responding to the Remote
Possible Cause: There are a number of reasons why your Remote may not be working.
This includes physical damage, battery issues, pairing issues, or issues with the infrared
sensor on the Remote or SmartVU+.
Solution 1: Batteries that are depleted or incorrectly inserted are the most common
reason for a Remote to stop working, or work intermittently. We recommend replacing
the batteries as a first step, checking that the + and - ends of the batteries correspond
with the + and - markings in the battery compartment of the Remote.
Solution 2: Ensure that the infrared sensor located on the SmartVU+ has not been
covered or obscured, and move any obstructions if necessary.
Solution 3: Try re-pair the Bluetooth Remote.
1. Press the Google Home button to access the Android TV Home screen.
2. Select the Settings icon in the top-right.
3. Follow the steps according to the Android TV Settings menu.
• Select Remotes & Accessories → Add Accessory.
4. See Page 08 on Connecting the Bluetooth Remote.
TIP: Before contacting Dish TV for any issues, go to Menu → Settings → Help, or try
turning off the SmartVU+ for 30 seconds. If the issue persists, contact Dish TV.
17Troubleshooting Tips
How to Reset the SmartVU+
Solution 1: Perform a Power Reset.
1. Unplug the SmartVU+ power supply from the wall socket and wait one minute.
2. Reconnect the power supply.
Solution 2: Perform a Factory Data Reset.
1. Press the Google Home button to access the Android TV Home screen.
2. Select the Settings icon in the top-right.
3. Follow the steps according to the Android TV Settings menu.
• Select Device Preferences → Reset → Reset → Erase Everything → Yes.
WARNING! Performing a Factory Data Reset will remove all customer settings on the
SmartVU+ including apps, channels, and wireless network settings.
Date/Time is incorrect
Solution: Ensure the correct Time Zone (Auckland/New Zealand) is set.
1. Press the Google Home button to access the Android TV Home screen.
2. Select the Settings icon in the top-right.
3. Follow the steps according to the Android TV Settings menu.
• Select Device Preferences → Date & Time → Set Time Zone → Set it to Auckland.
NOTE: If you’re using a special Network environment such as a VPN, the time on the
SmartVU+ may differ from the time of the location where the SmartVU+ is located.
Not connecting to Network via Wi-Fi
Solution 1: Ensure the Wi-Fi Password (Security Key) entered is correct.
Security keys are case sensitive. Be careful to use upper case and lower case correctly.
Examples of mistakes:
• I (capital i), l (lower case L) and 1 (number one).
• 0 (number zero) and O (capital o).
Solution 2: The Wi-Fi signal strength is too weak.
The SmartVU+ has a maximum optimal Wi-Fi range of 10 to 11 metres. If the signal is
weak, signal drops might be reduced by placing the SmartVU+ and the Modem/Router
closer together.
Solution 3: The SmartVU+ is too close to your Modem/Router.
If the SmartVU+ and Modem/Router are too close, communication may not work, as it
could have a detrimental affect on Wi-Fi performance. We recommend that you keep
the distance between the SmartVU+ and Modem/Router at more than 1 metre.
18Troubleshooting Tips
The SmartVU+ is powered on, but there’s no Video/Audio on TV.
Solution 1: Ensure the HDMI/AV cable used is firmly connected to both the SmartVU+
and TV.
Solution 2: Ensure you selected the correct Input/Source on the TV.
Solution 3: Try replacing the HDMI/AV cable used.
Solution 4: Try connecting the SmartVU+ to another TV.
19Placement Tips
With long extended periods of use, the SmartVU+ will operate at temperature. This does
not affect the operation or overall performance of the SmartVU+. So to help ensure the
SmartVU+ operates as smooth as possible and to avoid damaging the SmartVU+, there
are several instructions outlined below. Please follow each of the installation instructions
carefully to help protect the SmartVU+ from malfunction.
DO NOT place the SmartVU+ and/or Remote Control in the following environments:
• Avoid locations exposed to direct sunlight, that risk the SmartVU+ overheating.
• DO NOT place the SmartVU+ near any heat source, such as other electronic devices.
• Avoid locations with high humidity, that risk contact with water or moisture.
• Ensure there is a reasonable amount of ventilation space around the A7070.
• DO NOT place the SmartVU+ in a location with NO ventilation, such as a cupboard.
• Ensure the air vents on the SmartVU+ are not blocked or covered.
• Avoid locations where dust is prone to collect in large amounts.
Otherwise, this may result in fire, electric shock, malfunction or product deformation.
20Contact Us
We provide free technical assistance for all of our products during our normal business
hours. We try our best to get the issues sorted either over the phone or via email.
OFFICE HOURS are between 8:00am and 5:00pm NZST, Monday to Friday, excluding
Public Holidays.
Phone 0800 DISH TV (347 488) or 07 929 4123
Fax 07 929 4122
Email support@dishtv.co.nz
Website www.dishtv.co.nz
Follow us on Twitter Follow us on Facebook
twitter.com/dishtvNZ facebook.com/dishtvNZ
21Warranty Information
Dish TV would like to thank you for your recent purchase of the SmartVU+.
For your benefit, we recommend that you keep the original invoice or receipt in a safe
place and show them to the retailer or place of purchase whenever a warranty repair is
necessary.
Dish TV Consumer Warranty:
Dish TV warrant this product to be free of defects in materials and workmanship, subject
to the conditions set forth below.
• The warranty is valid for a period of one year from the date of first purchase.
• The warranty is only valid in New Zealand.
• This product must be used solely for domestic purposes.
• In the event that this product fails to function properly during the warranty period, Dish
TV will make this product capable of operating for the purpose of which it was designed,
without charging for labour or parts.
• All warranty claims will require you to return the product to our address.
• The obligations of Dish TV are limited to the repair of defective parts. Costs and risks of
transport to the retailer as well as removal and installation of the product, and any other
costs directly or indirectly related to its repair, are not covered by warranty.
• All repairs performed by non-authorized repair shops will not be reimbursed. If such
repairs damage this product, such damage will not be covered by this warranty.
• This warranty is not applicable to cases outside defects in materials and workmanship,
in particular, it does not cover:
A. the replacement of parts due to normal wear and tear.
B. damage caused by accidents, negligence, modifications, improper use or installation,
such as providing insufficient ventilation.
C. damage caused by lightning, water, fire, acts of war, incorrect mains voltages or any
other cause beyond the control of Dish TV.
D. products whose serial number has been removed, defaced or is illegible.
• This warranty is offered to any person who has legally obtained possession of this
product within the warranty period.
Warranty and Product Registration:
Please register your product on our website, to assist with any future product or warranty
updates. To register:
1. Go to www.dishtv.co.nz through selected internet browser.
2. Select Registration and Warranty from the options provided.
More information about this warranty and technical support can be found on our website.
22Version 1.3 JUNE 2020 www.dishtv.co.nz
You can also read