WebTMS Administrator's Guide - Web Ticket Management System - Ohio Utilities ...
←
→
Page content transcription
If your browser does not render page correctly, please read the page content below
WebTMS
Web Ticket Management System

 Administrator’s Guide
Web Page for Launching WebTMS Applications
In Internet Explorer’s “Address” field, type: ohtmsa.oups.org and click Enter. The Login
page will be displayed.

Click on Login and enter your previously assigned User Name and Password, then click OK. If
you would like for your password to be remembered simply click the box beside of “Remember
my password”.

The Administrator can opt to (1) run the WebTMS system directly from this web page, which
may require some additional security settings, or (2) download and install the programs to your
local machine, which does not require any security settings to be set.

The Web Ticket Management System requires the .NET Framework v1.1. To determine if you
have it already, from your Start button, click on Control Panel, and then click on Add or Re-
move Programs. Once the list is displayed look for Microsoft .Net Framework 1.1. If you do
not see this in the list visit, www.microsoft.com, and download the .Net Framework 1.1.

                                               2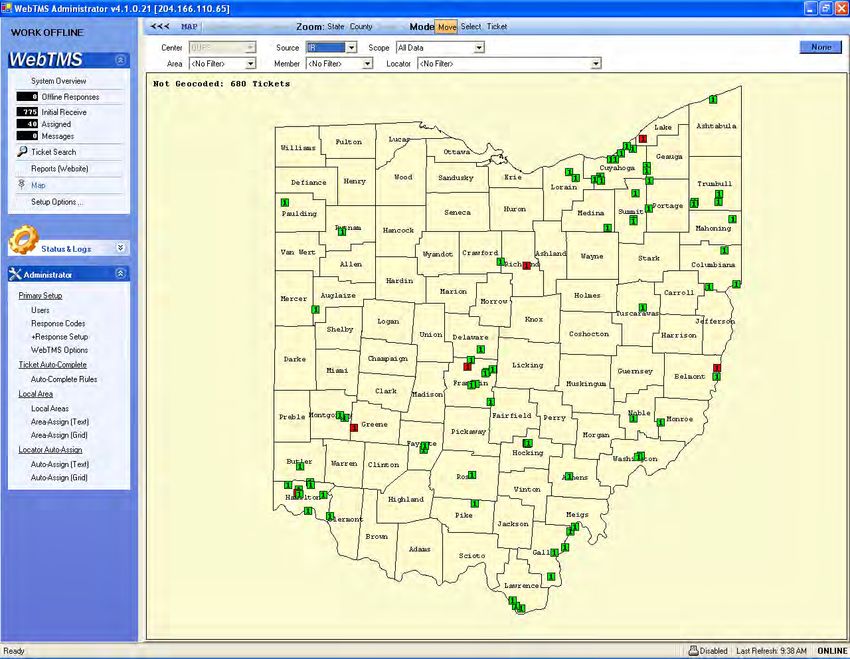
Setup Options
Setup Option (1): In order to run the applications directly from this web page, this web site
must be set as a trusted site in Internet Explorer. For more information on how to set up Inter-
net Explorer and .NET Security, see Setup Internet Explorer below.

Setup Option (2): Alternatively, you can download and install the programs to your local com-
puter and run them directly. With this method there are no changes required to Internet Explor-
er or the default .NET security settings. The only difference will be that you will be prompted
for your user name and password when starting each program. Once installed on your local
computer, the WebTMS applications will detect new versions and will update themselves auto-
matically through the built-in Live Update process. Simply download and install the Ohio
WebTMS Setup.

                                 Getting Started on WebTMS

The Web Ticket Management System, run through Internet Explorer, requires communication
with the server on port 80 (HTTP). By default, Internet Explorer will sandbox all applications
and limit their functionality. To allow the Web Ticket Management System to run, you must
setup Internet Explorer to trust the host web site. To do this, follow these steps.

Setup Internet Explorer

1.  Open Internet Explorer
2.  Select “Internet Options” from the Tools menu
3.  Click the “Security” tab
4.  Click the “Trusted Sites” Icon
5.  Find in the lower portion of the dialog the area for “Security level for this zone”
6.  Verify that the level is set to “Low”. If necessary, click the ‘Custom Level’ button and at
    the bottom of the dialog displayed, select “Low” and click the “Reset” button.
7. Click the “Sites” button to open the trusted sites list.
8. If checked, uncheck the “Require server verification (https:) for all sites in this zone” op-
    tion.
9. In the “Add this Web site to this zone:” field, enter the host server: ohtmsa.oups.org
10. Click the “Add” button to add the site to the Web sites list.
11. Click OK to dismiss the Trusted Sites dialog
12. Click OK to dismiss the Internet Options dialog

                                                 3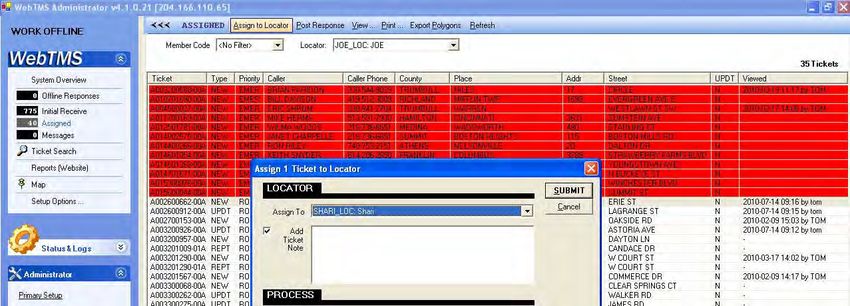
Setup .NET Security Settings
Microsoft’s shortcut to the .NET Security Wizard application is not updated when installing
the .NET 1.1 Framework after having installed the .NET v1.0 Framework. The best way to
launch the .NET 1.1 Security Wizard application is to run it directly.

**Important: If you do not have Administrative Rights on your computer you must have
your IT Department adjust the .Net Security Settings**

1. Click on Start and then Control Panel
2. Double-Click the Administrative Tools icon (if this is not displayed you will need to change
   to Classic View)
3. Double-Click on Microsoft .NET Framework v1.1 Wizards
4. Double-Click on Adjust .NET Security
5. Make sure that the radio button beside of “Make changes to this computer” is highlighted

** If “Make changes to the current user” is highlighted you will need to have your Sys-
tem’s Administrator log into your computer and adjust the .NET Security **

6. Click the “Next” button to continue.
7. Click the “Trusted Sites” icon.
8. Make sure that you move the slider to the top towards the label “Full Trust”
9. Click the “Next” button to continue.
10. Verify in the settings summary that Trusted Sites now reads “Full Trust” and click the
   “Finish” button to finish.
11. Close all open windows.

           Note: If your network is running with a proxy server, your IT Department may need
              to set up a rule to allow access to the following hosts: ohtms.oups.org,
              ohtmsa.oups.org, ohmtsb.oups.org, 64.208.88.4 & 96.56.43.179.

.

                                               4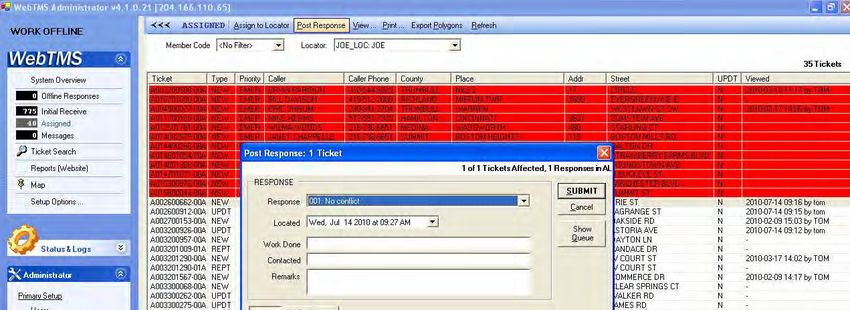
WebTMS Administration
                              Downloading Archives

From the main Administrator page (after initial login), the Administrator can select Download
Archives to reach the monthly downloaded archives as shown below. Each monthly archive is
in a zipped file that you can download to your local computer. Archives are in Microsoft Ac-
cess MDB format containing all ticket data for their specified sequence date range, as well as all
Auto-Assign, Local Area, and Auto-Complete rules and/or grid selections.

                                                5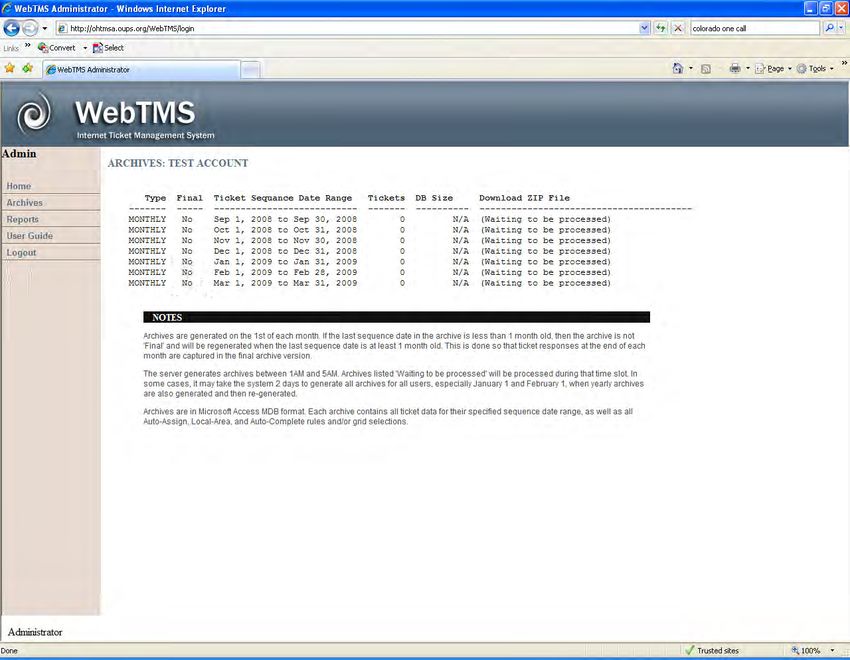
WebTMS Administration
   Establishing Users

          From the Administrative menu list under
          Primary Setup click on Users and the
          screen shot below will open. From this
          screen you can create a new user and edit
          existing users.

            6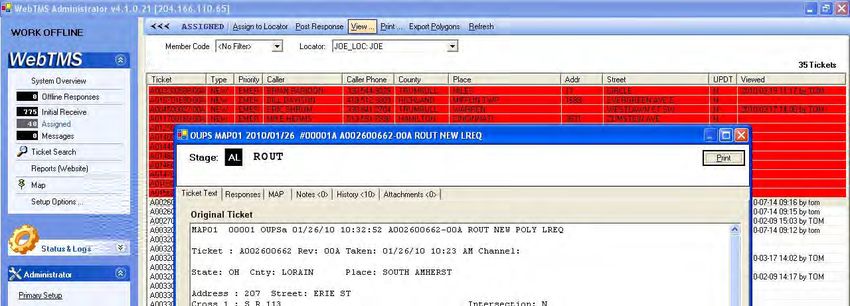
WebTMS Administration
                             Establishing New Users

To Create a new user, simply click the New button and fill in all fields as appropriate. If the
new user will not need immediate access, the account may be left disabled by unchecking the
Access Allowed box. It may be Edited to enable their access at a later date. This may also be
used to disable access without deleting an account, which might be useful in the case of an
extended leave of absence. Please remember that each Account name must be unique. (The
system will advise if another account exists with the Account name that was entered) Enter a
valid email address if this is an Administrator account and they will be receiving the End of
Day Audits from WebTMS and the One-Call Center and check the box beside of E-mail
Notifications.

Local Areas can be set up for Operators so that they can only view tickets based upon County/
Text and Grid information that the Administrator has assigned to them.

To change an existing User’s account, highlight the User’s name and then click the Edit button.
Make the changes as appropriate and click the OK button.

                                                7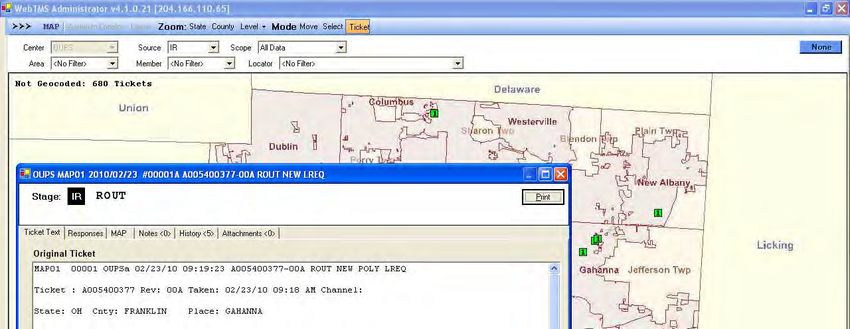
WebTMS Administration
               Establishing New Users - Locator Settings

The Administrator will then be able to check whether or not they would like the locator to
receive email notifications of their Assigned tickets, put the locator on Hold in the event of a
lengthy absence, set an open ticket limit, select an alternate locator, and input upcoming
vacation dates.

Please note that the Locator Settings will not be enabled until the User Group is set to Locator.

Open Ticket Limit - used to establish a limit on the number of tickets that may be dispatched
to an individual locator at the same time.

Alternate Locator - used in conjunction with the Open Ticket Limit to allow the overflow of
open tickets to be dispatched to the alternate locator. To establish an alternate locator select the
alternate’s name from the drop down list.

If all of the locator’s tickets need to be sent to the alternate locator, check the Force Alternate
Locator box. This can be useful in the event of vacation or illness.

On Vacation - used to input a date or date range that the locator will be on vacation. This in-
formation will been shown on the System Overview screen as well.

                                                  8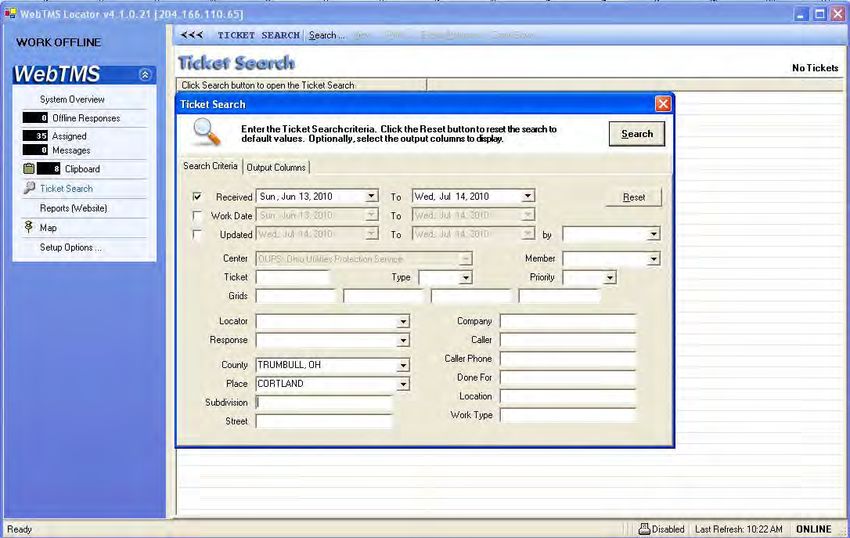
WebTMS Administration
                                  Member Codes

                                                                                       The

Member Codes screen shows each member code whose underground facilities you are responsi-
ble for locating. If you need to add additional member codes simply click on New and a new
window will open (see screen shot below). Enter the Member Code in the “Member Code”
field. Then enter the Company Name and/or facility type in the “Description” field. Click OK
when done. To edit an existing member code highlight the code and click Edit. Change the
appropriate information and click OK when done.

Note: you will only need to add member codes when a new member code has been created for
your company within the O.U.P.S. database.

                                             9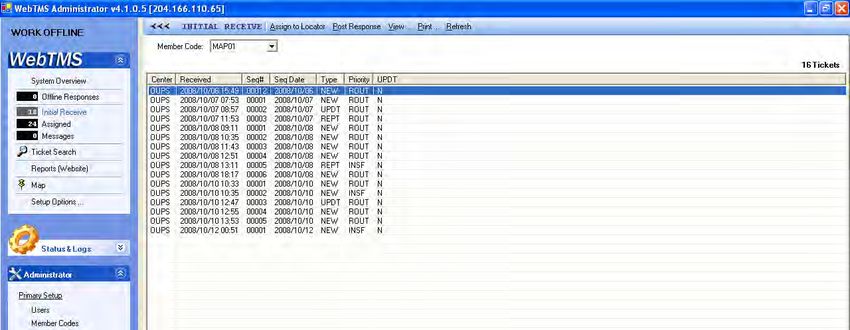
WebTMS Administration
                    Adding WebTMS Response Codes

WebTMS is set up with eight static response codes. If you wish to add more company specific
WebTMS response codes click on the Response Codes menu item and the screen above will be
displayed. To create a new code, click on New and the screen below will open. Enter the Re-
sponse Code and Description. For example, enter “11” as the response code and “No conflict,
water belongs to the City”. Click OK to complete the entry. **This is not available under the
default mode**

                                             10
WebTMS Administration
+Response Setup
The +Response Setup screen is used to create a translation between the new WebTMS response
codes created for company use and the +Response Codes accepted by the Ohio Utilities Protec-
tion Service. If you do not provide a translation for any new codes your tickets will fail to
provide a +Response to the Center. This fact would show up on the +Response Queue with
errors saying “No +Response Translation Found”.
To provide the translation simply highlight the new WebTMS Response Code and click Edit.
The Accounts tab is for use only by the O.U.P.S. Technology Department for entering the pass-
word to allow the member’s positive response feedback to our Positive
Response System.
11WebTMS Administration
+Response Setup (continued)
Once you have highlighted the new WebTMS Response Code and clicked Edit, a new window
will open showing the eight static +Response Codes that the Center will accept. Highlight the
+Response Code that matches the best with the new WebTMS code that was created. Click OK
to complete the entry.
12WebTMS Administration
WebTMS Options - General Tab
From the General tab, the Administrator may select to email the EOD (End of Day) reports
from WebTMS and/or O.U.P.S. to the Administrators. The WebTMS EOD shows the total
number of tickets WebTMS expected to receive, the number of tickets that WebTMS actually
received, and the number of tickets that were missing. It will even identify the tickets that were
missed so that it is easy for the Administrator to call O.U.P.S. and request a resend of the tickets
missed. The One-Call EOD shows the summary of all tickets transmitted from the Center.
There will be two summaries for each day, one from each server that the Center uses.
The Administrator can give the Operators the ability to edit Locator Account Settings so that
they can switch the locator to an alternate locator or update vacations. By default, the Opera-
tors are allowed to view Default Local Area, if the Local Area of Operator is different. If the
Administrator decides that they want the Operators to see only areas specific to them simply
uncheck this checkbox.
13WebTMS Administration
WebTMS Options - Emergency Tab
From the Emergency tab, the Administrator must select to Allow Emergency Tickets to be Auto
-Assigned. The default setting is to Use Auto-Assign rules, but the Administrator can specify a
locator from the drop down list.
Supplemental E-Mail Deliveries - this allows the Administrator to add numerous email
addresses to send Emergencies tickets to. This feature becomes significantly important in cases
where a locator loses Internet connectivity and can’t receive their tickets online. The dispatcher
or someone else designated within the office would receive the Emergency locate request via
email and be able to contact the locator via telephone or radio to ensure the Emergency is
located within the requested time frame.
14WebTMS Administration
WebTMS Options - Locator Tab
From the Locator tab, the Administrator may select to email the locator a notification when
their tickets have been re-assigned to another locator. Note: this is only for the locators who
receive their tickets via email. They can also select whether or not to allow the locator to
re-assign their tickets to another locator, to post responses for members assigned to other
locators, to view tickets assigned to other locators, and to see all ticket response data in the
Assigned view. Note: if enabled, the Assigned view shows all member response data, if disa-
bled the locator only sees the member response data for members assigned to them.
15WebTMS Administration
WebTMS Options - Response Data Tab
From the Response Data tab, the Administrator can opt to collect Extra Response Date, such as,
Site Visit Information, Number of Feet Marked, and the Number of Facilities Marked. If these
options are checked, then these three extra fields will be added to the Post Responses dialog.
Collect Site Visit Information - this field allows the locator to enter whether they performed a
locate, only visited the site, or did nothing.
Collect Number of Feet Marked - this field allows the locator to enter the distance in feet that
they located, such as 150, indicating that they located 150ft.
Collect Number of Facilities Marked - this field allows the locator to enter how many
facilities they located, such as 3, indicating that they located water, sewer, and power.
16WebTMS Administration
WebTMS Options - User Map Layers Tab
From the User Map Layer tab, the Administrator can opt to add their own facility data. There is
a data structure that you need to follow. This folder structure will be automatically downloaded
with the WebTMS exe that you will be given. The data needs to be in LL NAD 83 or LL
WGS84. To load the data into client WebTMS mapping, place the data in the corresponding
county folder. You then browse to the location, C:\Newtin\OUPS\data and hit the add
button. The data that you had placed in the folder will now be available to “add”. At this time
you will be able to change color and pattern.
17WebTMS Administration
Auto-Complete Rules
On the Administrator menu under Ticket Auto-Complete the Administrator can set up Auto-
Complete Rules. This allows rules to be defined for auto-completing tickets. For example, if
your company or your contractor calls in tickets you can set up a rule that will look at the com-
pany name and automatically respond with the response code that you have set up. The tickets
will then be removed from your IR or AL screen without having to manually post a response.
To set up a new rule, click on New and then select the response code that you want to assign
and then select one or more criteria for Auto-Completing the ticket. You can select from search
criteria such as member code, ticket priority, ticket type, local area, county, place, subdivision,
address, street name, company, caller, caller phone, done for, work type, and keyword. Once
you have selected your response and auto-complete criteria, click OK to save the changes.
18WebTMS Administration
Local Areas
From the Local Areas menu item the Administrator is able to create local areas that will give
them the ability to set up Operator accounts to have access only to a particular local area. This
allows the Operator to only see tickets and locator accounts that are in the district area that they
manage. To create a new local area, click on New and specify the Local Area and you can pro-
vide a description. Click OK to save the changes. Once you have created the Local Area you
can now set up Area-Assign rules based on Text and/or Grid information.
Note: this tool would mainly be used if you have one Administrator for your entire company
and have supervisors over the districts. It allows the Administrator to separate the districts so
that the Operator will not have to sort out the tickets from districts other than their own. If you
do not have all districts coming into the same WebTMS Administrator then you will not need
to set up anything in this area.
19WebTMS Administration
Local Areas - Area-Assign (Text) & (Grid)
To create new Area-Assign (Text) rules, the Administrator will click on New and then select
the Local Area from the drop down box. You can then assign by member code, county and
place, subdivision, street, keyword, ticket priority, and ticket type.
To create new Area-Assign (Grid)
rules, the Administrator will click on
the Local Area to add grids to and
then select the county to work with
by clicking the Show All Counties
box. This will give you the entire list
of Counties in OH. If there are al-
ready grids in a county, simply click
on the County name.
20WebTMS Administration
Establishing Auto-Assign (Text)
From the Auto-Assign (Text) screen the Ad-
ministrator will establish criteria for each loca-
tor’s tickets to be auto-assigned.
To add a new Locator, click New and a separate window will open (see screen shot below).
Select the Locator from the drop down list beside Assign to Locator.
21WebTMS Administration
Establishing Auto-Assign (Text) cont’d
Once the new window has opened you may enter the auto-assignment criteria for this locator
based on Member Code, County, Place, Subdivision, Street, Keyword, Ticket Priority, and
Ticket Types.
Member Code - Choose the Member Code from the drop down list if you receive for more
than one Member Code but this individual Locator will only locate for a particular Member
Code. Otherwise should be left in the Member Code field.
County - Choose the County from the drop down list if this individual Locator will only locate
in a particular county. If multiple entries need to be created for a Locator, they must be created
one at a time. For example, create an entry for one county, then create a second entry for the
second county.
Place - Choose the Place from the drop down list if this individual Locator will be receiving
tickets for or type the place name in the “Place” field. If multiple entries need to be created for
a Locator, they must be created one at a time. For example, create an entry for one county and
place, then create a second entry for the second county and place.
Subdivision - Enter a subdivision name in this field if the Locator will receive tickets based
upon a subdivision name. If multiple entries need to be created for a Locator, they must be
created one at a time.
Street - Enter a street name in this field if the Locator will receive tickets based upon a street
name. If multiple entries need to be created for a Locator, they must be created one at a time.
Keyword - Enter a keyword in this field if the Locator will receive tickets based upon a word.
For example, if the locator will receive all tickets that contain the word “Private”, enter Private
in the “Keyword” field.
Ticket Priority - Select the ticket priority from the drop down list if this Locator will receive
tickets based upon a particular Priority (Emergency, Rush, Short). For example, if the Locator
will receive all EMERGENCY tickets, EMER should be entered into the “Priority” field.
Ticket Type - Select the ticket type from the drop down list if this Locator will receive tickets
based upon a particular ticket type (New, Retransmit, 2nd Notice, Damage, Design). For Ex-
ample, if the Locator will receive all RETRANSMITTED tickets, RXMT should be entered into
the “Ticket Type” field.
** If you receive for more than one Member Code but this individual Locator will only locate
for a particular Member Code using any of the fields listed above, that Member Code may be
entered in the “Member Code” field.
22WebTMS Administration
Establishing Auto-Assign (Grids)
1. From the menu, click Auto-Assign (Grids)
2. Highlight the Locator account
3. Check the box beside of Show All Counties
4. Select the County you will be gridding
5. Click Edit
6. Select Member Code from the drop down box beside of “Member Code for Grid
Selection”.
By default, the system will assign the grids for this locator to any member code you
receive for if no selection is made.
7. Next, enter a Place name, address (if available), street name and cross street name
8. Click on the “Street” button next to the word “Find”
Note: if no address was entered, click on the “Streets” tab to see a list of all street
names matching the search criteria. If an address was entered and there are several
address ranges for this street, you will automatically be taken to the street listing on the
“Streets” tab.
9. Once you have selected the street that best matches your search criteria, click on Level
(at the top of the screen) and you can change your zoom level (between 1-10 with 1
being the closest in) and you will be able to see the street highlighted in RED.
10. To begin selecting grids, click on Grid Select from the “Mode” section at the top of the
page.
11. Click and drag on the map to highlight the grids that indicate this particular Locator’s
territory.
12. Once you have selected all of the grids for the Locator, click Save from the “Action”
section at the top of the page.
13. Click Ok to post changes to server.
Some other useful functions include searching for intersections, draw a bullseye, measuring a
distance, and identifying the Place you’re in and addresses you are near.
23WebTMS for Administrators
System Overview
By default the System Overview screen will be displayed on initial login. This screen shows by
graph the times of when tickets come in for each day. Administrators and Operators will also
see a grid of all locators showing how many tickets they have, if they are on hold, if they have
an alternate locator, and any upcoming vacation scheduled. The Administrator can allow the
Operators the ability to change Locator Settings. If enabled, the Operator will see a Locator
Settings button on their System Overview screen.
You can also navigate through the program with the menu items on the left side of the screen.
This menu may be toggled on and off by hitting the escape (ESC) key on your keyboard or by
clicking on the three arrows at the top of the screen by the page name (such as System Over-
view). If you would like to have a different page appear when you login, you can change the
startup screen from the Setup Options menu. (See page 38)
24WebTMS for Administrators
Initial Receive (IR)
This screen shows the tickets that could not be automatically assigned for some reason. From
here the Administrator may view all currently unassigned tickets and make the decision to as-
sign them to a specific locator, post a response, view the entire ticket text, and print each ticket
separately or in multiples. Once the tickets have been assigned, the tickets will be removed
from the IR screen to the Assigned to Locator screen.
The Refresh option will poll the server for any new, unassigned tickets that have been received
since the last time the program checked. Auto-refresh can be assigned from the Setup Options
menu item to automatically refresh anywhere from every 5-60 seconds. (See page 38)
Note: If all of your tickets are auto-assigned to locators there will not be any tickets showing
on the Initial Receive screen.
Note: All fields shown in the table above may be sorted in ascending or descending order
simply by clicking on the field header. For example, Ticket, Revision, Locator, etc.
25WebTMS for Administrators
Initial Receive (IR) Assign to Locator
Once it is determined by the Administrator that the ticket should be assigned for locate, high-
light the ticket to be assigned and click Assign to Locator at the top of the screen. A separate
window will open. From the drop down list select the locator that you wish to assign to the
ticket. This screen will also allow the Administrator to add a note to the ticket by checking the
box and entering the text in the Add Ticket Note box. It displays the Member code that is being
processed and the stage of the ticket. Under Options the Administrator may choose to Re-
assign tickets to another locator even if it has already been assigned to a locator or to Force
assignment which ignores any Locator Assignment rules. If the information shown is correct,
click Submit and the ticket(s) will be assigned to the Locator section. If the information shown
is NOT correct, click Cancel and begin again.
26WebTMS for Administrators
Initial Receive (IR) Post Response
From the Initial Receive screen the Administrator may post a response to any ticket. Select the
ticket(s) to post a response to and click on Post Response. A new window will open (see
above). The Administrator may choose the response from the drop down list, enter work done,
and include remarks for the ticket(s). Click Submit and the ticket(s) will be completed.
The Administrator can opt to collect additional response data on the Post Responses window
such as Site Visit Information, Number of Feet Marked, and Number of Facilities Marked. (See
page 16)
A new dialog box will appear to show that the posting of the response has completed success-
fully. Click OK to close this box. To set this box to close automatically upon completion go to
Setup Options and on the Options Tab check the box under Misc. Options that says to Automat-
ically close the Post Responses dialog if completed successfully.
27WebTMS for Administrators
Initial Receive (IR) View Tickets
From the Initial Receive screen the Administrator may view the entire ticket text. Simply
highlight the ticket and click on view at the top of the screen. This will open a second window
allowing the ticket to be reviewed. The ticket may be printed in its entirety by clicking on the
Print button in the right corner of the new window. If you need to print multiple tickets from
the Initial Receive screen simply highlight the tickets to print and click on Print from the top of
the screen.
From this new window, the Administrator may click on the tabs at the top to view the email
headers, how the ticket was auto-assigned, any notes and responses, the complete history of the
ticket, and a map showing how the ticket was gridded. If created, the User Buttons will appear
on the Ticket View window. From here you can post a response by clicking on the User Button
or F1-F4 buttons on your keyboard. (For more information on setting up the User Buttons, see
page 38)
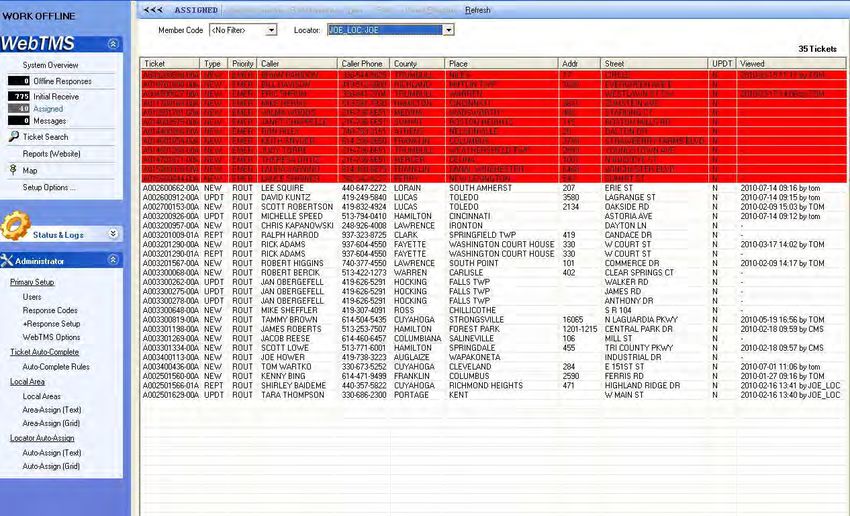
28WebTMS for Administrators
Assigned (AL) Unfiltered View
Once tickets have been assigned to a locator, they appear on the Assigned screen until the
Response is posted or the ticket is re-assigned to a different locator. Since this is an Adminis-
trator view, tickets dispatched to all locators can be reviewed, completed, or reassigned. The
screen shot above shows an “unfiltered” view of the currently dispatched tickets.
Note: All fields shown in the table above may be sorted in ascending or descending order
simply by clicking on the field header. For example, Ticket, Revision, Locator, etc.
29WebTMS for Administrators
Assigned (AL) Filtered View
If it is more convenient for the Administrator to review only those tickets dispatched to a
particular locator, select the locator from the drop down list provided. The unfiltered screen
(such as on the previous page) will be replaced by a screen that shows dispatched tickets for the
chosen locator only (such as above).
30WebTMS for Administrators
Assigned (AL) Re-Assign to Locator
If a ticket or tickets have been assigned to a particular locator and need to be re-assigned to a
different locator, highlight the ticket or tickets and click Assign to Locator. The window above
will be displayed. Select the new locator for these ticket(s) from the drop down list and under
the Options section check the boxes beside of Re-Assign Tickets (if already assigned to another
Locator) and Force Assignment (Ignore any Locator Assignment Rules). Then click Submit.
The chosen ticket(s) will be removed from the previous locator’s Assignment list to the new
locator’s Assignment list.
31WebTMS for Administrators
Assigned (AL) Post a Response
From the Assigned to Locator (AL) screen the Administrator may post a response to any ticket.
Select the ticket(s) to post a response to and click on Post Response. A new window will open
(see above). The Administrator may choose the response from the drop down list, enter work
done, and include remarks for the ticket(s). Click Submit and the ticket(s) will be completed.
32WebTMS for Administrators
Assigned (AL) View Tickets
The View option under Assigned (AL) works the same as the View option under Initial Receive
(IR). The Administrator can view entire ticket text, email headers, auto-assign, notes,
responses, history, and the map.
WebTMS for Administrators
Messages
The Messages screen will show all non-ticket items such as the Administrative messages sent
from the Center to each member. To display messages by month, simply select the month you
wish to view from the drop down list.
33WebTMS for Administrators
Ticket Search
From the Ticket Search screen the Locator may search for a ticket using any of several fields
from a locate request, such as date received, ticket number, locator, county, place, and street, or
even caller information. For example, if you wanted to see all tickets that were called in be-
tween June 1, 2010 and June 8, 2010 for Trumbull County, Cortland, you would select the date
range in the “Received” and “To” fields by clicking the down arrow and highlighting the dates
you wish. Next you would select Trumbull from the drop down list for the “County” field and
Cortland from the drop down list for the “Place” field. Click Search and the list of all tickets
found for this search criteria will be displayed.
To view the ticket text, highlight the ticket and click on View.
To print the ticket, highlight the ticket or tickets and click on Print.
From the Output Columns tab you can add/delete columns that you want displayed when doing
a search.
34WebTMS for Administrators
Reports
Events - the events log will show all important events that have taken place on WebTMS for a
specified date or date range. Events can include adding and editing user accounts,
setup options, member codes, positive response codes, and WebTMS options.
Ticket Responses - the ticket responses report shows all ticket responses for a specified day or
date range. Selections from the drop down box will allow the user to see data for All
Users, All Locators, All Administrators, or All Operators. The user can also select to
see information displayed for each day in the date range or the totals for the entire date
range.
Tickets Due - the tickets due report shows the number of tickets that are due for a response for
a specified date or date range.
35WebTMS for Administrators
Map
State Level
The Map Screen enables the Administrator to have a visual representation of where each ticket
is located. You may view all Initial Receive, Assigned, and even Ticket Search results. The
push pins are also color-coded showing normal notices in green, short notices in yellow, and
emergencies in red.
The ticket information for any push pin may be displayed simply by clicking on Ticket from the
top of the screen and then clicking on the push pin that you wish to view.
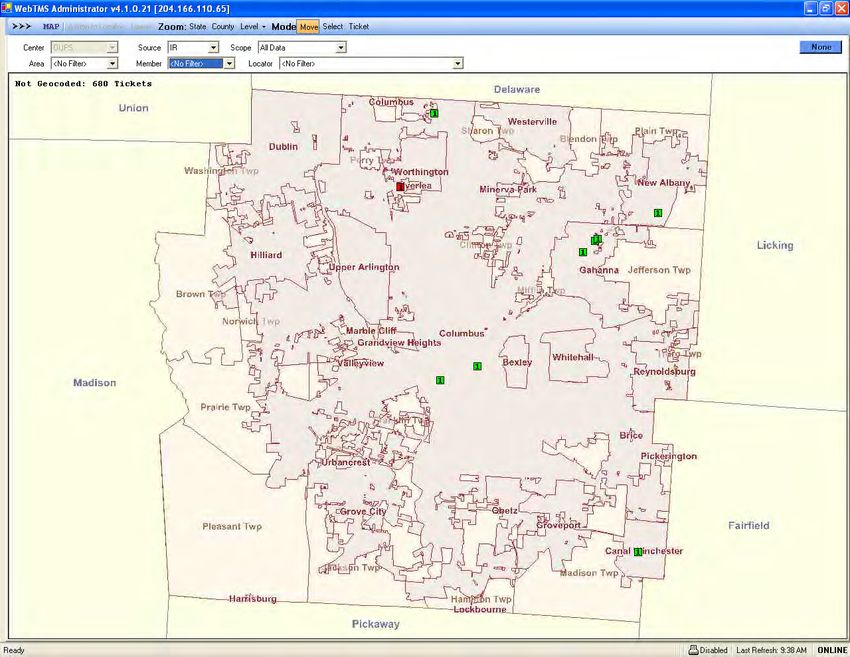
36WebTMS for Administrators
Map
County Level
To display the County level, click on the County button from the top of the screen and then
click in the county that you wish to zoom in on.
The ticket information for any push pin may be displayed simply by clicking on Ticket from the
top of the screen and then clicking on the push pin that you wish to view.
Note: If there are multiple push pins in one area that are on top of each other you will need to
zoom in closer before you will be able to view the ticket text.
37WebTMS for Administrators
Map
To view the entire text of the ticket simply click on Ticket at the top of the screen and then click
the push pin of the ticket you wish to view. A new window will open displaying the ticket text.
I have adjusted the size of the new window to allow you to still see the County view of the map.
From this new window you will also be able to view the email headers, auto-assign, notes, re-
sponses, history, and map.
Note: The map view will only show the grids that were assigned to the ticket by the Customer
Service Representatives or Remote Ticket Entry User. This will show a visual of the location
area requested on the ticket.
38WebTMS for Administrators
Setup Options
The first tab in the Setup
Options window allows the
Administrator to change
the startup view, enable
auto-refresh every 5-60
minutes, auto-print as-
signed tickets to a specified
printer, set up the margins
for auto-printing, and the
option to automatically
close the Post Response
dialog and the Assign
Locator dialog.
The second tab allows the
Administrator to select an
alert on emergency tickets.
The alert can sound in the
Initial Receive screen or
the Assigned screen, or
both screens. Make sure
that the checkbox beside of
Only repeat alert on New
Emergencies is checked.
There are several sound
options available from the
drop down list beside
“Sound” or you may select “User specified sound” to browse for .wav files on your computer.
Under User Interface Options, the user can select to have all emergency tickets always sort to
the top, to highlight emergency, rush, and short notice tickets in a color of their choosing, and to
highlight Tickets Due and specify when due within so many hours.
The third tab allows the Administrator to change the columns that are displayed on the Initial
Receive screen. Simply check or uncheck the boxes beside each item that you want to display
on the Initial Receive screen and click OK to save the changes.
The fourth tab allows the Administrator to change the columns that are displayed on the As-
signed screen. Simply check or uncheck the boxes beside each item that you want to display on
the Assigned screen and click OK to save the changes.
The fifth tab allows the Administrator to create User buttons (hot buttons). The User buttons
are optional shortcuts for posting responses to selected tickets in either the Initial Receive or
39WebTMS System Status & Logs
+Response Queue
The +Response Queue screen shows all tickets that are in queue awaiting transmission to
O.U.P.S. Positive Response System. If for some reason there are any errors, such as WebTMS
being unable to connect to the +Response system, you will be able to identify the problem from
this screen.
Email Queue
The Email Queue screen displays all outgoing emails (tickets) that have been dispatched to the
locators and WebTMS and Call Center EOD Audits. You will be able to see any possible
errors that WebTMS may have encountered in sending these emails.
EOD Audits
The EOD Audits screen shows the Call-Center and WebTMS audit reports for each day. At the
end of each day an audit report is generated by O.U.P.S. which displays by ticket and sequence
number the amount of tickets that were transmitted to each member for that day. The WebTMS
audit report shows the number of tickets that WebTMS expected to receive for the day, the ac-
tual number of tickets it received, and the number of
tickets that were missing for the day.
To view the individual details for each day, highlight the EOD audit and click on View. You
can also view the EOD Audits for a particular month simply by selecting the month from the
drop down list at the top of the screen. A print button is available if you need to print a hard
copy of the report.
Event Log
The Event Log screen shows a record of all important events on a particular day. This includes
all changes made to the WebTMS server, such as user account creations and updates, positive
response codes created and updated, and any other additions or deletions that the Administrator
has performed. You may view the events log for a particular day (back to 31 days) by selecting
the date from the drop down list at the top of the screen.
40You can also read