Sonar GNU/Linux Getting Started Guide - Sonar Gnome 2014.1
←
→
Page content transcription
If your browser does not render page correctly, please read the page content below
Sonar GNU/Linux Getting Started Guide
Sonar Gnome 2014.1
Sonar Project, 2014
                  Copyright 2014 by Sonar Project (http://sonargnulinux.com)
This work is licensed under the Creative Commons Attribution 4.0 International License. To view a
copy of this license, visit http://creativecommons.org/licenses/by/4.0/ or send a letter to Creative
Commons, 444 Castro Street, Suite 900, Mountain View, California, 94041, USA.

Sonar GNU/Linux Getting Started Guide                                                            Page 2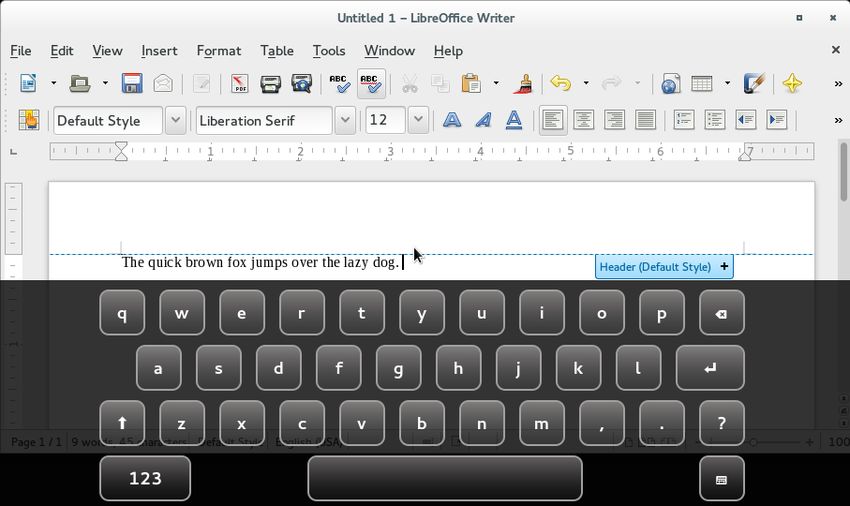
Table of Contents
Sonar Gnome 2014.1..................................................................................................................................1
Welcome.....................................................................................................................................................4
   About Sonar GNU/Linux......................................................................................................................4
   What is “GNU” anyway?......................................................................................................................4
   Translating from Windows to Sonar Linux...........................................................................................5
   Accessibility..........................................................................................................................................6
      Screen Reader...................................................................................................................................6
      Screen Magnification........................................................................................................................6
      On-Screen Keyboard........................................................................................................................6
      Head and Eye-Tracking Software.....................................................................................................6
      OpenDyslexic Font...........................................................................................................................6
Introduction to Sonar's Desktop.................................................................................................................7
   Activities Button....................................................................................................................................7
   Application Menu..................................................................................................................................7
   Clock.....................................................................................................................................................8
   Accessibility Menu................................................................................................................................8
   Status Menu...........................................................................................................................................8
Using Accessibility Applications...............................................................................................................9
   Setting Keyboard Shortcuts On the Gnome Desktop............................................................................9
   Using the Orca Screen Reader.............................................................................................................10
   Using Sonar's Screen Magnifier..........................................................................................................10
   Using the On-Screen Keyboard...........................................................................................................11
   Using Head and Eye-Tracking Software.............................................................................................11
Using Applications...................................................................................................................................12
   Web Browser.......................................................................................................................................12
   Word Processor....................................................................................................................................12
   Entertainment......................................................................................................................................13
Staying Secure and Up To Date...............................................................................................................14
   Getting the Latest Updates..................................................................................................................14
   Need More Software?..........................................................................................................................16

Sonar GNU/Linux Getting Started Guide                                                                                                              Page 3
Welcome
Congratulations! You've made the switch from a Windows PC to Sonar GNU/Linux. Some differences
exist between Sonar GNU/Linux and proprietary operating systems, and you may encounter a small
learning curve. Whether you are new to Linux or switching from Windows, this guide will help you get
the most from your Sonar computer.
About Sonar GNU/Linux
Sonar GNU/Linux (Sonar) is software for your computer – an operating system. It is unlike the
operating systems that come pre-installed on other computers, like OSX from Apple, Windows from
Microsoft or Chrome from Google. Sonar is focused on providing assistive technology. If you need an
accessible operating system that features top-notch assistive technology, you have come to the right
place. Your search is over. Sonar is the perfect fit for you. If you don't need assistive technology, don't
feel left behind. Sonar is a fully functional distribution of GNU/Linux that will work for you, too!
Sonar is a modern and secure operating system that offers many amazing features, and technology with
unparalleled quality. It uses free assistive technology to make it the most accessible operating system
available today. Sonar offers the following adaptive technology, pre-installed:
1. A screen reader for blind and low vision people.
2. A magnification program to help magnify the screen for low vision people.
3. An on-screen keyboard for people who have low motor skills and experience difficulty using a
keyboard. The on-screen keyboard can be used with a mouse or trackball to navigate the keyboard
on the screen.
4. A font called OpenDyslexic, that is designed to increase the readability of on-screen and printed
text for readers with dyslexia.
What is “GNU” anyway?
Sonar is a version (a "distribution") of GNU/Linux. Although "GNU" is a critical part of the operating
system, it is frequently omitted in common conversation. As a result, Sonar GNU/Linux is most often
referred to a "Sonar Linux", or even more simply as "Sonar." Throughout this document, we'll use all
three versions interchangeably.
You may have heard that Linux is an open source alternative to operating systems like Windows, and
that it is the basis of Google's Android and Chrome operating systems. On the other hand, "GNU" may
be an unfamiliar term. In fact the operating system commonly called "Linux" is more properly called
"GNU/Linux" because without the GNU tools that allow the Linux kernel to interact with the you, your
computer wouldn't do much. If you want to learn more about the GNU project and software freedom,
you can find more information on the project's website at https://www.gnu.org.
Sonar GNU/Linux Getting Started Guide Page 4Translating from Windows to Sonar Linux
You've made the switch from Windows to Sonar Linux, and now that you're here, you might be feeling
a bit lost. We've assembled this chart to make it easy for you to find the feature you're looking for,
whether it's your printer settings, audio controls, or where all your files are located.
If you used this in Windows... look here in Sonar... Additional tips
Audio Controls Sound Status menu > Settings button > Sound
Documents Folder Home Folder The home folder is where you put
everything you create. Documents,
audio files, video files, and more.
File Explorer File Manager Sonar's file manager is a powerful tool
for managing and searching for files in
your computer.
Microsoft Word LibreOffice Writer LibreOffice Writer is a word processor
that can create, open and save
documents that you can share with
anyone using Microsoft Word.
Network and Sharing Network Status menu > Settings button >
Network
Notepad Text Editor Gedit is the name of the text editor in
Sonar.
Printers and Faxes Printers Status menu > Settings button > Printers
Recycle Bin Trash Trash is a little less "politically correct"
but you can still recycle its contents if
you need to recover something you've
thrown away.
Jaws Screen Reader Orca Screen Reader Orca is a free, open source, flexible, and
extensible screen reader that provides
access to Sonar's graphical desktop via
speech and/or braille.
iTunes Rhythmbox Listen to music, podcasts, Internet radio
and more. You can even transfer the
files to your MP3 player for mobile
listening.
Sonar GNU/Linux Getting Started Guide Page 5Accessibility
The pre-installed accessibility features of Sonar Linux are what sets it apart from any other
computer operating system. In fact, if you installed Sonar on your own, you will already know
that even during the installation process, the Orca screen reader is active and assisting you, right
from the start!
Screen Reader
The Orca screen reader is provided for blind and low vision users. The screen reader in Sonar
is "on" by default. To turn the screen reader off or on again, press Alt+Super+S. (The "Super"
key may be labeled with the "Windows" icon on your keyboard.)
Screen Magnification
A magnification program is provided to help magnify the screen for low vision people. To turn
on screen magnification, press Alt+Super+M. To zoom in, press Alt+Super++ (plus key). To
zoom out, press Alt+Super+- (minus key).
On-Screen Keyboard
An on-screen keyboard is ready to go for people who have low motor skills and experience
difficulty using a keyboard. The on-screen keyboard can be used with a mouse or trackball to
navigate the keyboard on the screen. To turn the on-screen keyboard on or off, press
Alt+Super+K. To increase text size press Alt+Super+L and to decrease text size, press Alt+Super+D.
Head and Eye-Tracking Software
If your computer has a camera installed, or if you add one, you can use it to control the mouse
cursor. In combination with the on-screen keyboard, this will allow people with low motor
skills to navigate the software, and use the keyboard as well.
OpenDyslexic Font
Sonar Linux comes with the OpenDyslexic font pre-installed. OpenDyslexic is designed to
increase the readability of on-screen and printed text for readers with dyslexia.
In the documentation for OpenDyslexic, the author explains, "Your brain can sometimes do
funny things to letters. OpenDyslexic tries to help prevent some of these things from happening. Letters
have heavy weighted bottoms to provide an indication of orientation to make it more difficult to
confuse with other similar letters. Consistently weighted bottoms can also help [reinforce] the line of
text. The unique shapes of each letter can help prevent flipping and swapping. "
The font is available in any application that provides selectable fonts, like word processors and
browsers. OpenDyslexic can even be chosen as the default system font in System Settings.
Sonar GNU/Linux Getting Started Guide Page 6Introduction to Sonar's Desktop
Sonar Linux uses a popular Linux desktop environment named Gnome. When you first log in, you will
see a desktop displaying icons like Home and Trash, and a bar across the top of the screen. This is the
Gnome desktop environment. Gnome's top bar provides access to your windows and applications, your
calendar and appointments, and is where you'll find adjustment settings for such things as sound,
networking, power and accessibility features.
There are five components in the Sonar top bar. From left to right, they are, the Activities button, the
Application menu, the Clock, the Accessibility menu and the Status menu. Each of these provides
access to the settings and capabilities that will allow you to use your computer to its fullest. Let's start
with an overview of each of these components.
Activities Button
The button on the far left of the top bar is the Activities button. Clicking this button shows you an
overview of your windows and applications. The overview shows you live thumbnails of all the
windows on the current workspace. While viewing the Overview, you can also just start typing to
search your applications, files, folders and the web.
Illustration 1: The Activities button
On the left edge of the Overview screen, you will find a vertical region called the Dash. The Dash
shows you your favorite applications and your running applications. Click any icon in the Dash to open
that application. If the application is already running, the icon will be highlighted with a lighted region
just below it. Clicking the icon of a running application will bring up the application's most recently
used window. To open a new application window, or to display another window that is already open,
you can right-click the icon.
The grid button at the bottom of the Dash displays the Applications Overview. This shows you all the
applications installed on your computer. Click any application to run it. You can also drag an
application onto the Dash to make it a favorite. Your favorite applications stay in the Dash even when
they're not running, so you can get to them quickly.
Application Menu
The Application menu appears just to the right of the Activities menu if you have at least one
application running. It displays the icon for the currently running active application and a list of actions
that can be taken for that application. Note that the menu bar on the application window may contain
additional menus and actions as well.
Sonar GNU/Linux Getting Started Guide Page 7Clock
Sonar displays the day of the week and the time of day in the center of the top bar between the
Application and Accessibility menus. The clock is actually a button that, when you click on it, displays
a calendar and a menu that lets you adjust your computer's date and time settings. You can use these
settings to change such things as the format of the date and time as it is displayed in the top bar.
Accessibility Menu
The Accessibilities menu displays a convenient list of the
accessibility features and lets you turn each of them on or off
with a single click.
Status Menu
The menu on the far right of the top bar is the Status menu. In
the Status menu you can change the volume or screen
brightness, edit your Wi-Fi connection, check your battery
status, log out, switch users, and turn off your computer. The
three buttons at the bottom of the menu, from left to right,
allow you to launch the System Settings application, to lock
the screen, and to log out/switch users/shutdown.
Illustration 2: The Accessibility menu
Illustration 3: The Status menu
Sonar GNU/Linux Getting Started Guide Page 8Using Accessibility Applications
Setting Keyboard Shortcuts On the Gnome Desktop
Although keyboard shortcuts are technically not part of the Accessibility menu, they can be very
helpful as assistive technology. Sonar doesn’t set a lot of shortcuts for the user. We leave that up to each
person that uses Sonar. There are, however, an extensive number of keyboard shortcuts you can set for
yourself. If you would like to take a look at your own keyboard shortcuts you can press the Super key
to reveal the Overview, then type “settings”.
1. Next. locate the Settings option an press Enter.
2. Use the arrow keys to locate the Keyboard option and press Enter. Now you will have the
Keyboard Settings menu open.
3. First you will be on the Typing tab, which allows you to change available options for typing. Press
the right arrow key to move to the Shortcuts tab.
From here you can set what shortcuts you want for your sound and media. You can also set shortcuts
for moving your windows around and other system navigations. In addition, you can set shortcuts for
such things as launchers and taking screen shots. Follow the prompts at the bottom of the Keyboard
Settings window to make your changes.
1. When you find a shortcut you want to set, locate and highlight the action, and press Enter.
2. Press the key combination for the shortcut. Your new keyboard shortcut is now set and active.
Remember that the "Super" key is also known as the "Windows" key. The Alt+Super+M notation
indicates that you should press and hold the Alt key and the Super key at the same time, then the letter
“M” so that all three keys are pressed simultaneously.
Some of the accessibility keyboard shortcuts that are already provided for you in Sonar are:
• Turn screen reader on or off: Alt+Super+S
• Turn magnification on or off: Alt+Super+M
• Zoom in: Alt+Super++ (plus key)
• Zoom out: Alt+Super+- (minus key)
• Turn on-screen keyboard on or off: Alt+Super+K
• Increase text size: Alt+Super+L
• Decrease text size: Alt+Super+D
• Turn high contrast on or off: Alt+Super+H
Sonar GNU/Linux Getting Started Guide Page 9Using the Orca Screen Reader
Orca is a free, open source, flexible, and extensible screen reader that provides you with access to the
graphical desktop via user-customizable combinations of speech and/or braille. The Orca screen reader
in Sonar is "on" by default. To turn the screen reader off or on again, press Alt+Super+S.
For complete information about using and configuring the Orca screen reader, refer to the website
https://help.gnome.org/users/orca/stable/.
Note: The Orca documentation on the website occasionally refers to the "Orca Modifier" key. The key
that Orca uses by default as the "Orca Modifier" depends on whether you are using Orca's Laptop
keyboard layout or its Desktop keyboard layout:
• If you are using the Laptop layout, the default Orca Modifier will be CapsLock.
• If you are using the Desktop layout, for the Orca Modifier you can use either the normal Insert
key or the KeyPad Insert. KeyPad Insert is the same key as the 0 (zero) on the numeric keypad.
You can use the "Orca Modifier" key to get some help. Press Orca Modifier+H to enter "learn mode".
• To view Orca's documentation, press F1.
• To hear a list of Orca's shortcuts, press F2.
• To hear a list of Orca's shortcuts for the current application, press F3.
To learn more about how to use Orca to read documents and websites, the documentation is available
on the website: https://help.gnome.org/users/orca/stable/#reading.
You may find that the screen reader speaks too slowly or too quickly for you. You can adjust the rate at
which Orca speaks, and make other adjustments as well, in Orca Preferences. To get to the Orca
Preferences screens, press Orca Modifier+Spacebar. If you find yourself needing to adjust the speed
frequently, you might want to bind (map) the "increase the rate" and "decrease the rate" commands to
specific keys. That way you can more easily make these adjustments. To review (and setup) the
keyboard shortcuts and commands that Orca uses, you will want to refer to the documentation on key
bindings at this site: https://help.gnome.org/users/orca/stable/howto_key_bindings.html.en.
This is just a small sampling of the documentation that is available to you on the Orca site. Browse
around. Discover what this powerful tool can do.
Using Sonar's Screen Magnifier
If you are a low vision user and you require screen magnification, Sonar has magnification already
built in. To turn on or off screen magnification, press Alt+Super+M. You can also turn on screen
magnification in the Accessibility menu on the top bar if you prefer that method.
Once you have the magnification turned on you can zoom in by pressing Alt+Super and the plus (+)
sign. If you want to zoom out you can by pressing Alt+Super and the minus (-) sign. If you wish to
change the keyboard shortcuts you can, by opening the Overview by pressing the Super key and then
typing in “settings”. From there you can go to the keyboard settings and change all of the keyboard
shortcuts not only for the magnification but for all keyboard shortcuts.
Sonar GNU/Linux Getting Started Guide Page 10Using the On-Screen Keyboard Press Alt+Super+K to toggle the on-screen keyboard on and off. The on-screen keyboard is only visible when you need it. For example, when a text document is the active window and your cursor is in a position where you can type, you will see the on-screen keyboard. If you then click the Sonar desktop, or somewhere else that does not accept typed characters, the keyboard vanishes. Illustration 4: The on-screen keyboard. Using Head and Eye-Tracking Software Enable Viacam (frequently abbreviated as eViacam) is mouse replacement software that moves the pointer as you move your head. If you have low motor skills, with nothing more than your webcam and eViacam you can easily use your computer. You don't need anything more than a webcam to use eViacam – no cables, no dots and no additional hardware is required. With eViacam, you can control your computer with intuitive head movements. There is no need to use your hands! It's designed to eliminate the need for assistance after it's installed -- and remember, it's already installed with Sonar! Make it your own. You can customize the pointer speed, motion acceleration and smoothness, dwelling time and more! To learn how to use and configure eViacam, the user's manual is available within the software. It's also on-line at http://eviacam.sourceforge.net/help/en/contents.htm. Sonar GNU/Linux Getting Started Guide Page 11
Using Applications
Now that you have Sonar installed you most likely want to know what applications are installed, and
how to use them. If you would like to see a list of all your applications you can press Super+A. This
will bring up a list of all the applications you have installed on your system. You can choose any
application from this list and press enter or click on it to launch it. We won't cover all of the pre-
installed applications here, but let's discuss some that will likely be most popular.

Web Browser
One of the first applications you might want to use is the web browser, Firefox. To open Firefox, press
the Super key also known as the Windows key. This will bring up the Overview. You can also get there
by clicking the Activities button as we described earlier. Now that the Overview is up, start to type
"firefox" and it should automatically fill into the text box. Once you see it you can press Enter and
Firefox will open. You can do the same thing with any installed application.
Now the Overview is pretty powerful. Not only can you search for applications by name, but you can
also search by the function of the application. For example, type in something like "music" and Sonar
will find any applications that you have installed that have anything to do with music. So you don’t
need to know the name of the program. Sonar will find it for you using the Overview. You can also
search for files and folders, so you can just type the name of the file or folder and it will bring it up in
the Overview. So really the Overview is Sonar's powerful search tool for your whole system.

Word Processor
You might want to create a simple document, compose a newsletter, or write a novel, then save your
work in a file. A word processor is the perfect tool for this and Sonar already has one waiting for you to
use. Sonar is pre-installed with the LibreOffice suite of applications that includes a word processor
(Writer), a spreadsheet application (Calc), a program for creating professional presentations (Impress),
a formula editor for scientific or school work (Math), and a database program for cataloging anything
you want (Base).
As we have done before, start by opening the Overview by pressing the Super key. Start to type "word
processor" or "writer" and the word processor application will be highlighted before you can finish
typing! Press Enter to open LibreOffice Writer. Just like any other word processor you have ever used,
you can type on the screen, change the font, format the text using bold, underline and italics, create
tables, insert pictures and much, much more. Press the Save icon or Control+S to save your work,
Control+P to print, and exit using Control+Q.
As with all operating systems, Sonar provides more than one way to accomplish each of these actions,
and you will learn them over time. If you have switched to Sonar from Windows, you will adapt easily
because most things work the same way they did on your old system.

Sonar GNU/Linux Getting Started Guide                                                                Page 12
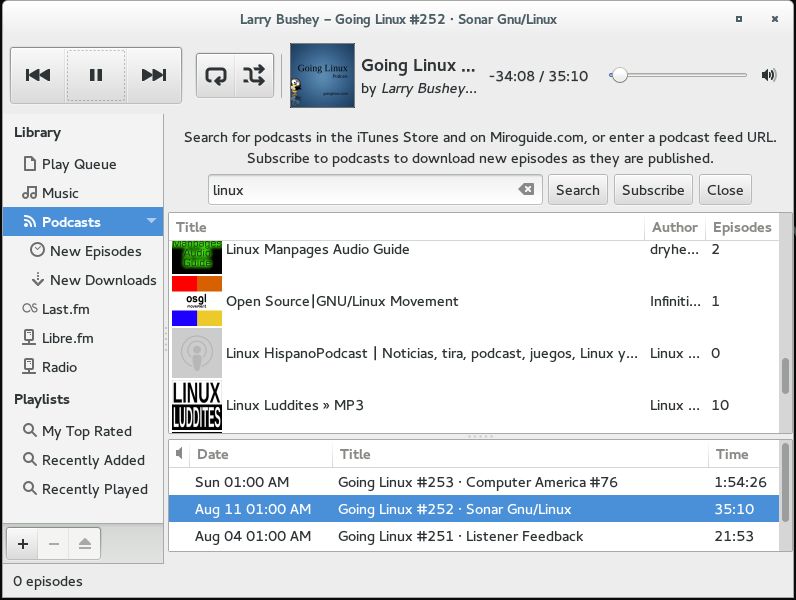
Entertainment
If you took our suggestion earlier, you will already know that when you type "music" at the Overview,
the application Rhythmbox appears. Rhythmbox is a multi-media powerhouse that rivals Apple's
iTunes. Whether you want to listen to Last.fm, your collection of MP3 files, or you are looking to
subscribe to your favorite Linux podcast, Rhythmbox gives you the ability to do all of that and more.
You can listen right from your computer, or transfer your play lists to your mobile phone, tablet or
media player, and listen on the go.
You'll find detailed instructions on how to adjust the preferences, view all of the settings, or read the
manual, by clicking the Application menu. You remember. That's right next to the Activities button on
Sonar's top panel. Just make sure Rhythmbox is open when you click. Play some tunes while you
explore all of the other applications available to you in Sonar GNU/Linux!

Illustration 5: The Rhythmbox media player

Sonar GNU/Linux Getting Started Guide                                                             Page 13
Staying Secure and Up To Date

Getting the Latest Updates
When updates are available for Sonar or any of its applications, the Update Manager displays a
notification at the bottom of the screen.
The updates are free, and are available for
download from the software repositories, also
known as "repos." You use the Update Manager             Illustration 6: Update Manager Notification
software to perform the updates.
1.    Click the Activities button (or press the Super button) to open the Overview.
2.     Type "software
     update" and press
     Enter. The Update
     Manager opens and
     pauses for a moment
     or two to contact the
     software
     repositories.
3.     When the list has
     refreshed, if there are
     updates available,
     you simply click the
     Apply button and
     provide your Sonar
     password to start
     downloading all of
     the updates.
4.     A progress bar
     keeps you informed
     as the download and
     installation proceeds.

                               Illustration 7: Updates pending

Sonar GNU/Linux Getting Started Guide                                                                  Page 14
5. When the process is complete, the window will display the message, "Transaction successfully
finished." Click Close to continue.
Illustration 8: Updates complete
6. The Update Manager does one final check and displays the message, "Your system is up-to-date."
Click Close to close the Update Manager window.
Your system is now up to date with the latest updates and security fixes for the operating system and its
installed applications. Everything is now running the latest versions available for each of your software
applications.
Sonar GNU/Linux Getting Started Guide Page 15Need More Software?
Enjoy Sonar's Free software. Never again have to worry about paying for that next upgrade, or having
to pay to get the features or functionality you’ve been looking for. Most of the software applications
you will need are either already installed in Sonar, or are available in the repositories.
Note that Sonar Linux is based on the Manjaro Linux distribution, so you may see references to
Manjaro repositories, tools, utilities, and support site as you use Sonar. If you see these, don't worry.
You are in the right place. The Manjaro Linux team provides a great deal of support for Sonar. In fact,
the release of Sonar GNU/Linux would not have been possible without their support.
You use the Package Manager software to get new software applications from the repositories.
1. Click the Activities button (or press the Super button) to open the Overview.
2. Type "add/remove software" and press Enter. The Package Manager opens.
3. The Package Manager offers four tabs to locate the software package you want. The easiest way to
find what you want is to use the Search tab. Since this tab is the default, all you need to do is begin
typing.
4. You can type the package name if you know it – like "Skype." If you don't know the name, just
search for what you want to do, like "image manipulation." The package manager displays the
possible packages that match your search in the top right panel.
Illustration 9: Searching the Package Manager
5. Click on the name of the package in the list for a brief description of the software.
Sonar GNU/Linux Getting Started Guide Page 166. With the package selected in the list, press the Spacebar or double-click the check box to indicate
that you want to install the package. A check mark appears in the check box. If you change your
mind, press the Spacebar or double-click again, to uncheck the box.
7. You can continue to search for, and check mark as many software packages as you like, before you
begin the installation process. All of the software you have selected, and any other utilities or other
packages that they require will be installed, at the same time.
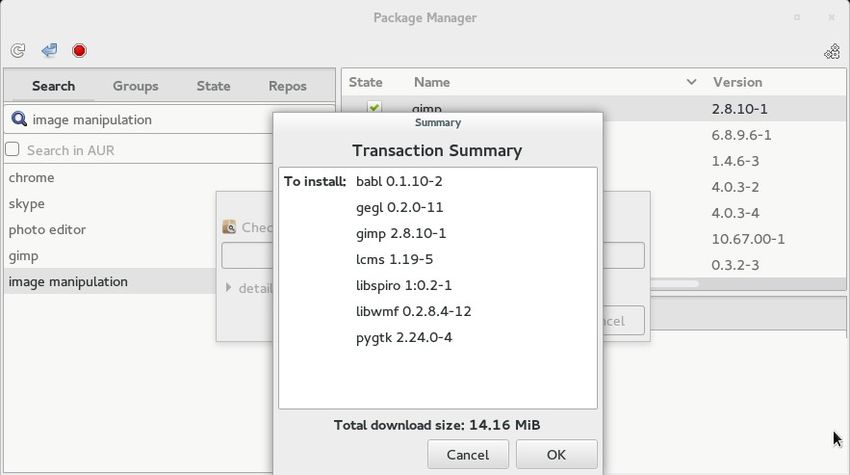
8. To display a "transaction summary" of the packages that will be installed, click the icon at the top
of the window that looks like a blue arrow. It's second from the left.
Illustration 10: Transaction Summary
9. Click OK to begin the installation.
10. A progress bar keeps you informed as the download and installation proceeds. When the process is
complete, the window will display the message, "Transaction successfully finished." Click Close to
finish.
Illustration 11: Installation Complete
Sonar GNU/Linux Getting Started Guide Page 17You can also read