DIY Weather Kit The OPAL - Glow Blogs
←
→
Page content transcription
If your browser does not render page correctly, please read the page content below
The OPAL
DIY Weather Kit
The weather is something everyone relates to. It is all around us and affects us all.
Meteorologists study the weather and use a variety of technical equipment to monitor
changes in the weather over time and make predications for the future e.g. weather forecast.
A weather forecast can include information on precipitation (rain, snow, sleet or hail), wind
(direction and strength) and air pressure. This DIY kit contains ideas and instructions which,
although not accurate enough to be used for professional weather forecasting, will enable you
to take a closer look at your local weather and record your findings in a weather diary.
Each DIY weather kit instrument could be made and
used on its own or you could make them all and
form your own mini weather station. Measurements
should ideally be taken daily and recorded in a
weather diary.
More information on weather and DIY weather kit
ideas can be found on the websites of the
Royal Meteorological Society www.rmets.org
and Met Office www.metoffice.gov.uk.
Micro-climate investigation
A microclimate is a space that has a different climate to the area around it. Investigate how the
microclimate varies in the grounds around a house or school. Place your weather instruments in a
variety of recording locations so that some are more sheltered (e.g. next to a tree) and some are more
exposed (e.g. open field). Monitor the variations in precipitation, wind strength and direction etc. at
different sites at regular intervals and record them in the weather diary. This can be monitored over a
day, week or even between seasons. Why not set a challenge at the end of the investigation to use
your findings – e.g. Where would be the best place to put the vegetable patch?
Staying safe
o Don’t look directly into the sun.
o Many of the activities involve the use of scissors. Take care.
Vulnerable people should be supervised.
o The cut edges of plastic bottles may be sharp. Trim carefully or
use sturdy gloves if necessary.
o Petroleum jelly (used in the barometer) can be an eye irritant.
Refer to COSHH guidelines where necessary.
Written by Louise Parker, Field Studies Council
© OPAL 2011. These sheets may be copied for educational use only.
Precipitation
Precipitation is any form of moisture that falls from the air to
the ground. It includes snow, hail, sleet, drizzle and rain. The
easiest form of precipitation to monitor is rainfall and this can
be measured with a rain gauge.

Rain gauge

Although a home-made rain gauge will not give you exact
measurements of rainfall, it will allow you to monitor the
variation in rainfall from day to day.

What you need:
Clean clear plastic bottle
Strong tape / paperclips
Water
Ruler (marked in mm)

Instructions
1 Cut the bottle in two as shown in the diagram.
2 Upturn the neck and place it inside the rest of the bottle.
3 Use sticky tape or paperclips to fix the two pieces together, but not too tightly as you will need to
take them apart to empty out the rainwater (see step 7).
4 Pour in water to form a base level. This will prevent the accuracy of the readings being affected by
the rounded bottom of the bottle.
5 Use sticky tape to fasten a ruler to the side of the gauge. The zero of the scale should be next to
the base level of water.
6 Place the gauge outside in the open, away from buildings and trees. Bricks or logs can be placed
around the bottle to prevent it from blowing over. Record the results each day.
7 After each reading, pour out the rainwater that has collected. You will need to take the rain gauge
apart to let the water out. Now return the water to the base level ready for the next day.

   1                                   2                                  3

   4                                   5                                  6
Wind
Wind is the horizontal movement of air. It is the result of differences in air pressure. Air moves from
areas of high pressure to areas of low pressure, and it is this movement of air which we call wind.
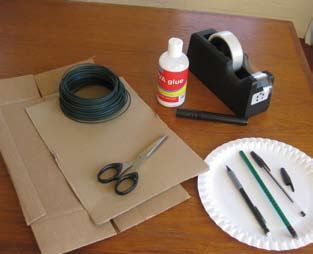
Wind vane to measure wind direction
What you will need:
Thin cardboard / card (A4 size)
Pencil and markers
Scissors
Glue or sticky tape
Pen cap
Garden wire (50cm) / wire coat hanger
Paper plate
Drawing pins
Optional:
Drinking straw
Plasticine (Place around base of the wire to add support)
Instructions
1 Draw an outline of an arrow on the cardboard / card (around 25cm long). Draw a picture of your
choice to place at the end of the arrow.
2 Cut out the arrow and shape out. Draw around the arrow and cut another one out.
3 Glue the 2 arrows together and leave a small opening in the middle.
4 Glue or tape the pen cap into the opening. Attach the picture at the end of the arrow.
5 Label the paper plate with the compass directions. Choose an area of open ground away from
buildings and trees.
6 Coil one end of the wire around a fence post leaving 10cm of wire pointing up in a straight line.
Cut the drinking straw 1cm shorter than the wire and place over the wire to add support. Make a
small hole in the middle of the paper plate with a pencil and place the plate on top of the wire. Use
a compass to find North and arrange the plate in the correct position. Secure the plate with drawing
pins. Place the pen top and arrow on top of the wire. Record the direction the wind is blowing FROM.
1 2 3
The arrow is pointing North so the
wind direction is FROM the north
4 5 6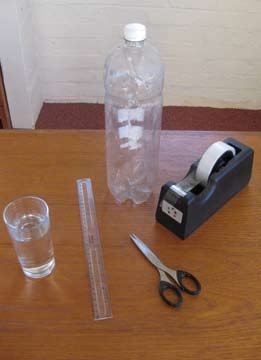
Wind sock

A wind sock can be used to monitor the wind direction and can
be a rough guide to wind speed. If the plastic strips hang down
there is no wind, if they flutter the wind is light and if the wind
sock extends fully the wind is strong.

What you will need:
Empty plastic bottle (2 litre) - cleaned and without label
Plastic bag
Scissors
Hole punch
String (10cm)

Instructions
1 Cut the top and bottom off the bottle. Trim with scissors to
make sure there are no sharp edges.
2 Use the hole punch or scissors to punch two holes at opposite sides. On the bottom end of the
plastic bottle punch sixteen holes all the way round.
3 Cut out sixteen 2 cm wide strips from the plastic bag.
4 Thread a plastic strip through each hole and tie securely leaving one end dangling down.
5 Thread the string through and tie at each side.
6 Hold the wind sock in the direction of the wind or hang on a tree/post and observe.

  1                                    2                              3

  4                                    5                              6

Compare your results

The bubble chase activity (See OPAL Climate Survey pack) is a great activity to track the wind
direction. How does this compare with the wind direction you have found using the wind sock or
wind vane? Are the results the same? Which do you think is most accurate and why?

Check you results with today’s weather forecast or a weather monitor to see how accurate they are.
Weather stations measure the wind speed at 10 metres above the ground – why might this be? Why
might the wind be different higher up?
Anemometer to measure wind speed
What you will need:
30 cm of strong thread or fishing line
Ping pong ball
Glue and sticky tape
Protractor
Piece of strong cardboard

Instructions
1 Cut out a cardboard to make a rectangle of 25 cm x 15 cm.
2 Fix the protractor to the cardboard with sticky tape, with the curved side facing outwards and just
touching the edge. You may also wish to copy the wind conversion chart (right) onto the cardboard.
3 Fix cardboard handles to each side of the rectangle.
4 Tape the thread to the centre of the zero degree reference line of the protractor.
5 Tape the other end of the thread to the ping pong ball.
6 Make sure that the thread and ping pong ball can swing freely
7 Hold the cardboard in the direction that the wind is blowing from, allowing the ball to be caught by
the wind.
8 Convert the angle the thread makes to a wind speed.

If you have one, compare your readings to those made with a                  Thread angle       Wind speed
                                                                              (degrees)         (km / hour)
‘real’ anemometer – how does it compare? Otherwise,
compare your readings with the Beaufort Scale.                                    90                0
                                                                              80 or 100             13
                                                                              70 or 110             19
                                                                              60 or 120             24
  1                                      2                                    50 or 130             29
                                                                              40 or 140             34
                                                                              30 or 150             41
                                                                              20 or 160             52

  3                                      4                               5

  6                                      7                               8
                     thread

                                                                         angle 52°
                                                                         approx. 29 km / hour
Beaufort Scale spinner
The Beaufort Scale uses observations of the environment to get a measure of wind speed.
What you will need:
2 paper plates
Ruler
Scissors
Paper fastener
Marker – fine-tip or felt-tip
Coloured pencils and paints
"EAUFORT SCALE SPINNER
Instructions
4HE "EAUFORT 3CALE USES OBSERVATIONS OF THE ENVIRONMENT TO GET A MEASURE OF WIND SPEED
1 Divide one paper plate into 12 sections using the ruler.
7HAT YOU WILL
2 Number theNEED
segments from 1 to 12.
X 0APER PLATE
3 Draw a picture of each point on the Beaufort Scale on the
2ULER
widest part of the paper plate. Write a brief description of the
3CISSORS
wind and
0APER wind speed.
FASTENER
-ARKER p üNE
4 Cut out TIPFELT circle
a smaller TIP from the second paper plate. Cut a
V shape the same size as a one section of the plate.
5 Place the smaller circle on top of the plate and attach with a
)NSTRUCTIONS
paper fastener.
o $IVIDE ONE PAPER PLATE INTO SECTIONS USING THE RULER
o6 .UMBER
Use the THE
scale to find wind
SEGMENTS FROMspeed.
Turn the dial to find the
Beaufort Scale reading.
o $RAW A PICTURE OF EACH WIND SPEED ON THE WIDEST PART OF THE PAPER PLATE 7RITE A BRIEF DESCRIPTION
OF THE WIND AND THE WIND SPEED IN MILES KM PER HOUR
Beaufort Wind Speed
Description What you see or feel
Scale
o #UT OUT A SMALLER CIRCLE FROM THE SECOND PAPER PLATE #UT A 6 SHAPE THE SAME(mph) km / hour
SIZE AS A ONE SECTION
0 Calm Calm. Smoke rises vertically Less than 1 < 1
OF THE PLATE
1 Light air Smoke drifts but wind vanes do not move. 1-3 1-5
o 0LACE THE SMALLER CIRCLE ON
YouTOP
canOFfeel
THEthePLATE
wind AND ATTACH
on your face. WITH A PAPER
Leaves FASTENER
rustle. Wind
o2 5SE THE Light
SCALEbreeze
TO üND WIND SPEED
vanes move. ,OOK AT THE PICTURES OF THE WIND SPEED 4-7 TURN THE DIAL
AND 6-11TO üND
THE BEAUFORT SCALE READING Leaves
AND MILES PER HOUR
and smaller VALUE
twigs in constant motion. Wind
3 Gentle breeze 12-19 12-19
extends a light flag.
Wind picks up dust and loose paper. Small branches
4 Moderate breeze 13-18 20-28
begin to move.
5 BeaufortFresh
Scale breeze Smaller trees sway. 19-24 29-38
Large branches in motion. Whistling heard in overhead
6 Beaufort Levelbreeze
Strong Description What you see/feel 25-31 Wind Speed
39-49
wires. Using an umbrella is difficult.
(mph)
0 Calm trees in motion. Effort
Whole Calm. Smoke
needed torises
walk vertically
against the Less than 1
7 1 Near gale Light Air Wind direction is shown by smoke32-38
but 1-350-61
wind.
not wind vane
Twigs broken from trees. Cars veer on road. Very difficult
8 2 Gale 39-46 4-762-74
toLight
walk.Breeze You can feel the wind on your face.
Leaves rustle.
Light structural damage. Chimneys and Wind vanes move.
roof tiles
9 3 Strong gale Gentle Breeze Leaves and smaller twigs in constant47-54 75-88
8-12
damaged.
motion. Wind extends a light flag.
10 4 Storm Trees uprooted.
Moderate Considerable
Breeze Windstructural
picks up damage. 55-63
dust and loose paper. 89-102
Small 13-18
branches begin to move.
11 Violent storm Widespread structural damage 64-72 103-117
5 Fresh Breeze Smaller trees sway. 19-24
Considerable and widespread damage to structures.
12 6 Hurricane Strong Breeze Large branches in motion. Whistling
73 and over25-31
>118
Destruction.
heard in overhead wires. Using an
umbrella is difficult.
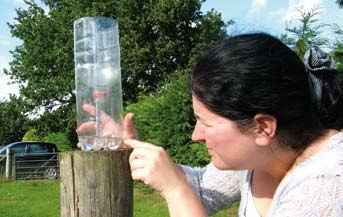
7 Near Gale Whole trees in motion. Effort needed to 32-38Air pressure Although air is invisible, it still has weight (1m3 of air weighs about 1kg). Air pressure varies daily, and is due to the weight of air in the atmosphere above us. High pressure is usually associated with warm dry weather and low pressure with wet and cloudy weather. Barometer Barometers are used to monitor changes in air pressure. This home-made barometer uses a balloon to trap air in a glass jar. When air pressure drops, the air in the balloon expands, so the pointer moves down. When air pressure increases, the air in the balloon contracts, so the pointer moves up. What you will need: Glass jar Petroleum jelly Balloon Drinking straw Drinks carton (1 litre) Sticky tape Instructions 1 Cut the tight opening off the balloon. 2 Place a small amount of petroleum jelly onto the top edge of the jar. This will help to form a seal. Stretch the balloon over the top of the jar. The balloon should form a flat surface over the jar. Secure the balloon with an elastic band. 3 Fix the straw onto the balloon platform at the top of the jar with sticky tape. Make sure the end of the straw is stuck onto the middle of the balloon to get maximum displacement (movement) when the air pressure changes. 4 Fix a paper clip to the other end of the straw. 5 For this barometer to work it needs to be kept at a stable temperature (inside not outside). Stand the drinks carton next to the straw to see where the arrow points to. Mark this point. Check the local weather report to see what the air pressure is at the moment. Record this value next to the marker. 6 Monitor changes in the movements of the pointer and check the local air pressure readings to fill in values. When you have a range of values you can continue to use the barometer to monitor air pressure and check if the barometer readings are accurate. 1 2 3 4 5 6
Weather diary

                                   Wind                   Beaufort
  Date    Time   Rainfall (mm)               Wind speed              Air pressure   Other weather observations
                                 direction                 Scale
You can also read