EBox smart Instructions for use
←
→
Page content transcription
If your browser does not render page correctly, please read the page content below
eBox smart
Instructions for use
2   Instructions for use

Fuelling becomes charging
               Dear EV Driver,

               innogy offers you modern, leading-edge
               solutions for the fast charging of electric
               vehicles. Thank you for buying the eBox
               smart.

               In order to commission your eBox, please
               download the eCharge+ app. For all further
               steps, please see the app.

                    eCharge+ app
Contents 3
Contents
04 Safety information
06 Product overview
07 Clicking the eBox into the eClick
10 Commissioning via app
11 Charging
12 Troubleshooting
14 Specifications
18 Notes Product subject to modification without prior
notice. This document might not contain the
19 Legal notice latest changes to the product’s specifications
or processes described herein.4 Safety information
Safety information
DANGER
Danger to life and limb
Danger Caution Caution Caution
Warning of electrical voltage! Turn off circuit before The feet of the eBox The contents of Small parts dangerous
remounting or are sharp-edged. the delivery must for children. Do not
replacing the eBox. Do not grip the eBox be checked for install in the presence
by its feet. completeness and of children.
intactness.
CAUTION
Significant risk of
injury/material damage
Caution: Significant risk of Note Caution Caution Note
injury or material damage! The eBox smart is a Ensure that all Check that the This is a CE-certified
maintenance-free components are warranty seal on product. All relevant
product. It does not dry throughout the the back of the eBox product standards and
contain any reparable installation. is intact. Do not rules and regulations
parts or components. operate the product applicable to the
HINWEIS Do not attempt unless the warranty product are confirmed
Information on optimising any repairs. If a seal is undamaged. in the product’s
malfunction persists, Damaged warranty EC Declaration of
the application replace the eBox. seals void the Conformity.
warranty.
Observing this information
can improve the product’s
application.Safety information 5
About this document Intended purpose Please bear in mind:
These instructions for use describe how the These instructions for use apply to the eBox • There must be no adapters, converters,
eBox smart is operated properly. The eBox must smart and to its use in Germany, Austria, and or charging cable extensions.
be handled as described in these instructions Switzerland. Please note the safety standards • The two circuit breakers are installed outside
for use. applying in the country of use. of the eBox and eClick and must be easily
The eClick serves as a docking station, so accessible.
this must be installed before the eBox can be eBox – intended use
mounted. This prior installation is described in The device is intended for use in the exterior
detail in the installation instructions provided and interior area.
with the eClick and must be performed by a In public spaces, the operator must
qualified electrician. ensure that these instructions remain
Please refer to the above-said installation permanently legible. The operation of the
instructions for the complete installation. eBox presupposes knowledge of the
Your personal safety is assured and the contents of these instructions.
eBox functions correctly only when you follow This design is intended exclusively for
exactly the steps in these instructions for the charging of electric vehicles fitted with
use. Do not perform any work on the eBox a Type-2 plug (IEC 62196-2), a Type-1 plug
when this work is not described in these (SAE J1772-2009; possible only with the
instructions for use. When in doubt, consult variant socket on the eBox), and charging
a qualified specialist. current control via the pilot signal (IEC 61851-1).
In addition, use only accessory parts that When the device does not have an attached
have been manufactured specifically for the charging cable, a Type-2 plug must be used at
eBox. least on the infrastructure side. It may not be
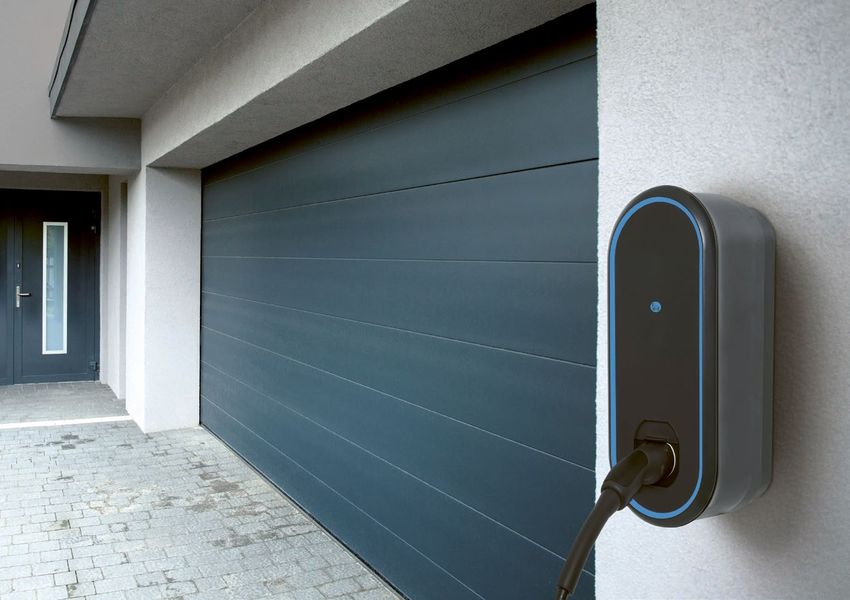
used to charge or supply other devices.6 Product overview
Product overview
Included in delivery
1 eBox smart with adhesive operating instructions
1 instructions for use with PUK label sticked on for 5
Bluetooth
eBox smart – product details
1 Shutter
2 Socket / plug compartment 8
3 Rating plate 4
4 Information on use
7
5 LED ring
6 Bluetooth pairing button
7 Vehicle connection indicator 6
8 Authentication indicator
9 eClick (delivered separately)
9
3
1
2Clicking the eBox into the eClick 7
Clicking the eBox into the eClick
Before mounting the eBox, make sure the supply to the eClick is off.
3a
3b 90°
1
2a
6
2b
4
5
01 02
If an eSmartMeter is installed, Connect the black ribbon data 1 LAN 1 RJ45 (eBox communication)
make sure the ports are connected cable of the eBox to the port 2a LAN 2 RJ45 (deactivated)
to the supplied data cable. ”5 Expansion Terminal“ at the 2b LAN 2 LSA-Plus (deactivated)
Connect port 3a (eSmartMeter) bottom right of the eClick. 3a eSmartMeter output (optional)
to port 3b (eClick) using the 3b eSmartMeter input (optional)
data cable. 4 Cable clips for S/FTP cable
Take the eBox and identify the 5 Expansion terminal (eBox communication)
connecting points (here red) on 6 LAN 1 LSA-Plus to internet router
its rear side.8 Clicking the eBox into the eClick
Caution
Make sure that the
flat ribbon data cables
are not trapped
between the eClick
and eBox when
mounting the eBox.
03 04 05
Place the eBox carefully on the Keep a firm hold on the eBox If necessary, readjust the locking
eClick, and push in the eBox to while pulling down the locking bracket until it adopts its original
the stop. bracket on the locking clip of the position. Alignment marks are
eClick. Now release the locking visible on the eClick. Check that
clip. As soon as the locking clip is the locking bracket is fully inserted.
pulled up, gently press the eBox The markers protruding laterally
onto the eClick. from the locking latch must be level
with the line mark of the eClick
housing.Clicking the eBox into the eClick 9
Note Caution
The grub screws Make sure that the
should only be fully eBox clicks correctly
inserted when the into the eClick.
locking clip is fully Marking of the locking
inserted. clip is in end position.
Grub screws are fully
screwed in.
Check box for
tight fit.
06 07
Tighten the two grub screws Power on the eClick circuit.
using the allen wrench at the rear
left and rear right of the eClick to
secure the locking mechanism in
place and the eBox on the eClick.10 Launching the app
Launching the app
Commissioning in case of private use
Danger In order to commission your eBox, please
This product contains download the eCharge+ app and set up an
antennas that emit account. For all further steps, please see
electromagnetic fields the app. The whole technical commissioning
that can interfere and the technical configuration of your
with other electronic eBox has already been performed by the
devices such as electrician.
mobile phones and
medical devices when For the commissioning of the eBox via the
exposed to prolonged eCharge+ app, it is necessary to enter the PUK.
periods of time at
intervals less than The PUK can be found on the back of this
3.5 cm. If prolonged manual. Keep this PUK in a safe place, and
exposure is expected, hand it over to the next owner of the eBox.
a minimum distance
of 20 cm is recom-
mended to avoid
interference.
eCharge+ appCharging 11
Charging
Charging involves connecting your vehicle to the eBox, authenticating the charging process, charging your vehicle, and finally disconnecting
your vehicle from the eBox. Please make sure that any connected cables are hung carefully back up. (Steps 1 and 2 are interchangeable.)
01 02 03 04
Connect your electric vehicle to Authenticate the charging Shortly after successful authenti Charging is finished* when both
the eBox. To do so, plug the cable process via the eCharge+ app. cation, the LED ring and vehicle the vehicle link indicator and the
first into the eBox. When your For this you will need the charging link indicator start flashing blue, LED ring light up green. After the
vehicle is detected, the vehicle port number displayed on the front and your vehicle starts to charge. vehicle is unlocked or charging is
link indicator lights up green. of the eBox. When authentication- For energy saving purposes, the complete, disconnect the charging
free charging has been set, ring goes out after some minutes cable and disconnect the eBox
charging starts immediately. when you move away from the from the vehicle.
Using charging cables properly eBox.
Do not use charging cables with * Optionally, charging may also be
adapters of any kind on the eBox. stopped via the eCharge+ app.
The use of extension cords is not
permitted.12 Troubleshooting
Troubleshooting
Troubleshooting Charging malfunction Authentication faults
Most eBox malfunctions are caused by In rare cases, charging is disrupted or reduced • The authentication indicator does not light
incorrect use. These errors can not be by external effects. This can occur when: up when:
detected by the eBox and therefore can authentication fails via the eCharge+ app.
not be displayed by the device. This applies • the eBox overheats: Please repeat authentication via the
e.g. to the following situations: The eBox down-regulates the charging eCharge+ app.
power automatically when a temperature
• No power source connected limit is exceeded and so temporarily reduces • Vehicle link indicator does not light up
charging. Shield, therefore, the eBox from (does not light up green):
• Charging cable not plugged in correctly direct sunlight. Communication fault between the vehicle
and eBox. Check the connection between
If a malfunction persists despite adherence the vehicle and the eBox, and if necessary
to the instructions for use, we recommend connect again.
restarting the eBox. To do so, disconnect Note
briefly the eBox from the mains by switching There is no facility • Bluetooth pairing button does not light up:
the (miniature) circuit breaker in sub-installation, for an additional Bluetooth communication fault between
and then reconnect it. If necessary, also check ventilation option the eBox and your smartphone / tablet
the connection on the vehicle side. on the eBox. (relevant only in the eBox private offline
mode). Initialise the Bluetooth connection on
your smartphone / tablet and the eBox by
• Charging problem at the vehicle: pressing again the Bluetooth pairing button.
Check the fault display in your vehicle.Troubleshooting 13
Danger Critical fault
Device error. A serious device fault has rendered the eBox
Warning of inoperable, and it must be disconnected
electrical voltage. immediately from the mains. If the fault
persists after a restart and after the eBox
has cooled down by itself, then consult a
qualified electrician, and if necessary have
the eBox replaced.14 Specifications
General specifications
Number of charging ports 1
Cable length (version with cable) 6.5 m
Charging mode Mode 3 (IEC 61851)
Protected internal areas; unprotected exterior areas
Applications
exposed to rain and direct sunlight
IP code of the housing IP 55
Protection category (impact strength) IK10 in accordance with IEC 62262:2002
UV protection Outdoors (F1)
Housing material Lexan® EXL9330 (copolymer)
3.1 kg (version without cable)/6.4 kg (version with attached cable)
Weight
(each without eClick and without eSmartMeter)
Storage temperature -30 °C to +80 °C
515 mm x 225 mm x 235 mm (version without cable)/
Packaging dimensions (W x D x H)
695 mm x 370 mm x 235 mm (version with attached cable)
Power consumption in standby mode 6W
Certification CE certificate (tested and confirmed by a certified body)
Foliation High-quality standard film; custom films possible for a surcharge
Charging port number Charging port number lasered on shutter bracket in productionSpecifications 15
Working conditions
-30 °C to +50 °C (full load output at -30 °C to +50 °C)
Operating temperature
Thermal overload protection: output power reduced at higher temperatures
Air humidity 5 % to 95 % as defined under IEC 61851-1 Ed.3/EN 61851-1 (2017)
Max altitude above sea level Max 2,000 m (air pressure: 860 hPa to 1,060 hPa)
IEC protection class I
Electrical input/power connection
Three-phase current 400 V AC, 32 A (22 kW)/20 A (13.8 kW)/16 A (11 kW)
Input power from eClick
Alternating (single-phase) current 230 V AC, 32 A (7.4 kW)/20 A (4.6 kW)/16 A (3.7 kW)
Charging power 3.7/4.6/7.4/11/13.8/22 kW (16 A, 20 A, 32 A; single- or three-phase)
Three-phase current 400 V AC, 32 A (22 kW) or 16 A (11 kW)
Output power
Alternating (single-phase) current 230 V AC, 32 A (7.4 kW) or 16 A (3.7 kW)
Without cable: Type 2 plug assembly as defined under DIN EN 62196-2
with automatic plug locking, shutter
Plug assembly
With cable: Type 2 plug as defined under DIN EN 62196-2,
plug compartment on eBox, shutter
Consumption measuring eSmartMeter: optional for eClick, MID-compliant (Europe) and CE-certified
Protective equipment
DC residual current monitoriing (pro- Integrated AC/DC sensitive RCD,
tection of people) triggering at: DC 6 mA
Welding detection (indication signal for Connection via change-over contact (max. 230 V, 1 A),
welded power contacts) use e.g. for shunt release for disconnection of main power path
Integrated overvoltage protection According to IEC 61851-21-2:2018 (ESD/surge/burst)16 Specifications
Communication
Vehicle communication Charging current controlled via PWM pilot signal in accordance with IEC 61851-1:2017
Direct communication Bluetooth Class 1 and 2 (power level)
Communication protocol
OCPP1.6J to innogy eOperate backend or to third-party provider backend
B2B application
Communication protocol
OCPP2.0 to innogy eHome backend
B2C application
Backend communication WLAN with 2.4 GHz IEEE 802.11 b/g/n with WPA2 (antenna gain, frequency-dependent, max. 4.6 dBi)
Authentication
Authentication/activation Free charging, eCharge+ app (smartphone app for iOS®/Android™)Specifications 17
UI/UX
LED ring for charging status;
Display/interaction 2 status LEDs: authentication, vehicle link;
1 status LED as touch button: Bluetooth
Operating instructions Graphical operating instructions have been installed on the product
External accessories
Type A RCD:
User protection to be installed in
32 A connection: ABB F204A-40/0.03, Type A, 4-pin (short time delay operating voltage: 230/400 V AC)
sub-distribution
16 A connection: ABB F204A-25/0.03, Type A, 4-pin (short time delay operating voltage: 230/400 V AC)
Over-current protection device:
Short circuit/overload protection to
32 A connection: ABB S203-NA K40A (rated switching capacity: 6,000 A)
be installed in sub-distribution
16 A connection: ABB S203-NA K20A (rated switching capacity: 6,000 A)
The eBox smart is available for wall-mounting as the following variants:
eBox smart, Type 2 socket
eBox smart, Type 2 plug with cable
each including eClick
The eBox smart is not branded and has a neutral colour. On request, the eBox may be ordered with the
innogy branding. Additional accessories, e.g. the eSmartMeter, may be included in the order.
Note
Android is a trademark
of Google LLC.18 Notes
Notes
The product eBox smart must always be 6. The product can be used in closed and Cleaning
used in conjunction with the eClick. public areas. The eBox may only be cleaned with water;
the use of lukewarm water is recommended.
Electric vehicle charger characteristics 7. The product can be installed on walls and Do not use cleaning agents containing solvents.
(IEC 61851-1 Ed 3): in compatible Pole products.
Disassembly
1. The product must be connected to an 8. The product eBox smart in conjunction with To dismantle the eBox, you first have to
AC mains. the eClick or coverage is rated electrical disconnect the power supply. First unscrew
protection class I. the two grub screws on the side and remove
2. The product is connected permanently The open eClick is rated electrical the eBox from the eClick by pulling down the
to the mains. protection class I. locking clip, Remove the charging unit and, if
necessary, the Ethernet cables, that connect
3. The product is eClick-compatible. It is Maintenance/repair the eBox and the eClick.
available in the variants with a Type-2 The eBox is a maintenance-free product.
socket and with a Type-2 plug with It does not contain any repairable parts or
connected cable. components. Do not perform any repair
work. In case of a permanent error, replace
4. The product is compatible with electric the eBox.
vehicles charged with AC in Mode 3.
Disposal
5. The product can be installed and used in The eClick and the eBox are are electrical
protected indoor areas and unprotected devices. These must be disposed according
outdoor areas exposed to rain and direct to the EU directive WEEE II or the ElektroG Danger
sunlight. of October 20, 2015 or in Switzerland The eClick must be disconnected
according to VREG, SR 814.620 of January 14, from the power supply before
1998. disassembly. Make sure that
all components are dry during
disassembly.Legal notice 19 Legal notice Copyright © 2019 innogy eMobility Solutions GmbH. All rights reserved. This document is copyright-protected. It may not be changed, reproduced, or distributed without the prior agreement issued in writing by innogy eMobility Solutions GmbH. innogy eMobility Solutions GmbH Flamingoweg 1 44139 Dortmund Germany Head office: Dortmund, Germany Registered as a company at the Amtsgericht Dortmund, trade register no. HRB 30359
eMob-79/12.19
innogy eMobility Solutions GmbH
Flamingoweg 1
44139 Dortmund
Germany
emobility@innogy.com
innogy-emobility.com
You can also read