Eventide H9000 User's Manual Software Version 1.0 - Part No: 141242 Rev 2 2018 Eventide Inc., One Alsan Way, Little Ferry, NJ, 07643 USA - DJ-Store
←
→
Page content transcription
If your browser does not render page correctly, please read the page content below
Eventide H9000 User’s Manual

        Software Version 1.0

                      Part No: 141242 Rev 2

  ©2018 Eventide Inc., One Alsan Way, Little Ferry, NJ, 07643 USA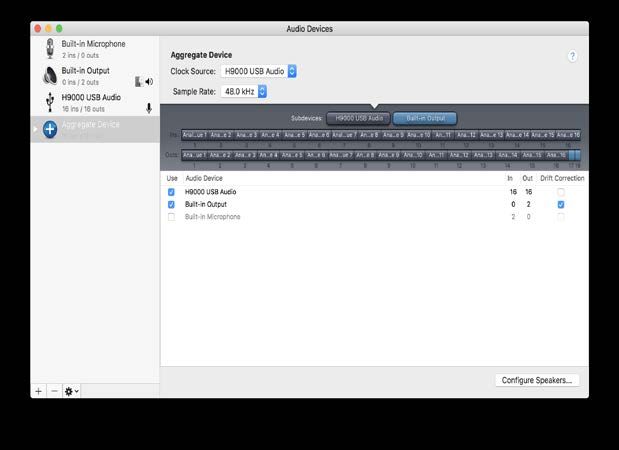
Table of Contents

INTRODUCTION ........................................................................................................................................ 4
  A NOTE ON THE USER INTERFACE ........................................................................................................................ 4
  WHAT’S IN THE BOX................................................................................................................................................ 4
  H9000 FEATURES ................................................................................................................................................... 5
  TERMINOLOGY ..........................................................................................................................................................6
PRESETS ...................................................................................................................................................... 8
H9000 HARDWARE ................................................................................................................................. 9
  STANDARD FRONT PANEL ...................................................................................................................................... 9
  REAR PANEL .......................................................................................................................................................... 12
OPERATING THE H9000 ..................................................................................................................... 15
  A NOTE ON “LATCHING” SOFT KEYS: ................................................................................................................ 15
  THINGS TO KNOW ABOUT SIGNAL ROUTING.................................................................................................... 15
  SESSIONS ................................................................................................................................................................. 16
  FX CHAINS .............................................................................................................................................................. 18
    Direct I/O .................................................................................................................................................................20
    The FX Chain Preset Browser..........................................................................................................................21
    Mix ...............................................................................................................................................................................22
    Levels ..........................................................................................................................................................................23
  ALGORITHMS .......................................................................................................................................................... 24
    Algorithms Overview ..........................................................................................................................................24
    Algorithm Selection Screen ..............................................................................................................................28
  PARAMETERS ......................................................................................................................................................... 31
    Editing Parameters in an Algorithm ...........................................................................................................32
    Functions ..................................................................................................................................................................35
  METERS................................................................................................................................................................... 37
  SAVING AND IMPORTING DATA........................................................................................................................... 40
    Saving.........................................................................................................................................................................40
    Importing Data......................................................................................................................................................42
  SCENES .................................................................................................................................................................... 43
    Trigger Source Options ......................................................................................................................................43
    Working with Scenes ..........................................................................................................................................44
SETUP........................................................................................................................................................ 47
  INFO ......................................................................................................................................................................... 48
  NAME....................................................................................................................................................................... 49
  CLOCK ...................................................................................................................................................................... 50
  TEMPO..................................................................................................................................................................... 52
  PREFERENCES ........................................................................................................................................................ 53
  PEDALS.................................................................................................................................................................... 54
  ANALOG REFS ........................................................................................................................................................ 56
  NETWORK ............................................................................................................................................................... 57
    Ethernet Setup .......................................................................................................................................................57
    Wireless Setup ........................................................................................................................................................58
    Creating a Local Access Point .........................................................................................................................59
  SOFTWARE UPDATE.............................................................................................................................................. 60

                                                                                           2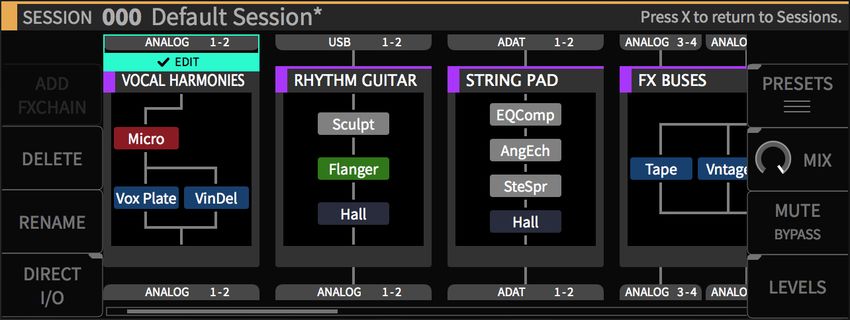
USING THE H9000 AS A COMPUTER AUDIO INTERFACE ........................................................ 61
  CHANGING THE USB AUDIO SAMPLE RATE ....................................................................................................... 61
  USING THE H9000 WITH OS X .......................................................................................................................... 61
    Using the H9000 With Your Existing Computer Audio Interface ...................................................62
APPENDICES ........................................................................................................................................... 63
  APPENDIX A: SIGNAL FLOW ................................................................................................................................ 63
  APPENDIX B: STARTUP SEQUENCES .................................................................................................................. 65
  APPENDIX C: WORD CLOCK TERMINATION IN THE H9000.......................................................................... 66
  APPENDIX D: H9000 MIDI FUNCTIONALITY .................................................................................................. 67
  APPENDIX E: H9000 PRESETS........................................................................................................................... 68
  APPENDIX F: H9000 ALGORITHMS ................................................................................................................... 78
SAFETY INFORMATION ....................................................................................................................... 96
LIMITED WARRANTY .......................................................................................................................... 97

                                                                             3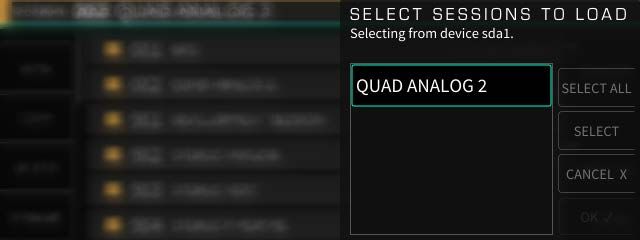
Introduction
Congratulations on your purchase of the Eventide H9000, the new flagship
processor in the Eventide product line.

The H9000 is designed to be an incredibly versatile tool, allowing you to process a
large number of channels using the latest digital and networked audio formats, and
offering the great sounding effects you have always loved from Eventide.

The H9000 is available in two basic models:

   •   The H9000 Standard: Full set of front panel controls and a color display.
   •   The H9000R: Blank front panel. Requires emote remote control software.

Both versions of the H9000 accept a range of expansion boards that support
industry standard protocols for digital and networked audio I/O.

A Note on the User Interface
The standard H9000 comes with a front-panel color display and a large complement
of hardware controls, allowing you to navigate the device with ease. However, we
highly encourage you to download and use the full-featured control app/plug-in
“emote”, available as a free download at www.eventideaudio.com/emote. emote is
required to control the blank front panel model, H9000R.

emote is available as a stand-alone program for Windows and OS X computers, as
well as a plug-in for VST, AU and Pro Tools. emote gives you control of all features
and settings of your H9000, allowing you to craft your effects extremely quickly and
intuitively. Think of emote as your artistic partner, letting you dig deeper into the
creative potential of the H9000.

What’s in The Box
Your H9000/H9000R comes with the following contents:

   •   H9000/H9000R 2RU Rack Mount processor
   •   Rack Mount Screws
   •   User’s Manual
   •   Registration/Warranty Card
   •   Wireless Network (WIFI) Dongle
   •   Power Cable
   •   USB Cable

                                          4
H9000 Features
The H9000 is designed to be easy to use while still giving you a large amount of power,
control and versatility through the implementation of the following features:

Multiple Quad ARM Processors
The H9000 uses multiple cutting-edge effects processors, allowing it to process a large
number of I/O channels and up to 16 separate effects algorithms simultaneously.

Flexible and Adaptable Effects Structure
Your H9000 can utilize up to 4 separate FX Chains, with each chain containing up to 4
separate processing algorithms. The FX Chains can be routed in series, parallel, and
more.

Large Complement of Analog and Digital Input / Output
Multiple formats and connector types allow you to easily integrate the H9000 into a
variety of setups.

Expandable I/O
Three option card slots allow you to integrate your H9000 into the latest digital audio and
networked audio environments. We are always developing new option cards, ensuring
that your processor is as future-proof as possible in the always-evolving world of digital
and networked audio formats.

Full Front Panel Control
While we offer the extremely useful emote control app, the standard H9000 also provides
intuitive front panel control using a large color display, context sensitive soft keys, and a
large complement of physical navigation controls.

Network Connectivity
Connect the H9000 to your Local Area Network for quick and easy software updates, as
well as full control through our emote software.

Computer Audio Interfacing
USB 2.0 allows you to interface your H9000 with your audio software as a standard
audio interface with 16 channels of I/O. Send, process, and return 16 separate channels of
individual DAW tracks.

Easy Sharing of FX Chains and Sessions
The H9000 uses standard, “off-the-shelf” USB thumb drives to save and import your
custom effects settings, making it easy to back up, carry, and share your creative efforts.

                                              5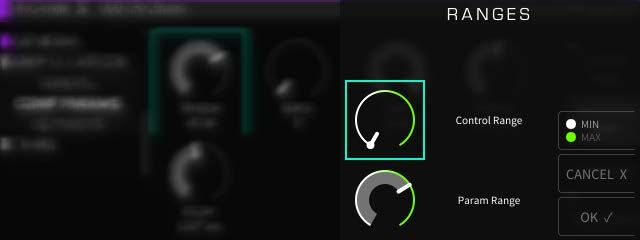
Terminology
In order to get the most out of your H9000, please familiarize yourself with the four
main terms below which represent the “hierarchy” used in the product:

   •   Algorithm
   •   Parameters
   •   FX Chain
   •   Session

Algorithm
Over many years, Eventide has created a vast library of audio processing routines,
which exist as effects processing “modules”. Some of these are simple, such as a low
pass filter, a limiter, a compressor, etc., while others are more complex, such as an
FFT or a reverb network.

An Algorithm in the H9000 is a combination of some of these modules, and of certain
variable values associated with the modules that make up that algorithm. The
designer of the algorithm might choose to set some variables of some modules to a
specific value that cannot be changed by the user, while at the same time allowing
that user to change the values of other variables.

Simply put, the algorithms are the H9000’s “secret sauce”, with specific effects
parameters that are adjustable by you, the user.

Parameters
Parameters are the individual adjustments you can make within an effects algorithm
which customize that effect. On the H9000, when you navigate to a specific
algorithm you are presented with that algorithm’s specific parameters, which you
can easily adjust.

A parameter might control one variable of one underlying processing module, or it
may control several variables of several modules. Some parameters may be
adjustable, whereas for others the designer may choose to set some of the
underlying variables to a fixed value and not “bring them out” to the user of the
effect.

For example, a reverb algorithm would present you with settings such as reverb
time, room size, decay time, etc. In contrast, a guitar amp emulator might offer
parameters such as gain amount, low/mid/high EQ, etc.

                                          6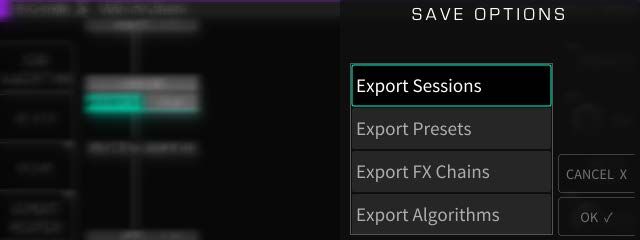
FX Chain
The H9000 allows you to chain up to 4 separate algorithms together into a custom
FX Chain. The FX Chain is fed by an audio input, then the audio is routed through up
to 4 algorithms, and then finally to an audio output.

You are free to decide which algorithms are included in the FX Chain, the order they
process the audio in, and even determine aspects such as separate parallel and
series audio paths.

Sessions
A Session is the highest level on the H9000 hierarchy. It saves the entire state of the
product at any given moment, including:

   •   The currently loaded FX Chains (up to all 4)
   •   The current settings for the parameters within the FX Chains
   •   The current input/output assignments to and from the FX Chains
   •   The current state of the assorted global settings

The standard H9000’s front panel contains dedicated hardware buttons for all four
of the above modes, making it quick and easy to access any level of the hierarchy at
the touch of a button.

                                           7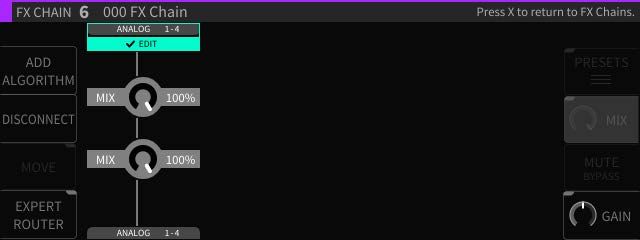
Presets
The term “preset” is perhaps overused in our industry, so we would like to clarify
how this term is used by the H9000. The H9000 supports 3 types of presets, each
corresponding to the top 3 levels of the hierarchy. You can save and load:

Algorithm Presets

   •   Algorithm-related parameter values
   •   General parameter values related to the algorithm container (mix,
       mute/bypass, input/output gains)
   •   Mappings of parameters to external controllers and Functions (can be
       excluded at load time)
   •   Assorted metadata (Name and ID are the most relevant to the user)

FX Chain Presets

   •   Everything contained within an algorithm preset, for all the algorithms
       present in the FX chain
   •   General parameter values related to the entire FX chain container (mix,
       mute/bypass, input/output gains)
   •   Additional mappings of these FX Chain parameters to MIDI controllers
   •   All routing information internal to the FX Chain (from the FX chain inputs,
       to/between algorithm containers, to the FX chain outputs). No Physical I/O
       information is included
   •   Function values, as well as mappings of the actual Function knobs to external
       controllers
   •   Metadata (Name and ID are the most relevant to the user)

Sessions

   •   Everything contained within an FX chain preset, for all the FX chains present
       on the device
   •   Routing information external to each FX chain, including:
           o Physical I/O in and out of each FX chain container
           o Direct I/O connections made between Physical I/O
   •   Additional input/output gain settings for each I/O channel routed to/from
       the FX chain
   •   All the settings found in the Setup mode (these can be excluded by category
       when loading)
   •   All the Scene Maps found in Scenes mode, along with current active map
       index
   •   LED meter mappings
   •   The state of Global Mute/Bypass
   •   Metadata (Name and ID are the most relevant to the user)

                                         8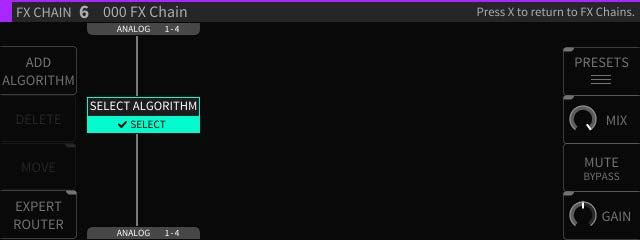
H9000 Hardware
Standard Front Panel

The H9000 has a full set of front panel controls, allowing for quick and easy control
of all of its features. Note that the color display on the front panel is not a
touchscreen. However, eight dedicated “soft keys” are available, with their specific
function always tied to a specific, context sensitive adjustment located adjacent to
them on the screen.

If you prefer to install the H9000 in a location where working with the front panel is
not practical or convenient, all adjustments can also be made using our emote
software.

The H9000 front panel contains the following controls:

Setup
Press the Setup button to enter the setup menu, where you can configure assorted
preferences for your device.

Save/Import
Press the Save/Import button to save the different types of presets to internal
memory, as well as optionally saving to an attached USB drive.

Long-press the Save/Import button to import saved presets into the H9000. See the
section “Saving and Importing” for more details.

Tap/Scenes
Press the Tap button multiple times to set a tempo (measured in BPM). This tempo
setting will be used as a sync reference for time-based effects such as digital delay.

The Tap button’s inset LED illuminates in time with the tempo you have set, giving a
visual indication of the tempo itself. Note that if you’re not a fan of constant
flashing, this can be disabled in the Setup menu.)

Long-press the tap/scenes button in order to create a scene; a naming screen will
come up to allow you to create a name for the scene. See the section “Creating
Scenes” for more details.

                                           9
Mute/Bypass
Press the Mute/Bypass button in order to mute the audio output of the H9000. Long-
press the Mute/Bypass button in order to bypass any and all processing while still
preserving the flow of audio through the I/O connectors and FX chains.

When either Global Mute or Global Bypass is activated, an indicator will show in the
upper right hand corner until deactivated.

Meters
Press the Meters button to switch the display to a full-fledged meter bridge.

Soft Keys
These 8 unlabeled buttons (four on either side of the display) allow you to quickly
navigate the H9000’s front panel user interface. The soft keys correspond to
different functions and are always context sensitive to the currently screen.

Color Display
The H9000’s large color display allows you to both view and control all aspects of
the product while working with its front panel controls.

8-Channel Meters
These 3-segment hardware meters display metering information for the H9000 and
are active at all times.

Cursor Diamond
Use the 4 keys of the cursor diamond to navigate up, down, left and right.

Enter (√)
Press the Enter (check mark) button to confirm or complete an action that you are
currently performing.

Cancel (X)
Press the Cancel (X) button to “cancel out of” an action.

Jog Wheel
The large, heavily weighted jog wheel is used to both navigate around the display, as
well as adjust a currently highlighted setting. For example, if adjusting a room size
parameter in a reverb algorithm, you can spin the wheel to comfortably adjust the
specific parameter value.

                                          10
Mode Buttons
The H9000 has 4 dedicated Mode buttons that let you switch to any of the editing
modes with a single touch. The mode button illuminates to remind you which mode
you are currently in, at any given time.
• Sessions
• FX Chains
• Algorithms
• Parameters
Power
Press the latching power button to turn the H9000 on or off.
USB Ports
The front panel USB ports provide three separate functions:
• Connect a standard USB thumb drive or hard drive to either of the front/rear
panel USB ports to save or import any H9000 presets you have created
• Attach the included USB Wi-Fi dongle to connect the H9000 to a local area
network
• Connect a class-compliant USB MIDI controller for real-time adjustment of
assorted H9000 functions
Number Pad
Use the buttons on the number pad to type in a custom name, for any naming screen
you are presented with. The number buttons operate “vintage mobile phone” style,
where each button cycles through multiple letters and also offers special characters.
Up/Down Arrows
The up/down arrows act as modifier keys for the number pad when naming an
object, allowing you to switch between upper and lower case characters as well as
enter in different symbols. You can also use the arrow keys to fine-tune parameter
values, as well as scroll through list items.
Delete (CXL)
Press the CXL button to delete a character you have typed when creating a custom
name. Long press the CXL button to clear the entire text field.
Return
Press the return arrow to confirm the name you have typed in the naming field.
11Rear Panel
The H9000’s rear panel offers a wide variety of audio and data connections,
allowing it to be used in many different environments and workflows.
Power Connector
Connect your H9000 to your power source using a standard IEC power cable. The
H9000’s power supply is designed to work with a wide variety of international
voltages; your unit will ship with a power cable designed to work in your territory.
Pedal (x2)
The H9000 allows you to connect 2 separate foot pedals, which you can then assign
to different functions of the processor. This ability is useful in a live performance
situation.
Relay (x2)
The dual ¼” relay connectors allow H9000 actions to be completed using standard
relay signals.
Note: In the current 1.0 Firmware, the relay connectors on the H9000 are not yet
operational. Please check back at www.eventideaudio.com for details of a future
software update that will enable their operation.
Ethernet Connector
The H9000’standard RJ-45 connector allows you to connect it to your Local Area
Network (LAN).
Once connected, you can view and control the H9000’s operations using emote.
Additionally, if your LAN has Internet access, your H9000 can connect to Eventide’s
servers to install software/firmware updates.
USB A Connector
The rear panel USB ports provide the exact same functions as the front panel ports:
• Connect a standard USB thumb drive or hard drive to either of the rear panel
USB ports to save or import any H9000 presets you have created
• Attach the included USB Wi-Fi dongle to connect the H9000 to a local area
network
• Connect a class-compliant USB MIDI controller
12USB B Connector
Connect the H9000 to your Mac or PC, allowing you to use it as a 16-input, 16-
output computer audio interface.
AES/EBU Connector
This connector allows you to feed the H9000 with 8 channels of AES-EBU digital
audio, and also allows the unit to output 8 channels, all on the same single DSUB
connector.
AES/EBU 2-channel Input
This XLR input accepts a standard 2-channel AES/EBU digital audio signal.
AES/EBU 2-channel Output
This connector outputs 2 channels of audio in the AES/EBU digital audio format at
whatever sample rate the system is currently set to.
S/PDIF Input
This input accepts a standard 2-channel S/P DIF digital audio signal.
S/PDIF Output
This connector outputs 2 channels of audio in the S/P DIF digital audio format at
whatever sample rate the system is currently set to.
Note: The H9000’s digital audio connectors support the following sample rates:
• 44.1kHz
• 48kHz
• 88.2kHz
• 96kHz
Analog Input 8-channel
This connector feeds the H9000 with 8 channels of balanced analog audio input.
Analog Output 8-channel
This connector outputs 8 channels of balanced analog audio.
Note: You can adjust the operating level of the 8-channel analog inputs and outputs
in the Setup menu, between +4dBu and -10dBv. Levels can be set independently for
each stereo pair of analog inputs and outputs.
13Analog Input 2-Channel
These dual balanced XLR connectors accept two channels of balanced analog audio.
Analog Output 2-Channel
These balanced XLR connectors output two channels of balanced analog audio.
MIDI Input
The MIDI input allows you to control various H9000 parameters with incoming
MIDI messages, using MIDI controller hardware or MIDI software of your choosing.
The MIDI input also allows you to synchronize the H9000’s time-based effects to an
incoming MIDI clock signal.
MIDI Output
The MIDI Out connector outputs a MIDI clock signal, allowing you to synchronize
other equipment with the internal tempo set for your unit.
MIDI THRU
The MIDI THRU connector accepts any incoming MIDI signals and outputs a
mirrored duplicate of those signals. This allows you to daisy chain multiple MIDI
devices when you don’t have enough MIDI ports on your standalone MIDI interface.
Word Clock Input
This connector allows the H9000 to slave its digital system clock to an incoming
word clock signal. It is compatible with word clock signals ranging in sample rate
from 44.1kHz to 96kHz.
Work Clock Output
This connector outputs the H9000’s digital clock signal at the unit’s currently
configured sample rate.
Optical Input
The H9000’s optical input accepts an 8-channel ADAT signal.
Optical Output
The optical output sends 8 channels of ADAT format digital audio.
Note: The ADAT optical connectors only support sample rates of 44.1kHz and
48kHz; they are not operational when the H9000 is set to run at higher sample rates
of 88.2kHz or 96kHz.
14Operating the H9000
In this section, we will show you how to navigate around the H9000 front panel,
perform common operations, and operate the unit in general.
A Note on “Latching” Soft Keys:
The H9000 UI has context-sensitive “soft keys” on the left and right sides of the
display.
There are two different types of soft keys on the H9000:
• “Normal” soft keys: These execute their labeled action when pressed
• “Latching” soft keys: When pressed, they change the front panel display to a
different state. Think of the latching soft keys as a quick and easy way to
access “sub-menus” or alternate screens on the H9000
Latching soft keys are visually distinguished by a small triangular “flag” in the top
corner of the key.
In this user’s manual, any time you are presented with a list of soft key functions,
latching soft keys will be distinguished with an underline.
Things to Know About Signal Routing
There are a few general “rules” about signal routing in the H9000 which are useful
to keep in mind.
● You can only use one of the following digital audio protocols at any given
time:
○ AES3 (aka AES/EBU) over the DB25 connector
○ AES3 (aka AES/EBU) over the XLR connector
○ S/PDIF over the optical connector
○ S/PDIF over the RCA connector
○ ADAT over the optical connector
● When using S/PDIF over the optical ADAT connectors, you can only work at
sample rates of 44.1kHz and 48kHz. 88.2kHz and 96kHz are not supported.
● FX Chains support 8 inputs and 8 outputs. However, the eight outputs of an
FX Chain can be “multed” to an arbitrary number of physical Input/Output
channels, computer audio interface channels, etc.
15Sessions
A Session is the “big picture” for the H9000, a snapshot of the current state of all settings
on the unit.
To load a session, press the front panel Sessions button; the button will illuminate as a
reminder you are currently working with the sessions screen.
The screen will switch to the Sessions view, presenting you with a numbered list of
sessions available for loading. The presently loaded session is displayed in the title bar at
the top of the screen.
There are several different ways to navigate through the list of sessions:
• Press the cursor up/down buttons or rotate the wheel to scroll through the list one
entry at a time;
• Press the cursor left/right buttons to navigate through the Sessions list one page at
a time.
• The session you have currently navigated will highlight in green.
• Press the Enter button to load the highlighted session.
• The chosen session will load and you will automatically be taken to the FX
CHAINS screen where you can edit the session’s FX Chains.
Session Screen Soft Keys
The 8 Session soft keys offer additional session-related functions:
• New
• Copy
• Delete
• Rename
• Search
• Preview
• Load
16New
Press the New soft key to create a new session. If you have made changes to the
currently loaded session, you will be prompted to save your changes first. You will
then see the Create New Session screen; press the Create New Session soft key (or the
Cancel soft key if you wish to cancel out of the operation). The new session you have
created will be titled “Default Session” and will contain a default FX Chain.
Copy
Press the Copy soft key to make a copy of the currently highlighted session. The
naming screen will appear, allowing you to create a new name for the copy of the
session. In this sense, it is similar to the “Save As” function on a word processor
application, where you can save a copy under a different name.
Delete
Press the Delete soft key to delete the currently highlighted session in the list. You
will be prompted with a confirmation screen; press either the Cancel or OK soft keys.
Note that you cannot delete Factory Sessions. These sessions are meant to always be
available on the H9000 and never be removed.
Rename
Press the Rename soft key to rename a currently highlighted session. You will then
be presented with the naming screen where you can enter in a new name.
Note that you cannot rename Factory Sessions. If you attempt to do so, you will be
presented with the option of creating a new user session, which you can rename.
Load
Press the Load soft key to load the currently highlighted session. This soft key
duplicates the function of pressing the Enter key when a session is highlighted.
Search
Press the latching Search soft key to bring up the search screen, where you can use
the keypad to type in a keyword. Sessions containing the letters you type will
appear in the filtered list of available sessions. As you type additional characters, the
list of sessions will further refine your search.
Preview
Press the Preview soft key to get a visual representation of the layout of the session:
• The number of FX chains
• The Algorithms in each FX Chain
• Physical Inputs and Outputs
Since loading a session is not an immediate operation, the Preview function offers a
quicker way to see what the session contains before you actually load it.
17FX Chains
Press the front panel FX Chain button to switch the display to the FX Chains screen,
where you can view and edit the various FX Chains of the currently loaded session.
Press the cursor left/right buttons or use the wheel to highlight the different FX
Chains. Press the cursor up/down buttons to move through the signal chain blocks
in the currently highlighted FX Chains Block. An FX Chain is comprised of:
• Audio inputs
• The algorithms contained in the FX Chain
• Audio outputs
Configuring the Audio Input/Output of your FX Chain
Use the cursor buttons to highlight the Edit block of the FX Chain’s audio input
section; you will then be presented with choices for selecting both the physical input
connector, and the channel number of your selected input connector. Use the wheel
to scroll through the available choices. When you have found your desired audio
input, press the Enter key. Your chosen input source will now be routed to the input
of the FX Chain and the display will show a connecting line.
To assign an output to the FX Chain, follow the same procedure using the Edit block
located at the bottom of the FX Chain display.
Note: You cannot select an Output that has been assigned to another FX Chain.
Replacing an FX Chain
The middle section of the FX Chain block shows the Algorithm(s) that make up the
current FX Chain. To replace the current FX Chain with a different FX Chain preset:
• Highlight the Replace block and press the Enter key. You will be presented
with a list of available FX Chain presets.
• Navigate to the FX Chain preset you wish to use as a replacement then press
the Enter key to insert the chosen preset into the FX Chain.
18At any time, you can press the Cancel button to back out of the current screen state
and return to the previous state. Pressing the Cancel button a final time will exit the
FX Chains screen and return you to the Sessions screen.
Note: You can always return to the Sessions screen by pressing the Cancel button
once for each iteration of menus you have entered. In other words, if you’re in too
deep and need to reset, press the Cancel button a couple of times to go back home.
FX Chain Soft Keys
The FX Chain screen contains 8 soft keys that offer the following functions:
• Add
• Delete
• Rename
• Direct I/O
• Presets
• Mix
• Mute/Bypass
• Gain/Levels
Add: Press the Add soft key to add a new FX Chain to the currently loaded session.
You can have up to four FX Chains in your H9000. The H9000 will prompt you to
select an I/O configuration for the FX Chain, which will be routed automatically
upon creation.
Delete: Press the Delete soft key to delete the highlighted FX Chain. Note that you
cannot delete the FX Chain if it is currently the only one loaded in the session.
Rename: Press the Rename soft key to bring up the naming screen, where you can
rename the currently highlighted FX Chain container in the session.
Note that the name of the FX Chain container is distinct from the name of the FX
Chain preset loaded into it; this can be useful for distinguishing an FX Chain’s
purpose (e.g. Guitar 1, Guitar 2) if the same preset is loaded into multiple containers.
19Mute/Bypass
Press the Mute/Bypass soft key to mute the currently highlighted FX Chain. Press it
again to unmute the FX Chain. When muted, a red “Mute” label will appear at the
bottom of the FX Chain block.
Long-press the Mute/Bypass soft key to bypass the currently highlighted FX Chain.
Long-press it again to un-bypass the FX Chain. When bypassed, a red “Bypass” label will
appear at the bottom of the FX Chain block.
Direct I/O
Press the Direct I/O soft key to create a “Direct I/O” Signal Chain. This is not an FX
Chain, but rather a direct audio pathway between a physical audio input and output.
Direct I/O allows you to take advantage of your H9000 as a network attached I/O
box, making the H9000’s pristine analog converters available for highest quality
analog I/O. Even at times when you do not require any of the external processing
the H9000 can provide, the 8 analog input and outputs, along with their different
routing options, allows the H9000 to work as a network-attached patch bay.
In the Direct I/O screen, use the cursor keys to highlight the input/output you wish
to assign, then use the wheel to select the physical input /output you wish to use in
your direct I/O pathway.
Four additional soft keys are available in the Direct I/O screen:
• Add: Press the Add soft key to add another direct I/O pathway within the
Direct I/O screen.
• Delete: Press the Delete soft key to delete a Direct I/O pathway that you have
highlighted.
• Page Left/Right: Press the Page Left/Right soft keys to navigate among the
different direct I/O pathways you have created, when there are more of them
than fit on the screen at one time.
Note: Direct I/O assignments are saved with Sessions, not with FX Chains.
20The FX Chain Preset Browser
• Press the Presets soft key to enter the FX Chain preset browser.
• Navigate to the FX Chain you wish to load and press Enter (√).
Rename
Press the Rename soft key to rename the currently highlighted FX Chain. Note that
factory FX Chains cannot be renamed.
Delete
Press the Delete soft key to delete the currently highlighted FX Chain preset. Note
that factory FX Chains cannot be deleted.
Search
Press the latching Search soft key to bring up the virtual keypad, where you can
enter in letters and numbers to search for a specific FX Chain or algorithm name. As
you enter in more characters, the algorithm list is filtered to show only FX Chains
that contain the characters you are typing.
Tags
Press the latching Tags soft key to switch the right-hand side of the display to the
Tags screen. You will be presented with a list of tag categories, which you can use
the cursor keys and enter key to select.
21The following tag categories are included:
• Effect Type
• Product Type
• Instrument Type
• Inputs/Outputs
Once you have selected a specific tag category, you will be presented with a menu of
specific tags within that category. Use the cursor and enter keys to select a specific tag; it
will be added to the current tag list and be shown above the tag list.
Note that you can select as many tags at once as you like. As you add tags, the master list
of FX Chains will be filtered to only show presets that correspond to the tag(s) you have
selected.
Also note that many of the algorithms on the H9000 will carry multiple tags – for
example, Blackhole will fall under the tags of Product Type H9 as well as Effect Type
Reverb. In this way, you can reach the same algorithm in a number of different ways.
This powerful feature is a great way to narrow down the H9000’s vast list of FX Chain
presets to a more manageable selection that is appropriate to the task at hand.
Clear
Press the Clear soft key to clear all currently loaded tags, and return the master list of FX
Chains to its complete state.
Mix
Press the latching Mix soft key to adjust the mix levels of the FX Chains present in the
currently loaded session.
The display will switch to the Mix screen, showing level controls for each FX Chain. Use
the cursor keys to navigate to the FX Chain for which you wish to adjust the level, then
use the wheel to adjust its mix level.
22Levels
Short press the latching Gain/Levels soft key to adjust the output gain levels of the
FX Chains present in the currently loaded session.
Similar to the Mix mode, the display will show level controls for each FX Chain. Use
the cursor keys to navigate to the FX Chain for which you wish to adjust the level,
and use the wheel to adjust its output gain.
Long-press the latching Gain/Levels soft key to show signal levels for the audio
inputs/outputs of the currently highlighted FX Chain. The levels screen contains its
own set of soft keys, as follows:
Clear Clip
Press the Clear Clip soft key to clear any overloads that are displayed on the I/O
meters.
Group
Press the latching Group soft key to group together the inputs or outputs of the
selected FX Chain input or output level.
When the latching soft key is illuminated, adjusting the level of either fader will
adjust the level of both equally.
23Algorithms
In the H9000, each FX Chain can contain up to four separate signal-processing
Algorithms. The Algorithms screen is where you work with these specific
algorithms; you can navigate to it by either:
• Pressing the Algorithms button on the front panel, or;
• Highlighting the Edit button in the center portion of an FX Chain block, then
pressing the Enter button.
The screen will switch to the Algorithms display and the front panel Algorithms
button will illuminate.
Algorithms Overview
The Algorithms overview screen displays the specific algorithms that make up the
currently highlighted FX Chain. The display shows the different algorithms present,
their routing within the FX Chain, and the audio inputs/outputs that feed the FX
Chain.
Rotate the wheel to navigate to the different objects in the FX Chain, which include:
• Algorithm processing blocks
• Input and Output blocks
When viewing the Algorithms overview screen, pressing the Enter button works
contextually for whatever specific object you have highlighted:
• Algorithm: When the Edit label is highlighted, pressing Enter takes you to the
Parameters page (see Parameters section for more details)
• I/O Label: Pressing Enter takes you to the editor screen for the audio
inputs/outputs
24Configuring Audio I/O For an Algorithm
To configure the audio I/O on the Algorithms Overview screen:
• Use the cursor keys to highlight the audio input or output block you wish to
configure, and press the Enter key.
• Note that you can then use the cursor keys to highlight only the audio I/O
category (Analog, Digital, Card Slot), then cursor over to the channel number
and adjust it separately.
• This type of fine-tuned I/O control is particularly important when an option
card slot is populated with a networked audio option card, which can have
dozens of I/O channels per slot.
• Use the wheel to cycle through the available input or output assignments.
Algorithm Screen Soft Keys
The algorithms Overview screen contains eight Soft Keys:
• Add Algorithm
• Delete
• Move
• Expert Router
• Presets
• Mix
• Mute/Bypass
• Gain
Add Algorithm:
• Press the Add Algorithm soft key to add a new algorithm to the currently
selected FX Chain. A new algorithm block will appear labeled “Select
Algorithm”.
• Use the cursor keys to highlight the “Select Algorithm” block and press the
Enter (√) key.
25• Use the navigation controls to select an Algorithm. Each entry contains
helpful info (Ins/Outs, a description of the algorithm, tips on its use, etc.).
Delete
Press the Delete soft key to remove the highlighted algorithm from the FX Chain.
Move
Press the Move soft key to change the location of the algorithm within the FX Chain.
You can move an algorithm in an FX Chain to be above or below any other algorithm
in series, or next to another algorithm in parallel.
Mix
Press the Mix soft key to change the display to a set of mixing controls, where you
can control the relative level of each Algorithm within the FX Chain. Navigate to the
Algorithm you wish to adjust the mix, then rotate the wheel to adjust its mix level.
Gain
Press the latching Gain soft key to change the display to a set of gain controls, where
you can control the output level of each Algorithm within the FX Chain.
Note: The difference between the Gain control and Mix control is that Gain
determines the overall signal presence of an algorithm in an FX Chain, whereas Mix
controls the overall Wet/Dry mix of an individual algorithm and its signal.
26Mute/Bypass
Press the Mute/Bypass soft key to mute the audio output of the currently
highlighted Algorithm. A red “Mute” label will appear at the right of the Algorithm
block when muted. Press the Mute/Bypass soft key again to unmute the audio
output.
Long-press the Mute/Bypass soft key to bypass the currently highlighted Algorithm.
A red “Bypass” label will appear at the right of the Algorithm block when bypassed.
Long-press the Mute/Bypass soft key again to un-bypass the audio output.
Expert Router
Press the latching Expert Router soft key to enter the “Expert Routing” mode. The
display switches to a graphical routing matrix, where you can view and edit a high-
level detailed overview of:
• All of the algorithms present in the current FX Chains.
• Their audio I/O assignments.
• Their signal routing configuration.
Note: The H9000 allows not only serial routing of algorithms, but also parallel and
mixed serial/parallel routing as well. The expert page is where you can view and
control this aspect of the routing.
To make adjustments in the Expert screen:
• Use the cursor keys to highlight the aspect of the block diagram you wish to
adjust (audio I/O block, routing, Algorithm).
• Use the wheel to adjust a highlighted audio I/O routing.
• Use the Move soft key to adjust a routing pathway when it is highlighted
27Algorithm Selection Screen
The Algorithm Selection Screen shows a list of the different algorithms available on the
H9000. To the right of the list is a description that shows information for the currently
highlighted algorithm, including:
• Algorithm Name
• The specific Eventide product the Algorithm is sourced from
• Numbers of Inputs and Outputs available in the Algorithm
• A description of the algorithm and tips on its use
Note that the description field will usually contain more text than can fit on the display;
in this case, use the cursor keys to highlight the description field, then rotate the wheel to
view the remaining description text.
For a quick overview of the thousands of H9000 algorithms, refer to the Appendix H9000
Algorithms located at the end of this document.
Algorithm Presets
Some Algorithms also contains Presets, which are variations of each Algorithm with
their parameters configured for different sounds. For a quick overview, refer to the
Appendix H9000 Presets located at the end of this document.
The Algorithm Presets screen contains numerous following soft keys, as detailed below:
Show Presets
Press the latching Show Presets soft key to shows/hide the Presets contained within each
Algorithm. This approach makes it easier to navigate all of the H9000’s unique
Algorithms, without having to wade through all of the presets contained within some of
the Algorithms.
28Sort Options
Press the Sort Options soft key to select which way the Algorithm presets are sorted,
including:
• By ID Ascending
• By ID Descending
• By Name
• By Recently Used
• By Most Used
Use the cursor up/down keys to navigate to the sort option you wish to use, and then
press the Enter key.
Jump to Loaded
Press this soft key to jump to the algorithm that is currently loaded in the FX Chain.
Search
Press the latching Search soft key to bring up the virtual keypad, where you can
enter in letters and numbers to search for a specific Algorithm name. As you enter in
more characters, the list is filtered to show only algorithms that contain the
characters you have typed.
Tags
Press the latching Tags soft key to switch the right-hand side of the display to the
Tags screen. You will be presented with a list of Tag categories, which you can use
the cursor keys and enter key to select.
Tag categories are:
• Effect Type
• Product Type
• Instrument Type
• Ins/Outs
Once you have selected a specific tag category, you will be presented with a menu of
tags within that category.
Use the cursor keys and Enter key to select a specific tag; it will then be added to the
current tag list and be shown above the tag list. Note that you can select as many
tags at once as you like.
As you add tags, the master list of algorithms will be filtered to only show presets
that contain text matching the tag(s) you have selected. This powerful feature is a
great way to narrow down the H9000’s vast list of presets to a more manageable
selection, one that is appropriate for the task at hand.
29Clear
Press the Clear soft key to clear all currently loaded tags and return the master list
of Algorithms to its complete state.
More
Press the More soft key repeatedly to switch the soft keys above it to alternate
functions. These additional soft keys include:
Jump to Previous
Press this soft key to jump to the algorithm most recently viewed in the list.
Jump to Loaded
Press this soft key to jump to the algorithm that is currently loaded in the FX Chain.
Bank Up/Bank Down
Press these two soft keys to quickly jump to the next/previous bank of algorithms.
Rename
Press the Rename soft key to rename the currently highlighted Algorithm. Note that
factory Algorithms are saved permanently in internal memory and cannot be
renamed.
Delete
Press the Delete soft key to delete the currently highlighted Algorithm. Note that
factory Algorithms are saved permanently in internal memory and cannot be
deleted.
Note: As seen in the list of Algorithms located in the appendix, the H9000 algorithms
are organized into different banks, each one representing different categories of
effects. Each bank begins with a new 3-digit number (100, 200, etc.).
30Parameters
On the H9000, each Algorithm contains a set of parameters; you adjust these
parameters to adjust the sound of the Algorithm you have selected.
For example, a reverb Algorithm contains parameters for settings such as room size,
decay time, pre-delay, and so on. The Parameters screen allows you to view and
adjust these parameters.
To switch to the Parameters screen:
• When the Edit label is highlighted, press the Enter key when an algorithm is
highlighted; you will be taken to the Parameters screen for that algorithm.
• Alternatively, press the front panel Parameters button.
The parameter page offers a handy list on the left-hand side of the screen, which
displays:
• The master parameters for the current FX Chain container
• The algorithms currently loaded in the selected FX Chain
• The parameter categories within each algorithm
Use the cursor keys to highlight the specific parameter category you wish to view
the parameters for. The screen will then display the parameters for only that
category.
This approach allows you to more easily “get your head around” the large number of
parameters that may be available to you. Many algorithms contain a large number of
parameters, and a single list of all of them would not be very intuitive to work with.
31Editing Parameters in an Algorithm
To adjust a specific parameter:
• Use the cursor up/down keys to navigate to a specific parameter category;
the right-hand side of the screen will display the specific parameters within
that category.
• Use the cursor keys to highlight the specific parameter you wish to adjust.
• Use the Enter key and/or wheel to adjust the parameter you have
highlighted.
Note: You can also use the two middle-left soft keys to page up/down among the
parameter categories, or the two outer-left soft keys to page up / page down
through the Algorithms, while highlighting parameters within the parameter view.
This can be a faster way to work than using the cursor keys exclusively; you can
jump around the screen quickly and don’t need to constantly “cursor left” back to
the parameter category list.
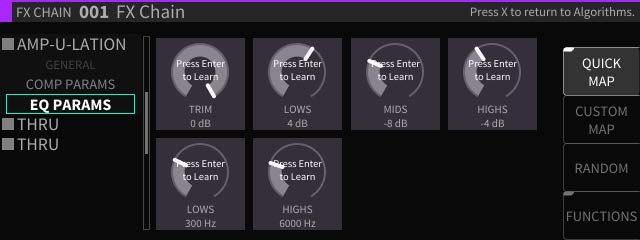
The parameters screen contains four additional soft keys:
• Quick Map
• Custom Map
• Random
• Functions
Quick Map
Press the latching Quick Map soft key to bring up the quick mapping function for the
parameters you are viewing.
The quick map feature is extremely powerful, as it lets you quickly map a wide
variety of MIDI controller software or hardware to any Algorithm parameter on the
H9000. Different aspects of different processing effects can be adjusted in real time
using hardware faders, knobs, foot pedals, buttons, etc.
32The MIDI functionality on the H9000 is “plug-and-play”. You can connect a MIDI
device to the 5-pin DIN ports, or connect a MIDI class compliant interface to one of
the USB connectors. All MIDI Channel configuration is done when individual
controllers are mapped, as opposed to in a central MIDI settings screen.
You can even map multiple parameters to a single MIDI continuous controller; you
cannot, however, have multiple MIDI controllers affect a single parameter.
For more complex mapping of multiple parameters to a single control source, please
refer to the FUNCTIONS section.
The Quick Map feature works as follows:
• Press the Quick Map soft key; you will see a “Press Enter to Learn” label
superimposed over each of the parameters on the screen.
• Use the cursor buttons to navigate to the parameter you wish to map a
controller to.
• Press the Enter button; the highlighted parameter’s label will change to
“Move Any Controller”.
• Move the MIDI hardware/software control you wish to pair to the
highlighted parameter.
• The MIDI hardware/software controller and the parameter are now paired.
Custom Map
The Custom Map feature is also designed to map controllers to H9000 parameters,
but with a much finer level of control. It works as follows:
• Use the cursor keys to navigate to the parameter you wish to custom map a
controller to, then press the Custom Map key.
• The “Controller Type” popup menu will appear, where you can select from
the following types of controllers you wish to map:
o Expression Pedal 1-4
o Switch 1-6
o Note On
o Poly Pressure
o MIDI CC (Continuous Controller) Single
o MIDI CC (Continuous Controller) Double
o MIDI Program Change
o Channel Pressure
o Pitch Wheel
o MIDI Start
o MIDI Stop
33• Navigate to the controller type you wish to use then press the Enter key;
many of the controller types listed above will contain additional settings that
you can select.
• Press the Enter key to navigate to the controller type you wish to use; you
will then be presented with an additional set of controls that allow you to
refine the mapping:
o Control Minimum
o Control Maximum
o Value Minimum
o Value Maximum
• Use the cursor keys to navigate among the above 4 controls, then use the
wheel to set their value.
• When you have finished, press the OK soft key and the custom mapping will
be completed.
• The display will return to the Parameters display. You will now see a green
text label above the parameter, showing you the specific controller you have
mapped to that parameter.
Random
Press the Random soft key to instantly assign random values to each and every
parameter of the Algorithm you are currently working with.
This extremely creative function allows you to try out different Algorithms in a free-
form “what-if” type scenario, because the different parameter values are all selected
with no specific purpose or sound in mind. Give it a whirl with your favorite
algorithm and see what happens…
34Functions
Functions in the H9000 act much like Macros in Ableton Live; essentially, they are
higher-level groupings of parameters that can be adjusted with a single knob.
There are 8 Functions available in each FX chain with three parameters available:
• Range
• Map
• Ext Control
Range
Each parameter that belongs to a Function has a defined range; it can be as large as
the true Minimum/Maximum range of the Parameter, or anywhere in-between. It
can also be inverted, becoming Max/Min). The main Function knobs then cause
each parameter change to be scaled, according to its defined range.
Minimum/Maximum
You can use the Min/Max soft key to toggle between adjusting the minimum or
maximum value of the range, as indicated by the white and green end cap markers.
MAP
The Map view displays a condensed view of all the parameters in the FX chain,
allowing selection of them for assigning to Functions. The Add/Remove key
assigns/unassigns the parameter, depending on which Function is selected.
35You can also read