Excel: Tables, Pivot Tables & More - February 7, 2019 - Sheldon Dueck, MCT
←
→
Page content transcription
If your browser does not render page correctly, please read the page content below
Excel: Tables, Pivot Tables &
            More

        February 7, 2019

                                         Sheldon Dueck, MCT
                                         dueck21@gmail.com
                      http://bit.ly/PivotTables_FMI (Booklet)

                                                           1
Contents
Tables ............................................................................................................................................. 3
Different ways of creating pivot tables ......................................................................................... 4
Compact, Outline & Tabular ...................................................................................................... 4
Compact Form ........................................................................................................................ 4
Outline Form .......................................................................................................................... 4
Tabular Form .......................................................................................................................... 5
Profit & Loss Statements in Excel using Pivot Tables ............................................................... 5
Create a Pivot Table ............................................................................................................... 6
Variance Reports .......................................................................................................................... 10
Colors for positive or negative ................................................................................................. 10
Arrows for positive vs. negative ............................................................................................... 12
Working with Dates ...................................................................................................................... 13
How Excel Stores Dates........................................................................................................ 13
Date Function ....................................................................................................................... 13
TODAY() ................................................................................................................................. 14
WORKDAY() ........................................................................................................................... 14
Retrieving Dates in Excel ...................................................................................................... 14
Auto Fill ......................................................................................................................................... 15
Flash Fill ........................................................................................................................................ 16
If Statements ................................................................................................................................ 17
Nested IF Statements ............................................................................................................... 18
IFERROR ........................................................................................................................................ 19
2Tables
A Table is defined as a range of Excel data. Each row in the range is one record of data. Each
row might describe, for example, an invoice or a customer or an inventory item. Each column
in the table creates another field for each row. Fields might include invoice number,
customer name, total sales, and so on. A table usually has headings in the first row.
There are two ways to create a table in Excel:
Select a cell in the dataset and choose Insert, Table, OK
Select a cell in the dataset, and press CTRL t (or CTRL l)
Once a table is created, the table is highlighted with a different background and has an arrow
listed beside each heading. This allows the user to filter and sort the table however they
choose. The background color can also be changed to whatever color is desired.
3Different ways of creating pivot tables
Compact, Outline & Tabular
When you create a new pivot table, it is automatically created in the compact layout.
Compact Form
The default report layout for a pivot table is Compact Form. There are two row fields –
customer and date. The Compact Form layout may be useful when you reduce the pivot table
width, and aren’t concerned about the Row field headings.
Outline Form
In Outline Form, each row field is in a separate column. There are two Row fields – Customer
and Date. The Outline Form layout may be useful when you want to show all the field names
as heading labels and aren’t concerned about the width of the pivot table.
4Tabular Form
In Tabular Form, each Row field is in a separate column. There are two Row fields – Customer
and Date. The Row labels are not in a separate row. The Tabular Form layout may be useful
when you want to show all the field names as heading labels and aren’t concerned about the
width of the pivot table but want to reduce the number of rows.
Profit & Loss Statements in Excel using Pivot Tables
Excel does a great job of storing data in rows and columns, and is very flexible. Pivot Tables
are an example of this flexibility. This example will show how to use Pivot Tables to make a
Profit and Loss statement.
Before we begin, there are some potential problems we need to address:
Data is not structured or not columnar. If this is the case, then we will need to get it
structured in some way. This can be done by using a Pivot Table.
Data is scattered over multiple workbooks or worksheets. In this case, we would need
to use lookup formulas to get the data into a structured format to continue with this
example.
5Create a Pivot Table
Insert / Pivot Table
Move the fields to the values box
Move the “Values” field from the Columns box to the Rows box
6 At this point, we now have all the figures in place. We need some subtotals for gross
profit or loss, operating profit or loss, profit before tax and profit after tax. Click
anywhere inside the pivot table, click the analyze tab / calculations group / Fields,
Items, Sets / click Calculated field.
o Drag the field you just created immediately below the “Sum of COGS” field.
7 Add another calculated field for operating profit/loss and move it to the spot
immediately below “Sum of Selling Exp”.
Add two more calculated fields and insert them in the appropriate place.
8 Once we’ve completed adding all the calculated fields, we get a bunch of labels that
state “Sum of….”. Let’s get rid of those words but doing a find and replace (CTRL + H).
9 Change the number formats to the format you desire. Then add lines to the cells that
need to it, in order to make the report more readable.
Variance Reports
Colors for positive or negative
There are scenarios where we may want to display reports that have numbers highlighted
that fit certain criteria. To do this, we will use Conditional Formatting.
10Once we have picked the table that we want to add colors to, select Conditional Formatting
from the Home Tab. We will start by highlighting the “Less Than” criteria.
The first box allows you to choose the criteria to determine what to highlight. Then choose
the type of formatting you want. In this example, we are selecting anything with the value as
less than zero, and we will format the cell with “Light Red Fill with Dark Red Text”.
11The result shows up like this (we only chose the CoGS variance).
Arrows for positive vs. negative
Some reports may require arrows instead of color as the conditional formatting. Choose
Conditional Formatting from the Home Tab. Choose Icon Sets, which will open the following
screen.
To show an arrow for only the negative numbers, change the values, and only select an arrow
for the bottom number. Change the other two options to “No Cell Icon”.
If you don’t want to see the number, but only the arrow (or any other icon), make sure to
enter a checkmark in the “Show Icon Only” option.
12The result looks like this:
Working with Dates
Dates and times are two of the most common data types people work with in Excel, but they
are also possibly the most frustrating to work with. This is because Excel uses a serial number
to represent the date instead of a proper month, day, or year. It is made even more
complicated by the fact that dates are also days of the week, like Monday or Friday, even
though Excel doesn’t explicitly store that information in the cells.
How Excel Stores Dates
Excel stores dates as a serial number that represents the number of days that have taken
place since the beginning of the year 1900. This means that January 1, 1900 is really just a 1.
January 2, 1900 is 2, and so on. By the time we get all the way to the present dates, the
numbers have gotten quite large… October 24, 2017 is stored as 43032.
Date Function
=DATE(YEAR, MONTH, DAY)
In this function, specify the year month and day as numbers and it will return the correct
date.
=DATE(2017,10,24) will return October 24, 2017
13TODAY()
The TODAY function always returns the current date’s serial number. The TODAY function is
just entered as:
=TODAY()
This function will always return the current date. It refreshes every time something is
changed in a workbook.
WORKDAY()
Occasionally, it may be useful to count ahead based on work-days (Monday – Friday) instead
of all 7 days of the week. For that, Excel has provided WORKDAY.
=WORKDAY(START_DATE, DAYS)
Example
Let’s find the date 6 work days before November 17.
=WORKDAY(A1,‐6) returns November 9, 2017
Retrieving Dates in Excel
Serial numbers don’t make it easy to extract months, years, and days from a cell. That’s why
Excel has specific functions for pulling out each of these values. For working with the
calendar, there is DAY, MONTH and YEAR.
For example, if cell A1 stores October 24, 2017, then:
=DAY(A1) – Returns the number 24 as a numeric value
=Month(A1) – Returns the number 11 as a numeric value
=YEAR(A1) – Returns the number 2017 as a numeric value
14Auto Fill
Whether you just want to copy the same value down or need to get a series of numbers or text
values, fill handle in Excel is the feature to help. It’s an irreplaceable part of the AutoFill
option. Fill handle is a small square that appears in the bottom-right corner when you select
a cell or range.
Whenever you need to get a series of values in the adjacent cells, just click on the Excel fill
handle to see a small black cross and drag it vertically or horizontally. As you release the
mouse button, you will see the selected cells filled with the values depending on the pattern
you specify.
One of the more popular questions we get at workshops like this are how to autofill numbers
in Excel. This can also be dates, times, days of the week, months, years and so on. IN
addition, Excel’s AutoFill will follow any pattern.
For example, if you need to continue a sequence, just enter the first two values into the
starting cell and grab the fill handle to copy the data across the specified range.
15Then, to take this concept of AutoFill one step further, suppose you have a huge database
with names, and you need to assign a number to each name. You can do it in a flash by
entering the first two numbers and double-clicking the Excel fill handle.
Flash Fill
In Excel 2016, there is a feature called Flash Fill. It will give you the ability to take part of the
data entered into one column of a worksheet table and enter just that data in a new table
column using only a few keystrokes.
The series of entries will appear in the new column literally in a flash, the moment Excel
detects a pattern in your initial data entry that enables it to figure out the data you want to
copy. The beauty is that all this happens without the need for you to construct or copy any
kind of formula.
As soon as it detects this information, and it makes sense, hit enter, and it will automatically
fill in the information.
16If Statements
Many calculations in our lives are not straightforward. Say that a manager offers a bonus
program if her team meets its goals. Or perhaps a commission plan offers a bonus if a certain
profit goal is met. These types of calculations can be solved using an IF statement.
There are three arguments in the IF function.
=IF(LOGICAL_TEST,VALUE_IF_TRUE,VALUE_IF_FALSE)
The first argument is any logical test that will result in a TRUE or FALSE. For
example, you may have logical tests such as these:
A2>100
B5=”WEST”
C99 Greater Than A1>B1
< Less Than A1= Greater than or equal to A1>=0
=65,”Pass”,”Fail”)
In plain English, we read this statement like this:
17If the score is greater than or equal to 65, then enter pass, otherwise enter fail.
Nested IF Statements
A limitation of IF Statements is that it has only two outcomes. If you are dealing with multiple
conditions then there may be a need to nest multiple IF statements into a formula.
Nested IF statements are the formulas that are formed by multiple IF statements inside one
another. This nesting makes it possible for a single formula to make multiple decisions. It is
possible to create up to 64 “nests” inside a single formula. (Just because you can doesn’t
mean you should)
You will often see nested IF statements to handle levels of something. For example, as a
teacher, you may want to determine what letter grade a student receives based on the
percentage based number in the previous example. We can nest an IF statement to do this
for us.
Score Grade Condition
0 – 63 FWe continue on this way until we reach the last grade. Then, instead of adding another IF
statement, just add the final grade for false.
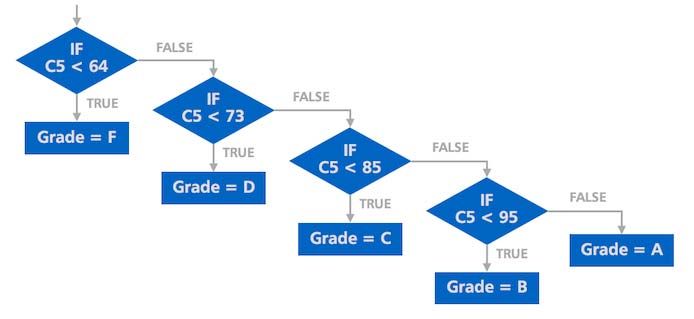
=IF(C5 < 64, “F”,IF(C5 < 73, “D”,IF(C5 < 85, “C”,IF(C5 < 95, “B”, “A”))))
The diagram below visualizes the logical flow of this formula.
IFERROR
In Excel, there are often formulas that contain an error or even those that return an error
when making calculations. Instead of displaying that error, error formulas can return a
specific value in an error rather than N/A or ERROR.
=IFERROR(VALUE,VALUE_IF_ERROR) – This function will return a custom result when a formula
generates an error, and a standard result when no error is detected. IFERROR is an elegant
way to trap and manage errors without using more complicated nested IF statements.
IFERROR checks for the following errors: #N/A, #VALUE!, #REF!, #DIV/0!, #NUM!, #NAME?, or
#NULL!.
A copy of this booklet is available at
19You can also read