Experiment Management for Machine Learning Projects - Dell ...
←
→
Page content transcription
If your browser does not render page correctly, please read the page content below

Experiment Management for
                                Machine Learning Projects
                                INTRODUCTION
                                This document is a two-part white paper that covers (a) the benefits of using Comet,
                                a machine learning experimentation platform, in tandem with a Dell EMC AI-enabled
                                infrastructure and (b) technical installation instructions to run Comet directly on a Dell
                                EMC-enabled Kubernetes cluster, or as part of a Kubeflow deployment or simple
                                Jupyter notebook server for readers who may want to experiment with this on their own.

                                Sections:
                                1. User Story
                                2. Technical Installation Instructions

                                July 2020

DELL TECHNOLOGIES WHITE PAPER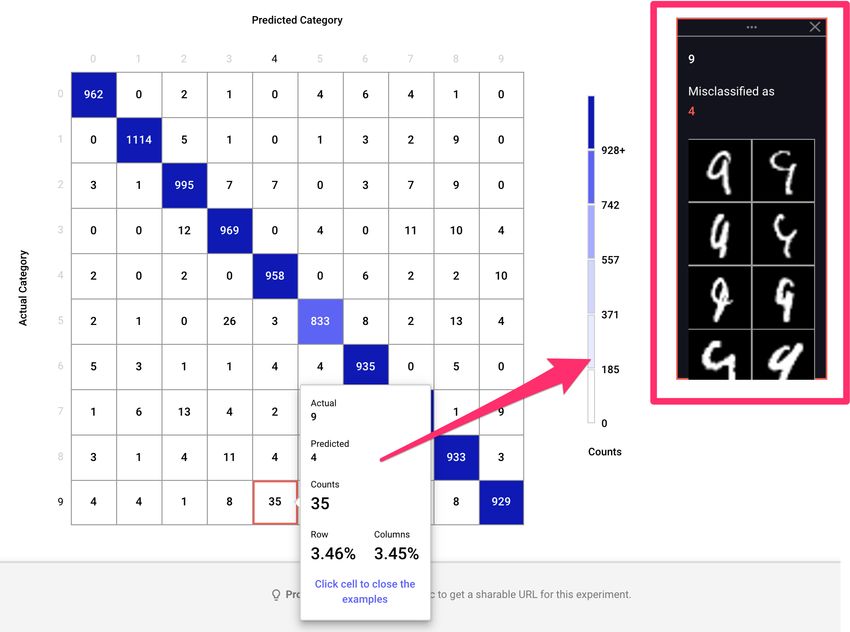
TABLE OF CONTENTS

                                              DATA SCIENCE TEAM USER STORY .  .  .  .  .  .  .  .  .  .  .  .  .  .  .  .  .  .1

                                              PROJECT FRAMEWORK  .  .  .  .  .  .  .  .  .  .  .  .  .  .  .  .  .  .  .  .  .  .  .  . 2

                                              CONCLUSION  .  .  .  .  .  .  .  .  .  .  .  .  .  .  .  .  .  .  .  .  .  .  .  .  .  .  .  .  .  . 8

                                              DELL EMC INFRASTRUCTURE FOR AI  .  .  .  .  .  .  .  .  .  .  .  .  .  .  .  . 8

                                              TECHNICAL INSTALLATION SPECIFICATIONS .  .  .  .  .  .  .  .  .  .  .  .9

                                              SET UP YOUR ENVIRONMENT  .  .  .  .  .  .  .  .  .  .  .  .  .  .  .  .  .  .  .  . 12

                                              DEPLOY KUBEFLOW  .  .  .  .  .  .  .  .  .  .  .  .  .  .  .  .  .  .  .  .  .  .  .  .  .            14

                                              CREATE A CLOUD STORAGE BUCKET .  .  .  .  .  .  .  .  .  .  .  .  .  .  .                             15

                                              ADDING COMET: CONFIGURE YOUR DOCKERFILE
                                              AND TRAINING SCRIPTS  .  .  .  .  .  .  .  .  .  .  .  .  .  .  .  .  .  .  .  .  .  .  . 15

                                              PREPARE TO RUN YOUR TRAINING APPLICATION ON GKE .  .  .                                               16

                                              TRAIN THE MODEL ON GKE  .  .  .  .  .  .  .  .  .  .  .  .  .  .  .  .  .  .  .  .  .                 19

                                              USE COMET TO VISUALIZE AND SHARE EXPERIMENT
                                              RESULTS  .  .  .  .  .  .  .  .  .  .  .  .  .  .  .  .  .  .  .  .  .  .  .  .  .  .  .  .  .  .  .  . 19

                                              DELL EMC KUBEFLOW SOLUTION OVERVIEW .  .  .  .  .  .  .  .  .  .  . 20

                                              DELL EMC ARCHITECTURE FOR KUBEFLOW
                                              ON CHARMED KUBERNETES .  .  .  .  .  .  .  .  .  .  .  .  .  .  .  .  .  .  .  .  . 20

                                              CORE COMPONENTS  .  .  .  .  .  .  .  .  .  .  .  .  .  .  .  .  .  .  .  .  .  .  .  .  . 20

                                              DELL EMC POWEREDGE RACK SPECIFICATIONS .  .  .  .  .  .  .  .  . 21

      The information in this publication is provided “as is.” Dell Inc. makes no representations or warranties of any kind with respect to the
      information in this publication, and specifically disclaims implied warranties of merchantability or fitness for a particular purpose.

      Use, copying and distribution of any software described in this publication require an applicable software license.

      Copyright © 2020 Dell Inc. or its subsidiaries. All Rights Reserved. Dell, Dell Technologies, EMC and other trademarks are
      trademarks of Dell Inc. or its subsidiaries. Intel, Intel Logo are trademarks of Intel Corporation in the U.S. and/or other countries.
      Other trademarks may be the property of their respective owners.

      Dell Technologies believes the information in this document is accurate as of its publication date. The information is subject to
      change without notice.

      Published in the USA 7/20.

DELL EMC WHITE PAPER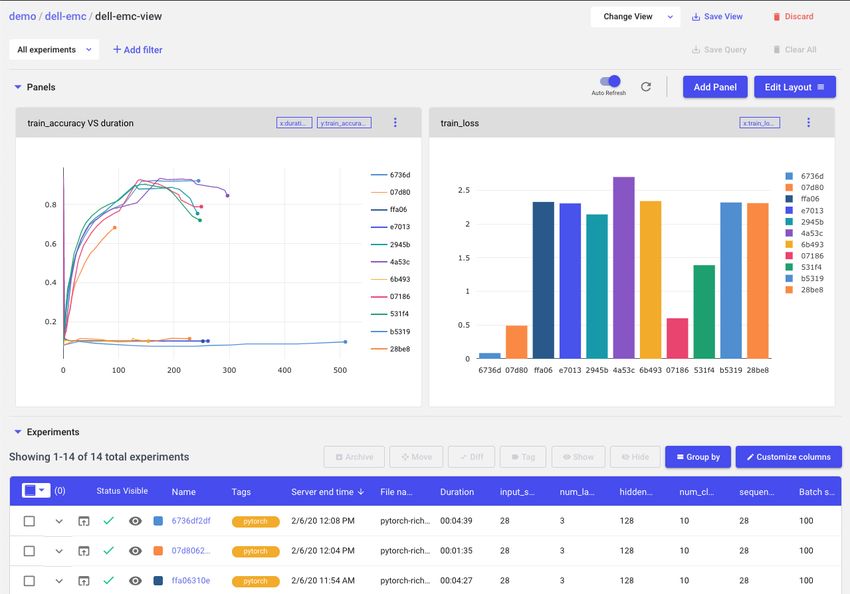
DATA SCIENCE TEAM USER STORY
    The data science team user story is a narrative guide through a typical data science team’s
    workflow, showcasing how the adoption of Comet can dramatically improve a data science
    team’s ability to work collaboratively, efficiently and transparently, building better models
    faster. Dell Technologies and Comet have decided to make the user story more personal by
    using character names and roles.

                                    Imagine this scenario:

                                    You are a data scientist on the data
                                    science team at a large company, and
                                    your team is trying to build a character
                                    recognition model that performs well on
                                    the famous MNIST dataset. The MNIST
                                    dataset is a collection of scanned images
                                    with hand-drawn integers, from 0-9. Your
                                    team is going to train a computer vision
                                    model that can accurately predict new
                                    handwritten numbers based on the
                                                                                  Example MNIST scanned images
                                    information contained within each image
                                    of the MNIST data.

                                    Your data science team organizational chart

                                    This task is part of a larger initiative for your company: an application that can convert
                                    human-written pages into computer-readable text. Your team’s model will provide a key
                                    part of the number-recognition functionality of this application. Accuracy is important, and
                                    your manager, Yoshua, has tasked your team with developing a model that achieves 97.5
                                    percent accuracy on unseen samples (your holdout or test set).

1   DELL TECHNOLOGIES WHITE PAPER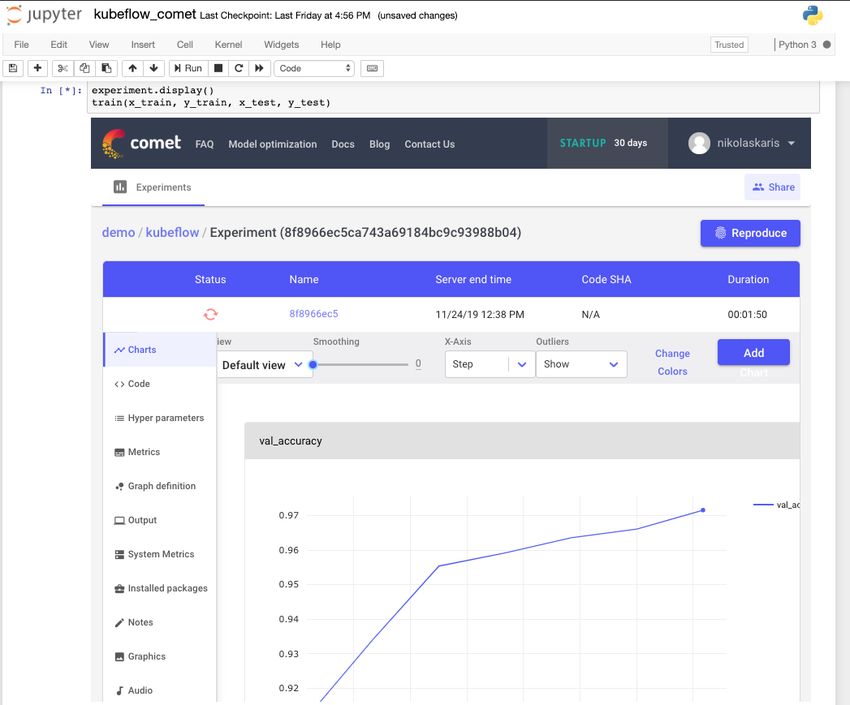
PROJECT FRAMEWORK
                                    This isn’t the first project your team has worked on together, so you already have a useful
                                    project framework. Traditionally, your team defines the steps of a modeling process in the
                                    following way:
                                    1. Problem identification
                                    2. Data wrangling
                                    3. Preprocessing and training data development
                                    4. Modeling (which often loops back to any step 1-4)
                                    5. Documentation

                                    In this case, steps 1and 2 have already been completed because you’re working with
                                    MNIST, a well-known, clean dataset with a good balance of samples for each number 0-9.

                                    1 - PROBLEM IDENTIFICATION
                                    Correctly classify numbers in images of hand-drawn integers from 0 to 9.

                                    2 - DATA WRANGLING
                                    You will use the MNIST dataset to train your model. This is a research-grade dataset, so
                                    you and your team do not need to invest time in assembling, labeling, cleaning and storing
                                    a dataset for this modeling task.

                                    Your team can move ahead with MNIST data into the exploratory data analysis (EDA)
                                    phase of your project.

                                    3 - PREPROCESSING AND TRAINING DATA DEVELOPMENT
                                    While excellent results have been achieved with the MNIST data in the past without
                                    feature engineering prior to training, your team would nevertheless like to explore whether
                                    applying certain preprocessing methods will deliver a higher-accuracy model or faster time
                                    to convergence.

                                    DATA MODIFICATION 1: REMOVE CONSTANT 0- OR 255-VALUE PIXELS
                                    To start, you decide you’d like to check whether there are any pixels that are background
                                    (black) in every dataset sample. If there are, you might try dropping those pixels, thereby
                                    reducing the size of the input data and potentially speeding up model training.

                                    Your intuition is correct! Some pixels always have an intensity of 0 (max = 0) or of 255
                                    (min = 255). Since the pixels that always have an intensity of 255 (white) are members of
                                    the pixel groups that comprise the digits, you’ll leave those as is, but you remove all of the
                                    border (max = 0) pixels and create a new zero-pixel-removed dataset.

                                    DATA MODIFICATION 2: NORMALIZE PIXEL VALUES BETWEEN 0 AND 1
                                    INSTEAD OF BETWEEN 0 AND 255
                                    Your colleague Mary has another good idea: normalizing the pixel values down from
                                    the original 0-255 scale to 0-1. Given that the model weights will be initialized randomly
                                    to values close to zero, it could take a long time for the weights to update sufficiently to
                                    manipulate input features on an orders-of-magnitude different scale.

2   DELL TECHNOLOGIES WHITE PAPER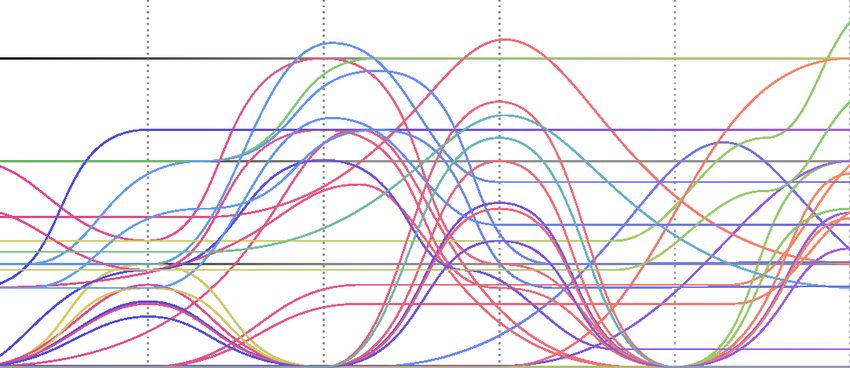
Normalizing the pixel values between 0 and 1 may help the models train faster. Mary
                                    completes this work and stores the dataset as a second preprocessed version of the
                                    baseline dataset.

                                    For now, you and the team are satisfied with these two engineered datasets and the
                                    baseline dataset to start the modeling phase. If your models do not perform at or above
                                    the accuracy target, your team may return to this stage and explore other feature
                                    engineering and preprocessing techniques.

                                    4 - MODELING
                                    The team now has three training datasets:
                                    • Baseline MNIST
                                    • Zero-pixel-removed MNIST
                                    • Normalized MNIST

                                    Your data science team is ready to start experimenting with modeling techniques. You’d
                                    like to try many different architectures and model families to find out what works best. The
                                    team comes up with a preliminary list to experiment with:
                                    •   MLP Neural Networks
                                    •   ConvNets
                                    •   ResNets
                                    •   Tree-based models

                                    You, Mary and Tim decide to break up the work into three buckets. You each own one of the
                                    datasets (baseline, zero-pixel-removed and normalized). To get complete coverage of the
                                    modeling options, you will each own testing all four model types with your assigned dataset.

                                    Your team decides that Comet is the right platform given the size of the team, number of
                                    experiments and short project timeline. You need to make sure every experiment is logged
                                    to one central dashboard every time you, Mary or Tim run a script or execute cells in a
                                    Jupyter notebook. That way, you can share insights, create custom visualizations and
                                    iterate more quickly toward a production-grade model. Yoshua also wants to use Comet so
                                    he can have visibility into how each approach is developing and who is working on what.

                                    You are assigned the zero-value-pixel dataset. You developed good template code for
                                    ConvNets, ResNets, simple feedforward Neural Networks and XGBoost, so you quickly spin up
                                    some experiments. After logging into Comet, you go to your dashboard to see some results.

                                    Comet Project UI

3   DELL TECHNOLOGIES WHITE PAPER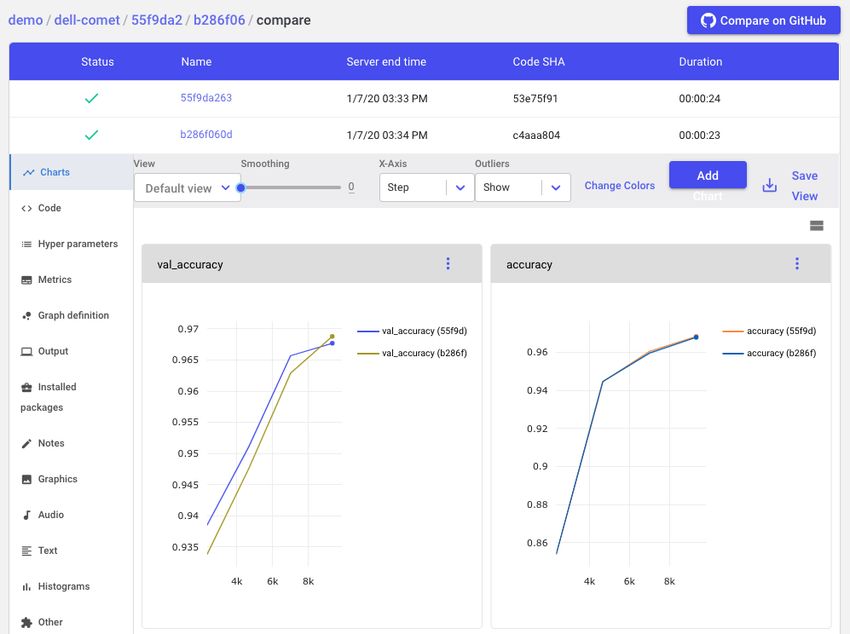
Right away, you can tell that your ConvNet models are outperforming the others, but
                                    you’re still not at the 97.5 percent accuracy your manager wants for this project. You
                                    quickly put together a couple project-level visualizations to further inspect the performance
                                    of your models.

                                    First, you’d like to compare accuracy across all experiments for your entire team, so you
                                    create a visualization charting model accuracy over time (duration of training).

                                    Next, you’d like a way to visualize the underlying hyperparameter space for each of your
                                    models. Comet provides a parallel coordinates template that gives you exactly what you
                                    need for now. The parallel coordinates view is simple, but you’ll add more
                                    hyperparameters later. Already, you can tell that lower batch sizes are outperforming
                                    larger ones.

                                    You decide to inspect your CNN model in more detail by spinning up a confusion matrix to
                                    identify common misclassifications. Comet’s built-in module for this does the trick, and lets
                                    you inspect each box to see specific samples that are being misclassified.

4   DELL TECHNOLOGIES WHITE PAPER
While you analyze your first batch of experiments, you see new ones popping up in
Comet. Your teammates are also at work. By using Comet, you can immediately compare
experiments that you’re each contributing to in one central workspace.
Once your team has completed baseline models with a fixed set of hyperparameters for
each architecture for each dataset, you sit down together and make some decisions about
where to focus next. It seems that, from the first pass, the zero-value-pixel-removed
dataset is yielding slightly higher-accuracy models, given identical architectures and
hyperparameter settings.
5 DELL TECHNOLOGIES WHITE PAPERAs one last sanity check, you select the two best experiments trained on the zero-value-
pixel-removed dataset and use the Comet “Diff” feature to compare every aspect of each
experiment.
The Comet “Diff” feature allows data scientists to compare everything about two experiments: metrics,
code, hyperparameters, dependencies, system information and more, right in the UI.
Well aware that parameter tuning may cause this to change, you decide to focus on the
zero-pixel-removed dataset for the next stage of research, taking your best performing
architecture and conducting a hyperparameter optimization to try and identify a set of
hyperparameters that will yield better results.
One day, Yoshua pulls you and Mary aside and asks if you’d be willing to assist another
data science pod for a short two-week project, putting your MNIST classifier work on hold.
They’re working on the character recognition model for alphabet letters and have hit a
roadblock. You and Mary agree to have Tim run the next phase of your research project —
the optimization — while you and Mary spend a couple of weeks assisting the other team.
6 DELL TECHNOLOGIES WHITE PAPERComet’s built-in Optimizer allows Tim to do the experimentation efficiently and without
spending too much time setting up testing code and managing the sweep.
After completing the sweep, Tim inspects the performance of each experiment visually to
look for insights. Right away something interesting jumps out at him: models where kernel
size equals 5 are almost always outperforming other models.
Comet Parallel Coordinates Chart
7 DELL TECHNOLOGIES WHITE PAPERArmed with these new insights, the whole team is ready to sit down and plan the next
steps. Now that you and Mary are back from assisting the other team, you quickly see that
the best model is right around 97.5 percent accuracy on test data — exactly where your
manager wanted you to be! You can either keep digging on the convolutional network,
zero-pixel-removed data combination, or dive into other combinations.
It comes as a huge surprise when, the next Monday, Tim lets your boss know that he is
leaving the company. Not only is Tim a huge asset to your team, he has built up a ton of
modeling intuition for this MNIST project and ran the entire hyperparameter optimization
phase of your research cycle solo.
Thankfully, your team had a few Ph.D. interns over the past year, so you’re quickly able to
make a replacement hire. And, again, the decision to use Comet saves a ton of effort as
your new data scientist, Sara, gets up and running in a fraction of the time it would have
taken her without access to this system of record.
5 - DOCUMENTATION
Because your team adopted Comet, you get great documentation for free! All of the
modeling decisions, experimentation history, performance and team-wide record keeping
have all been taken care of for you. You get to spend more time on the activities that add
value to the team and the company.
CONCLUSION
This user story highlights some of the common challenges for data science teams during a
typical modeling project. Comet provides a solution to many of these challenges, and can
allow any data science team, large or small, to work more collaboratively, transparently
and with faster research cycles. The partnership between Dell Technologies and Comet
ensures that using Comet with Dell EMC AI-enabled infrastructure stacks is the shortest
path to improved productivity for any organization.
DELL EMC INFRASTRUCTURE FOR AI
Dell Technologies provides an extensive portfolio of technologies — spanning
workstations, servers, networking, storage, software and services — to create AI and data
analytics solutions that drive successful machine and deep learning implementations.
Teams can leverage Dell EMC PowerEdge servers to build a data science platform and
environment using their choice of tools from the AI ecosystem and leverage Comet to
make their data scientists more productive. They also have the option of leveraging Dell
EMC Ready Solutions and Reference Architectures for AI, which can be utilized with
Comet to improve the productivity of your organization.
8 DELL TECHNOLOGIES WHITE PAPERComet Enterprise can be deployed on premises and supports multiple versions of
installation from a single machine to distributed microservices. This is an option for
organizations that want to host Comet services on their infrastructure for security or
privacy reasons and still take advantage of Comet features and insights to improve
productivity, collaboration and visibility across data science teams.
TECHNICAL INSTALLATION SPECIFICATIONS
RUNNING AND TRACKING YOUR ML EXPERIMENTS WITH
KUBEFLOW AND COMET
A. SIMPLE NOTEBOOK SERVER EXAMPLE
B. END-TO-END DOCKERIZED Kubeflow + GCP EXAMPLE
C. DIRECT KUBERNETES CLUSTER INSTALLATION DETAILS
A - NOTEBOOK EXAMPLE
An End-to-End ML Pipeline with Jupyter Notebooks and Comet on Kubeflow and
MiniKF
1. Set up a Kubeflow Cluster
2. Create a Kubeflow Notebook Server
3. Install Comet on Kubeflow Notebook Server
4. Track an Experiment on Kubeflow with Comet
1. SET UP A KUBEFLOW CLUSTER
*Steps dependent on system configuration*
2. CREATE A NOTEBOOK SERVER
On the Kubeflow Dashboard, click the Notebook Servers link on the left pane to go to the
Notebook Manager UI.
9 DELL TECHNOLOGIES WHITE PAPERFrom the list of Notebook Servers, click “+ New Server” to create a new Notebook Server. Intel-optimized Intel® provides optimized frameworks, tools, libraries and software development kits (SDKs) Define a new server with your Kubeflow namespace and deployment information. to quickly develop, train and deploy solutions, including Intel Distribution for Python, Intel Data Analytics Acceleration Library (DAAL), Intel-optimized XGBoost and Intel- optimized TensorFlow for servers with Intel Xeon Scalable processors. Intel DAAL is an easy-to-use library that boosts big data analytics and machine learning performance. The Deep Learning Reference Stack is a set of container images based on optimized libraries that leverage Deep Learning Boost and other features of Second Generation Intel Xeon Scalable processors. Using these container images with Kubeflow allows developers to dramatically increase the speed of model training using TensorFlow and PyTorch training jobs and model serving with SeldonCore. The Deep Learning Reference Stack includes various images allowing the users to choose the set of optimized libraries based on unique use case, while Once you’ve created your Notebook Server, wait a few minutes for it to boot up. Once it’s all can benefit from the hardware ready, click “Connect” to access your Kubeflow Notebook Server. acceleration. To learn more, visit software.intel.com. 10 DELL TECHNOLOGIES WHITE PAPER
3. INSTALL COMET ON NOTEBOOK SERVER
                                     Once you’ve connected to your notebook server, open a new terminal window.

                                     With a simple pip install command, install Comet in your server environment.

                                     4. TRACK AN ML EXPERIMENT WITH COMET

                                     Once Comet is installed, open a python kernel and import your dependencies. The only
                                     changes you need to make to your ML pipeline to start logging your experiments with
                                     Comet are importing the Comet SDK and creating a Comet experiment.

                                     To initialize a Comet experiment, enter your API KEY (unique to each Comet user) and
                                     project and workspace names to specify which Comet project your experiment belongs to.

                                     And that's it! Run your code as usual and Comet will automatically capture all
                                     hyperparameters, real-time training metrics, system and dependency information, dataset
                                     debugging samples, and much more. You can even view your experiment in real time from
                                     the Kubeflow Notebook.

11   DELL TECHNOLOGIES WHITE PAPER
B - END-TO-END DOCKERIZED KUBEFLOW + GCP EXAMPLE
Adapted from an official Kubeflow example.
The overall workflow:
• Setting up Kubeflow in a GKE cluster
• Testing the code locally using a Jupyter notebook
• Training the model:
– Packaging a TensorFlow program in a Kubernetes container
– Uploading the container to the container registry
– Submitting a TensorFlow training (tf.train) job
• Setting up and using Comet to track all of your training jobs
SET UP YOUR ENVIRONMENT
DOWNLOAD THE PROJECT FILES
To simplify this tutorial, you can use a set of prepared files that include a TensorFlow
application for training your model, a web UI to send prediction requests and display the
results, and the Docker files to build runnable containers for the training and prediction
applications. The project files are in the Kubeflow examples repository on GitHub.
Clone the project files and go to the directory containing the MNIST example:
12 DELL TECHNOLOGIES WHITE PAPERSET UP YOUR GCP ACCOUNT AND SDK
Follow these steps to set up your GCP environment:
1. Create a project on the GCP Console.
2. Make sure that billing is enabled for your project.
3. Install the Cloud SDK. If you already have the SDK installed, run gcloud
components update to get the latest versions of the SDK tools.
INSTALL DOCKER
Follow the Docker installation guide.
INSTALL KUBECTL
Run the following Cloud SDK command to install the kubectl command-line tool for
Kubernetes:
INSTALL KUSTOMIZE
Kubeflow makes use of kustomize to help manage deployments.
SET UP SOME HANDY ENVIRONMENT VARIABLES
Set up the following environment variables for use throughout the tutorial:
Set your GCP project ID. In the command below, replace with your
project ID:
Set the zone for your GCP configuration. Choose a zone that offers the resources you
need. See the guide to GCP regions and zones.
1. Ensure you have enough Compute Engine regional capacity. By default, the GKE
cluster setup described in this guide requires 16 CPUs.
2. If you want a GPU, ensure your zone offers GPUs.
For example, the following commands set the zone to us-central1-c:
If you want a custom name for your Kubeflow deployment, set the DEPLOYMENT_NAME
environment variable. If you don’t set this environment variable, your deployment gets the
default name of kubeflow:
13 DELL TECHNOLOGIES WHITE PAPERDEPLOY KUBEFLOW
Follow the instructions in the guide to deploying Kubeflow on GCP, taking note of the
following:
• Make sure you deploy Kubeflow v0.7.0 or later.
• Set up OAuth client credentials and Cloud Identity-Aware Proxy (IAP) as prompted
during the deployment process.
When the cluster is ready, you can do the following:
Connect your local kubectl session to the cluster:
Switch to the kubeflow namespace to see the resources on the Kubeflow cluster:
Check the resources deployed in the kubeflow namespace:
Access the Kubeflow UI, which becomes available at the following URI after several
minutes:
https://.endpoints..cloud.goog/
The following screenshot shows the Kubeflow UI:
14 DELL TECHNOLOGIES WHITE PAPERNotes:
• When the deployment has finished, you should have a running cluster in the cloud ready
to run your code. You can interact with the cluster either by using kubectl or by going
to the GKE page on the GCP Console.
• While the deployment is running, you can watch your resources appear on the GCP
console:
– Deployment on Deployment Manager
– Cluster on GKE
– Computing resources on Compute Engine
• It can take 10 to 15 minutes for the URI to become available. Kubeflow needs to
provision a signed SSL certificate and register a DNS name.
If you own/manage the domain or a subdomain with Cloud DNS then you can configure
this process to be much faster.
CREATE A CLOUD STORAGE BUCKET
The next step is to create a Cloud Storage bucket to hold your trained model.
Cloud Storage is a scalable, fully managed object/blob store. You can use it for a range
of scenarios including serving website content, storing data for archival and disaster
recovery, or distributing large data objects to users via direct download. This tutorial uses
Cloud Storage to hold the trained machine learning model and associated data.
Use the gsutil mb command to create a storage bucket. Your bucket name must be
unique across all of Cloud Storage. The following commands create a bucket in the
us-central1 region, which corresponds to the us-central1-c zone used earlier in the tutorial:
ADDING COMET: CONFIGURE YOUR DOCKERFILE AND
TRAINING SCRIPTS
Update your to pip install Comet and any other dependencies you
may need.
Dockerfile.model
Add the Comet tracking code to your modeling scripts. In this example, the model training
occurs in the file. You can access your Comet API KEY from the Comet UI, and
your project name and workspace are abstractions to help you organize your various
modeling tasks.
15 DELL TECHNOLOGIES WHITE PAPERWhile Comet will capture most experiment artifacts for you automatically, the Comet
Experiment provides a rich and flexible set of methods to customize experiment logging.
Consult the docs to tailor your experiment tracking to your specific needs.
PREPARE TO RUN YOUR TRAINING APPLICATION ON GKE
When you downloaded the project files into your ${WORKING_DIR} directory at the start of
the tutorial, you downloaded the TensorFlow code for your training application. The code is
in a Python file, model.py, in your ${WORKING_DIR} directory.
The model.py program does the following:
• Downloads the MNIST dataset and loads it for use by the model training code.
• Offers a choice between two models:
– A two-layer convolutional neural network (CNN). This tutorial uses the CNN,
which is the default model in model.py.
– A linear classifier, not used in this tutorial.
• Defines TensorFlow operations to train and evaluate the model.
• Runs a number of training cycles.
• Saves the trained model to a specified location, such as your Cloud Storage bucket.
Build the container for your training application.
To deploy your code to Kubernetes, you must first build your local project into a Docker
container image and push the image to Container Registry so that it’s available in the cloud.
Create a version tag from the current UNIX timestamp, to be associated with your model
each time it runs.
Set the path in Container Registry that you want to push the image to:
Build the Docker image for your working directory:
The container is tagged with its eventual path in Container Registry, but it hasn’t been
uploaded to Container Registry yet.
If everything went well, your program is now encapsulated in a new container.
Test the container locally:
16 DELL TECHNOLOGIES WHITE PAPERYou may see some warnings from TensorFlow about deprecated functionality. Then you
should see training logs start appearing in your output, similar to these:
When you see log entries similar to those above, your model training is working. You can
terminate the container with Ctrl+c.
Next, upload the container image to the Container Registry so that you can run it on your
GKE cluster.
Run the following command to authenticate to Container Registry:
Push the container to Container Registry:
The push may take a few minutes to complete. You should see Docker progress updates
in your command window.
Wait until the process is complete, then you should see your new container image listed
on the Container Registry page on the GCP console.
Prepare your training component to run on GKE.
Enter the training/GCS directory:
Give the job a name so that you can identify it later:
Configure your custom training image:
17 DELL TECHNOLOGIES WHITE PAPERConfigure the image to run distributed by setting the number of parameter servers and
workers to use. The numPs means the number of Ps (parameter server) and the
numWorkers means the number of worker:
Set the training parameters (training steps, batch size and learning rate):
Configure parameters for where the training results and exported model will be saved in
Cloud Storage. Use a subdirectory based on the VERSION_TAG, so that if the tutorial is run
more than once, the training can start fresh each time.
CHECK THE PERMISSIONS FOR YOUR TRAINING COMPONENT.
You need to ensure that your Python code has the required permissions to read/write to
your Cloud Storage bucket. Kubeflow solves this by creating a user service account
within your project as a part of the deployment. You can use the following command to list
the service accounts for your Kubeflow deployment:
Kubeflow granted the user service account the necessary permissions to read and write to
your storage bucket. Kubeflow also added a Kubernetes secret named user-gcp-sa to
your cluster, containing the credentials needed to authenticate as this service account
within the cluster:
To access your storage bucket from inside the train container, you must set the GOOGLE_
APPLICATION_CREDENTIALS environment variable to point to the JSON file contained
in the secret. Set the variable by passing the following parameters:
18 DELL TECHNOLOGIES WHITE PAPERTRAIN THE MODEL ON GKE
Now you are ready to run the TensorFlow training job on your cluster on GKE.
Apply the container to the cluster:
When the command finishes running, there should be a new workload on the cluster,
with the name mnist-train-dist-chief-0. If you set the option to run a distributed
workload, the worker workloads show up on the cluster too. You can see the workloads on
the GKE Workloads page on the GCP console. To see the logs, click the mnist-train-dist-
chief-0 workload, then click Container logs.
USE COMET TO VISUALIZE AND SHARE EXPERIMENT
RESULTS
When training is complete, head to Comet and you will see all your training run metadata:
metrics, hyperparameters, code, system information, dependencies and more.
19 DELL TECHNOLOGIES WHITE PAPERC - KUBERNETES CLUSTER DIRECT DEPLOYMENT
Comet can also be installed directly onto a Dell EMC AI-Enabled Kubernetes Cluster.
For details, please contact Comet and Dell Technologiesfor more information. Comet
Enterprise can be deployed on premises and was tested on the Canonical/Dell Kubeflow
architecture described below.
DELL EMC KUBEFLOW SOLUTION OVERVIEW
The solution for Kubeflow is comprised of pools of compute, storage and networking
resources, which are managed through a single point of rack management. All nodes in
the rack are Dell PowerEdge servers handling compute, control and storage functions, as
assigned by the Metal as a Service (MAAS) management nodes.
DELL EMC ARCHITECTURE FOR KUBEFLOW ON
CHARMED KUBERNETES
This architecture test is based on Charmed Kubernetes — upstream code of Kubernetes
release 1.16 delivered by Canonical. Canonical commercially distributes and supports
the pure upstream version of Kubernetes. Ubuntu is the reference operating system for
Kubernetes deployments, making it an easy way to build Kubernetes clusters.
Canonical reference architectures are delivered on a converged infrastructure approach,
where any of the servers can accommodate more than one specific Kubernetes role or
service simultaneously. This converged approach has many benefits, including simplicity
of operation and management overhead. Canonical can also deploy Kubernetes in a more
traditional manner, grouping servers per role — controllers, storage and container pods.
Canonical is an active member of the Kubeflow community and strongly believes in its
role in democratising AI/ML by making model training and deployment as frictionless as
possible. Canonical delivers the upstream components of the Kubeflow ecosystem as
an add-on to Kubernetes, wrapping it with automation so that it can be easily deployed,
managed and upgraded.
CORE COMPONENTS
Component Codename
Persistent storage Ceph RBD
Compute Kubernetes Worker (Docker based)
Machine learning platform Kubeflow
Networking Flannel or Canal
Logging Graylog
Monitoring Prometheus
The standards-based APIs are the same between all Kubernetes deployments, and they
enable customer and vendor ecosystems to operate across multiple clouds. The site-
specific infrastructure combines open and proprietary software, Dell EMC hardware and
operational processes to deliver cloud resources as a service.
20 DELL TECHNOLOGIES WHITE PAPERThe implementation choices for each cloud infrastructure are highly specific to the
requirements of each site. Many of these choices can be standardized and automated
using the tools in this reference architecture. Conforming to best practices helps reduce
operational risk by leveraging the accumulated experience of Dell Technologies and
Canonical.
Canonical’s Metal as a Service (MAAS) is used as a bare metal and virtual machine
(VM) provisioning tool. The foundation cluster is composed of MAAS and other services
(running in highly available (HA) mode) that are used to deploy, manage and update the
Kubernetes cluster nodes.
The reference architecture solution is based on the Dell EMC PowerEdge R640, R740xd
and R740xd2 servers. The reference architecture uses the following rack and server
specifications.
DELL EMC POWEREDGE RACK SPECIFICATIONS
Component type Component description Quantity
Standard data center rack (1) with
Rack enough capacity to hold 12x 1RU 1
nodes, and 3x 1RU switches
Dell PowerEdge R740xd
3
(3 Infras3 Cloud nodes)
Dell PowerEdge R740
Chassis 3
(3 Cloud nodes)
Dell PowerEdge R740xd2
4
(4 storage nodes)
Data switches S5248F-ON (25G ToR, 48 ports) 2
iDRAC/Provisioning switch S3048-ON 1
Please see the detailed architecture guide with Canonical for the architectural diagram
and additional guidance.
Because the optimum solution configuration will depend on the specific mix of applications
and types of data analytics, artificial intelligence and advanced computing workloads,
recommended and engineering-validated options are provided, along with relevant criteria
to consider when making these selections. As always, Dell Technologies AI experts
are available to assist you with designing a solution for your specific needs. And Dell
Technologies Services — ranging from consulting and education to deployment and
support — are available when and where you need them.
To learn more, visit DellTechnologies.com/ReferenceArchitectures.
Join Intel AI Builders at builders.intel.com/ai.
21 DELL TECHNOLOGIES WHITE PAPERYou can also read