G-SPORT RATCHET HUB / INSTRUCTION MANUAL
←
→
Page content transcription
If your browser does not render page correctly, please read the page content below
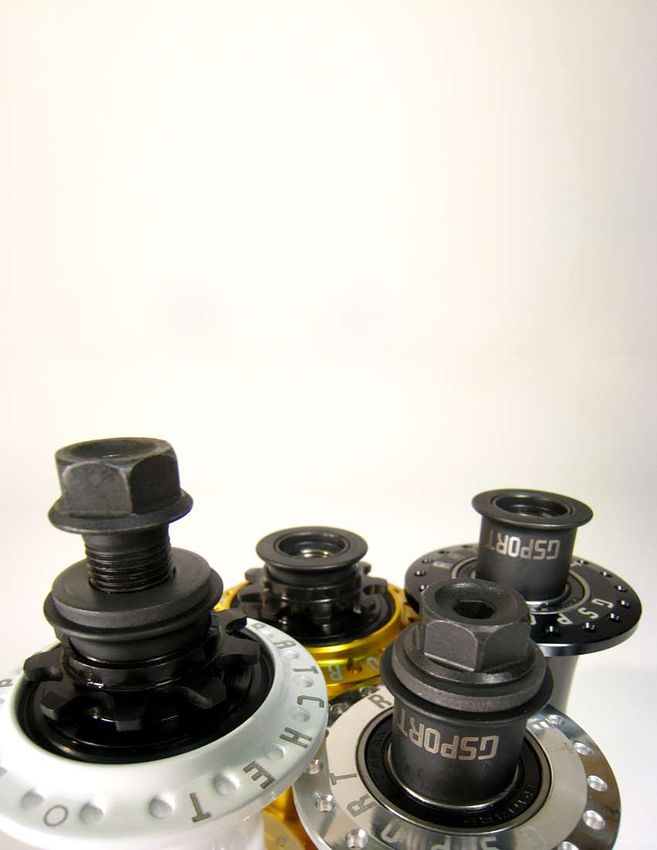
G-SPORT             RATCHET                HUB
                     /////////////////////////// INSTRUCTION MANUAL

G-SPORT RATCHET HUB INSTRUCTION MANUAL (PAGE 1 OF 15) / WWW.ODYSSEYBMX.COM / 562.623.9995 / INFO@ODYSSEYBMX.COM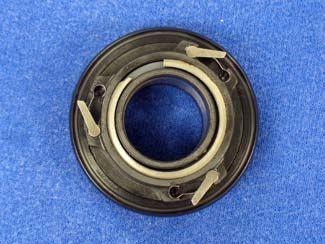
TABLE OF CONTENTS

   Technical Specifications                                                                               3

   PART 1: Taking a look inside the hub                                                                   4
     Reassembly                                                                                           5

   PART 2: Switching from right to left                                                                   6

   PART 3: Cleaning and lubricating the pawls                                                           10

   PART 4: Cleaning and lubricating the driver bearings                                                 11
     Reassembly                                                                                         12

   PART 5: Replacing the hub and shell bearings                                                         13

   PART 6: General problem solving                                                                      15

   If you ever have additional comments or questions,
   please feel free to contact us:

   TEL: 562-623-9995,
   HOURS: M-F, 9-5, Pacific Time
   EMAIL: info@odysseybmx.com
   WEB: www.odysseybmx.com

      G-SPORT RATCHET HUB INSTRUCTION MANUAL (PAGE 2 OF 15) / WWW.ODYSSEYBMX.COM / 562.623.9995 / INFO@ODYSSEYBMX.COM
TECHNICAL SPECIFICATIONS

   SPOKE LENGTHS: 36-H (3-Cross) = 186mm and 48-H (4-Cross) is coming soon
   SPOKE COMPENSATION: Tighten the drive-side flange spokes using two extra turns during build-
   ing to compensate for the uneven flange size and to eliminate dish.

   FLANGE SIZES (P.C.D. HOLES): 57.5mm / 53.5mm
   FLANGE SIZES OVERALL: 66mm / 62mm
   FLANGE SPACING (CENTERLINE AT HOLE): 63.5mm

   DROPOUT SPACING (OVERALL HUB WIDTH): 110mm
   BOLT SIZE: M14 x 1.25, 17mm external AF, 6mm internal hex.

   BEARINGS (MAIN HUB): 6904 2RS
   BEARINGS (DRIVER): 24 x 28 x 13mm caged needle bearings, 20 x 24 x 16mm inner race, with
   proprietary thrust bushings.

   RECOMMENDED TIGHTENING TORQUE: 50 N·m / 37 ft·lb
   MINIMUM TORQUE: 20 N·m / 15 ft·lb
   MAXIMUM TORQUE: 100 N·m / 74 ft·lb

   WEIGHT (14mm STEEL AXLE, 10-T DRIVER): 564g / 19.9 oz.
   WEIGHT (3/8” ALUMINUM AXLE, 10-T DRIVER): 440g / 15.5 oz. (approximate)

   SUGGESTED RETAIL PRICE (U.S.A.): $154.00
   COLORS: Black, Gold, White, High-polished and limited edition.
   DRIVERS: 10-T, right and left-hand switch-able. 9-T available, Spring 2009.

   WARRANTY (14mm AXLE): Lifetime against bending or snapping, discretionary on other issues.
   WARRANTY (OTHER): Lifetime on defects, discretionary on other issues.

   MAINTENANCE: Thank you for using the new G-Sport Ratchet Hub. This product is designed to
   last through the harshest conditions and heaviest landings, but occasionally it will be necessary
   to clean and re-lubricate some of the parts. Please familiarize yourself with these instructions and
   refer to them as necessary during the procedures. As usual, Odyssey and G-Sport strongly recom-
   mend that all repairs and maintenance procedures be handled by a qualified professional bicycle
   mechanic only.

       G-SPORT RATCHET HUB INSTRUCTION MANUAL (PAGE 3 OF 15) / WWW.ODYSSEYBMX.COM / 562.623.9995 / INFO@ODYSSEYBMX.COM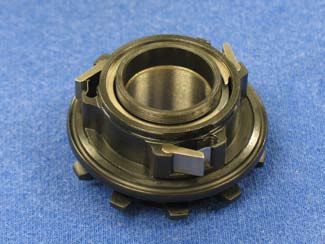
PART 1: TAKING A LOOK INSIDE THE HUB

                                                             1.1
                                                             Remove the bolt from the driver side of
                                                             the hub.

                                                             1.2
                                                             Remove the driver-side collar. This is a
                                                             tight fit by design. If the collar cannot be
                                                             removed by hand, then use a tool (ex. small
                                                             flathead screwdriver) under the collar’s lip
                                                             to gently pry it off.

                                                             1.3
                                                             Pull the driver away from the hub while
                                                             turning the driver backwards (so an
                                                             audible “clicking” noise is heard).
                                                             A slight “pop” may be noticed as the
                                                             seal pulls free of the hub shell. Examine
                                                             the driver and hub shell as needed.

      G-SPORT RATCHET HUB INSTRUCTION MANUAL (PAGE 4 OF 15) / WWW.ODYSSEYBMX.COM / 562.623.9995 / INFO@ODYSSEYBMX.COM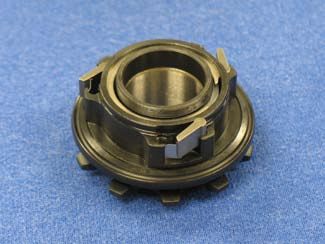
PART 1: TAKING A LOOK INSIDE THE HUB
                                                                                                       REASSEMBLY

                                                             1.4
                                                             Check that the black steel-backing washer
                                                             is still inside the hub.

                                                             1.5
                                                             Slide the driver down the axle, turning it
                                                             backwards (the direction it would “click”),
                                                             pressing the driver firmly into place. The
                                                             pawls should click into engagement, and
                                                             the driver should drop home easily. If there
                                                             is unusual difficulty, hold the pawls closed
                                                             while sliding the driver down the axle.

                                                             1.6
                                                             Replace the collar with the flared end
                                                             outward. Make sure that the collar is fully
                                                             seated.

                                                             1.7
                                                             Place the wheel back in the frame’s drop-
                                                             outs and tighten the bolts as necessary.
                                                             Check the bicycle for proper assembly
                                                             before riding it.

      G-SPORT RATCHET HUB INSTRUCTION MANUAL (PAGE 5 OF 15) / WWW.ODYSSEYBMX.COM / 562.623.9995 / INFO@ODYSSEYBMX.COM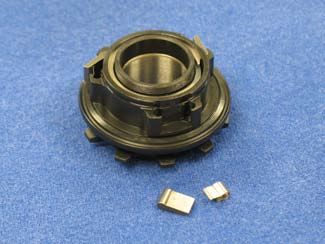
PART 2: SWITCHING FROM RIGHT TO LEFT

    Ratchet Hubs are shipped with the driver configured for right hand drive (RHD), but the hub can
    be easily switched to left hand drive (LHD). To switch the driving direction, it is only necessary to
    reconfigure the driver. The hub shell does not need modification.

                                                               2.1
                                                               Remove the driver as described in “Part 1.”

                                                               2.2
                                                               Lay the driver teeth-side down on a clean
                                                               rag, towel or piece of paper. Be sure to do
                                                               this in a neat and organized workspace.
                                                               The aim here is to prevent the chance of
                                                               losing small parts.

                                                               2.3
                                                               Use the tip of a small flathead screwdriver
                                                               to gently pry the plastic “bash” washer off
                                                               of the back end of the driver.

                                                                2.4
                                                                Locate the outermost end of the spiral-
                                                                pawl retaining ring and use the small
                                                                flathead screwdriver to gently pry the end
                                                                up. Slide the screwdriver under the ring
                                                                and unwind it from the driver’s slot.

                                                                NOTE: Once the retaining ring has been
                                                                removed the pawls and springs will be free
                                                                to fall out, so keep the teeth-side down in
                                                                this step to avoid losing them.

        G-SPORT RATCHET HUB INSTRUCTION MANUAL (PAGE 6 OF 15) / WWW.ODYSSEYBMX.COM / 562.623.9995 / INFO@ODYSSEYBMX.COM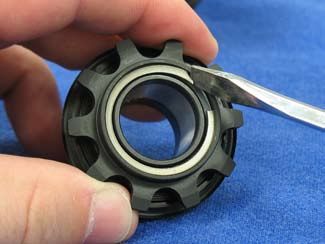
PART 2: SWITCHING FROM RIGHT TO LEFT
                                                                                                         CONTINUED

                                                             2.5
                                                             Remove one pawl and its spring and reposi-
                                                             tion them for LHD. Be sure to check the
                                                             spring to make sure that it is correctly
                                                             seated in cavity’s special groove. Also
                                                             check to make sure that the tip of the pawl
                                                             is oriented properly for engagement with
                                                             the hub’s tooth ring.

      G-SPORT RATCHET HUB INSTRUCTION MANUAL (PAGE 7 OF 15) / WWW.ODYSSEYBMX.COM / 562.623.9995 / INFO@ODYSSEYBMX.COM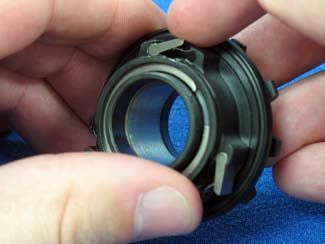
PART 2: SWITCHING FROM RIGHT TO LEFT
                                                                                                         CONTINUED

                                                             2.6
                                                             Repeat the previous step for the two
                                                             remaining pawls. Before replacing the
                                                             spiral-pawl retaining ring, double check to
                                                             make sure that all of the pawls are facing
                                                             in the same direction. Check this by run-
                                                             ning a finger fully around the driver so that
                                                             each pawl is folding downward in the same
                                                             manner.

      G-SPORT RATCHET HUB INSTRUCTION MANUAL (PAGE 8 OF 15) / WWW.ODYSSEYBMX.COM / 562.623.9995 / INFO@ODYSSEYBMX.COM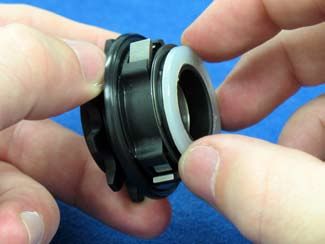
PART 2: SWITCHING FROM RIGHT TO LEFT
                                                                                                         CONTINUED

                                                             2.7
                                                             After checking the pawls for their proper
                                                             direction and tip orientation, replace the
                                                             driver’s spiral retaining ring by tucking one
                                                             end into the driver’s groove and wind the
                                                             rest of the ring on so it is fully seated
                                                             in place.

                                                             2.8
                                                             Replace the plastic “bash” washer by push-
                                                             ing it home and checking it for rotation.

                                                             2.9
                                                             Reassemble the hub according to “Part 1.”

      G-SPORT RATCHET HUB INSTRUCTION MANUAL (PAGE 9 OF 15) / WWW.ODYSSEYBMX.COM / 562.623.9995 / INFO@ODYSSEYBMX.COM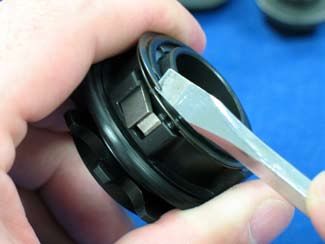
PART 3: CLEANING AND LUBRICATING THE PAWLS

   The drive cavity uses a lip seal to keep debris out of the hub shell. To keep the hub as smooth
   as possible a relatively loose fit between the seal and driver has been used. This means that it is
   possible for finite amounts of dirt and gunk to make their way into the hub over time (especially
   in very wet or dusty conditions). If the hub becomes noticeably quieter or skips even slightly, then
   chances are likely that the pawls need cleaning and re-lubricating. There are two basic ways to
   accomplish this.

   3.1
   Remove the driver from the hub shell as described in “Part 1.”

   3.2
   The first way is the fastest, though it is not as thorough; Lay the driver teeth-side up on an old rag
   and spray the pawls and springs liberally with a degreaser or thin lubricant like WD-40. Take pre-
   cautions to prevent this step from washing the grease out of the actual driver bearings. Wipe down
   all of the exposed areas with a clean rag to remove the excess dirt and gunk.

   3.3
   The second and more thorough approach is to remove all of the pawls and springs as described in
   “Part 2” and clean them individually.

   3.4
   After cleaning and re-assembling the pawls and springs (if necessary), apply a very small amount
   of thin lubricant (like Tri-Flow) by wiping it around the pawl and spring areas. Never use grease on
   the pawls, as it runs the risk of causing the pawls to become stuck in the closed position.

       G-SPORT RATCHET HUB INSTRUCTION MANUAL (PAGE 10 OF 15) / WWW.ODYSSEYBMX.COM / 562.623.9995 / INFO@ODYSSEYBMX.COM
PART 4: CLEANING AND LUBRICATING THE DRIVER BEARINGS
As with the pawls, the driver bearings may also need cleaning and re-lubricating from time to time.
4.1
Remove the driver as described in “Part 1.”
4.2
Remove the plastic “bash” washer as
described in “Part 2.”
4.3
Lay the driver teeth-side up on a clean rag,
towel or piece of paper in a clear workspace
to prevent part loss.
4.4
Remove the driver’s outermost circlip by
using a small flathead screwdriver to gently
pry the clip free.
4.5
Take the driver’s internal parts out in order,
and lay them on the towel in the order they
were removed.
4.6
Clean the inner surface of the driver and
each individual part, making sure to
remove any excess debris.
G-SPORT RATCHET HUB INSTRUCTION MANUAL (PAGE 11 OF 15) / WWW.ODYSSEYBMX.COM / 562.623.9995 / INFO@ODYSSEYBMX.COMPART 4: CLEANING AND LUBRICATING THE DRIVER BEARINGS
REASSEMBLY
4.7
Re-install the driver’s innermost nylon bushing.
4.8
Apply a thin coating of quality bicycle grease to the face of the nylon bushing and to the inside
surface of the driver.
4.9
4.9.1.) Re-install the “long” shouldered spacer so the textured section extends from the back of
the driver.
4.9.2.) Add another nylon bushing and grease as described in 4.8.
4.10
4.10.1.) Apply grease to the needle roller bearings and install them in the driver.
4.10.2.) Install the needle bearing’s raceway sleeve.
4.10.3.) Install two more nylon bushings and grease their top faces as described in 4.8.
4.11
4.11.1.) Replace the outermost (short) shouldered spacer.
4.11.2.) Add the final nylon bushing and the driver’s retaining circlip to cap it off.
4.11.3.) Reassemble the driver into the hub as described in “Part 1.”
G-SPORT RATCHET HUB INSTRUCTION MANUAL (PAGE 12 OF 15) / WWW.ODYSSEYBMX.COM / 562.623.9995 / INFO@ODYSSEYBMX.COMPART 5: REPLACING THE HUB SHELL BEARINGS
The Ratchet Hub runs on two standard-size 6904 cartridge bearings (20mm bore, 37mm outer
diameter, 9mm wide). This bearing size is readily available from local ball bearing suppliers, and
it has already proven itself in previous G-Sport hubs (Homer, Vandal, Monkey), where they’ve been
known to last for five years or more. Under unusually harsh conditions the bearings may become
dirty or could have the grease washed out, in which case, they may need replacing. Ask the bear-
ing supplier for 6904 2RS, since the replacements will need to have two rubber seals.
5.1
5.1.1.) Remove the driver as described in “Part 1.”
5.1.2.) Remove the black steel backing-washer from the drive cavity.
5.1.3.) Remove the non-drive side collar by pulling it off the axle. Use a small flathead screw-
driver to gently pry it free, if necessary.
5.2
Place the hub drive-side down on an open bench vise (with strips of wood or plastic to protect
the hub from damage). If no bench vise is available, simply use two blocks of wood for support.
Leave enough room underneath the support for the axle to be removed from the hub.
5.3
Install one of the bolts in the non-drive side end of the axle. Thread it in at least half way.
5.4
To drive the axle and bearing out of the hub, hit the end of the axle bolt with a wooden or rubber
mallet or by using an ordinary hammer and a block of wood to protect the bolt.
5.5
Remove the drive side bearing from the axle, flip the hub over and re-insert the axle into the bear-
ing to perform the same removal operation on the non drive-side bearing. Make sure that the sup-
port being used is capable of allowing the bearing to clear so it is free to exit the hub shell.
5.6
Place the new non-drive-side bearing over the hub shell’s bearing seat. Mount the bearing into
the hub shell seat by using a bearing press. If a bearing press is not available then the bear-
ing can be reseated using the same mallet (or block of wood + hammer) used to knock the axle
out. Please note that using the non-press method requires significant mechanical skill to perform
the procedure properly. To seat the bearing without the press, tap the bearing in slowly by using
small hits around the outside edge to keep the bearing moving into the shell with a consistently
straight alignment. Stop when the bearing is left with 2mm sticking out of the shell. If the bear-
ing press is being used, fully seat the bearing into the shell now.
G-SPORT RATCHET HUB INSTRUCTION MANUAL (PAGE 13 OF 15) / WWW.ODYSSEYBMX.COM / 562.623.9995 / INFO@ODYSSEYBMX.COMPART 5: REPLACING THE HUB SHELL BEARINGS
CONTINUED
5.7
Install the axle, making sure that the “long” end is situated on the drive-side.
5.8
Press the drive-side bearing into position using a bearing press. If a bearing press is not avail-
able, the bearing can be fully seated by using the hub’s axle in combination with a stack of
ordinary M20 FORM-A washers (approx. 20mm inner diameter, 37mm outer diameter, 3mm
thickness). This size is readily available at many good hardware stores and industrial fastener
suppliers. Place two washers on the non-drive-side of the axle, followed by the non-drive side axle
collar. Next, place ten washers over the drive-side of the axle, placing the collar on the axle at the
end of the stack, followed by the axle bolt and its washer. Tighten the drive-side bolt until the axle
has been fully pulled over to this side. At this stage, the non drive-side bolt should be threaded
into the axle and tightened as needed to fully seat the bearings in the hub shell.
5.9
Remove the bolts and washers and check for play in the axle. If there is significant movement,
repeat step 5.8 until the bearings are seated properly. Small amounts of play (0.1mm or less) or
slight tightness will resolve itself during normal riding.
5.10
Install the non-drive-side collar and the black steel backing-washer for the driver.
5.11
Install the driver as described in “Part 1.”
G-SPORT RATCHET HUB INSTRUCTION MANUAL (PAGE 14 OF 15) / WWW.ODYSSEYBMX.COM / 562.623.9995 / INFO@ODYSSEYBMX.COMGENERAL PROBLEM SOLVING
Axle bolt is stuck.
A bolt will not un-thread from the axle, and the axle rotates in the hub.
1.) Tighten the bolt on the opposite side into a dropout (with wheel positioned outside of the
frame).
2.) Loosen the bolt that is stuck in the axle.
3.) Inspect the bolt for damage and replace it as necessary.
Helicoil damage or loss.
Damaged helicoils can be removed by prying the end up with a sharp tool and pulling the coil
outward by clamping the end with a Vise-Grip (aka Mole Grip).
The helicoil is an M14 x 1.25, which is commonly used for repairing automobile spark plug socket
threads.
The purpose of the helicoil is to protect the axle from damage. It is easier and cheaper to replace
the helicoil instead of the whole axle. If the helicoil has a problem, check the bolts carefully for
damage before rebuilding the repaired hub to prevent the problem from happening again in the
future.
Other issues.
Please contact Odyssey for assistance if the hub has a problem that has not been addressed here
or if replacement parts are needed. ALL parts are available as spares and the hub should not be
used if any parts are missing or damaged.
TEL: 562-623-9995,
HOURS: M-F, 9-5, Pacific Time
EMAIL: info@odysseybmx.com
G-SPORT RATCHET HUB INSTRUCTION MANUAL (PAGE 15 OF 15) / WWW.ODYSSEYBMX.COM / 562.623.9995 / INFO@ODYSSEYBMX.COMYou can also read