OZONE GENERATOR USER MANUALS - Carl Roth
←
→
Page content transcription
If your browser does not render page correctly, please read the page content below
1

  OZONE GENERATOR

USER MANUALS

        UM Generatore ozono OZ ENG rev. 0 21.05.2020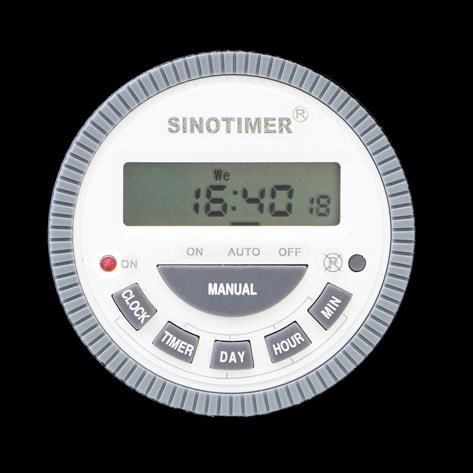
2

Phoenix Instrument
Heinkelstraße 4
30827 Garbsen

Tel. 05131/90818-30

info@phoenix-instrument.de

                             UM Generatore ozono OZ ENG rev. 0 21.05.2020
3

Index
1 Safety Information .................................................................................................................................................. 4

   Definitions of warning words and symbols ........................................................................................................... 4
   1.1 Warning definition:.......................................................................................................................................... 4
   1.2 Warning symbols: ............................................................................................................................................ 4
2 OZONE Sanitation ................................................................................................................................................... 5

3 Health and safety risks............................................................................................................................................ 5

4 Safe use................................................................................................................................................................... 6

5 Package Content ..................................................................................................................................................... 7

6 First use................................................................................................................................................................... 7

   6.1 Preliminary operations .................................................................................................................................... 7
   6.2 Parts of the equipment.................................................................................................................................... 7
7 Timer....................................................................................................................................................................... 8

   7.1 Set data and time ............................................................................................................................................ 8
8 Functioning ............................................................................................................................................................. 9

   8.1 Manual mode .................................................................................................................................................. 9
   8.2 Programs mode (AUTO)................................................................................................................................. 10
   8.2.1 How to set programs .................................................................................................................................. 10
9 How to use ............................................................................................................................................................ 11

10 Technical data ..................................................................................................................................................... 12

11 Tips and warning................................................................................................................................................. 12

12 Cleaning and maintenance ................................................................................................................................. 13

13 Warranty ............................................................................................................................................................. 14

14 Disposal of electrical devices .............................................................................................................................. 14

                                                                                                   UM Generatore ozono OZ ENG rev. 0 21.05.2020
4
1 Safety Information
Definitions of warning words and symbols
The safety information in the manual is very important to avoid personal injury, damage to the instrument, malfunc-
tions or incorrect results due to failure to comply with them. Read this manual carefully in its entirety and make sure
you familiarize yourself with the tool before putting it into operation and starting to work with it.
This manual must be kept in the vicinity of the instrument, so that the operator can consult it if necessary.
Safety provisions are indicated with warning terms or symbols.
1.1 Warning definition:
CAUTION for a dangerous situation that could lead to minor or moderate injuries, serious injuries or
death if not avoided.
NOTICE for important product information.
WARNING for product recommendations.
1.2 Warning symbols:
Caution
This symbol indicates a potential risk and warns you to proceed with caution.
Notice
This symbol draws attention to possible damage to the instrument or
instrumental parts.
Warning
This symbol recommends avoiding contact with water
UM Generatore ozono OZ ENG rev. 0 21.05.20205
2 OZONE Sanitation
Ozone (O3), one of the most powerful bactericides found in nature. More effective than Chlorine, it acts on
bacteria, fungi and molds by modifying the permeability of the cell wall, thus causing its death in a few minutes.
It is also extremely effective against the viruses to which it disturbs their reproductive cycle.
In its gaseous form it allows to reach even the most inaccessible ravines, allowing meticulous sanitation in any
environment.
Ozone sanitation furnishings, all surfaces, eliminates any odor, penetrates fabrics, ventilation channels and in all
those places that are difficult to reach by other products. It acts quickly, completely ecologically and turns back
into oxygen when it decomposes, leaving no trace or chemical residue.
3 Health and safety risks
Ozone is a powerful oxidant that is used all over the world to purify and sanitize the air and water in the
environment. It is an extremely reactive gas molecule, capable of damaging the molecular walls and breaking the
macromolecular components that underlie the life of bacterial cells, viruses, protozoa, fungi. It is a bluish-colored
gas with a characteristic sour, pungent smell of freshly cut hay.
The presence of high levels of ozone damages human health, that of animals and plants and produces the
deterioration of materials.
The main effects it has on humans are:
• eye, nose, throat and respiratory tract irritation
• sense of pressure on the chest and cough (strong irritating action against the mucous membranes)
The risks depend on the concentration of ozone present and on the duration of the exposure.
The most sensitive individuals, such as asthmatics and the elderly, may be subject to asthma attacks
even at low concentrations.
UM Generatore ozono OZ ENG rev. 0 21.05.20206
4 Safe use
Before using the ozone generator, please read these instructions carefully as it represents an essential
requirement for the proper functioning of the product and guarantees the SAFETY of the personnel responsible
for its use.
• this device complies with the safety standards for electrical and / or electronic (CE) appliances;
• the power supply cable must be intact, must not be crushed to avoid short circuits and dangerous electrical
discharges;
• keep this booklet carefully. In case of transfer of the device, this booklet must also be delivered;
• if any damage is found during transport, do not put the device into operation;
• no liability is accepted for any damage resulting from improper use not covered by these instructions;
• disconnect the power supply cable of the device from the electrical socket before proceeding with any check
and / or cleaning activity;
• do not keep the machine in humid places and / or high temperatures;
• avoid the very frequent use of the device in metal storage warehouses as ozone gas is highly oxidizing.
• keep this electrical device out of the reach of children;
Caution
• before proceeding with the connection of the device to the power supply, make sure that the voltage
corresponds to the required requirements (AC 220-240V / 50Hz);
• high voltage develops inside the device during ozone production.
• do not use the device in environments where flammable or explosive gases / liquids may be present e
electrostatic powder;
• do not expose the device to rain or splashes of water, to avoid the risk of fire or electric shock;
• it is forbidden to modify and / or tamper with the device.
UM Generatore ozono OZ ENG rev. 0 21.05.20207
5 Package Content
The instrument is supplied complete with the following parts:
1. Ozone generator
2. Power Cable
3. n°2 Rapid test for detection of PRO-Clean protein residues.
4. User Manual
6 First use
6.1 Preliminary operations
The instrument must be installed in the following conditions:
1. Stable work surface with a flat horizontal surface, dry and clean
2. Minimum spaces of at least 50 cm around the instrument
3. Ambient temperature between 0 ° C and 40 ° C and humidity not higher than 70%
4. Grounded power socket
5. Power supply 220-240 V 50H
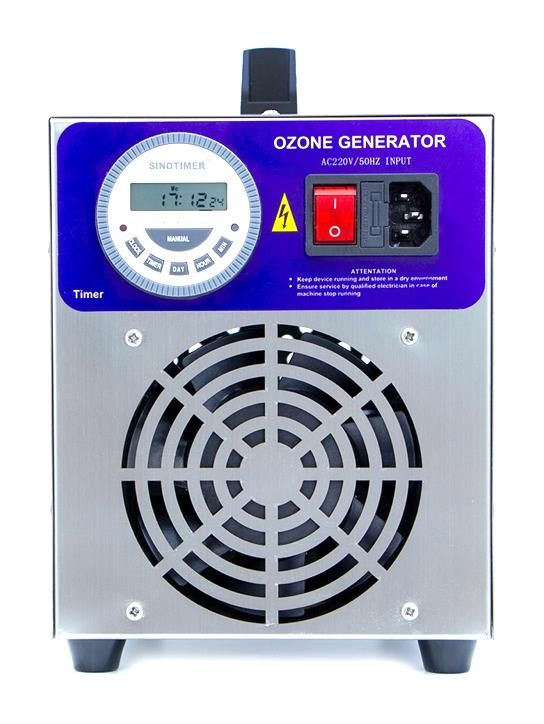
6.2 Parts of the equipment
Carrying handle
Timer Power socket
Power button
Fan
UM Generatore ozono OZ ENG rev. 0 21.05.20208
7 Timer
Button Description
CLOCK The CLOCK button allows you to set the date.
TIMER The TIMER button allows you to set the operating programs.
DAY The DAY button allows you to set the date and set the various operating programs of
the instrument.
HOUR The HOUR button allows you to set the time of the date and set the time of the TIMER
operating programming.
MIN The MIN button allows you to set the time of the date and set the time of the TIMER
operating programming.
MANUAL The MANUAL button allows you to change the operation of the instrument to manual
ON, AUTO with programs set and OFF.
The P button allows you to reset the inserted programs.
Power Button The ON / OFF button allows you to switch the instrument on and off.
7.1 Set data and time
The correct date must be set before using the tool.
Follow the instructions to correctly set the date:
• Day setting: keeping the CLOCK button pressed, press the DAY command repeatedly until the correct day
appears on the TIMER display.
• Time setting: keeping the CLOCK button pressed, press HOUR repeatedly until the correct time appears
on the display.
• Minute setting: keep the CLOCK button pressed and press the MIN command repeatedly until the correct
minutes appear on the display.
UM Generatore ozono OZ ENG rev. 0 21.05.20209
NB: you can choose the time format between PM-AM and from 00:00 to 23:59. To change the format, keep
the CLOCK command pressed for 3/4 seconds.
The timer is powered by an internal lithium battery, so there is no need to power the generator to set the
time and programs.
8 Functioning
The OZ Ozone generator can operate in two modes
1. Manual (ON)
2. Programmed (AUTO)
8.1 Manual mode
The manual mode allows you to use the OZ Ozone generator continuously.
By pressing the MANUAL button it is possible to select the mode of use of the instrument most suitable for the
operator; in fact, a black segment will appear on the display (below the time) above one of the three buttons (ON-
AUTO-OFF).
To use the OZ ozone generator in manual mode, select the ON button.
Once set to ON, connect the power cable to the power outlet and press the power button to ON; the red LED next
to the ON item will light up on the Timer.
UM Generatore ozono OZ ENG rev. 0 21.05.202010
The generator will begin to produce Ozone continuously until the operator changes the mode to OFF by MANUAL
command or by pressing the power button on OFF.
8.2 Programs mode (AUTO)
The AUTO function allows you to set the OZ Ozone generator so that it works automatically in one or more periods;
in fact, it is possible to select one, some or all days by setting one or more start times (1 ON -: -, 2 ON -: -, 16 ON -
: -) and one or more end times (1OFF -: -, 2OFF -: -, 16OFF -: -), up to a maximum of 16 programs.
8.2.1 How to set programs
1. Press TIMER button: will appear on the display 1ON -- : --
2. Press button DAY to select the day / days of the week the instrument is used
MO MONDAY
TU TUESDAY
WE WEDNESDAY
TH THURSDAY
FR FRIDAY
SA SATURDAY
SU SUNDAY
3. Press the HOUR and MIN buttons to set the instrument's departure time in the 1ON program
4. Once the start time has been set, press TIMER again; 1OFF will appear on the display --:--
5. Repeat steps 2 and 3 to set the end time of the program 1.
6. If you want to set a second timed program, press TIMER again, item 2ON will appear on the display, repeat
steps 2, 3 and 4.
NB: It is possible to set up to 16 programs
7. To confirm and exit, press the CLOCK button
8. Press MANUAL button to select AUTO mode on the display
UM Generatore ozono OZ ENG rev. 0 21.05.202011
9. To reset programs and date, press button
10. To check programs set, press TIMER repeatedly.
Once the programs are set and the AUTO mode is selected, connect the power cable to the power outlet and
press the power button to ON. The red LED next to the ON item will light up on the Timer. The instrument will
begin to produce Ozone during the period (s) selected in the programming phase.
9 How to use
For efficient use, position the instrument in a strategic point of the room (so that the ozone produced can best
disperse in the entire area), close doors and windows. Consider for this purpose, in choosing the location, that the
weight of ozone is higher than that of oxygen; it is therefore advisable to position the instrument as close as
possible to the ceiling.
If you use manual mode, start the ozonation and exit as quickly as possible from the room undergoing treatment;
In automatic mode, make sure that there are no people or animals in the room during the treatment.
Consider as ozonation times between 20 and 40 minutes and, once the treatment is finished, wait 40 minutes
before entering the room (time necessary for the ozone present in the room to continue to oxidize and turn back
into oxygen); then let the room air out by opening doors and windows.
UM Generatore ozono OZ ENG rev. 0 21.05.202012
Table of indicative times for inactivation of bacteria, viruses, molds, insects
Organism Exposition time
Bacteria (e.coli, legionella, mycobacterium, fecal virus)13
• it is not recommended to use the instrument in continuous for more than 60 minutes;
• keep the instrument dry;
• it is not recommended to tamper with the instrument by unauthorized personnel;
• it is not recommended to use ozone generators in really dusty environments, with high humidity levels
and with an ambient temperature above 40 ° C;
• the timer is powered by a CR2032 battery, if it should discharge, simply remove the external frame and,
using the battery support inserted in the timer, replace the discharged battery;
• When an OZ ozone generator is operating, the environment must have closed doors and windows and
people and animals MUST NOT BE PRESENT within the environment being treated; also make sure that
there are no materials incompatible with ozone. At the end of the treatment wait for the scheduled times
for the ozone to turn back into oxygen or air the environment before staying there;
• Keep the instrument away from sources of water.
• For a correct sanitization of a room it is recommended to proceed with a general cleaning before
ozonating.
• The generator can be fixed on the wall thanks to the holes on the steel frame of the device.
12 Cleaning and maintenance
OZ ozone generators do not require any maintenance.
We recommend cleaning the external surface with a normal multipurpose detergent sprayed on a soft damp
cloth, so as not to use it concentrated.
Notice:
If the instrument should be sent back to service, it is advisable to return the instrument to its original packaging.
Any damage caused by incorrect shipping will not be covered by the warranty.
UM Generatore ozono OZ ENG rev. 0 21.05.202014
13 Warranty
Under normal conditions of use, this tool is guaranteed for a period of 24 months from the date of purchase.
The guarantee is valid only if the purchased product remains original. It does not apply to any product or parts of
it that have been damaged due to incorrect installation, improper connections, incorrect use, accident or
abnormal operating conditions.
No liability is accepted for damage caused by use not in accordance with these instructions, and any unauthorized
modification made on it.
14 Disposal of electrical devices
.
This equipment is subject to the regulations for electronic devices.
Dispose of in accordance with local regulations.
UM Generatore ozono OZ ENG rev. 0 21.05.2020You can also read