Telkom ADSL 5102G Router

    Quick Start Guide
←
→
Page content transcription
If your browser does not render page correctly, please read the page content below

Telkom ADSL 5102G Router
Quick Start Guide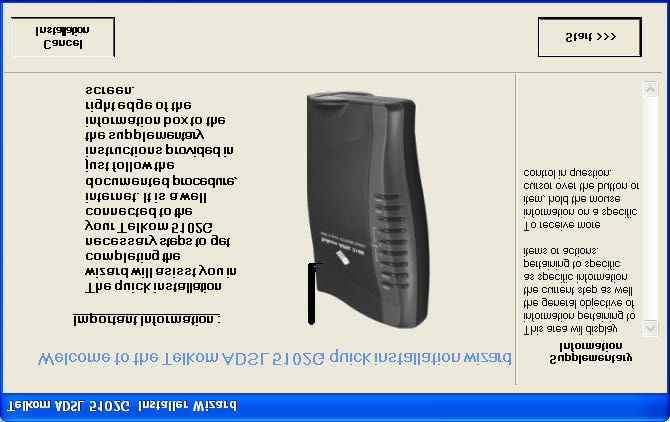
Telkom ADSL 5102G

                       This Quick start guide describes a basic installation. For
                       instructions on configuring a more detailed setup, please
                       refer to the on-line manual.

Package Content:

         Ethernet (Cat -5 LAN)       2 X RJ-11
            cable - Straight         ADSL/telephone Cable
                                                                          Integrated Power
                                                                          and surge unit

                                                              CD-ROM
                                     This Quick
                                     Start Guide

  Telkom ADSL
  5102G router

                                                                 2 X ADSL
                                                                 Micro-filters

                   ü      Do not use the Telkom ADSL 5102G in high humidity or high
                          temperature rooms and/or surroundings. I.e. Kitchens.
                   ü      Do not open or try to repair the Telkom ADSL 5102G yourself.

                   ü      If the Telkom ADSL 5102G gets too hot, turn off the power
  Warning
                          immediately and contact technical support on 0860 2C HELP
                          (0860 22 43 57)

                  ü      Place the Telkom ADSL 5102G on a stable surface.
                  ü      Only use the power adapter that comes with the package. Using
                         a different voltage rating power adaptor may damage the router.
 Attention                                                                                   1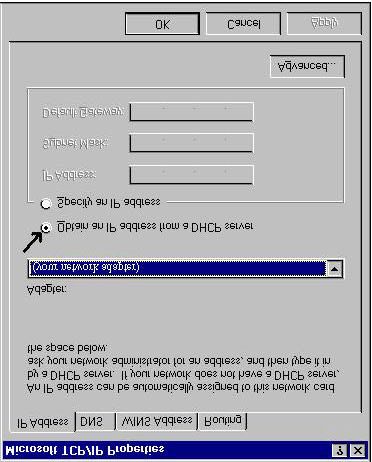
Quick Start Guide
The Front LEDs
                    6   5       4              3      2      1

Figure 1

           LED                                         Meaning

     1     PWR :            Lit when power is ON.

     2     SYS :            Lit when the router is ready.

                            Lit green when wireless connection is established.
     3     WLAN:
                            Flashes when sending/receiving data

           LAN Port         Lit when connected to an Ethernet device.
     4
            1-4:            Green for 100Mbps; Orange for 10Mbps.
                            Flashes when sending/receiving data

                             Lit steadily when successfully connected to an ADSL DSLAM
     5     ADSL:
                        (“linesync”).

                            Lit steady when there is a PPPoE connection using the internal
     6     PPP :
                             PPPoE of the router.

2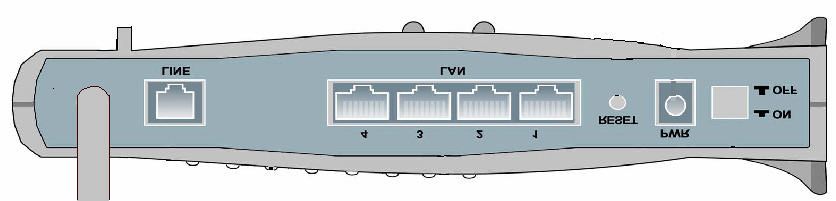
Telkom ADSL 5102G
The Rear Ports

                   5                        4                     3      2     1
                                                                         2

Figure 2

           Port                                   Meaning

    1      Power Switch   Power ON/OFF switch

    2      PWR            Connect the supplied power adapter to this socket.
                          The moment the device is powered on, press it to reset the
                          device or restore to factory default settings.
                          0-3 seconds: reset the device
    3      RESET
                          6 seconds above : restore to factory default settings (this is
                          used when you can not login to the router, e.g. forgot the
                          password)
           LAN             Connect a UTP Ethernet cable (Cat-5 or Cat-5e) to one of the
           1X — 4X        four LAN ports when connecting to a PC or an office/home
    4
           (RJ -45        network of 10Mbps or 100Mbps. You may use a straight or a
           connector)     crossover cable.

    5      LINE           Connect the surge protected (“out”) RJ-11 plug of the integrated
                          surge and power unit into this socket.

                                                                                             3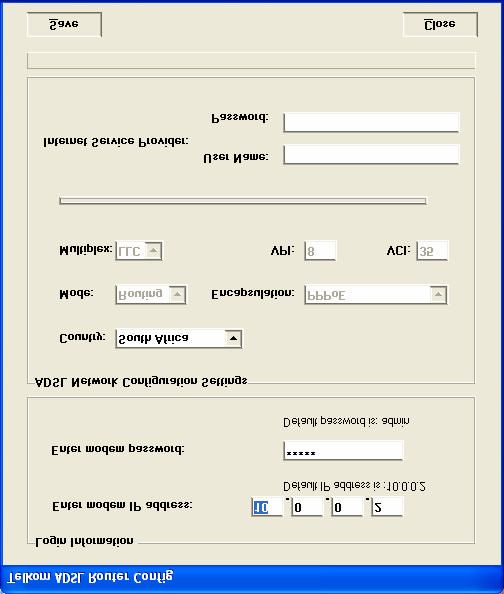
Quick Start Guide
Start installing your Telkom ADSL 5102G

                    Advanced users:
                    ü   Advanced users may access the router on the following IP
                        address: 10.0.0.2
                    ü   The default username and password is “admin” and “admin”.
                    ü   Important Note: It is a security risk to leave your username and
     Attention          password as the default. Please change them. Please refer to the
                        online user manual for assistance.

                     ü The following sections of this guide are only applicable to users
                        running Microsoft Windows operating systems. If you are
                        running a different operating system, please refer to the manual
                        for assistance in installing the Telkom ADSL 5102G.
                     ü The installation procedure differs for different operating
                        systems. If you are installing the Telkom ADSL 5102G
                        using a Windows XP or Windows 2000 operating system
                        please proceed with the next step below. If you are using a
                        Windows 98, 98 Second Edition, Windows ME of Windows
                        NT4 operating system, please skip to the section on page
                        8.

4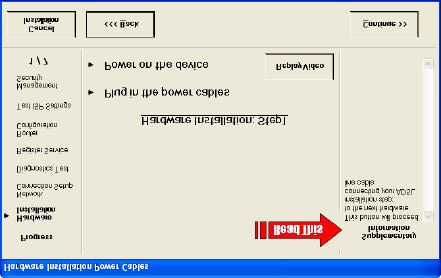
Telkom ADSL 5102G
Installation u sing Windows XP or Windows 2000:
An easy installation wizard has been developed to simplify the installation process for users
running the newer versions of Windows. The process has been well documented and online
help/supplementary info has been provided for each step.

                      ü The wizard has been included on the enclosed CD and will be
                          installed on your hard drive once you insert the CD.
                      ü The wizard installation process is very easy and is described in
                          detail below. It is recommended for novice users to not change
                          any settings on the initial installer.
                      ü The wizard will require the .Net framework in order to function
                          properly. If you do not have the framework installed on your
                          computer, the initial installer will prompt you to install it from the
                          enclosed CD. The framework requires approx. 25Mb of disk
                          space.
                      ü If nothing happens when you insert the CD, refer to the
                          troubleshooting section at the end of this guide.

   1. Please insert the Telkom ADSL 5102G CD now.

   2. The installer will now test whether you have the .Net framework installed. If not, you will
      be prompted to install it. See figures below and follow the onscreen instructions. If you do
      have the .Net framework installed the wizard will automatically skip to step number 3 .

      This step may take a few minutes. Please be patient.

                                                                                                   5
Quick Start Guide
3. The initial installer will open automatically (See figure below). This utility will install the
wizard and other useful 5102G utilities onto your hard drive. Just follow the onscreen
instructions and complete all the steps.
Initial Installer (Figure 6)
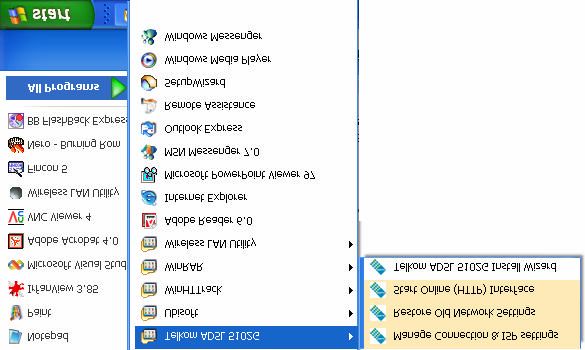
4. When you have successfully completed the previous step, the wizard will be installed on
your hard drive. To run the wizard click on Start> All programs> Telkom ADSL 5102G>
Telkom ADSL 5102G Install Wizard. See figure below, and perform the action now.
ü Note that there are also other applications installed here.
ü Manage Connection & ISP settings – used to alter ISP &
connection settings at a later stage.
ü Restore Old Network settings – The install wizard will alter your
network connection settings in order to establish communications
with the 5102G. If you wish to undo these settings and roll-back to
your original setup, use this application.
ü Start Online (HTTP) Interface – Access the web interface of the
6 router using your web browser.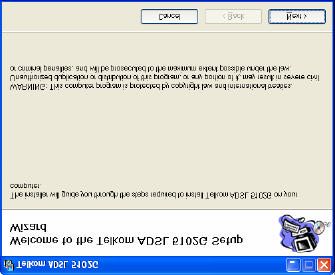
Telkom ADSL 5102G
5. The easy install wizard will open on your screen. (See figures below)

   Please note the supplementary information block to the right edge of the form. This block
   will provide you with relevant information pertaining to the current step and/or specific
   buttons or actions. To receive supplementary information on a specific button or object
   move your mouse cursor over the item in question. The information will appear in the
   information block until you move the cursor away from the item.

   Also note the progress indicator to the left edge of the form. There are a total of seven
   steps to complete. You have to perform all seven steps in order to successfully complete
   the wizard.

6. Please note that this printed booklet does not discuss the steps included in the online
   wizard. For assistance, please read the supplementary information provided in order to
   successfully complete each step. It is crucially important to read all the information given
   in the supplementary information section to the right edge of the wizard screen.

7. After you have completed this wizard you will be able to surf the internet. Windows XP &
   2000 users should not proceed to the next step of this quick guide.
                                                                                           7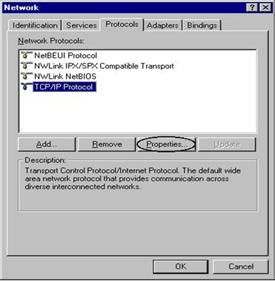
Quick Start Guide
Installation using Windows 98, 98SE, ME or NT4:
Connecting Your Telkom ADSL 5102G Router
(Hardware Installation)
    Follow the installation instructions below, using the images provided and the overview sketch
    (figure 3) and the corresponding letter indicators.

    1. Power up the device
       a) Plug the power adapter into the electrical wall-socket (A).
       b) Plug the power pin-connector (male) into the router’s power socket (B).
       c) Switch on the device.
       d) Wait for approximately 20 seconds, then confirm that the “PWR” and “SYS”
          LED’s (front panel lights) are steadily lit.

                 A
                                                                              B

    2. Connect the ADSL line
       a) Connect one of the included telephone cables between the Telkom wall-socket
          and one of the sockets on top of the integrated power and surge unit (C).
       b) Connect the other included telephone cable between the remaining unused
          socket on top of the integrated power and surge unit and the router’s “LINE”
          port (D).

                                                               D

                               C

8
Telkom ADSL 5102G
c) Your router will now attempt to synchronize with the Telkom ADSL line. The
“ADSL” LED will come on, start to blink and after approximately 1-2 minutes be
steadily lit. If the “ADSL” LED does not come on, please refer to the
troubleshooting section at the end of this guide.
d) The Telkom ADSL 5102G router is, by default, distributed with a guest ISP
username and password. This guest account allows you access to the
www.telkom.co.za website only. Although this account only allows limited
access, it serves as a tool to confirm that your hardware installation and your
own PC’s network configuration has been completed successfully. This guest
account will cause your router’s “PPP” LED to be steadily lit now. We will again
refer to this guest account at a later stage of the installation process.
3. Connect the LAN (network) cable
a) Plug one end of the enclosed Ethernet (CAT -5 LAN) cable into one of the
router’s LAN ports, you may choose any of the 4 ports (E).
b) Plug the other end of the Ethernet (CAT-5 LAN) cable into your computer’s
network port or network hub/switch (F).
F
E
c) Confirm that the corresponding LAN LED is lit.
d) You can connect up to 4 network devices directly to the Telkom ADSL 5102G
as shown in the overview sketch (F).
4. Connect the ADSL micro filters
a) If you also intend to use traditional telephones (for voice calls) on the ADSL
line, you need to connect the included ADSL micro filters. (These units filter
out any data noise on your voice lines.)
b) Plug the micro filter into the Telkom wall-s ocket from where you intend to
utilize your traditional telephone (G).
c) Plug the telephone into the micro filter (H)
9Quick Start Guide
G
H
d) Important Note: Make sure that you do not connect any micro filters between
the Telkom wall socket used for the router and the router itself. Refer to the
overview sketch, from indicator (C) to indicator (D).
Figure 3: Hardware Installation Overview
Once the hardware is correctly installed and the “ADSL” & “PPP” LED is steadily lit then you can
proceed with the next section of the quick start guide.
10Telkom ADSL 5102G
Configuring PC in Windows 98/ME
1. Go to Start / Settings / Control Panel. In
the Control Panel, double-click on Network
and choose the Configuration tab.
2. Select TCP/IP ->
NE2000 Compatible, or the name of your
Network Interface Card (NIC) in your PC.
3. Select the Obtain an IP address
automatically radio button.
4. Then select the DNS Configuration tab.
5. Select the Disable DNS radio button and
click OK.
6. Click OK again to finish the configuration.
11Quick Start Guide
Configuring PC in Windows NT4.0
1. Go to Start / Settings / Control Panel. In
the Control Panel, double-click on Network
and choose the Protocols tab.
2. Select TCP/IP Protocol and click
Properties.
3. Select the Obtain an IP address from a
DHCP server radio button.
4. Now select the DNS tab and make sure that
no DNS is specified.
5. Click OK to close TCP/IP Properties.
6. Click OK again to close the Network
window.
12Telkom ADSL 5102G
Configuring Your Telkom ADSL 5102G Router
(Software Installation using Windows 98, 98SE, ME or NT4 )
Now that the hardware installation is complete you will need to perform certain soft
actions to complete the installation. All these actions are made easy by using the
enclosed Telkom ADSL 5102G CD.
In this section you will:
1) Verify that your computer meets the minimum requirements for Telkom ADSL
2) Test your guest account connection to the www.telkom.co.za website
3) Install (and run) the utility which will setup your own ISP account details on the
router
4) Read the router’s manual. This is optional, but recommended if you want to use
some more advanced features of the router. If you only want to surf the Internet
and get your e -mail, you do not need to look at the manual now.
ü It is crucially important that you read the supplementary
information supplied to you on the right side of the CD’s auto run
menu. It supplies valuable information on how to use the menu
and explains the function of each button.
Please follow the next few steps to successfully complete your router setup.
1) Insert the Telkom ADSL 5102G CD now.
2) The CD will auto run and the menu screen will appear as shown in figure 4 below.
Auto run Menu (Figure 4)
13Quick Start Guide
ü If nothing happens when you insert the CD, please refer to the
troubleshooting section at the end of this guide.
ü Not all buttons are active when the utility starts up. As you perform
the actions from top to bottom they will become available.
3) Click “PC Qualification Test”. A program will open to verify that your PC meets the
minimum requirements. Just follow the instructions and when complete, close the
program to return to the menu screen.
4) Next, click on the “Register Telkom ADSL service” button. Your web-browser will
now open and attempt to connect to the Telkom ADSL service registration page. If
you are using the web-browser for the first time, the browser will prompt you to
complete a few simple setup instructions. If you are able to see the Telkom
webpage, please follow the onscreen instructions to register your ADSL service. If
you can not see the Telkom webpage, please make sure that you have performed
the previous steps of this quick guide correctly. If the problem persists, contact
technical support on 0860 2C HELP (0860 22 43 57).
It is imperative that you register your ADSL service on this webpage within
seven days after installation. If you do not, Telkom will cancel your ADSL
service.
ü Before you continue, make sure that you do not have
any software firewalls running. These will include
programs like: Norton Internet Security, TrendMicro’s
PC-Cillin, Bit-Defender, McAfee, etc. Please disable
these programs temporarily to perform the next step. It
is also important to remember to re -activate your
software firewall after you have completed this step.
5) Click the “Setup your own ISP account” button. The Telkom ADSL 5102G utility
will now open. Enter your supplied ISP(Internet Service Provider) username and
password in the location indicated by the two arrows in Figure 5. The default
Telkom guest account will now be replaced and thereby, enable you to browse the
whole Internet and not just the Telkom website.
ü The “Login Info” section of the utility form, houses the
information that enables you to access your router. If you have
changed either your router’s IP address and/or administrative
username and password, you will need to enter the new
information here before you click “Save”.
ü The utility will open with all the fields preset to Telkom’s default
settings. Should you require different settings and/or a bridged
connection then select “Custom” in the “Country” field to make
all the fields editable. Note, that this function is only for
advanced users and is not for a standard setup. Please consult
the manual for further information.
14Telkom ADSL 5102G
Telkom ADSL 5102G utility (Figure 5)
After you have entered your details, click on “Save ”. The router will now be
updated with your own ISP account. On successful completion, a message will be
displayed reporting that the save process was a success. Just click “Ok” and
close the utility to proceed to the next step.
ü If the utility does not seem to respond, please refer to the
troubleshooting section.
ü If you want to rerun this utility in future without performing
the whole wizard, insert the Telkom 5102G CD, then
click on “Start”, “Run” and type “D:\
RouterUtil \setup.exe”. Where D is the drive number
representing your CD Rom drive.
6) Please power down the router, wait a few seconds and power it up again in order
for the new settings to be loaded.
7) The moment the “ADSL” and “PPP” LEDs are steadily lit, you will be able to
browse the Internet. To test your new Internet connection, please click on the
“Test your own ISP account” button. This action will open your Internet browser on
www.aardvark.co.za. If you are not able to see the aardvark site, you may have
may a spelling mistake while inserting your ISP username and password – please
repeat step 5.
8) The last button on the menu, “Read 5102G User Manual (.PDF)”, will open the
User manual from the CD. It is recommended that you read this manual should
you want to make use of some of the advanced features on the Telkom ADSL
15Quick Start Guide
5102G. The manual is in Adobe Acrobat PDF format and requires Acrobat reader
to open the file.
If you do not have Acrobat reader installed on your PC. Click on the “Install
Acrobat Reader….” hyperlink to the immediate right of the manual button, select
your operating system and click install.
ü You have now completed the Telkom ADSL 5102G setup
(for Windows 98, 98SE, ME or NT4) and should now be
able to browse the Internet. Please do not proceed with
the next steps as they are only intended for Windows XP
and 2000 us ers. If you can not browse the Internet,
please refer to the troubleshooting section at the back of
this quick start guide.
ü This guide provides assistance to setup the router to connect to
the Internet. For other services such as e -mail setup, please
contact your ISP (Internet Service Provider) for details.
Getting Started using a wireless connection:
1. To ensure wireless security “out-of-the-box”, Telkom distributes each 5102G with
a unique WPA pre-shared key already setup on your router. This pre-shared key is
printed on a sticker on the back panel of the router.
2. In order to establish a wireless connection to the 5102G, you will need to setup
your wireless client (e.g. laptop with built in wireless module, wireless PCI card or
USB stick) with this pre-shared key. Please consult the security section on the
manual of your specific wireless client device for instructions on how to do this.
3. Should you wish to alter this pre-shared key, please refer to section 4.2.3 of the
online manual. To view the on-line manual, click on ‘Start” , then “Run” and type
“D:\manual\manual.pdf” in the space provided (where D represents your CD
drive’s drive letter)
16Telkom ADSL 5102G
Troubleshooting:
Problem Description 1:
ADSL LED (light) does not come on.
Solution:
1. Check line connection at wall socket (C) and on router (D). (Refer to overview
sketch – figure 3)
2. Make sure the micro filters are connected as illustrated in the overview sketch (figure
3) and not directly between the Telkom ADSL wall socket (C) and the Telkom ADSL
5102G router (D).
3. If your “ADSL” LED still keeps blinking after approximately 5 minutes, there may be a
fault on your Telkom ADSL line, please report the fault to Telkom support on 0800 375
375.
Problem Description 2:
Nothing happens when I insert my CD.
Solution:
Your computer may not be set to auto run CDs you insert. To manually start the auto -run
menu, click on “Start”> “Run”. The following screen will open, click “Browse”.
Navigate to the CD drive containing the installation CD (Telkom ADSL 5102G) and
double click the file “autorun.exe”. This will start the application from which you may
proceed with the installation.
Problem Description 3:
When I click OK on the Telkom ADSL 5102G utility window (figure 5), it does not seem to
respond. (Applicable only to Windows 98, 98SE, ME and NT4)
Solution:
Please make sure that you have disabled all firewall software on your computer that may
block traffic to the router. The utility is trying to communicate with the router on an IP
address that may be filtered out by your firewall. The most well-known firewall software
packages are: Norton Internet Security, TrendMicro’s PC-Cillin, Bit-Defender, McAfee,
etc. Please also remember to re-enable the firewall software again after the router has
been setup.
17Quick Start Guide Problem Description 4: When the wizard tries to open the Telkom website or when I try to open any other website, a Dial-up Connection screen pops up asking me to connect to the internet. It doesn’t matter what choice I make I can not connect or see the website. Solution: 1. Your Internet explorer is still setup to connect to the Internet using a dial-up account such as traditional analog or ISDN. Please change this setting to “Never Dial a connection”. You will find this setting on the internet options form. Click on Start> Control Panel> Internet Options, then click on the connections Tab. Now check the “Never Dial a Connection” button. If the problem persist, click the “setup” button in the top-right corner of the connections tab. Select “Connect to the Internet”, “Setup my Connection Manually”, “Connect Using a Broadband connection that is Always on” and then click finish. Problem Description 5: I’m using Windows 95 or 98 and I’ve completed the utility step but I still can’t browse the Internet. Solution: 1. You may have misspelled your ISP username and password. Remember that the username and password is case-sensitive. Type them exactly as provided by your ISP. Please ensure that the PPP light on your router is lit, as it will indicate a correct ISP information setup. 2. Your ISP may have provided you with incorrect information. Proble m Description 6: The router’s “PPP” LED (light) did not come on after I submitted my own ISP username and password using the utility. (Only applicable for routed connections) Solution: 1. You may have misspelled your ISP username and password. Remember that the username and password is case-sensitive. Type them exactly as your ISP have printed them. 2. If you are sure that you have correctly typed your ISP details but is still unable to browse the Internet, please contact your ISP to confirm your username and password. Product Support and Contact Information Most problems with setting up the router can be solved by referring to the Troubleshooting section in the User Manual on the enclosed CD. If you cannot resolve the problem using the Troubleshooting above, please contact 0860 2C HELP (0860 22 43 57). Windows 98, Windows NT, Windows 2000, Windows Me and Windows XP are registered Tradem arks of Microsoft Corporation. 18
You can also read