Cloud Secure Microsoft Office 365 - Configuration Guide - Pulse Secure
←
→
Page content transcription
If your browser does not render page correctly, please read the page content below
Cloud Secure
Microsoft Office 365
Configuration Guide

Product Release      9.0R1
Document Revisions   3.0
Published Date       May 2018
Microsoft Office 365 Deployment Guide

Pulse Secure, LLC
2700 Zanker Road, Suite
200 San Jose
CA 95134

https://www.pulsesecure.net.

Pulse Secure and the Pulse Secure logo are trademarks of Pulse Secure, LLC in the United States. All other
trademarks, service marks, registered trademarks, or registered service marks are the property of their
respective owners.

Pulse Secure, LLC assumes no responsibility for any inaccuracies in this document. Pulse Secure, LLC
reserves the right to change, modify, transfer, or otherwise revise this publication without notice.

Microsoft Office 365 Configuration Guide

The information in this document is current as of the date on the title page.

END USER LICENSE AGREEMENT

The Pulse Secure product that is the subject of this technical documentation consists of (or is intended
for use with) Pulse Secure software. Use of such software is subject to the terms and conditions of the
End User License Agreement (“EULA”) posted at https://www.pulsesecure.net/support/eula/. By
downloading, installing or using such software, you agree to the terms and conditions of that EULA.

© 2018 Pulse Secure, LLC. All rights reserved                                                                       2
Microsoft Office 365 Deployment Guide

Table of Contents

INTRODUCTION ............................................................................................................................................................................4
       ABOUT THIS GUIDE ....................................................................................................................................................................4
OVERVIEW ......................................................................................................................................................................................4
       APPLICATIONS SSO SUPPORT MATRIX ........................................................................................................................................4
       PREREQUISITES ...........................................................................................................................................................................6
CONFIGURATIONS FOR OFFICE 365 DEPLOYMENT.............................................................................................................8
       CONFIGURING OFFICE 365 ........................................................................................................................................................8
       CONFIGURING O365 CLOUD APPLICATION ON PCS ..................................................................................................................10
END-USER FLOW ..........................................................................................................................................................................13
       IOS MOBILE (IOS NATIVE MAIL CLIENT) .....................................................................................................................................13

       ANDROID MOBILE (DIVIDE PRODUCTIVITY APP) ..........................................................................................................................13
       MICROSOFT OUTLOOK APPLICATION (ANDROID & IOS) .............................................................................................................13
       DESKTOPS/LAPTOPS ...................................................................................................................................................................14
       OTHER OFFICE365 APPLICATIONS .............................................................................................................................................14
TROUBLESHOOTING ...................................................................................................................................................................15
       TROUBLESHOOTING TIPS ............................................................................................................................................................15
REQUESTING TECHNICAL SUPPORT........................................................................................................................................15

© 2018 Pulse Secure, LLC. All rights reserved                                                                                                                                                   3
Microsoft Office 365 Deployment Guide
Introduction
About This Guide
This guide provides information on the deployment, configuration, and administration of Office 365 for
seamless access over mobile and desktop devices for Cloud Secure solution. It does not cover information
related to third party MDM configurations.
This document provides configuration of Office 365 on Pulse Connect Secure, configuration of Microsoft
Office 365 Service Provider. This document does not cover basic configurations on Pulse Connect Secure
(PCS) and Pulse Workspace Mobile Device Management (PWS) Server which are required to be enabled
before configuring O365 and cloud service specific configurations outlined in this document. Basic
configurations of PCS and PWS are covered as part of Cloud Secure Admin Guide.
MobileIron and AirWatch Third-party MDM servers can also be used in this solution to manage devices
and to evaluate compliance posture of the mobile devices.
Overview
Cloud Secure provides seamless access to Office 365 users on their mobile and desktop devices. Office
365 is Microsoft’s cloud offering which is a cloud version of Microsoft Office software services such as
Office, Lync, Yammer, Exchange, and SharePoint. It uses Azure Active Directory service to manage users.
Azure Active Directory extends on-premises Active Directory into the cloud, enabling users to use the
primary organizational account to not only sign in to the domain-joined devices and company resources,
but also the web and SaaS applications.
Cloud Secure leverages existing PCS authentication and authorization infrastructure to provide seamless
access to Office 365. When user tries to access Cloud Application, compliance posture of the device is
evaluated before providing access. On mobile devices, compliance posture is done based on the attributes
information received from MDM server. On desktops, compliance posture is done using the host checker
functionality provided by Pulse client. Once authentication and the compliance check of the device
completes, access to the resources are provided.
Applications SSO Support Matrix
The user experience for SSO access is seamless. However, the SSO mechanism used, i.e web browser or
ECP, varies based on the platform and the application usage. This section outlines details on the
supported mechanism on different client applications.
The SAML web browser SSO is supported on:
• All Browsers (Chrome, Safari, Firefox, Internet Explorer)
• Microsoft applications such as Word, PowerPoint, Excel etc. on desktops and mobiles.
• Microsoft Outlook 2016
• Microsoft Outlook 2013 with a registry update. Refer to Desktop/Laptop section in End-User-Flow
for more information on registry update.
© 2018 Pulse Secure, LLC. All rights reserved 4Microsoft Office 365 Deployment Guide
The SAML ECP is supported on:
• iOS Native Mail.
• Gmail applications on Android.
• Mail app on Mac desktops
• Microsoft Outlook 2013 on desktops.
Cloud Secure deployment with ECP Active-Sync profile is supported only through Pulse Workspace and
not with Third-party MDM Servers.
© 2018 Pulse Secure, LLC. All rights reserved 5Microsoft Office 365 Deployment Guide
Prerequisites
Before enabling Cloud Secure Solution for Office 365 deployments, you should have Microsoft
subscriptions and few other tools which are outlined below. The following are the minimum requirements
needed before deploying Cloud Secure Solution for Office 365.
Few of these components would have been setup already if you have existing Office 365 deployment in
your Enterprise. In such case, you just have to enable Single Sign-On settings to get it working.
Requirements Description
To configure Office 365 as Service Provider for Cloud Secure, you
Microsoft Office 365 subscription with Single need to have subscription for Office 365 Business plan. To sign
Sign-on Capabilities up for Office 365, refer to
https://support.office.com/en-us/article/How-to-sign-up-for-
Office-365-Admin-Help-9b23c065-eef9-4bf7-acf5-
127eb46d5e67?ui=en-US&rs=en-US&ad=US
DNS Domain registered with Office 365 Office 365 SSO requires an Internet-resolvable domain name to
use as the suffix in each user’s username. In Office 365 for
business, you can use a custom domain name with your email
address. To set up a domain to use with Office 365, you must own
a domain and change some of the DNS records for your domain.
You can easily buy one from Office 365, or from another domain
reseller or registrar. For details on buying a new domain, refer to
https://support.office.com/en-us/article/How-to-buy-a-domain-
name-1561140a-16a9-4a02-822d-a989250e479d?ui=en-
US&rs=en-US&ad=US
Windows Local AD/LDAP Server Local LDAP Server is required to maintain on-premises Active
Directory users which are synchronized with Azure Active
Directory.
Windows PowerShell Remote PowerShell allows you to manage your Exchange Online
settings from the command line. You use Windows PowerShell on
Note: Install the latest version of Microsoft your local computer to create a remote PowerShell session to
Online Services Sign-In Assistant for IT Exchange Online.
Professionals for Windows Powershell to work Single sign-on configuration process for hybrid Office 365
properly. requires PowerShell to federate to Exchange.
Windows PowerShell 3.0 arrives installed, configured, and ready
to use on Windows 8, Windows 10 and Windows Server 2012.
Azure Active Directory Module for Windows Microsoft Azure Active Directory Module for Windows PowerShell
PowerShell (64-bit version) is a download for managing your organization’s data in Azure AD.
This module installs a set of cmdlets to Windows PowerShell; you
run those cmdlets to set up single sign-on access to Azure AD and
in turn to all of the cloud services you are subscribed to. You can
download the module at
http://go.microsoft.com/fwlink/p/?linkid=236297
Azure AD Connect for Directory Directory Synchronization tool is required to synchronize your
Synchronizations on-premises Active Directory users to the Azure Active Directory
© 2018 Pulse Secure, LLC. All rights reserved 6Microsoft Office 365 Deployment Guide
Requirements Description
tenant associated with an Office 365 subscription.
For procedure to synchronize on-premises AD users to Azure AD,
refer to:
https://www.microsoft.com/en-
us/download/details.aspx?id=47594
For procedure to synchronize on premise directory with Azure
Ad, refer to:
https://blogs.technet.microsoft.com/canitpro/2014/05/13/step-
by-step-syncing-an-on-premise-ad-with-azure-active-directory/
Pulse Connect Secure Pulse Connect Secure (PCS) enables security and controled
access to corporate data and applications for external users. In
the Cloud Secure deployments, Pulse Connect Secure acts as
SAML Identity Provider for supporting Single Sign-On.
Wild Card/SAN certificate for Office 365 domain Wild card certificate or Subject Alternative Name certificate is
required for the Office 365 domain.
Note: It is recommended to install all the above mentioned Microsoft related components in the same
AD/LDAP server used for directory synchronization.
© 2018 Pulse Secure, LLC. All rights reserved 7Microsoft Office 365 Deployment Guide
Configurations for Office 365 Deployment
This section covers the configurations that are involved in the deployment. The admin needs to configure
PCS as an Identity Provider, O365 as a Service Provider and PWS to provision and push the profile
information on mobile clients. Refer the Cloud Secure Admin Guide for completing the basic
configurations.
Configuring Office 365
To enable Single Sign-On on Office 365 Service Provider login to Local Windows AD/LDAP Server (where
all the components mentioned in Prerequisites section are installed) and:
1. Open Windows Powershell and execute the command “connect-msolservice” and Provide
Microsoft Admin credentials to connect to Microsoft Azure Active Directory.
2. Run the following command to enable SSO for the domain:
Set-MsolDomainAuthentication -Authentication managed -DomainName
3. Execute the following commands in PowerShell Prompt for SSO configuration:
$dom=""
$FedBrandName=""
$url=”https://< Alternate Host FQDN for SAML>/dana-na/auth/saml-sso.cgi”
$logouturl=”https://< Host FQDN for SAML>/dana-na/auth/logout.cgi”
$issuer = “https:///dana-na/auth/saml-endpoint.cgi”
$ecpUrl=”https://< Host FQDN for SAML>/dana-ws/samlecp.ws”
$certData=””
Note:
▪ Domain Certificate Data can be obtained from PCS by navigating to Authentication-
>Signing In->Sign-in SAML->Metadata Provider and clicking on ‘Download Metadata’. The
Certificate content from the downloaded file should be assigned to $certData parameter.
▪ $FedBrandName must be unique.
▪ Federation cannot be configured on the default O365 domain.
▪ Ensure that the federation is not enabled with the same URL’s on any other domain.
Set-MsolDomainAuthentication -DomainName $dom -FederationBrandName $FedBrandName -
Authentication Federated -PassiveLogOnUri $url -SigningCertificate $certData -IssuerUri $issuer -
ActiveLogOnUri $ecpUrl -LogOffUri $logouturl -PreferredAuthenticationProtocol SAMLP
4. To verify the SSO configuration run the following command
Get-MsolDomainFederationSettings –DomainName
5. To enable modern authentication for Exchange Online, which supports SAML web browser based
SSO profile for certain clients such as Outlook 2016 in desktops, execute the following commands:
a. Run the following command and give Office 365 Admin credentials.
$UserCredential = Get-Credential
© 2018 Pulse Secure, LLC. All rights reserved 8Microsoft Office 365 Deployment Guide
In the Windows PowerShell Credential Request dialog box, type your Office 365 Admin
credentials, and then click OK.
b. Run the following command to provide required connection settings.
$Session = New-PSSession -ConfigurationName Microsoft.Exchange -ConnectionUri
“https://outlook.office365.com/powershell-liveid/” -Credential $UserCredential -
Authentication Basic –AllowRedirection
c. Run the following command to import the Exchange Online cmdlets into your local Windows
PowerShell session.
Import-PSSession $Session
d. Run the following command to enable modern authentication for Exchange Online.
Set-OrganizationConfig -OAuth2ClientProfileEnabled:$true
e. Run the following command to verify that change was successful.
Get-OrganizationConfig | ft name, *OAuth*
f. Be sure to disconnect the remote powershell when you are finished.
Remove-PSSession $Session
6. To enable modern authentication for Skype for Business Online, complete the following steps:
a. Install Skype for Business Online Windows PowerShell Module on On-Premise Active Directory
Server https://www.microsoft.com/en-us/download/details.aspx?id=39366
b. Open Windows PowerShell on AD Server and execute following commands:
1. Run the following command to connect to Skype for Business using PowerShell.
$sfboSession = New-CsOnlineSession -UserName user@domain.com (Office 365 Admin
username). Provide admin password when prompted and Sign In.
2. Run the following command to import the Skype for Business Online cmdlets into your
local Windows PowerShell session.
Import-PSSession $sfboSession
3. (Optional) Run the following command to verify the current settings.
Get-CsOAuthConfiguration
4. Run the following command to enable modern authentication for Skype for Business Online.
Set-CsOAuthConfiguration -ClientAdalAuthOverride Allowed
5. Run the following command to verify that the change was successful.
Get-CsOAuthConfiguration
6. Be sure to disconnect the remote PowerShell when you are finished.
Remove-PSSession $sfboSession
© 2018 Pulse Secure, LLC. All rights reserved 9Microsoft Office 365 Deployment Guide
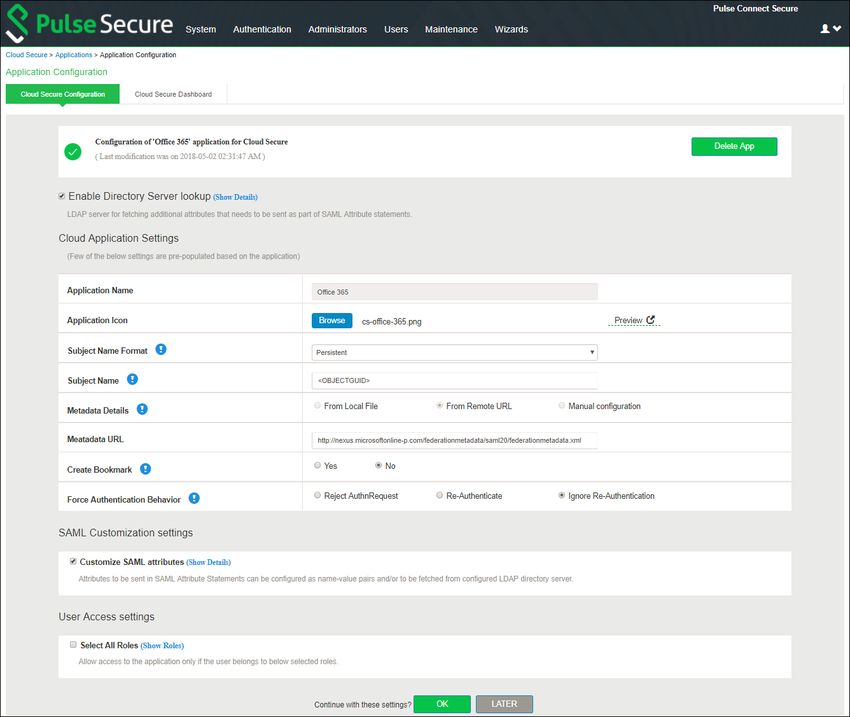
Configuring O365 Cloud Application on PCS
The Admin can configure the O365 Cloud Applications as Peer SP once the basic configurations are
completed. The O365 application is available with some pre-populated application settings for ease of
configuration.
To configure O365 application:
1. Click the Office 365 icon to configure the application.
2. Select Enable Directory Server lookup to enable LDAP server for fetching additional
attributes. If the LDAP server is already configured the details will be pre-populated.
Admin also has a provision to create a new LDAP server in the same section.
3. Under Cloud Application Settings:
a. Enter the application name.
b. Click Browse and select the application icon.
c. Select the Subject Name Format = Persistent.
d. Enter the Subject Name.
e. Under Metadata details, the metadata file is uploaded from a remote URL by default.
The Admin can also choose to upload the metadata file from a local file or through
manual configuration by entering the Entity ID and Assertion Consumer Service URL.
f. (Optional) Set Create Bookmark to Yes to support IdP initiated SSO.
g. Set the Force Authentication Behaviour to Ignore Re-Authentication.
4. Under SAML Customization & User Access settings, assign the application to applicable
roles.
5. Click OK.
© 2018 Pulse Secure, LLC. All rights reserved 10Microsoft Office 365 Deployment Guide
Figure 1 Application Configuration
© 2018 Pulse Secure, LLC. All rights reserved 11Microsoft Office 365 Deployment Guide
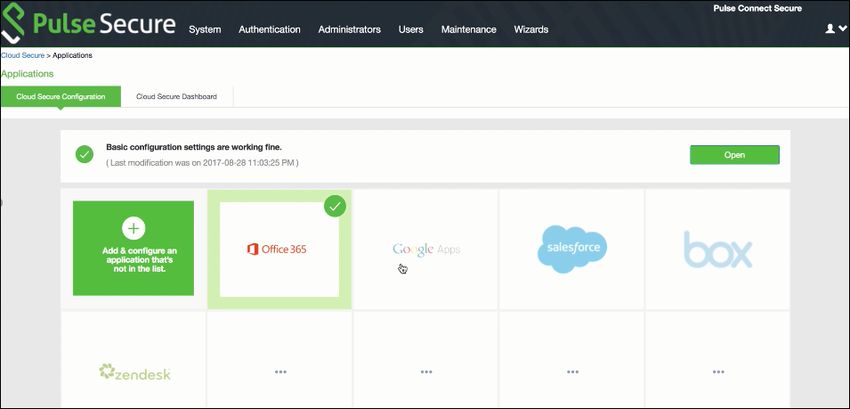
The following screen with a green tick mark on the O365 application is displayed after a successful
configuration.
Figure 2 O365 Configuration Completed
© 2018 Pulse Secure, LLC. All rights reserved 12Microsoft Office 365 Deployment Guide
End-User Flow
End user can access O365 services from both mobile and desktops and flow varies depending on the
platform type. User flow for iOS, Android and desktop platforms are listed below.
iOS Mobile (iOS Native Mail Client)
1. User receives a welcome email once admin creates an account in Pulse Workspace.
2. Follow the instructions outlined in the email and register the mobile device.
3. Upon successful registration, user is notified to install the enterprise applications from Pulse
Workspace. In addition to this Active Sync and VPN profiles are installed on the client device.
4. Go to Setting > Mail, Contact, Calendars > Accounts and verify that Active Sync Profile is added
with required details.
5. Launch the iOS Native Mail client application for accessing the emails using SSO which doesn’t
require credentials.
Android Mobile (Divide Productivity App)
1. User receives a welcome email once admin creates an account in Pulse Workspace.
2. Follow the instructions outlined in the email and register the mobile device.
3. Upon successful registration, user is notified to install the enterprise applications from Pulse
Workspace. In addition to this Active Sync and VPN profiles are installed on the client device.
4. Launch the Divide Productivity Application for accessing the emails using SSO which doesn’t require
credentials.
Microsoft Outlook Application (Android & iOS)
1. User receives a welcome email once admin creates an account in Pulse Workspace.
2. Follow the instructions outlined in the email and register the mobile device.
3. Upon successful registration, user is notified to install the outlook application from Pulse
Workspace. In addition to this, VPN profile gets installed on the client device.
4. Launch the Microsoft Outlook Application. VPN tunnel gets established automatically in iOS
whereas in Android user has to manually establish VPN connection from Pulse client. Choose
‘Office 365’ from the list of Email services and input Username. User should get redirected
automatically and will be give accesss to Emails without asing for credentials again.
© 2018 Pulse Secure, LLC. All rights reserved 13Microsoft Office 365 Deployment Guide
Desktops/Laptops
Cloud Secure requires Microsoft Office 2013 or 2016 client for providing SSO access to emails through
modern authentication.
In Office 2016 client, Microsoft has added support for modern authentication (for doing web browser SSO)
and is enabled by default. Prior to this, earlier versions of outlook client supports only ECP profile for SAML
exchange.
Follow the below steps for enabling modern authentication in Office 2013 clients on Windows platform:
1. Update Office 2013 client to obtain the update that includes the new Azure Active Directory
Authentication Libraries (ADAL) based authentication features.
2. Set the following registry keys.
Registry Key Type Value
HKCU\SOFTWARE\Microsoft\Office\15.0\Common\Identity\EnableADAL REG_DWORD 1
HKCU\SOFTWARE\Microsoft\Office\15.0\Common\Identity\Version REG_DWORD 1
Note: End-Users are usually not recommended to change the registry settings.
Follow the below steps for setting up Outlook client to access emails:
1. Add email account in Outlook client.
For Windows, navigate to File > Add Account. Provide name, email address and password and click
Next.
For Mac, navigate to Tools > Account. Click + and Select New Account. Provide email address and
click Continue. Provide password in the Account Information prompt and click OK.
2. Outlook client starts searching for server settings and once the details are obtained, new browser
window is opened and gets redirected to PCS login page.
3. Provide user credentials and ‘Sign In’ for authenticating with PCS.
4. After successful authentication with PCS, SAML SSO is triggered and email account gets added to
Outlook.
Note: End user needs to manually establish VPN connection with PCS before accessing emails through
Outlook client. This enables SSO access to the cloud resource by leveraging re-use VPN functionality.
Other Office365 Applications
1. Access any other Office 365 applications (Word, Excel, PowerPoint, OneDrive, Skype For Business
etc.)
2. To Sign In, provide Email Address and Click Next.
3. User will be redirected to PCS login page. Provide user credentials and Sign In for authenticating
with PCS.
4. After successful authentication, user will be provided access to the application.
© 2018 Pulse Secure, LLC. All rights reserved 14Microsoft Office 365 Deployment Guide
Troubleshooting
Cloud Secure deployment involves PCS, PWS/MDM, Cloud Service Provider and Pulse Mobile client.
Troubleshooting starts with identifying the exact components/devices that might be causing the problem.
Hence for troubleshooting any issue below set of logs has to be collected.
• On PCS : Enable the event codes - saml, auth, soap at level “50” and collect debug logs. You can
also capture the Policy traces for the specific user.
• On Mobile Client : You can use Send Logs feature for collecting the client logs.
• On Browsers: You can download the SAML tracer plugin and use it to validate the SAML message
flows.
Troubleshooting Tips
1. Check User Access logs to see if SAML ECP response is sent by PCS.
2. Check if PCS and O365 SP are in same time zone. NTP Server can also be configured on PCS to
resolve time zone issues.
3. Possible causes of error “Cannot Get Mail. The connection to the server failed” on the Native Mail
App but User Access Logs on PCS shows SAML ECP response sent successfully.
▪ Signing Certificate configured in Basic Identity Provider settings in PCS is different from
the certificate configured on O365 SP.
▪ IDPEmail attribute is not configured in Peer SP configuration on PCS.
4. Possible causes of error “Cannot Get Mail. The connection to the server failed” on the Native Mail
App and User Access Logs on PCS shows error ‘SAML ECP Login : Building of SAML ECP response
failed for user ’.
▪ Check if LDAP server details are correct and LDAP server is configured as Directory Server
in O365 Peer SP.
5. Possible causes of error “Cannot Get Mail. The connection to the server failed” on the Native Mail
App and User Access Logs on PCS shows error ‘SAML ECP Login : failed for user ’.
▪ Check if the compliance check passed on the user device and user role is assigned to the
user.
6. If there is an error 'No SP configured with entity ID : urn:federation:MicrosoftOnline' on user device,
check Event logs for similar error message. It implies that PCS is not configured with O365 Peer
SP.
Requesting Technical Support
Technical product support is available through the Pulse Secure Global Support Center (PSGSC). If you
have a support contract, then file a ticket with PSGSC.
• Product warranties—for product warranty information, visit https://www.pulsesecure.net.
© 2018 Pulse Secure, LLC. All rights reserved 15You can also read