Gateway to Discovery: A Science Fair Guide to Get You Started - www.homesciencetools.com
←
→
Page content transcription
If your browser does not render page correctly, please read the page content below
Gateway to Discovery:
A Science Fair Guide to Get You Started

         www.homesciencetools.com
             1.800.860.6272
         Copyright © 2007 Home Science Tools
It starts with curiosity. Why does something act the way it does? What would happen if…?
Such questions form the basis of scientific inquiry, and you probably ask them all the time! A science fair
project provides the opportunity for you to act on your questions and discover answers. As you formulate
a question, develop a hypothesis, design an experiment, and analyze the results, you’ll gain valuable
critical thinking skills. As you design a presentation and interact with judges, you’ll grow in confidence
and public speaking ability. In fact, science is just one of many subjects used in designing a science fair
project—you also learn research, writing, grammar, planning and organizing, math, logic, and more.
           Science fairs are a wonderful way to get excited about learning, but they require a lot of hard
work. If you want the benefits of participating in a science fair, but don’t know where to start, this guide is
for you. It will provide a brief overview of the most important aspects of a science fair project and get you
well on your way to having a display at your local fair. Though the information is most applicable for
middle school students, it can be adapted for use with elementary students and can be a great resource
for first-time high school participants.

What’s In the Guide
The Scientific Method.................................................................................................................................... 1
Choosing a Question..................................................................................................................................... 2
Developing the Experiment ........................................................................................................................... 3
Analyzing Data & Forming a Conclusion ...................................................................................................... 4
Presenting your Project................................................................................................................................. 4
Science Fair Project Ideas ............................................................................................................................ 6
  Elementary School. ................................................................................................................................... 6
  Middle School. ........................................................................................................................................... 8
  High School. .............................................................................................................................................. 9

The Scientific Method
          The key to a good science fair project is the scientific method, an essential tool for scientific
discovery and sound conclusions. The scientific method acts as a tour guide through the world of
inductive reasoning: it helps you test a specific phenomenon and draw a general conclusion from the test.
It will help you keep your project well organized, and also help you avoid “jumping to conclusions.” The
method can be summarized in five simple steps:

            •     Define the problem. Ask a question you can answer through experimentation.
            •     Observe/Gather data. Collect information about the topic—learn as much as you can.
                  Sometimes what you learn will cause you to rework your question.
            •     Predict/Hypothesize. Based on the information you found in your research, predict an
                  answer to your problem (make a hypothesis). Tell why you predict a certain outcome.
            •     Experiment. Design an experiment to test your hypothesis.
            •     Analyze data/Form conclusion. Evaluate the results of your tests to determine if your
                  hypothesis was correct. If it wasn’t, explain why not.

            That’s the scientific method in the abstract. Now let’s apply it to an example situation:

            •     Define the problem. I noticed something funny about my mom’s houseplants. She had two
                  that were exactly the same, but when my sister put one of them inside her fort it started to
                  look a lot worse than the one by the window. I wonder why? Maybe it was the sunlight:
                  Does lack of sunlight affect plant growth?
            •     Observe/Gather data. My science textbook says that plants use energy from the sun to
                  make their food in a process called photosynthesis. Without any sunlight they couldn’t make
                  any food, and would die. But what about a plant that got just three hours less sunlight per
                  day? Would it suffer? My refined problem: Does a lack of sunlight for three hours during the
                  day affect plant growth?

© 2007 Home Science Tools                                        Page 1 of 10                                   www.homesciencetools.com
•    Predict/Hypothesize. Since sunlight is necessary for a plant to live, I predict that even three
             hours less sunlight per day will have a negative effect on plant growth.
        •    Experiment. I will test my hypothesis by covering some bean plants for three hours during
             the sunniest part of the day, then compare their health with plants that were left uncovered.
             There are many different factors that could affect plant growth (water, seeds, soil), but since I
             only want to test the effect of sunlight, I will control my variables carefully. Each bean seed
             will come from the same seed packet, and will be planted at the same depth in the same kind
             of soil. Each plant will receive exactly the same amount of water per day. Sometimes a
             factor beyond my control could affect the results, so to avoid basing my conclusions on a
             “fluke,” I will use several plants. Three will receive full sunlight (these are the control); three
             will receive partial sunlight, and I will average the results.
        •    Analyze data/Form conclusion. Every day for three weeks I measure the height of each
             bean plant, the diameter of the stalk, and the breadth of the leaves. I also record the time of
             day the plants are covered and whether the day is sunny, partly cloudy, or cloudy. By looking
             at this data I can now determine if my hypothesis is correct and answer my original question.
             I can also suggest modifications to the experiment for further study (e.g., have three test
             subject groups: one that gets full sunlight, one that is covered for six hours, and one that is
             covered for three hours).

Choosing a Question
        A science fair project can’t get much better than its original question. Though the temptation to
get right to experimenting is strong, it is better to spend significant time developing your topic first.
Starting with a solid foundation—an interesting, specific, and testable question—will make building your
project much easier.
        Criteria. Try to focus on inquiry-type topics instead of
demonstration-type topics. In other words, judges want to see
students design an experiment to answer a question they have.
They do not want to see a mere demonstration of a principle that is
already common knowledge.
        Good questions will meet several criteria: They will be

        •    Clear. This means having operational definitions. Many questions will start with the words
             “what is the best…”, but you need to define exactly what you mean by “best.” In our plant
             growth example we need to have an operational definition for the “negative effects” of lack of
             sunlight: I will operationally define “negative effects” as shorter stalks, smaller stalk
             diameters, and smaller leaves.
        •    Safe. As with any science project, you must choose a topic you can safely investigate with
             the equipment you have. Be aware of the safety regulations at your science fair.
        •    Quantifiable. You should be able to arrive at an answer to your question through
             experimentation. Your experiment needs to have components that can be changed (or be
             observed to change, e.g., temperature) and measured. You should also be able to
             adequately control your variables.
        •    Interesting! You must be interested in your topic, or you will have a hard time finding
             motivation to work on it. Ask a question that you really want to answer, and you will enjoy the
             investigation process and put together a good presentation.

         Brainstorming. Finding a topic that meets all of these criteria is not always easy! The best
place to start is with your interests. Do you like animals? Electricity? Astronomy? Have you seen things
in your backyard or in your house that have caused you to wonder? Have you done a science experiment
in school that you really liked? Maybe you could design a similar experiment to discover something new
about the topic.
         You can also look for ideas in science magazines, science news websites, or guides like this one.
Many books about science fairs will have lists of key words and categories that will help you start thinking
in the right direction. Some books even have project ideas, but if you find one you like, try to “make it

© 2007 Home Science Tools                     Page 2 of 10                     www.homesciencetools.com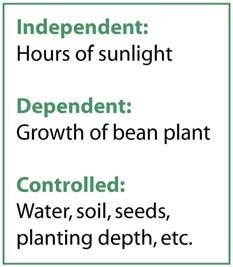
your own” by looking at the topic from a different angle or testing for another variable. When something
excites your interest, write it down. It is a good idea to start keeping a science fair ideas notebook several
months in advance.
          Research. Once you have found a topic that interests you, begin your research. Younger
students can look in books, magazines, and on the internet (you are more likely to get accurate
information from university or government websites). Older students can gain access to a local university
or college library to find scientific journals. It is also a good idea to write letters to government
departments or people with expertise in the area you’re studying. (A personal interview is even better, if
you have the opportunity.) They can often give you important information or at least point you in the right
direction. You may also consider finding a mentor in the appropriate field who will advise you throughout
your investigation. Some science fairs have mentor programs to match you up with a scientist who knows
your topic. (You will have to submit an application for this program.)
          Wherever you get information, be sure to write down the source in a project notebook. When you
write your science report you will need to give credit to your sources, and you don’t want to take the time
to find them all again!
          Restrictions.     Each science fair has a set of
guidelines that include restrictions on certain topics. Be
aware of these restrictions as you choose your topic. Many
science fairs are affiliated with the Intel International
Science and Engineering Fair (ISEF). ISEF has strict rules
regarding the use of human and animal subjects and
potentially hazardous substances. Even if your local fair
has more lenient rules, you need to be familiar with the
ISEF rules as well. You don’t want to win your state fair and then be disqualified from higher competition
for not complying with the higher competition’s regulations! Find the ISEF rules and guidelines here.

Developing the Experiment
          After you have chosen a question and made a hypothesis, it is time to develop your experiment.
This will be easier if your question is specific and quantifiable, but there are several areas you will need to
think through carefully.
          Variables. Whenever you test a hypothesis, you should identify all
the factors—variables—that could have an effect on your results. Only test
the effect of one factor at a time; all the other variables must be kept constant.
There are three categories of variables:
          • Independent. An independent variable is your changing variable.
               You control the change. In our plant example, you control how
               many hours of sunlight each plant gets.
          • Dependent. The dependent variable is the measurable result of
               the change of your independent variable. If you change the
               number of hours of sunlight a plant gets (independent), you will
               measure the resulting growth of the plant (dependent).
          • Controlled. These are the variables you keep constant, so they
               cannot affect your result. For example, give each plant exactly the same amount of water and
               plant the seeds at the same depth in the same type of soil.
          Protocols. Your goal as you design your experiment is to come up with a procedure that
someone else could repeat and get the same results you do. To make sure your procedure is repeatable,
you need to come up with a list of guidelines for conducting the experiment; these are called protocols.
There are two categories of protocols: one contains rules for following the procedure under normal
conditions; the other contains rules for what to do in unusual circumstances.              For our bean plant
example, the first set of rules may tell you how much water to give the plants, how deep to plant the seed,
etc. The second set of rules would outline what to do if one of the plants is tipped over (e.g., make sure it
is refilled with soil up to the same level as before).
          Multiple tests. If you perform your experiment only once, or if you use only one test subject
(e.g., one bean plant), you might get some faulty results. Even if your result seems to confirm your
hypothesis, you can’t be sure some other variable didn’t have a hand in the outcome. (What if the growth

© 2007 Home Science Tools                    Page 3 of 10                     www.homesciencetools.com
of your bean plant was stunted by a parasite attack on the roots instead of by lack of sunlight, for
example?) Scientists test their hypotheses over and over again, and for your science fair project you
should too! The more you test, the more accurate your results will be. If you get the same results each
time, that will go a long way to confirming your hypothesis. Make sure you follow the exact same
procedure each time you do a test.
        Records. Take careful notes of your procedures and all your observations and measurements.
You may also want to make sketches or take pictures at various stages of your experiment. You can use
these notes for you presentation at the fair, so be neat and organized!

Analyzing Data & Forming a Conclusion
          After you have finished your experiment and gathered all your data, you’re ready to formulate
your analysis and conclusion. There are three important parts to your analysis (younger students may
only need to include a conclusion):
          • Conclusion. Did your results support your hypothesis? How? (Be specific!) If your results
              did not support your hypothesis, this doesn’t mean you failed! In fact, it gives you valuable
              information and can lead you to ideas for further experimentation. Make sure that you
              describe how your results contradicted your hypothesis.
          • Error Analysis. There are often variables beyond your control that might have affected your
              results. It is important to identify these variables in your analysis so that someone looking at
              your data will know the possibility of inaccuracy. For example, you should note if your
              uncovered plants got less light energy because half the days were very cloudy.
          • Limitations. In this part of your analysis, you caution against over-generalizing your results.
              For example, you may have proved the negative effects of less sunlight on a bean plant, but
              you cannot take your conclusion and apply it to any other type of plant. One of the limitations
              of your study is that you only tested one kind of plant.
          After you have written your analysis, you may also want to include some ideas for taking your
investigation further. Some students work on the same topic for several years, continually building on
their findings from the year before. Even if you don’t intend to continue your project, you can impress the
judges by thinking about the direction it could go.

Presenting your Project
         Last, but not least, you need to get your project ready for presentation at the fair. Judges have a
lot of projects to look at, and their time is limited, so your display should be well-organized and easy-to-
follow. You may have a fantastic experiment and come up with amazing results, but if you present it
poorly, a judge may not take enough time to see the quality of your investigative work. Do your project
justice by taking time to present it well! There are several important components to your presentation:
         Abstract. It may seem like no big deal to write a 250-word summary of your project, but your
abstract may be the key to your success at a fair. Many judges read abstracts ahead of time to get an
idea of the different projects, so their first impression of your work will most likely be based on your
abstract. An abstract should be no more than 250 words and should include a brief synopsis of the
following:
         • Purpose of experiment
         • Procedures used
         • Observations/Data/Results
         • Conclusions
         The abstract should be written in sentence style, not list style, so you may alternate back and
forth between the four categories above, especially if your project has several levels of investigation. To
see a sample upper-level abstract, visit the ISEF website.
         Spend time working on your abstract—make it capture the judges’ attention and convince them
that you have done some serious work.

         Science Report. Reports are not always required for younger grades, but for 6th grade and up
you will usually have to write one. The report is a detailed explanation of your entire project—background
information (with proper citation of sources), purpose, procedures, data, conclusions, etc. Don’t be

© 2007 Home Science Tools                    Page 4 of 10                    www.homesciencetools.com
overwhelmed! If you took good notes during your researching and experimenting stages, you have all
you need to write a great report. You can also include your graphs and pictures in the report to support
your text. Display your report in a three-ring binder on your table at the fair.
Science Notebook. This is another three-ring binder containing your data records and other
notes you took as you investigated your topic. Display this along with your science report.
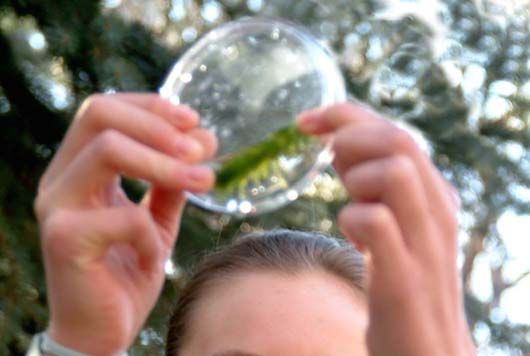
Display Board. Check the fair guidelines before beginning work on your display board: some
fairs require boards of a certain size. Make your board attractive, but not distracting. Organize the
information more or less sequentially, so your audience can follow the train of your project easily. Include
your project title, original question and hypothesis, abstract, summary, procedure, experiment, data, and
conclusion. You can include background research in your summary, and graphs, illustrations, and
photographs in your experiment section. Here is an example:
Display Items. If you want to display objects from your experiment on your table at the fair,
carefully check the guidelines to see if what you have is acceptable. ISEF fairs don’t allow the display of
any live materials (e.g., plants).
Oral Presentation. Many fairs require you to give an oral presentation of your project to the
judges (especially in the upper levels) during a judging interview. Do not memorize a speech, but practice
explaining your project to other people so you feel comfortable with the material. Prepare your
explanation to last from 2-5 minutes, but be able to touch on every aspect of your project in more detail—
sometimes your interview could last up to 15 minutes. Also prepare yourself for questions from the
judges. For example, they might ask you what you found that you didn’t expect, what your next step
would be if you decided to continue the project, or why you think your research is important.
Judging Criteria. As you organize your display and prepare for your
oral presentations, consult the judging criteria for your particular fair.
Emphasize how you meet each category of criteria in your display and
your speech. According to the ISEF Student Handbook, judges
generally base their evaluations on the following points:
• Creative ability
• Scientific thought and engineering goals
• Thoroughness
• Skill
• Clarity
© 2007 Home Science Tools Page 5 of 10 www.homesciencetools.comScience Fair Project Ideas
Start brainstorming for your science fair project right now! The following pages contain sample
questions, keywords, and project ideas organized by age level and category. If you need other ideas,
check the Science Projects page on our website, where projects and project ideas
are added frequently.
Elementary School. Science fairs aren’t just for older kids! Elementary
students can learn a lot and have a great time doing their own projects. Some
science fairs allow students in grades K-3 to do demonstration projects, but not all
do. Check with your local science fair for K-3 rules regarding demonstration
projects. If in doubt, it is always acceptable to do a real experiment. For 4-5th
graders, a complete experiment that answers a question about science is usually
required.
Life Science Ideas
• Have you noticed how the seeds in different kinds of fruit (like an apple and an orange) look very
different from each other? Try growing seeds from different fruit that you've eaten, soaking them
in water for one night and then planting them in a cup of dirt. Which kinds of seeds do you expect
to grow best? (Which seed turns into the tallest plant after a month?) After doing the experiment,
which seeds really grow best? Why do you think that might be?
• Lots of factors affect plant growth. Try experimenting with soil type, light, temperature, water, and
more.
• A person's five senses are sight, smell, sound, taste, and touch. Compare sensitivity to touch in
different parts of the body. Can you distinguish between an apple and a peach using your toes,
knees, elbows, or belly? What about the difference between a sweater, sweatshirt, and t-shirt?
• Have you ever watched ants carrying bits of food? What food from your kitchen do you think an
ant or other insect would like best? What "bait" will probably attract the greatest number of
different insect species?
• Do a project to find out if temperature affects the butterfly life cycle. Make sure there is a 2-3
degree temperature difference between the caterpillars placed in a warm area versus those
placed in a cooler area. For smaller creatures, you could hatch some brine shrimp. Is tap water
or distilled water better for hatching the eggs?
• If you like collecting insects, perhaps you could design an experiment dealing with collecting
techniques. What is the best method for softening butterfly wings so they can be mounted?
Earth Science Ideas
• The sun causes water to evaporate into the air, where it forms clouds and comes back down as
rain or snow. Can wind speed, humidity, or temperature have an effect on the rate of
evaporation?
• How good is soil at breaking things down? What can you find that is biodegradable? How can you
test to see whether something is or not?
• What holds more water, sand or soil? How does this affect what kinds of plants can grow in
each?
• Can you learn to predict the weather from the clouds? Try using a cloud chart to make your own
forecast every day for a few weeks. How accurate was the cloud-forecast method?
© 2007 Home Science Tools Page 6 of 10 www.homesciencetools.comPhysical Science Ideas
• Can you use a magnet to find traces of iron in food, dollar bills, and other household materials?
Are some magnets stronger than others? (Different magnets are available here.)
• What type of flooring creates the most or the least friction? Try carpet, wood, tile, linoleum, etc.
Younger kids might test this by rolling a ball or toy truck over different surfaces.
• Why does a balloon stick to the wall after you rub it against your hair? Experiment with static
electricity to find out how positive and negative charges in household items interact. What
causes static electricity to increase? What are some ways to decrease static electricity and which
methods work best?
• The sun gives off energy that can be used like a battery to power things. Connect a motor to a
solar cell and figure out what conditions it runs best under. Do different types of light (such as
fluorescent, incandescent, halogen, or LED light) power a solar cell better than others? What
happens on a cloudy day? Older kids can research to find out what else solar energy can be used
for.
• What makes a rainbow after a storm? Use a spectroscope to compare the spectra of different
types of light. Do different light sources contain different colors of light?
• Experiment with the density of different liquids. Which is denser, oil, corn syrup, or water? If you
add all three to the same glass, which liquid will float on top of the others? Compare how well
some objects (e.g., raisin, paper clip) float in each of the three substances. You can also
experiment with colored water (e.g., red for hot, blue for cold) to find out whether different
temperatures affect water density.
Chemistry Ideas
• Design a science fair project comparing and contrasting how long it takes ice to melt at room
temperature compared to a warm stovetop or the refrigerator.
• Your kitchen offers lots of chemistry ideas. How does cola or another soft drink compare in acidity
with other common drinks or food? You can test acidity using pH paper. You can also test which
fruits have the most vitamin C using indophenol.
• Water is sometimes called “the Universal Solvent” because it dissolves other substances so well.
How well does water dissolve salt or sugar compared to other liquids (oil, corn syrup, or vinegar)?
• Make crystals from sugar, salt, and baking soda. How do their crystal shapes compare? Does the
rate of evaporation of the crystal growing medium (water, vinegar) affect the size of the crystals?
Does the rate of how fast the crystals cool down affect the size of the crystals? Do impurities
(such as iodized salt versus salt that is not iodized) affect the growth of the crystals?
• Chemical energy can produce power! Try making a battery from food items. Which type of citrus
fruit works best? What about vinegar?
• Experiment with polymers by using milk proteins to make homemade glue. How does homemade
glue compare with commercial glue?
© 2007 Home Science Tools Page 7 of 10 www.homesciencetools.comMiddle School. The middle school years are important years to get excited about
science. Now is a great time to start doing in-depth thinking on your own as you develop
your problem-solving skills. Many of the ideas listed in the elementary school section
can be converted into more complex middle school projects. All projects should use
experimentation to answer a testable question.
Life Science Ideas
• Compare the germination of monocot seeds and dicot seeds. Experiment with different factors
that affect germination speeds.
• Experiment with how the pH of soil affects plant growth. Develop an experiment that tests the
importance of CO2 to plant health.
• Do plants grow differently under different wavelengths of light (e.g., ultraviolet or fluorescent)?
• Design an experiment to discover the effects of abnormal radiation on plant growth, using
irradiated seeds that are treated at different radiation levels.
• Use a microscope to study protozoa (find them in a local pond, or hatch them yourself). How do
heat, light, water pH, and the use of quieting substances like methyl cellulose affect them? You
could also do a pond water study to determine the various effects of pollutants on pond life.
• Experiment with the use of antibiotics and common household cleaners to fight bacteria growth.
Earth Science Ideas
• Experiment with the effects of erosion (by wind, water, ice, or gravity) on different soil types.
Does vegetation in the soil slow erosion?
• Perform an acid test to discover if local minerals contain carbonate compounds.
• Find out how temperature, wind, or humidity affects the rate of evaporation.
• Sink holes are formed when the rock below the soil is dissolved by ground water. What kind of
rock would present the most risk of a sink hole?
Physical Science Ideas
• Use a spectroscope to analyze the light spectra produced by burning different elements. Do you
expect compounds that contain some of the same elements to have similar spectra?
• Build your own light bulb, and then experiment with what materials make the longest-lasting or
brightest filament.
• Experiment with the most effective materials and design for propellers or model airplanes.
• What kind of substance (metal, ceramic) conducts heat the best? Do a thermal conductivity study
to discover which substance works best for a pot handle and which works best for a teapot.
• Find out how increased mass affects velocity and acceleration by doing a project with dynamic
carts. You can also experiment with the resulting velocities after a collision between a moving
object and unmoving one, or between two objects moving in opposite directions.
© 2007 Home Science Tools Page 8 of 10 www.homesciencetools.com• Experiment with the best way to build a solar oven to cook your own food.
Chemistry Ideas
• Try distilling drinkable water from salt water using the sun. What materials can you use to speed
up the rate of evaporation?
• Make your own ink using different substances and compare how each withstands the effects of
heat, light, or moisture. For example, does one type fade faster than another when they are
heated or when exposed to strong light? If so, why?
• Use pennies to copper-plate an iron nail. See if pennies minted before 1982 (when they were
95% copper) make a thicker coating than newer pennies do (they only have 2.5% copper). How
does the number of pennies you use affect the time it takes to plate the nail?
• Use a semi-permeable membrane to experiment with osmosis. What kinds of substances pass
through the membrane, and what substances don’t? What is a common property that prevents
substances from passing through the membrane?
• Which retains heat longer, salt water or fresh water? Design an experiment to find out.
High School. Whether your goal is to compete in your school fair, or to win scholarships at the Intel
ISEF, your experience in a high school science fair will stretch your knowledge, your creativity, and your
ability. All high school projects should consist of a high level of original thought and development. To
participate in upper-level competition, your project should be relevant to current science and technology,
and should present a benefit to society. Start your brainstorming by taking a look at the ISEF categories;
it’s a good idea to check the ISEF guidelines, also, before you choose a topic. The following general
topic ideas can help you define an area of interest that you can turn into your own unique question.
(Remember, sometimes you will be working with dangerous materials—take every safety precaution!)
Life Science Ideas
• Compare the effect of antibiotics on gram-positive and gram-negative bacteria
• Test the effect of ultraviolet radiation on bacteria growth
• Investigate the sensitivity or resistance of common bacteria to antibacterial soap
• Experiment with plant genetics (plant hybrids, cross-breeding)
• Test factors that affect transpiration rates for plants
• Investigate effects of increased oxygen or carbon dioxide concentration on plant germination
• Find out the differences in properties and effects of organic vs. chemical fertilizers
• Test for harmful effects of pesticides; test or develop natural/organic alternatives; test the
effectiveness of common pesticides such as DEET
Earth Science Ideas
• Explore methods of erosion prevention, test effects of soil composition on erosion
• Test the relationship between soil composition and water drainage
• Experiment with methods of flood management and containment
• Investigate the effects of sunspots on weather patterns
• Work with methods for forecasting weather
• Test the concentration and effect of minerals in soil and water samples
© 2007 Home Science Tools Page 9 of 10 www.homesciencetools.com• Determine chemical makeup of rain in your area; test possible hazardous effects
Physical Science Ideas
• Test the effect of temperature and solute concentration on the refraction index of liquids
• Study acoustic models and methods of noise control
• Experiment with the effect of storage temperatures on batteries
• Develop improvements in battery chargers; try methods of using solar cells to recharge batteries
• Compare the bending strength of different building materials
• Test the effects of stress and strain on bridges
• Experiment with building materials that are fire-preventative
• Design industrial uses of magnets; test the effects of magnetic and electromagnetic fields on
living organisms
• Develop design improvements for prosthetic devices
Chemistry Ideas
• Experiment with types, effectiveness, and the impact on nutritional value of preservatives in food.
• Compare the properties and effects of artificial sweetener vs. sugar or other natural sweeteners
• Test the effects of the pH level of a solution on the corrosion of iron and copper
• Explore different methods of corrosion prevention
• Experiment with different methods of water filtration/purification
• Test the chemical properties and physiological impact of saturated, unsaturated, and trans fats
• Investigate the role of enzymes and yeast in the fermentation process
• Test the effect of different cooking methods on the depletion of vitamin C in food
• Analyze the by-products of gasoline; compare efficiency of various octane levels
Environmental Science Ideas
• Test methods for cleaning up and neutralizing the effect of oil in salt water
• Work with methods of processing/recycling non-biodegradable items; experiment with
decomposition aids
• Experiment with design and function of water or wind turbines
• Compare or develop methods of hydrogen production and storage for use in fuel cells
• Investigate methods of home insulation
• Experiment with expanded uses of solar energy.
Online Resources
For additional project ideas, try sciencebuddies.org. They have a good selection of detailed projects for
junior high and high school.
You might also find our Tips for Internet Research article helpful.
© 2007 Home Science Tools Page 10 of 10 www.homesciencetools.comYou can also read