Harness your light The way of the application - Scout Lighting
←
→
Page content transcription
If your browser does not render page correctly, please read the page content below
2021
             The way of the application

          Harness your light

1 of 17
Terminology     3
                              Surfaces    4
                     Types of Lighting    5
                     Harnessing Light     6
               The Scout Advantage        7
                The Scout Select Line     8
                6”x6” Standard Cove       9
          Open Cove / Upper Cabinet      10
            Wall Wash / Pocket Cove      11
                          Glow Cove      12
                       Under Cabinet     13
                    Stairs & Toe Kicks   14
                              Grazing    15
                                Vanity   16
                           Contact Us!   17

2 of 17                                   Index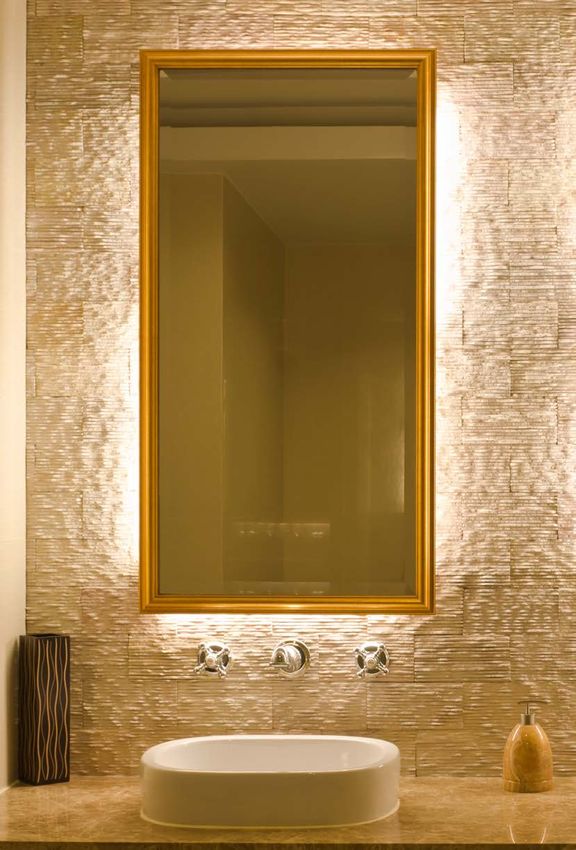
2200
             Color Temp (CCT) :
             Color temperature is a way to describe the light appearance provided by a light source and
             measured in degrees of Kelvin (K) on a scale from 1,000 to 10,000. Warm tones (2000 -
             3200K) are generally viewed as incandescent, early morning or sunset sunlight, candlelight,
             etc, while Cool tones (4000 – 10,000k) are generally viewed midday. It is scientifically proven
      2700   that the use of cooler tones elicits greater productivity from people, while the warmer tones
             relax and calm the body.

             CRI :
             An acronym for Color Rendering Index, is a term used to describe the measure of how well
             light sources render the color of the objects they illuminate. The higher the better. The highest
             CRI is 100, which would only be given to a source identical to standardized daylight. The CRI
     3000    of a light source is calculated by comparing the appearance of eight reference colors (R1 to
             R8) under the light source in question with a reference light source (incandescent light or sun
             light). The smaller the difference between the reference colors when viewed under the two
             light sources, the higher the R value will be. The first eight R values are then averaged, and
             the resulting number is the CRI (or Ra) value.

             R9 :
     3500    As noted above, CRI is calculated by comparing the 8 (R1 to R8) reference colors, with the 9th
             one, R9, one being red. A source that has a high R9 value often has a higher CRI.

             Lumens :
             The luminous flux, or brightness of a fixture. Lumens measure how much light you are getting
             from a fixture. More lumens means it’s a brighter light; fewer lumens means it’s a dimmer light.

             Foot Candles :
     4000
             A unit of illumination equal to that given by a source of one candela at a distance of one foot
             (equivalent to one lumen per square foot or 10.764 lux).

             Lux :
             A unit of illuminance, equal to one lumen per square meter. Used to measure light in a given
     5000    area.

3 of 17                                                                                          Terminology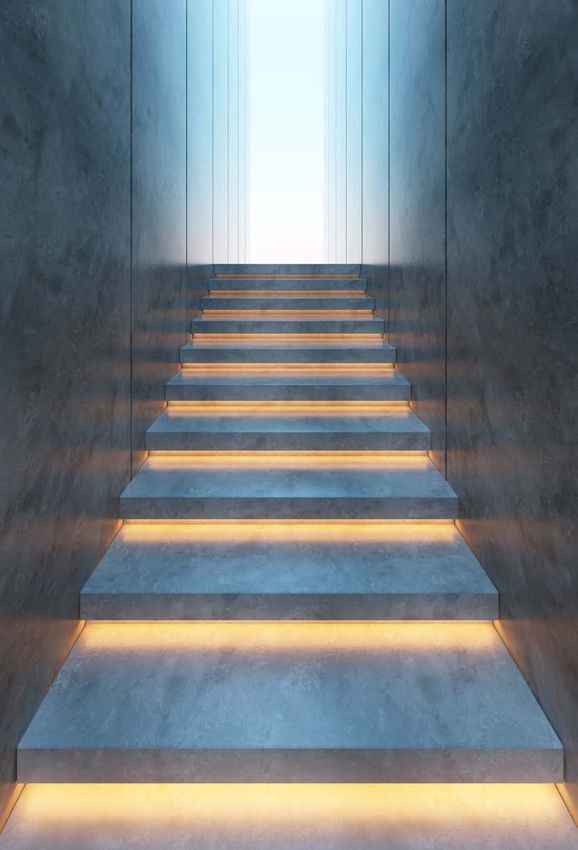
Reflective Surfaces :
          The angle of incidence equals the angle of reflection

          For any surface with a shine, you want to avoid any direct lighting where the light is perpendicular, or 90
          degrees, to the plane, as the light will reflect right back at you. For this application, angling the light from the
          surface, say, at 45 degrees would be the best solution. To avoid seeing any hot spots on the surface, we would
          suggest using a Milky lens to diffuse the light and create soft glows.

          Matte Surfaces :
          Think of surfaces such as wood without sealant, drywall or natural materials. Depending on surface, you may
          want to highlight these details or flatten, or hide them. For these purposes, you can choose to use a location that
          skims, or grazes the wall for dramatic highlighting of these details or washing the surface to create an even tone
          of light. Locations close to the surface and lighting across it create this grazing effect, while a position further
          away and above or below will create a wash effect. The Scout Optic Fixture would be a great option here.

          Shadows :
          Along with Contrast, the use of Shadows could be your friend or the bane of your existence. Lights too far away
          from their subject or exposed could cause unwanted shadows if items are placed in front of them. Lights too
          close could cause hotspots in some areas and dead spots or darkness in others. Decide if you want to use a
          lensed fixture to highlight that feature wall from a cove or wall wash to reduce shadows.

          Contrast :
          You may have a surface with a varied color palette or materials, allowing you to choose to enhance or mute this
          likely feature in your room. This feature might also look quite different in various light levels, which may create an
          interesting dynamism. Test out a few different light levels, colors and positions for this to create the best effect.
          Contrast can also mean the varying of light in the room. Bright ceiling lighting, specifically highlighted artwork or
          a feature wall and task lighting can create these contrasts.

          Glare :
          Reflective surfaces, high contrast surfaces, and even some matte surfaces, if lit at the wrong angle, could cause
          glare: unwanted light reflecting back in your eyes, causing strain and discomfort. Glare could be from the high
          hats in the kitchen reflecting off countertops or from fixtures washing glossy walls and reflecting in the paint in an
          undesirable angle. The use of diffused light, Milky lenses and bouncing light into ceilings, for example, reduces this
          glare and creates an inviting ambiance to any room.

4 of 17                                                                                                                  Surfaces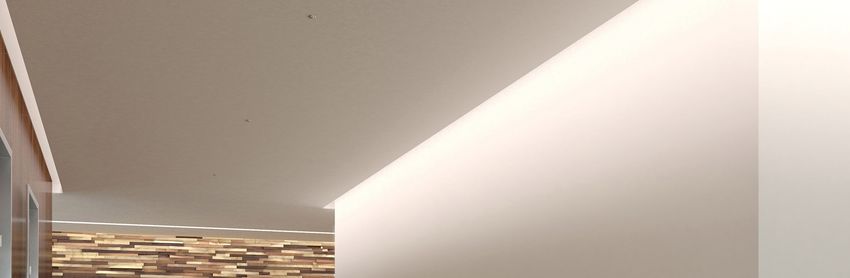
General Lighting :
      General lighting refers to the use of light fixtures and
      positions to create usable light for task, work, movement
      and safety.

      Accent Lighting :
      Accent lighting refers to fixtures and materials that are
      mounted to create points of focus or interest or features
      in each location. While they may create light in the space,
      they are not necessarily the main source of light

      Direct Lighting :
      Can be a light source that is seen or hidden, through
      masking, baffles, louvers or lenses.

      Light source is visible and could be used as accent of as
      general lighting.

      Indirect Lighting :
      Consists of bounce lighting, uplighting or any lighting that
      is directed upward.

      Has a soft glow of even light that can be used as the
      main source of light or as accent.

5 of 17                                                              Types of Lighting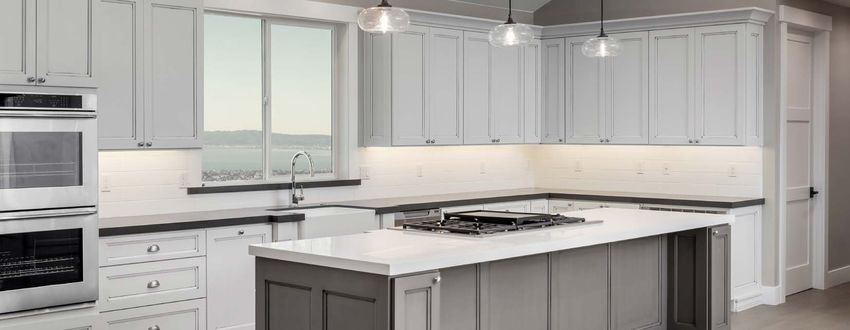
Milky Milky vs Frosted Lensing :
In using all of our fixtures, you will likely choose a lens for your application. If you
aren’t using our Optic lens system, you will be choosing between our Milky and
Frosted lens.
Frosted lensing maintains the output, while slightly softening the points of light. Use
Frosted this lens in indirect applications.
The Milky lens creates an even glow of light, while hiding the points of light and
slightly reducing the output of the fixtures. Use in direct view applications.
Harnessing your light :
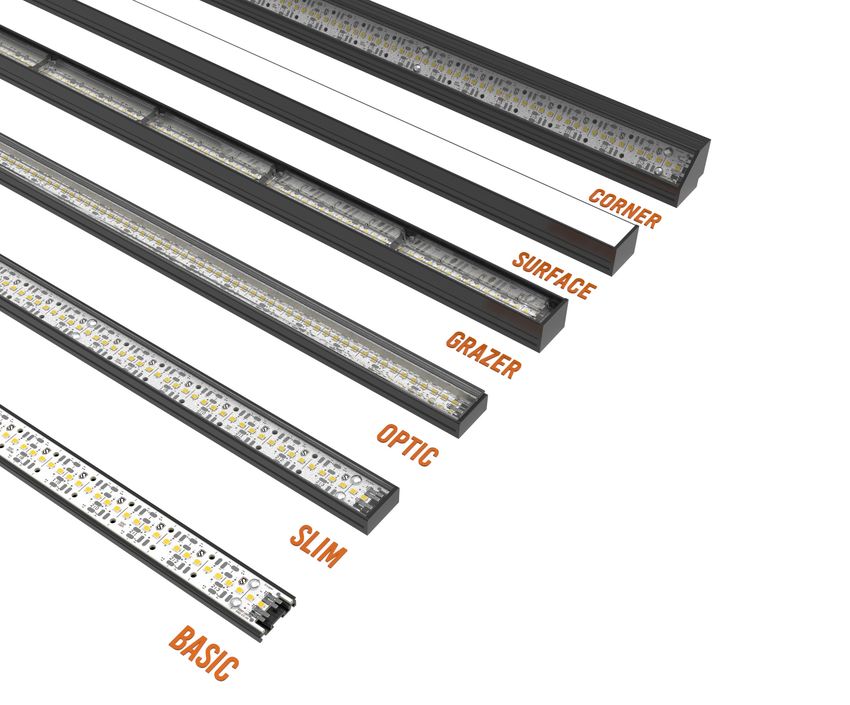
Corner Surface Grazer Optic - Asym 25 Basic
The corner fixture is perfect for The workhorse of the Scout Perfect for The optic line allows for beam The Basic fixture allows you to
throwing light out of a cove or Accent Line. getting that manipulation. What better way to harness the core of the Scout
upper cabinet. texture from harness your light then to bend Line - The Scout Engine. Works
Great for direct and indirect brick, stone it your will. With 9 diff optic with all of our mounting clips and
Best for indirect lighting with our lighting. Pair with the Milky lens and biophilic options you can choose what’s gives you a rigid mounting plane
frosted lens. for diode free illumination! applications. best for you. and heat sinking.
6 of 17 harnessing light
Fully Assembled - Click together Fixtures
                                                                                           The Scout engine is the hero of the job site! With the use of male / female
                                                                                           connectors on both ends of the Scout engine, you never have to worry about
                                                                                           soldering on site.

                                                                                           Snap the boards together for seemingly limitless lines of light and never worry
                                                                                           about double sided tape drying up and your lights falling off!

          Infinite Runs - Unlimited Power Injection                                                                          Side Feeds
                                                                                                                             Anywhere
          The Scout Fixture line is built to make sure you never have a visible hot spot
          or shadow.

          Our proprietary engines clicks together with seamless connectors never
                                                                                               Solderless
          creating a shadow.
                                                                                               Power Injector
          Add in the ability to inject power every 1/2” along either side or rear of the
          fixture and we can promise you’ll never have a break in light.
                                                                                                                                        Rear Feeds
          Guaranteed.                                                                                                                   Anywhere

                                                                                           LumenDial

                                             Lumen                                         Scout’s proprietary boards allow us to burn in a specific lumen & wattage output
                                                                                           at time of manufacture.

                                             dial
                                                                                           All without ever changing anything on the board.

                                                                                           We’re about to guarantee you’ll never have a hot spot or shadow or break in
                                                                                           light at any intensity or any wattage!
                           Never a Hot spot - Never a Shadow
                                - Never a break in light -                                 Looking for .75 watt/ft to meet a com check? Easy. (We can go from 0.1 to 10)
                              Any Intensity - Any Wattage                                  Looking for 361 lumens / foot? Easy (We can go from 1 to 1400)
                                       - Dialed In -
                                                                                           You let us know what you need and we’ll take care of the rest!

7 of 17                                                                                                                                             The Scout advantage
Basic

          .25”

                            1.00”

                   Slim / Optic

          .50”

                            1.00”

                 Surface / Grazer

          .81”

                            1.00”

                      Corner

                   1.00”

                      1.25”

8 of 17   The Scout Select Line
Give your space an open feel with cove lighting. These soffits
          around architectural details are the perfect place to add lighting
          to create a statement with lighting.

          Unless your cove is relatively close to the ceiling, you will likely                              Cove Size        Suggested intensity
          want to use a clear lens to wash the ceiling.                                                          2x2                      Low
                                                                                                                 4x4               Low / Medium
          Things to keep in mind when choosing the fixture is the intent:
                                                                                                                 6x6               Medium / High
          are you trying to create a line of light or wash the whole ceiling?
                                                                                                                 8x8               Medium / High
          Is the cove the main light in the room or an accent? Choose the
          color temperature that matches the project.                                                           10x10                     High
                                                                                                                12x12 +                   High

                     Corner Back                                                 Surface Middle                           Corner Front

      Corner Back : Placing the light in the back of the cove will give you the most expansive spread, washing well past the cove and covering a
      significant portion of the ceiling. Frosted Lens

      Surface Middle : Placing it in the middle will create a dramatic effect and keep the light relatively controlled inside the cove.

      Corner Front : Placing it by the front edge will give you a noticeable line on the ceiling above, and the most intense light of all placements.

9 of 17                                                                                                                          6” X 6” Standard Cove
Cove Size         Suggested intensity
                                                                                                                 2x2                   Low
                                                                                                                 4x4               Low / Medium
                                                                                                                 6x6               Medium / High
                                                                                                                 8x8               Medium / High
                                                                                                                10x10                  High
                                                                                                                12x12 +                High

                     Corner Back                                    Surface Middle                                        Corner Front

      Corner Back : Placing the lights in the back of the cove will give you the most expansive spread, washing well past the cove and covering
      a significant portion of the ceiling.

      Surface Middle : Placing the lights in the middle will create a dramatic effect and will keep the light relatively contained inside the cove,
      with some spill out into the ceiling. A great compromise of all the options.

      Corner Front : Placing it by the front edge of the cove or cabinet will give you a noticeable line on the ceiling above and the most intense
      light of all placements.

10 of 17                                                                                                                     Open cove / Upper Cabinet
Cove Size Suggested intensity
2x2 Low
4x4 Low / Medium
6x6 Medium / High
8x8 Medium / High
10x10 High
12x12 + High
Corner Back Surface Middle Corner Front
Corner Back : Placing the light against the wall and washing
towards the center of the room will give you a light glow on the
wall you intend to wash and a good amount of ambient light. Best
for flat surfaces where seeing minimal wall imperfections is desired.
portion of the ceiling.
Surface Middle : Place the light fixtures here for a more dramatic
wash on the wall, with soft highlighting of wall texture. Wall
imperfections will be visible.
Corner Front : Place the light at the front of the cove for the most
even wash on your wall and minimizing all wall imperfections.
Great for washing flat surfaces with minimum need to highlight
texture and for the most ambient bounce light you can achieve.
placements.
11 of 17 Wall Wash / pocket CoveCove Size Suggested intensity
2x2 Low
4x4 Low / Medium
6x6 Medium / High
8x8 Medium / High
10x10 High
12x12 + High
Corner Top Corner Bottom Surface Bottom
Corner Top : Great for getting a glow out of your cove, indirect lighting of a space or to light a piece of plastic for a surface glow, the
corner top is the best location.
Corner Bottom : Use this location for when seeing into the cove is possible and you are trying to get as much indirect lighting out of your
cove as possible.
Surface Bottom : Great to minimize the amount of indirect lighting you want to cast into your room, and maximizing the vibrancy of your
cove.
12 of 17 Glow CoveCabinet Height Suggested intensity
Less than 14” Low
14 - 24” Medium
24” + High
Corner Back Surface Middle Corner Front
Corner Back : Best for task lighting your counter top and having the source
as hidden as possible. Will cast shadows onto what you are working on.
Surface Middle : When in doubt, place it here. Perfect to have that balance
of light on the back splash with task lighting as well. Be careful of reflective
counter tops. We suggest pairing with out Milky Lens
Corner Front : Great for task lighting and lighting the back splash to minimize
Asymmetrical 25 Grazer any surface imperfections.
Asymmetrical 25 : Use this optic in the middle of the cabinet to highlight your
back splash and make that feature pop! Perfect for walls with texture and
color to make it all stand out.
Grazer : The ultimate in making that backsplash texture stand out! Place it in
the back of the cabinet, lighting straight down to highlight the wall.
13 of 17 UNDER CABINETCorner Surface
Corner Surface
Corner : Use the corner position to maximize throw distance
and to get the most coverage on the stairs. Minimal stair rise
highlighting
Surface : Perfect to highlight the stair and for lighting the treads,
Height Suggested intensity minimizing the spill off the stair.
Less Than 2” Low
4-8” Medium
8” + High
14 of 17 STAIRS & TOE KICKSGrazer : Use this fixture when you have a feature wall where
texture needs to stand out! Minimal bounce light into your room.
Wall Height Suggested intensity
Less than 2 Feet Low
4 - 6 Feet Medium
6+ Feet High
15 of 17 GrazingCorner Surface Slim
Corner Surface Slim
Corner : Great to bounce the light off the back of the mirror to
glow the wall softly.
Surface : Place on the back of the mirror to create a distinctive
line of light around your mirror.
Slim : Use this fixture for small clearance and when there is no
need for a lens or diffuser. Mount on the wall or on the mirror
for the perfect look.
16 of 17 VanityVisit
Web www.ScoutLighting.com
Call
Office 646.350.5025
email
Info Info@ScoutLighting.com
Sales Sales@ScoutLighting.com
Quotes Quotes@ScoutLighting.com
Orders Orders@ScoutLighting.com
Technical Support Support@ScoutLighting.com
17 of 17 Contact us!You can also read