PELLET HYDRO INSERTO VIVO 80 - INSTALLATION GUIDE EN
←
→
Page content transcription
If your browser does not render page correctly, please read the page content below
INSTALLATION GUIDE                         EN

INSERT
INSERTO
VIVO 80 PELLET
HYDRO
PELLET
HYDRO

Translation of the original instructions
TABLE OF CONTENTS
TABLE OF CONTENTS...................................................................................................... II
INTRODUCTION.............................................................................................................1
1-WARNINGS AND WARRANTY CONDITIONS......................................................................2
2-INSTALLATION............................................................................................................8
3-DRAWINGS AND TECHNICAL FEATURES........................................................................18
4-INSTALLATION AND ASSEMBLY...................................................................................20
5-PRECAUTIONS BEFORE START-UP................................................................................30
6 - HYDRAULIC CONNECTION.........................................................................................34
7 - CONTROL PANEL......................................................................................................45
8-SAFETY DEVICES AND ALARMS....................................................................................57
9 - RECOMMENDATIONS FOR A SAFE USE.........................................................................61
10-MAINTENANCE AND CLEANING.................................................................................62
11-PROBLEMS/CAUSES/SOLUTIONS...............................................................................67
12-WIRING DIAGRAMS.................................................................................................71

II
INTRODUZIONE
INTRODUCTION
Dear Customer,
our products are designed and manufactured in compliance with European reference Standards for construction products (EN13240 wood-
burning stoves, EN14785 pellet-burning appliances, EN13229 fireplaces/wood-burning inserts, EN 12815 wood-burning cookers), with
high quality materials and extensive experience in the transformation processes. The products also meet the essential requirements of
Directive 2006/95/EC (Low Voltage) and Directive 2004/108/EC (Electromagnetic Compatibility).
To get the best performance, we suggest you read the instructions in this manual carefully.
This installation and use manual forms an integral part of the product ensure that the manual is always supplied with the appliance, even
if it changes owner. If the manual is lost, you can request another copy from the local technical service or download it directly from the
company website.
All local regulations, including those regarding national and European regulations, must be observed when the appliance is installed.
In Italy, for the installation of systems with biomass below 35KW, refer to ministerial decree D.M. 37/08, and the qualified installation
technician with the appropriate requisites must issue a certificate of compliance for the system installed. (By system one means
Stove+Chimney+Air inlet).

REVISIONS TO THE PUBLICATION
The content of this manual is strictly technical and the property of MCZ Group Spa.
No part of this manual may be translated into other languages and/or adapted and/or reproduced, even in part, in other mechanical or
electronic forms, photocopies, recordings or other, without the prior written authorisation from MCZ Group Spa.
The company reserves the right to make changes to the product at any time without prior notice. The proprietary company reserves its
rights according to the law.

CARE OF THE MANUAL AND HOW TO CONSULT IT
•    Take care of this manual and keep it in an easily accessible place.
•    Should the manual be misplaced or ruined, request a copy from your retailer or directly from the authorised Technical Assistance
     Department. It can be downloaded from the company website.
•    The “text in bold” must be read with particular care.
•    “The “text in italics” draws attention to other sections in this manual or clarifications.
•    “NOTE” provides the reader with additional information.

SYMBOLS USED IN THE MANUAL

                      ATTENTION:
                      Read the relative message with care as failure to observe the information provided could result in serious
                      damage to the product and put the persons who use it at risk.

                      INFORMATION:
                      failure to comply with these provisions will compromise the use of the product.

                      OPERATING SEQUENCES:
                      sequence of buttons to be pressed to access the menus or change settings.

                      MANUAL
                      carefully read this manual or the relative instructions.

Technical Dept. - All rights reserved - Reproduction is prohibited                                                                      1
1-WARNINGS AND WARRANTY CONDITIONS

       SAFETY PRECAUTIONS

• Installation, electrical connection, function test and maintenance
  must only be carried out by authorised and qualified personnel.
• Install the product in accordance with all local and national legislation
  and regulations in force in the region or state.
• A bad use or unproper maintainance of the product can bring to a
  serious risk of explosion in the combustion chamber.
• Only use the fuel recommended by the manufacturer. The product must not be
  used as an incinerator.
• It is strictly forbidden to use alcohol, petrol, liquid fuel for lanterns, diesel, bio-
  ethanol, fluids for lighting charcoal or similar liquids to light/rekindle the flame
  in these devices. Keep these flammable liquids well away from the appliance
  when in use.
• Do not put any fuel other than wood pellets in the hopper.
• The instructions provided in this manual must always be complied with to
  ensure the product and any electronic appliances connected to it are used
  correctly and accidents are prevented.
• This appliance can be used by children aged from 8 years and above
  and persons with reduced physical, sensory or mental capabilities or
  lack of experience and knowledge if they have been given supervision
  or instruction concerning use of the appliance in a safe way and
  understand the hazards involved. Children shall not play with the
  appliance. Cleaning and user maintenance shall not be made by
  children without supervision.
• The user, or whoever is operating the product, must read and fully understand
  the contents of this installation guide before performing any operation. Errors
  or incorrect settings can cause hazardous conditions and/or poor operation.
• Do not climb on or lean on the product.
• Do not put linen on the product to dry. Any drying racks or similar objects must
  be kept at a safe distance from the product. Fire hazard.
• All liability for improper use of the product is entirely borne by the user and relieves
  the Manufacturer from any civil and criminal liability.
2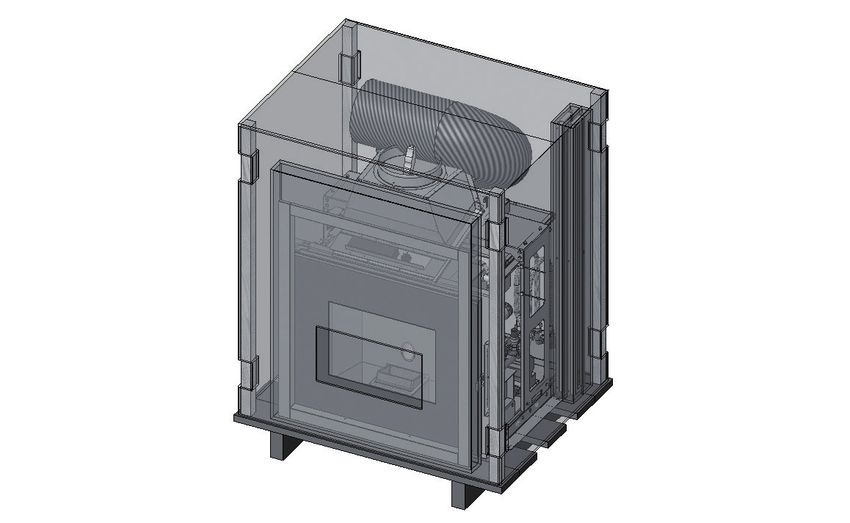
1-WARNINGS AND WARRANTY CONDITIONS

• Any type of tampering or unauthorised replacement with non-original spare
  parts could be hazardous for the operator’s safety and relieves the company
  from any civil and criminal liability.
• Many of the surfaces of the product get very hot (door, handle, glass, smoke
  extraction pipes, etc.). Avoid coming into contact with these parts
  without adequate protective clothing or suitable means, such as
  gloves with thermal protection or “cold handle” operating systems.
• It is forbidden to operate the product with the door open or the glass
  broken.
• The doors/covers on the appliance must remain closed when it is not
  used.
• The product must be powered by an electrical system that is equipped with an
  effective earthing device.
• Switch the product off in the event of a fault or malfunction.
• Accumulated unburned pellets in the burner after each “failed start-up” must
  be removed before lighting again. Check that the burner is clean and positioned
  properly before lighting again.
• Shut the stove down in the event of a breakdown or bad running and
  contact the engineer immediately.
• Pellets must not be fed manually into the burner – this wrong
  behaviour can generate an abnormal amount of unburned gas, with a
  risk of explosion in the chamber.
• Accumulated unburnt pellets in the burner after a failed ignitions
  must be removed before lighting.
• Failure too clean and maintain the brazier can result in improper running and
  explosions within the stove. Make sure you remove and clear the holes in the
  brazier and any loose encrustations every time you empty the ash from the
  stove or every time you have a failed ignition.Make sure that the holes in the
  brazier are never reduced in size as this will affect the safe performance of the
  stove if not maintained.
• Do not wash the product with water. The water could get inside the unit and
  damage the electrical insulation and cause electric shocks.
Technical Dept. - All rights reserved - Reproduction is prohibited                3
1-WARNINGS AND WARRANTY CONDITIONS

• A carbon monoxide alarm must be fitted in the room where the appliance is
  sited Refer too ADJ part 2.34 through too 2.36 page 41 (ONLY FOR UK).
• If there is a fire in the flue pipe, extinguish the stove, disconnect it from the
  power supply and never open the door. Then contact the competent authorities.
• Do not light the stove with flammable materials if the ignition system breaks
  down.
• Do not stand for a long time in front of the product in operation. Do not overheat
  the room you are in and where the product is installed. This could cause injuries
  and health problems.
• Install the product in a location that does not present a fire hazard and is
  equipped with power and air supplies and smoke extractors.
• In the event of fire in the chimney, turn off the device, disconnect it from the
  mains electricity and do not open the hatch. Then contact the competent
  authorities.
• The product and the cladding must be stored in a dry place and must not be
  exposed to weathering.
• It is recommended not to remove the feet that support the product in order to
  guarantee adequate insulation, especially if the flooring is made of flammable
  materials.
• In the event of a malfunction with the ignition system, do not force it to light by
  using flammable materials.
• Special maintenance must only be performed by authorised and qualified
  personnel.
• Assess the static conditions of the surface on which the weight of the product
  will rest and provide suitable insulation if it is made of flammable material (e.g.
  wood, fitted carpet or plastic).
• Live electrical parts: only power the product after completing assembly.
• Disconnect the product from the 230V power supply before performing any
  maintenance operation.
• IF ANY SMOKE SPILLAGE IS SEEN WITHIN THE ROOM OR THE APPLIANCE
  SUFFERS FROM AN EXPLOSIVE IGNITION PLEASE TURN OFF THE
  APPLIANCE, VENTILATE THE ROOM AND CONTACT THE INSTALLER/
  SERVICE ENGINEER IMMEDIATELY.
4
1-WARNINGS AND
1-AVVERTENZE   WARRANTY CONDITIONS
             E CONDIZIONI DI GARANZIA

INFORMATION
 • In case of any problems, get in touch with your dealer, or a qualified engineer authorised by MCZ, and if a repair is necessary, insist
   on the use of original spare parts.
 • Use only the fuel recommended by MCZ (for Italy pellets with a diameter of 6 mm and for other European countries with a diameter
   of 6-8 mm) and provided only with an automatic supply system.
 • Periodically check and clean the smoke outlet ducts (connection to the flue pipe).
 • Accumulated unburnt pellets in the burner after repeated failed ignitions must be removed before lighting.
 • The pellet stove is not a cooking appliance.
 • Always keep the cover of the fuel hopper closed.
 • Keep this instruction manual carefully because it must stay with the stove throughout its working life. If the stove is sold or
   transferred to another user, always make sure that the booklet goes with the product.
 • If it gets lost, ask MCZ or your authorised dealer for another copy.

INTENDED USE
The product only works with wood pellets and must be installed indoors.

WARRANTY CONDITIONS
The company guarantees the product, with the exception of elements subject to normal wear (listed on the following page), for a
period of 2 (two) years from the date of purchase attested by:
• a document to serve as proof of purchase (invoice and/or receipt) that shows the name of the vendor and the date on which the
     purchase was made;
• forwarding of the completed certificate of guarantee within 8 days of purchase.

Furthermore, the product must be installed and started by specialised personnel who must, where provided, issue a declaration of
conformity of the plant and of the proper functioning of the product, for the warranty to be valid and effective.
We recommend functionally testing the product before completion with the relevant finishes, where provided (claddings, painting of
walls, etc.).
Installations not meeting the current standards, improper use and lack of maintenance as expected by the manufacturer, void the product
warranty.
The guarantee is valid on the condition that the instructions and warnings contained in the use and maintenance manual are observed,
and therefore the product is used correctly.
The replacement of the entire system or the repair of one of its components does not extend the guarantee period, and the original expiry
date remains unchanged.
The guarantee covers the replacement or free repair of parts recognised as being faulty at source due to manufacturing defects.

In order to activate the product warranty the commissioning document which is supplied with the appliance and also is
available as a download from the Specflue website must be filled in correctlty and returned within 14 days (ONLY FOR UK).

Technical Dept. - All rights reserved - Reproduction is prohibited                                                                      5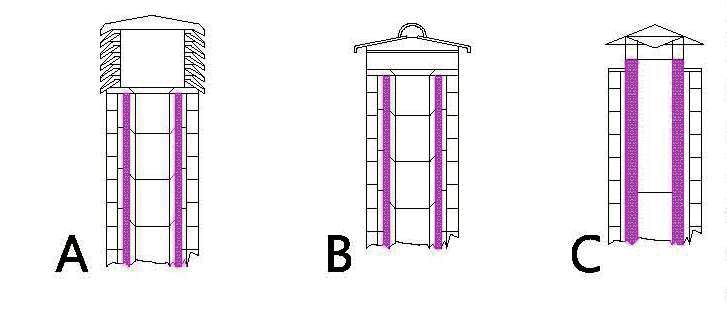
1-WARNINGS AND WARRANTY CONDITIONS
EXCLUSIONS
The guarantee does not cover malfunctions and/or damage to the appliance that arise due to the following causes:
• Damage caused during transportation or relocation
• all parts that develop faults due to negligence or improper use, incorrect maintenance, installation that does not comply with the
     manufacturer’s instructions (always refer to the installation and use manual provided with the appliance)
• incorrect dimensioning with regards to the use or faults in the installation or failure to adopt the necessary devices to guarantee
     proper execution
• improper overheating of the equipment, use of fuels not conforming to the types and quantities indicated in the instructions provided
• further damage caused by incorrect user interventions in an attempt to fix the initial fault
• worsening of the damage due to the continued use of the equipment by the user, once the defect has been noticed
• in the presence of a boiler, any corrosions, incrustations or breaks caused by water flow, condensation, hardness or acidity of the
     water, improperly performed descaling treatments, lack of water, mud or limescale deposits
• inefficiency of chimneys, flues or parts of the plant affecting the equipment
• damage caused by tampering with the appliance, atmospheric agents, natural disasters, vandalism, electrical discharges, fires, faults
     in the electric and/or hydraulic system.
• Failure to have the stove cleaned on an annual basis by an authorised technician or qualified personnel will result in the loss of the
     warranty.
Also excluded from this guarantee are:
• parts subject to normal wear such as gaskets, glass, claddings and cast iron grids, painted, chrome-plated or gilded parts, handles
     and electric cables, bulbs, indicator lights, knobs, all parts which can be removed from the hearth.
• Variations in colour of the painted or ceramic/serpentine parts and craquelure ceramics as they are natural characteristics of the
     material and product use.
• masonry work
• plant parts (if present) not supplied by the manufacturer

Any technical interventions on the product to eliminate the above-said defects and consequent damages must be agreed upon with
the Technical Assistance Centre, who reserves the right to accept the relative appointment or not. However, said interventions will not
be carried out under warranty but as technical assistance to be granted at part of any eventual and specific agreed conditions and in
accordance with the fee in force for the work to be carried out.
The user will also be charged for any costs incurred to remedy the incorrect technical interventions, tampering or damage to the appliance,
not attributable to original faults.
Save for the legal or regulatory limits, the guarantee does not cover the containment of atmospheric and acoustic pollution.

The company declines all liability for any damage which may be caused, directly or indirectly, to persons, animals or objects as
a consequence of non compliance with any prescription specified in the manual, especially warnings regarding installation,
use and maintenance of the appliance.

6
1-WARNINGS AND WARRANTY CONDITIONS
SPARE PARTS
In the event of a malfunction, consult the retailer who will forward the call to the Technical Assistance Service.
Use only original spare parts. The retailer or service centre can provide all necessary information regarding spare parts.
We do not recommend waiting for the parts to be worn before having them replaced. It is important to perform regular maintenance.
The company declines all liability if the product and any other accessory is used improperly or modified without
authorisation.
All parts must be replaced with original spare parts.
WARNINGS FOR THE CORRECT DISPOSAL OF THE PRODUCT.
The owner is the sole party responsible for demolishing and disposing of the product. This must be performed in compliance with laws
related to safety and environmental protection in force in his/her country.
At the end of its working life, the product must not be disposed of as urban waste.
It must be taken to a special differentiated waste collection centre set up by the local authorities or to a retailer that provides this service.
Separating and recycling prevents potential negative effects on the environment and health (often caused by inappropriately disposing of
product parts). It also allows materials to be recovered in order to obtain significant savings in energy and resources.
Technical Dept. - All rights reserved - Reproduction is prohibited 72-INSTALLATION
The instructions in this chapter refer explicitly to the Italian installation regulation UNI 10683. In any case, always
observe the domestic regulations in force.
PELLETS
Wood pellets are manufactured by hot-extruding compressed sawdust which is produced during the working of natural dried wood. The
compactness of the material is guaranteed by the lignin contained in the wood itself and allows pellets to be produced without glue or
binders.
The market offers different types of pellets with characteristics that vary according to the wood mixtures used. The most common
diameter on the market is 6 mm (although 8 mm diameter is available too) with a length, on average, of between 3 and 40 mm. A good
quality pellet has a density of between 600 and 750 or more kg/metres cubed and a water content that accounts for 5 to 8% of its weight.
Pellets have technical advantages besides being an ecological fuel, as the wood residue is used completely, thereby achieving cleaner
combustion than that of fossil fuels.
Good-quality wood has a calorific value of 4.4 kW/kg (15% moisture, after about 18 months of seasoning), whereas that of pellets is 4.9
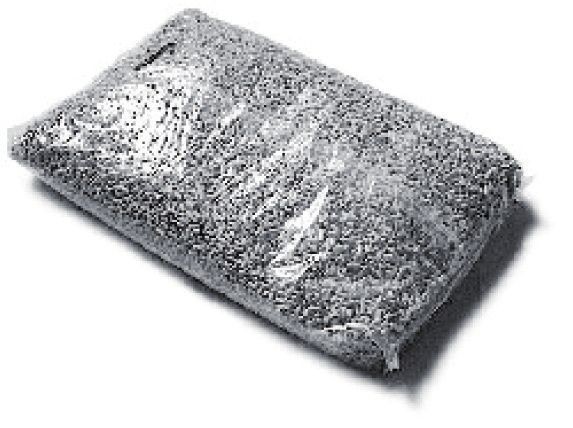
kW/kg. To ensure good combustion, the pellets must be stored in a dry place and protected from dirt. Pellets are usually supplied in 15 kg
bags, therefore, storing them is very convenient.
15 Kg BAGS OF FUEL
Good quality pellets guarantee good combustion, thereby decreasing harmful emissions into the atmosphere.
The poorer the quality of the fuel, the more often the internal parts of the brazier and combustion chamber must
be cleaned.
The main quality certifications for pellets currently available on the European market guarantee that the fuel complies with class A1/A2
according to EN14961-2. These certifications include, for example, ENPlus, DINplus, Ö-Norm M7135, and in particular, guarantee the
following characteristics:
• calorific value: 4.6 ÷ 5.3 kWh/kg.
• Moisture content: ≤ 10% of the weight.
• Percentage of ash: max 1.5% of the weight.
• Diameter: 6±1/8±1 mm.
• Length: 3÷40 mm.
• Content: 100% untreated wood without the addition of binding substances (max 5% bark).
• Packaging: in sacks made from ecologically compatible or biologically decomposing material.
The company strongly recommends using certified fuel for its products (ENplus, DINplus, Ö-Norm M7135).
Poor quality pellets or others that do not comply with the characteristics specified previously may compromise the
operation of your product and can therefore render the guarantee and product liability invalid.
82-INSTALLATION
FOREWORD
The installation position must be chosen according to the room, to the smoke extraction system, to the chimney flue. Check with local
authorities whether there are any restrictive regulations in force regarding the combustion air inlet, the smoke outlet system, the
flue or the chimney cap. The manufacturer declines all responsibility in the event of installations that do not comply with the laws in
force, incorrect room air exchange, electrical connection non-compliant with the standards and inappropriate use of the appliance. The
installation must be carried out by a qualified technician, who must issue a declaration of conformity of the system to the purchaser and
will assume full responsibility for final installation and consequent good operation of the product.
In particular one must ensure that:
• there is a suitable combustion air inlet and smoke outlet in compliance with the type of product installed
• other stoves or devices installed do not cause depression in the room where the product is installed (for sealed appliances only, a
maximum of 15 Pa of depression in the room is allowed)
• when the product is switched on there is no reflux of smoke in the room
• fumes extraction takes place in total safety (sizing, smoke seal, distances from flammable materials..).
We especially recommend to check the data tags of the flue for the safety distances that must be observed in presence
of combustible materials and the type of insulating material to be used. These indications must be followed strictly to
prevent serious harm to people and the integrity of the home. The installation of the appliance must ensure easy access to
clean the appliance itself, the smoke outlet pipes and the flue. It is forbidden to install the stove in rooms with a fire hazard.
Installation in studio flats, bedrooms and bathrooms is only allowed with sealed or closed appliances equipped with
suitable combustion air ducting directly outside. Always maintain adequate distance and protection in order to prevent
the product from coming into contact with water.
In the event there are several appliances installed, the external air inlet must be sized accordingly.
MINIMUM DISTANCES
It is recommended to install the stove detached from any walls and/or furniture, with a minimum clearance to allow effective aeration of
the appliance and a good distribution of heat in the room.Observe distances from flammable or heat-sensitive objects (sofas, furniture,
wood panelling, etc..) as specified below. The front distance from flammable materials must be at least as set out in the product’s technical
data table.
If particularly delicate objects are present, such as furniture, curtains or sofas, increase the stove clearance accordingly.
If the floor is made of wood, it is recommended to fit a floor protection sheet in compliance with the Standards in
force in the country of installation.
VIVO 80 PELLET HYDRO Non-flammable walls Flammable walls
A
B
A = 50 mm A = 100 mm
Hydro Version
B = 50 mm B = 100 mm
If the floor is made of combustible material, it is recommended to use protection made of non-combustible material (steel, glass...) that
also protects the front from falling combusted material during cleaning operations.
The appliance must be installed on a floor with adequate load capacity.
If the existing construction does not meet this requirement, one must take appropriate measures (for example a load distribution plate).
Technical Dept. - All rights reserved - Reproduction is prohibited 92-INSTALLATION
CONNECTION OF THE SMOKE EXHAUST DUCT
When making the hole for the passage of the smoke discharge pipe, one must take into account the possible presence of flammable
materials. If the hole must be made through a wooden wall or thermolabile material, the INSTALLER MUST first of all use the appropriate
wall fitting (minimum diameter 13 cm) and suitably insulate the pipe of the product that passes through it using adequate insulating
materials (1.3 - 5 cm thick with minimum thermal conductivity 0.07 W/m°K).
The same minimum distance must be applied if the pipe of the product must pass through vertical or horizontal sections near the
thermolabile wall.
It is recommended to use an insulated double-wall pipe in external sections in order to prevent condensation from forming.
The combustion chamber works in negative pressure.
SMOKE EXHAUST
COUPLING
102-INSTALLATION
FOREWORD
This chapter on the Smoke Flue has been produced in reference to the prescriptions of European regulations (EN13384 - EN1443 - EN1856
- EN1457).
The chapter provides indications for installing an efficient and correct smoke flue but is under no circumstances to substitute the
regulations in force, which the qualified technician must be in possession of. Check with local authorities whether there are any restrictive
regulations in force regarding the intake of air for combustion, the smoke extraction system, the flue or the chimney.
The company declines all liability relating to the poor functioning of the boiler if this is due to the use of an insufficiently sized flue in
violation of regulations in force.
SMOKE FLUE
The flue or chimney is of great importance for the proper operation of a solid fuel-burning heating appliance with natural draught, as
modern heating appliances have high efficiency with cooler flue gasses and consequently less draught, it is therefore essential that the
flue is built up to standard and always kept in perfect working order. A flue that serves a pellet/wood fuelled appliance must be at least
category T400 (or greater if the appliance requires, and resistant to soot fires. Smoke must be extracted through a single flue made of
insulated steel (A) or an existing flue that complies with the intended use (B).
A simple air shaft in cement must be suitably lined. In both solutions there must be an inspection cap (AT) and/or inspection hatch (AP)
- FIG.1.
It is prohibited to connect more than one wood/pellet or any other type of appliance (vent cowling...) to the same flue.
The stove must be connected to a flue pipe or an internal or external vertical duct conforming to EN 1856-1-2 to suit the
appliance and types of fuels to be burnt – refer to detailed guidance in sections 2, 3 and 4 (ONLY FOR UK).
min.3,5 metri
AP
AT (B)
(A)
FIGURE 1 - SMOKE FLUE
Technical Dept. - All rights reserved - Reproduction is prohibited 112-INSTALLATION
TECHNICAL CHARACTERISTICS
Have the efficiency of the flue checked by an authorised technician.
The flue must be sealed against flue gasses, in a vertical direction without narrowing, be made with materials impermeable to smoke,
condensation, thermally insulated and suitable to resist normal mechanical stress over time (we recommend fireplaces made of A/316
or refractory material with insulated round section double chamber). Be suitably insulated externally to avoid condensation and reduce
smoke cooling. It should be separated from combustible or flammable materials with an air gap or insulating materials: check the distance
specified by the manufacturer of the fireplace according to EN1443. The chimney opening must be in the same room as the appliance,
or at most in the adjoining room, and have a soot and condensation collection chamber beneath the opening, and be accessible via a
watertight metal hatch.
FLAT ROOF
A = 0.50 metres
B = DISTANCE > 2 metres
D C = DISTANCE < 2 metres
A D = O.50 metres
B C E = TECHNICAL VOLUME
E
FIGURE 2
ROOF AT 15°
B A = MIN. 1.00 metres
B = DISTANCE > 1.85 metres
C C = DISTANCE < 1.85 metres
D = 0.50 metres above
highest point
E = 0.50 metres
D F = REFLUX ZONE
F
A 15° E FIGURE 3
ROOF AT 30°
B A = MIN. 1.30 metres
B = DISTANCE > 1.50 metres
C
C = DISTANCE < 1.50 metres
D = 0.50 metres ABOVE
HIGHEST POINT
D E = 0.80 metres
F = REFLUX ZONE
A
F
E
30°
FIGURE 4
122-INSTALLATION
ROOF AT 60° ROOF AT 45°
B B
C
C
D
D
E
A F A E F
60° 45°
A = MIN. 2.60 metres FIGURE 5 A = MIN. 2.00 metres FIGURE 6
B = DISTANCE > 1.20 metres B = DISTANCE > 1.30 metres
C = DISTANCE < 1.20 metres C = DISTANCE < 1.30 metres
D = 0.50 metres ABOVE HIGHEST D = 0.50 metres ABOVE HIGHEST
POINT POINT
E = 2.10 metres E = 1.50 metres
F = REFLUX ZONE F = REFLUX ZONE
DIMENSIONING
The drop in pressure (draft) of a flue depends on its height. Check the drop in pressure with the values indicated in the technical
characteristics. The minimum height of the chimney is 3.5 meters.
The interior cross-section of the flue can be circular (best variation), square or rectangular (the ratio between the interior sides must be
≤1.5) with the sides joined with a minimum radius of 20 mm. The dimension of the cross-section must be minimum Ø100mm.
The cross sections/lengths of chimneys must be correctly sized in accordance with the general method of calculation of UNI EN13384-1 or
other proven efficiency methods.
Below is a list of some flues available on the market:
Steel chimney AISI 316 with Refractory chimney with Traditional square-section Avoid products with an
double chamber insulated double insulated chamber and clay chimney with insulating internal rectangular section
with ceramic fibre or equiva- external lightweight concrete empty inserts. where the larger side is 1.5
lent resistant up to 400°C. cladding with cellular material times the smaller side (e.g.
such as clay. 20x40 or 15x30).
EXCELLENT GOOD POOR VERY POOR
Technical Dept. - All rights reserved - Reproduction is prohibited 132-ISTRUZIONI PER L'INSTALLAZIONE
2-INSTALLATION
MAINTENANCE
The flue must be kept clean, since the deposit of soot or unburned oils reduces the cross-section reducing the draft and thus compromising
the efficient functioning of the heater and, if large build-ups accumulate, can catch fire. The flue and chimney must be cleaned and
checked by a qualified chimney sweep at least once a year. Once the maintenance has been performed, request a written declaration that
the device is safe.
Failure to clean the system jeopardises the safety.
CHIMNEY
The chimney is a crucial element for the heating appliance to work properly: we recommend a wind proof chimney (A), see Figure 7.
The area of the opening for smoke
extraction must be at least double the
cross-section of the smoke duct/flue
system, and arranged so that smoke
extraction is ensured even in strong
wind. The chimney must prevent rain,
snow or animals from entering the
chimney. The height of outflow into
the atmosphere must be beyond the
reflux zone created by the shape of the
roof or any obstacles near the outlet
(see Figures 2-3-4-5-6).
FIGURE 7
CHIMNEY COMPONENTS
1 KEY:
2 (1) CHIMNEY
3 (2) REFLUX CHANNEL
(3) SMOKE DUCT
4 (4) THERMAL INSULATION
9 (5) OUTSIDE WALL
5 (6) CHIMNEY CONNECTION
(7) SMOKE CHANNEL
(8) HEAT GENERATOR
(9) INSPECTION ACCESS PANEL
6
7
FIGURE 8
8
9
9
142-INSTALLATION
EXTERNAL AIR INLET
It is mandatory to provide an adequate external air intake that supplies the combustion air required for the product to work properly. The
flow of air between the outside and the installation room may be direct, through an inlet in an external wall of the room; or indirect, via
air intake from adjoining rooms and connecting permanently with the installation room (see Figure 9 b). Adjoining areas may not include
sleeping areas, garages or general areas with a fire hazard. During installation one must check the minimum clearances required for air
intake from outside. Take into account the presence of doors and windows that could interfere with the proper flow of air to the stove (see
diagram below).
The air intake must have a minimum total net area of 80 cm2: the surface must be increased accordingly if within the room there are other
active generators (for example: electric fan for stale air extraction, kitchen hood, other stoves, etc...), which could cause cause depression
in the room. One must verify that, with all the equipment on, the pressure drop between the room and the outside does not exceed a value
of 4 Pa. If necessary increase the intake section of the air inlet, which must be made at floor level and always protected with a bird-proof
outer protection grid and in such a way that it cannot be obstructed by any object.
A B
A C A
FIGURE 9 A - DIRECTLY FROM OUTSIDE FIGURE 9 B - INDIRECTLY FROM THE ADJACENT ROOM
A=AIR INLET
B=ROOM TO BE VENTILATED
C=INCREASE OF THE GAP UNDER THE DOOR
MIN.1,5 m MIN.1,5 m
It is possible to connect the air required for
combustion directly to the outside air inlet,
with a pipe of at least Ø50mm, with maximum
length of 3linear metres; each pipe bend shall be
considered equivalent to a linear metre. To attach
the pipe see the back of the stove.
For stoves installed in studio flats, bedrooms and
MIN.0,3 m bathrooms (where allowed), it is mandatory to
connect the combustion air outside. In particular
for sealed stoves the connection must be sealed
in order not to compromise the overall sealed
MIN.1,5 m
characteristic of the system.
FIGURE 10
Technical Dept. - All rights reserved - Reproduction is prohibited 152-INSTALLATION DISTANCE (metres) The air inlet must be at a distance of: 1.5 m UNDER Windows, doors, smoke outlets, cavities, .... 1.5 m HORIZONTALLY Windows, doors, smoke outlets, cavities, .... 0.3 m ABOVE Windows, doors, smoke outlets, cavities, .... 1.5 m AWAY from smoke outlet CONNECTION TO FLUE The connection between the flue and the appliance must be via a smoke duct that conforms with EN 1856-2. The connecting section must extend no more than 4 m horizontally, with a maximum incline of 3% and containing a maximum of 3 90% bends (accessible for inspection - do not count the T joint at the appliance outlet). The diameter of the smoke duct must be equal to or greater than that of the appliance outlet (Ø 80 mm). TYPE OF DEVICE SMOKE DUCT Minimum vertical length 1.5 metres Maximum length 6.5 metres (with 1 accessible 90° bend) Maximum length 4.5 metres (with 3 accessible 90° bends) Maximum number of accessible 90° bends 3 Horizontal sections 4 metres (minimum incline 3%) Use a smoke duct according to the regulations in force in the country of installation and verify that it is compatible with the product and installation characteristics. The temperature class of the smoke duct must exceed operating temperatures of the appliance. It is prohibited to connect more than one appliance to the same smoke duct, or the discharge from overhead cowling. It is prohibited to extract the products of combustion directly through the wall, whether into indoor spaces or outdoors. Should there be flammable or heat-sensitive structures, the smoke duct must respect the safety distances specified in the data plate. SUPPLEMENTARY ISTRUCTIONS ONLY FOR UK FOR CONNECTION TO THE FLUE PIPE, NOT MORE THAN 150mm OF HORIZONTAL PIPE MUST BE USED AND NOT MORE THAN 4 x 45° bends MUST BE USED. I accordance with UK Building Regulations . All exterior flue or flue used internaly above 1.8m should be twin wall insulated pipe installed in accordance with ADJ reference page 23 section 1.31 and 1.32 and 1.33 & Hetas regulations. The external fluepipe must have internal dimensions of a minimum of 150mm, and maximum 180mm. Check with suitable instruments that there is a minimum draught of 5 Pa. on low fire and 10pa on high fire. The flue must always run under negative pressure and a cold flue pull of – 2>3 pascals must be secured. 16
2-INSTALLATION
EXAMPLES OF CORRECT INSTALLATION

                                                                             1. Installation of Ø150mm flue with hole for the passage
                                                                             of the tube increased by:
                                                                             minimum 100 mm around the tube if next to non
                                                                             flammable parts such as cement, brick, etc.; or
                                                                             minimum 300 mm around the tube (or as prescribed by
                                       1                                     data tags) if next to flammable parts such as wood etc.
                                                       U                     In both cases, install suitable insulation between the flue
                                                                         F   and the ceiling.
                                                                             Always check and respect the data tags on the flue,
                                                                             in particular the minimum safety distances from
                                                                             combustible materials.
                                           E
                                                                             The previous rules also apply for holes made in walls.
                                                                             2. Old flue, minimum pipe Ø100mm with the inclusion of
                                                                             an external access door for chimney cleaning.
                                                                             3. External flue made of insulated stainless steel pipes,
                                                                             i.e. with double walls minimum Ø100mm: all securely
                                                       V                     mounted on the wall. With wind-proof chimney. See fig.
                                                                             7 type A.
                                                       I                     4. Ducting system using T joints that allow easy access for
                                                                             cleaning without having to remove the tubes
        2

                                           D                             3    FIGURE 11

                                                                               U = INSULATING
                                                                               V = ANY REDUCTION FROM 100 TO 80 MM
                                                                               I = INSPECTION CAP
                                 B                                             S = INSPECTION ACCESS PANEL
                                                                               P = AIR INLET
                                                                         I     T = T JOINT WITH INSPECTION CAP
    U                        A
                                                                     U         A = MINIMUM 40 MM
                    C                                                          B = MAXIMUM 4 M
    I                                                                I         C = MINIMUM 3°
                                                                               D = MINIMUM 400 MM
                                                                               E = HOLE DIAMETER
     S                                                     4                   F = SEE FIG.2-3-4-5-6

                                                           T

                        P                          I

Technical Dept. - All rights reserved - Reproduction is prohibited                                                                  17
3-INSTALLAZIONE
3-DRAWINGS E MONTAGGIO
AND TECHNICAL FEATURES
DRAWINGS AND CHARACTERISTICS
VIVO 80 PELLET HYDRO DIMENSIONS (dimensions in mm)
786.5
40 40
40
600
677
40
Ø8
53.5 355
0
09
Ø2
48
600
10
155
87.8 45
45
183-DRAWINGS AND TECHNICAL FEATURES
TECHNICAL CHARACTERISTICS VIVO 80 PELLET HYDRO
Nominal output power 16,9 kW (14534 kcal/h)
Nominal output power (H2O) 14,2 kw (12212 kcal/h)
Minimum output power 4,9 kW (4214 kcal/h)
Minimum output power (H2O) 3,5 kw (3010 kcal/h)
Efficiency at Max 90,1%
Efficiency at Min 95,2%
Temperature of exhaust smoke at Max 150°C
Temperature of exhaust smoke at Min 65°C
Particulate/OGC / Nox (13%O2) 20 mg/Nm3 - 1 mg/Nm3 - 117 mg/Nm3
CO at 13% O2at Min and at Max 0,028 – 0,012%
CO2 at Min and at Max 6,4 - 9,8%
Recommended draught at Max power*** 0,10 mbar - 10 Pa***
Recommended draught at Min power 0,02 mbar - 2 Pa
Maximum operating pressure 2,5 bar - 250 kPa
Mass of smoke 12.5 g/sec
Hopper capacity 20+15 litres
Type of pellet fuel Pellet diameter 6-8 mm and size 3-40 mm
Pellet hourly consumption Min ~ 1 kg/h* - Max ~ 3,6 kg/h*
Autonomy At min ~ 23 h* - At max ~ 7 h*
Heatable volume m 3
363/40 – 415/35 – 484/30 **
Combustion air inlet External diameter 50 mm
Smoke outlet External diameter 80 mm
Air inlet 80 cm2
Nominal electrical power (EN 60335-1) 80 W (Max 420 W)
Supply voltage and frequency 230 Volt / 50 Hz
Net weight 160 kg
Weight with packaging 170 kg
Distance from flammable material (back) 100 mm
Distance from flammable material (side) 100 mm
* Data that may vary depending on the type of pellets used
** Volume that can be heated, according to the power requirement per m3 (respectively 40-35-30 Kcal/h per m3)
***Value recommended by the manufacturer (non-binding) for optimal product operation
Tested according to EN 14785 in accordance with European regulation for Construction Products (UE 305/2011)
Technical Dept. - All rights reserved - Reproduction is prohibited 194-INSTALLATION AND ASSEMBLY
PREPARATION AND UNPACKING
The product is supplied in a single package. Inside the package there are the tube, the loading door, the frame and ventilation grilles.
Open the package, remove the product from the pallet and set it in the pre-selected place, making sure this complies with the requirements.
PRODUCT PACKAGING
The two brackets must be removed in order to remove the product from pallet, by loosening the two flanged nuts and the two screws.
The appliance must always remain in a vertical position and handled solely with a cart. Pay particular attention to the door and its glass,
protecting them from mechanical knocks that would compromise their integrity.
SCREW
NUT
NUT
BRACKET
SCREW
Always handle the product with care. If possible, unpack the product near the place of installation. The materials that make up the
packaging are neither toxic nor harmful, and so require no particular disposal measures. Therefore, the end user is responsible for product
storage, disposal or possible recycling in compliance with the relative applicable laws.
If the product must be connected to an exhaust pipe that goes through the rear wall (to enter the flue), make sure not to force it in.
204-INSTALLATION AND ASSEMBLY POSITIONING Before installing the product assess the optimal position. One can install the product in a pre-existing traditional fireplace or as a new system. In addition to lift the product to the recommended height of 600 mm one can purchase a metal support separately (refer to the relative optional accessories price list) INSTALLATION IN A PRE-EXISTING FIREPLACE Assess the following elements: The supporting surface of the product must have the following characteristics: • support the weight of the product and of any accessories • consistency such as to allow anchoring by means of plugs for safety • perfectly level • the jambs as perpendicular as possible to the surface The housing compartment must be large enough to accommodate the product. After verifying the conditions needed for proper installation proceed with the installation of the product: • fix the base of the product to the supporting surface • carry out all chimney plumbing and electrical connections in compliance with the regulations in force. Any space between the cladding walls and the product can be closed via a compensation frame that can be easily disassembled in the event of maintenance of the insert. It is mandatory to fix the product to the supporting surface, as otherwise the product could tilt when extracted. One must check that all connections (plumbing and electrical) enable to extract the product. INSTALLATION AS A NEW SYSTEM Assess the following elements: The supporting surface of the product must have the following characteristics: • support the weight of the product and of any accessories • consistency such as to allow anchoring by means of plugs for safety • perfectly level After verifying the conditions needed for proper installation proceed with the installation of the product: • fix the base of the product to the supporting surface • carry out all chimney plumbing and electrical connections in compliance with the regulations in force. It is mandatory to fix the product to the supporting surface, as otherwise the product could tilt when extracted. One must check that all connections (plumbing and electrical) enable to extract the product. • Proceed to assemble the cladding. It is best to leave the product without cladding for a few days to check the tightness of all plumbing connections. For any type of installation, both on a new system as on an existing one, it must be possible to inspect the connections of the hoses fitted on the wall, because when the product is extracted one must disconnect the pipes from the system. Technical Dept. - All rights reserved - Reproduction is prohibited 21
4-INSTALLATION AND ASSEMBLY
FASTENING TO THE BASE OF THE INSERT
It is mandatory to anchor the product to a support as the authorised technician can remove the combustion chamber from its seat by
means of two extendable guides while performing the annual maintenance.
Fasten the insert as follows:
• measure the distance (A) from the edge of the frame to the outer edge of the support for it to be adequately set back into place.
A=590 mm (measurement from the edge of the frame to the outer edge of the support).
A1= 3 mm (measurement from the outer edge of the wall to the edge of the frame).
• Remove compensation frame C (see the relative paragraph).
• Loosen the lower screws (B) under the frame.
• Then remove the machine and separate it from its support (D).
• Set the support (D) away from the wall at the previously measured distance.
• Fasten the support (D) to the base (E) or to the optional support with the screws supplied, making sure that the support anchor
      surface (D) and the wall are perpendicular.
• Set the machine back on the support (D), insert the screws (B) again, making sure the machine and the support are well secured in
      order to guarantee product operation.

                                                                   A1=3 mm

                                A=590 mm

It is very important to make sure the positioning measurements of the product base have been respected and the support
anchor surface and the wall are perpendicular. Also make sure that the screws secure the machine to the support.

The product can be installed at the desired height by constructing a suitable platform. This support must be made of non-flammable
material.
The company declines all liability for any damage to objects and persons if the above-mentioned precautions are not
complied with.

22
4-INSTALLATION AND ASSEMBLY
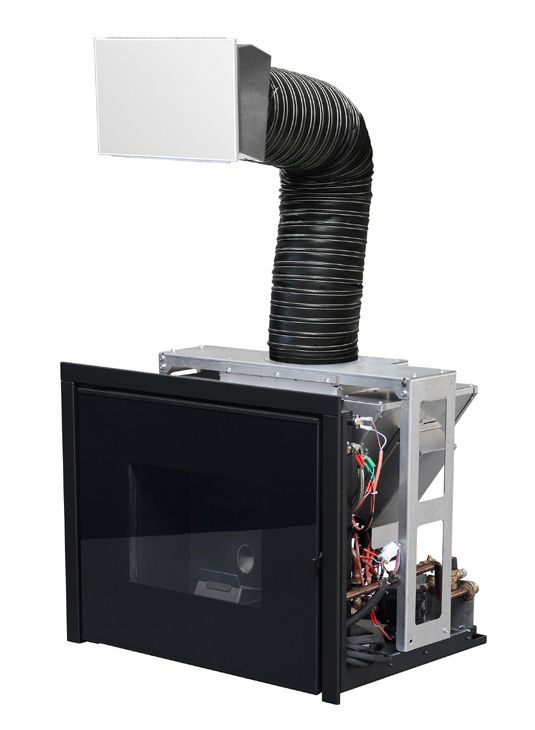
PELLET LOADING CHUTE ASSEMBLY
Another decision to be made before positioning the product is to define the side on which to install the chute for loading fuel. The pel-
lets fuelled Vivo 80 Hydro is delivered with two clamps, the connection pipe and chute with hatch.
The chute can be fitted on the right side, on the left side or frontally. The connection pipe is 1 metre long.
It is mandatory to shorten the connection pipe, depending on its positioning (side or front), so that it is well taut and
forms a minimum angle with respect to the horizontal as shown in the drawing. This operation is necessary for the pellets'
descent.
Before setting up the cladding carry out a fuel loading test to assess its proper descent towards the hopper.
It is mandatory to insulate the pipe properly in the event this is fitted on the left side in correspondence of the smoke evacu-
ation duct. Fire hazard!
Chute assembly
In the event one decides to position the pipe laterally, the distance from the machine axis to the wall must be at least 80 cm (figure
shown here).
To position the chute act as follows:
• Connect the supplied pipe to the product paying attention that it is rotated sideways, and fasten it with the clamp.
• Connect the pipe (in the upper part) to the opening of the door structure with the supplied clamp.
• Position the pipe with the door structure so that, when the cladding is complete, one can screw and fasten it to the cladding wall in
correspondence of the hole made for its insertion.
• To assemble the external door, which must only be done when the cladding is complete, refer to the relative section.
800 max 800 max
Technical Dept. - All rights reserved - Reproduction is prohibited 234-INSTALLATION AND ASSEMBLY
HOOD VENTILATION GRILLES
Foreword
Depending on how the product is positioned, one must provide grilles for ventilation.
If inserted in existing cladding, the ventilation grilles on the cladding will be used.
If used as a new installation, the company recommends installing the ventilation grilles as described in the following paragraph.
CONVECTION HOT AIR
HOT AIR INFLOW FROM THE ROOM
HOOD VENTILATION GRILLES FOR NEW CLADDING
It is mandatory to install the hood ventilation grilles of the manufacturer or grilles that can guarantee the same functions
and the same air passage section.
The company cannot be held liable for any damage caused to the structure or the electrical components if this precaution
is not complied with.
The structure becomes very hot and it is essential that constant and efficient ventilation is always guaranteed inside the cladding.
This allows to recover part of the structure heat that would otherwise be lost if left inside the cladding, whilst guaranteeing perfect
product operation.
The company supplies the “Blade” nozzle that is to be installed in the upper part of the insert as shown in the figure.
CONVECTION HOT AIR: ONE MUST RELEASE THE
HOT AIR ACCUMULATED INSIDE THE CLADDING.
SUPPLIED “BLADE” GRILLE
AIR INFLOW FROM THE ROOM: ALLOWS AIR
RECYCLE. ONE MUST PROVIDE AN OPENING IN
THE LOWER PART OF THE CLADDING TO PROMOTE
CONVECTION.
244-INSTALLATION AND ASSEMBLY ELECTRICAL CONNECTION First connect the power cable to the rear part of the product and then to a wall socket, which must always be accessible. Should this not be possible, during installation, insert appropriate power supply disconnection devices, in compliance with the national regulations regarding electrical installations. It is recommended to disconnect the power cable when the product is not used. SETTING UP THE CLADDING The product must be fully tested before the cladding is applied. The company cannot be held liable for any damage to the cladding should operating anomalies arise, which were not verified before the cladding was applied to the product. IT IS MANDATORY to check the tightness of all the pipes through which smoke passes (smoke fitting, gaskets and flue coupling) before setting up the cladding. READ THE "OPERATION TEST" CHAPTER BEFORE STARTING ANY PRODUCT CLADDING OPERATION. The product and the cladding parts must be fastened together WITHOUT COMING INTO CONTACT WITH THE STEEL STRUCTURE in order to prevent heat from being transmitted to the marble and/or stone and to allow for normal thermal expansion. Pay attention to the wood finishes, such as beams or shelves. It is recommended to set up the counter hood made of 15 to 20 mm thick fireproof plasterboard with a freestanding frame made of a galvanised profile to prevent bearing the weight on the cladding components (wooden beams or marble lintels), which do not have a freestanding structure and in order to intervene easily in case of anomalies and/or future maintenance. Dry mount the hearth of the cladding, leaving a 1 cm gap between the insert and the hearth for insulation. Technical Dept. - All rights reserved - Reproduction is prohibited 25
4-INSTALLATION AND ASSEMBLY
WOODEN BEAM INSULATION
If you wish to mount a wooden beam, it must be protected with adequate insulation from the hot parts in order to prevent the risk of fire
or damage to the cladding.

                                                                                 1 - INSULATION APPLIED OR TO BE APPLIED
                                                                                 2 - WOODEN BEAM
                                                                                 3 - MARBLE OR OTHER MATERIAL

STANDARD CLADDING ASSEMBLY
The installation guide found in each specific cladding must be referred to for the assembly of MCZ product specific claddings.

FRAME ASSEMBLY
Once the cladding and/or the plasterboard wall is set up, fit the frame.
This frame is meant for finishing and covering the gap between the metal structure of the product and the cladding.
The four screws for fixing the frame are already screwed to the lateral columns. Simply open the door of the product, insert the frame as
shown in the figure, loosen the screws fixed to the columns and tighten them fastening the frame to the structure.

                                                                                                                  LATERAL COLUMNS

           FRAME

           SCREWS

26
4-INSTALLATION AND ASSEMBLY DIAGRAM FOR MAKING HOLES IN THE CLADDING PELLET LOADING DOOR INSERTION HOLE The product can be installed on a brick base built on site or one can purchase the support (optional) that enables to raise the product to a suitable height. The recommended measurements go from 50 to 60 cm below the product support surface. To make the hole for inserting the loading door there are standard measures required by the same length of the loading pipe. Below is the drawing with the recommended and required measurements in order to ease fast installation. Technical Dept. - All rights reserved - Reproduction is prohibited 27
4-INSTALLATION AND ASSEMBLY
PRODUCT INLET HOLE
The hole to be made in the wall must be 765*610 mm. These measurements allow the frame to cover the gap that remains between the
product and the hole and also allow the product to be removed if maintenance is to be performed and/or parts are to be replaced.

                                                610

                                                                 765

SWITCH AND CONTROL PANEL CONNECTION
The emergency panel and switch are already fitted on the pellets loading door and are already connected to the relative cables by the
manufacturer. Take the switch cable and connect it to the socket on the rear of the product.
The control panel must instead be connected to the circuit board in position 1.

           •    Pay utmost attention when handling panels connected to the relative cables.
           •    Cables must stay in areas away from heat or in areas where they cannot be damaged in the event of extracting
                the product.
           •    For proper operation make the flat cable and the switch cable pass far from each other, with different paths.
           •    Do not force insertion of the connector under any circumstances.
           •    Do not fold and/or twist the cables.
           •    Do not modify the connectors or cabling or panel supports.

DOOR ASSEMBLY
Once the electrical cabling is complete, before fixing the hood door permanently, carry out an operation test.
If the test has a positive outcome, fix the door to the hood with four screws, using the four holes present on the door frame and indi-
cated with the letter (B).
The holes indicated on the horizontal profiles of the door (A) are instead for fixing the door frame to the chute frame to permanently
fasten the two elements, enclosing the hood wall in the middle.
One must preventively make a rectangular hole in the hood at a height determined by how the optional support has been installed or by
how the brickwork platform has been constructed.

28
4-INSTALLATION AND ASSEMBLY
A
B B
B B
A A
PELLETS DOOR OPENING/CLOSING
The door is fitted with a pressure closure and is therefore completely free of handles or grips.
To open or close the door, press the upper left corner. With a simple press this will hook on or unhook from the closure latch placed on
the door frame.
Technical Dept. - All rights reserved - Reproduction is prohibited 295-PRECAUTIONS BEFORE START-UP
GENERAL PRECAUTIONS
Remove all components that could burn from the firebox and glass (instructions, various adhesive labels and any polystyrene).
Check that the brazier is positioned correctly and rests properly on the base.
After a long period of inactivity, remove any pellets left in the hopper (using a vacuum cleaner with a long pipe ), as they could have
absorbed moisture, thereby altering their original characteristics and no longer being suitable for combustion.
The first start-up may not be successful as the feed screw is empty and does not always manage to load the required
amount of pellets in the brazier in time for the fire to be regularly ignited.
If a flame does not ignite after a number of failed start-ups, even though the pellet supply is correct, make sure the brazier is set in place
correctly, which must be interlocked in its seat and free from any ash deposits. If no anomaly is found during this inspection, there
may be a problem with the product components or installation may not be correct.
REMOVE THE PELLETS FROM THE BRAZIER AND CONTACT AN AUTHORISED TECHNICIAN.
Avoid touching the product during the initial start-up, as the paint hardens during this phase. If you touch the paint,
you may expose the steel surface.
If necessary, touch up the paint with the spray can of the specific colour.
It is good practice to guarantee effective ventilation in the room during the initial start-up, as the product will emit
some smoke and smell of paint.
ATTENTION!
Please ensure the brazier is clear of ALL pellets and ash build up following any failed ignitions. Failure to clear out
the brazier prior to resetting may result in further failed ignitions or in certain conditions an explosive ignition.
Do not stand close to the product and air the room. The smoke and smell of paint will disappear after about an hour of operation, however,
remember they are not harmful in any case.
The product will be subject to expansion and contraction during the start-up and cooling phases, therefore light creaking noises may be
heard.
This is absolutely normal as the structure is made of laminated steel and must not be considered a defect.
It is extremely important to make sure the product is not immediately overheated and the temperature is increased gradually, initially
using low power.
305-PRECAUTIONS BEFORE START-UP
It is good practice to guarantee effective ventilation in the room during the initial start-up, as the product will emit
some smoke and smell of paint.
Do not stand close to the product and air the room. The smoke and smell of paint will disappear after about an hour of operation, however,
remember they are not harmful in any case.
The stove will be subject to expansion and contraction during the start-up and cooling phases, therefore light creaking noises may be
heard.
This is absolutely normal as the structure is made of laminated steel and must not be considered a defect.
Make sure the plumbing system is sealed perfectly and that there are no leaks or pressure drops.
Make sure that all cut-off valves between the product and the system are open.
Make sure you have bled all air out of the system before start-up.
Make sure that internal devices work properly (flow switches, thermostats, etc.). Make sure that the combustion chamber and the chimney
are clean, and that the plumbing circuit is free of obstructions.
The basic settings ensure proper operation and prevent overheating during the first ignitions.
SETTINGS TO BE CARRIED OUT BEFORE THE INITIAL START-UP
SWITCHING ON/OFF
Once the power cable is connected in the rear part of the product, bring the switch, which is in the pellets loading door, to position (I). The
illuminated pushbutton switch will turn on.
The product remains switched off and the panel shows a first screen displaying OFF, by pressing any button a screen displaying MENU will
appear.
I/O SWITCH CONNECT THE POWER
CABLE
The product is switched on and off by pressing key B on the control panel for 2 seconds.
After a start-up phase that lasts approximately 15 minutes, the product starts to work in steady-state conditions.
After switching off the product by pressing key B on the control panel, the cooling stage begins, which involves interruption of fuel
loading, brazier cleaning and ventilation until the product is sufficiently cool.
FEED SCREW LOADING
This function can only be activated when the product is off and allows the pellets to be loaded into the loading system (feed screw). It
can be used each time it runs out of pellets in the hopper (see alarm A02). It is useful to prevent failed start-ups (alarm A01) due to the
hopper being empty.
To activate the FEED SCREW LOADING function, with the product switched off, from the control panel enter the SETTINGS entry, select
FEED SCREW LOADING and ON. When the pellets start falling into the brazier deactivate FEED SCREW LOADING and switch on the product
Technical Dept. - All rights reserved - Reproduction is prohibited 31You can also read