OWNER'S MANUAL MANUEL DU PROPRIÉTAIRE MANUAL DEL PROPIETARIO - Danby
←
→
Page content transcription
If your browser does not render page correctly, please read the page content below
OWNER’S MANUAL
                                                    MANUEL DU PROPRIÉTAIRE
                                                    MANUAL DEL PROPIETARIO

                                                             DAS090BAHWDB
                                                             DAS120BAHWDB
                                                             DAS180BAHWDB
                                                            DAS180DBAHWDB
                                                             DAS240BAHWDB

           SPLIT AIR CONDITIONER
           Owner’s Use and Care Guide ................................... 1 - 12

           CLIMATISEUR DIVISÉ
           Guide d’utilisation et d’entretien du propriétaire....... 13 - 24

           AIRE ACONDICIONADO DIVIDIDO
           Guía de utilización y cuidado para el propietario..... 25 - 36

      FOR ANY QUESTIONS OR CONCERNS REGARDING INSTALLATION OR SERVICING OF THIS
        APPLIANCE, PLEASE CONTACT THE DEALER OR BUILDER WHO SOLD THE APPLIANCE.
          _____________________________________________________________________

    POUR TOUTE QUESTION OU PRÉOCCUPATION CONCERNANT L’INSTALLATION OU L’ENTRETIEN
     DE CET APPAREIL, VEUILLEZ CONTACTER LE REVENDEUR OU LE CONSTRUCTEUR QUI A VENDU
                                          L’APPAREIL.
             __________________________________________________________________

   PARA CUALQUIER PREGUNTA O INQUIETUD RELACIONADA CON LA INSTALACIÓN O SERVICIO DE
  ESTA UNIDAD, PÓNGASE EN CONTACTO CON EL DISTRIBUIDOR O CONSTRUCTOR QUE VENDIÓ LA
                                       UNIDAD.

www.Danby.com     DANBY PRODUCTS LIMITED, ONTARIO, CANADA N1H 6Z9
                    DANBY PRODUCTS INC., FINDLAY, OHIO, USA 45840                  2019.12.11
Important Safety Information
           READ AND FOLLOW ALL SAFETY INSTRUCTIONS
SAFETY REQUIREMENTS                                         • Do not allow the appliance to operate for long
                                                              periods of time with doors or windows open or if
To avoid installation or operation difficulties, read          the humidity is very high.
these instructions before first use of the product.

• Use this appliance only for its intended use, as          GROUNDING INSTRUCTIONS
  described in this manual.
                                                            This appliance must be grounded. In the event of an
• Never allow children to operate, play with, or            electrical short circuit, grounding reduces the risk of
  crawl inside the appliance.                               electric shock by providing an escape wire for the
                                                            electric current. The serial rating plate indicates the
• Never clean appliance parts with flammable                 voltage and frequency the appliance is designed for.
  fluids. The fumes can create a fire hazard or
  explosion.                                                WARNING - Improper use of the grounding plug can
                                                            result in a risk of electric shock. Consult a qualified
• Do not store or use flammable vapors or liquids            electrician or service technician if the grounding
  in the vicinity of this or any other appliance. The       instructions are not completely understood, or if
  fumes can create a fire hazard or explosion.               doubt exists as to whether the appliance is properly
                                                            grounded.
• Do not use this product near water, e.g. in a wet
  basement, laundry room or near a sink.

• Do not cover or block any openings on the
  appliance.

• This appliance should be serviced only by a
  qualified HVAC technician. Contact the dealer at
  the location where the appliance was purchased
  for information on servicing the appliance.

• Disposal of this appliance should be in
  accordance with federal and local regulations.

• This appliance is not intended for use by persons
  (including children) whose physical, sensory or
  mental capabilities may be different or reduced,
  or who lack experience or knowledge, unless
  such persons receive supervision or training to
  operate the appliance by a person responsible
  for their safety.

• Do not climb onto or place objects on top of the
  outdoor appliance.

• Do not operate this appliance with wet hands as
  this can cause electric shock.

• Do not insert fingers or other objects into the
  air inlet or outlet as the fan rotates at very high
  speed and can cause serious injury or damage.

                                    SAVE THESE INSTRUCTIONS!
                                                        1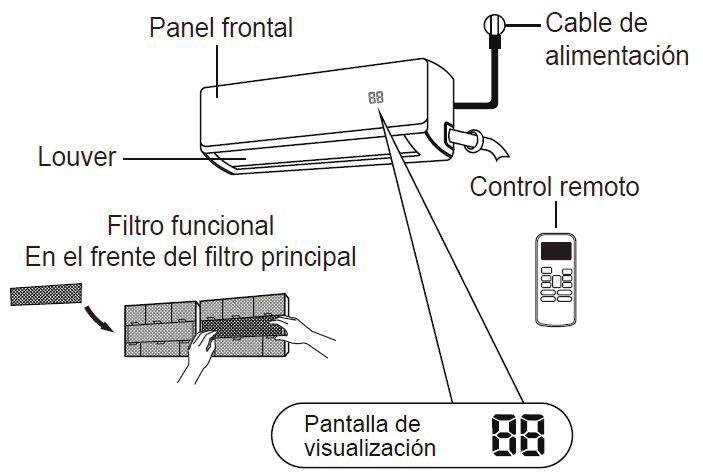
OPERATING INSTRUCTIONS

FEATURES

DISPLAY CODE MEANINGS
      will display for 3 seconds when:
      • TIMER ON is set
      • SWING, TURBO or SLEEP features are turned on

      will display for 3 seconds when:
      • TIMER OFF is set
      • SWING, TURBO or SLEEP features are turned off

      will display when anti-cold air feature is turned on

      will display when the appliance is defrosting

      • In fan mode, the appliance will display the room temperature
      • In other modes, the appliance will display the temperature setting

                                                    2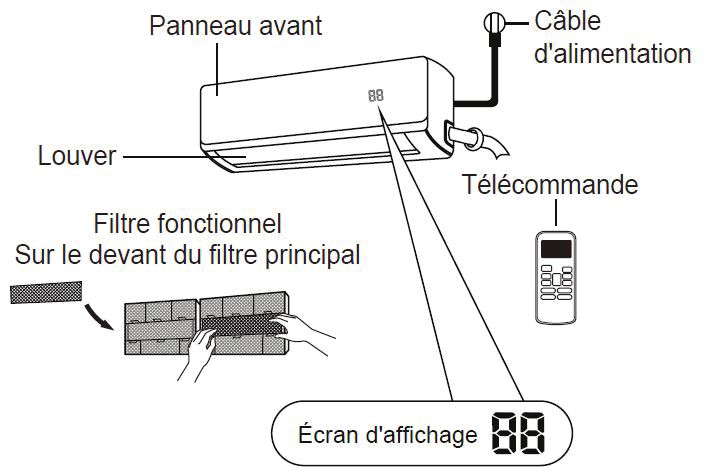
OPERATING INSTRUCTIONS

OPERATING TEMPERATURE                                         To optimize the performance of the appliance:

Optimal performance for the COOL, HEAT and DRY                •   Keep doors and windows closed
modes can be achieved in the following temperature            •   Do not block air inlets or outlets
ranges. When the air conditioner is used outside of           •   Regularly inspect and clean all air filters
these temperature ranges, certain safety protection           •   Limit energy usage by using the timer function
features will activate and cause the appliance to
perform less efficiently.                                      Note: When the outside temperature is below 0°C
                                                              (32°F), keep the appliance plugged in at all times
                                                              to ensure smooth ongoing performance.

                                       COOL mode                      HEAT mode              DRY mode
                                       17°C - 32°C                    0°C - 30°C            10°C - 32°C
      Room temperature                 (63°F - 90°F)                 (32°F - 86°F)          (50°F - 90°F)
                                        0°C - 50°C                  -15°C - 30°C             0°C - 50°C
      Outdoor temperature             (32°F - 122°F)                  (5°F - 86°F)         (32°F - 122°F)

OPERATION WITHOUT THE REMOTE CONTROL
Operational functioning can be access through the
remote control. In the event that the remote control
fails to work, the appliance can be operated
manually with the manual control button located on
the indoor appliance. Note that manual operation
is not an efficient long-term solution and that
operating the appliance with the remote control is
recommended.

The appliance must be turned off before manual
operation. To operate the appliance manually:

1. Open the front panel of the indoor appliance.

2. The manual control button is located on the right
   side hand side of the appliance.

3. Press the manual control button one time to
   activate forced AUTO mode.

4. Press the manual control button a second time to
   activate forced COOL mode.

5. Press the manual control button a third time to turn       Note: The manual button is intended for testing
   the appliance off.                                         purposes and emergency operation only. Do not
                                                              use this function unless absolutely necessary. To
6. Ensure the front panel is closed when finished.             restore regular operation, use the remote control to
                                                              activate the appliance.

                                                          3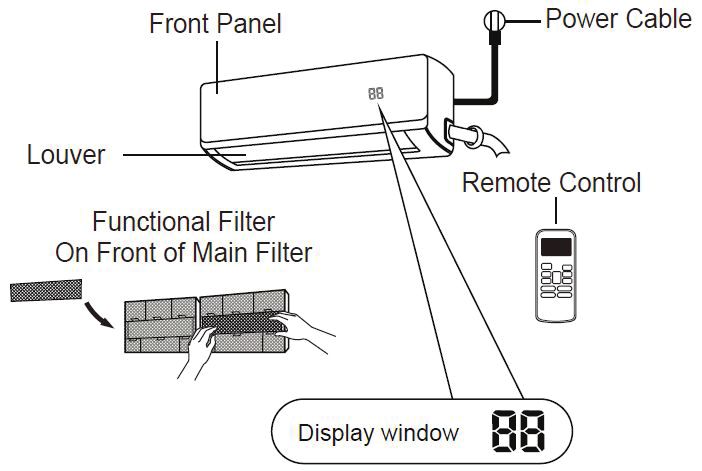
OPERATING INSTRUCTIONS
OPERATION WITH THE REMOTE CONTROL
• The air conditioner will not operate if curtains, doors or other materials block the signal from the remote
    control to the indoor appliance.
• Do not expose the remote control to water, direct sunlight or excessive heat.
• Do not allow direct sunlight to fall on the infrared receiver on the indoor appliance as this can impede
    the signal from the remote control.
• Remote signal reception is confirmed with a beep.
                                                                                 UP AND DOWN BUTTONS:
                                                                                 Used to increase or decrease
                                                                                 the temperature setting in 1°
 ON/OFF: Turns the appliance                                                     increments. Press and hold
 on or off                                                                       the up and down buttons for
                                                                                 three seconds to change the
 MODE: Selects mode                                                              temperature scale between
                                                                                 °C and °F
 operation in the following
 order:
 Auto --> Cool --> Dry --> Heat                                                  SHORTCUT: Used to restore
 --> Fan                                                                         the current settings or resume
                                                                                 previous settings

FAN: Selects fan speed in the                                                         TIMER ON: Used to set
following order:                                                                      automatic on function
Auto --> Low --> Med --> High
                                                                                      TIMER OFF: Used to set
SLEEP: Conserves energy                                                               automatic off function
during sleeping hours
                                                                              DIRECT: Used to change the
TURBO: Starts and stops the                                                   louver movement and set the up
turbo function, which will run                                                or down air flow direction
the appliance continuously to
reach the preset temperature                  LED: Turns the LED                    SWING: Used to start or
in the shortest amount of time;               display on or off                     stop the horizontal louver
after running for 30 minutes                                                        swing feature
turbo mode will stop

      Symbol will flash
      to indicate that the
      appliance has received                                   Remote Control Specifications
      the signal from the
      remote control.                           Model                   RG57B/BGEU1
                                                Rated Voltage           3.0V (dry batteries R03/LR03x2)
                                                Signal Receiving Range 8m (26 feet)
                                                Environment             -5°C to 60°C (23°F to 140°F)
                                                       4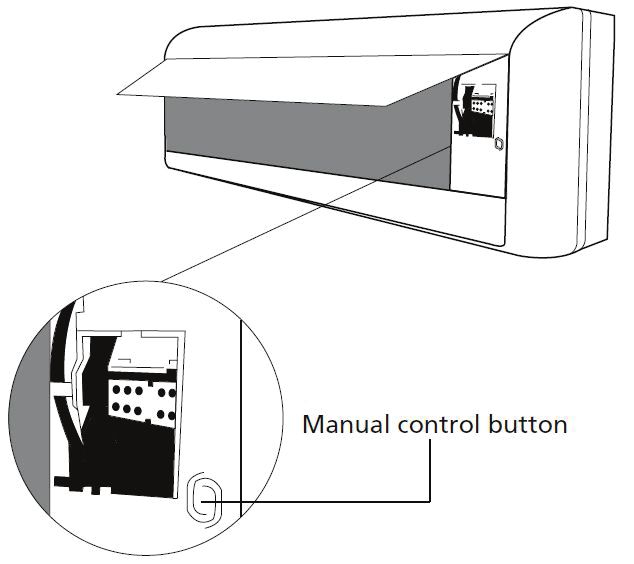
OPERATING INSTRUCTIONS

OPERATING MODES                                            SLEEP function

AUTO mode                                                  • The SLEEP function is used to decrease energy
                                                             use during sleeping hours. This function can only
• Press the MODE button to select AUTO mode.                 be activated by pressing the SLEEP button on the
• The appliance will automatically select cooling,           remote control.
  or fan only operation depending on what                  • When in COOL mode, the temperature will
  temperature has been set and the ambient room              increase by 1°C (2°F) in the first hour and
  temperature.                                               will increase an additional 1°C (2°F) in the
                                                             second hour. The appliance will then hold this
DRY (dehumidifying) mode                                     new temperature for 5 hours. At the end of the
                                                             SLEEP cycle, the appliance will resume normal
• Press the MODE button to select the DRY mode.              operation.
• The fan speed cannot be adjusted in this mode.           • When in HEAT mode, the temperature will
  The fan operates at LOW speed.                             decrease by 1°C (2°F) in the first hour and
• Keep windows and doors closed for the best                 will decrease an additional 1°C (2°F) in the
  dehumidifying effect.                                      second hour. The appliance will then hold this
• Condensed water will automatically drain                   new temperature for 5 hours. At the end of the
  through the drain hose.                                    SLEEP cycle, the appliance will resume normal
                                                             operation.
Note: The fan speed cannot be adjusted in AUTO
and DRY mode.                                              Note: The sleep feature is not available in FAN and
                                                           DRY mode.
COOL mode / HEAT mode / FAN operation

• Press the MODE button to select the desired
  mode; COOL, HEAT or FAN.
• Press the UP or DOWN buttons to select your
  desired room temperature. The temperature can
  be set within a range of 17°C - 30°C (62°F -
  86°F).
• Press the FAN button to choose the fan speed:
  Auto, Low, Med or High.

SHORTCUT function (only available on remote):

• Used to save a favourite setting
• Set the unit to the temperature and fan speed that
  you would like to set as a favourite
• Press and hold the SHORTCUT button for 2                 AUTOMATIC FEATURES
  seconds
• Press the SHORTCUT button at any point in future         Auto-Restart
  to return to the favourite setting                       If the appliance loses power, it will automatically
• If no favourite is set, pressing the SHORTCUT            restart with the previous settings once power is
  button will cause the unit to run in AUTO mode at        restored.
  26°C (79°F), with fan speed set to AUTO
                                                           Louver Angle Memory
Anti-Cold Air Feature                                      When turning on the appliance, the louver will
                                                           automatically resume the previous angle setting.
• The fan speed and the louver angle adjust
  according to the ambient temperature. The                Refrigerant Leakage Detection
  manual control button and remote control cannot          The indoor appliance will automatically display
  adjust fan speed or louver angle in this setting.        “EC” when it detects a refrigerant leakage and the
                                                           appliance will shut off.

                                                       5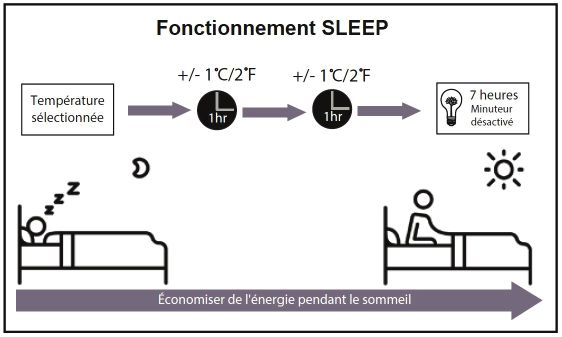
OPERATING INSTRUCTIONS

TIMER OPERATION                                              Using the TIMER ON and TIMER OFF feature at the
                                                             same time
To set the Auto-off timer:
                                                             The appliance can be set to turn on and run for a
• Ensure the appliance is turned on                          set period of time and then turn off again by using
• Press the TIMER OFF button and the Timer Off               the TIMER ON and TIMER OFF features at the same
  indicator will illuminate                                  time. Keep in mind that the hours displayed on the
• Press the TIMER OFF button to select the desired           appliance refer to the number of hours that will pass
  amount of hours before the appliance turns off             from the current time before the action is taken.

To set the Auto-on timer:                                    For example:

• Ensure the appliance is turned on                          • First, set the Auto-off timer
• Press the TIMER ON button and the Timer On                 • Ensure the appliance is turned on
  indicator will illuminate                                  • Press the TIMER OFF button and the Timer Off
• Press the TIMER ON button to select the desired              indicator light will illuminate
  amount of hours before the appliance turns on              • Press the TIMER OFF button to select the desired
                                                               amount of hours before the appliance turns off
Notes:                                                       • Press the TIMER ON button within 5 seconds and
                                                               the Timer On indicator light will illuminate
• The TIMER ON and TIMER OFF buttons will                    • Press the TIMER ON button to select the amount
  increase the time in 0.5 hour increments up to               of hours before the appliance turns back on
  10 hours and then in 1 hour increments up to 24
  hours                                                      Note: If the TIMER OFF function and the SLEEP
• The display will revert back to showing the                function are used at the same time, the appliance
  previous temperature setting if the appliance does         will only implement the setting whose duration is
  not receive a signal within a 5 second period              shorter.
  during programming
• Turning the appliance on or off at any time or             If the TIMER OFF function is set for less than seven
  adjusting the timer setting to 0.0 hours will cancel       hours, the TIMER OFF will turn the appliance off
  the TIMER settings                                         before the SLEEP function can complete its cycle.

                                                             If the TIMER OFF function is set for more than seven
                                                             hours, the SLEEP function will turn the appliance off
                                                             before the TIMER OFF can complete its cycle.

                                                         6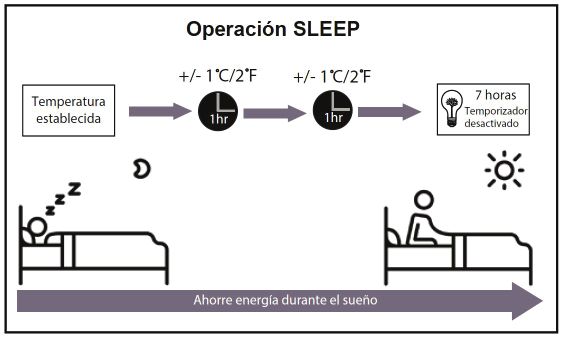
OPERATING INSTRUCTIONS

SETTING VERTICAL ANGLE OF AIR FLOW
While the appliance is on, use the SWING/DIRECT
button to set the vertical angle of the air flow.

1. Press the SWING/DIRECT button once to
   activate the louver. Each press of the button will
   adjust the louver by 6°.

2. To make the louver swing up and down
   continuously, press and hold the SWING/
   DIRECT button for 3 seconds. Press it again to
   stop the continuous swing.

SETTING HORIZONTAL ANGLE OF AIR
FLOW
The horizontal angle of the air flow must be set
manually. Grip the deflector rod and manually adjust
it to the preferred direction.

NOTE ON LOUVER ANGLES

When using COOL or DRY mode, do not set the
louver at an extreme vertical angle for a long period
of time. Water can condense on the louver blade
which can then drip on the floor or furnishings.

When using COOL or HEAT mode, do not set the                                       CAUTION
louver at an extreme vertical angle for a long period              Do not put fingers in or near the blower
of time. This can cause reduced performance due to                 and suction side of the appliance. The
restricted air flow.                                                high-speed fan inside the appliance can
                                                                   cause serious harm or injury.
Do not force the louver to move or adjust the louver
by hand. This will cause the louver to be out of sync
and it will not function correctly. If this occurs, turn off
the appliance and unplug it for a few seconds and
then restart the appliance. This will reset the louver
position.

                                                               7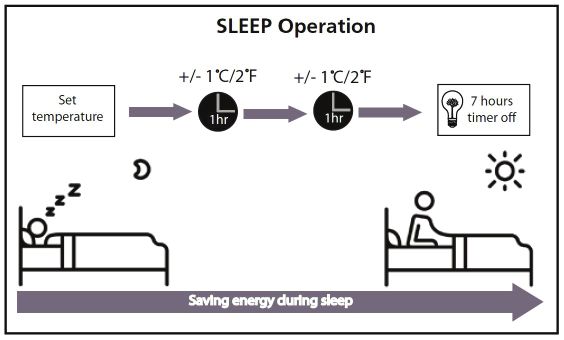
OPERATING INSTRUCTIONS
REPLACING THE REMOTE BATTERIES
The appliance comes with two AAA batteries. Place the batteries in the
remote control before use.

1. Slide the back cover from the remote downward to expose the battery
   compartment.

2. Insert the batteries, ensure to match the (+) and (-) symbols on the ends of
   the batteries with the symbols inside the battery compartment.

3. Slide the battery cover back into place.

• Do not mix old and new batteries or batteries of different types.

• Do not leave the batteries in the remote control if it is not going to be
  used for more than 2 months.

• Do not dispose of batteries as unsorted municipal waste. Collection of
  such waste separately for special treatment is necessary.

Note: Removing the batteries from the remote will erase all previous
programming. After inserting new batteries, the settings on the appliance must
be reprogrammed.

This equipment has been tested and found to comply with the limits for a Class B digital device, pursuant
to Part 15 of the FCC Rules. These limits are designed to provide reasonable protection against harmful
interference in a residential installation. This equipment generates, uses and can radiate radio frequency
energy and, if not installed and used in accordance with the instructions, may cause harmful interference
to radio communications. However, there is no guarantee that interference will not occur in a particular
installation. If this equipment does cause harmful interference to radio or television reception, which can be
determined by turning the equipment off and on, the user is encouraged to try to correct the interference by
one or more of the following measures:

1.   Reorient or relocate the receiving antenna
2.   Increase the separation between the equipment and receiver
3.   Connect the equipment into an outlet on a circuit different from that to which the receiver is connected
4.   Consult the dealer or an experienced radio/TV technician for help

Changes or modifications not approved by the party responsible for FCC compliance could void the user’s
authority to operate the equipment. This appliance complies with Part 15 of the FCC Rules and Industry
Canada’s license-exempt RSS.

Operation is subject to the following conditions:
1. This device may not cause harmful interference.
2. This device must accept any interference received, including interference that may cause undesired
operation.

This device complies with Canadian CAN ICES-3 (B) / NMB-3 (B)

                                                        8
CARE & MAINTENANCE
CLEANING THE INDOOR APPLIANCE
Note: Always turn off the air conditioner and
disconnect the power source before cleaning the
appliance or removing the filter.
• Use a soft, dry cloth to clean the outside of the
appliance. If the appliance is especially dirty,
use a cloth soaked in warm water to clean the
outside of the appliance.
• Do not use water to clean the inside of the
appliance as this can destroy the insulation and
cause electric shock.
• Do not use chemicals or chemically treated cloths
to clean the appliance.
• Do not use benzene, paint thinner or other
solvents to clean the appliance. They can cause
the plastic surface to crack or deform.
• Do not use water hotter than 40°C (104°F) to
clean the front panel. This can cause the panel to
deform or become discoloured.
CLEANING THE AIR FILTER
A clogged air filter can reduce the efficiency of the
air conditioner. It is advisable to clean the air filter
every two weeks or after 240 hours of operation,
whichever comes first. When removing the filter, do
not touch any metal parts inside the appliance as the
sharp metal edges can cause injury.
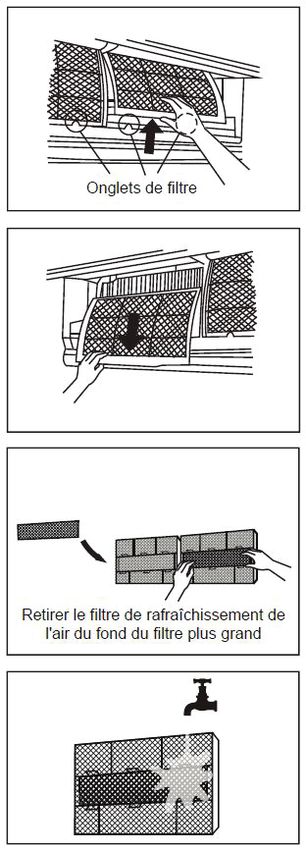
1. Lift the front panel of the indoor appliance.
2. Grip the tab on the end of the filter, lift it up and
pull it outwards to remove it from the appliance.
3. If the filter has a small air freshening filter, unclip if
from the larger filter. Clean the air freshening filter
with a soft brush or hand-held vacuum cleaner.
4. Clean the large filter with warm, soapy water.
Use mild detergent.
5. Rinse the filter with clean water. Ensure all soap
is removed from the filter and shake off excess
water.
6. Dry the filter in a cool, dry place. Do not expose
the filter to direct sunlight as this can warp or
shrink the filter.
7. When the filter is dry, replace the air freshening
filter and then slide the larger filter back into the
appliance.
8. Close the front panel of the indoor appliance.
Note: Do not touch the air freshening (plasma) filter
for at least 10 minutes after turning off the appliance
to allow it to cool.
9CARE & MAINTENANCE
MAINTENANCE - MAINTENANCE AND CLEANING OF THE
LONG PERIODS OF NON USE OUTDOOR APPLIANCE
If the air conditioner will not be used for a long Any cleaning, maintenance or repairs of the
period of time, complete the following: outdoor appliance must be completed by a licensed
HVAC technician. Contact the dealer who sold the
1. Turn on the FAN function until the appliance is appliance for information on maintenance or repairs
completely dry. to the outdoor appliance.
2. Turn off the appliance and disconnect the power.
DISPOSAL
3. Clean and replace all filters.
4. Remove the batteries from the remote control. Check for local regulatory compliance regarding the
approved and safe disposal of this appliance.
MAINTENANCE -
PRE-SEASON INSPECTION ERROR CODES
After a long period of non-use or before a period of If an error code appears in the display window, the
frequent use, complete the following: appliance may stop operation as a safety feature.
1. Check for damaged wires. Wait approximately 10 minutes as the error may
resolve itself. If the error code persists, disconnect
2. Clean all filters. the power to the appliance, wait approximately 5
minutes and then restore power to the appliance.
3. Check for leaks.
4. Replace the remote control batteries. If the error persists after the power cycle, contact the
sales center where the appliance was purchased for
5. Ensure nothing is blocking air inlets and outlets. information on servicing the appliance.
Ensure nothing is in the way of the infrared
remote receiver.
10TROUBLESHOOTING
Danby consumer care: 1-800-263-2629
Hours of operation:
Monday to Thursday 8:30 am - 6:00 pm Eastern Standard Time
Friday 8:30 am - 4:00 pm Eastern Standard Time
Information in this manual is subject to change without notice.
PROBLEM POSSIBLE CAUSE
The appliance does not start • The appliance has a protection feature that prevents it from being turned back
when pressing on/off button on for 3 minutes after being turned off to avoid overloading
• Room temperature is lower than the set temperature. (Cooling mode)
• Room temperature is higher than the set temperature (Heat mode)
• Power failure
• A fuse is burned out
• Remote control batteries have burned out
The appliance changes from • The appliance may change mode to prevent frost from forming on the internal
COOL or HEAT to FAN mode coils
automatically • The set temperature has been reached, at which point the compressor is turned
off. The appliance will continue operating when the room temperature fluctuates
from the set temperature
The indoor or outdoor • In humid regions, a large temperature difference between the room temperature
appliance are emitting white and the set temperature can cause white mist
mist • When the appliance restarts in HEAT mode after defrosting, white mist may be
emitted due to moisture generated from the defrosting process
The indoor or outdoor • A rushing air sound may occur when the louver resets its position
appliance are making noise • A squeaking sound may occur after running the appliance in HEAT mode due to
the expansion and contraction of internal plastic parts
• A low hissing sound during operation is normal; this is caused by refrigerant gas
flowing through the appliance
Dust is emitted from the • The appliance may accumulate dust on the internal components during long
appliance periods of non-use, which will be emitted when the appliance is turned on
The appliance emits a bad • The appliance may absorb odors from the surrounding environment, (cooking
odor smells, animal smells, cigarette smells, etc.) which will be emitted during
operation
• The filter has become clogged and should be cleaned
The fan of the outdoor • During operation, the fan speed on the outdoor appliance is controlled to
appliance does not operate optimize product efficiency
Operation is erratic, • Interference from cell phone towers and remote boosters may cause the
unpredictable, or appliance appliance to malfunction. To reset the appliance: disconnect the power then
is unresponsive reconnect and press the power button to restart operation
Poor cooling or heating • Temperature setting is higher or lower than the ambient room temperature
performance • The outdoor temperature is extremely high or low
• The air filter is clogged
• The air inlet or outlet is blocked
• Doors and windows are open
• Low refrigerant due to leak or long-term use
• The heat exchanger is dirty
The appliance starts and • There is too much or too little refrigerant in the system
stops frequently • Incompressible gas or moisture has entered the system
• The voltage is too high or too low
• The compressor is malfunctioning
11LIMITED IN-HOME APPLIANCE WARRANTY
LIMITED
This quality product is warranted to be free from manufacturer’s APPLIANCE
defects WARRANTY
in material and workmanship, provided that the unit is used under the normal operating
conditions intended by the manufacturer.
Thisquality
This warranty isproduct
available only to the person toto
is warranted whom
be the
freeunitfrom
was originally sold by Danby Products
manufacturer’s defectsLimited (Canada) orand
in material Danbyworkmanship,
Products Inc.provided
(U.S.A.) (hereafter
that the
“Danby”) or by an authorized distributor of Danby, and is non-transferable.
unit is used under the normal operating conditions intended by the manufacturer.
This warranty is available only to the person to whom the unit was originally sold by Danby Products Limited (Canada)
or Danby Products Inc. (U.S.A.) (hereafter “Danby”)TERMS or by OF an authorized distributor of Danby, and is non-transferable.
WARRANTY
Plastic parts, are warranted for thirty (30) days only from purchase date, with no extensions provided.
TERMS OF WARRANTY
Plastic parts,
First Year are warranted for thirty (30) days only
During the first twelve (12) months, any functional from
partspurchase
of this productdate,
found towith no extensions
be defective, provided.
will be repaired or replaced, at warrantor’s
option, at no charge to the ORIGINAL purchaser.
First 24 months During the first twenty-four (24) months, any functional parts of this product found to be defective,
To obtain willreserves
Danby be replaced, at warrantor’s
the right to limit the boundaries ofoption,
“In Home at no charge
Service” to the
to the proximity of anORIGINAL purchaser.
Authorized Service Depot. Any app liance
Service requiring service outside the limited boundaries of “In Home Service” , it will be the consumer’s responsibility to transport the appliance (at
Nothing within this warranty shalltoimply
their own expense) that
the original Danby
retailer (point will be responsible
of purchase) or a service depot or for
liable
repair.for any spoilage
See “Boundaries of In Homeor Serv
damage to ice”food
below. or
Contact your dealer from whom your unit was purchased, or contact
other contents of this appliance, whether due to any defect of the appliance, or its use, whether proper or improper. your nearest authorized Danby service depot, where service
must be performed by a qualified service technician.
If service is performed on the units by anyone other than an authorized service depot, or the unit is used for commercial appli
EXCLUSIONS cation, all
obligations of Danby under this warranty shall be void.
Save as herein provided, by Danby, there are no other warranties, conditions, representations or guarantees, express
or implied, made or intended by Danby or its authorized distributors and all other warranties, conditions, representa-
Boundaries of If the appliance is installed in a location that is 100 kilometers (62 miles) or more from the nearest service center your unit must be
tions
In Homeor Service
guarantees,delivered including to theany
nearestwarranties,
authorized Danby conditions,
Service Depot,representations
as service must only beorperformed
guarantees underqualified
by a technician any Sale of Goods
and certif Act
ied for
or like legislation orwarranty statuteservice
is hereby
by Danby.expressly
Transportation excluded.
charges to and Save as service
from the herein provided,
location Danby
are not protected by shall not be
this warranty and responsible
are t he for
any damages to persons or property,
responsibility including the unit itself, howsoever caused or any consequential damages arising
of the purchaser.
from the malfunction of the unit and by the purchase of the unit, the purchaser does hereby agree to indemnify and
hold harmless
Nothing within thisDanby
warranty shallfrom any
imply thatclaim
Danby willforbedamages
responsible ortoliable
persons or property
for any spoilage or damagecaused
to food orby
otherthe
c unit. ontents of this appliance, whether due
to any defect of the appliance, or its use, whether proper or improper.
GENERAL PROVISIONS
No warranty or insurance herein contained or set out shall apply when damage or repair is caused by any of the
EXCLUSIONS
following:
Save as herein provided, Danby, there are no other warranties, conditions, representations or guarantees, express or implied, m ade or intended by Danby or its
authorized distributors and all other warranties, conditions, representations or guarantees, including any warranties, conditio ns, representations or guarantees
1)under
Power failure.
any Sale of Goods Act or like legislation or statue is hereby expressly excluded. Save as herein provided, Danby shall no t be responsible for any damages
to persons or property, including the unit
2) Damage in transit or when moving the appliance. itself, howsoever caused or any consequential damages arising from the malfunction o f the unit and by the purchase of
the unit, the purchaser does hereby agree to indemnify and hold harmless
3) Improper power supply such as low voltage, defective house wiring or inadequate fuses. Danby from any claim for damages to persons or propert y caused by the unit.
4) Accident, alteration, abuse or misuse of the appliance such as inadequate air circulation in the room or abnormal
operating conditions (extremely high or low room temperature). GENERAL PROVISIONS
5) Use for commercial or industrial purposes (ie. If the appliance
No warranty or insurance herein contained or set out shall apply when damage is not
or repair is caused installed
by any in a domestic residence).
of the following:
6) Fire, water damage, theft, war, riot, hostility, acts of God such as hurricanes, floods etc.
1) Power failure.
7) Service
2) Damagecallsinresulting
transit or whenin moving
customer education.
the appliance.
8) Improper
3) Improper Installation
power supply(ie. suchBuilding-in
as low voltage, of a free
defective housestanding appliance
wiring or inadequate fuses.or using an appliance outdoors that is not
approved for outdoor
4) Accident, alteration,application).
abuse or misuse of the appliance such as inadequate air circulation in the room or abnormal operating con ditions
(extremely high or low room temperature).
Proof 5)of purchase
Use for commercialdateorwill be required
industrial purposes (ie. for
If thewarranty
appliance is notclaims;
installedplease
in a domesticretain bills of sale.
residence).
6) Fire, water damage, theft, war, riot, hostility, acts of God such as hurricanes, floods etc.
7) Service calls resulting in customer education.
8) Improper Installation (ie. Building-in of a free standing appliance or using an appliance outdoors that is not approved for out door application).
Proof of purchase date will be required for warranty claims; so, please retain bills of sale. In the event warranty service is required, present this document to our
AUTHORIZED SERVICE DEPOT.
Warranty Service
In-home
Danby Products
Danby Products Limited
Limited Danby Products
Danby Products Inc. Inc.
POPOBox 1778,
Box 1778, Guelph,
Guelph, Ontario, Ontario,
Canada N1HCanada
6Z9 N1H 6Z9 1-800-263-2629
1-800-263-2629 PO BoxPO669, Findlay,
Box 669, Ohio,
Findlay, Ohio, U.S.A.
U.S.A. 45840 45840
Telephone: (519)
Telephone: (519) 837-0920
837-0920 FAX: (519) FAX:
837-0449(519) 837-0449 12/19 Telephone:Telephone:
(419) 425-8627
(419) 425-8627 FAX: (419)
FAX: (419) 425-8629
425-8629
04/09Consignes de sécurité importantes
LIRE ET SUIVRE TOUTES LES INSTRUCTIONS DE SÉCURITÉ
EXIGENCES DE SÉCURITÉ • N’insérez pas de doigts ou d’autres objets dans
l’entrée ou la sortie d’air car le ventilateur tourne
Pour éviter les difficultés d’installation ou d’utilisation, à très grande vitesse et peut causer des blessures
lisez ces instructions avant la première utilisation du graves ou des dommages.
produit.
• Ne laissez pas l’appareil fonctionner pendant de
• Utilisez cet appareil uniquement pour son usage longues périodes avec des portes ou des fenêtres
prévu, tel que décrit dans ce manuel. ouvertes ou si l’humidité est très élevée.
• Ne laissez jamais les enfants utiliser, jouer ou
ramper à l’intérieur de l’appareil. INSTRUCTIONS DE MISE À LA TERRE
• Ne jamais nettoyer les pièces de l ‘appareil avec Cet appareil doit être mis à la terre. En cas de
des fluides inflammables. Les fumées peuvent courtcircuit, la mise à la terre réduit les risques de
créer un risque d’incendie ou une explosion. décharge électrique en fournissant un échappatoire
au courant électrique. Le voltage et la fréquence
• Ne pas entreposer ou utiliser des vapeurs ou des requis pour cet appareil sont indiqués sur la plaque
liquides inflammables à proximité de cet appareil d’identification
ou de tout autre appareil. Les fumées peuvent
créer un risque d’incendie ou une explosion. AVERTISSEMENT - Une fiche de mise à la terre mal
branchée peut entraîner un risque d’incendie, de
• Ne pas utiliser ce produit près de l’eau, p. Dans choc électrique ou de blessures aux personnes qui
un sous-sol humide, buanderie ou près d’un évier. utilisent l’appareil. Si vous n’êtes pas certain que
l’appareil est correctement mis à la terre, consultez
• Ne pas couvrir ou bloquer les ouvertures de un préposé du service qualifié.
l’appareil.
• Cet appareil ne doit être entretenu que par un
technicien HVAC qualifié. Contacter le revendeur
à l’endroit où l’appareil a été acheté pour des
informations sur l’entretien de l’appareil.
• L’élimination de cet appareil doit être conforme
aux règlements fédéraux et locaux.
• Cet appareil n’est pas destiné à être utilisé par
des personnes (y compris des enfants) dont les
capacités physiques, sensorielles ou mentales
peuvent être différentes ou réduites, ou qui
manquent d’expérience ou de connaissances,
sauf si ces personnes reçoivent une supervision
ou une formation pour faire fonctionner l’appareil
par une personne responsable de leur sécurité.
• Ne pas monter ou placer des objets sur le dessus
de l’appareil extérieur.
• Ne faites pas fonctionner cet appareil avec des
mains mouillées car cela peut provoquer un choc
électrique.
GARDER CES INSTRUCTIONS!
13INSTRUCTIONS D’UTILISATION
CARACTÉRISTIQUES
Persienne
SIGNIFICATIONS DES CODES D’AFFICHAGE
affiche pendant 3 secondes lorsque:
• TIMER ON est réglé
• les fonctions SWING, TURBO ou SLEEP sont activées
affiche pendant 3 secondes lorsque:
• TIMER OFF est réglé
• les fonctions SWING, TURBO ou SLEEP sont désactivées
affiche lorsque du fonction anti-air froid est activee
affiche si l’appareil est dégivrage
• En mode ventilateur, l’appareil affiche la température ambiante
• Dans les autres modes, l’appareil affiche le réglage de la température
14INSTRUCTIONS D’UTILISATION
TEMPÉRATURE DE FONCTIONNEMENT Pour optimiser les performances de l’appareil:
Des performances optimales pour les modes COOL, • Gardez les portes et fenêtres fermées
HEAT et DRY peuvent être obtenues dans les plages • Ne pas obstruer les entrées ou les sorties d’air
de températures suivantes. Lorsque le climatiseur • Inspecter et nettoyer régulièrement tous les filtres
est utilisé hors de cet gamme de températures, à air
certaines caractéristiques de sécurité seront activés • Limiter l’utilisation d’énergie en utilisant la fonction
et causeront un fonctionnement moins efficace dans de minuterie
l’appareil.
Remarque: Lorsque la température extérieure est
inférieure à 0°C (32°F), maintenez l’appareil
branché à tout moment pour assurer un bon
fonctionnement continu.
Mode COOL Mode HEAT Mode DRY
17°C - 32°C 0°C - 30°C 10°C - 32°C
Température ambiante (63°F - 90°F) (32°F - 86°F) (50°F - 90°F)
0°C - 50°C -15°C - 30°C 0°C - 50°C
Température extérieure (32°F - 122°F) (5°F - 86°F) (32°F - 122°F)
FONCTIONNEMENT SANS TÉLÉCOMMANDE
Le fonctionnement peut être accessible via la
télécommande. Si la télécommande ne fonctionne
pas, l’appareil peut être actionné manuellement avec
le bouton de commande manuelle situé sur l’appareil
intérieur. Notez que le fonctionnement manuel
n’est pas une solution efficace à long terme et que
l’utilisation de l’appareil avec la télécommande est
recommandée.
L ‘appareil doit être éteint avant l’ utilisation
manuelle. Pour faire fonctionner l’appareil Bouton de commande manuelle
manuellement:
1. Ouvrez le panneau avant de l’appareil intérieur.
2. Le bouton de commande manuelle se trouve sur
le côté droit de l’appareil.
3. Appuyer une fois sur le bouton de commande Remarque: Le bouton manuel est destiné
manuelle pour activer le mode AUTO forcé. uniquement aux essais et aux opérations
d’urgence. N’utilisez pas cette fonction à
4. Appuyer une seconde fois sur le bouton de moins d’être absolument nécessaire. Pour
commande manuelle pour activer le mode rétablir un fonctionnement régulier, utilisez
COOL forcé. la télécommande pour activer l’appareil.
5. Appuyez une troisième fois sur le bouton de
commande manuelle pour éteindre l’appareil.
6. Assurez-vous que le panneau avant est fermé
lorsqu’il est terminé.
15INSTRUCTIONS D’UTILISATION
FONCTIONNEMENT AVEC LA TÉLÉCOMMANDE
• Le climatiseur ne fonctionnera pas si des rideaux, des portes ou d’autres matériaux bloquent le signal de
la télécommande vers l’appareil intérieur.
• N’exposez pas la télécommande à l’eau, à la lumière directe du soleil ou à une chaleur excessive.
• Ne laissez pas la lumière directe du soleil tomber sur le récepteur infrarouge de l’appareil intérieur car
cela peut entraver le signal de la télécommande.
• La réception du signal à distance est confirmée par un bip. BOUTONS HAUT ET BAS:
Permet d’augmenter ou de
diminuer le réglage de la
ON/OFF: Active ou désactive température par incréments de
l’appareil 1°. Appuyez et maintenez les
boutons haut et bas pendant
trois secondes pour changer
MODE: Sélectionne le mode l’échelle de température entre °
de fonctionnement dans C et ° F
l’ordre suivant:
AUTO --> COOL --> DRY --> SHORTCUT: Utilisé pour
HEAT --> FAN restaurer les paramètres
actuels ou reprendre les
paramètres précédents
FAN: Sélectionne la vitesse du TIMER ON: Permet de régler
ventilateur dans l’ordre suivant: la fonction de mise en
Auto --> Bas --> Moyen --> Haute marche automatique
SLEEP: Conserve l’énergie TIMER OFF: Permet de régler
pendant les heures de sommeil la fonction de désactivation
automatique
TURBO: Démarre et arrête la DIRECT: Utilisé pour changer
fonction turbo, qui exécutera le mouvement du déflecteur
l’appareil en continu pour LED: Active ou désactive et régler le sens d’écoulement
atteindre la température l’affichage LED d’air vers le haut ou vers le bas
préréglée dans le plus
court laps de temps; Après SWING: Utilisé pour démarrer
avoir fonctionné pendant ou arrêter la fonction
30 minutes, le mode turbo horizontale du déflecteur
s’arrêtera
Le symbole clignotera
pour indiquer que Caractéristiques de la télécommande
l’appareil a reçu
le signal de la Modèle RG57B/BGEU1
télécommande. Tension nominale 3.0V (piles sèches R03/LR03x2)
Plage de réception du signal 8m (26 pieds)
Environnement -5°C to 60°C (23°F to 140°F)
16INSTRUCTIONS D’UTILISATION
MODES DE FONCTIONNEMENT Fonction SLEEP (sommeil)
Mode AUTO (automatique) • La fonction SLEEP est utilisée pour réduire la
• Appuyez sur le bouton MODE pour sélectionner le consommation d’énergie pendant les heures
mode AUTO. de sommeil. Cette fonction ne peut être activée
• L’appareil sélectionnera automatiquement le qu’en appuyant sur le bouton SLEEP de la
refroidissement ou le fonctionnement du ventilateur télécommande.
uniquement en fonction de la température réglée et • En mode COOL, la température augmentera de
de la température ambiante. 1°C (2°F) dans la première heure et augmentera
1°C supplémentaire (2°F) dans la deuxième
Mode DRY (déshumidification) heure. L’appareil maintiendra cette nouvelle
• Appuyez sur le bouton MODE pour sélectionner le température pendant 5 heures. À la fin du cycle
mode DRY. SLEEP, l’appareil reprend son fonctionnement
• TLa vitesse ne peuvent pas être réglées dans ce normal.
mode. Le ventilateur fonctionne à basse vitesse. • En mode HEAT, la température diminue de 1°C
• Gardez les fenêtres et les portes fermées pour obtenir (2°F) dans la première heure et diminuera 1°C
le meilleur effet de déshumidification. supplémentaire (2°F) dans la deuxième heure.
• L’eau condensée s’écoule automatiquement à travers L’appareil maintiendra cette nouvelle température
le tuyau de vidange. pendant 5 heures. À la fin du cycle SLEEP,
l’appareil reprend son fonctionnement normal.
Remarque: La vitesse du ventilateur ne peut pas être
réglée en mode AUTO et DRY. Remarque: la fonction de sommeil n’est pas
disponible en mode FAN et DRY.
Mode COOL (refroidir) / Mode HEAT (chaleur) /
Fonction FAN (ventilateur)
• Appuyez sur le bouton MODE pour sélectionner le
mode désiré; COOL, HEAT ou FAN.
• Appuyez sur les boutons HAUT ou BAS pour
sélectionner la température ambiante désirée. La
température peut être réglée dans 17°C - 30°C
(62°F - 86°F).
• Appuyez sur le bouton FAN pour choisir la vitesse du
ventilateur: Auto, Low, Med ou High.
SHORTCUT fonction (uniquement disponible sur la
télécommande):
• Utilisé pour enregistrer un paramètre favori
• Réglez l’appareil sur la température et la vitesse du
ventilateur que vous souhaitez régler comme favori CARACTÉRISTIQUES AUTOMATIQUES
• Maintenez la touche SHORTCUT enfoncée pendant 2
secondes Redémarrage automatique
• Appuyez sur le bouton SHORTCUT à tout moment Si l’appareil perd le courant, il redémarre
pour revenir au réglage préféré automatiquement avec les réglages précédents une
• Si aucun favori n’est réglé, le fait d’appuyer sur la fois que l’alimentation est rétablie.
touche SHORTCUT fera fonctionner l’appareil en
mode AUTO à 26 °C (79 °F), avec la vitesse du Mémoire d’angle de déflecteur
ventilateur réglée sur AUTO Lorsque vous allumez l’appareil, le déflecteur reprend
automatiquement le réglage d’angle précédent.
Fonction anti-air froid
• La vitesse du ventilateur et l’angle du déflecteur Détection de fuites de réfrigérant
s’ajustent en fonction de la température ambiante. Le L’appareil intérieur affiche automatiquement “EC”
bouton de commande manuelle et la télécommande lorsqu’il détecte une fuite de réfrigérant et que
ne peuvent pas régler la vitesse du ventilateur ou l’appareil s’éteint.
l’angle du déflecteur dans ce réglage.
17INSTRUCTIONS D’UTILISATION
FONCTIONNEMENT DU MINUTEUR Utilisation simultanée des fonctions TIMER ON et
TIMER OFF
Pour régler la minuterie d’arrêt automatique:
L’appareil peut être réglé pour s’allumer et
• Assurez-vous que l’appareil est sous tension fonctionner pendant un certain temps, puis à
• Appuyez sur la touche TIMER OFF et l’indicateur nouveau désactivé en utilisant les fonctions Auto-on
Timer Off s’allume et Auto-off en même temps. Gardez à l’esprit que
• Appuyez sur la touche TIMER OFF pour les heures affichées sur l’appareil se rapportent au
sélectionner le nombre d’heures avant que nombre d’heures qui passent de l’heure actuelle
l’appareil ne s’éteigne avant que l’action soit prise.
Pour régler la minuterie de mise en marche Par exemple:
automatique: • Commencez par régler la minuterie d’arrêt
automatique
• Assurez-vous que l’appareil est sous tension • Assurez-vous que l’appareil est sous tension
• Appuyez sur la touche TIMER ON et l’indicateur • Appuyez sur la touche TIMER OFF et le voyant
Timer On s’allume Timer Off s’allume
• Appuyez sur la touche TIMER ON pour • Appuyez sur la touche TIMER OFF pour
sélectionner le nombre d’heures avant que sélectionner le nombre d’heures avant que
l’appareil ne s’allume l’appareil ne s’éteigne
• Appuyez sur la touche TIMER ON dans les 5
Remarques: secondes qui suivent et le voyant de la minuterie
s’allume
• Les boutons TIMER ON et TIMER OFF • Appuyez sur la touche TIMER ON pour
augmentent le temps par incréments de 0,5 sélectionner le nombre d’heures avant que
heure jusqu’à 10 heures, puis par incréments de l’appareil ne se rallume
1 heure jusqu’à 24 heures
• L’affichage revient à l’affichage de la température Remarque: Si la fonction TIMER OFF et la fonction
précédente si l’appareil ne reçoit pas de signal SLEEP sont utilisées en même temps, l’appareil ne
pendant une période de 5 secondes pendant la mettra en œuvre que le réglage dont la durée est
programmation plus courte.
• Active ou désactive l’appareil à tout moment ou
ajuster le réglage de la minuterie à 0,0 heures Si la fonction TIMER OFF est réglée pour moins de
annule les réglages de la TIMER sept heures, la TIMER OFF éteint l’appareil avant que
la fonction SLEEP puisse terminer son cycle.
Si la fonction TIMER OFF est réglée pour plus de sept
heures, la fonction SLEEP éteindra l’appareil avant
que le TIMER OFF ne puisse terminer son cycle.
18INSTRUCTIONS D’UTILISATION
RÉGLAGE DE L’ANGLE VERTICAL DU FLUX
D’AIR
Pendant que l’appareil est allumé, utilisez le bouton
SWING / DIRECT pour régler l’angle vertical du flux
d’air.
1. Appuyez une fois sur le bouton SWING /
DIRECT pour activer le déflecteur. Chaque fois
que vous appuyez sur la touche, le déflecteur est Gamme
réglée de 6°.
2. Pour faire pivoter le déflecteur vers le haut et vers
le bas continuellement, appuyez et maintenez Attention: Ne pas maintenir
enfoncé le bouton SWING / DIRECT pendant le déflecteur à un angle trop
vertical pendant de longues
3 secondes. Appuyez à nouveau pour arrêter périodes. Cela peut provoquer
l’oscillation continue. une condensation d'eau sur les
meubles
RÉGLAGE DE L’ANGLE HORIZONTAL DU
FLUX D’AIR
L’angle horizontal du flux d’air doit être réglé
manuellement. Saisir la tige du déflecteur et la régler
manuellement dans la direction préférée.
Barre pour
le déflecteur
NOTE SUR LES ANGLES DE LE DÉFLECTEUR
Lorsque vous utilisez le mode COOL ou DRY, ne
mettez pas le volet à un angle vertical extrême
pendant une longue période. L’eau peut se
condenser sur la lame de le déflecteur qui peut
ensuite couler sur le sol ou les meubles.
Lorsque vous utilisez le mode COOL ou HEAT, ne
mettez pas le déflecteur à un angle vertical extrême PRECAUTION
pendant une longue période. Cela peut entraîner Ne mettez pas les doigts dans ou à
des performances réduites en raison du débit d’air proximité du ventilateur et de la face
restreint. d’aspiration de l’appareil. Le ventilateur à
grande vitesse à l’intérieur de l’appareil
Ne forcez pas le déflecteur à déplacer ou ajustez peut causer des blessures graves.
le déflecteur à la main. Cela provoquera le
déflecteur être hors de la synchronisation et il ne
fonctionnera pas correctement. Si cela se produit,
éteignez l’appareil et débranchez-le pendant
quelques secondes, puis redémarrez l’appareil. Ceci
réinitialisera la position du le déflecteur.
19INSTRUCTIONS D’UTILISATION
REMPLACER LES PILES DE LA TÉLÉCOMMANDE
L’appraeil est livré avec deux piles AAA. Placez les piles dans la
télécommande avant utilisation.
1. Faites glisser le couvercle arrière de la télécommande vers le bas pour
exposer le compartiment des piles.
2. Insérez les piles, assurez-vous qu’elles correspondent aux symboles (+) et
(-) aux extrémités des piles avec les symboles à l’intérieur du compartiment
des piles.
3. Remettez le couvercle en place.
• Ne mélangez pas des piles neuves et des piles usées, ou de piles de
types différents.
• Ne laissez pas les piles dans la télécommande si celle-ci ne servira pas
plus de 2 mois.
• Ne jetez pas les piles comme déchets municipaux non triés. Se référer
aux lois locales pour l’élimination correcte des piles.
Remarque: Enlever les piles de la télécommande efface toute la
programmation précédente. Après avoir inséré de nouvelles piles, les
réglages de l’appareil doivent être reprogrammés.
Cet appareil a été testé et déclaré conforme aux limites imposées aux appareils numériques de classe
B, en vertu de l’alinéa 15 du règlement de la FCC. Ces limites sont destinées à assurer une protection
raisonnable contre les interférences nuisibles dans un environnement résidentiel. Cet appareil génère, utilise
et peut émettre de l’énergie radiofréquence et, s’il n’est pas installé et utilisé conformément aux instructions,
risque de provoquer des interférences nuidibles lors de la réception d’émissions de radio ou de télévision (il
suffit, pour le vérifier, d’allumer et d’éteindre successivement l’appareil); s’il constate de telles interférences,
l’utilisateur devra prendre les mesures nécessaires pour les éliminer. À cette fin, il devra:
1. Réorienter ou déplacer l’antenne réceptrice.
2. Accroître la distance entre l’appareil et le récepteur.
3. Brancher l’appareil sur une prise de courant appartenant à un autre circuit que celui du récepteur.
4. Chercher de l’aide auprès du détaillant ou d’un technicien en radio ou en télévision expérimenté.
Des changements ou modifications non approuvés par l’autorité ayant confimé la conformité de l’appareil
aux règlements de la FCC pourraient faire retirer l’autorisation d’utilisation de l’appareil.
Cet appareil est conforme à la partie 15 des Règles de la FCC et au RSS exclus de licence d’Industrie
Canada.
Son utilisation est soumise aux deux conditions suivantes:
1. Cet appareil ne doit pas causer d’interférences nuisibles, et
2. Cet appareil doit accepter toute interférence reçue, y compris les interférences qui pourraient causer un
fonctionnement non souhaité.
Cet appareil est conform à la norm CAN ICES-3 (B) / NMB-3 (B) du Canada.
20SOINS ET ENTRETIEN
NETTOYER L’APPAREIL INTÉRIEUR
Remarque: Éteignez toujours le climatiseur et
débranchez la source d’alimentation avant de
nettoyer l’appareil ou de retirer le filtre.
• Utilisez un chiffon doux et sec pour nettoyer
l’extérieur de l’appareil. Si l’appareil est
particulièrement sale, utilisez un chiffon imbibé
d’eau chaude pour nettoyer l’extérieur de
l’appareil.
• N’utilisez pas d’eau pour nettoyer l’intérieur de
l’appareil car cela peut détruire l’isolant et causer
un choc électrique.
• N’utilisez pas de produits chimiques ou de
chiffons traités chimiquement pour nettoyer
l’appareil.
• N’utilisez pas de benzène, de diluant à peinture
ou d’autres solvants pour nettoyer l’appareil.
Ils peuvent provoquer la fissuration ou la
déformation de la surface en plastique.
• N’utilisez pas d’eau plus chaude que 40°C
(104°F) pour nettoyer le panneau avant.
Cela peut entraîner une déformation ou une
décoloration du panneau.
NETTOYER LE FILTRE À AIR
Un filtre à air bouché peut réduire l’efficacité du
climatiseur. Il est conseillé de nettoyer le filtre à
air toutes les deux semaines ou après 240 heures
de fonctionnement, selon la première éventualité.
Lorsque vous retirez le filtre, ne touchez aucune pièce
métallique à l’intérieur de l’appareil car les bords
métalliques tranchants peuvent causer des blessures.
1. Soulever le panneau avant de l’appareil intérieur.
2. Saisissez la languette à l’extrémité du filtre,
soulevez-la et tirez-la vers l’extérieur pour la retirer
de l’appareil.
3. Si le filtre a un petit filtre rafraîchissant l’air,
décollez si du filtre plus grand. Nettoyez le filtre
de rafraîchissement d’air avec une brosse douce
ou un aspirateur portatif.
4. Nettoyez le grand filtre avec de l’eau chaude
savonneuse. Utiliser un détergent doux.
5. Rincez le filtre avec de l’eau propre. S’assurer
que tout le savon est retiré du filtre et secouer
l’excès d’eau.
6. Sécher le filtre dans un endroit frais et sec.
N’exposez pas le filtre à la lumière directe du
soleil, car cela peut déformer ou rétrécir le filtre.
7. Lorsque le filtre est sec, remplacez le filtre de Remarque: Ne pas toucher le filtre de
rafraîchissement de l’air, puis faites glisser le filtre rafraîchissement d’air (plasma) pendant au moins 10
plus grand dans l’appareil. minutes après avoir éteint l’appareil pour le laisser
8. Fermez le panneau avant de l’appareil intérieur. refroidir.
21You can also read