INSTALLATION INSTRUCTIONS FOR CQUESTGB, GLASBAC, GLASBACRE, GRAPHLAR & GRAPHLEX TILES - CONTENTS
←
→
Page content transcription
If your browser does not render page correctly, please read the page content below
Installation Instructions for
CQuest™GB, GlasBac,™ GlasBacRE,
Graphlar®& Graphlex® Tiles

Contents

    English                Français   Español   Português

www.interface.com

InterfaceFLOR, LLC
1503 Orchard Hill Road
LaGrange, GA 30240
1.800.336.0225 ext.56511
Installation Instructions for CQuest™GB, GlasBac,™
                                                                                                                                                     Rev. 04/12/21
GlasBacRE, Graphlar®& Graphlex® Tiles

Important Notices

These Installation Instructions cover most installation procedures. If you run across a situation that isn’t addressed in this document or requires
more detailed assistance please contact the Interface Help Desk. U.S. (877) 733-7403 / Canada (888) 224-2972.
All carpet tiles should be carefully inspected for damage or defects prior to installation. Interface will not be responsible for any cost associated
with replacement or repair as a result of damaged or defective tiles being installed when said damage or defects were identifiable prior to installation.
If you encounter any conditions or defects during installation that could jeopardize the installation or affect the installation procedure, you should
STOP the installation immediately and call the Interface Help Desk. U.S. (877) 733-7403 / Canada (888) 224-2972.
The carpet tiles are warranted in accordance with Interface’s Standard Product Warranty. If you do not have a copy of Interface’s Standard
Product Warranty and wish to obtain one, call the Interface Help Desk. U.S. (877) 733-7403 / Canada (888) 224-2972 or visit our website at
www.interface.com/warranty.
EXCEPT AS EXPRESSLY PROVIDED IN THE STANDARD PRODUCT WARRANTY, INTERFACE MAKES NO REPRESENTATION OR WARRANTIES,
EXPRESS OR IMPLIED, INCLUDING, WITHOUT LIMITATION, ANY WARRANTY OF MERCHANTABILITY OR FITNESS OF ITS PRODUCTS FOR ANY
PARTICULAR PURPOSES, AND HEREBY DISCLAIMS THE SAME.
Without limiting the foregoing, Interface will not be responsible for tears, burns, cuts, pulls or other damage, deterioration, problems or loss caused by abuse,
neglect, misuse, improper installation, improper maintenance, flood, use on stairs, or use with athletic equipment, or installations over substrates where
hydrostatic pressure and/or groundwater intrusion exists. Moisture and pH testing at the installation site are not the responsibility of Interface, and issues
related to or arising from excessive moisture and/or pH are specifically excluded from the Interface warranty except as expressly set forth herein and in
Interface’s product warranty. The Interface warranty also does not cover any problems or damages arising from or related to the use of adhesives or non-
recommended installation techniques or conditions.
WARNING: IN THE EVENT THAT ANY ASBESTOS-CONTAINING MATERIALS OR OTHER HAZARDOUS MATERIALS ARE ENCOUNTERED
DURING INSTALLATION, YOU SHOULD STOP THE INSTALLATION IMMEDIATELY AND OBTAIN ASSISTANCE FROM A QUALIFIED REMEDIATION
CONSULTANT OR CONTRACTOR PRIOR TO PROCEEDING.
Area Rug Installation Instructions are available at interface.com/install.
Installation Instructions for any product are subject to change. Please check for updates on our website interface.com/install immediately
prior to installation.

Pre-Installation Visit

                            90 Days
                                                                   Conditioning prior to installation is important for all products. For this reason, the jobsite must
                                                                   be completely sealed (all exterior windows and doors properly installed) before beginning the
                                                                   installation process or before any floor preparations are performed. The jobsite, along with the
                                                                   floor covering materials and adhesive, must be acclimated to a temperature between 65°F
                                                                   (18.3°C) and 85°F (29.4°C) and air humidity from 45% to 65% for at least 48 hours before,
                                                                   during, and continuously after the final installation. The substrate temperature should be at least
                                                                   5° F (-15°C) higher than the dew point. These conditions are best achieved with a functioning
                                                                   HVAC system.
   65°F (18.3°C) -
   85°F (29.4°C)                                                   All carpet tiles must be removed from the cartons and allowed to adjust to the job site
                                                                   temperature for 48 hours prior to installation.

                                                                                1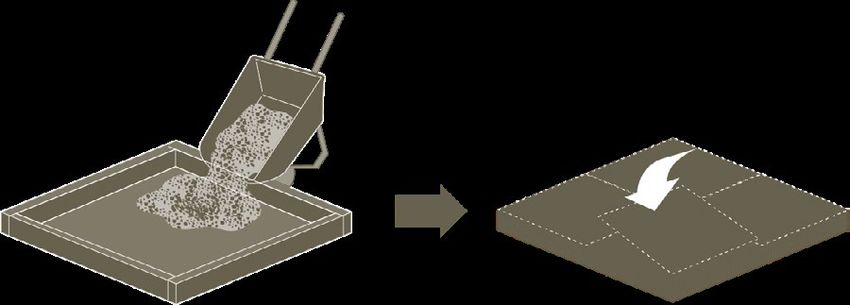
Concrete Moisture and Alkalinity Testing

                                                                                  Before installing, all concrete floors, regardless of age, must comply with the moisture and
                                                                                  pH requirements stated below, and must otherwise be suitable for carpet tile installation as
                                                                                  set forth herein. The moisture conditions of the concrete should be determined by use of the
                                                                                  In Situ probe relative humidity (RH) test method (ASTM F 2170). The testing device must be
                                                                                  properly maintained and calibrated in accordance with the manufacturer's specifications and
                                                                                  frequency recommendations. Certificates of calibration should be maintained for test validation.
                                                                                  Interface allows for carpet tile installation under a variety of conditions depending on the
                                                                                  type of slab and the moisture and pH test results at time of installation. For best results
                                                                                  we require the pH test developed by Interface. Please see Standard Practice for
                                                                                  pH Testing Concrete Floors p. 11.

Concrete substrate should have a working vapor barrier. Concrete compromised by ground water intrusion and/or Hydrostatic Pressure are not acceptable
substrates for this option and are expressly excluded. The following are the approved adhesives and other limitations for use with the carpet product backing
systems listed below. Any installations that are not strictly in accordance with chart below will void the warranty provided.

Carpet Product                         Installation System/                      Required Primer                         Moisture Limit                         Surface pH Limit
Backing System                         Adhesive
                                                                                                                                                                Must use Interface pH
                                                                                                                                                                Testing Protocol)

CQuest™GB                              TacTiles™*                                None                                    Unlimited RH                           Between 7.0 and 9.0
                                                                                 XL Brands 9511                          Up to 97% RH                           Between 7.0 and 11.0
                                       XL Brands Adhesive 2000                   XL Brands RH95                          Up to 95% RH                           Between 7.0 and 11.0
                                       Plus (U.S.) or
                                       Adhesive 2500 Plus (Canada)               None                                    Up to 90% RH                           Between 7.0 and 10.0

GlasBac™/GlasBacRE                     TacTiles*                                 None                                    Unlimited RH                           Between 7.0 and 9.0
                                                                                 XL Brands 9511                          Up to 97% RH                           Between 7.0 and 11.0
                                       XL Brands Adhesive 2000                   XL Brands RH95                          Up to 95% RH                           Between 7.0 and 11.0
                                       Plus (U.S.) or
                                       Adhesive 2500 Plus (Canada)               None                                    Up to 80% RH                           Between 7.0 and 9.0

Graphlar®/Graphlex®                    TacTiles*                                 None                                    Up to 85% RH                           Between 7.0 and 9.0
                                                                                 XL Brands 9511                          Up to 97% RH                           Between 7.0 and 11.0
                                       XL Brands Adhesive 2000                   XL Brands RH95                          Up to 95% RH                           Between 7.0 and 11.0
                                       Plus (U.S.) or
                                       Adhesive 2500 Plus (Canada)               None                                    Up to 80% RH                           Between 7.0 and 9.0

*Be sure to use the correct TacTiles connector for the tile backing – CQuestGB/ GlasBac/GlasBacRE or Graphlar/Graphlex.

All XL Brands written requirements for product application, including but not limited to moisture and pH testing protocols, must be met for Interface warranty eligibility. More information concerning
the proper use of XL Brands can be obtained through your local Interface representative or by visiting www.xlbrands.com.

NOTE: Moisture and pH test reflect only the conditions of the concrete at the time of testing. Stated moisture and pH limitations must be maintained before,
during and at all times following installation to avoid installation and product failures and to preserve warranty coverage. If the moisture and/or pH test results
are outside of the stated allowable limits, STOP and DO NOT PROCEED with the installation. Seek further advice from Interface before proceeding. Refer to
Preparing the Subfloor for additional information concerning issues relating to surface conditions of the concrete slab prior to installation.
NOTE: The required pre-installation moisture and alkalinity tests should be performed to ASTM standards. Per CRI guidelines it is recommended that
these tests be performed by a qualified independent testing consultant. Interface will not be responsible for failures, problems, or damage arising from high
moisture, high alkalinity, or other subfloor conditions.
NOTE: New or bare concrete is defined as concrete free of adhesive residue, paint, sealers, primers and other applied materials.

                                                                                                  2
Product Inspection

                                                       INSPECT INTERFACE CARPET TILES TO BE SURE THEY MEET THE ORDER
                                                       SPECIFICATIONS. IF THE WRONG PRODUCT OR COLOR IS INSTALLED, INTERFACE
                                                       WILL NOT BE RESPONSIBLE FOR CORRECTING THE PROBLEM.
                                                       The labels on each carton indicate product style, pattern, color, run number and dye lot. Be
                                                       sure the style, pattern and color match the specifications for each area of your installation.
                                                       Check to confirm that you have the right quantity and correct installation method. Be sure
                                                       you also have enough tiles to establish an “attic stock” for future replacements.
                                                       Open all cartons to inspect for damaged or defective tiles. If you find any, call the Interface
                                                       Help Desk. U.S. (877) 733-7403 / Canada (888) 224-2972.

                                                       LIGHTING
                                                       Ensure adequate overhead lighting is provided. Ideally, lighting should mimic or consist of
   No                                          Yes     the same conditions expected at time of occupancy.
                                                       INSTALLATION OF CARPET TILES SHOULD BE THE LAST ITEM ON THE
                                                       CONSTRUCTION SCHEDULE. CAREFULLY CONSIDER THE RISKS IF YOU ARE
                                                       ASKED TO INSTALL CARPET TILES TOO EARLY. IF CARPET TILES ARE INSTALLED
                                                       BEFORE CONSTRUCTION IS COMPLETE, ANY STAINING, SOILING OR DAMAGE
                                                       CAUSED BY OTHER TRADES MAY VOID THE PRODUCT WARRANTY.

Preparing the Subfloor (Concrete)

                Level    Reference 10' straight edge   INSTALLING OVER CONCRETE
                         method. Level is defined as
                         having up to 1/4" maximum     All concrete floors must comply with moisture and alkalinity requirements prior to proceeding
                         gap within 90% of samples     with installation. (Concrete Moisture and Alkalinity Testing p. 2)
                         taken. No sample should
                         exceed a maximum gap          Level the floor to the standards outlined in the American Concrete Institute specifications
                         of 3/8".                      for Concrete Buildings in regard to troweled finish and finishing tolerances. Leveling
                                                       compounds must be cementitious based.

                                                       EXISTING CONCRETE
                                                       Patch cracks and holes with one of the following approved patching compounds: Ardex
Patch                   Sand                           Feather Finish, Ardex K-15, Henry’s 547, Armstrong S-184 or similar cement based
Compound
                                                       compound. NOTE: Some patching compounds can be mixed with water while some must be
                                                       mixed with latex. Follow the manufacturer’s specifications and instructions for use.
                                                       NOTE: All adhesives, solvent based materials and other contaminants should be removed
                                                       and encapsulated prior to application of adhesive and installation of carpet. Contact the
                                                       Interface Help Desk. U.S. (877) 733-7403 / Canada (888) 224-2972.

                                                       NEW CONCRETE
                                                       New or bare concrete is defined as concrete free of adhesive residue, paint, sealers, primers
                                                       and other applied materials. Interface recommends that dusty and / or porous conditions be
                                                       primed using XL Brands Prelude or a similar product.

                                                                    3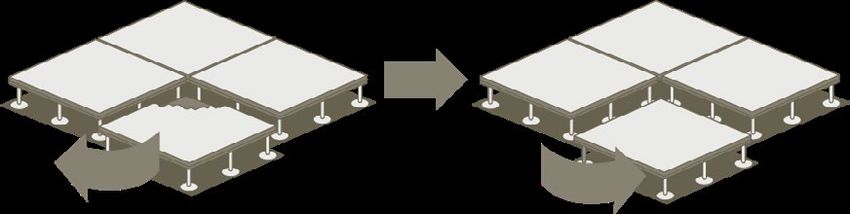
Preparing the Subfloor (Gypsum-Based Underlayment)

INSTALLING OVER GYPSUM-BASED UNDERLAYMENT
Interface recommends that the gypsum-based product be installed at a commercial strength of 3500 psi or higher to help prevent cracking.
Interface recommends properly sealing gypsum-based underlayment before installing Interface carpet tiles. Sealing the surface of the gypcrete allows the
carpet to properly release from the adhesive and it reduces the natural dusting of gypsum-based materials.
Installing over properly applied gypsum-based underlayment will not void the Interface standard product warranty, but Interface assumes no liability for issues
relating to or resulting from the use of gypsum or any other underlayment. For this reason, claims associated with the use/failure of an underlayment product
should be directed to the underlayment manufacturer or the individual(s) responsible for its application.

Preparing the Subfloor (Wood, Plywood or Particle Board)

             Repair

                                                                  INSTALLING OVER WOOD, PLYWOOD OR PARTICLE BOARD
                                                                  Repair loose or broken boards. Secure with 8-D cement-coated screw nails.

                      Plywood                     Nail 6” Apart

                                                                  If the majority of the boards are worn or badly cupped, cover with 5/8 inch (1.6 cm) exterior
                                                                  grade AD plywood secured with 8-D cement-coated screw nails spaced 6 inches (15.2 cm)
                                                                  apart. Sand seams smooth.

                                                                  Sand the finish down to bare wood. Remove dust by sweeping, then wiping with a tack
                                                                  cloth. All wood surfaces should be primed prior to application of an adhesive. Interface
                                                                  recommends XL Brands TriSeal or similar product.
                                                                  NOTE: All adhesives, solvent based materials and other contaminants should be removed
                                                                  and encapsulated prior to application of adhesive and installation of carpet. Contact the
  Sand                          Barrier Coat                      Interface Help Desk. U.S. (877) 733-7403 / Canada (888) 224-2972.

Preparing the Subfloor (Vinyl)

                Sand                                              INSTALLING OVER VINYL TILE
                                                                  WARNING: EXISTING FLOOR COVERING MAY CONTAIN ASBESTOS OR OTHER
                                                                  HAZARDOUS MATERIALS. IN THE EVENT ASBESTOS-CONTAINING MATERIALS
                                                                  OR OTHER HAZARDOUS MATERIALS ARE ENCOUNTERED, YOU SHOULD STOP
                                                                  THE INSTALLATION IMMEDIATELY AND OBTAIN ASSISTANCE FROM A QUALIFIED
                                                                  REMEDIATION CONSULTANT OR CONTRACTOR PRIOR TO PROCEEDING.
                                                                  Use an appropriate non solvent stripper or a sander to remove the wax top coat.
                                                                  Remove any damaged or loose vinyl tiles and replace with comparable thickness tile or
                Remove                  Replace                   patching compound.

                                                                               4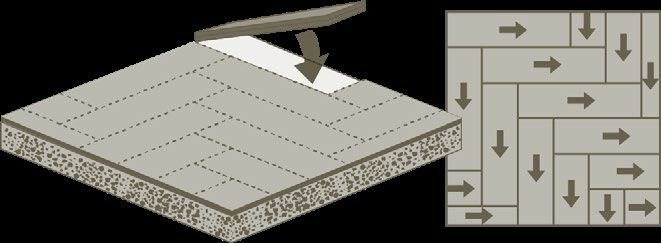
Preparing the Subfloor (Vinyl) Continued

                                                  INSTALLING OVER SHEET VINYL

             Remove                               Do not install Interface carpet tile with adhesive over sheet vinyl. The sheet vinyl must be
                                                  removed with a scraper. Any existing adhesive remaining on subfloor should be removed by
                                                  grinding/scraping and residue encapsulated. Once removed, follow instructions for subfloor
                                                  found under the sheet vinyl.
                                                  If installing Interface carpet tiles with our TacTiles connectors, you may install over sheet vinyl.
                                                  The sheet vinyl must be secure to the subfloor, and you must use an appropriate non solvent
                                                  stripper or a sander to remove the wax top coat.

Preparing the Subfloor (Natural Materials)

                                                  INSTALLING OVER NATURAL MATERIALS
                                                  For natural materials such as granolithic, terrazzo, marble, ceramic tile, etc., either breakout
               Remove                   Replace
                                                  and remove all material or replace damaged areas with substitute material of the same
                                                  thickness to create a flat, level floor.

                        Fill                      Patch and fill cracks and irregularities, including grout lines, with one of the following
                                                  approved patching compounds: Ardex Feather Finish, Ardex K-15, Henry’s 547 or similar
                                                  cement based compound.
                                                  NOTE: Some patching compounds can be mixed with water while some must be mixed
                                                  with latex. Follow the manufacturer’s specification and instructions for use.
                                                  Sand top surface to remove glaze. Remove dust by sweeping, then wiping with a tack cloth.
                                                  All porous surfaces should be primed prior to application of an adhesive. Interface
               Sand            Barrier Coat
                                                  recommends XL Brands TriSeal or similar product.

Preparing the Subfloor (Raised Access Floors)

                                                  INSTALLING OVER RAISED ACCESS FLOORS
                                                  Patch or replace any damaged floor panel inserts.
                                                  Panels should be free of any dirt, grease, oil, paint, sealer, adhesive or other materials from floor.
                                                  NOTE: All adhesives, solvent based materials and other contaminants should be removed
    Remove                       Replace
                                                  and encapsulated prior to application of adhesive and installation of carpet. Contact the
                                                  Interface Help Desk. U.S. (877) 733-7403 / Canada (888) 224-2972.

                                                                5
Establishing the Starting Point

                                          Snap a Line

                                                                     1. Measure to determine the center point and mark. Snap a chalk line.

                                          Measure

                                                                     2. Measure 8 feet (243.8 cm) out from your center point along the chalk line.
                                                                        Make a mark.

                                          Measure

                                                                     3. Measure 6 feet (182.9 cm) from your center point at a right angle to your
                                                                        chalk line and make a mark.

                                                                     4. Measure the distance between your marks. It should be exactly 10 feet (304.8
                                          Measure
                                                                        cm). If it is, your quadrants will be square. Snap a chalk line here

                                                                     NOTE: If the room is too small for the above measurements, reduce them by half.
                                                                     Measure 4 feet (121.9 cm) vertically and 3 feet (91.4 cm) horizontally. In this case,
                                                                     the measurement between your two marks should be exactly 5 feet (152.4 cm).

DETERMINE IF CENTER LINES NEED TO BE OFFSET
The need to offset either or both center lines will depend upon the installation method and tile format (squares or planks).
Dry fit (without adhesive) a row of tiles along the entire length of your vertical and horizontal center lines. Go all the way to the walls.
If necessary, offset either or both center lines to ensure perimeter tiles will be cut no less than half size, or 9.84 inches (25 cm).

                                                                                   6
Installation Methods

Approved installation methods vary by product and are printed on box labels. An arrow is printed on the back of each tile to indicate direction.

SQUARE TILES                                                                                25CM X 1M SKINNY PLANK TILES
Monolithic Installation                                                                     Ashlar Installation

                                                                                                                                     Offset the front and back tile
                                                  Point all arrows in the same                                                       joints. We recommend a vari-
                                                  direction.                                                                         able drop ashlar for our Skinny
                                                                                                                                     Planks, as shown here, but our
                                                                                                                                     products can also be installed
                                                                                                                                     with a half drop ashlar.

Quarter-Turn Installation
                                                                                            Herringbone Installation

                                                                                                                                     Lay tiles in an L pattern.
                                                  During installation, rotate tiles
                                                  so that arrows are turned 90
                                                  degrees every other tile.

Ashlar Installation

                                                  Offset front and back tile joints         50CM X 1M PLANK TILES
                                                  with arrows facing in the same
                                                  direction.                                Ashlar Installation

                                                                                                                                     Offset front and back tile joints.

Non Directional Installation

                                                  Lay tiles in any direction without
                                                  regard for the arrows.

                                                                                            Herringbone Installation
                                                                                                                                     Lay tiles in an L pattern.

Brick Installation

                                                  Offset the side joints of the tiles
                                                  with arrows facing in the same
                                                  direction.

NOTE: INTERFACE ASSUMES NO LIABILITY FOR ISSUES RELATED TO OR RESULTING FROM INSTALLING OUT OF SPECIFICATION,
INCLUDING, BUT NOT LIMITED TO, RECOMMENDED INSTALLATION METHOD.

                                                                                        7
TacTiles Installation System

APPLYING TACTILES CONNECTORS
Be sure to use the appropriate TacTiles connector for the product backing.
NOTE: The average number of TacTiles connectors needed depends on the size of the tiles and the installation method used.

50cm x 50cm Square Tiles                                                 50cm x 1m Plank Averages:
• Monolithic, Quarter-Turn, Non Directional – 4/sq. yd.                  • Ashlar – 4/sq. yd.
• Ashlar, Brick – 6/sq. yd.                                              • Herringbone – 5/sq. yd.
25cm x 1m Skinny Plank Averages:
• Ashlar Random or Variable – 7/sq. yd.
• Herringbone – 8/sq. yd.

TACTILES CONNECTOR PLACEMENT
Install carpet using a step method (shown on p. 9), placing a TacTiles connector at every corner. Lay anchor rows, placing a TacTiles connector at every joint.
Interface recommends securing plank anchor rows with adhesive or two-sided tape. Insert tiles based on approved installation method. TacTiles connectors
should be applied based on the following diagrams.

50cm x 50cm Square Tiles                                                                 50cm x 1m Planks

Quarter-Turn / Monolithic / Non           Brick / Ashlar Installations                   Ashlar Installation               Herringbone Installation
Directional Installations / Area Rugs

25cm x 1m Skinny Planks

Ashlar Installation                       Herringbone Installation

NOTE: WHEN INSTALLING USING INTERFACE TACTILES CONNECTORS, PERIMETER TILES SHOULD BE CUT NET TO THE WALL. IN THE
EVENT A WALL OR OTHER TERMINATION POINT DOES NOT EXTEND TO THE SUBFLOOR, THE PERIMETER TILES SHOULD BE INSTALLED
USING AN APPROVED INTERFACE ADHESIVE.

                                                                                     8
Adhesive Installation
APPLYING ADHESIVE
If you choose spread adhesive, use only XL Brands Adhesive 2000 Plus (U.S.) or Adhesive 2500
Plus (Canada).
Full Spread Adhesive Application
Apply adhesive with a 3/8” nap paint roller. Expect a spread rate of 39-44 square yards per gallon
Spread Rate: Raised Floor Systems using a 3/8” nap paint roller.
39 - 44 Sq. Yds./Gallon
Adhesive in Special Situations
Flatwire - never apply adhesive directly over flatwire. The flatwire may be damaged if the tiles need
to be removed.
Uneven areas - any surface that cannot be leveled may require adhesive or double-sided tape to
NO hold a tile in place.
Tile Installation (Laying Tiles)
LAYING TILES
550cm or 216 17/32”
Lay an initial tile at the established starting point. Following the center lines closely, lay an anchor
row of 10 additional tiles aligned with the center line. In smaller rooms, your anchor rows may
consist of fewer than 11 tiles.
Measure your anchor rows. For an installation of square tiles, each should equal 550 cm (11 tiles x
50 cm each, or 216 17/32”) with no more than a 3mm (1/8”) gain. If the gain is more than 3 mm,
the tiles aren’t tight enough and should be laid again. After relaying, measure again. If tiles are less
than 550 cm they are too tight and should be laid again.
3mm or 1/8” Gain
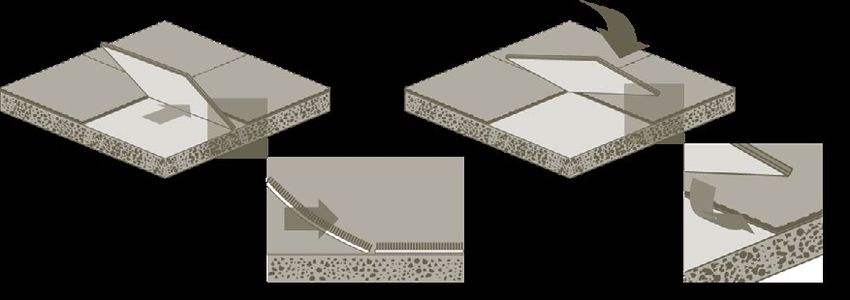
Tip Into Place
Don’t position tiles by sliding them across the adhesive. This will cause the corner to bend under.
Instead, brush the pile back with one hand, then tip a corner of the tile into place. Position the rest
DON’T Slide Tip In of the tile once the corner is properly aligned. Do not catch the pile in the joints.
Lay Tiles in Step or Pyramid Pattern
1. Lay two tiles vertically, and check that they are square to
the anchor rows.
2. Lay two tiles horizontally, and check that they are square to
the anchor rows.
3. Lay one tile to complete the step.
4. Follow the ABCD pattern laid out here until you reach the
end of your anchor rows. Repeat laying anchor rows and
Check Square Check Square Check Square ABCD patterns in all quadrants until complete.
9Tile Installation (Laying Tiles Continued)
Floor Outlets
Floor outlets are usually wired after carpet tiles have been installed. Consequently, you should install tiles directly over
floor outlets and mark the location with tape. This way, it will be easy to see which tiles need to be lifted for cutouts later.
Tape
Flatwire
Tile layout should allow flatwire to be centered under a row of tile.
Straddle Flatwire
Trench Headers
Tile layout should allow trench headers to be centered under a row of tile. Secure the tiles on either side of trench
headers with adhesive. This will prevent the installation from shifting while servicing trench headers.
Straddle Trench
Raised Access Floors
Raised access floor panels are susceptible to subtle flexing. To ensure uniform appearance, avoid matching raised
access floor seams with tile joints.
Straddle Seams
Tile Installation (Cutting Tiles)
Tiles adjacent to fixtures, architectural elements and walls need to be cut.
Follow these guidelines:
• If practical, remove the base molding before installing perimeter tiles. Replace molding
when finished.
Measure Cut
• Replace blades often. Sharp blades make cutting quicker, easier and more precise.
• Never use other tiles as a cutting surface. Place tiles on layers of cardboard before cutting.
Tip In
• Always secure cut tiles with adhesive.
Preparing for Occupation
Final Inspection and Vacuum
Inspect the entire installation, paying close attention to joints and any tiles that have been cut.
Cuts
Vacuum the floor with a pile lifter. If you don’t have a pile lifter, use an upright vacuum cleaner.
Seams
Vacuum
Follow CRI Installation Standards
In addition to the specific floor preparation and installation instructions detailed here, the Carpet and Rug Institute’s Carpet Installation Standard must be
followed. Please note that many of the Interface installation requirements may exceed or differ from those in the CRI Standard. In the event of conflict between
the Interface Installation Instructions and the CRI Standard, you should follow the Interface Installation Instructions.
10Standard Practice for pH Testing Concrete Floors
Prior To Installation
All concrete floors, old and new, should be tested for alkalinity using an approved pH test kit. The approved pH test kit should include pH test strips capable
of measuring a range of 0 -14 along with deionized or distilled water. The area to be tested must be weather-tight and conditioned, via the building’s HVAC
system, to a temperature range of 65o - 85o Fahrenheit (18.3° - 29.4° Celsius) and a relative humidity range of 45% - 65%. These temperature and humidity
ranges must be maintained for at least 48 hours prior to commencing the test and at all times during the test. The concrete surface temperature should not
be less than 65° Farenheit (18.3° Celsius).
All adhesives, coatings, finishes, dirt, curing compounds, sealants and other substances should be removed from the area to be tested. Non-chemical
methods, such as sanding, grinding, or bead blasting should be used to remove these substances to achieve an appropriate state for testing. Any cleaning
should take place a minimum of 48 hours before testing.
Once the above conditions have been met:
1. Abrade the surface using 100 grit sandpaper to a minimum depth of 1/32” but no more than 1/8”.
2. Apply a small amount (approximately 1” in diameter) of de-ionized or distilled water.
3. Allow the de-ionized/distilled water to stand for 60 seconds.
4. Dip the 0-14 pH test strip into the puddle and remove.
5. Allow the test strip to stand for 15 seconds.
6. Compare to the pH chart in the test kit to determine pH level.
7. At least three pH tests must be performed for the first 1,000 square feet of space. One additional test should be performed for each additional 1,000
square feet thereafter.
The concrete slab should have an alkalinity level within the range as set forth on p. 2 to be suitable for carpet installation without a primer. Refer to the chart
on p. 2. If pH levels fall outside of acceptable ranges STOP, and DO NOT proceed with installation. Call the Interface Americas Help Desk. U.S. (877) 733-
7403 / Canada (888) 244-2972.
NOTE: Results obtained by this method reflect only the conditions of the concrete at the time of testing. Stated pH limitation must be maintained for the life
of the installation to avoid installation and product failures and to preserve warranty coverage.
11Directives d’installation des carreaux à endos
Révision : 12 avril 2021
CQuestMCGB, GlasBacMC, GlasBacRE, Graphlar®
et Graphlex®
Remarques importantes
Ces directives présentent la plupart des procédures d’installation. Si vous vous trouvez dans une situation qui n’est pas abordée dans le présent
document ou qui exige des directives plus précises, veuillez communiquer avec le Centre d’aide technique d’Interface au 1 888 224-2972 (Canada)
ou au 1 877 733-7403 (É.-U.).
Tous les carreaux de tapis doivent être inspectés minutieusement avant l’installation pour déceler tout dommage ou défaut. Interface ne pourra être
tenue responsable des coûts liés au remplacement ou à la réparation de carreaux défectueux ou endommagés ayant été installés alors que les
défauts ou dommages étaient détectables avant l’installation.
Si, durant l’installation, vous constatez un défaut ou une situation qui risque de compromettre l’installation ou de nuire à celle-ci, vous devez ARRÊTER
immédiatement l’installation et communiquer avec le Centre d’aide technique d’Interface au 1 888 224-2972 (Canada) ou au 1 877 733-7403 (É.-U.).
Les carreaux de tapis sont couverts par la Garantie standard des produits d’Interface. Si vous n’avez pas d’exemplaire de la Garantie standard des
produits d’Interface et souhaitez en obtenir un, veuillez communiquer avec le Centre d’aide technique d’Interface au 1 888 224-2972 (Canada) ou au
1 877 733-7403 ou visiter notre site Web à l’adresse www.interface.com/garantie.
À MOINS D’INDICATIONS CONTRAIRES DANS LA GARANTIE STANDARD DE SES PRODUITS, INTERFACE NE FAIT AUCUNE DÉCLARATION NI
N’OFFRE AUCUNE GARANTIE, EXPRESSE OU TACITE, EN CE QUI A TRAIT NOTAMMENT À LA QUALITÉ MARCHANDE OU À LA CONVENANCE DE
SES PRODUITS POUR UN USAGE PARTICULIER, ET SE DÉGAGE PAR LA PRÉSENTE DE TOUTE RESPONSABILITÉ À CET ÉGARD.
Sans préjudice de la portée de ce qui précède, Interface n’est pas responsable pour les déchirures, les brûlures, les coupures, les fils tirés ni les autres
dommages, détériorations, problèmes ou pertes causés par un usage abusif ou inadéquat, la négligence, une installation incorrecte, un entretien inadéquat,
une inondation, l’utilisation sur les marches d’un escalier, l’utilisation d’équipement sportif ou l’installation sur une surface soumise à une pression
hydrostatique ou en présence d’infiltration d’eaux souterraines. Les analyses du taux d’humidité et de pH sur les lieux de l’installation ne relèvent pas
d’Interface, et les problèmes liés à une humidité excessive ou à un pH inadéquat sont expressément exclus de la présente garantie, à moins d’une disposition
expresse dans la présente garantie ou dans la garantie du produit d’Interface. La garantie d’Interface ne couvre ni les problèmes ni les dommages liés à
l’utilisation d’un adhésif ou d’une technique d’installation non recommandés ou au non-respect des conditions d’installation prescrites.
AVERTISSEMENT : SI VOUS DÉTECTEZ LA PRÉSENCE DE MATÉRIAUX CONTENANT DE L’AMIANTE OU CELLE DE TOUTE AUTRE MATIÈRE
DANGEREUSE PENDANT L’INSTALLATION, ARRÊTEZ IMMÉDIATEMENT ET OBTENEZ L’AIDE D’UN CONSULTANT OU D’UN ENTREPRENEUR
QUALIFIÉ EN MATIÈRE DE MESURES CORRECTIVES AVANT DE CONTINUER.
Visite préalable à l’installation
Il est important de laisser tous les produits s’acclimater avant l’installation. Le site doit donc
90 jours être complètement scellé (fenêtres et portes extérieures bien installées) avant le début de
l’installation ou de la préparation du plancher. Le site, le revêtement de plancher et l’adhésif
doivent être à une température entre 18,3 °C (65 °F) et 29,4 °C (85 °F) et à une humidité
ambiante entre 45 % et 65 % au moins 48 heures avant l’installation, pendant celle-ci et en
tout temps après. La température du substrat doit être d’au moins 3 °C (5 °F) de plus que
le point de rosée. Le moyen le plus facile d’atteindre ces conditions est par l’utilisation d’un
système de chauffage, de ventilation et de climatisation.
18,3 °C (65 °F) à
29,4 °C (85 °F) Tous les carreaux de tapis doivent être retirés des boîtes et laissés à la température ambiante
du site pendant 48 heures avant l’installation pour qu’ils s’y adaptent.
1Essais d’humidité et d’alcalinité du béton
Avant l’installation, toute surface de béton, peu importe son âge, doit répondre aux exigences
d’humidité et de pH décrites ci-dessous et convenir à l’installation de carreaux de tapis selon
les présentes directives. Les conditions d’humidité du béton doivent être déterminées au moyen
de la méthode d’essai de l’humidité relative avec sonde in situ (ASTM F2170). La sonde doit
être entretenue et calibrée selon les directives du fabricant et à la fréquence recommandée par
celui-ci. Les certificats de calibration doivent être conservés aux fins de validation des essais.
Interface permet l’installation de carreaux de tapis dans diverses conditions, selon le type
de dalle et les résultats des essais d’humidité et de pH au moment de l’installation. Pour des
résultats optimaux, vous devez utiliser le test de pH créé par Interface pour effectuer ces essais
(voir « Pratique standard pour la vérification du pH des planchers de béton », p. 11).
La surface en béton doit comporter une couche imperméable à la vapeur. Les surfaces de béton exposées à une pression hydrostatique ou à une infiltration
d’eaux souterraines ne sont pas acceptables pour l’installation et sont expressément exclues de la garantie. Le tableau suivant présente les adhésifs
approuvés ainsi que certaines exigences pour les différents systèmes d’endos de carreaux de tapis. Toute installation qui n’est pas strictement conforme au
tableau ci-dessous annulera la garantie.
Système d’endos de Système d’installation ou Apprêt requis Limite d’humidité relative Limite de pH à la surface
carreaux de tapis adhésif
(doit être mesuré selon le
protocole d’Interface)
CQuestMCGB TacTilesMC* Aucun Pas de maximum Entre 7 et 9
9511 de XL Brands 97 % Entre 7 et 11
Adhesive 2500 Plus (Canada) ou RH95 de XL Brands 95 % Entre 7 et 11
Adhesive 2000 Plus (É.-U.) de XL
Brands Aucun 90 % Entre 7 et 10
GlasBacMC et TacTilesMC* Aucun Pas de maximum Entre 7 et 9
GlasBacRE 9511 de XL Brands 97 % Entre 7 et 11
Adhesive 2500 Plus (Canada) ou RH95 de XL Brands 95 % Entre 7 et 11
Adhesive 2000 Plus (É.-U.) de XL
Brands Aucun 80 % Entre 7 et 9
TacTilesMC* Aucun 85 % Entre 7 et 9
Graphlar et®
9511 de XL Brands 97 % Entre 7 et 11
Graphlex® Adhesive 2500 Plus (Canada) ou RH95 de XL Brands 95 % Entre 7 et 11
Adhesive 2000 Plus (É.-U.) de XL
Brands Aucun 80 % Entre 7 et 9
* Choisissez les bons connecteurs TacTiles selon le type d’endos (CQuestGB/GlasBac/GlasBacRE ou Graphlar/Graphlex).
Toutes les exigences écrites concernant l’application des produits de XL Brands, notamment les protocoles de mesure de l’humidité et du pH, doivent être respectées pour que la garantie
d’Interface s’applique. Pour en savoir plus sur l’utilisation adéquate des produits XL Brands, communiquez avec votre représentant d’Interface ou visitez le www.xlbrands.com.
N.B. : Les essais d’humidité et de pH ne révèlent que l’état du béton au moment de l’essai. Les limites d’humidité et de pH énoncées précédemment doivent
être respectées avant, pendant et en tout temps après l’installation pour prévenir des défaillances ou des problèmes d’installation et pour maintenir la validité
de la garantie. Si les valeurs d’humidité relative ou de pH obtenues lors des essais dépassent les limites prescrites, ARRÊTEZ le travail et NE FAITES PAS
l’installation. Demandez l’aide d’Interface avant de continuer. Consultez la section « Préparation du plancher brut » pour en savoir plus sur les problèmes
liés à l’état de la surface de la dalle de béton avant l’installation.
N.B. : Les essais d’humidité et d’alcalinité nécessaires avant l’installation doivent être effectués conformément aux normes de l’ASTM. Selon les lignes
directrices du Carpet and Rug Institute (CRI), il est recommandé de faire appel à un consultant indépendant qualifié pour effectuer ces essais. Interface ne
pourra être tenue responsable des défaillances, des problèmes et des dommages découlant d’un taux d’humidité élevé, d’une alcalinité élevée ou de l’état de
la surface du plancher brut.
2Inspection du produit
INSPECTEZ LES CARREAUX DE TAPIS D’INTERFACE POUR VÉRIFIER QU’ILS
CORRESPONDENT À VOTRE COMMANDE. SI VOUS INSTALLEZ LE MAUVAIS
PRODUIT OU UN PRODUIT DE LA MAUVAISE COULEUR, INTERFACE NE SERA PAS
TENUE DE CORRIGER LA SITUATION.
Les étiquettes sur chaque boîte indiquent le style, le motif, la couleur, le numéro de tirage et le
lot de teinture du produit. Vérifiez que le style, le motif et la couleur correspondent aux produits
commandés pour chacune des aires de votre installation.
Assurez-vous d’avoir la bonne quantité de carreaux de tapis et d’utiliser la méthode appropriée
pour l’installation, et aussi d’avoir une quantité suffisante de carreaux pour disposer d’une
réserve en cas de futurs remplacements.
Ouvrez et inspectez toutes les boîtes pour voir si elles contiennent des carreaux endommagés
ou défectueux. Si vous en trouvez, communiquez avec le Centre d’aide technique d’Interface
au 1 888 224-2972 (Canada) ou au 1 877 733-7403 (É.-U.).
ÉCLAIRAGE
Veillez à disposer d’un éclairage en plongée adéquat. Idéalement, l’éclairage sera identique à
celui qui sera installé pour les utilisateurs finaux ou le reproduira.
Non Oui
LES CARREAUX DE TAPIS DOIVENT ÊTRE INSTALLÉS UNE FOIS TOUS LES AUTRES
TRAVAUX DE CONSTRUCTION TERMINÉS. ÉVALUEZ SOIGNEUSEMENT TOUS
LES RISQUES SI L’ON VOUS DEMANDE D’INSTALLER LES CARREAUX DE TAPIS
DE FAÇON TROP HÂTIVE. SI LES CARREAUX DE TAPIS SONT INSTALLÉS AVANT
LA FIN DES TRAVAUX DE CONSTRUCTION, LES TACHES, LA SALETÉ OU TOUT
AUTRE DOMMAGE CAUSÉ PAR D’AUTRES TRAVAILLEURS PEUVENT ANNULER LA
GARANTIE DU PRODUIT.
Préparation du plancher brut (béton)
INSTALLATION SUR UNE SURFACE EN BÉTON
Voir la méthode avec règle
Niveler Avant de procéder à l’installation, vérifiez que tous les planchers en béton sont conformes
droite de 3 m (10 pi). Par «
niveler », on entend obtenir au taux d’humidité et à l’alcalinité requis (voir « Essais d’humidité et d’alcalinité du
un écart d’au plus 0,64 cm béton », p. 2).
(1/4 po) entre les mesures
prises dans au moins 90 Nivelez le plancher conformément aux exigences de l’American Concrete Institute pour
% des cas. Il ne doit jamais
les bâtiments en béton, plus précisément en ce qui concerne la finition à la truelle et les
y avoir un écart de plus de
0,95 cm (3/8 po) entre tolérances de finition. Utilisez un produit cimentaire pour niveler la surface.
deux mesures.
DALLE DE BÉTON EXISTANTE
Remplissez les fissures et les trous avec l’un des produits de ragréage approuvés suivants
: enduits Ardex Feather Finish, Ardex K-15, Henry’s 547 et Armstrong S-184, ou un produit
Appliquer un Poncer semblable à base de ciment. N.B. : Certains produits de ragréage peuvent être mélangés à
produit de de l’eau, alors que d’autres doivent être mélangés à un additif au latex. Veuillez respecter les
ragréage exigences et le mode d’emploi du fabricant.
N.B. : Les adhésifs, les produits à base de solvant et les autres contaminants doivent être
retirés ou encapsulés avant l’application de l’adhésif et l’installation du tapis. Communiquez
avec le Centre d’aide technique d’Interface au 1 888 224-2972 (Canada) ou au
1 877 733-7403 (É.-U.).
NOUVELLE DALLE DE BÉTON
Un nouveau béton ou un béton nu est défini comme étant un béton libre de tout résidu
d’adhésif, de peinture, de scellant, d’apprêt ou de tout autre produit appliqué sur celui-ci.
Interface recommande d’apprêter toute surface poussiéreuse ou poreuse avec l’apprêt
Prelude de XL Brands ou un produit semblable.
3Préparation du plancher brut (sous-couche à base de plâtre)
INSTALLATION SUR UNE SOUS-COUCHE À BASE DE PLÂTRE
Interface recommande d’installer la sous-couche à base de plâtre de façon à ce qu’elle résiste à une pression convenant à un environnement commercial (3
500 psi ou plus) pour aider à prévenir les fissures.
Interface recommande de sceller correctement la sous-couche à base de plâtre avant d’installer les carreaux de tapis. Le scellage de la surface du béton de
plâtre permettra de pouvoir bien décoller le tapis de l’adhésif et de réduire la poussière naturellement libérée par les matériaux à base de plâtre.
L’installation sur une sous-couche à base de plâtre bien posée ne rendra pas nulle la Garantie standard des produits d’Interface, mais Interface n’assume
aucune responsabilité quant aux problèmes liés à l’utilisation de plâtre ou d’un autre type de sous-couche. C’est pourquoi les réclamations en lien avec
l’utilisation ou la défaillance de la sous-couche doivent être adressées à son fabricant ou son installateur.
Préparation du plancher brut (bois, contreplaqué ou aggloméré de bois)
Réparer
INSTALLATION SUR DU BOIS, DU CONTREPLAQUÉ OU DE L’AGGLOMÉRÉ
DE BOIS
Réparez les planches lâches ou brisées. Fixez-les à l’aide de clous-vis enduits de ciment 8-D.
Contreplaqué Clous espacés de
15,2 cm (6 po)
Si la plupart des planches sont trop usées ou enfoncées, il faut les recouvrir de
contreplaqué pour l’extérieur A-D de 1,6 cm (5/8 po) fixé à l’aide de clous-vis enduits de
ciment 8-D espacés de 15,2 cm (6 po). Poncez les joints jusqu’à ce qu’ils soient lisses.
Poncez la surface jusqu’au bois nu. Enlevez la poussière en balayant la surface, puis en
l’essuyant avec un chiffon de dépoussiérage. Toutes les surfaces en bois doivent être
apprêtées avant l’application d’un adhésif. Interface recommande les produits TriSeal de XL
Brands ou un produit semblable.
N.B. : Les adhésifs, les produits à base de solvant et les autres contaminants doivent être
retirés ou encapsulés avant l’application de l’adhésif et l’installation du tapis. Communiquez
Poncer Appliquer une couche avec le Centre d’aide technique d’Interface au 1 888 224-2972 (Canada) ou au
protectrice
1 877 733-7403 (É.-U.).
Préparation du plancher brut (vinyle)
Poncer INSTALLATION SUR DES CARREAUX DE VINYLE
AVERTISSEMENT : IL EST POSSIBLE QUE LE REVÊTEMENT DE SOL EXISTANT
CONTIENNE DE L’AMIANTE OU D’AUTRES MATIÈRES DANGEREUSES. SI VOUS
DÉTECTEZ LA PRÉSENCE DE TELLES MATIÈRES, ARRÊTEZ IMMÉDIATEMENT
L’INSTALLATION ET OBTENEZ L’AIDE D’UN CONSULTANT OU D’UN ENTREPRENEUR
QUALIFIÉ EN MATIÈRE DE MESURES CORRECTIVES AVANT DE CONTINUER.
Utilisez un décapant sans solvant approprié ou une ponceuse pour enlever la couche de cire de
la surface.
Enlevez tout carreau de vinyle endommagé ou lâche, et remplacez-le par un carreau de même
Retirer Remplacer
épaisseur ou un produit de ragréage.
4Préparation du plancher brut (vinyle) (suite)
INSTALLATION SUR UNE FEUILLE DE VINYLE
N’installez pas les carreaux de tapis d’Interface sur une feuille de vinyle si vous utilisez un
Retirer adhésif. Enlevez d’abord la feuille de vinyle avec un grattoir, puis enlevez tout adhésif encore
présent sur le plancher brut en le ponçant ou en le grattant et encapsulez le résidu. Suivez
ensuite les instructions pour le type de plancher brut en place.
Vous pouvez toutefois installer des carreaux de tapis d’Interface sur une feuille de vinyle en
utilisant les connecteurs TacTiles. La feuille de vinyle doit être bien fixée au plancher brut
et vous devez utiliser un décapant sans solvant approprié ou une ponceuse pour enlever la
couche de cire de la surface.
Préparation du plancher brut (matériaux naturels)
INSTALLATION SUR DES MATÉRIAUX NATURELS
Dans le cas des matériaux naturels, comme le granito, le terrazzo, le marbre et le carrelage
en céramique, cassez et enlevez tous les matériaux ou remplacez les parties endommagées
Retirer Remplacer
par un matériau de la même épaisseur pour former un plancher plat et de niveau.
Ragréez et remplissez les fissures et les irrégularités, y compris les lignes de joint, avec l’un
Remplir des composés de ragréage approuvés suivants : enduits Ardex Feather Finish, Ardex K-15
et Henry’s 547, ou un produit semblable à base de ciment.
N.B. : Certains produits de ragréage peuvent être mélangés à de l’eau, alors que d’autres
doivent être mélangés à un additif au latex. Veuillez respecter les exigences et le mode
d’emploi du fabricant.
Poncez la surface pour enlever tout fini brillant. Enlevez la poussière en balayant la surface,
puis en l’essuyant avec un chiffon de dépoussiérage.
Poncer Appliquer une
Toutes les surfaces poreuses doivent être apprêtées avant l’application d’un adhésif.
couche protectrice Interface recommande les produits TriSeal de XL Brands ou un produit semblable.
Préparation du plancher brut (faux-planchers)
INSTALLATION SUR UN FAUX-PLANCHER
Ragréez ou remplacez tous les panneaux de plancher endommagés
Enlevez du plancher toute saleté, graisse, huile ou peinture, tout scellant ou adhésif et toute
autre matière.
N.B. : Les adhésifs, les produits à base de solvant et les autres contaminants doivent être
Enlever Remplacer
retirés ou encapsulés avant l’application de l’adhésif et l’installation du tapis. Communiquez
avec le Centre d’aide technique d’Interface au 1 888 224-2972 (Canada) ou au
1 877 733-7403 (É.-U.).
5Marquage du point de départ
Cingler au cordeau
1. Mesurez la surface afin de déterminer le point central et faites-y une marque.
Cinglez une ligne de craie au moyen du cordeau.
Mesurer
2. À partir du point central, mesurez 243,8 cm (8 pi) le long de la ligne. Faites une marque.
Mesurer
3. À partir du point central, mesurez 182,9 cm (6 pi) perpendiculairement
à la ligne et faites une marque.
4. Mesurez la distance entre vos marques. Celle-ci doit être de 304,8 cm (10 pi)
Mesurer exactement. Le cas échéant, vos quadrants seront carrés. Cinglez une ligne de
craie au moyen du cordeau entre vos deux marques.
N.B. : Si la pièce est trop petite pour les mesures ci-dessus, réduisez-les de moitié.
Mesurez 121,9 cm (4 pi) à la verticale et 91,4 cm (3 pi) à l’horizontale. La distance
entre vos deux marques devrait alors être de 152,4 cm (5 pi) exactement.
DÉTERMINER SI LES LIGNES MÉDIANES DOIVENT ÊTRE DÉCALÉES
La nécessité de décaler une des lignes médianes, ou les deux, dépend de la méthode d’installation choisie et du format des carreaux (carrés ou planches).
Posez à sec (sans adhésif) une rangée de carreaux tout le long de vos lignes médianes perpendiculaires. Rendez-vous jusqu’aux murs.
Si nécessaire, décalez l’une des lignes médianes, ou les deux, pour vous assurer que la coupe à effectuer sur les carreaux du périmètre ne dépasse pas 25
cm (9,84 po) ou la moitié de leur largeur.
6Méthodes d’installation
Les méthodes d’installation approuvées varient selon le produit et figurent sur l’étiquette de la boîte. Une flèche est imprimée au dos de chaque carreau pour
indiquer l’orientation.
CARREAUX CARRÉS PLANCHES ÉTROITES (25 CM X 1 M)
Installation monolithique Installation selon un motif de pierres de taille
Décalez les joints avant et
Orientez toutes les flèches dans arrière des carreaux. Pour
la même direction. nos planches étroites, nous
recommandons un motif de
pierres de taille à décalage
variable, comme illustré ici, mais
l’installation avec décalage à la
moitié est aussi possible.
Installation de type quart de tour
Installation selon un motif de chevrons
Disposez les planches en « L ».
À l’installation, tournez les
carreaux de sorte que chaque
flèche soit orientée à 90° par
rapport au carreau adjacent.
Installation selon un motif de pierres de taille
Décalez les joints avant et arrière PLANCHES STANDARD (50 CM X 1 M)
des carreaux, tout en orientant
les flèches dans la même Installation selon un motif de pierres de taille
direction.
Décalez les joints avant et arrière
des carreaux.
Installation non directionnelle
Posez les carreaux dans
n’importe quel sens sans vous
préoccuper des flèches.
Installation selon un motif de chevrons
Disposez les planches en « L ».
Installation selon un motif de briques
Décalez les joints latéraux des
carreaux, tout en orientant les
flèches dans la même direction.
N.B. : INTERFACE NE POURRA ÊTRE TENUE RESPONSABLE DES PROBLÈMES RÉSULTANT D’UNE INSTALLATION NON CONFORME AUX
SPÉCIFICATIONS, Y COMPRIS, MAIS SANS S’Y LIMITER, À LA MÉTHODE D’INSTALLATION RECOMMANDÉE.
7Système d’installation TacTiles
APPLICATION DES CONNECTEURS TACTILES
Choisissez les connecteurs TacTiles appropriés pour le type d’endos des carreaux.
N.B. : Le nombre moyen de connecteurs TacTiles requis varie selon la taille des carreaux et la méthode d’installation choisie.
Carreaux carrés de 50 x 50 cm Moyennes pour les planches de 50 cm x 1 m
• Monolithique, quart de tour, non directionnelle – 4/vg² • Pierres de taille – 4/vg²
• Pierres de taille ou briques – 6/vg² • Chevrons – 5/vg²
Moyennes pour les planches étroites de 25 cm x 1 m
• Pierres de taille à décalage irrégulier ou variable – 7/vg²
• Chevrons – 8/vg²
DISPOSITION DES CONNECTEURS TACTILES
Installez le tapis en escalier (illustration à la p. 9) en plaçant un connecteur TacTiles à chaque coin. Créez des rangées d’ancrage en plaçant un connecteur
TacTiles à chaque joint. Interface recommande de fixer les rangées d’ancrage avec un adhésif ou du ruban à double face. Insérez les carreaux selon la
méthode d’installation recommandée. Les connecteurs TacTiles doivent être installés selon les diagrammes suivants.
Carreaux carrés de 50 x 50 cm Planches de 50 cm x 1 m
Installations quart de tour / monolithique Installations selon un motif de pierres de Installation selon un motif de pierres Installation selon un motif de chevrons
/ non directionnelle / de carpettes taille / briques de taille
Planches étroites de 25 cm x 1 m
Installation selon un motif de pierres Installation selon un motif de chevrons
de taille
N.B. : POUR UNE INSTALLATION AVEC LES CONNECTEURS TACTILES D’INTERFACE, LES CARREAUX DU PÉRIMÈTRE DOIVENT ÊTRE COUPÉS
AU RAS DU MUR. SI UN MUR OU UNE LIGNE DE FIN NE SE PROLONGE PAS JUSQU’AU PLANCHER BRUT, LES CARREAUX DU PÉRIMÈTRE
DOIVENT ÊTRE INSTALLÉS À L’AIDE D’UN ADHÉSIF APPROUVÉ PAR INTERFACE.
8Application de l’adhésif
APPLICATION DE L’ADHÉSIF
Si vous choisissez d’appliquer un adhésif, n’utilisez que l’Adhesive 2500 Plus (Canada) ou
l’Adhesive 2000 Plus (É.-U.) de XL Brands.
Application d’adhésif sur toute la surface
Appliquez l’adhésif recommandé avec un rouleau à peinture à poils de 0,95 cm (3/8 po). Ce type
Taux d’étalement : Systèmes de de rouleau donnera un taux d’étalement de 39 à 44 vg² par gallon.
39 à 44 vg² par gallon faux-planchers
Adhésif utilisé dans les cas spéciaux
Fil méplat : N’appliquez jamais un adhésif directement sur un fil méplat. Celui-ci risque d’être
endommagé si l’on enlève les carreaux.
Surfaces inégales : Toute surface qu’il est impossible de niveler nécessitera peut-être l’utilisation
d’un adhésif ou d’un ruban à double face pour retenir un carreau en place.
NON
Pose des carreaux
POSE DES CARREAUX
Posez un premier carreau à la marque du point de départ. Posez ensuite des rangées d’ancrage de
550 cm (216 17/32 po) 10 carreaux supplémentaires chacune, bien alignées sur les lignes médianes. Dans les pièces plus
petites, vos rangées d’ancrage peuvent contenir moins de 11 carreaux.
Mesurez vos rangées d’ancrage. Dans le cas de carreaux carrés, chaque rangée doit mesurer 550
cm (11 carreaux de 50 cm chacun ou 216 17/32 po au total) avec un gain maximal de 3 mm (1/8
po). Si le gain est supérieur à 3 mm, cela signifie que les carreaux ne sont pas assez serrés et
qu’il vous faut refaire la pose. Après la nouvelle pose, mesurez le tout de nouveau. Si les carreaux
couvrent moins de 550 cm, ils sont trop serrés et la pose doit être refaite.
Gain de 3 mm (1/8 po)
Incliner le carreau pour le mettre en place
Ne faites pas glisser les carreaux sur l’adhésif pour les mettre en place. Les coins auraient alors
tendance à se recourber vers le dessous. Brossez plutôt les poils vers vous d’une main, puis, de
NE PAS faire Incliner
l’autre, inclinez un coin du carreau en le mettant en place. Positionnez le reste du carreau après en
glisser avoir correctement aligné le coin. Évitez de coincer les poils dans les joints.
Pose des carreaux selon un motif d’escalier ou de
pyramide
1. Posez deux carreaux à la verticale et vérifiez qu’ils forment
un angle droit avec les rangées d’ancrage.
2. Posez deux carreaux à l’horizontale et vérifiez qu’ils
forment un angle droit avec les rangées d’ancrage.
3. Posez un carreau pour compléter la marche d’escalier.
4. Suivez le motif ABCD ainsi défini jusqu’à ce que vous
atteigniez la fin de vos rangées d’ancrage. Répétez la
Vérifier l’angle droit Vérifier l’angle droit Vérifier l’angle droit pose des rangées d’ancrage et des motifs ABCD dans
tous les quadrants.
9Pose des carreaux (suite)
Prises de plancher
Les prises de plancher sont généralement câblées après l’installation des carreaux de tapis. Par conséquent, vous devez
installer les carreaux directement sur les prises de plancher et marquer l’emplacement avec du ruban. De cette façon, il est
facile de voir quels carreaux il faudra soulever pour les découper ultérieurement.
Enregistrer
Fil méplat
Les carreaux doivent être posés de façon à ce que le fil méplat passe au centre d’une rangée de carreaux.
Chevaucher le fil méplat
Collecteurs en caniveau
Les carreaux doivent être posés de façon à ce que les collecteurs en caniveau soient centrés sous une rangée de
carreaux. Fixez les carreaux de chaque côté des collecteurs avec de l’adhésif. Vous éviterez ainsi que les carreaux ne
se déplacent pendant l’entretien des collecteurs.
Chevaucher le collecteur en caniveau
Faux-planchers d’accès
Les panneaux du faux-plancher d’accès peuvent s’incurver légèrement. Pour assurer une apparence uniforme, évitez
d’aligner les joints du faux-plancher sur les joints des carreaux.
Chevaucher les joints du faux-plancher
Coupe des carreaux
Il faut découper les carreaux adjacents aux accessoires fixes, aux éléments d’architecture et
aux murs. Voici la marche à suivre :
• Si possible, enlevez les plinthes avant d’installer les carreaux périphériques. Replacez-les
après la pose.
Mesurer Couper • Remplacez fréquemment la lame du couteau. Une lame tranchante permet une coupe plus
rapide, plus facile et plus précise.
• N’utilisez jamais d’autres carreaux comme surface de coupe. Placez les carreaux sur
Incliner plusieurs couches de carton avant de les couper.
• Fixez toujours les carreaux coupés avec de l’adhésif.
Préparation en vue de l’occupation
Inspection finale et passage de l’aspirateur
Inspectez toute l’installation, en particulier les joints et tout carreau qui a été coupé.
Passez l’aspirateur sur le plancher en utilisant un râteau à tapis. Si vous n’en avez pas, utilisez
Zones
de coupe
un aspirateur vertical.
Seams
Vacuum
Respect des normes d’installation du CRI
Outre les directives particulières de préparation du plancher et d’installation décrites dans le présent document, vous devez vous conformer à la norme
d’installation des tapis commerciaux du Carpet and Rug Institute (CRI). Veuillez noter que bon nombre des exigences relatives à l’installation des produits
d’Interface peuvent être plus rigoureuses que celles stipulées dans la norme du CRI ou en différer. En cas de divergences entre les présentes directives
d’installation d’Interface et la norme du CRI, vous devez vous conformer aux directives d’installation d’Interface.
10You can also read