VWR INSTRUCTION MANUAL - Pro HDMI - VWR International
←
→
Page content transcription
If your browser does not render page correctly, please read the page content below
VWR
		              Pro HDMI

                  INSTRUCTION MANUAL

                   Model         European Catalogue Number
                  HDMI13                  630-2627

Version:   3
Issued:    27, 07, 2015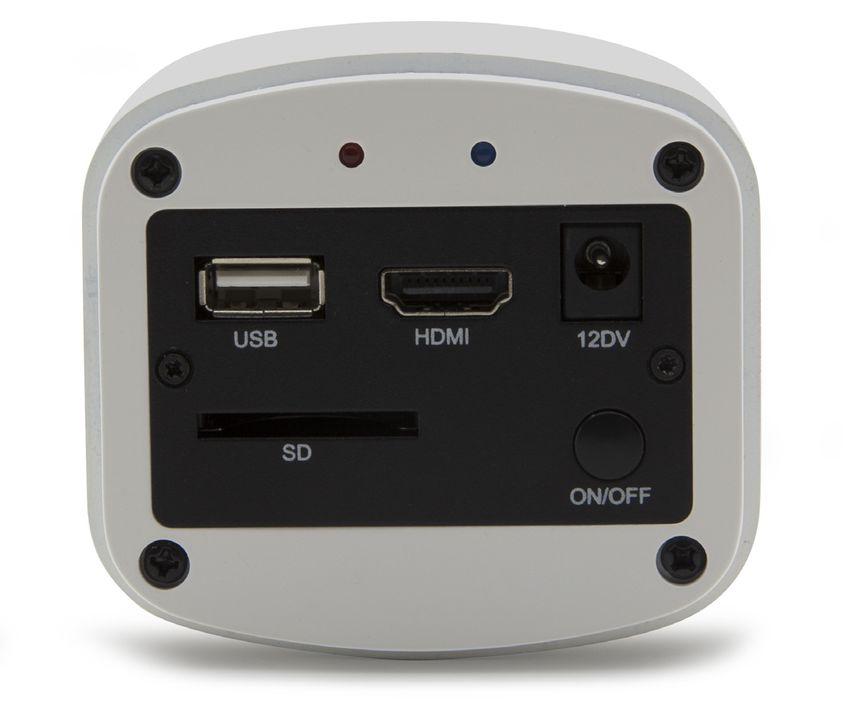
Legal Address of Manufacturer

Europe
VWR International bvba
Researchpark Haasrode 2020
Geldenaaksebaan 464
B-3001 Leuven
+ 32 16 385011
http://be.vwr.com

Country of origin: ITALY

Table of Contents

Package Contents
Installation of camera drivers and software
Some notes
How to test your Camera
Select the right driver
Getting started with VisiCam, a very easy measuring and documentation software.
Getting started with optika IsView, a complete software for measuring, adjusting, capturing images
and video clip.
HDMI user guide
HDMI Operation
Technical service
Warranty
Compliance with local laws and regulations
Disposal

                                             2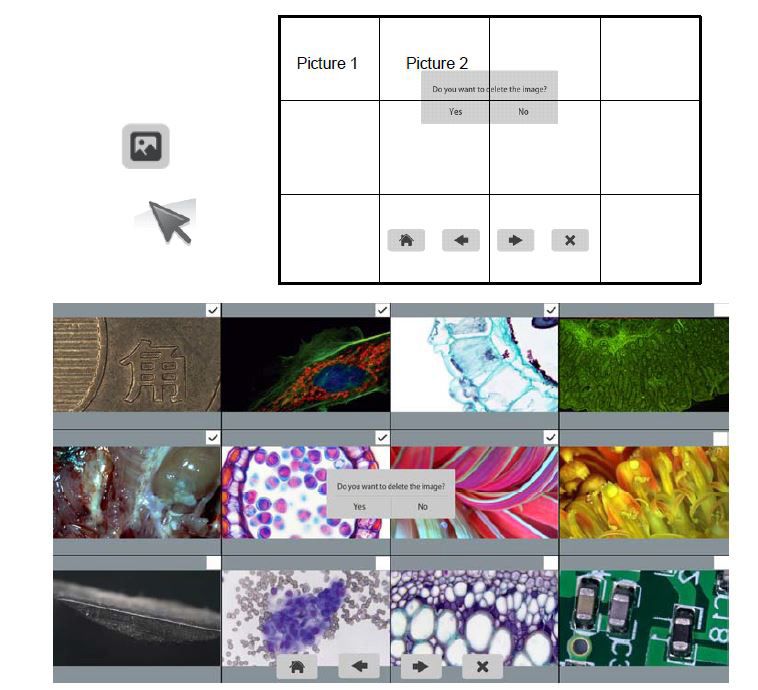
Package Contents

DESCRIPTION                   QUANTITY

HDMI Camera                   1
12V 2000mA power supply       1
SD card                       1
USB cable                     1
HDMI cable                    1
Calibration slide             1
CD                            1
Mouse                         1

                          3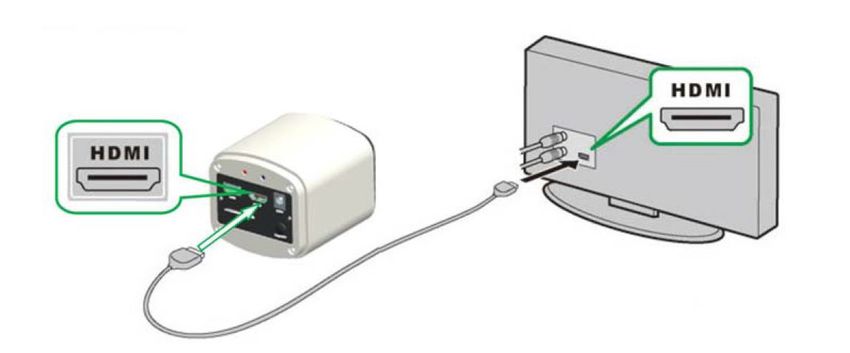
Installation of camera drivers and software

1.     Operating system requirements: all the Windows O.S.

2.     Please insert your CD and run:
       \VisiCam\ setup.exe

3.     Now the VisiCam icon appears on your desktop.

4.     Please Run
       \optika IsView\ setup.exe

5.     Now the optika IsView icon appears on your desktop

6.     You don’t need to install any driver.

7.     Plug the Camera in your PC: the camera will be identified automatically.

Some notes
Often a PC has some ports on the front and some on the back: the ports on the back are usually faster. We
suggest to use these ones.

If you connect the camera into another USB port, Windows needs to recognize its Driver again even if it has
already done this operation for the first USB port.

It may happen sometimes that Windows doesn’t recognize a Camera using one of your PC USB ports, while
gives no problem using another port.

How to test your Camera
In order to check if your Camera works correctly, it’s not necessary to put it into the microscope: it’s enough
to connect it into the USB port, run VisiCam using the icon on your desktop, select the right driver and check
whether the shown image is not totally black.

Select the right driver
Please select: USB CAMERA.

With VisiCam you have to tell the Software which is the Driver by selecting the microscope-shaped icon.
With optika IsView the live image coming from your camera will automatically appear.

                                                  4
Getting started with VisiCam, a very easy measuring and documentation soft-
ware.
Run VisiCam by clicking on its icon on your desktop.

Select the right Driver for capturing the image. Note that after choosing the driver and before capturing the
image you can set the brightness, saturation, gamma ecc..
Then you can capture the image.

The image is now ready for being manipulated using VisiCam.

Getting started with optika is view, a complete software for measuring, adjust-
ing, capturing images and video clip.
Run optika IsView by clicking on your desktop.

The live image with easy buttons for set your camera live view will automatically appear.

                                                          5
HDMI user guide

1. USB interface.

A: Connect a mouse to the USB port. Use the mouse to control the camera directly.

B: Connect the USB port to PC to make the camera work as a Driver-Free camera.

                                                      HDMI

          POWER LIGHT                                                                WORKING LIGHT

                                                                                     POWER
                    USB

               SD CARD
                                                                                     TURN ON/OFF

2. HDMI interface.

Use the HDMI cable to connect the camera to the HDMI monitor.

3. Power interface.

Please use the provided 12V2A power supply. When power is plugged in the red light is on. When switch on the
camera blue light is on.

4. ON/OFF KEY

Press and hold the ON/OFF key until the blue light is ON, press the ON/OFF key again to turn the camera off.

5. SD CARD

To get faster and more stable data transfer recommend to use “Class10” SD card we supply a 8 giga SD card.

6. C MOUNT

Standard C-mount optical port.

                                                  6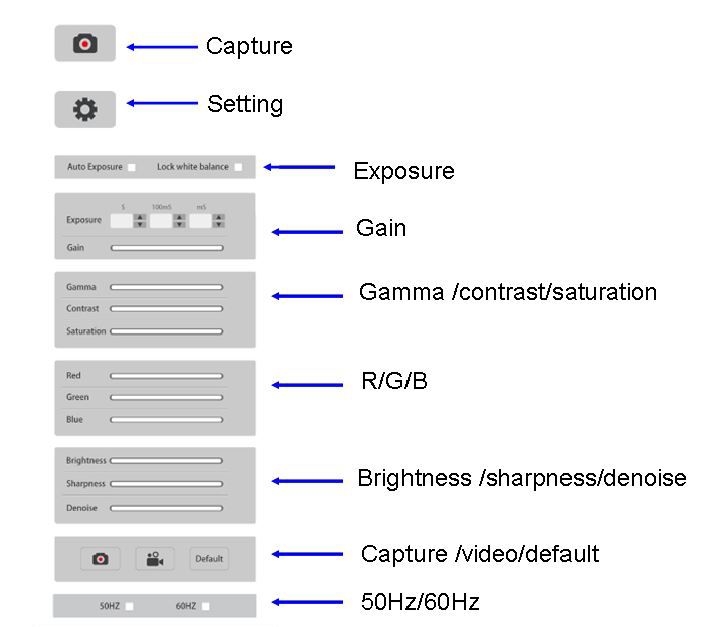
HDMI Operation
Step 1. Connect the camera.
1. Plug in the 12V2A power supply. Use HDMI cable to connect the camera to the monitor. Press and hold
ON/OFF key until blue light is on.
2. Connect the mouse to the USB port. Move the cursor to get the settings on the screen.
3. Insert the SD card.
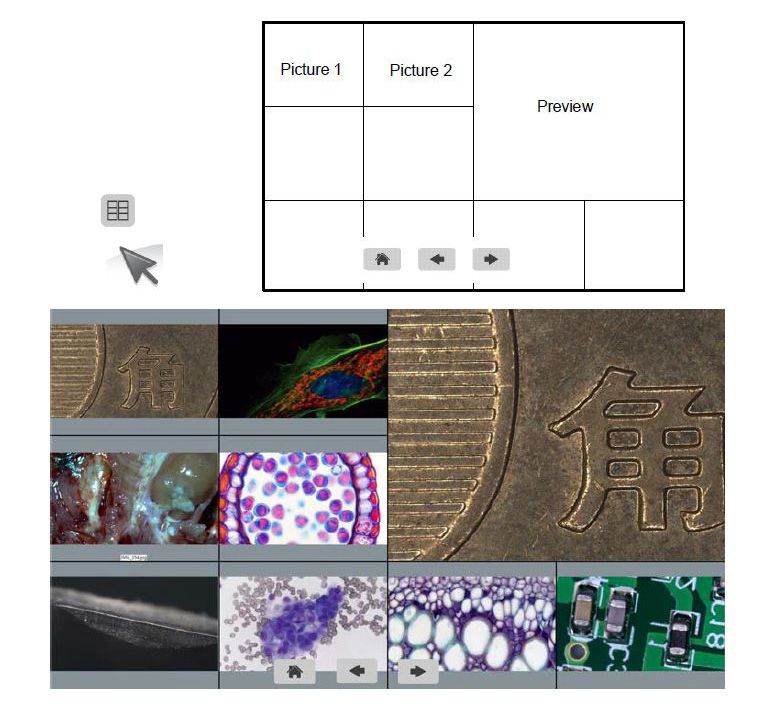
Step 2. Move the cursor to the left of the screen.
When move the cursor to the left of the screen, ‘Capture’ and ‘Setting’ icons will appear (See image on the left
side). Click ‘Setting’ to get parameter setting menu (See image on the right side).
7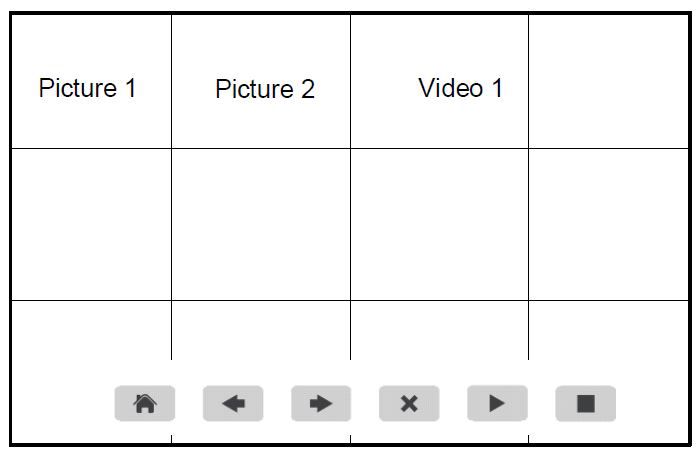
Step 3. Move the cursor to the right of the screen.

Step 4. Check the images and videos you have captured on the SD card.

1. Check the album and delete the images.

                                             8
2. Check the video and delete the video. To delete the video successfully, be sure this video is not in use.
Step 5. Compare preview with the captured images.
Connect the camera to the PC
1. Use the special USB cable for connecting the camera to the PC.
2. Plug in the 12V 2A Power Supply.
3. Press and hold the on/off key until the blu light is on.
4. Run the Optika IsView software, please open the on-line help to discover all the software features.
9Technical service
Web Resources
Visit the VWR’s website at www.vwr.com for:
• Complete technical service contact information
• Access to VWR’s Online Catalogue, and information about accessories and related products
• Additional product information and special offers
Contact us For information or technical assistance contact your local VWR representative or visit. www.vwr.
com.
Warranty
VWR International warrants that this product will be free from defects in material and workmanship for a period
of 24 months from date of delivery. If a defect is present, VWR will, at its option and cost, repair, replace, or re-
fund the purchase price of this product to the customer, provided it is returned during the warranty period. This
warranty does not apply if the product has been damaged by accident, abuse, misuse, or misapplication, or from
ordinary wear and tear. If the required maintenance and inspection services are not performed according to the
manuals and any local regulations, such warranty turns invalid, except to the extent, the defect of the product is
not due to such non-performance.
Items being returned must be insured by the customer against possible damage or loss. This warranty shall
be limited to the aforementioned remedies. IT IS EXPRESSLY AGREED THAT THIS WARRANTY WILL BE IN
LIEU OF ALL WARRANTIES OF FITNESS AND IN LIEU OF THE WARRANTY OF MERCHANTABILITY.
Compliance with local laws and regulations
The customer is responsible for applying for and obtaining the necessary regulatory approvals or other authori-
zations necessary to run or use the Product in its local environment. VWR will not be held liable for any related
omission or for not obtaining the required approval or authorization, unless any refusal is due to a defect of the
product.
10Disposal
This equipment is marked with the crossed out wheeled bin symbol to indicate that this equipment must not
be disposed of with unsorted waste.
Instead it is your responsibility to correctly dispose of your equipment the end of its life cycle by handling it
over to an authorized facility for separate collection and recycling. It is also your responsibility to decontami-
nate the equipment in case of biological, chemical and/or radiological contamination, so as to protect from
health hazards the persons involved in the disposal and recycling of the equipment.
For more information about where you can drop off your waste equipment, please contact your local dealer
from whom you originally purchased this equipment.
By doing so, you will help to conserve natural and environmental resources and you will ensure that your
equipment is recycled in a manner that protects human health.
Thank you
11Australia Hungary Singapore
VWR International, Pty Ltd. VWR International Kft. VWR Singapore Pte Ltd
Unit 1/31 Archimedes Place Simon László u. 4. 18 Gul Drive
Murarrie, Queensland 4172 4034 Debrecen Singapore 629468
Tel.: 1300 727 696 Tel.: (52) 521-130 Tel.: +65 6505 0760
Fax: 1300 135 123 Fax: (52) 470-069 Fax: +65 6264 3780
E-mail: info@hu.vwr.com E-mail: sales@sg.vwr.com
Austria
VWR International GmbH India
Graumanngasse 7 VWR Lab Products Private Limited Spain
1150 Vienna 135/12, Brigade Towers, 2nd Floor VWR International Eurolab S.L.
Tel.: +43 1 97 002 0 Front wing, Brigade Road, C/ Tecnología 5-17
Fax: +43 1 97 002 600 Bengaluru, India – 560 025 A-7 Llinars Park
E-mail: info@at.vwr.com Tel.: +91-80-41117125/26 (Bengaluru) 08450 - Llinars del Vallès
Tel.: +91-2522-647911/922 (Mumbai) Barcelona
Belgium Fax: +91-80-41117120 Tel.: 902 222 897
VWR International bvba E-mail: vwr_india@vwr.com Fax: 902 430 657
Researchpark Haasrode 2020 E-mail: info@es.vwr.com
Geldenaaksebaan 464 Ireland / Northern Ireland
3001 Leuven VWR International Ltd / Sweden
Tel.: 016 385 011 VWR International (Northern Ireland) Ltd VWR International AB
Fax: 016 385 385 Orion Business Campus Fagerstagatan 18a
E-mail: customerservice@be.vwr.com Northwest Business Park 163 94 Stockholm
Ballycoolin Tel.: 08 621 34 00
China Dublin 15 Fax: 08 621 34 66
VWR International China Co., Ltd Tel.: 01 88 22 222 E-mail: kundservice@se.vwr.com
Rm.219, 2100 Dongming Road Fax: 01 88 22 333
Pudong New District E-mail: sales@ie.vwr.com Switzerland
Shanghai 200123 VWR International GmbH
Tel.: +86-21-5898 6888 Italy Lerzenstrasse 16/18
Fax: +86-21-5855 8801 VWR International PBI S.r.l. 8953 Dietikon
E-mail: info_china@vwr.com Via San Giusto 85 Tel.: 044 745 13 13
20153 Milano (MI) Fax: 044 745 13 10
Czech Republic Tel.: 02-3320311/02-487791 E-mail: info@ch.vwr.com
VWR International s. r. o. Fax: 800 152999/02-40090010
Veetee Business Park E-mail: info@it.vwr.com Turkey
Pražská 442 Pro Lab Laboratuar Teknolojileri Ltd.Şti.
CZ - 281 67 Stříbrná Skalice The Netherlands a VWR International Company
Tel.: +420 321 570 321 VWR International B.V. Orta Mah. Cemal Gürsel Caddesi
Fax: +420 321 570 320 Postbus 8198 Ördekcioglu Işmerkezi No.32/1
E-mail: info@cz.vwr.com 1005 AD Amsterdam 34896 Pendik - Istanbul
Tel.: 020 4808 400 Tel.: +90216 598 2900
Denmark Fax: 020 4808 480 Fax: +90216 598 2907
VWR - Bie & Berntsen E-mail: info@nl.vwr.com Email: info@pro-lab.com.tr
Transformervej 8
2730 Herlev New Zealand UK
Tel.: 43 86 87 88 Global Science - A VWR Company VWR International Ltd
Fax: 43 86 87 90 241 Bush Road Customer Service Centre
E-mail: info@dk.vwr.com Albany 0632, Auckland Hunter Boulevard - Magna Park
Tel.: 0800 734 100 Lutterworth
Finland Fax: 0800 999 002 Leicestershire
VWR International Oy E-mail: sales@globalscience.co.nz LE17 4XN
Valimotie 9 Tel.: 0800 22 33 44
00380 Helsinki Norway Fax: 01455 55 85 86
Tel.: 09 80 45 51 VWR International AS E-mail: uksales@uk.vwr.com
Fax: 09 80 45 52 00 Haavard Martinsens vei 30
E-mail: info@fi.vwr.com 0978 Oslo
Tel.: 02290
France Fax: 815 00 940
VWR International S.A.S. E-mail: info@no.vwr.com
Le Périgares – Bâtiment B GO TO VWR.COM FOR THE
201, rue Carnot Poland LATEST NEWS, SPECIAL OFFERS
94126 Fontenay-sous-Bois cedex VWR International Sp. z o.o.
Tel.: 0 825 02 30 30 (0,15 € TTC/min) Limbowa 5 AND DETAILS OF YOUR LOCAL
Fax: 0 825 02 30 35 (0,15 € TTC/min) 80-175 Gdansk VWR DISTRIBUTOR
E-mail: info@fr.vwr.com Tel.: 058 32 38 200 do 204
Fax. 058 32 38 205
Germany E-mail: info@pl.vwr.com
VWR International GmbH
Hilpertstraße 20a Portugal
D - 64295 Darmstadt VWR International -
Freecall: 0800 702 00 07 Material de Laboratório, Lda
Fax: 0180 570 22 22* Edifício Neopark
Email: info@de.vwr.com Av. Tomás Ribeiro, 43- 3 D
*0,14 €/Min. aus d. dt. Festnetz 2790-221 Carnaxide
Tel.: 21 3600 770
Fax: 21 3600 798/9
E-mail: info@pt.vwr.com
12VWR
Pro HDMI
MANUEL D’UTILISATION
Modèle European Catalogue Number
HDMI13 630-2627
Version: 3
du: 27, 07, 2015Adresse du Fabricant
Europe
VWR International bvba
Researchpark Haasrode 2020
Geldenaaksebaan 464
B-3001 Leuven
+ 32 16 385011
http://be.vwr.com
Pays d’origine: ITALIA
Contenu
Contenu de l’emballage
Installation des pilotes de la camera et du logiciel
Quelques notes
Comment tester votre caméra
Quel est votre pilote
VisiCam, un logiciel simple et complet de mesure et de documentation d’images.
Pour commencer avec Optika IsView, un logiciel complet pour la mesure, réglage capture d’images
et vidéo
Guide HDMI
Opérations HDMI
Service technique
Garantie
Conformité à la législation et aux réglementations locales
Ramassage
14Contenu de l’emballage
DESCRIPTION QUANTITÉ
Caméra HDMI 1
Alimenation 12V 2000mA 1
Carte SD 1
Câble USB 1
Câble HDMI 1
Lame micrométrique 1
CD 1
Mouse
15Installation des pilotes de la camera et du logiciel
1 Système d’exploitation requis: compatible avec tous les systèmes d’exploitation Windows.
2 Veuillez insérer votre CD:
\VisiCam\ setup.exe
3 Ensuite, l’icone VisiCam apparait sur votre écran.
4 Veuillez exécuter
\ optika IsView\ setup.exe
5 Maintenant optika IsView icône apparaît sur votre écran.
6 Pas besoin d’installer des pilotes.
7 Brancher la caméra au PC, Windows en reconnaîtra les pilotes.
Quelques notes
Souvent, les PC ont des ports USB devant et derrière, il est conseillé de brancher la caméra sur les ports situés
à l’arrière du PC.
Si vous connectez la caméra sur un autre port USB Windows devra reconnaître à nouveau son pilote, même si
cette opération à déjà été faite pour le premier port USB.
Il peut arriver que Windows ne reconnaisse pas une caméra en utilisant l’un des ports USB de votre PC et qu’il
n’y ait aucunde problème avec les autres ports.
Comment tester votre caméra
Pour vérifier le fonctionnement de votre caméra il n’est pas nécessaire de la fixer sur le microscope, il suffit de la
connecter au port USB et d’exécuter Vision Lite en cliquant sur l’icône sur l’écran de votre pc, puis sélectionnez
le pilote et vérifiez enfin que vous ne voyez pas d’image noire.
Quel est votre pilote
Sélectionner: USB CAMERA.
Avec VisiCam vous devez indiquer au logiciel qui est le pilote en sélectionnant l’icône en forme de microscope.
Avec Optika IsView l’image en direct provenant de votre appareil photo apparaîtra automatiquement.
16VisiCam, un logiciel simple et complet de mesure et de documentation d’images.
Lancez VisiCam en sélectionnant l’icone sur l’écran.
Sélectionnez le bon pilote et capturez l’image. Avant la capture d’une image vous pouvez régler la luminosité,
la saturation…. puis vous pourrez capturer une image.
L’image est maintenant prête à être élaborée en utilisant VisiCam.
Pour commencer avec optika IsView, un logiciel complet pour la mesure, réglage
capture d’images et vidéo
Exécuter optika IsView en cliquant sur votre écran.
L’image en direct avec des boutons faciles pour voir votre caméra live view apparaîtra automatiquement.
17Guide HDMI
1. Interface USB.
A: Connecter une souris au port USB. Utiliser la souris pour contrôler directement la caméra.
B: Connecter un PC au port USB pour utiliser la caméra comme une caméra sans pilote.
HDMI
ALIMENTATION LUMIERE LUMIÈRE DE TRAVAIL
ALIMENTATION
USB
CARTE SD
ON/OFF
2. Interface HDMI.
Utiliser le câble HDMI pour connecter la caméra à un écran HDMI.
3. Alimentation de l’interface.
Utiliser l’alimentation 12V2A fournie. Quand l’alimentation est branchée, la lumière rouge est allumée.
Quand la caméra est allumée, la lumière bleue est allumée.
4. BOUTON ON/OFF
Appuyer et maintenir le bouton ON / OFF jusqu’à ce que la lumière bleue s’allume , appuyer à nouveau sur le
bouton ON/OFF pour éteindre la caméra.
5. CARTE SD
Pour obtenir le transfert de données de façon plus rapide et plus stable, utiliser la carte SD Class10 8GB four-
nie.
6. MONTURE-C
Port optique monture-C standard.
18Opérations HDMI
Étape 1. Connecter la caméra.
1. Brancher l’alimentation 12V2A fournie. Utiliser le câble HDMI pour connecter la caméra à l’écran.
Appuyer et maintenir le bouton ON / OFF jusqu’à ce que la lumière bleue s’allume.
2. Connecter la souris au port USB. Déplacer le curseur pour paramètrer l’écran.
3. Insérer la carte SD.
Étape 2. Déplacer le curseur vers la gauche de l’écran.
Quand on déplace le curseur vers la gauche de l’écran, les icônes ‘’capture’’ et ‘’paramètres’’ apparaissent
(image à gauche). Cliquer sur ‘’paramètres’’ pour entrer dans le menu de paramètrage (image à droite).
19Étape 3. Déplacez le curseur vers la droite de l’écran.
Étape 4. Vérifier les images et les vidéos sauvegardés sur la carte SD.
1. Vérifier l’album et supprimer les images.
202. Ver y borrar un video. Para borrar un v?deo con ?xito compruebe que dicho video no est? en uso.
Étape 5. Comparer l’avant première avec les images sauvegardées.
Connecter la caméra à l’ordinateur
1. Utiliser le câble USB pour connecter la caméra à l’ordinateur.
2. Brancher l’alimentation 12V 2A.
3. Appuyer et maintenir le bouton ON / OFF jusqu’à ce que la lumière bleue s’allume.
4. Exécuter le logiciel Optika IsView, ouvrir l’aide en ligne pour découvrir toutes les fonctions du logiciel.
21Service technique
Ressources Web
Visitez le site Web de VWR à l’adresse www.vwr.com pour:
• Coordonnées complètes du service technique.
• Accès au catalogue en ligne de VWR et à des informations sur les accessoires et produits connexes.
• Informations supplémentaires sur les produits et les offres spéciales.
Contactez-nous Pour plus d’informations ou une assistance technique, contactez votre représentant VWR
local ou visitez le site www.vwr.com.
Garantie
VWR International garantit ce produit pièces et main-d’œuvre pour une durée de 24 mois à compter de la
date de livraison. En cas de vice, VWR pourra, à sa discrétion et à ses frais, réparer, remplacer ou rembour-
ser au client le prix d’achat du produit, à condition qu’il lui soit retourné au cours de la période de garantie.
Cette garantie n’est pas applicable si le dommage provient d’un accident, d’une utilisation abusive ou incor-
recte, d’une mauvaise application ou de l’usure normale du produit. Cette garantie deviendrait non valide
dans le cas où les services de maintenance et de vérification requis ne seraient pas exécutés conformément
aux manuels et réglementations locales, sauf exception si le défaut du produit n’est pas imputable à cette
non exécution.
Il est recommandé au client d’assurer les éléments retournés contre les risques éventuels d’endommagement
ou de perte. Cette garantie se limite aux réparations susmentionnées. IL EST EXPRESSÉMENT CONVENU
QUE LA PRÉSENTE GARANTIE SE SUBSTITUE À TOUTES LES GARANTIES DE CONFORMITÉ ET DE
VALEUR MARCHANDE.
Conformité à la législation et aux réglementations locales
Le client est chargé de la demande et de l’obtention des approbations réglementaires et autres autorisations
nécessaires à l’utilisation ou à l’exploitation du Produit dans l’environnement local. VWR ne saura être tenu
responsable de toute omission ou non obtention des approbations ou autorisations requises, sauf exception
si le refus est dû à un défaut du produit.
22Ramassage
Le symbole du conteneur qui figure sur l’appareil électrique ou sur son emballage indique que le produit de-
vra être, à la fin de sa vie utile, séparé du reste des résidus. Pour la gestion du ramassage sélectif du présent
instrument, l’utilisateur qui souhaite éliminer l’appareil devra se mettre en contact avec le fabricant et suivre
la procédure que celui-ci a adopté pour permettre le ramassage sélectif de l’appareil. Le ramassage sélectif
correct de l’appareil pour son recyclage, traitement et élimination compatible avec l’environnement contribue
à éviter d’éventuels effets négatifs sur l’environnement et la santé et favorise la réutilisation et/ou recyclage
des composants de l’appareil. L’élimination du produit de manière abusive de la part de l’utilisateur entraînera
l’application de sanctions administratives sur la norme en vigueur.
Merci.
23Allemagne Hongrie République Tchèque
VWR International GmbH VWR International Kft. VWR International s. r. o.
Hilpertstraße 20a Simon László u. 4. Veetee Business Park
D - 64295 Darmstadt 4034 Debrecen Pražská 442
Freecall: 0800 702 00 07 Tel.: (52) 521-130 CZ - 281 67 Stříbrná Skalice
Fax: 0180 570 22 22* Fax: (52) 470-069 Tel.: +420 321 570 321
Email: info@de.vwr.com E-mail: info@hu.vwr.com Fax: +420 321 570 320
*0,14 €/Min. aus d. dt. Festnetz E-mail: info@cz.vwr.com
Inde
Australie VWR Lab Products Private Limited Royaume-Uni
VWR International, Pty Ltd. 135/12, Brigade Towers, 2nd Floor VWR International Ltd
1/31 Archimedes Place Front wing, Brigade Road, Customer Service Centre
Murarrie, Queensland, 4172 Bengaluru, India – 560 025 Hunter Boulevard - Magna Park
Tel.: 1300 727 696 Tel.: +91-80-41117125/26 (Bengaluru) Lutterworth
Fax: 1300 135 123 Tel.: +91-2522-647911/922 (Mumbai) Leicestershire
Fax: +91-80-41117120 LE17 4XN
Autriche Tel.: 0800 22 33 44
VWR International GmbH Irlande / Irlande du Nord Fax: 01455 55 85 86
Graumanngasse 7 VWR International Ltd / E-mail: uksales@uk.vwr.com
1150 Wien VWR International (Northern Ireland) Ltd
Tel.: 01 97 002 0 Orion Business Campus Singapour
Fax: 01 97 002 600 Northwest Business Park VWR Singapore Pte Ltd
E-mail: info@at.vwr.com
Ballycoolin 18 Gul Drive
Belgique Dublin 15 Singapore 629468
VWR International bvba Tel.: 01 88 22 222 Tel.: +65 6505 0760
Researchpark Haasrode 2020 Fax: 01 88 22 333 Fax: +65 6264 3780
Geldenaaksebaan 464 E-mail: sales@ie.vwr.com E-mail: sales@sg.vwr.com
3001 Leuven
Tel.: 016 385 011 Italie Suède
Fax: 016 385 385 VWR International PBI S.r.l. VWR International AB
E-mail: customerservice@be.vwr.com Via San Giusto 85 Fagerstagatan 18a
20153 Milano (MI) 163 94 Stockholm
Chine Tel.: 02-3320311/02-487791 Tel.: 08 621 34 00
VWR International China Co., Ltd Fax: 800 152999/02-40090010 Fax: 08 621 34 66
Rm.219, 2100 Dongming Road E-mail: info@it.vwr.com E-mail: kundservice@se.vwr.com
Pudong New District
Shanghai 200123 Norvège Suisse
Tel.: +86-21-5898 6888 VWR International AS VWR International GmbH
Fax: +86-21-5855 8801 Haavard Martinsens vei 30 Lerzenstrasse 16/18
E-mail: info_china@vwr.com 0978 Oslo 8953 Dietikon
Tel.: 0 2290 Tel.: 044 745 13 13
Danemark Fax: 815 00 940 Fax: 044 745 13 10
VWR - Bie & Berntsen E-mail: info@no.vwr.com E-mail: info@ch.vwr.com
Transformervej 8
2730 Herlev Nouvelle-Zélande Turquie
Tel.: 43 86 87 88 Global Science - A VWR Company Pro Lab Laboratuar Teknolojileri Ltd.Şti.
Fax: 43 86 87 90 241 Bush Road a VWR International Company
E-mail: info@dk.vwr.com Albany 0632, Auckland Orta Mah. Cemal Gürsel Caddesi
Tel.: 0800 734 100 Ördekcioglu Işmerkezi No.32/1
Espagne Fax: 0800 999 002 34896 Pendik - Istanbul
VWR International Eurolab S.L. E-mail: sales@globalscience.co.nz Tel.: +90216 598 2900
C/ Tecnología 5-17 Fax: +90216 598 2907
A-7 Llinars Park Pays-Bas Email: info@pro-lab.com.tr
08450 - Llinars del Vallès VWR International B.V.
Barcelona Postbus 8198
Tel.: 902 222 897 1005 AD Amsterdam
Fax: 902 430 657 Tel.: 020 4808 400
E-mail: info@es.vwr.com Fax: 020 4808 480
E-mail: info@nl.vwr.com
Finlande
VWR International Oy Pologne
Valimotie 9 VWR International Sp. z o.o.
00380 Helsinki Limbowa 5 RENDEZ-VOUS SUR WWW.
Tel.: 09 80 45 51 80-175 Gdansk
Fax: 09 80 45 52 00 VWR.COM ET RETROUVEZ
Tel.: 058 32 38 200 do 204
E-mail: info@fi.vwr.com Fax. 058 32 38 205 NOS NOUVEAUTÉS ET OFFRES
E-mail: info@pl.vwr.com SPÉCIALES
France
VWR International S.A.S.
Le Périgares – Bâtiment B
Portugal
VWR International - Material de Labo-
201, rue Carnot
94126 Fontenay-sous-Bois cedex ratório, Lda
Tel.: 0 825 02 30 30 (0,15 € TTC/min) Edifício Neopark
Fax: 0 825 02 30 35 (0,15 € TTC/min) Av. Tomás Ribeiro, 43- 3 D
E-mail: info@fr.vwr.com 2790-221 Carnaxide
Tel.: 21 3600 770
Fax: 21 3600 798/9
E-mail: info@pt.vwr.com
24VWR
Pro HDMI
BEDIENUNGSANLEITUNG
Model European Catalogue Number
HDMI13 630-2627
Version: 3
Datum: 27, 07, 2015Herstellersadresse
Europe
VWR International bvba
Researchpark Haasrode 2020
Geldenaaksebaan 464
B-3001 Leuven
+ 32 16 385011
http://be.vwr.com
Ursprungsland: ITALY
Inhalt
Verpackung
Installation des drivers und der software
Anmerkungen
Überprüfung der kamera
Was ist ihr driver?
VisiCam, ein komplettes programm um messungen Durchzuführen und ihre bilder zu dokumentie-
ren
Erste schritte mit optika IsView, eine vollständige software Zum messen, bearbeiten, video- und
bildaufnahme.
Bedienungsanleitungen HDMI
HDMI Anweisung
Technischer Kundendienst
Gewährleistung
Befolgung lokaler Gesetze und anderer Rechtsvorschriften
Wiederverwertung
26Verpackung
BESCHREIBUNG MENGE
HDMI Kamera 1
12V 2000mA Netzteil 1
SD-Karte 1
USB-Kabel 1
HDMI-Kabel 1
Kalibrierungsobjektträger 1
CD 1
Mouse 1
27Installation des drivers und der software
1 Stellen Sie sicher, dass Ihr PC mit all the windows o.s ausgestattet ist.
2 Bitte setzen Sie die CD ein und lassen:
\VisiCam\ setup.exe laufen
3 Jetzt erscheint das VisiCam Symbol am Desktop.
4 Führen Sie \optika IsView\ setup.exe aus
5 Das optika IsView Symbol erscheint auf Ihrem Desktop.
6 Es ist nicht nötig, einen driver zu installieren
7 Verbinden Sie jetzt die Kamera, Windows wird sie automatisch erkennen.
Anmerkungen
Jeder Computer hat unterschiedliche USB Port-Paare: die auf der Rückseite sind normalerweise schneller,
deshalb verwenden Sie diese um eine schnellere Datenübertragung zu haben.
Falls ein Peripheriegerät mit einem USB-Port verbunden ist und es wird dann mit einem anderen Port verbun-
den, so muss Windows es erkennen und deshalb den Driver auch für diesen Port installieren. Normalerweise,
wenn ein anderer Port verwendet wird und dann die Kamera verbunden wird, muss es von Windows erkannt
werden und der Driver muss wieder
installiert werden.
Es kann auch passieren, dass Windows das Peripheriegerät an einem USB-Port nicht erkennt
aber an anderen schon.
Überprüfung der kamera
Um den Kamerabetrieb zu prüfen ist es nicht notwendig das Mikroskop einzustecken, sondern es genügt, die
Kamera mit dem USB Port zu verbinden und Vision Lite auszuführen. Verwenden Sie das Icon am Desktop,
wählen Sie den richtigen Driver und dann stellen Sie sicher, dass Sie keine schwarzen Bilder bekommen.
Was ist ihr driver?
Wählen Sie USB CAMERA aus.
Mit VisiCam müssen Sie den Driver auswählen; verwenden Sie das Mikroskop-Symbol.
Mit Optika IsView erscheint das Live-Bild aus der Kamera automatisch.
28VisiCam, ein komplettes programm um messungen Durchzuführen und ihre bil-
der zu dokumentieren
Wählen Sie das Symbol am Desktop um VisiCam auszuführen.
Wählen Sie den richtigen Driver und nehmen Sie das Bild auf. Vor der Aufnahme können einige Parameter
wie, Sättigung, Kontrast, Spektrum u.s.w. eingestellt werden.
Das Bild ist jetzt bereit, um mit VisiCam bearbeitet zu werden.
Erste schritte mit optika IsView, eine vollständige software
Zum messen, bearbeiten, video- und bildaufnahme.
Klicken Sie auf dem Desktop um optika IsView laufen lassen.
Das Kamera Live-Bild erscheint automatisch, mit einfachen Kontrollknöpfen
29Bedienungsanleitungen HDMI
1. USB Interface.
A: Verbinden Sie eine Mouse an den USB-Port. Verwenden Sie die Mouse für die direkte Steuerung der Kamera.
B: Verbinden Sie den USB-port an den PC, so dass die Kamera als eine Driver-Free Kamera funktioniert.
HDMI
POWER LIGHT WORKING LIGHT
POWER
USB
SD CARD
TURN ON/OFF
2. HDMI Interface.
Verwenden Sie den HDMI Kabel, um die Kamera an den HDMI Monitor zu verbinden.
3. Power Interface.
Verwenden Sie den mitgelieferten 12V2A Netzteil. Wenn die Betriebsspannung eingesteckt ist, ist die rote Licht
an. Wenn eingeschaltet, ist die blaue Licht an.
4. ON/OFF TASTE
Drücken Sie den ON/OFF Taste bis die blaue Licht ON ist, drücken Sie die ON/OFF Taste wieder bis die Kamera
ausgeschaltet ist.
5. SD-KARTE
Für einen schnelleren und stabileren Datentransfer empfehlen wir eine “Class10” SD-Karte. Wir liefern eine
“Class10” 8 Giga SD-Karte.
6. C MOUNT
Standard C-mount optisches Port.
30HDMI Anweisung
Step 1. Verbindung der Kamera.
1. Stecken Sie den 12V2A Netzteil ein. Verwenden Sie den HDMI Kabel, um die Kamera an den Monitor zu
verbinden. Drücken Sie die ON/OFF Taste bis die blaue Licht an ist.
2. Verbinden Sie die Mouse an den USB-Port. Bewegen Sie den Cursor um die Konfiguration an
dem Bildschirm zu haben.
3. Setzen Sie die SD-Karte ein.
Step 2. Bewegen Sie den Cursor an die linke Seite des Bildschirmes.
Wenn der Cursor an die linke Seite des Bildschirmes bewogen wird, werden die Icone ‘Capture’ und ‘Setting’
erscheinen (siehe Abbildung links). Clicken Sie ‘Setting’, um das Parameter setting Menu zu haben (siehe Ab-
bildung rechts).
31Step 3. Bewegen Sie den Cursor an die rechte Seite des Bildschirmes
Step 4. Kontrollieren Sie die Bilder und Video in Ihrer SD-Karte.
1. Kontrollieren Sie Ihre Bildergalerie und löschen Sie die Bilder.
322. Kontrollieren und löschen Sie das Video. Um es zu löschen vergewissern Sie sich, das dieses Video nicht
aktiv ist.
Step 5. Vergleichen Sie die Preview mit den gespeicherten Bildern.
Verbindung der Kamera an den PC
1. Verwenden Sie den Spezial-USB Kabel, um die Kamera an den PC zu verbinden.
2. Stecken Sie den Anschlusstecker in den 2V 2A Netzteil ein.
3. Drücken Sie die on/off Taste, bis die blaue Licht an ist.
4. Führen Sie die Optika IsView Software aus, konsultieren Sie die On-line Hilfe, um alle Funktionen der
Software zu entdecken.
33Technischer Kundendienst
Auf der VWR Website unter www.vwr.com finden Sie die folgenden Informationen:
• Alle Kontaktdaten des technischen Kundendienstes
• VWR Online-Katalog sowie Informationen über Zubehör und zugehörige Produkte
• Weiterführende Produktinformationen und Sonderangebote
Kontakt Wenn Sie Informationen oder technische Unterstützung benötigen, wenden Sie sich an Ihr VWR
Vertriebszentrum oder besuchen Sie unsere Website unter www.vwr.com
Gewährleistung
VWR International gewährleistet, dass dieses Produkt ab Lieferung 24 Monate von Material- und Herstel-
lungsfehlern ist. Liegt ein Fehler vor, entscheidet VWR nach eigenem Ermessen, das Produkt kostenlos zu
reparieren oder auszutauschen oder dem Kunden den Kaufpreis des Produkts zu erstatten, sofern es inner-
halb des Gewährleistungszeitraums zurückgesendet wird. Diese Gewährleistung erlischt, wenn das Produkt,
versehentlich oder absichtlich, durch unsachgemäßen Gebrauch oder durch normalen Verschleiß beschädigt
wurde. Sofern die erforderlichen Wartungsarbeiten und Inspektionen nicht entsprechend der Bedienungsan-
leitung und den lokalen Erfordernissen durchgeführt werden, erlischt die Gewährleistung, es sei denn, dieses
Unterlassen ist nicht ursächlich für den auftretenden Fehler des Produktes.
Zurückgesendete Artikel müssen vom Kunden gegen Schäden und Verlust versichert werden. Diese Ge-
währleistung ist auf die zuvor genannten Rechte beschränkt. ES WIRD AUSDRÜCKLICH VEREINBART,
DASS DIESE GEWÄHRLEISTUNG ANSTELLE JEGLICHER GEWÄHRLEISTUNG DER EIGNUNG UND
ANSTELLE DER GEWÄHRLEISTUNG DER ALLGEMEINEN GEBRAUCHSTAUGLICHKEIT GILT.
Befolgung lokaler Gesetze und anderer Rechtsvorschriften
Der Kunde ist dafür verantwortlich, die notwendigen behördlichen Genehmigungen und anderen Bewilligun-
gen zu beantragen und zu erhalten, die erforderlich sind, das erworbene Produkt an seinem Standort zu
betreiben und zu nutzen. VWR kann nicht haftbar gemacht werden, wenn der Kunde es unterlässt, die hierzu
erforderlichen Handlungen vorzunehmen, oder dafür, dass die notwendigen Genehmigungen oder Bewilli-
gungen nicht erteilt werden, es sei denn, eine entsprechende Ablehnung ist auf einen Mangel des Produktes
zurückzuführen.
34Wiederverwertung
Das Symbol vom Müllcontainer erscheint auf dem Gerät oder der Verpackung und weist darauf hin, dass das
Produkt Ende des Lebens separat von anderen Abfällen entsorgt werden muss.
Es ist Ihre Verantwortung, dieses Gerät korrekt zu entsorgen, durch die Übergabe zu einer genehmigten An-
lage für die getrennte Sammlung und das Recycling. Es ist auch Ihre Verantwortung, die Einrichtung im Falle
von biologischen, chemischen und / oder radiologischen Kontamination zu dekontaminieren, um vor gesund-
heitlichen Gefahren die Personen schützten, die in der Entsorgung und Recycling der Geräte beteiligt sind.
Für weitere Informationen, kontaktieren Sie bitte Ihren lokalen Händler, wo Sie dieses Gerät gekauft haben.
35Australia Italien Singapur
VWR International, Pty Ltd. VWR International PBI S.r.l. VWR Singapore Pte Ltd
1/31 Archimedes Place Via San Giusto 85 18 Gul Drive
Murarrie, Queensland, 4172 20153 Milano (MI) Singapore 629468
Tel.: 1300 727 696 Tel.: 02-3320311/02-487791 Tel.: +65 6505 0760
Fax: 1300 135 123 Fax: 800 152999/02-40090010 Fax: +65 6264 3780
E-mail: info@it.vwr.com E-mail: sales@sg.vwr.com
Belgien
VWR International bvba Neuseeland Spanien
Researchpark Haasrode 2020 Global Science - A VWR Company VWR International Eurolab S.L.
Geldenaaksebaan 464 241 Bush Road C/ Tecnología 5-17
3001 Leuven Albany 0632, Auckland A-7 Llinars Park
Tel.: 016 385 011 Tel.: 0800 734 100 08450 - Llinars del Vallès
Fax: 016 385 385 Fax: 0800 999 002 Barcelona
E-mail: customerservice@be.vwr.com E-mail: sales@globalscience.co.nz Tel.: 902 222 897
Fax: 902 430 657
China Niederlande E-mail: info@es.vwr.com
VWR International China Co., Ltd VWR International B.V.
Rm.219, 2100 Dongming Road Postbus 8198 Tschechische Republik
Pudong New District 1005 AD Amsterdam VWR International s. r. o.
Shanghai 200123 Tel.: 020 4808 400 Veetee Business Park
Tel.: +86-21-5898 6888 Fax: 020 4808 480 Pražská 442
Fax: +86-21-5855 8801
E-mail: info@nl.vwr.com CZ - 281 67 Stříbrná Skalice
E-mail: info_china@vwr.com
Tel.: +420 321 570 321
Dänemark Norwegen Fax: +420 321 570 320
VWR - Bie & Berntsen VWR International AS E-mail: info@cz.vwr.com
Transformervej 8 Haavard Martinsens vei 30
2730 Herlev 0978 Oslo Türkei
Tel.: 43 86 87 88 Tel.: 0 2290 Pro Lab Laboratuar Teknolojileri Ltd.Şti.
Fax: 43 86 87 90 Fax: 815 00 940 a VWR International Company
E-mail: info@dk.vwr.com E-mail: info@no.vwr.com Orta Mah. Cemal Gürsel Caddesi
Ördekcioglu Işmerkezi No.32/1
Deutschland Österreich 34896 Pendik - Istanbul
VWR International GmbH VWR International GmbH Tel.: +90216 598 2900
Hilpertstraße 20a Graumanngasse 7 Fax: +90216 598 2907
D - 64295 Darmstadt 1150 Wien Email: info@pro-lab.com.tr
Freecall: 0800 702 00 07 Tel.: 01 97 002 0
Fax: 0180 570 22 22* Fax: 01 97 002 600 UK
Email: info@de.vwr.com E-mail: info@at.vwr.com VWR International Ltd
*0,14 €/Min. aus d. dt. Festnetz Customer Service Centre
Polen Hunter Boulevard - Magna Park
Finnland VWR International Sp. z o.o. Lutterworth
VWR International Oy Limbowa 5 Leicestershire
Valimotie 9 80-175 Gdansk LE17 4XN
00380 Helsinki Tel.: 058 32 38 200 do 204 Tel.: 0800 22 33 44
Tel.: 09 80 45 51 Fax: 058 32 38 205 Fax: 01455 55 85 86
Fax: 09 80 45 52 00 E-mail: info@pl.vwr.com E-mail: uksales@uk.vwr.com
E-mail: info@fi.vwr.com
Portugal Ungarn
Frankreich VWR International - Material de Labo- VWR International Kft.
VWR International S.A.S. ratório, Lda Simon László u. 4.
Le Périgares – Bâtiment B Edifício Neopark 4034 Debrecen
201, rue Carnot Av. Tomás Ribeiro, 43- 3 D Tel.: (52) 521-130
94126 Fontenay-sous-Bois cedex 2790-221 Carnaxide Fax: (52) 470-069
Tel.: 0 825 02 30 30 (0,15 € TTC/min) Tel.: 21 3600 770 E-mail: info@hu.vwr.com
Fax: 0 825 02 30 35 (0,15 € TTC/min) Fax: 21 3600 798/9
E-mail: info@fr.vwr.com E-mail: info@pt.vwr.com
Indien Schweden
VWR Lab Products Private Limited VWR International AB
135/12, Brigade Towers, 2nd Floor Fagerstagatan 18a
Front wing, Brigade Road, 163 94 Stockholm BESUCHEN SIE UNS UNTER
Bengaluru, India – 560 025 Tel.: 08 621 34 00
Tel.: +91-80-41117125/26 (Bengaluru) WWW.VWR.COM UND FINDEN
Fax: 08 621 34 66
Tel.: +91-2522-647911/922 (Mumbai) E-mail: kundservice@se.vwr.com HIER DIE NEUESTEN ANGEBOTE
Fax: +91-80-41117120
E-mail: vwr_india@vwr.com ZUR VWR COLLECTION UND DIE
Schweiz
VWR International GmbH ADRESSE IHRES LOKALEN VWR
Irland / Nordirland Lerzenstrasse 16/18
VWR International Ltd / VERTRIEBSPARTNERS
8953 Dietikon
VWR International (Northern Ireland) Ltd
Orion Business Campus Tel.: 044 745 13 13
Northwest Business Park Fax: 044 745 13 10
Ballycoolin E-mail: info@ch.vwr.com
Dublin 15
Tel.: 01 88 22 222
Fax: 01 88 22 333
E-mail: sales@ie.vwr.com
36VWR
Pro HDMI
MANUALE D’ISTRUZIONI
Modello European Catalogue Number
HDMI13 630-2627
Versione: 3
Emesso il: 27, 07, 2015Indirizzo legale del produttore
Europa
VWR International bvba
Researchpark Haasrode 2020
Geldenaaksebaan 464
B-3001 Leuven
+ 32 16 385011
http://be.vwr.com
Origine della merce: ITALIA
Indice
Contenuto della confezione
Installazione dei drivers e del software
Alcune note
Come verificare la telecamera
Selezionare il driver corretto
VisiCam, un programma completo per eseguire misurazioni e per documentare le vostre immagini
Iniziare a utilizzare Optika IsView, un software completo per la misura, regolazione e cattura di im-
magini e video
Guida HDMI
Assistenza tecnica
Garanzia
Conformità a leggi e normative locali
Smaltimento
38Contenuto della confezione
DESCRIZIONE QUANTITÀ
Camera HDMI 1
Alimentazione 12V 2000mA 1
SD card 1
Cavo USB 1
Cavo HDMI 1
Vetrino di calibrazione 1
CD 1
Mouse 1
39Installazione dei drivers e del software
1. Requisiti del sistema operativo: compatibile con tutti i sistemi operativi Windows.
2. Inserire il CD e avviare il programma:
\ VisiCam \ setup.exe
3. Ora l’icona VisiCam apparirà sul vostro desktop.
4. Avviare il programma
\ optika IsView\ setup.exe
5. Ora l’icona Optika IsView apparirà sul vostro desktop.
6. Non è necessario installare alcun driver.
7. A questo punto inserire la telecamera: la fotocamera verrà identificata automaticamente.
Alcune note
Consigliamo di utilizzare le porte USB poste sul retro del PC, poiché garantiscono in generale una migliore co-
municazione.
Se utilizzate una periferica su una porta USB e la collegate poi in una seconda porta, Windows avrà bisogno di
riconoscerla ed installare il Driver anche per questa porta.
È possibile che Windows non riconosca la periferica su una porta USB, si consiglia di provare il collegamento
su di un altra porta USB.
Come verificare la telecamera
Per verificare il funzionamento non è necessario inserire fisicamente la telecamera nel microscopio, basta colle-
garla alla porta USB ed eseguire VisiCam usando l’icona sul vostro Desktop, selezionare quindi il Driver corretto
e controllare di non avere un’immagine completamente nera.
Selezionare il driver corretto
Seleziona: USB CAMERA.
Con VisiCam dovete indicare al software il driver da utilizzare selezionando l’icona a forma di microscopio.
Con Optika IsView l’immagine live proveniente dalla telecamera apparirà automaticamente.
40VisiCam, un programma completo per eseguire misurazioni e per documentare le
vostre immagini
Lanciate VisiCam selezionando l’apposita icona sul desktop.
Selezionate il Driver corretto e catturate l’immagine. Notate che prima di catturare l’immagine potete regolare
alcuni importanti fattori quali: sensibilità del CCD, saturazione, contrasto, gamma, ecc..
Quindi catturate l’immagine. L’immagine è ora pronta per essere elaborata con VisiCam.
Iniziare a utilizzare Optika IsView, un software completo per la misura, regolazio-
ne e cattura di immagini e video
Avviare Optika IsView cliccando sull’icona sul desktop.
L’immagine live della telecamera apparirà automaticamente, con semplici pulsanti di controllo.
41Guida HDMI
1. Interfaccia USB.
A: Collegare un mouse all’uscita USB. Usare il mouse per controllare direttamente la telecamera.
B: Collegare un PC all’uscita USB per utilizzare la telecamera come una Driver-Free camera.
HDMI
POWER LIGHT WORKING LIGHT
POWER
USB
SD CARD
TURN ON/OFF
2. Interfaccia HDMI.
Usare il cavo HDMI per collegare la camera a un monitor HDMI.
3. Alimentazione.
Utilizzare l’alimentatore 12V2A fornito in dotazione. Quando l’alimentazione è attiva la luce rossa è accesa.
Quando la telecamera è in uso la luce blu è accesa.
4. ON/OFF
Tener premuto il pulsante ON/OFF finchè la luce blu sia accesa, premere di nuovo il pulsante ON/OFF per
spegnare la telecamera.
5. SD CARD
Per rendere più rapido e stabile il trasferimento dati, si raccomanda di utilizzare la SD CARD Class10 SD da
noi fornita da 8 GB.
6. C MOUNT
Uscita con attacco standard C-MOUNT.
42Operazioni HDMI
Step 1. Collegare la camera.
1. Accendere l’alimentatore 12V2A fornito. Usare il cavo HDMI per collegare la camera al monitor.
Tener premuto il pulsante ON/OFF finchè si accenda la luce blu.
2. Collegare il mouse all’uscita USB. Muovere il cursore per impostare la schermata.
3. Inserire la SD card.
Step 2. Muovere il cursore sulla parte sinistra dello schermo.
Portando il cursore nella parte sinistra dello schermo, appariranno le icone ‘Capture’ e ‘Setting’ (vedi immagine
a sinistra). Cliccare su ‘Setting’ per entrare nel menu dei parametri (vedi immagine a destra).
43Step 3. Spostare il cursore a destra dello schermo.
Step 4. Controllare immagini e video salvate su SD card.
1. Controllare la galleria e cancellare le immagini.
442. Controllare il video e eliminare il video. Per eliminare il video con successo, essere sicuri che questo video
non è in uso.
Step 5. Confrontare anteprima con immagini salvate.
Collegare la camera a PC
1. Usare il cavo USB per collegare la camera a PC.
2. Collegarlo all’alimentatore 12V 2A.
3. Tener premuto il pulsante on/off fino a che si accenda la spia blu.
4. Avviare il software Optika IsView, aprire la Guida on-line per scoprire tutte le funzioni del software.
45Assistenza tecnica
Risorse sul web
Visitare il sito web VWR all’indirizzo www.vwr.com per:
• Informazioni complete sui contatti dell’Assistenza tecnica
• Accesso al catalogo on-line VWR e ad ogni altra informazione relativa agli accessori e ai prodotti collegati
• Ulteriori informazioni sui prodotti e sulle promozioni
Contatti Per informazioni o assistenza tecnica, contattare i nostri uffici VWR o visitare il sito. www.vwr.com
Garanzia
VWR International garantisce per questo prodotto l’assenza da difetti nei materiali e di fabbricazione per un
periodo di di 24 mesi dalla data di consegna. In caso contrario, VWR provvederà, a sua discrezione e a pro-
prie spese, alla riparazione, sostituzione o al rimborso del prezzo di acquisto del prodotto al cliente, purché
venga restituito durante il periodo di garanzia. La presente garanzia non copre eventuali danni accidentali
o causati da abuso, uso o applicazione impropri o dal normale logorio dell’apparecchio. Qualora i servizi di
ispezione e manutenzione necessari non vengano eseguiti secondi i manuali e le eventuali normative locali,
tale garanzia risulta non valida, salvo nella misura in cui il difetto del prodotto non sia causato dalla mancata
prestazione dei suddetti servizi.
Il cliente dovrà assicurare le parti da restituire contro eventuali danni o perdite. La presente garanzia è limi-
tata ai suddetti rimedi. SI CONCORDA ESPRESSAMENTE CHE LA PRESENTE GARANZIA SOSTITUISCE
TUTTE LE GARANZIE DI IDONEITÀ E LA GARANZIA DI COMMERCIABILITÀ.
Conformità a leggi e normative locali
Il cliente è responsabile della richiesta e dell’ottenimento delle approvazioni normative necessarie o di altre
autorizzazioni necessarie per eseguire o utilizzare il prodotto nel suo ambiente locale. VWR non sarà ritenuta
responsabile delle relative omissioni o del mancato ottenimento dell’approvazione o autorizzazione necessa-
ria, a meno che l’eventuale rifiuto non sia dovuto a un difetto del prodotto
46Smaltimento
Questo strumento riporta il simbolo del bidone con ruote con una croce sopra. Questo indica che lo strumen-
to non può essere smaltito nei rifiuti indifferenziati.
E’ responsabilità dell’utente smaltirlo correttamente ,consegnandolo ad una struttura autorizzata per lo smi-
stamento ed il riciclo dei rifiuti. Inoltre, è responsabilità dell’utente provvedere alla decontaminazione dello
strumento da eventuali contaminazioni con materiale biologico, chimico e/o radioattivo, al fine di proteggere
le persone coinvolte nel processo di riciclo dello strumento da eventuali pericoli per la salute.
Per ulteriori informazioni sui luoghi adatti allo smaltimento dello strumento, si prega di contattare il rivenditore
locale che ha venduto lo strumento.
In questo modo, si favorirà la conservazione delle risorse naturali e l’ambiente e si garantirà un riciclaggio
dello strumento che non danneggia la salute umana.
Grazie.
47Australia Irlanda / Irlanda del Nord Repubblica Ceca
VWR International, Pty Ltd. VWR International Ltd / VWR International VWR International s. r. o.
1/31 Archimedes Place (Northern Ireland) Ltd Veetee Business Park
Murarrie, Queensland, 4172 Orion Business Campus Pražská 442
Tel.: 1300 727 696 Northwest Business Park CZ - 281 67 Stříbrná Skalice
Fax: 1300 135 123 Ballycoolin Tel.: +420 321 570 321
Dublin 15 Fax: +420 321 570 320
Austria Tel.: 01 88 22 222 E-mail: info@cz.vwr.com
VWR International GmbH Fax: 01 88 22 333
Graumanngasse 7 E-mail: sales@ie.vwr.com Spagna
1150 Wien VWR International Eurolab S.L.
Tel.: 01 97 002 0 Italia C/ Tecnología 5-17
Fax: 01 97 002 600 VWR International PBI S.r.l. A-7 Llinars Park
E-mail: info@at.vwr.com Via San Giusto 85 08450 - Llinars del Vallès
20153 Milano (MI) Barcelona
Belgio Tel.: 02-3320311/02-487791 Tel.: 902 222 897
VWR International bvba Fax: 800 152999/02-40090010 Fax: 902 430 657
Researchpark Haasrode 2020 E-mail: info@it.vwr.com E-mail: info@es.vwr.com
Geldenaaksebaan 464
3001 Leuven Norvegia Turchia
Tel.: 016 385 011 VWR International AS Pro Lab Laboratuar Teknolojileri Ltd.Şti.
Fax: 016 385 385 Haavard Martinsens vei 30 a VWR International Company
E-mail: customerservice@be.vwr.com
0978 Oslo Orta Mah. Cemal Gürsel Caddesi
Cina Tel.: 0 2290 Ördekcioglu Işmerkezi No.32/1
VWR International China Co., Ltd Fax: 815 00 940 34896 Pendik - Istanbul
Rm.219, 2100 Dongming Road E-mail: info@no.vwr.com Tel.: +90216 598 2900
Pudong New District Fax: +90216 598 2907
Shanghai 200123 Nuova Zelanda Email: info@pro-lab.com.tr
Tel.: +86-21-5898 6888 Global Science - A VWR Company
Fax: +86-21-5855 8801 241 Bush Road Singapore
E-mail: info_china@vwr.com Albany 0632, Auckland VWR Singapore Pte Ltd
Tel.: 0800 734 100 18 Gul Drive
Danimarca Fax: 0800 999 002 Singapore 629468
VWR - Bie & Berntsen E-mail: sales@globalscience.co.nz Tel: +65 6505 0760
Transformervej 8 Fax: +65 6264 3780
2730 Herlev Paesi Bassi E-mail: sales@sg.vwr.com
Tel.: 43 86 87 88 VWR International B.V.
Fax: 43 86 87 90 Postbus 8198 Svezia
E-mail: info@dk.vwr.com 1005 AD Amsterdam VWR International AB
Tel.: 020 4808 400 Fagerstagatan 18a
Finlandia Fax: 020 4808 480 163 94 Stockholm
VWR International Oy E-mail: info@nl.vwr.com Tel.: 08 621 34 00
Valimotie 9 Fax: 08 621 34 66
00380 Helsinki Polonia E-mail: kundservice@se.vwr.com
Tel.: 09 80 45 51 VWR International Sp. z o.o.
Fax: 09 80 45 52 00 Limbowa 5 Svizzera
E-mail: info@fi.vwr.com 80-175 Gdansk VWR International GmbH
Tel.: 058 32 38 200 do 204 Lerzenstrasse 16/18
Francia Fax: 058 32 38 205 8953 Dietikon
VWR International S.A.S. E-mail: info@pl.vwr.com Tel.: 044 745 13 13
Le Périgares – Bâtiment B Fax: 044 745 13 10
201, rue Carnot Portogallo E-mail: info@ch.vwr.com
94126 Fontenay-sous-Bois cedex VWR International - Material de Labo-
Tel.: 0 825 02 30 30 (0,15 € TTC/min) ratório, Lda Ungheria
Fax: 0 825 02 30 35 (0,15 € TTC/min) Edifício Neopark VWR International Kft.
E-mail: info@fr.vwr.com Av. Tomás Ribeiro, 43- 3 D Simon László u. 4.
2790-221 Carnaxide 4034 Debrecen
Germania Tel.: 21 3600 770 Tel.: (52) 521-130
VWR International GmbH Fax: 21 3600 798/9 Fax: (52) 470-069
Hilpertstraße 20a E-mail: info@pt.vwr.com E-mail: info@hu.vwr.com
D - 64295 Darmstadt
Freecall: 0800 702 00 07 Regno Unito
Fax: 0180 570 22 22* VWR International Ltd
Email: info@de.vwr.com Customer Service Centre
*0,14 €/Min. aus d. dt. Festnetz Hunter Boulevard - Magna Park
Lutterworth VISITA IL SITO WWW.VWR.COM
India Leicestershire PER CONOSCERE LE NOSTRE
VWR Lab Products Private Limited LE17 4XN
135/12, Brigade Towers, 2nd Floor Tel.: 0800 22 33 44 OFFERTE SPECIALI, LE NOVITÀ
Front wing, Brigade Road, Fax: 01455 55 85 86
Bengaluru , India – 560 025 E I CONTATTI
E-mail: uksales@uk.vwr.com
Tel.: +91-80-41117125/26 (Bengaluru)
Tel.: +91-2522-647911/922 (Mumbai)
Fax: +91-80-41117120
E-mail: vwr_india@vwr.com
48VWR
Pro HDMI
MANUAL DE INSTRUCCIONES
Modelo European Catalogue Number
HDMI13 630-2627
Versión: 3
Publicado: 27, 07, 2015Dirección legal del fabricante
Europa
VWR International bvba
Researchpark Haasrode 2020
Geldenaaksebaan 464
B-3001 Leuven
+ 32 16 385011
http://be.vwr.com
País de origen: ITALIA
Cuadro de contenidos
Contenido del embalaje
Instalación de los drivers y del software
Notas
Cómo verificar la tele cámara
Reconocimiento del tipo de driver
VisiCam, un programa completo para realizar mediciones y documentar imágenes
Con el software Optika IsView será posible realizar mediciones, correcciones, adquirir imágenes y
videoclips
Guía del usuario cámara HDMI
Operation HDMI
Servicio técnico
Garantía
Cumplimiento de leyes y normativas locales
Eliminación de residuos
50Contenido del embalaje
DESCRIPCIÓN CANTIDAD
Cámara HDMI 1
Alimentación12V 2000mA 1
Tarjeta SD 1
Cable USB 1
Cable HDMI 1
Muestra de calibración 1
CD 1
Mouse 1
51Instalación de los drivers y del software
1. Sistemas operativos requeridos: compatible con todos los sistemas operativos Windows.
2. Introducir el CD y ejecutar:
\ViSicam\ setup.exe
3. Aparecerá en el fondo de escritorio el icono de ViSicam.
4. Poner en marcha
\ optika IsView\ setup.exe
5. Aparecerá en el fondo de escritorio el icono de Optika IsView.
6. No es necesario instalar ningún controlador.
7. En este punto, inserte la cámara: la cámara se detecta automáticamente.
Notas
Se aconseja utilizar los puertos USB situados en la parte posterior del pc porque la velocidad de comunicación
es superior.
Si se utiliza una periférica en un puerto USB y después se conecta a un segundo puerto, Windows necesitará
reconocerla e instalar también el Driver en la segunda.
Puede suceder que Windows no reconozca la periférica en uno de los puertos USB, pero sí en el resto.
Cómo verificar la tele cámara
Para verificar el funcionamiento de la tele cámara no es necesario introducirla en el microscopio.
Será suficiente conectarla al puerto USB, ejecutar el icono ViSicam situado en el fondo de escritorio y verificar
que NO aparezca una imagen negra.
Reconocimiento del tipo de driver
Seleccionar: USB CAMERA.
Para utilizar ViSicam, seleccionar en el driver el icono con un microscopio.
Para Optika IsView aparecerá automáticamente la imagen en vivo de la cámara.
52ViSicam, un programa completo para realizar mediciones y documentar imágenes
Poner en marcha ViSicam, seleccionando el incono situado en el fondo de escritorio.
Seleccionar el Driver correcto y capturar la imagen. Observar que antes de capturar la imagen es posible re-
gular algunos factores importantes como por ejemplo: sensibilidad del CCD, saturación, colores, balance del
blanco, contraste, gama, etc.
Ahora será posible capturar y elaborar la imagen utilizando ViSicam.
Con el software Optika IsView será posible realizar mediciones, correcciones,
adquirir imágenes y videoclips.
Poner en marcha Optika IsView pulsando el icono del fondo de escritorio.
La imagen de la cámara live aparecerá automáticamente.
53Guía del usuario cámara HDMI
1. Interfaz USB.
A: Conecte un ratón al puerto USB. Utilice el ratón para controlar la cámara directamente.
B: Conecte el puerto USB al PC para hacer el trabajo de cámara como una cámara sin drivers.
HDMI
LUZ DE ENCENDIDO LUZ DE FUNCIONAMIENTO
CONEXIÓN A
USB CORRIENTE
TARGETA SD
BOTON DE ENCENDIDO
2. Interfaz HDMI.
Utilice el cable HDMI para conectar la cámara al monitor HDMI.
3. Interfaz de corriente.
Por favor, utilice la fuente de alimentación 12V2A proporcionada. Cuando la cámara recibe corriente desde el
alimentador la luz roja aparecerá encendida. Cuando la cámara esté en funcionamiento se enciende luz azul.
4. Botón de encendido (ON/OFF)
Mantenga presionado el botón de encendido ON / OFF hasta que la luz azul aparezca encendida. Pulse el
botón ON / OFF para apagar la cámara.
5. Targeta SD CARD
Para obtener la transferencia de datos más rápida y estable recomendamos el uso de targetas SD Clase 10
nosotros suministramos una tarjeta SD de 8 gigas.
6. Montura C
Montura C standar.
54You can also read