Instruction & Recipe Booklet Cook Central 3-in-1 Multicooker - MSC-600XA - Cuisinart Australia
←
→
Page content transcription
If your browser does not render page correctly, please read the page content below
Instruction & Recipe Booklet
     Cook Central 3-in-1 Multicooker - MSC-600XA
For your safety and continued enjoyment of this product, always read the instruction booklet carefully before using.
IMPORTANT • Do not operate this appliance if it has been
dropped or damaged (including the cord) in
SAFEGUARDS
any manner or is not operating correctly.
• Do not operate this appliance in an appliance
cabinet or under a wall cabinet. When storing
READ ALL INSTRUCTIONS in an appliance cabinet, always unplug the
multicooker from the electrical outlet. Not
BEFORE USING doing so could create a risk of fire, especially
When using any electrical appliance, especially if the multicooker is in contact with the walls
when children are present, basic safety of any cabinetry or on closing the cabinet
precautions should always be taken to reduce door and touching the multicooker.
the risk of fire, electric shock and/or injury, • Keep hands hair and clothing away during
including the following: operation to reduce the risk of injury.
• Never leave unattended while cooking to • Always unplug from the electrical outlet when
avoid possibility of fire. not in use before putting on or taking off
• This appliance is intended for HOUSEHOLD parts and before cleaning.
USE ONLY and similar applications such as: • The use of attachments not recommended by
- staff kitchen areas in shops, offices and other Cuisinart may be hazardous.
working environments;
- farmhouses; • At no time, before or during cooking and
- clients in hotels, motels and other residential cleaning immerse multicooker, plug or cord in
type environments; water, or any other liquids similarly under
- bed and breakfast settings running water too – this is to protect against
the starting of a fire and electric shock that
• This appliance is not intended for use by could induce injury to persons. If the
persons (including children) with reduced multicooker, plug or cord should fall into
physical, sensory, or mental capabilities, or water or other liquids, unplug the cord from
lack experience and knowledge unless, they the electrical output immediately. DO NOT
have been given instruction and or guidance reach into the water.
concerning use of the appliance by a person
responsible for their safety. • The temperature of accessible surfaces may
be high when the appliance is operating.
• Use only on an appropriate benchtop and Surfaces marked with this symbol will be very
indoors only, sitting away from flammable hot to touch during use – only use
materials such as curtains, draperies and walls handles and/or knobs. DO NOT
of similar nature as a fire may occur if comes in TOUCH until the multicooker has
contact or becomes covered during operation. cooled down.
• Do not place on or near a hot gas, electric • Avoid sudden temperature changes, such as
burner, or in a heated oven. adding refrigerated foods into the glass dish.
• Do not use appliance for other than its • Only cook in the pot provided or in containers
intended use. placed on the cooking rack in the provided pot
• This multicooker is not a deep fryer. • A heated pot may damage benchtops tables.
• This appliance is under 220V~240V use only. When removing the hot pot from the
Check voltage to be sure the voltage indicated multicooker, do not place it directly on any
on the nameplate agrees with your voltage. unprotected surface. Always set on a heat-
protective surface e.g. a trivet or rack.
• Always attach plug to multicooker first, then
plug cord to wall outlet. To safely disconnect, • Do not place sealed or airtight containers in
press the START/STOP button to stop cooking the cooking pot.
cycle and remove plug from electrical outlet. • Do not place paper, cardboard, plastic or
• To avoid the possibility of the multicooker similar products in the cooking pot.
being accidentally pulled off the working area, • Use extreme caution when removing lid and
which could result in damage to the unit or steaming tray or when moving the
personal injury, do not let the cord hang over multicooker itself that may be very hot.
the edge of a table or benchtop.
• Extreme caution must be used when moving
• To avoid damage to the cord and possible fire the multicooker containing hot oil or other
or electrocution hazard, do not let cord come hot liquids.
into contact with any hot surfaces including a
stovetop.
2• Do not clean with metal scouring pads. Pieces
can break off the pad and touch electrical CONTENTS
parts, involving a risk of electric shock. Important Safeguards . . . . . . . . . . . . . . . . . . . . . 2
SPECIAL CORDSET Parts & Features . . . . . . . . . . . . . . . . . . . . . . . . . 4
Control Panel . . . . . . . . . . . . . . . . . . . . . . . . . . . . 4
INSTRUCTIONS
A short power supply cord is provided to reduce Operating Instructions . . . . . . . . . . . . . . . . . . . . . 5
the risks resulting from becoming entangled in or Cooking Functions . . . . . . . . . . . . . . . . . . . . . . . 5
tripping over a longer cord. Brown/Sauté
Extension cords may be used if care is exercised in Slow Cook
their use. Steam
If an extension cord is used, the marked electrical Quick Tips . . . . . . . . . . . . . . . . . . . . . . . . . . . . . . 6
rating of the extension cord must be at least as
great as the electrical rating of the appliance, and Quick Tips Guides . . . . . . . . . . . . . . . . . . . . . . . 7
the longer cord should be arranged so that it will Cleaning & Maintenance . . . . . . . . . . . . . . . . . . . 9
not drape over the countertop or tabletop where it
can be tripped over unintentionally or pulled on by Troubleshooting . . . . . . . . . . . . . . . . . . . . . . . . 10
children.
SAVE THESE
INSTRUCTIONS
BEFORE THE FIRST USE
Before using your Cook Central 3-in-1 Multicooker
for the first time, remove any dust from shipping
by wiping the housing and control panel.
Be sure to thoroughly clean all accessories before
first use. The removable glass lid, steaming rack
and aluminium cooking pot should be hand-
washed in hot, sudsy water and thoroughly rinsed.
Before using your Cook Central 3-in-1 Multicooker,
ensure it is 15cm away from the wall or from any
items on the benchtop. Do not use on heat-
sensitive surfaces.
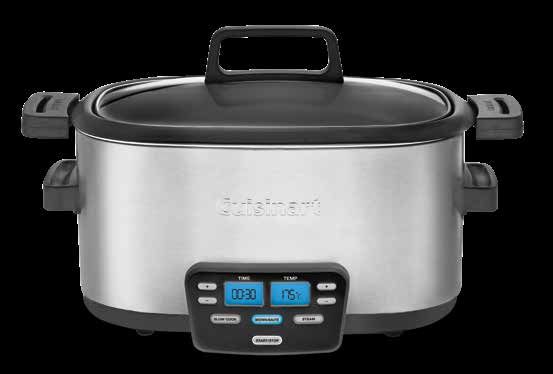
3PARTS & FEATURES
A. Glass Lid with Handle
Check the progress of a dish without releasing
A heat
B. Steaming Rack
B Elevates ingredients for steaming
C. 5.7L Nonstick Aluminum Cooking Pot
Spreads heat evenly to perfectly brown & sauté
ingredients right in unit
C
D. Control Panel
See below for more detail
E. BPA Free (not shown)
All parts that come into contact with food are
BPA free
D
GETTING TO KNOW YOUR
CONTROL PANEL
A. B
lue Backlit LCD Display
A Side-by-side display shows cooking time &
temperature
B. T
emperature Directionals
Use to set cooking temperatures. Press & hold
to scroll quickly; press & release to advance
more slowly
C. C
ooking Function Buttons
SLOW COOK, BROWN/SAUTÉ or STEAM
E B D. S
tart/Stop Button
Starts and stops cooking function
D C E. T
ime Directionals
Use to set cooking time. Press & hold to scroll
quickly; press & release to advance more
slowly
4OPERATING 3. S
elect High, Low, Simmer or Warm for
preprogrammed temperature selection. Refer
INSTRUCTIONS to chart on page 6 for more information.
Cooking is simple with the Cook Central® 4. S
et desired cooking time (up to 24 hours)
3-in-1 Multicooker. with Time Directionals.
1. Select cooking function. 5. P
ress the START/STOP button to begin
cooking. Selected time and temperature
2. Set desired cooking time and temperature. setting (High, Low, Simmer or Warm) will be
3. Press START/STOP to begin cooking. displayed.
4. To turn off the unit at any time during NOTE: If you browned ingredients before
cooking, press START/STOP. switching to slow cooking, the unit is already on,
so Step 5 is not necessary.
NOTE: The unit is hot. Always use pot holders
during and after cooking, and always lift the lid 6. W
hen slow cooking on High, Low or Simmer,
away from you. the unit will beep five times at the end of the
cooking time and will automatically switch to
the Keep Warm setting for 8 hours.
COOKING FUNCTIONS 7. W
hen Warm time elapses, one beep will
BROWN & SAUTÉ sound and heater will turn off.
1. Press BROWN/SAUTÉ. A preset temperature 8. T
o turn the heater off manually at any time,
of 175°C will flash, as this is the most press the START/STOP button.
commonly used Brown/Sauté temperature.
2. Press Temperature Directionals to select a STEAM
different temperature (from 65°C to 200°C). 1. P
lace no more than 1.9 litres of water
3. Press the START/STOP button to begin or other liquid in cooking pot and insert
preheating. Selected temperature will flash steaming rack as shown below; cover with lid.
during heatup.
4. When selected temperature is reached, two
beeps will sound. Add ingredients to cooking
pot—for best results, do not crowd pot.
2. P
ress STEAM. Steaming temperature cannot
5. O
nce cooking is complete, press START/ be changed.
STOP to stop cooking, or if you’ve browned 3. S
et desired cooking time (up to 1½ hours) by
ingredients as a first step, switch to the pressing Time Directionals.
SLOW COOK function now. There is no need
to press START/STOP again, as the unit is 4. P
ress the START/STOP button to start preheating.
already cooking. Selected time and temperature will flash as unit
heats up.
NOTE: Though browning is usually a hands-on
5. W
hen steaming temperature is reached, the
task, you can set a cooking time with the Time
unit will beep two times and the timer will
Directionals. Countdown will start when selected
begin counting down cooking time.
temperature is reached and unit will automatically
shut off when countdown is complete. 6. Carefully lift lid away from you and place food
on rack, starting in the middle and working your
way out. Be sure to cover pot with lid again.
SLOW COOK 7. W
hen cooking time is completed, the unit will
1. Fill cooking pot with ingredients and cover beep five times and the heater will turn off
with lid. automatically.
8. C
arefully remove food from pot with spoon,
2. Press SLOW COOK. A preset temperature
fork or tongs.
setting of LOW will flash, as this is the most
commonly used Slow Cook setting. 9. T
o turn the heater off manually at any time,
press the START/STOP button.
5NOTE: If all water has boiled away, the unit will
shut off, so be sure to add enough for the
QUICK TIPS
desired steaming task. BROWN/SAUTÉ
Use Brown/Sauté as you would a skillet or sauté
CHANGING SETTINGS pan on the stovetop for a variety of recipes.
Switching functions during cooking is easy. Press Prepare a quickly sautéed skillet dish, or brown
the desired new cooking function button and food right in the pot as the first step in many
the unit will adjust to the default settings for braised or slow-cooked family favorites.
your selection. To reheat foods, use Brown/Sauté at 175°C and
Set your desired time and temperature stir until all ingredients are warmed through.
as needed. You can also adjust cooking time or Switch to Slow Cook/Warm until ready to serve.
temperature at any point with the Time/
Temperature Directionals. SLOW COOKING
Do not press START/STOP to select new Three slow cooking settings are available to
settings. The unit is already on prepare a wide variety of flavourful slow-cooked
and cooking. dishes. You can adapt many recipes to slow
down cooking times, or speed it up; select what
COOKING WITHOUT A TIMER suits you and coordinate delicious meals to your
timetable. If you’re starting a dish later in the
If you do not wish to program a time, the unit day, select the HIGH setting to ensure your food
will cook at the selected temperature until you is cooked, warm and ready when you’d like to
manually turn the heater off. serve, or alternatively select the LOW or
The heater will also turn off automatically after SIMMER setting for recipes that take longer to
the maximum allowable time for the selected cook.
function has been reached.
The Simmer and Low settings are usually used
for recipes that cook longer. When starting a
SLEEP MODE dish later in the day, select the High setting to
ensure that food is cooked, warm, and ready
The multicooker is equipped with a power- when you’d like to eat.
saving Sleep mode that will turn off the lights if
the multicooker is not being used. The unit will To reheat foods, use Brown/Sauté at 175°C and
also enter sleep mode if you manually stop stir until all ingredients are warmed through.
cooking. Then switch to Slow Cook/Warm until ready to
serve.
Press any button, except Start/Stop, to “wake
up” the unit and operate as normal.
STEAMING
Steaming is one of the healthiest methods of
cooking. No butter or oil is required and fewer
nutrients are lost in the steaming process. Four
cups/ 1 litre of water is used for basic steaming
unless otherwise specified.
6QUICK TIPS GUIDES
SLOW COOKING
Setting Notes Temp. Timer
Use this setting for a
quicker slow cook or when
"baking" e.g. Programmable up to 24
HIGH • Potatoes 74°C-100°C hours then up to 8 hours
• Casseroles on WARM.
• Puddings
• Rolls
Use this setting for a
typical "slow cook" e.g.
• Braises Programmable up to 24
LOW • Roasts 74°C-93°C hours then up to 8 hours
• Casseroles on WARM.
• Shanks
• Chops
• Less-tender cut meats
Use this setting to blend &
intensify flavours e.g. Programmable up to 24
SIMMER •Soups 74°C-85°C hours then up to 8 hours
•Casseroles on WARM.
• Stocks
This is NOT a cooking Defaults to WARM once
function. time has expired or is
WARM 74°C
This setting is intended, programmable up to 8
only with preheated foods. hours.
SUGGESTED CUTS OF MEAT FOR SLOW COOKING
BEEF/VEAL PORK LAMB POULTRY GAME
Choose cuts that Less tender cuts Choose flavorful Best choice – dark Game generally
are full of flavour & work best. cuts that benefit meat – bone-in. tends to be less
benefit from Tenderloin will from braising to Breast meat can tender; therefore it
braising to become tough if tenderise. become dry when is perfect for Slow
tenderise. slow cooked. Slow Cooked. Cooking.
Pot roast, brisket, Pork shoulder Lamb shoulder; Chicken or turkey Venison roasts or
short ribs, bottom pieces; sausages; lamb stew meat; legs & thighs stew meat,
round, chuck or country style pork lamb shanks pheasant, duck
rump roast, chuck ribs (bone-in); pork thighs & legs
shoulder steak, shoulder or blade
veal shanks roast
7STEAMING
Food Amount Preparation Cooking Time
Artichokes trimmed – see recipe
6 individual 45 – 60 mins
page 25
Asparagus 450g medium trimmed 4 – 7 mins
1 bunch (about
Broccoli 5 cm florets 7 – 10 mins
480g-600g)
Carrots, baby 450g whole 10 – 12 mins
1 small head
Cauliflower 5 cm florets 7 – 9 mins
(about 20 oz.)
Corn 4 ears husked 10 – 12 mins
Green Beans 450g trimmed 8 – 10 mins
Peas, snow 450g trimmed 4 mins
Potatoes, new 450g quartered/halved 15 – 20 mins
Potatoes, mixed 480g-600g 1 cm thick slices 15 – 20 mins
(medium sized)
Potatoes, sweet 480g-600g 1 cm thick slices 10 – 15 mins
Squash, summer/zucchini 450g 1 cm thick slices 5 – 8 mins
350g (approx. 2
Chicken Whole 12 – 15 mins
chicken breast fillets)
Prawns* (Green/Raw) 450g medium peeled & deveined 4 – 5 mins
Fish Fillets 450g cut into portion sizes 8 – 12 mins
(salmon, kingfish, barramundi)
*3 cups of water should be used here
8CLEANING & MAINTENANCE
All removable parts are dishwasher safe.
•U
nplug unit and allow it to cool completely
before cleaning.
• Never immerse unit in water or other liquids.
•T
o clean the housing and control panel, simply
wipe with a clean damp cloth.
•W
ash cooking pot, lid and rack with warm
soapy water and rinse thoroughly. Or, clean in
top rack of dishwasher.
• Dry all parts after every use.
•A
ny other servicing should be performed by
an authorized service representative.
NOTE: If food residue sticks or burns onto
cooking pot surface, fill pot with warm soapy
water and allow to soak before cleaning. If
scouring is necessary, use a nonabrasive cleanser
or liquid detergent with a nylon pad or brush.
9TROUBLESHOOTING
Subject Question Answer/Solution
Make sure your unit is plugged into a functional outlet.
Why won’t my unit turn on?
Contact Customer Service at 1800 808 971.
Cooker will enter sleep mode after 5 minutes of no use and unit will
appear off. Press any button except Start/Stop to “wake up” the unit.
If you did not press START after setting your unit, the cooker will enter
sleep mode. Press any button except Start/Stop to “wake up” the unit.
The unit may have overheated. Let it cool and try again. If it does not
turn on, contact Customer Service at 1800 808 971.
Power
If pot has boiled dry during steaming, the unit will shut off as a safety
Why is my unit turning itself off? precaution. Add water to the pot and restart.
If changing functions when the unit is already cooking, do not hit the
START/STOP button again. Doing so will turn the unit off. Just press
your new function and select settings; the unit will switch automatically.
The heater will turn off automatically after time has elapsed.
If you do not set a cooking time, the unit will shut off after the
maximum allowable cooking time for the selected function.
The unit has overheated. Let it cool down and try again. If problem
Error Code Err
persists, contact Customer Service at 1800 808 971
Can I set a timer for the Brown/ Yes. Setting the timer for Brown/Sauté is easy. Simply use the Time
Sauté function? Directionals as you would for any other function.
Yes. Simply use the cooking function, Time and Temperature
Programming Can I change my cooking
Directionals. The unit is already on, so you do not need to hit the
function, time or temperature
START/STOP button again. In fact, doing so will turn the unit off.
when the unit is already
Simply press the new function and/or desired settings; the unit will
cooking?
switch automatically and adjust itself accordingly.
Browning meat before slow cooking is an optional step that adds
When should I brown my meat
flavor and color. You can omit it if time is short. Exception: ground
before slow cooking?
meats must be browned.
Which position should the rack
Place rack in the “up” position for steaming (see page 5).
Cooking be in for steaming?
Can I use the cooking pot on The cooking pot was designed specifically for use in this multi-cooker.
the stove/in the oven? We do not suggest using it on the stove or in the oven.
Why isn’t enough liquid in my Recipe ingredient amounts may vary if using multiple functions. See
slow cooked dish? page 8 for details.
All removable parts are dishwasher safe.
Can I put my unit in the
dishwasher? Do not immerse or put the base of the unit in the dishwasher. Clean the
base and control panel with a clean damp cloth.
The pot is nonstick – why is
food sticking? Though the pot has a nonstick coating, food residue can burn onto it,
Cleaning
making it difficult to remove.
Food residue is sticking to the If food has burned on, fill pot with warm soapy water and allow to soak
cooking pot surface. How do I before cleaning. If scouring is necessary, use a non-abrasive cleanser or
clean it without damaging it? liquid detergent with a nylon pad or brush.
10NOTES:
11cuisinart.com.au
©2021 Cuisinart
Suite 101 Ground Floor
18 Rodborough Rd
Frenchs Forest NSW, 2086
Australia
Visit our Website:
cuisinart.com.au
Printed in China
Trademarks or service marks of third parties referred
to herein are the trademarks or service marks of
their respective owners. IB-14/104CYou can also read