Instructions for Swisscom Webmail

Page created by Clyde Harmon
 
CONTINUE READING
Instructions for Swisscom Webmail

                                    1
Instructions for Swisscom Webmail
1   Login                                                 Operation

Getting started
                                                              Select the "E-mail + SMS" tab. If you are not
                                                              logged in already, you will be asked to do so.
                                                                                                               7    Single-clicking
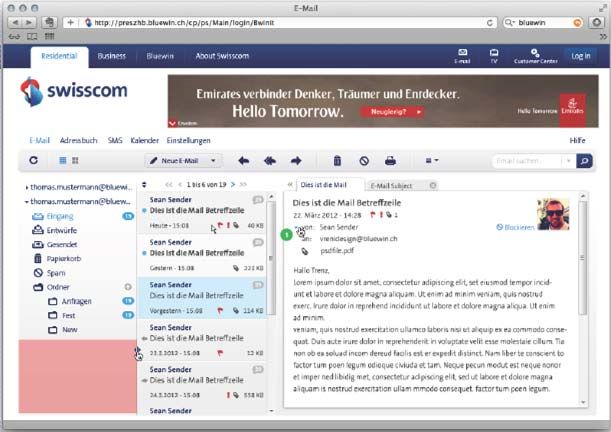
                                                                                                                    Select an element with a single click.
                                                          2   Logout
                                                              To log out properly from Webmail, click on
                                                              “Logout” at the top right.                       8    Double-clicking
                                                                                                                    Open or edit an element with a double-click.

  3             4                6   1   11   2
                                                                                                               9    Select several elements
                                                              Functions                                             Select several elements by holding down the
                                                          3                                                         Shift or Ctrl key while selecting several
                                                                                                                    elements. This lets you work on, move or
                                                              E-mail                                                delete several elements at the same time.
                                                              >> see pages 2-6 for explanations
                                                                                                               10   Drag & drop
                                                              Address book                                          Select one or more elements. Hold the mouse
                                                              >> see page 7 for explanations                        key down and drag the element to where you
                                                                                                                    want it. Release the mouse key and the
                                                              SMS messages                                          element will be moved to the desired
                                                                                                                    location.
                                                              >> see page 8 for explanations

                                                              Calendar                                                                                  Important
                                                              >> See page 9 for explanations
                                                                                                               11   Recommended browser
                                                                                                                    Not all browsers support modern web
                                                          4   Mobile phone                                          technology. To get the best possible
                                                              If you want to read and edit your e-mails on          experience, we recommend that you update
                                                              your mobile phone, the required settings for          your browser regularly. In particular, versions
                                                              your phone will be configured automatically           that are older than Internet Explorer 9 do not
                                                              here.                                                 support all functions.

                                                              Settings                                              Tablets & Smart Phones
                                                              >> See page 10 for explanations                       Webmail can also be accessed on an iPad;
                                                                                                                    however, other tablets and smartphones are
                                                          5   Help                                                  currently not supported.
                                                              If you have any questions, select "Help" to
                                                              access the help available on
                                                              www.swisscom.ch.

                                                          6   Would you like less advertising?
                                                              Your e-mail address is linked to a Service
                                                              Package. You can order the Service Package
                                                              Classic on www.swisscom.ch if you would like
                                                              less advertising.

            7       8   9   10                    5   2
Instructions for Swisscom Webmail
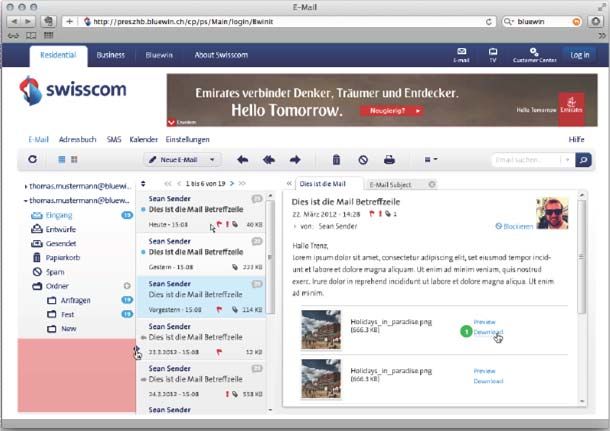
1   Defining e-mail view                             4   Sort e-mail list
                                                                                                             Clicking on the double arrow opens a list with

E-mail: Views                                           The “Switch layout” menu (in the top-right of
                                                        the screen) can be used to set:
                                                                                                             various criteria. Choose which of the options
                                                                                                             you wish to sort the opened folders by.
                                                        … whether the reading pane appears to the
                                                        right (see image to the left) or below (see
                                                        image below) the e-mail list                     5   E-mail as a tab
                                                        … whether no reading pane appears                    double-clicking on a message in the list opens
                                                                                                             it in a separate tab. If you create a new
          2     3   2           5   1                   … whether an overview of all attachments             message, this will also appear in a separate
                                                        within the selected folder is displayed.             tab. This allows you to have several messages
                                                        To return to the normal e-mail view, simply          open at the same time.
                                                        select “Reading pane right”, “Reading pane
                                                        bottom” or “No reading pane”.
                                                        >> See slide 6 for a more detailed explanation       Show e-mail details
                                                                                                         6   By default, e-mail details are collapsed. Click
                                                                                                             on the arrow to make this appear.

                                                                                                         7   Viewing attachments as thumbnails

                                                                                                         8   Preview
                                                                                                             Clicking on the preview opens the
                                                                                                             attachment in a separate window, allowing it
                                                                                                             to be viewed without the need to download
                                                                                                             it first.

                                                    2   Defining the size of the elements
                                                        The dimensions of the different elements
                                                        may be customised. Move the mouse over
                                                        the lines until the arrow appears. Hold the
                                                        mouse key down and change the size of the
                                                        elements as desired.

                                                    3   Scrolling through the e-mail list
                                                        If a folder contains numerous messages,
                                                        these will be shown over several pages. Select   9   Downloading files
                                                        the desired page or navigate with the arrows.        Click on "Download" if you wish to save the
                                                                                                             files locally.

           4            6   7           8   9   3
Instructions for Swisscom Webmail
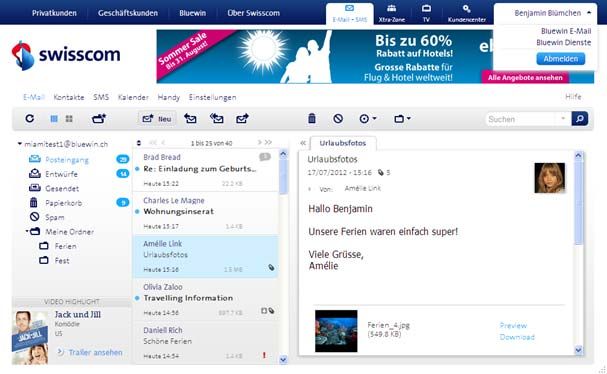
1   Basic e-mail functions                                 Quick search
                                                                                                           9
                                                         Move the mouse over the symbol to discover
E-mail: Functions                                        what functions it conceals.
                                                                                                                Are you looking for a specific e-mail? Simply
                                                                                                                click on the folder in which you think it is
                                                                                                                located and type in a keyword. Clicking on the
                                                                                                                magnifying glass symbol will now search
                                                     2   Create folder                                          through all of the emails in the folder,
                                                         To create a new folder, click on the plus              comparing the keyword against the subject,
                                                         symbol (+) next to “My folders”. If the new            the recipient‘s name and the sender‘s name.
                                                         folder is to be a subfolder, you can move it to
  1       7       2       8   5        9    10           the target folder via the drag & drop method.          Expanded search
                                                                                                           10
                                                                                                                Do you want to search for a specific keyword
                                                     3   Renaming folders                                       in the subject, content or attachment of an
                                                         double-clicking on a personal folder allows it         email? To open an expanded search, simply
                                                         to be renamed.                                         click on the folder to be searched and then on
                                                                                                                the arrow next to the magnifying glass. Now
                                                     4   Moving e-mail to a folder                              enter your search criteria and click on the
                                                         Move one or more messages to the desired               magnifying glass to start the search process.
                                                         folder using drag & drop. Alternatively,
                                                     5   messages can also be moved using the folder
                                                         symbol. Select a message and then choose
                                                         the desired folder.
                                                                                                           11   Saving a contact in the address book
                                                                                                                If you have not yet saved a sender‘s e-mail
                                                     6   Deleting a folder                                      address in your address book, a plus symbol
                                                         If you move the mouse over a personal folder,          (+) is displayed next to their e-mail address.
                                                         a cross will appear to the right. Click on this        You can create a new contact or add the
                                                         cross, to move the folder and its contents to          address to an existing contact by clicking on
                                                         the recycle bin.                                       the e-mail address.

                                                         Alternatively, you can move the folder to the     12   Blocking a sender
                                                         "Recycle bin" folder using drag & drop.                If you do not want to receive any more
                                                                                                                messages from a sender, select "Block".
                                                                                                                Messages from blocked senders are moved
                                                         Emptying the folder Sent items,                        straight to the recycle bin. "Settings > E-mail
                                                     7                                                          > Blocked sender" allows you to block both
                                                         Trash or Spam                                          individual addresses and entire domains. In
                                                         If you move the mouse over the folder “Sent            the case of newsletters, we would ask you to
                                                         items”, “Trash" or "Spam", a small recycle bin
                                                                                                                unsubscribe from them rather than blocking
                                                         will appear to the right. Click on the recycle         them.
                                                         bin to permanently delete the contents of the
                                                         folder.                                                Contact photo
                                                                                                           13
                                                                                                                The sender's photo appears if you have added
                                                                                                                a photo to that contact in your address book.
                                                     8   Further actions
                                                         The following functions are summarised
                                                         here:
                                                         - Select all messages
                                                         - Mark message as read/unread
                                                         - Select message/deselect message
                                                         - Save message locally
                                                         - Print message

      3       6       4           11   12   13   4
Instructions for Swisscom Webmail
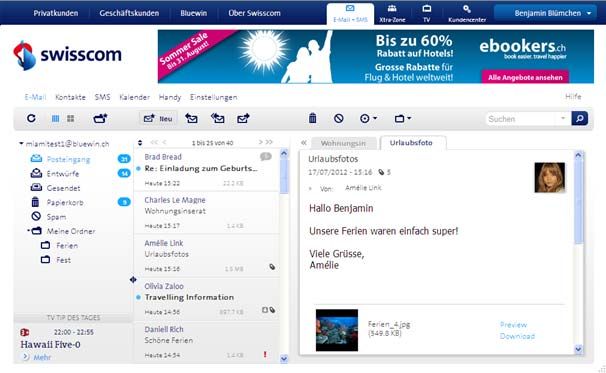
Defining recipients                                10   Attaching a file

E-mail: Composing a message
                                                                                                                Click on the plus sign to select one or more
                                                    1   To                                                      files as attachments. Alternatively, you can
                                                        Click on the plus sign to add one or more               also attach the files using drag & drop
                                                        contacts from your address book as                      (depending on the browser you are using).
                                                        recipients.                                             To add several files at once, select them by
                                                        Alternatively, you can type in the first few            pressing the Ctrl or Shift keys.
                                                    2
                                                        letters of the recipient's name. If there is a
                                                                                                           11   Spellcheck
                                                        similar entry in your address book or the
         12        1   2                                name has been entered before, it will come              Select spellcheck if you wish to check your
                                                        up as a suggestion. If you enter more than              message for spelling mistakes. Ensure that
                                                        one recipient, separate them with a space.              you have selected the right language.

                                                    3   CC
                                                        Clicking on "CC" opens the respective input        12   Sending, saving, deleting e-mails
                                                        field. Contacts entered here can be seen by all         Move the mouse over the symbol to discover
                                                        recipients.                                             what functions it conceals.

                                                    4   BCC (blind copy)
                                                        Clicking on "BCC" opens the respective input
                                                        field. Contacts entered here can NOT be seen
                                                                                                           13   Saving contacts in the address book
                                                        by the other recipients.                                When you send a message to contacts whose
                                                                                                                e-mail addresses have not yet been entered
                                                    5   Deleting a recipient                                    into your address book, you will be asked if
                                                        If you move the mouse over a contact, a cross           you wish to save them. Click on the e-mail
                                                        will appear to the right. Clicking on this cross        addresses to generate a new contact or add
                                                        removes that contact.                                   to an existing contact.

                                                5
                                                    6   Open options
                                                        Click on "Options" to enter further settings.

                                                    7   Selecting a signature
                                                        If you are unable to select a signature, you
                                                8
                                                        must first define one. This can be done at
                                                9       "Settings > E-mail > signatures“.

                                                    8   Transmission and receipt
                                                        confirmation
                                                        You will be sent a transmission confirmation
                                                        by the system as soon as the message has
                                                        been successfully sent. You will receive a
                                                        receipt confirmation only when the recipient
                                                        of the message confirms this.

                                                    9   Formatting the font
                                                        Select "HTML" if you wish to format the font
                                                        in your message.

              10       3   4   6   7   11   5
Instructions for Swisscom Webmail
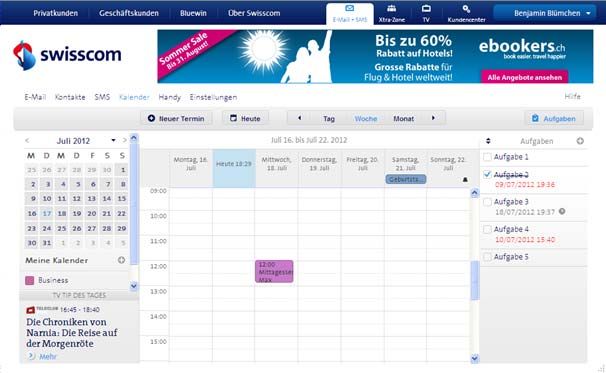
Conversations                                         Overview of all attachments

E-mail: Further views            1   Showing conversations                            7    Overview of all attachments
                                     Choose whether to group messages with the             The "Attachment view" shows all
                                     same subject in conversations at "Settings >          attachments in the selected folder at a
                                     E-mail".                                              glance.

                                 2   Number of messages
                                     The number indicates the number of received
                                                                                      8    Clicking on thumbnail views
                                     messages making up the conversation.
                                                                                           A single click on the thumbnail view or the
                                 3   Clicking on a conversation                            file name will open the attachment in the
                                     Clicking on a conversation opens the group of         reading area below.
    1                                received messages sharing the same subject
                                                                                      9    Clicking on text
                                     in the reading area.
                                                                                           .By clicking on the details of the message, the
    2                   5        4   Double-clicking on a conversation                     message belonging to the annex opens in the
                                     double-clicking on a conversation opens it in         underlying reading area.
    3                   6            a separate tab.

    4                                                                                 10   Sorting
                                 5   Opening an e-mail                                     Choose the criteria by which the attachments
                                     Clicking on a message in a conversation               should be sorted.
                                     opens it and displays its content (only with
                                     the “Reading pane right” view).                  11   Restricting display
                                                                                           Choose whether only certain attachments
                                 6   Editing an e-mail                                     should be displayed.
                                     Reading pane right – A “Reply” button is
                                     displayed on the right. Click on the arrow
                                     next to this button if you want to perform            Attachment as full screen
                                     another action.
                                                                                      12
                                                                                           Hide the attachment list to see the preview
                                     Reading pane bottom – Double-click to open            or the accompanying message in full-screen
                                     the conversation in a separate tab. You can           format. Clicking again on the same symbol
                                     now edit the message. Individual messages             will make the list appear again.
                                     within a conversation can be opened by
                                     clicking on the arrow on the left-hand side of   13   Resizing thumbnails
    7                                the message.                                          The size of thumbnails can be individually
                        10                                                                 resized using the slider.

    8                                                                                 14   Scrolling
                        11                                                                 If there are numerous attachments. these will
                                                                                           be shown over several pages.. Select the
    9
                                                                                           desired page or navigate with the arrows.

                        13

    12
                        14

                             6
Instructions for Swisscom Webmail
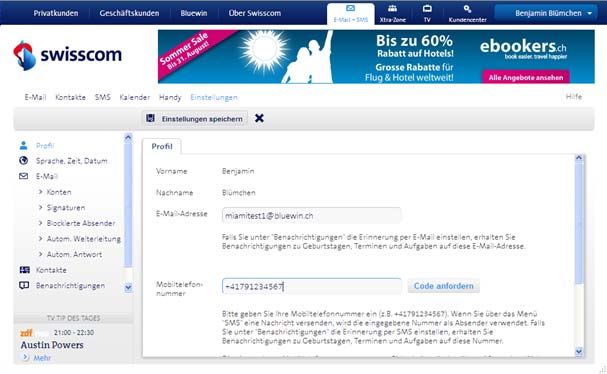
1   Basic e-mail functions                             5    Alternatively, you can click on the e-mail

Address book
                                                     Move the mouse over the symbol to discover              address or mobile phone number of the
                                                     what functions it conceals.                             selected contact to send them a message.

                                                 2   Further actions                                    6    Creating a group
                                                     The following functions are summarised                  Create a new contact group by clicking on the
                                                     here:                                                   plus symbol (+) next to “Groups”. You can use
                                                                                                        7    the Ctrl or Shift key to select several contacts
  1       6   10   2        3   4       12           Importing contacts                                      and add these to the group using drag &
                                                     Contacts may be imported from CSV-format                drop. The "Send message" function allows
                                                     documents in CSV format.                                you send an e-mail or SMS message to the
                                                                                                             entire group.
                                                     Exporting contacts
                                                     Contacts stored in the address book may be         8    Renaming a group
                                                     exported as a CSV file.
                                                                                                             Double-clicking on a group allows you to
                                                     Merging selected contacts                               rename it.
                                                     Select two contacts that you wish to merge
                                                                                                        9    Deleting a group
                                                     into one by pressing the Ctrl or Shift key, then
                                                                                                             Select a group and click on the delete symbol
                                                     select the "Merge contacts" option. This
                                                                                                             on the right-hand side next to the group
                                                     allows you to combine the information
                                                                                                             name. The group will then be moved to
                                                     within a single contact.
                                                                                                             “Trash”.
                                                     Search for duplicate contacts                           Sending a message to a group
                                                     Find out whether your address book has             4
                                                                                                             Select a group and click on "Send message".
                                                     duplicate contacts and, if you wish, merge
                                                                                                             This lets you create an e-mail or SMS
                                                     them.
                                                                                                             message to the entire group.

                                                 3   Sending contact data as a vCard                         Sorting contacts
                                                     Select one or more contacts by pressing the        10   Clicking on the double arrow opens a list
                                                     Shift or Ctrl key and click on "Send vCard".
                                                                                                             ordered by either first name or surname.
                                                     This lets you create a message with the
                                                                                                             Choose which of the options you wish to sort
                                                     relevant contact data as an attachment.
                                                                                                             the opened folders by.

                                                 4   Sending a message                                       Searching contacts alphabetically
                                                     Select one or more contacts by pressing the        11   Select the desired letters and the contact list
                                                     Shift or Ctrl key and click on "Send message".
                                                                                                             will jump to contacts with those initial
                                                     This lets you create an e-mail or SMS
                                                                                                             letters.
                                                     message.

                                                                                                        12   Searching contacts with search
                                                                                                             function
                                                                                                             As soon as you enter a letter or name into the
                                                                                                             search field, the list reduces immediately to
                                                                                                             those contacts that correspond to the search
                                                                                                             term.

      8   9        7   11           5        7                                                               Synchronising contacts
                                                                                                             >> see page 10 for explanations
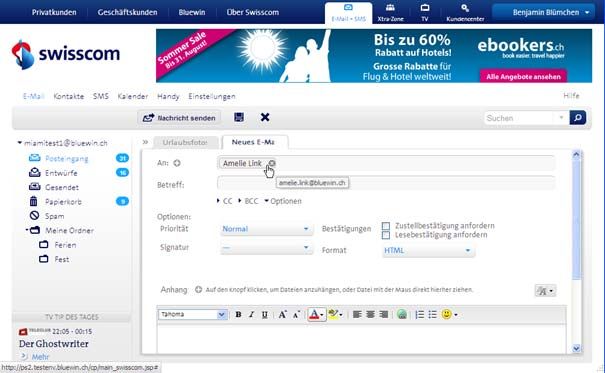
Instructions for Swisscom Webmail
Important
                                  1   Setting up the SMS function                         6   SMS BOX archive

SMS messages
                                      To use the SMS function, you need to set it up          The former Webmail solution SMS Box has
                                      as follows:                                             been replaced by a new SMS function. If you
                                                                                              used the SMS Box, you will find all the folders
                                      Step 1: Activate SMS function
                                                                                              in the "SMS BOX archive". This folder serves as
                                      Select the "SMS" function. If this has not yet          an archive in which messages can be read or
                                      been activated, a link will take you to the             deleted. All sent or deleted e-mails are now
                                      Customer Centre. To activate the service, you           stored in the “Sent items" or "Recycling bin"
                                      need to have a fixed-line connection to                 folders of your main e-mail address.
                                      enable the billing of your SMS messages
                                                                                              Check whether the "SMS Box archiv > My
                                      (Service Package Light: CHF 0.20 per SMS,
                                                                                              folders > Schedules" folder still contains
                                      Service Package Classic: 30 free SMS
                                                                                              messages. If so, please delete them as these
                                      messages included).
                                                                                              SMS messages will no longer be sent
    1                                 Step 2: Defining the sender number                      automatically.
                                      Define the sender number from which your
    2                     3           SMS messages should be sent at "Settings >
                                      Profile > Mobile telephone number". Should
                                      you need to, you can change the sender
                                      numbers here as well.

                                  2   Define Recipient
                                      Click on the plus sign to add one or more
                                      contacts from your address book as
                                      recipients.
                                      Alternatively, you can type in the number or
                                  3   the first few letters of the recipient's name. If
                                      there is a similar entry in your address book
                                      or the name has been entered before, it will
                                      come up as a suggestion. If you enter more
                                      than one recipient, separate them with a
                          5           space.

                                  4   Sent and deleted SMS messages
                                      Messages sent or deIeted messages in
                                      Webmail are located in the "Sent" or
                                      "Deleted" folders of your main e-mail address.
                                      You can change your main e-mail address in
    4                                 the Customer Centre under "Internet >
                                      Bluewin e-mail > Change main e-mail
                                      address".
    6   SMS BOX archiv

                                  5   Cost overview
                                      You can see the costs you have already
                                      incurred in the Customer Centre under
                                      "Internet > Bluewin services > SMS Box".
                              8
Instructions for Swisscom Webmail
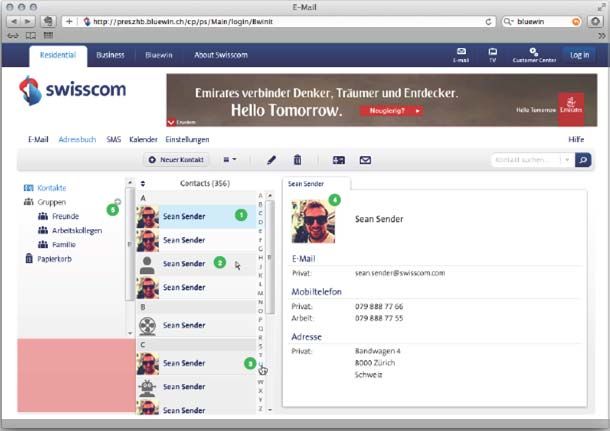
1   Adding events and reminders                      7    Adding a calendar

Calendar
                                                         To add your appointments to the calendar              You have the option of defining more than
                                                         and set up reminders, select the "Reminder"           one calendar. If you have several calendars,
                                                         option.                                               you can add individual activities to the
                                                                                                               calendar of your choice.
                                                     2   Under " Settings > Notifications" you can
                                                         choose whether you want to be reminded by
                                                         e-mail or SMS message (both free of charge).
                                                                                                          8    Showing or hiding the calendar
                                                         You can define the e-mail address or mobile           You can show or hide individual calendars by
              1   2   6       5   3   12   10   11       phone number to which you want the                    clicking on the coloured square.
                                                         notification to be sent under "Settings >
                                                         Profile".                                        9    Renaming calendar
                                                                                                               To rename a calendar, click on the edit
                                                                                                               symbol, which appears when you hover your
                                                     3   Birthdays                                             cursor over the area to the right of the
                                                         If you add a birthday to a contact in your            calendar‘s name.
                                                         address book, this is incorporated into the
                                                         calendar as an annually-recurring event. You
                                                         will be reminded automatically by SMS
                                                                                                          10   Showing or hiding tasks
                                                         message or e-mail (both free of charge), as           The calendar also allows you to create a list of
                                                         long as you have activated reminders under            tasks.
                                                         "Settings > Notifications".
                                                                                                               Adding tasks and reminders
                                                         If you do not wish to receive reminders, open    11   New task can be added by clicking on the plus
                                                         the relevant event in the calendar and
                                                         deactivate the "Reminder" option.                     sign. To receive a reminder, set a due date
                                                                                                               and select the "Reminder" option.
                                                         Where birthdays are to be changed, this must
                                                         also be done in the address book.                     Under " Settings > Notifications" you can
                                                                                                               choose whether you want to be reminded by
                                                                                                               e-mail or SMS message (both free of charge).

                                                         Moving an event                                       You can define the e-mail address or mobile
                                                     4                                                         phone number to which you want the
                                                         The simplest way to move events is with drag
                                                         & drop. Alternatively, you can open the event         notification to be sent under "Settings >
                                                         by double-clicking on it and amending the             Profile".
                                                         data.

                                                                                                          12   Sorting
                                                     5   View                                                  Added tasks may be sorted according to
                                                         Select whether you want the calendar to be            various criteria.
                                                         displayed in by the day, week or month.

                                                     6   Today
                                                         Click on "Today" and the calendar will display
                                                         the current date.

  8   9   7               4                     9
Instructions for Swisscom Webmail
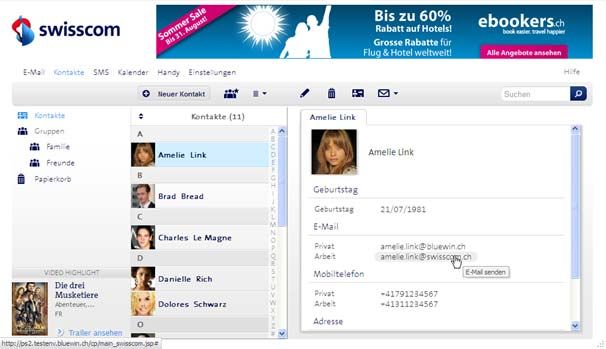
1   Settings in Webmail                                8    Defining signatures

Settings
                                                                                         You can define more than one signature and
                             2   Profile settings                                        choose which to enter when you create a
                                                                                         message. You can define a signature as the
                             3   User name                                               standard signature for all Bluewin e-mail
                                 The name displayed is your Swisscom login. If           addresses or allocate a different standard
                                 this is incorrect, please contact the Hotline on        signature to each Bluewin e-mail address
                                 0800 800 800 (free of charge).                          under "E-mail > Accounts".

           1   11            4   E-Mail address                                     9    Blocked addresses
                                 If you choose the e-mail notification option in         Should you no longer wish to receive
                                 "Notifications", you will receive notifications         messages from an address or an entire
                                 about birthdays, meetings and tasks at this e-          domain, you can block them.
                                 mail address.
                                                                                    10   Notifications
                             5   Mobile phone number                                     If you use the reminder function for events or
                                 If you send messages via "SMS", the number              tasks, you can define whether you want to
                                 stored here will appear as the sender. If you           receive them by e-mail or SMS message here.
                                 select reminders via SMS under
                                                                                         The e-mail address or mobile phone number
                                 "Notifications", you will receive reminders
                                                                                         to which the reminder is sent can be defined
                                 about birthdays, events and tasks.
                                                                                         or changed under "Settings > Profile".

                                 E-mail settings
                             6                                                      11   Further settings in the
                                 Used storage space                                      Customer Centre
                                 Shows how much storage space has been
2                                used. Depending on your service package, you            The following and further settings can be
                                 have up to 5 GB of storage space per e-mail             undertaken in the Customer Centre under
                                 address.                                                "Internet":
6
                         3
                             7   Accounts:                                               Change Service Package
7                                                                                        You can change your current Service Package
                         4       Adding an e-mail address                                from Light to Classic – or the other way
                                 You can create a further Bluewin e-mail                 around.
8
                                 address (only for customers with Service
                                 Package Classic) (>> this will lead you to the          Administering e-mail accounts
9                                Customer Centre) or attach an external e-               You can add additional Bluewin e-mail
                                 mail address.                                           addresses and rename, delete or separate
10                       5                                                               them from an existing e-mail account.
                                 Edit e-mail address
                                 Select an e-mail address from the overview,             Defining the main e-mail address
                                 click on "Edit" and define:                             If you have the Service Package Classic and
                                                                                         use several e-mail addresses, you can define
                                 > the name by which you wish to be know to
                                                                                         which you would like as your main e-mail
                                 the recipient;
                                                                                         address in the Customer Centre.
                                 > whether a standard signature should be
                                 assigned

                    10
You can also read