Jira Connector Option - v18.0.1 - ONEPOINT Projects
←
→
Page content transcription
If your browser does not render page correctly, please read the page content below
Jira Connector Option - v18.0.1
Copyright 2019 ONEPOINT Projects GmbH. All rights reserved.

ONEPOINT Projects, Enterprise Edition, Version 18.0.1

ONEPOINT Informationslosungen and the ONEPOINT Logo are registered trademarks, ONEPOINT
Projects is a trademark of ONEPOINT Projects GmbH.

All company and product names mentioned are trademarks of their respective owners as far as
registered.
The optional module "Jira Connector" allows to import projects from Atlassian's Jira into "ONEPOINT
Projects Enterprise Server"-edition to automatically synchronize changes entered on Jira-side.

New tools or tool-groups which get enabled by this module:

      The tool "External Apps" will appear inside the System Settings in the tool group "ADMINISTRATE"
      to allow establishing the connection to the Jira-server (Can only be accessed by users with the
      access level "System")

Contents

      1. Prerequirements
             1.1. For "Enterprise Server"-installations
             1.2. For your Jira-server
             1.3. Make sure that Jira will accept remote API calls
             1.4. Plugin Installation
                    1.4.1. Installation through Atlassian’s Marketplace
                    1.4.2. Manual Upload of the Jira-plugin
             1.5. Enable the connection in "External Apps"
      2. "Jira linked projects"
             2.1. Jira Mappings
                    2.1.1. Status Mappings
                    2.1.2. Issue Type Mappings
                           2.1.2.1. Excluding Issue Types from the synchronization
                    2.1.3. Priority Mappings
                    2.1.4. Custom Field Mappings
                           2.1.4.1. Synchronization of markdown formatting
             2.2. Projects of kind "Jira"
                    2.2.1. To create a project of kind "Jira"
                    2.2.2. Sort-order of "Sprints" and "Tasks"
                    2.2.3. Start- and finish-dates of "Sprints"
                    2.2.4. Public levels when using projects of kind "Jira", combined with the "Program
                    Management Option"
             2.3. Projects of kind "Traditional"
                    2.3.1. Active Assignments
                    2.3.2. Active Work Package Title and Description
                    2.3.3. Asynchronous check-in
                    2.3.4. Draft work packages
      3. Resource-Assignments for Jira-Projects
             3.1. Automatic Resource-Assignments
      4. Advanced Configuration Options
             4.1. Configuring the Jira Trigger
             4.2. Connecting to Jira via HTTPS
             4.3. Forwarding the URL of your "ONEPOINT Projects"-server to Jira
             4.4. Configuring the Jira timeout
      5. Appendix
             5.1. Enable increased logging for the plugin
1. Prerequirements
1.1. For "Enterprise Server"-installations
Both, the "ONEPOINT Projects" and Atlassian's "Jira" web-applications must be hosted by
separate Tomcat-installations (Libraries required by Jira for Tomcat are known to lead to conflicts)
If you need to connect to Jira using a secure "HTTPS"-connection or using an additional web-
server in front of "Tomcat", you might need to alter the configuration like described in the last
chapter at the end of this document
Make sure that the port the "ONEPOINT Projects" web-application will use to access your Jira-
installation does not get blocked by a firewall or similar
1.2. For your Jira-server
Your local Jira installation must be upgraded to version 6.0 or later
The user-account in Jira which will be used for the connection of ONEPOINT Projects and Jira will
need to be part of the following groups to gain the required permissions:
1. "jira-administrators": Required to be allowed to retrieve system-configuration parameters
2. "jira-developers": Simplifies getting Jira users from Jira projects.
3. "jira-users": Your user-account will most likely already be part of this group
1.3. Make sure that Jira will accept remote API calls
To allow the "ONEPOINT Projects"-server to connect, Jira must be configured to listen to "remote API
calls":
1. Sign on to your Jira-server with a user-account that owns administrative permissions
2. Click "Administration" in the upper right corner
3. From the pull-down menu "System", select the first item "General Configuration"
4. In the section "Options", you will find the setting "Accept remote API calls"
Please make sure that this setting is enabled. To alter the setting, click the button "Edit Configuration"
below
1.4. Plugin Installation
To allow real-time synchronization of changes made in Jira, a plugin must be installed on Jira-side.
1.4.1. Installation through Atlassian’s Marketplace
The easiest way to install our "Jira Connector“-plugin is to access Atlassian’s Marketplace for Jira and
installing the "Project & Portfolio Management for Jira"-add-on.1.4.2. Manual Upload of the Jira-plugin
1. Sign on to your Jira-server with a user-account that owns administrative permissions
2. Navigate to the "Plugin/Add-on"-administration
3. If you do not yet see a button labeled "Upload Plugin" or "Upload add-on" you might need to select
the tab "Install" or click "Manage Add-ons"
4. Now click the button labeled "Upload Plugin" or "Upload add-on"
5. Click the "Browse"-button and select the file "Onepoint-Project-Connector-3.0.1.jar" which can be
found in the folder "ira_plugin" of our software-distributions
1.5. Enable the connection in "External Apps"
1. Sign on using your "Administrator" user-account to your "Enterprise Server"-installation
2. Click the tool-shaped button in the upper right corner to open the system settings of ONEPOINT
Projects
3. Select the tool "External Apps" inside the tool-group "ADMINISTRATE"
4. Click the "Enable Jira"-checkbox
No tool "External Apps"?
If the tool "External Apps" is not visible then the "Jira Connector Option" is not activated for
your server or your account.
Afterwards all fields in the tool "External Apps" will allow you to enter the connection-parameters:
Instance Since release 16.0 it is possible to connect ONEPOINT Projects to
multiple Jira instances. Each Jira instance is configurable separately inside
"External Apps" and can be selected in the drop-down menu "Instance"
afterwards. When linking a ONEPOINT project to a Jira project, all projects
from both instance are selectable afterwards.
Description A description of the Jira instance can be entered inside the corresponding
field.
Jira URL The URL to your Jira-server, for example "https://my.jira.server/jira",
without "/secure/Dashboard.jspa" or similar.
Jira Username The Jira-account's user-name that will be used to retrieve data from Jira.
Jira Password The password for the user-account entered above.
Synchronize Jira This checkbox enables the automatic creation of work records according to
worklogs logged work in Jira for all linked Jira on ONEPOINT-side.
(timetracking)
Enable Jira two- This checkbox is enabled by default. In case you only want to create
way projects with kind "Jira", it is possible to deactivate the two-way-
synchronization synchronization by disabling this checkbox.Show issue If you would like that the Jira keys are visible inside the activity lists in
number in ONEPOINT Projects, enable this checkbox. Afterwards the
activity lists corresponding Jira key of the issue is visible inside the tab "Planning
/Activity List" and the issue can be accessed through this key.
Public Activity Depending on the entered outline level, the synchronized work packages
Levels for Jira of projects with kind "Jira" are public by default. The outline level can be
set to "None", "All" or to a specific level (1st Level etc.).
Synchronization If this checkbox is enabled, deleting work packages of projects which are
must not delete linked to Jira, does not have any impact of the issue on Jira side.
objects in Jira
Use Wiki The formatting of the following default fields can now also be synchronized
Renderer for to ONEPOINT or Jira: "Issue: Description", "Issue: Comment", "Log Work:
Jira fields Description" and "Project: Description". More details can be found in
chapter 2.1.4.1.
Jira event poll This is the interval which ONEPOINT Projects uses to ask Jira for
interval changes. 30 seconds is the recommended value from ONEPOINT Projects.
(seconds)
Instance full This field can be used for configuring the daily sync. If this field is left
sync schedule empty, the "" from the configuration file or the default setting
(UTC) at 8am every day is used.
Last full sync These fields display the duration of the last full sync.
start / finish
Establishing the connection between onepoint PROJECTS and JIRA
If the parameters are fine and the connection can be established, the "Status Mappings"-,
"Issue Type Mappings"- and "Priority Mappings"-tables will get filled automatically with the
values of your corresponding Jira-instance. Afterwards you can choose the corresponding
values on ONEPOINT-side.
If the connection does not get updated although it should be possible, please check the
logfiles "atlassian-jira.log" of your Jira-server for errors or contact our support-team.
JIRA Worklog-synchronization
If you need your tracked efforts to be synchronized from Jira to "ONEPOINT Projects",
please enable the checkbox "Synchronize Jira worklogs (timetracking)" now.2. "Jira linked projects"
First of all, we would like to provide an overview of how the integration works. There are two different
types of Jira linked projects, aggegrated (kind Jira) and executed (kind Traditional) projects. In the
following comparison chart you will find a details about these two projects:
Processes Kind Jira Project (Aggregated) Kind Traditional Project (Executed)
Properties
one-way-synchronization two-way-synchronization
from Jira to ONEPOINT controlling in ONEPOINT and execution in
planning and execution in Jira, Jira, planning on both sides depending on the
controlling in ONEPOINT department (project manager will most likely
work in ONEPOINT whereas the IT and
technical deparments will work in Jira)
Creation Create a ONEPOINT project with Create a ONEPOINT project with kind
kind "Jira" and link it to a "Traditional" and link it to a corresponding Jira
corresponding Jira project or fix project or fix version.
version.
Workflow The issues will be created with or In this type of project issues can either be
without fix versions in Jira. When created on ONEPOINT or Jira side. Usually these
the ONEPOINT project gets linked projects are planned and controlled
to the Jira project, all issues will be in ONEPOINT by the corresponding project
synchronized immediately to the manager, but other departments or users work in
planning in ONEPOINT Projects. Jira, therefore the execution happens on Jira side.
The issues are sorted below their
fix versions and all issues without When creating issues in Jira, they will be
fix version appear at the end of the synchronized into the "Controlling"-tab in
planning. Tasks, like tracking work, ONEPOINT Projects. Afterwards they can be
creating comments and converted into the "Planning"-tab with the button
attachments have to be done "Add ad-hoc-task to plan" which is visible in the
in Jira and will be synchronized to button row below the planning when the project is
the "Planning"- and "Controlling"- edited. You are able to add work packages to the
tabs afterwards. In the tab planning which will be synchronized to Jira after
"Controlling" the resources and the next check-in. In conclusion, the planning of w
costs can be controlled afterwards. ork packages is possible on both sides, so you
Additionally the tab "RESOURCES can plan with whichever system you prefer.
/Utilization" is available which Creating comments and attachments is also
provides a more detailed overview possible on both sides, but please note that
regarding the resources. tracking work for issues is only possible on Jira
side. These work logs will then be synchronized
to the tab "MY WORK/Time and Costs" and into
the properties of the corresponding issue. Again
the project will be controlled on ONEPOINT side,
the resources and costs can be controlled in the
tab "Controlling" and "RESOURCES/Utilization".
A detailed description of both project types can be found in the next chapters.2.1. Jira Mappings
2.1.1. Status Mappings
A customizable status mapping is available since release 15.0 in "External Apps". The default Jira
statuses can be mapped to an ONEPOINT status and will be set for all synchronized work packages
according to the mapping. Custom statuses can be mapped and synchronized as well.
The "Status"-field of your Jira-issue does not affect the planning itself, but if needed, it can always be
monitored inside the tab "Controlling/Activity List" in the column "Status" or additionally inside the "Edit Ad
Hoc Activity"-dialog for ad hoc work packages.
2.1.2. Issue Type Mappings
The functionality "Issue Type Mapping" has been implemented in previous releases. The four issue types
"Task", "Issue", "New Feature" and "Improvement" are available and all issues get synchronized
from ONEPOINT to Jira and vice versa with the corresponding mapped issue type in the system settings.
Each issue type has an own icon and is additionally visible inside the "Edit Activity"-dialog in the field
"Type". Changes which have been made to the issue type in Jira will only be synchronized for ad hoc wor
k packages to ONEPOINT Projects whereas changing the issue type in ONEPOINT is not possible at all.
Issue Types are reportable as well by using the field "Activity.Sub Type".
2.1.2.1. Excluding Issue Types from the synchronization
Within release 18.0.1 the functionality has been extended. Now, it is possible to exclude issue types from
the synchronization by setting the issue type to "-- Not synchronized --" in ONEPOINT’s system settings
in "ADMINISTRATE/External Apps". Some special cases need to be considered:
If an issue type gets excluded which is already used for planned ONEPOINT work packages, the
corresponding work package won't be deleted in Jira. It remains in Jira, the mapping will be ignored
in this case and all changes will still be synchronized to Jira.
If an issue type gets excluded which is already used for an ad hoc work package in ONEPOINT
which is linked to a corresponding Jira issue, the ad hoc work package gets deleted in ONEPOINT,
but remains in Jira.
When creating an issue in Jira with an issue type that is excluded from the synchronization, the
issue won't be synchronized to ONEPOINT.
When creating a planned work package in ONEPOINT with an issue type that is not mapped, the
issue will be synchronized to Jira with the next valid issue type from the list in ONEPOINT’s system
settings in "ADMINISTRATE/External Apps".
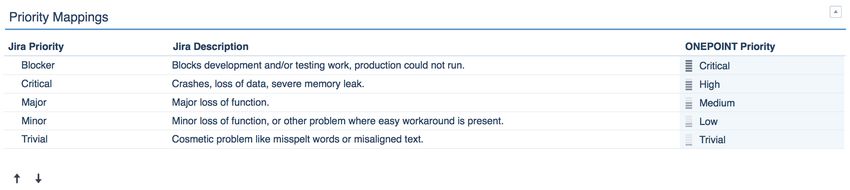
2.1.3. Priority Mappings
A "Priority"-mapping has been implemented which allows to map the priorities from Jira ("Blocker","
Major", etc.) with the ONEPOINT priorities inside the System Settings in "External Apps". Issues will be
synchronized with the corresponding priority which has been set inside the System Settings afterwards, e.
g. an issue with "Blocker" in Jira will be synchronized with the corresponding priority icon to ONEPOINT
and vice versa. If Jira priorities match more than one ONEPOINT priority the highest priority inside the list
in the System Settings will be used for the synchronization. If a priority in ONEPOINT is not set, the
mapped value before or afterwards depending on the order inside the list will be used for the
synchronization.2.1.4. Custom Field Mappings
A "Custom Field"-mapping has been implemented which allows to map ONEPOINT custom fields to Jira
custom fields in the System Settings in "External Apps". Additionally some default fields of ONEPOINT
Projects can also be mapped to custom fields in Jira. The mapping table contains five columns:
ONEPOINT Activity Field: This column shows the name of the custom field or the default field in
ONEPOINT Projects.
Sync Direction: In this column you are able to define if the fields should be synchronized in both
direction, from ONEPOINT to Jira or from Jira to ONEPOINT. For some of the default fields the
sync direction is pre-defined, that means these fields can only be synchronized from ONEPOINT to
Jira.
Active: By enabling or disabling this checkbox you can define which fields should be synchronized.
Jira Issue Field (Jira Internal Field Name): This column shows the name of the custom field in Jira.
Jira Wiki Markdown: We also support the synchronization of wiki formats in both directions now.
This point will be further described in chapter 2.1.4.1.
Currently the custom field types "Checkbox", "Choice", "Date", "Decimal", "Memo", "Number" and "Text"
are supported. These fields must be mapped to the same field types in Jira, e.g. a "Date"-custom field
needs to be mapped to a "Date"-field in Jira, otherwise the synchronization won't work. For some of these
fields more constraints need to be considered:
Custom fields with the type "Checkbox" in ONEPOINT needs to be mapped to a Jira custom field
with the type "Single Choice". Afterwards the values "Yes" and "No" must be defined as possible
choices for this field in Jira.
Custom fields with the type "Choice" in ONEPOINT needs to be mapped to a Jira custom field with
the type "Single Choice". It is required to define the same choice options as in ONEPOINT so that a
successful synchronization is possible. If a choice option is available in ONEPOINT, but not in Jira,
the corresponding issue won't be synchronized.
Additionally, the following default fields from ONEPOINT Projects are supported and can be mapped to
Jira custom fields. Please note, that these fields can only be synchronized from ONEPOINT to Jira:
Actual Costs: All activated cost types of your ONEPOINT instance can be mapped to Jira custom
fields.
Assigned Resources: If a resource or pool is assigned in ONEPOINT, the corresponding pool or
resource name of the Jira user is shown in this field in Jira.
Created
Expanded Assigned Resources: If a pool is assigned in ONEPOINT, all included resources that
have a corresponding Jira users are shown in this field in Jira.
Modified
Plan Costs: All activated cost types of your ONEPOINT instance can be mapped to Jira custom
fields.Responsible Resource
Start (start date of work packages)
WBS Code (global): Synchronizes the project number and the wbs code to the mapped custom
fields to Jira.
If you make changes on custom fields in Jira which are linked to work packages in ONEPOINT which are
part of the planning, a blue icon gets shown in the properties of the work packages in ONEPOINT. Similar
to the "Active Assignment"- and "Active Title/Description"-features you can take over the new value from
Jira to planning in ONEPOINT or you can reset the custom fields to the original planned values. After
checking-in the project plan, Jira as well as ONEPOINT Projects should contain the same values.
2.1.4.1. Synchronization of markdown formatting
The formatting of the following default fields can now also be synchronized to ONEPOINT or Jira: "Issue:
Description", "Issue: Comment", "Log Work: Description" and "Project: Description". That means if these
fields are formatted with bold, italic etc. in Jira or ONEPOINT, they will also be displayed with these
formats in the second system. Additionally, it is also possible to enable the checkbox "JIRA Wiki Format"
in the "Custom Field Mappings"-section for custom types with the type "Memo". Afterwards also the
format of these fields will be synchronized depending on the sync direction. Please note, that currently
only the supported ONEPOINT formats (headings, bold, italic, ordered list, unordered list, link and quote)
are supported to be synchronized correctly.
2.2. Projects of kind "Jira"
Projects with kind "Jira" are read-only in ONEPOINT Projects. The planning-hierarchy of projects of kind
"Jira" only consists of the activity types "Sprint" and "Task". Such projects do not allow changes inside the
planning on "ONEPOINT Projects"-side and get directly imported from your Jira-server.
The transferred data gets translated in the following way:
Jira ONEPOINT Projects
Fix Version Sprint (Jira's release-date gets translated to Sprint's "Finish"-
date)
Issue Task
(For example Bug, New Feature, (At least 2nd outline-level, always has a parent-sprint which gets
Task, Subtask Improvement, Epic, chosen according to the latest fix version entered for the issue in
Story) Jira)
Original Estimate/Estimated "Base"-effort
Remaining Estimate/Remaining "Open"-effort (Requires Jira-worklog synchronization and
"Allow contributor estimations" both enabled)
Time Spent/Logged "Actual"-effort (Requires Jira-worklog synchronization enabled)
2.2.1. To create a project of kind "Jira"
1. Select the tool-group "PROJECTS" and select a portfolio for which your user-account owns at least
"Manager"-permissions
2. Click the button "New Project" (Will open the "Properties"-form of the new project)
3. Select "Jira" for the chooser "Kind"
4.4. Enter a name for your project
5. Click the button on the right side of the "Link to Jira Project"-chooser. This will open a subdialog
allowing to choose a remote Jira-project or version from which tasks and versions should get
imported
6. After the project or version on Jira-side was chosen, confirm the subdialog "Jira Project or Version"
with "OK"
7. Next scroll down a bit inside the "Properties"-form to the section "Constraints" and enable or
disable "Allow contributor estimations" as required
8. After confirming the project-creation with the button "Save" on the upper right side of the form the
planning will get retrieved from Jira
Setting "Allow Contributor Estimations" for step 7 above
If you are using Jira-worklog-synchronization, having "Synchronize Jira worklogs (time-tracking)"
enabled in the tool "External Apps" and you would like to monitor the tracked values in
ONEPOINT Projects, please make sure to enable the setting "Allow contributor estimations" for
the project, otherwise you are not able to monitor the actual and completed values in ONEPOINT
Projects.
2.2.2. Sort-order of "Sprints" and "Tasks"
These are the rules for the sort-order of Sprints and Tasks in the planning and controlling shown inside
the tool "PROJECTS":
Tasks will always first be sorted according their "Importance", starting with highest importance and
then descending. All tasks with the same priority will be sorted alphabetically by their names
afterwards.
Sprints will always be shown in the same order like you would see them in Jira or Greenhopper's
planning-views, except versions without a release-date - These will always be shown at the end of
the "Activity List" of the tool "Planning".
2.2.3. Start- and finish-dates of "Sprints"
The activity-type "Sprint" that is used to describe Jira's versions will always have a start- and finish-date.
Since neither ONEPOINT's nor Jira's projects will always have a release-date, some rules are needed:
The first start-date:
1. Will be the taken from the project's tab "Properties" in the tool "PROJECTS"
2. If this start-date cannot be applied (If Jira's release-date is earlier than the project's start-date
in the tab "Properties"), then use a fictive ten-day duration until the start-date was corrected.
All other start-dates:
1. if a new Sprint's finish-date is not identical to the previous Sprint's one, then use the previous
Sprint's finish-date as start-date for the new one
2. If the previous Sprint's finish-date is identical, then make both Sprints run parallel (Apply
identical start- and finish-dates)
If a Jira-version does not have a release-date:
1. Inherit the project's finish-date from the project's tab "Properties" in the tool "PROJECTS"
2. Inherit the finish-date of the parent Sprint (For child-versions, when using Greenhopper)
If a child-version's release-date was defined to be later that the parent's, then this date will override
the parent-Sprint's finish-dateIf no finish-date was created for the project in the tab "Properties", then always use the start-date of
the project as finish-date if no other is available (Will result in a one-day duration for all sprints if no
finish- or release date was entered, neither on ONEPOINT- nor on Jira-side
Limited real-time synchronization for changes on JIRA's versions
Please note that changes on Jira's versions can in most situations not be synchronized in real-
time because of technical limitations. Instead these changes will only be applied during the next
daily synchronization-cycle. If needed, you can always force a full synchronization-cycle to update
all changes by clicking the button "Synchronize" in the tool "External Apps", using the
"Administrator"-login.
2.2.4. Public levels when using projects of kind "Jira", combined with the "Program Management
Option"
The optional module "Program Management" allows to include projects of kind "Jira" as sub-projects in
other plannings. If tasks or sprints of subprojects shall be shown in the master-planning, they will have to
be marked as "Public". For projects of kind "Jira" we included a setting which allows to apply this setting
automatically:
Depending on the entered outline level, the synchronized work packages of projects with kind "Jira"
are public by default when the chooser "Public Activity Levels for Jira" is activated in "External
Apps" (Can only be accessed after signing on with the "Administrator"-account). The outline level
can be set to "None", "All" or to a specific level (1st Level etc.).
2.3. Projects of kind "Traditional"
This latest way to connect ONEPOINT Projects to Jira is similar to a project of kind "Jira", but here any
existing project of kind "Traditional" can be linked to a project or version stored in your Jira-server,
allowing to maintain a planning in ONEPOINT while executing the project on Jira-side.
1. Select the tool-group "PROJECTS" and select a project of kind "Traditional" in the navigator for
which your user-account owns at least "Manager"-permissions
2. Click the button on the right side of the "Link to Jira Project"-chooser. This will open a subdialog
allowing to choose a remote Jira-project or version
3. After the project or version on Jira-side was chosen, confirm the subdialog "Jira Project or Version"
with "OK"
When linking an existing project plan to a Jira project, all issues get immediately synchronized to Jira. If
you are currently editing the planning, the last submitted plan version will be synchronized to Jira. All new
changes will be synchronized to Jira after checking-in a new version of the project plan.
Please note that after checking in a new version, all tasks or work packages in your planning will
be mirrored to your Jira project and all existing issues in Jira will appear on ONEPOINT-side as
"Issues" or "Tasks" depending on the entered values inside the "Issue Type Mapping", inside the
tab "Controlling", too.
Further information on the "Jira Executed" project can be found in the following document:
http://www.onepoint-projects.com/resources/documents/onepoint-wp-jira-integration-en.pdf
2.3.1. Active AssignmentsSince release 15.0 the new functionality "Active Assignments" is available. An active assignment is now shown when the assignee in Jira differs from ONEPOINT’s planning, but it will not replace the planned assignment automatically. The described functionality works as follows: An active assignment is auto-generated when a synchronized issue is reassigned in Jira. In this case an icon appears beside the "Resource"-column in the tab "Planning/Activity List". By clicking on this icon when the planning is in edit-mode a new dialog will be available in which you are able to accept the assignment from Jira or to reset it to the planned assignment. Due to this functionality, reassignments do not get lost in the re-planning cycle, but it is still easily possible to reset the assignment to the previously planned value. A few special cases need to be considered when using this functionality: • In case that the assigned resource from Jira does not exist on ONEPOINT side, the planned resource will be marked with an asterisk in ONEPOINT, but it won’t be synchronized to Jira. • Resources which were not part of the project team in ONEPOINT so far, will be automatically added to the project team as soon as an assignment is available for them on Jira side. • If multiple resources are assigned to a work package in ONEPOINT, the issue in Jira remains unassigned. If a user, who is not part of the planned resources in ONEPOINT, is assigned to the task in Jira afterwards, that user will be shown as an active assignment in ONEPOINT. 2.3.2. Active Work Package Title and Description Similiar to the functionality "Active Assignments", this functionality has been implemented for the title and the description of work packages as well. If the title or description of an issue in Jira gets changed and the corresponding linked work package is planned in ONEPOINT, a blue icon appears in the activity list and in the properties of the work packages. When editing the project plan, you can either take the new value over into the planning or reset it to the original planned value. After checking-in the project plan, Jira as well as ONEPOINT should have the same value. Please note, that there is one restriction when using this functionality: If the description of an issue is empty and adding a description in Jira, resetting it to an empty description in ONEPOINT does not work anymore. The description remains in Jira although the field is empty in ONEPOINT. 2.3.3. Asynchronous check-in An asynchronous check-in for projects with kind "Traditional" (Jira Executed Projects) has been implemented within release 15.0. This functionality improves the waiting time for check-in operations and works as follows: When checking-in a project plan, users will not have to wait for the following Jira sync to finish anymore and instead a “Lock”-icon will appear beside the project name which says "Project plan is currently being locked by Jira System". As soon as this icon is shown, the user is able to switch to another project or tab and can continue his work, while the usual Jira sync runs in the background. 2.3.4. Draft work packages It is possible to exclude work packages from the synchronization to Jira by enabling the checkbox "Draft" in the properties of the corresponding work package. When enabling this checkbox, the work package won't be synchronized to Jira. If the corresponding issue already exists in Jira and enabling the "Draft"- checkbox later in ONEPOINT, the issue in Jira gets deleted when checking-in the project plan. Please note, that draft work packages do not have a WBS code.
3. Resource-Assignments for Jira-Projects
3.1. Automatic Resource-Assignments

Resources will be automatically assigned if an automatic synchronization of changes takes place (Either
during a daily synchronization-cycle or if changes were applied to issues in Jira). Our web-application
always retrieves the field "Username" from Jira and compares it with ONEPOINT's resources and user-
accounts, following these rules:

      First of all, the user in Jira can only be automatically assigned to issues in ONEPOINT Projects if it
      is member of the group "jira-developers" of the corresponding Jira project.
      If the first point is true and the resource name in ONEPOINT Projects is identical to the username
      on Jira side, the resources will be assigned automatically to the corresponding task on ONEPOINT
      side.
      If no "Name"-field can be matched to the given "Username", then check if the "Login"-field of one of
      your "ONEPOINT Projects" user-accounts is identical. If the "Login" field does match a "Username"
      in Jira, check if the user is linked to more than one resource:

  1. If the user is only linked to a single resource, assign this one.
  2. If the user is linked to more than one resources, compare the local part of the User's mail address
     entered in its "E-mail" field on ONEPOINT-side (The left part of the mail-address, without "@" and
     the domain-name) with the resource's name. If one matching resource can be found, assign this
     one.

     Asterisk beside Resource Name
     In the following cases an asterisk is shown beside the resource name in ONEPOINT:

           Inactive assignments are shown if multiple resources are planned in ONEPOINT, but only
           one is active - the one that is assigned in Jira. All others are inactive and are shown with an
           asterisk.
           Inactive assignments are shown with an asterisk in case that the resources are not planned
           in ONEPOINT, but tracked work in Jira.
           Inactive assignment are shown with an asterisk if they were assigned to work packages and
           tracked work in the past, but have been deleted from the work package. The work logs must
           still be shown, therefore the resource gets also shown, but with an asterisk.

     Handling of multiple resource assignments
     In ONEPOINT Projects it is possible to assign multiple resources to work packages. Please note
     that these multiple assignments can not be automatically assigned to Jira issues, because in Jira
     there is always only one assignee.
4. Advanced Configuration Options
These optional configuration parameters can only be applied to a "Enterprise Server" web-application
hosted by your own servers. These configuration parameters will require changes to be made to the file "
configuration.oxc.xml", which can usually be found in the folder "Onepoint Project Home
/onepoint". More information about the file "configuration.oxc.xml" can be found in the
"ONEPOINT Projects" installation manual.
4.1. Configuring the Jira Trigger
All requirements, work records or tasks which have been imported from Jira get by default synchonized
with the Jira-server at the same time every day at 8:00 AM GMT.
This can be overridden by the following setting (Here an example for 12'clock, every day - the
configuration works the same way like the "Notification Trigger" described in 6.2):
0 0 12 * * ?
The full documentation on the format of the "Cron-Expression" string inbetween and can be found here:
http://www.quartz-scheduler.org/docs/tutorials/crontrigger.html
4.2. Connecting to Jira via HTTPS
In most situations it is not essentially required to follow these steps to connect to your https-
enabled Jira-server, so for trial setups you could usually skip this part. But for HTTPS-enabled
production-servers please make sure to configure your "ONEPOINT Projects"-server like shown
below.
To configure your "ONEPOINT Projects"-server to allow access to Jira using HTTPS perform the
following steps:
1. Download the X.509 certificate of your Jira-server using your favourite browser and save it to a
local file (We'll call this file, including its path "path_to_jira_cert" during these steps)
2. Run the command "keytool" in the terminal or command-line (A small tool that was installed along
with Java, you'll find it in your Java-installations "bin"-folder) to add the downloaded certificate to a
keystore-file (We'll call the filename and its full path "path_to_keystore_file"). Here's an example:
keytool -importcert -file path_to_jira_cert -keystore path_to_keystore_file -storepass keystore_password
The given keystore will be created if it does not exist. The "keystore_password" should be a strong
password which will be needed to access the keystore-file.3. Add the path to the keystore and the required password from above to the configuration-file of your
ONEPOINT-server's installation (The file "configuration.oxc.xml" in the folder "Onepoint Project
Home/onepoint"):
....
path_to_keystore_file
keystore_password
After applying the changes please make sure to restart the Tomcat application-server.
4.3. Forwarding the URL of your "ONEPOINT Projects"-server to Jira
In some situations the Jira-plugin could fail to connect back to your "ONEPOINT Projects" Server, for
example when using an additional webserver connected to the "Tomcat" application-server or due to
proxy-issues. If this is the case, the URL of the "ONEPOINT Projects"-server can be forwarded to Jira
using the following entry in the configuration-file (The file "configuration.oxc.xml" in the folder "Onepoint
Project Home/onepoint"):
....
HOMEURL
After applying the changes please make sure to restart the Tomcat application-server.
4.4. Configuring the Jira timeout
The default timeout for the Jira connection is 20 seconds, but for larger Jira installations some queries
can take longer, which lead to follow-up-issues. To avoid these situations it is possible to increase
the Jira timeout by adding the following parameter to the "configuration.xml"-file which can be found
inside the "Onepoint Project Home"-folder.
505. Appendix 5.1. Enable increased logging for the plugin To solve communication issues between Jira and the "ONEPOINT Projects"-server it will be required to alter the logging-level of the Jira-server. These are the required steps for Jira 6 and higher: 1. Open the "Administration"-section in Jira 2. Navigate to "System" to the section "Troubleshooting and Support" 3. Select "Logging & Profiling" in the navigator (left side) 4. Scroll down to the section "Default Loggers" 5. Click "Configure logging level for another package" 6. Enter "ONEPOINT" for the field "Package name" 7. Set the "Logging Level" at "DEBUG" Confirm the changes by clicking the button "Add". The increased logging parameters will only be kept temporarily until the next restart of the Jira-server.
You can also read