Server Design for Digital Payment System
←
→
Page content transcription
If your browser does not render page correctly, please read the page content below
Distributed
                                        Computing

Server Design for Digital Payment
             System
           Distributed System Lab Report

                    Shenyi Wang
               shewang@student.ethz.ch

            Distributed Computing Group
     Computer Engineering and Networks Laboratory
                     ETH Zurich

                     Supervisors:
                  Supervisor Ye Wang
              Prof. Dr. Roger Wattenhofer

                   January 26, 2021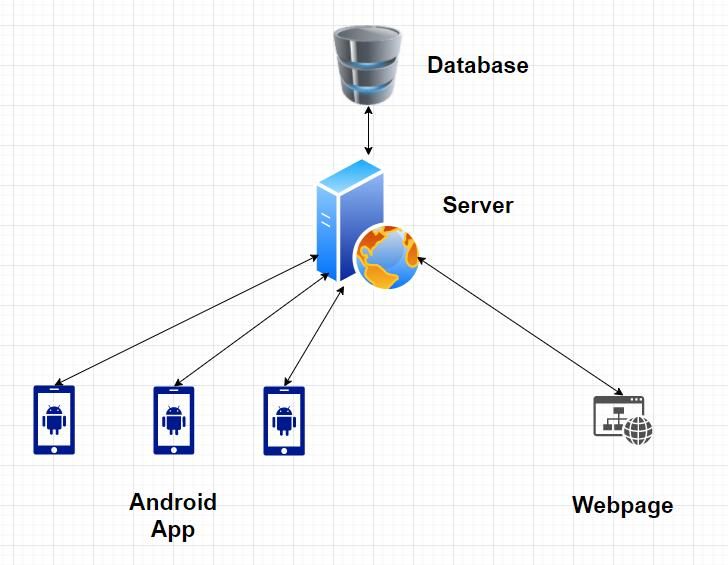
Abstract

      This is a report for my work in the course “Distributed System Lab”.
      In this lab I work on the project “Crypto money in real life” in a team
      of three under the mentoring of a supervisor. We designed and de-
      veloped a payment system, including an App on Android, a back-end
      server with database and a web interface. Unlike traditional digital
      payment Apps, our system enables the conversion between digital cur-
      rency and physical cash and support offline payments. This report will
      give a general overview of the project, and then focus on the server-side
      implementations in this project. I will also go through the details and
      thoughts in our development process.

1    Motivation
With the thrive of Bitcoin, digital currency came into in people’s sight.
Nowadays, lots of cryptocurrencies emerged. Inspired by these digital cur-
rencies, the governments of many countries start to think about using Cen-
tral Bank Digital Currency (CBDC) as well, though CBDC is still in the
hypothetical stage at this moment [1].
Despite the popularity of digital currencies, there are still a large portion of
people reluctant to use such kind of money, especially minority groups. One
of the biggest concerns of these people is that digital currency is entirely
“virtual”. Even though we know there are strict algorithms to ensure the
security of digital currency, for people who are less familiar with information
technologies, digital currency is all about several numbers in the cold ma-
chine, which makes them feel insecure. Unlike cash that people can hold it
and the concept of cash has already prevailed for hundreds of years, digital
currencies don’t have anything physical to prove their existence, and thus
for people who don’t understand the theories behind it, it is natural for them
to feel reluctant.
Besides the reluctance of certain groups of people, digital currencies also
have many limitations. Though the internet is covering almost every corner,
it’s very common for people to encounter situations that no available internet
could be used, and thus cannot access their digital currencies.
All these situations motivated us to design a new payment system that
could efficiently covert digital currency into physical forms, and vice versa.
We also believe such system could make people feel more acceptable about
digital currency, and allow more people to get involved.

                                         1
2 Solution
Our system is token-based. Users could create tokens as they wish, as long
as there is enough balance in their account. Each token contains a key pair
for authentication, an address unique to the token, and its amount. Tokens
could be created in three ways: QR code, NFC chip and half-half. Users
can use QR codes and NFC chips just as cash. However, people who receive
tokens still need to verify online. Besides the free tokens, users could also
create “merchant-specific tokens”. If users know where they would like to
spend the money, they could specify the receiver of the tokens they create.
For merchant-specific tokens, receivers can verify these tokens offline.
When designing our systems, we make a lot of simulation on scenarios that
could happen in real life. We develop assistant functionalities to improve the
convenience of our system, such as money request and changes. To ensure
the safety of money, we always encrypt sensitive data if it is sent through
online channels.
3 System Design
Figure 1: High level system design
23.1 High Level Architecture
Based on the nature of the project, we use the classical server-client model.
A central server runs the server program, and clients have two-way commu-
nication with the server. We developed two types of client programs, one
for Android and one for website. Both App program and server program are
written with Java, while the website are developed with HTML5 and JSP.
3.2 Development
The development of this project could be divided into four stages. As all of
us have little prior experience on mobile development, we divided the large
project into smaller goals. After each small target is achieved, we verify the
module and move to the next target.
Stage 1: Single App
We start the project with building a single APP prototype. We added some
basic features to the App, such as the main interface, which contains a couple
buttons. Clicking on the buttons will be redirected to other interfaces. In
this stage the App is rather “static” that users could only see pre-configured
contents.
Stage 2: Connecting to the database
Since we are developing a payment App, user account is an essential element.
Then we realize that having the App only could not fulfill our requirement,
because we need some sort of database to hold data regarding to users and
transactions. Thus, we add a database (MySQL) into our system and set
up a direct communication channel between our App and database. In this
stage, the App directly connect to the database and manipulate the data.
Stage 3: Server-Client Model
Though users can register for accounts and log into their personal account,
such direct communication is very insecure. Malicious users could attack
the database easily, and cause severe problems. During the development of
the project, we also notice that in most situations, verification is needed
before the user App directly modifying the data in central database. Thus,
we added a server into our system. The user Apps only communicate with
the server, while the server will update the database accordingly.
With one single central server, there is a risk of “one-point failure”, but we
want to keep things simple so we only use one server. In the future, it should
be easy to have backup servers to avoid service outage if we want to run the
App on large scale. To begin with, we use a laptop as our central server.
Stage 4: Moving to the cloud
3It is more convenient to deploy the server on cloud, so there is no need to
keep the laptop running all the time. Since it’s difficult to develop and debug
the server program with a VM, we move our server to the cloud after we
finish all the development work and tested the functionalities are correct.
4 Implementation Details
4.1 Database
4.1.1 Tables
We have six tables in our database.
accountinfodb: Stores account related information including account ID,
username, balance, email and cellphone. When registering account, a new
entry will be added into this table.
logindb: Stores information needed for users to login into their account.
There are seven keys in this table: ID, username, password, usertype, secret
key, N and public key. ID is the primary key and it is also the foreign key
for account ID in accountinfodb. The key usertype is to indicate if the ac-
count is a customer account or a merchant account, as they have different
functionalities.
transactiondb: Stores normal account-to-account transaction information
including transaction time, amount and accounts. Each new account-to-
account transaction will create a new entry in this table.
cryptotransferdb: Stores information about free tokens including amount,
address, public key and account ID which creates the token. When free to-
kens are created, the information about this token will be stored into this
table.
merchant token: Stores merchant-specific token information. This table
is very similar to cryptotransferdb, but contains extra data including to
which merchant is the token specified. Similarly, when merchant-specific
tokens are created, their information will be stored into this table.
contract: This table is only used when requesting money. A contract will
be created when a merchant or user start to request money.
contract record: This table records the money received under contract.
After a request is initiated, when user use tokens to fulfill the request, all
the tokens received will be stored in this table. This table keeps track of
4from whom the money is received, amount of tokens and contract id.
4.1.2 Procedures
We also defined common operations as database procedures. Database Pro-
cedures are subroutines that can contain one or more SQL statements that
perform a specific task. They can be used for data validation, access control,
or to reduce network traffic between clients and the DBMS servers. [2] In
our project, procedures are used to reduce network traffic that server only
sends parameters to the database instead of the whole query.
In the following paragraphs I enumerate some important procedures we use.
login check: This procedure takes two parameters, username and pass-
word. It selects the entry from logindb with specified username and pass-
word combination. This procedure returns the whole entry is the username
and password combination exists. Otherwise it will return 0, which indicates
the combination does not exist.
account register: This procedure is called when users register new ac-
counts. It takes four parameters, username, password, email and cellphone.
This subroutine first check if the username already exist. If so, the pro-
cedure will return 0 to indicate the username is repeated. Otherwise, the
account is created successfully and a new entry is inserted into logindb as
well as accountinfodb. If account registration is successful, the procedure
will return 1.
check balance: This procedure is widely used in many functions of the
APP. It takes two parameters account id and target value. By selecting the
balance of intended account and compare it with target value, the function
will return 1 if balance is enough and return 0 on the other hand.
exe transaction: This procedure is called by account-to-account trans-
actions. It takes three parameters including to account, from account and
amount. This subroutine first checks the validity of account numbers. If
to account is invalid, this procedure returns -1. Then, the subroutine also
checks if to account and from account is the same. The procedure returns
-2 if user transfers to himself. After ruling out invalid inputs, the procedure
then check if from account has enough balance. If not, 0 is returned. If bal-
ance is enough, the transaction could be executed, and the target amount
will be transfered from from account to to account, which means two en-
tries in accountinfodb with from account and to account will be updated.
If the transaction is successful, the procedure returns 1 like other procedures.
5crypto transfer: This procedure is called when creating tokens. It takes
five parameters of address, value, account id, N (modulo) and public key.
This subroutine check the validity of address. If it is valid, the balance
of the account id will be updated to balance - value. In addition, a new
entry with address, value, N, public key and crpto time will be inserted into
cryptotransferdb. The procedure returns 1 if successful and 0 if address is
already existed.
4.1.3 Connection
As mentioned before, only the central server can connect to the database.
We use JDBC driver to help establishing the connection. JDBC stands for
Java Database Connector. It is a Java API to connect and execute the query
with the database.[4]
With JDBC driver, to start the connection, we first register the driver class,
and then create the connection object and statement object. After this
point, we are able to execute queries with the statement object. In the end
we close the connection after all operations are finished.[3]
4.2 App-Server Communication
The client App use POST method to send message to the server. POST is
a request method supported by HTTP used by the World Wide Web. By
design, the POST request method requests that a web server accepts the
data enclosed in the body of the request message. 1
The server uses HttpServlet class provided by Java to receive data sent by
clients. A servlet is a Java programming language class that is used to
extend the capabilities of servers that host applications accessed by means
of a request-response programming model. The HttpServlet class provides
methods, such as doGet and doPost, for handling HTTP-specific services.
[5]
4.3 Server Implementations
The data sent out by clients is firstly received in the UserServlet class. The
request message is in the form of “request=” + request name + “¶m-
eter 1 name” + parameter 1 value + “¶meter 2 name” + parameter
2 value + ... + “¶meter N name” + parameter N value. After server
receiving the request, this class first parse the request name from the mes-
sage. Then the server program will jump to different cases depending on the
request received. Though requests vary from one to the other, in general
the program will parse and store the parameters into local objects. The
program also creates an corresponding object of userService class and pass
1
https://en.wikipedia.org/wiki/POST (HTTP)
6Figure 2: Flow chart for login operation
7the parameters.
The userService serves as a intermediate class. It simply calls the corre-
sponding function in userDAO and pass in the parameters. In userDAO the
program will call procedures defined in database. In this class, the function
will set parameters for procedure calls, and also process the results returned
by database. After receiving return values from database, the program will
create the response message to client in the form of “parameter 1 name” +
parameter 1 value + “¶meter 2 name” + parameter 2 value + ... +
“¶meter N name” + parameter N value.
Figure 2 shows an example of how functions of the App work in the system.
When use try to login, after the login button in App is pressed, the underly-
ing login activity of the App will be triggered and reads in the username and
password user just typed. Then, the App will send a HTTP request to the
server, containing the message request=login&username=xxx&password=xxx,
where “xxx” are values from user input. The server will parse request mes-
sage, call function login with parameters username and password. The func-
tion will finally call the login check procedure in database. Details about
this procedure is mentioned in Section 4.1.2. After getting the response from
database, server will create the response message and send it back to client
App. The app will then parse the message. If login is successful, the App
will change to display the interface after login. If unsuccessful, the App will
prompt a message to remind user that there’s something wrong with the
username or password.
5 Experiments
After successfully developed the App, we conduct a series of performance
tests and user tests to fully evaluate our system. We designed 5 different
tasks that covers major functionalities of the App. In the performance tests,
same person execute the 5 tasks on different devices. Each task is executed
multiple times to reduce error. In user tests, we find 11 volunteers to execute
the five tasks on the same device.
The details of the experiments will be covered by another team member’s
paper and presentation, so I will not go deep in this part. In general, all
tasks could be completed very fast - within a minute. There are a few
outlier because users are unfamiliar with Android and NFC chips and have
difficulty read and write. However even under such extreme cases, all tasks
are completed within 3 minutes. Also, our App works well on different
devices, and all have very good results.
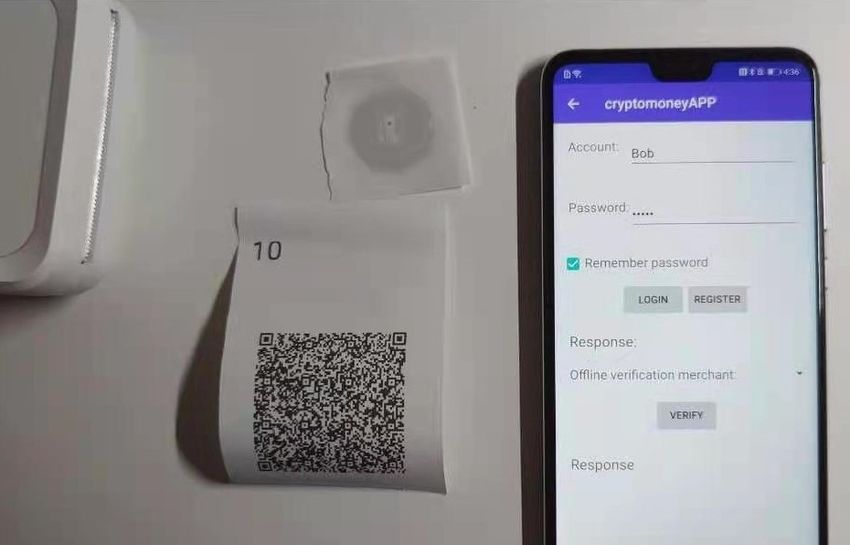
8Figure 3: A snapshot of the App and a token created by the App
6 Discussion
In this section, I would like to discuss some problems exists in the system
and potential improvements. As we have limited time developing the whole
system, there are still a lot of places we could work on.
Schema and procedure design in database
The tables in database could be better designed. Currently, the keys and ta-
bles are arranged arbitrarily, and the names for tables, keys, and procedures
are also created without a rule. You may feel it in previous sections that the
name of certain tables does not really match the real content stored in the
table, and many procedure names are also very confusing. Since we don’t
have a lot of data right now, we can manage all the data manually. However,
if we would like to put our App into real production, it is important to have
an optimal schema to organize data. Naming rules are also indispensable to
ensure we can easily interpret the purpose of keys, tables and procedures.
Server implementation could be simplified
From section 4.3, it is already mentioned that when server received the mes-
sage in UserServlet class, it pass the parameters into userService class, than
userDAO, and lastly call the stored procedures in database. It seems un-
necessary to have a middle layer, the userService class. Directly pass the
parameters into userDAO class is sufficient. This problem exists because
when building the server, we referred to online tutorials and used the im-
9plementation method in the tutorial.
Other issues
There are a lot of space for improvement on both App and web interface.
So far we mainly focus on the functionalities, but neglect aesthetic aspect.
If we have more time, making the interface more attractive would be ideal.
We also noticed a bug with the printer: it sometimes print redundant QR
codes. More details about the App and website will be covered by other
team members’ reports.
7 Conclusion
In this DSL project, I successfully designed and implemented a payment
App with server and website in collaboration with two other students and
a supervisor. Our payment App not only have basic functionalities of a
general payment App, but also focus on the conversion between the digital
and physical form of money. With our system, users could convert digital
balance in their account into physical tokens, and also the other way round.
Various experiments proved the performance of our system.
This project gave me good practice on mobile development with JAVA, and
also offered me many insights in digital currency field. By examine related
articles and books, I have deeper understanding about the evolution of dig-
ital payment technology and how they impact the society.
References
[1] Central bank digital currency. url: https : / / en . wikipedia . org /
wiki/Central_bank_digital_currency.
[2] Database Procedures. url: https://sparxsystems.com/enterprise_
architect_user_guide/14.0/model_domains/storedprocedures.
html.
[3] Java Database Connectivity with 5 Steps. url: https://www.javatpoint.
com/steps-to-connect-to-the-database-in-java.
[4] Java JDBC Tutorial. url: https://www.javatpoint.com/java-jdbc.
[5] What Is a Servlet? url: https : / / docs . oracle . com / javaee / 5 /
tutorial/doc/bnafe.html.
10You can also read