Joachim Heintz Csound Implementation of Günter Steinke's Arcade
←
→
Page content transcription
If your browser does not render page correctly, please read the page content below
Joachim Heintz
Csound Implementation of Günter Steinke’s Arcade

Background
Composition
Arcade for Violoncello and Live-Electronics has been written 1991/92 by german composer Günter
Steinke (* 1956). He worked out this composition in the Experimentalstudio des Südwestfunks in
Freiburg in close collaboration with Lucas Fels who performed the piece several times. Steinke
worked with these devices:
• Delay, potentially with feedback (“Verzögerung” = V 1, V 2 in score)
• Harmonizer (Publison Infernal) with Delay (= I 1, I 2 in score)
• Reverb (= I 3 in score)
• Filter (a series of band pass filters developed in the Experimentalstudio)
• Spatialization (Halafon)
• Swappable Matrix (“Koppelfeld”)

Implementations in MaxMSP and PD
There is an implementation in MaxMSP from 2002 (signed as “CRFMW”) and an implementation in
PD by Orm Finnendahl from 2010. Both are rather similar. The main difference to the original is the
implementation of the filter sequence which is done via FFT rather than a series of band pass filters.

This Implementation
After a performance of Arcade at the second Tehran International Electronic Music Festival 2018 I
felt the desire to go for an own implementation, together with providing better material for future
performances. So together with a group of composition students I developed the main working units
in Csound in winter semester 2018/19 at HMTM Hannover. This has been put together to a working
program by myself afterwards, and this version has been performed under guidance of Steinke in
April 2019, who authorized this version as authentic.
The main difference to the Max/PD version is the filter implementation which is quite close to the
original approach in providing a series of band pass filters. Some additional material about the piece
is added, too, so that future implementations in other programming languages should be easy.

Content / Overview
The Arcade_Csound directory should contain these files:
• Arcade_Csound.csd is the main program to which this description refers.
• filter_A_47.csv and filter_B_47.csv contain the filter sequences. They are loaded by the main
  program, so must be located in the same directory.
• Arcade_Csound_Description.pdf is this description.
• Arcade_Cues_Csound.pdf is an overview of what happens in the 98 cues, and at which time. For
  more details, see the Csound instruments Cue_0 to Cue_98 in the main program file
  Arcade_Csound.csd.
• Steinke_Arcade_Cello_only.wav makes it possible to run the program without live input (see below
  under Dummy Test).
• Arcade_Filter_A/B_Steinke.pdf and Arcade_Matrix_Max/Steinke.pdf provide some additional
  material.

                                                  1
Details of the Csound Implementation
Version
Csound 6.14 has been used with CsoundQt 0.9.8 as Front End. CsoundQt provides the Graphical
User Interface, and through the GUI also the MIDI handling. In case someone wants to use another
Front End or run Csound via the API, it should be very easy to adapt the code.
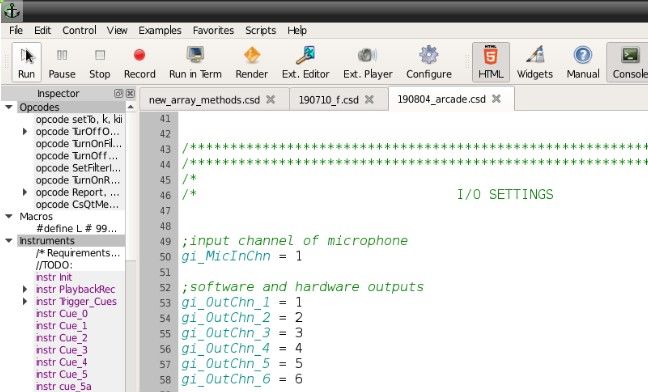
Matrix
The matrix has been implementated with global variables. This is how it looks like for Matrix 1:
When the matrix changes, the assignment of the variables changes. For instance, in the second
matrix the output of Harmonizer 1B is routed to channel 6 rather than channel 2, so the assignment
changes to
ga_Chn2_in = 0
ga_Chn6_in = ga_Harm1B_out
The advantage is that the code is straightforward and really expresses what happens. The
disadvantage is that there is no crossfade between the matrices, possibly resulting in clicks. It seems
to work (= there are no clicks), if the timing is correct. It would also be possible to implement a more
complex (and cpu intensive) version of the matrix, providing cross fades.
Filter Sequences
Here a completely new implementation has been done. Thanks to Steinke who provided the original
filter settings (containing the dB output of the single band pass filters which change from step to
step in the sequence) I could implement two series of 48 band pass filters and run them in parallel.
The performance was flawless, and the sound is much better than with the FFT approach, in my
2opinion. Unfortunately I could not get information about the specification of the original filters in
the Experimentalstudio. The filter opcode in Csound which I chose can easily be substituted by
another one (reson, butbp, mode and others are possible), if someone wants to try this out.
Cues
Based on the list of cues which the unknown programmer of the MaxMSP version created, I added
more details about what is happening in the single cues, and I also changed some. Main goal was to
describe as precise as possible what is happening in one cue, and to reduce the MIDI control
wherever applicable.
Spatialization
The original version of Arcade was for 6 speakers. The Csound implementation allows to swap easily
between 4, 6 or 8 speakers.
3How to play
Audio Input
In the top right section of the widget panel the input channels can be set:
Set the input channel number(s) of the microphone(s) in your audio device. Then choose “Use A” or
“Use B” or “Use A+B”. Mic Gain can be controlled by knobs 1 and 2 of the MIDI controller. The Sum
meter shows the effective signal which goes into the devices.
As written in the Arcade score, the violoncello should be amplified in speakers 1 and 2. There are two
ways to do it. If the microphone is fed in a mixer, the signal can be sent from the mixer to speaker 1
and 2, as well as to the input of the audio interface. In this case, choose “no” in the submenu for
“Live amplification by software”. The other possibility is to perform the live amplification through
Csound. In this case, choose “yes”. The amount of amplification can be controlled by knob 8 of the
MIDI controller.
Audio Output
Standard
The standard audio setting uses channels 1-8 of the output device. If this is the case, just choose 4, 6
or 8 channels and go. (If an output device with 4 channels is used, it may be necessary to change the
Csound header to nchnls = 4.)
Different Output Channels
If you need to route the output signals to different channels, say 9-16 for the 8 channel version, do
this:
1. In line 10 of the code, set nchnls = 16.
2. In line 42-49, set
gi_OutChn_1 = 9
gi_OutChn_2 = 10
etc.
3. Comment out line 2824 (instr Output) by inserting a semicolon at the beginning:
;out ga_Out
4. Uncomment lines 2827-2834 by removing the semicolon at the beginning. Line 2827 is now:
outch gi_OutChn_1, ga_Out[0]
A similar approach can be used, if only a stereo device is available. In this case, the program can be
run for testing (not for performance of course) by setting nchnls = 2 in step 1 above. Choose the
4 channel version in the CsoundQt GUI and set the hardware output channels to 1, 2, 1, 2 in step 2.
Step 3 and 4 are the same as described.
Different Speaker Setups
The setups for the implemented 4, 6 and 8 channel version start with speaker 1 as front left and
continue clockwise. As VBAP is used internally, Steinke's original 6 channel setup has speaker
positions 1-6 at -30°, 30°, 90°, 150°, -150° and -90°. Those positions are written in line 54 in the code:
vbaplsinit 2.02, 6, -30, 30, 90, 150, -150, -90
4If 6 speakers are used, but some are positioned slightly different, just change the angles. Same for
the 4 or 8 channels version (line 53 or 55).
MIDI Settings
MIDI control is set to a Korg Nano Kontrol with CC 11, 1, 2, 3, 4, 5, 6, 7 for the sliders, and CC 16-23
for the knobs (on MIDI channel 1). Any other similar device can be used.
To activate the device, click on the Configure button in CsoundQt (or choose Edit > Configuration).
Select the device in the Realtime MIDI section of the Run Tab:
After selecting, click Apply and then OK. When you move a slider or knob now, the widget in the
GUI should move, even when Csound has not yet been started.
If you want to change the controller numbers, right-click on a widget, go to Properties, and change
the CC and/or the MIDI channel number (or use the Midi Learn button):
This is the meaning of the sliders and knobs:
5Unit CC Function Software Channel
Slider 1 11 Delay output gain (-40 .. +12 dB) Del_out_midi
Slider 2 1 Harmonizer output gain Harm_out_midi
Slider 3 2 Reverb output gain Rev_out_midi
Slider 4 3 Filter output gain Filt_out_midi
Slider 5 4 Halafon A output gain Hala_A_out_midi
Slider 6 5 Halafon B output gain Hala_B_out_midi
Slider 7 6 Halafon C output gain Hala_C_out_midi
Slider 8 7 Sum output gain Sum_out_midi
Knob 1 16 Mic A input gain (-12 .. +12) micA_gain_midi
Knob 2 17 Mic B input gain micB_gain_midi
Knob 3 18 Reverb roomsize reduction (-0.1 .. 0) Rev_reduct_midi
Knob 4 19 Filter Q filt_q
Knob 5 20 Hala A speed modifier (-2 .. +2) Hala_A_speed_midi
Knob 6 21 Hala B speed modifier Hala_B_speed_midi
Knob 7 22 Hala C speed modifier Hala_C_speed_midi
Knob 8 23 Gain for software live amplification live_amp_midi
Basic Test
1. Open the Arcade_Csound.csd file in CsoundQt. In the Widgets Panel, select 4, 6 or 8 channel
setup and the IO settings as described above.
2. Run the program by clicking on the Run button (or pressing Ctrl-R).
You should see now in the console a message like this:
3. Click on the Widgets button (or View > Widgets, or Cmd/Alt+1) in case you don’t see the
widgets panel yet. Once the panel is visible, you should see the microphone signal top right.
64. Click in the widgets panel. This is very important because otherwise the computer
keyboard cannot be sensed by CsoundQt. (Rather you will insert spaces in the program code
which easily ruins it.)
5. Push the space bar. Now you should see the This Cue number moved to 1, and some green
lights for the device activity on the left side. If you have chosen “yes” for Live amplification
by software, you should hear the amplified signal now (careful — feedback is possible). You
can also check whether the latency is ok. If not, stop the .csd file and change the audio
settings in CsoundQt.1
6. Give some input and push the space bar again, so that Cue 2 is activated. After 12 seconds,
the input should be heard again as delay, and you should see it in the Internal Signals as Del
2, and in the Outputs 1-4 (for the 6 channel version).
The Graphical User Interface
Left section: The activity of the single devices is shown, as well as the Matrix (“Koppelfeld”)
number which is currently valid.
Middle section: Below the current and the next cue, the internal signals are shown. The gain of
each signal (controlled by the MIDI Fader 1-7) is shown in violet colour.
1 There are two important settings in CsoundQt: (1) The Buffer Sizes, and (2) the Real Time Audio Module.
(1) Go to Configure > Run and set the Software Buffer Size (-b) to 256 and the Hardware Buffer Size
(-B) to 1024 or even 512. This should give you a fair latency.
(2) If problems persist, change the RT Audio Module. In general, Csound runs best on Linux and OSX with
Jack (http://jackaudio.org).
For more information: https://csoundqt.github.io/pages/configuring-csoundqt.html
7Right section: Input and Output signals, as well as the output gain (controlled by MIDI Fader 8).
Bottom section: Mirror of the MIDI fader and knobs.
Performing the Cues
The computer keyboard in CsoundQt is only sensed during a performance if the mouse focus is in
the widget panel (or in the Console). As it is written in the GUI:
Once the mouse focus is in the widgets panel, the space bar triggers the next cue. With the + (plus)
key you can proceed to higher cue numbers, as well as with the - (minus) key for the lower
numbers. It is also possible to type directly into the “Next Cue” box.
The Cue Numbers are written in the score. Steinke’s colored lines make it possible to follow the
input on its way through the devices. The file Arcade_Cues_Csound.pdf provides detailed
information about what happens in the single cues.
Dummy Version
If the Playback Prerecorded File button is pushed after the start of the program, the microphone
input is substituted by a soundfile which Steinke provided. Now the Cues are automatically
triggered. (You can also set the spin box “Next Cue” to start playback from any cue.) The idea
behind this feature is:
• To give an impression how this version will sound (and make it possible to find/fix issues).
• To test spatialization.
• To practice the MIDI fader movement.
Live Record
If the Start/Stop Record is pushed, a 11-channel .wav file (24 bit) is written in the same directory
as the .csd file:
Channel Signal
1 Microphone input
2 Delay 1 output
3 Delay 2 output
4 Harmonizer 1 output
5 Harmonizer 2 output
6 Reverb A output
7 Reverb B output
8 Filter output
9 Hala A output
10 Hala B output
11 Hala C output
8This facility can be used to record a performance and later mix the single signals, or — together with
the Dummy Version feature — to diagnose issues.
Additional Material
Matrix
Arcade_Matrix_Steinke.pdf shows the original Matrix settings (provided by Steinke);
Arcade_Matrix_Max.pdf shows the Matrix settings in the MaxMSP version 2002.
List of cues
Arcade_Cues_Csound.pdf contains a detailed table about what happens in each cue.
Filter sequences
A copy of the original filter settings (provided by Steinke) is in the files
Arcade_Filter_A(B)_Steinke.pdf. The files filter_A(B)_47.csv contain the transmission of the original
settings to the list which is then read by the Csound program.
URL for Download
Look at joachimheintz.de/software. The score cannot be distributed because of copyright.
Credits
Orm Finnendahl generously shared his PD version of “Arcade”. Looking closely at his
implementation was a main inspiration for my own version.
Violoncellist Ulrike Brand had already played “Arcade” several times in the MaxMSP version with
Steinke performing the electronics. She was not only performing the Csound version the first time
on April 27, 2019 at Sprengel Museum Hannover, but also helped a lot because of her big experience
with this piece. She also performed the final version in a concert at BKA Berlin on October 6, 2020
(together with myself and Farhad Ilaghi Hosseini for the electonic part).
Marijana Janevska, Daria Cheikh-Sarraf, Farhad Ilaghi Hosseini, Philipp Henkel, Shadi Kassaee,
Dilxat Dawut and Hunjoo Jung were members of the seminar at HMTM Hannover in which we
explored together how to implement this classical piece for instrument and live-electronics in
Csound. Daria, Marijana and Shadi also performed the electronic part in the first performance of
this version. All helped a lot by asking and answering, by reading and correcting.
Last but not least, Günter Steinke supported this version not only by providing important source
material, but also by directing the rehearsals of the Csound version for the concert in April 2019.
This was extremely insightful for understanding the subtleties of his piece. On the following day he
held an inspiring class about his composition, both revealing the historical background and the
energetic root of this music. I am happy to know that he supports and honours this version.
Hannover, October 2020
9You can also read