Lecture Notes of the course Reference Management with Citavi - Advanced Course - mediaTUM
←
→
Page content transcription
If your browser does not render page correctly, please read the page content below
Universitätsbibliothek
Technische Universität München

                     Lecture Notes of the course
            Reference Management with Citavi
                                 - Advanced Course -

This work is licensed under a Creative Commons Attribution-ShareAlike 4.0 International License.

                                                                                            1 / 50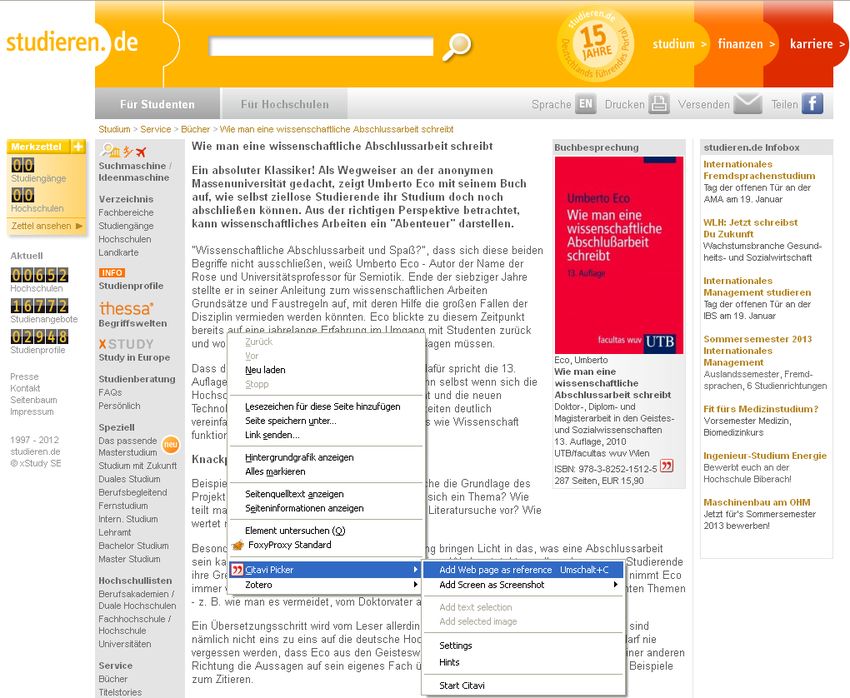
Universitätsbibliothek
Technische Universität München

Content

1   Content of the Citavi introductory workshop ............................................................................. 4
2   Adding references to Citavi ...................................................................................................... 4
    2.1 Searching library catalogs and databases using Citavi ................................................... 4
    2.1.1    Searching licensed databases via IP check ............................................................... 6
    2.2 Find full text search ........................................................................................................ 7
    2.2.1    Searching for full texts licenced by TUM .................................................................... 8
    2.3 Attaching, importing and renaming PDFs ..................................................................... 10
    2.3.1    Attach PDFs to existing records in Citavi .................................................................. 10
    2.3.2    Importing individual PDFs or entire folders ............................................................... 11
    2.3.3    Renaming PDF files ................................................................................................. 12
    2.4 Incorporating web pages with Citavi Picker .................................................................. 13
    2.5 RSS feeds .................................................................................................................... 14
3   Organizing quotations and references in Citavi ...................................................................... 16
    3.1 Keywords, categories, groups, labels, filters & search options ..................................... 16
    3.2 Creating and managing categories ............................................................................... 19
    3.3 Recording and assigning categories to knowledge items.............................................. 20
    3.4 Annotating PDFs in the preview window ....................................................................... 22
    3.5 Standardizing entries.................................................................................................... 23
4   Referencing in Word .............................................................................................................. 24
    4.1 Inserting quotations in Word ......................................................................................... 24
    4.2 Im-/exporting outlines ................................................................................................... 25
    4.2.1    Importing outlines ..................................................................................................... 25
    4.2.2    Exporting Categories................................................................................................ 26
    4.3 Creating Citavi compilations - From idea to text ........................................................... 26
    4.4 Creating grouped references ........................................................................................ 27
    4.5 Formatting reference lists in Word ................................................................................ 29
5   Modifying, creating and importing citation styles .................................................................... 32
    5.1 Changing citation styles ............................................................................................... 32
    5.2 Importing customised citaton styles .............................................................................. 33
    5.3 Modifying or creating a citation style ............................................................................. 34
6   Citavi and LateX ..................................................................................................................... 36
    6.1 What is a BibTeX key? ................................................................................................. 38
    6.2 Customizing BibTeX key templates .............................................................................. 38
    6.3 Citing with BibTeX keys ................................................................................................ 39
    6.4 Generating a BibTeX file .............................................................................................. 40
7   Task planning in Citavi ........................................................................................................... 41
8   Citavi Cloud............................................................................................................................ 42
    8.1 Assigning roles to team members ................................................................................ 43
    8.2 Converting local projects to cloud projects ................................................................... 44
    8.3 Working offline with cloud projects ............................................................................... 44
    8.4 Chatting with team members ........................................................................................ 45
9   Citavi add-ons ........................................................................................................................ 45

                                                                                                                                        2 / 50
Universitätsbibliothek
Technische Universität München

10 Contact and support ............................................................................................................... 47
11 Glossary................................................................................................................................. 48

We appreciate your feedback.
These lecture notes are being updated regularly. However, should you find that the information
mentioned herein is not accurate or you have suggestions for further improvement, we would wel-
come an email to workshop@ub.tum.de.

These lecture notes were published via the following link: https://media-
tum.ub.tum.de/node?id=1144896

                                                                                                                                        3 / 50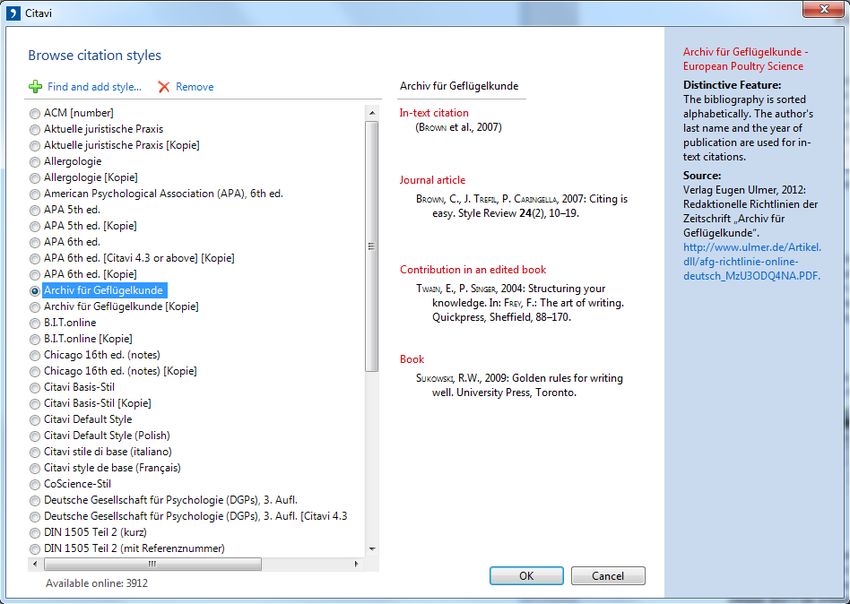
Universitätsbibliothek
Technische Universität München
1 Content of the Citavi introductory workshop
In Citavi introductory workshop the following themes, required for the Citavi Advanced Course, are
covered:
Incorporating references*1 in Citavi (rapid entry via ISBN* / DOI *, manual entry, importing
from a database *, incorporating references with Citavi Picker *)
Displaying a reference list
Working with the Word-Add-In (inserting references in a text document and creating reference
lists in a selected citation style*)
2 Adding references to Citavi
Citavi is fundamentally a reference management program. It allows you to organize, collect and
edit your references. In the reference editor program area you have several options for
including references in your Citavi-Project *:
1. Manual input (introductory course)
2. Quick Entry via ISBN, DOI or PubMed ID (introductory course)
3. Using of reference lists that contain DOIs or ISBNs (introductory course)
4. Importing from a database (introductory course)
5. Importing with Citavi Picker (introductory course)
6. Searching library catalogs and databases using Citavi
7. Full text search with Citavi (chapter 2.2)
8. Importing PDF files (chapter 2.3)
9. Incorporating web pages with Citavi Picker (chapter 2.4)
10. Adding references via RSS feed (chapter 2.5)
2.1 Searching library catalogs and databases using Citavi
You can search library catalogs and bibliographic databases * using Citavi. However, you should
note the following:
It is only possible to search databases that are freely available on the web. You cannot access
all the TUM licensed databases this way.
Library catalogs offer additional information on availability of print or electronic resources and
direct you to other results that may be of interest.
1
Words printed in bold with * are explained in the glossary at the end of this document.
4 / 50
Universitätsbibliothek
Technische Universität München
Reference databases are often restricted access, and thus are not automatically available for
searches using Citavi. Even where data sources are freely accessible, it is often the case that
the search interface itself offers more opportunities for a targeted search than Citavi.
In addition, Citavi only displays a limited number of hits and the criteria by which Citavi selects
which hits are displayed or not are unknown.
A Citavi search therefore makes sense if you already know the data on a book or article that you
want to include in your project, but you do not have the ISBN or DOI.
To start a Citavi search, click the Online search button . The Online Search window
opens up (Fig. 1).
Fig. 1: Online Search
If the catalog or the book trade directory you want to search does not appear in the list, you can
add approx. 4,600 additional data sources via the Add database or catalog button.
At the bottom of the window you will find search boxes for All fields, author, title and/or year range.
If this selection of fields is not sufficient for your search, you can click on the link Go to advanced
search (top left) or advanced online search (bottom right) to open a search form with more com-
plex search options.
At the end of the search, results will all be listed in an import window (similar to the import from a
database), so you can select the references you want and save them in your project.
5 / 50
Universitätsbibliothek
Technische Universität München
2.1.1 Searching licensed databases via IP check
Citavi can search some of the databases licensed by the TUM. A search by Citavi is possible if the
database provider permits Citavi access by IP check. Databases, which can be searched by Citavi,
include Web of Science and Scopus.
To enable Citavi to search these databases …
… from home: you have to establish a vpn connection to the TUM before starting Citavi. Here
you can find out, how to do so: https://www.it.tum.de/en/faq/it-services/internet-access-
eduroam-vpn-wifi/internet-access-eduroam-vpn-wifi/how-can-i-configure-vpn-access/ …
… as a TUM staff member working on campus: the TUM proxy has to be set.
How to set the TUM proxy in Citavi:
Menu Tools Options Search Proxy settings Use this proxy
Address: proxy.biblio.tu-muenchen.de
Port: 8080
User name: no entry
Password: no entry
Click OK and restart Citavi.
Fig. 2: Database search via IP chek not possible
To start a search use the Search button, select a database and run your search. If Citavi cannot
search the database, the following dialogue box appears, Authentication Required + name of the
database (s. Fig. 2).
6 / 50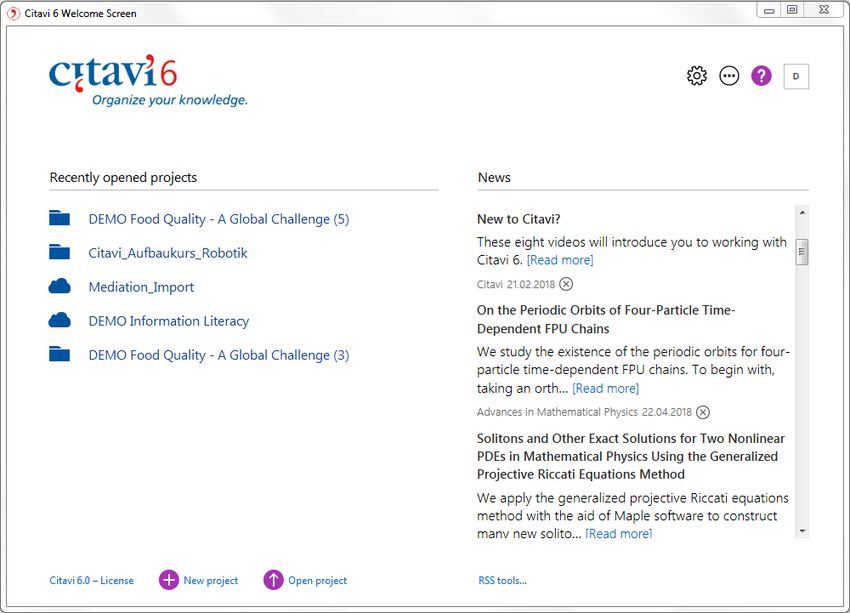
Universitätsbibliothek
Technische Universität München

2.2 Find full text search

You can use Citavi to search for the full texts of journal articles that are freely available on the In-
ternet.
In the Reference menu or the buttons bar, select Find full text.

In the Find full text dialog box that opens, select whether you want to search for full texts of journal
articles and newspaper articles of all titles in the project, a pre-designated selection, or only the
currently selected titles (Fig 3).

Citavi
Fig.     adds
     3: Find fullatext
                    link
                       in for all
                          Citavi    the titles for which a full text has been found.

Where Citavi finds a freely available full text, it will be set up as follows:
[Web] + URL + title of PDF file.pdf

                                                                                                     7 / 50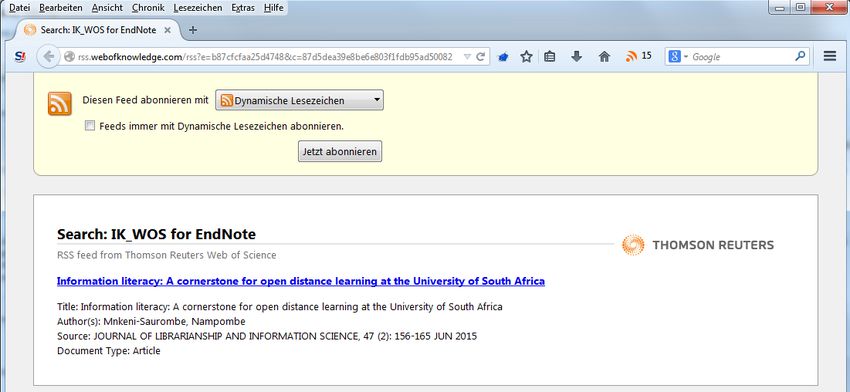
Universitätsbibliothek
Technische Universität München
Where Citavi finds a full text subject to license, this is indicated in the form of
[Web] + URL.html
In neither case is the file stored on your computer. It is only linked to the full text on the Internet. To
save free access full texts in your Citavi project, display the document in the preview window. In
the header of the preview window (Fig. 4), a Save as PDF button will appear. (Until Citavi 4 a yel-
low bar appears with the message Click here to save a copy of this document into the Citavi pro-
ject. Follow these instructions by clicking on the yellow bar.)
Fig. 4: Full text download in Citavi project
The document will then appear in the Reference tab in the following form:
[Citavi] + filename.pdf.
2.2.1 Searching for full texts licenced by TUM
If you wish to search for full texts licenced by TUM enter the following links in the Citavi settings via
the Tools menu Options RSS / OpenURL (Fig. 5)
OpenURL: http://sfx.bib-bvb.de/sfx_tum
EZproxy URL: https://eaccess.ub.tum.de/login.
8 / 50
Universitätsbibliothek
Technische Universität München

Fig. 5: Adding links to search for TUM licensed full texts

If you use the Find full text function, a link to Log in to https://eaccess.ub.tum.de/login will now be
offered (Fig. 6) where you can log in with your TUM ID (TUM e-mail address + password). Press
Login.

Fig. 6: Login for full text search for TUM licenced material

After the login you can close the login window and start your full text search. Please remember that
this is no guarantee that you will find all full texts licensed by TUM. Also the search will take con-
siderably longer.

Please keep in mind, that downloading full texts in a bulk is prohibited by copyright law and may
result in a total block on database access for all TUM members.

                                                                                                    9 / 50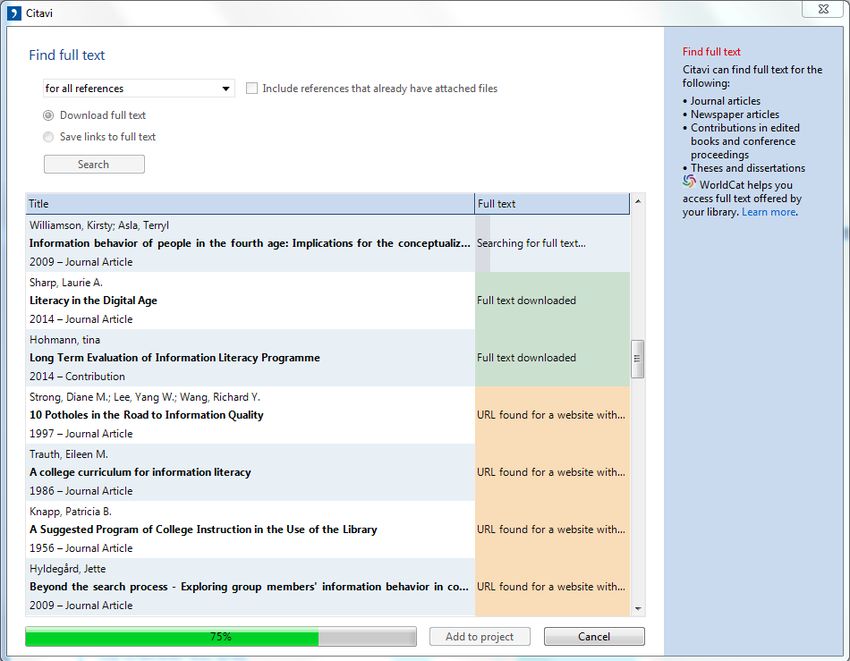
Universitätsbibliothek
Technische Universität München

2.3 Attaching, importing and renaming PDFs

Often one has interesting articles stored as PDFs somewhere on the computer already. Some-
times these are individual files, sometimes entire folders. You may attach these directly in Citavi
and replace the often cryptic file names by a descriptive name – the Citavi short title.

2.3.1 Attach PDFs to existing records in Citavi

To attach a PDF file to an existing reference record, there are several options (Fig. 7):

 1. In the reference tab
 2. In the preview window
 3. With drag and drop

 1. In the Reference tab (blue labels)
 Select the appropriate reference and open the Reference tab. At the bottom of the window, select
 Local file and browse to the file to attach on your computer.
 2. In the Preview window (orange labels)
 Select Add local file in the preview window and select the file to be inserted on your computer.

                                                                          Drag&Drop

Fig. 7: Import PDFs

                                                                                                10 / 50
Universitätsbibliothek
Technische Universität München
3. With drag and drop (green labels)
Select the appropriate reference and open the Reference tab. Select the desired file(s) on your
computer and drag and drop it/them into the lower part of the Reference tab.
2.3.2 Importing individual PDFs or entire folders
If you have already conducted a research and saved articles as PDF files on your computer, you
can now integrate these into your Citavi project. Citavi allows you to import both individual files and
entire folders.
1. Go to Import in the File menu.
2. In the dialog window What is the source of the data you want to import? select PDF files.
3. In the dialog box Source for PDF import, select either Single file or Folder of files.
4. In the File options area, you can determine whether files are to be moved, copied, or linked.
Generally, it is advisable to copy them into the Citavi project. Additionally, you can replace the
file reference with the Citavi short title during import. The Citavi short title consists of author,
year and title, and may thus be more meaningful than some of the filenames for downloaded
files.
5. In the next dialog window, all PDF files located by Citavi in the selected folder are displayed.
At this point you can remove unwanted files. Then go to Next.
6. In the following final dialog window you can see the bibliographic data Citavi was able to lo-
cate for the PDF files. This could look e.g. like this (Fig. 8):
Fig. 8: Importing PDF files
11 / 50Universitätsbibliothek
Technische Universität München
For some files no authors or titles could be located. These will need to be reworked manually.
How does Citavi assess data?
If Citavi locates a DOI, it searches through the service CrossRef for the bibliographic information
on the article. In addition, the metadata on the PDF file will be assessed. However, in many cases
this may not be very helpful. Thus, for example, the author name in Figure 8 is "Windows user".
Check your data carefully, therefore, when importing.
2.3.3 Renaming PDF files
PDF files that you download frequently have unintelligible names such as "9846.8245.pdf" (Fig. 8).
Citavi allows you to replace this file name with a Citavi short title, which consists of the information
on the author, year of publication, and title.
Replacing the title during import using Citavi short title was explained in the previous section. You
can repeat this procedure for titles already included in your project:
1. Option: go to the Reference menu and click Change short title
2. Option: Click the cog at the bottom of the Reference tab (Fig. 9). Select Rename files with the
Citavi Short title ...
Fig. 9: Renaming PDF Files
From the following dialog box select whether only a single file, all files in the selected record or all
the files in the project are to be renamed (Fig. 10).
Fig. 10: Renaming PDF files II
12 / 50Universitätsbibliothek
Technische Universität München
2.4 Incorporating web pages with Citavi Picker
Citavi Picker enables you to incorporate web pages comfortably. If you right-click on the web page
that you wish to add to your Citavi project, a context menu will open (Fig. 11). Choose Citavi Picker
and Add web page as reference and the website will be incorporated as an Internet document in
your project. Citavi does this using the metadata stored on the web page. This means that you
may have to correct or complete the data. Therefore it is best always to check all fields.
A special feature in Wikipedia: Citavi always stores two Internet addresses: one at which you can
always find the current version of the article and another at which the article was accessible at the
time of inclusion in your Citavi project. It is important always to specify the version from which the
quote was taken.
Fig. 11: Incorporating web pages using Citavi Picker
13 / 50Universitätsbibliothek
Technische Universität München
2.5 RSS feeds
RSS feeds keep you informed about new posts on a website, new articles in a journal or new arti-
cles regarding your research topic in a database. Citavi offers an integrated RSS reader. New RSS
feeds are displayed on the Citavi welcome screen on the right (s. Fig. 12).
Save the feed URL in Citavi to subscribe to new feeds. To do this follow the link RSS tools link on
the bottom right of your Citavi welcome screen or open the Tools menu, go to Options and choose
the tab RSS/OpenURL.
Fig. 12: Citavi welcome screen with RSS feeds
14 / 50Universitätsbibliothek
Technische Universität München
Where do I find the feed URL?
If a database or website offers RSS, this is indicated with this icon . To subscribe to an RSS
feed follow this icon. In most cases, a page like the following (s. Fig 13) opens up.
Fig. 13: RSS feed in Web of Science
Copy the URL and paste it into the field Feed URL in the RSS options (s. Fig. 14) and click Add.
The RSS feed is saved / subscribed to. From now on your will be notified about new post and
articles on your welcome screen in Citavi.
Fig. 14: Entering a feed URL into
15 / 50Universitätsbibliothek
Technische Universität München
If you want to subscribe to a search query, you might be asked to name your query before the feed
URL is displayed. This helps to distinguish between different search queries in the same database.
3 Organizing quotations and references in Citavi
Knowledge organization is the central program area if you want Citavi to give assis-
tance when writing your work. This enables you to capture content along with the references that
you have accumulated.
The following useful features will help you to organize the references that you have included in
your Citavi project, and to keep track of them:
Keywords
Categories
Groups
Labels
Filters
Search options
Table View
3.1 Keywords, categories, groups, labels, filters & search options
Keywords
Keywords can be assigned to each reference in the context tab in the middle of the window. Key-
words are usually content descriptive terms, a table of contents in single words if you will. All terms
that you have entered in your project as a keyword will be saved. Once you start entering a new
keyword in the keyword box, a list of all previously assigned keywords appears. You can - as de-
scribed above - filter and search by keyword.
Categories
The Citavi categories are a good tool to map the outline of your scientific paper. To have a good
overview on how much literature you have collected for each chapter already, assign the catego-
ries in which you want to cite your literature to each source.
Moreover, you have all references you want to cite in one chapter at a glance when writing on a
chapter. You can assign as many categories to one reference as you like.
Groups
Groups in Citavi work the same way keywords do. Like keywords groups are not hierarchical. The
group names can be managed in the corresponding list, just as with keywords.
16 / 50Universitätsbibliothek
Technische Universität München
Unlike keywords, you can use groups not just to organise your references according to subject but
to any form of category you would like. You could use groups to document your progress or your
next task (e.g. acquire, read, excerpt, check) or to mark the relevance of your citations (important,
negligible, contradictory, etc.). In addition to that they can serve as grouping criteria (chapter 4.4).
Labels
For marking your references, you have two labels to choose from: red labels (flags) and blue la-
bels (hoops) . The meaning of these labels is not predefined - you can define them for yourself.
To assign a flag or a loop to a reference, or to remove the label, left click in the reference list on
the appropriate icon. If the labels do not appear in the reference list, you can insert them using the
Show labels command, which appears when you click on the gray cog in the upper left naviga-
tion pane in the reference list.
Filter
The filter function can also be found in the navigation pane top left. Above the icons and cre-
ate a selection of references that you have assigned to one of the labels. Using the icon , you
can filter references by keyword; the button is used to list all the references that you have clas-
sified into a specific category*. Clicking the filter symbol will make further criteria available by
which you can display sources from your reference list. You can, for example, filter by reference
type or author.
Search options
Using the button you can search your project for references that match specific criteria. In
the window that opens when you click this button, you have a quick search with a search field and
an advanced search option available. Using the advanced search, you can restrict your search to
certain fields (e.g. author field, reference field) and combine your search criteria to create a com-
plex search query (Fig. 15).
Fig. 15: Advanced search function
17 / 50Universitätsbibliothek
Technische Universität München
Table View
Clicking on the button will open a new window in which the most important data about the
references in your project are displayed in tabular form. You can organize the display according to
your own requirements. You can add or remove columns and assign labels. The table view can be
exported to Excel (Fig. 16).
Fig. 16: Table view
18 / 50Universitätsbibliothek
Technische Universität München
3.2 Creating and managing categories
2
1
5
4
3
Fig. 17: Program area Knowledge Organization
1. Toolbar in the program area knowledge organiza-
tion
When changing program areas (Fig. 17, 1), the buttons
that are offered in the toolbar will also change (17, 2).
2. List of keywords, categories or groups (left col-
umn, Fig. 17, 3)
As with the reference list in the reference management
program area, in the left pane of the knowledge organi-
zation a list of categories will be shown (Fig. 18). The
categories structure your knowledge items* and can, for
example, map the structure of your work. Obviously, in a
new project, no bullet points will have been created. Us-
ing the buttons at the top of the column you can insert
new bullets , and in the categories available, change
the order as well as level of bullets ( promote,
demote). The knowledge items that have been assigned
Fig. 18: List of categories
19 / 50Universitätsbibliothek
Technische Universität München
to a category are moved at the same time. The numbers behind the bullet points indicate how
many knowledge items have been assigned to a category.
In addition to sorting by categories, the collected knowledge items in the left column of the program
area are also sorted by keywords or group. Click in the column header on the keywords or groups
icon.
3. List of knowledge items (middle column, Fig. 17, 4)
In the middle column, the accumulated knowledge items will be displayed according to the se-
lected category. Again, you can change the order of entries . Additionally, the
button can organize your knowledge items by subheadings.
4. Preview (right column, Fig. 17, 5)
In the preview area, the contents of the knowledge item are displayed.
3.3 Recording and assigning categories to knowledge items
Citavi recognizes seven different types of knowledge items. Five knowledge items are directly re-
lated to a source:
Direct quote *
Text is taken unchanged from source
Indirect Quote *
Text is paraphrased
Summary
Main points of a text
Comment *
Either the source itself or another knowledge item is commented on
Image or file citation
A digital or digitized image or file (from source) referred to
The other two knowledge items are independent of a particular text. Using them, you can retain
your thoughts and ideas about content.
Thought * (text)
Note down the ideas that come to you in the course of your work
Thought (image or file)
Capture a link or an appropriate image
The button, which allows you to incorporate text, image or file citations, is included in
each part of the program as the last item on the toolbar.
You can create new knowledge items, connected to specific references, in three places:
20 / 50Universitätsbibliothek
Technische Universität München
1. The button in the toolbar of the knowledge organization program area. If you
choose this route, first select the reference to which you refer.
2. The Knowledge items menu (only in the knowledge organization area).
3. In the reference management program area for each reference in the tab Quotations (middle
column).
The window that appears when you want to incorporate a new knowledge item is the same for all
knowledge items (Fig. 19). In the following screenshot the example of the knowledge item
is shown.
Fig. 19: Incorporating knowledge items
The window is made up of different fields:
First of all you will find the short verification of the reference, to which the quote is connected.
This does not happen when including a thought
The type of quotation which you can change at any time later.
Core statement: The core statement is the name given to the particular knowledge item and
appears in the middle column of the knowledge organization program area . If you do not write
a core statement yourself, Citavi inserts the first words of the quotation here.
You type the actual text in, either by hand or by copying it into the field. You can then edit it fur-
ther. Some options are directly available to you in the toolbars at top of the window: You can
add brackets or ellipsis, or change the font.
Please note: You must insert quotation marks for direct quotations yourself; they will not be
inserted automatically!
In many citation styles, the citation is specified in the text with the page number from which a
quotation is taken. In addition to page numbers, column numbers or paragraphs can be en-
tered. Instead of Arabic numbers, letters or Roman numerals may be used. This adjustment
can be made by clicking on Page range.
21 / 50Universitätsbibliothek
Technische Universität München
Keywords: Assign keywords to your knowledge item. In the knowledge organization program
area, you can show your knowledge items sorted by keywords. Once keywords have been in-
corporated in your project, you can look them up by clicking on keywords.
Categories: Specify where in your text a quotation is to be assigned. If you click on the term
categories, a new window opens with all previously created categories.
Groups: Sort your quotations into groups. When creating a new group you will be ask, whether
you want to create the new group for your literature, your quotations or for both.
You can assign a knowledge item to as many categories and subcategories as you wish.
The field Modified is automatically loaded with your initials and the date of the last modification.
3.4 Annotating PDFs in the preview window
Text passages and images to be saved as a knowledge items can also be generated from the pre-
view of the document in the reference management program area (Fig. 20).
Fig. 20: PDF annotations in Citavi's preview window
Here you have the following options for processing content (Fig. 17, left to right):
Text selection
Snapshot tool
Highlighter (yellow): Highlights text without saving it as a knowledge item
Highlighter (red) / quick quotation saver: Highlights text and saves it as knowledge item without
saving the exact content. The location of the quotation will be saved including the core state-
ment but without the actual quotation text.
Having marked a passage, it can be saved as:
Direct quotation
Indirect quotation
Summary
Comment
Task
Abstract
Keyword
22 / 50Universitätsbibliothek
Technische Universität München
Table of contents
More information on how to analyse PDFs with Citavi is available here: https://www.citavi.com/ser-
vice/en/docs/Citavi_5_Analyzing_PDFs.pdf
3.5 Standardizing entries
Different databases often store data in a variety of forms. It
may happen, for example, that when importing from one da-
tabase, the name of a particular journal appears in full,
whereas another database may provide you with a refer-
ence for the same journal, but only in an abbreviated form.
In your reference list at the end of your work these differ-
ences must be rectified. Citavi manages the terms of some
input fields in lists *.
You will find the automatically created directories in the
menu bar under Lists (Fig. 21): Fig. 21: Available lists
In the lists, incorporated items are displayed in alphabetical order. In the following we deal with the
list of Persons and Organizations (Fig. 22). All other lists are edited analogously.
Fig. 22: Lists of persons and organizations
23 / 50Universitätsbibliothek
Technische Universität München
In the list view, you can add new entries using the button. To complete or correct infor-
mation in existing entries, select them with the mouse and click . Please note: If a citation
style requires that first names should be given in abbreviated form, Citavi implements this automat-
ically. There is no need at this stage to make a correction to the name as written!
The , which you see in front of many entries, indicates that references are connected to this en-
try. When you click on this icon, the respective references appear.
If there are two entries for the same person (as in the example above: Rader, Hannelore and
Rader, Hannelore B.), you can merge the two names into a single entry. Mark the corresponding
entries with the mouse (select multiple entries by holding down the CTRL key on your keyboard)
and then click . In the window that opens you define the form in which the names should
be merged – subsequent re-editing is possible at any time. All references that are affected by the
name merge will be corrected automatically.
Useful add-ons:
Correct author names in all caps
Import journal abbreviations
4 Referencing in Word
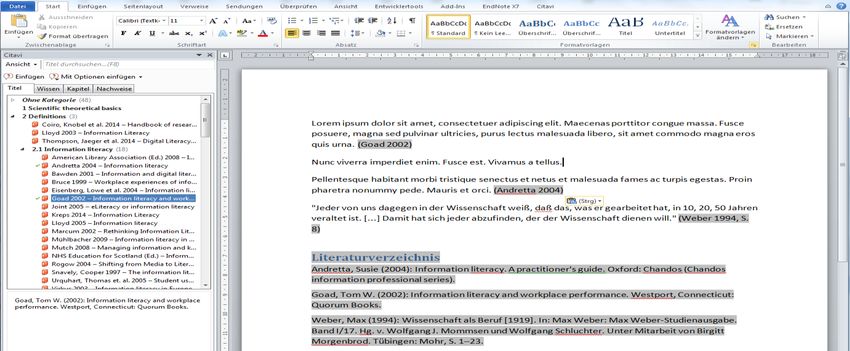
4.1 Inserting quotations in Word
You can insert your quotations into your manuscript by and
by. To do so you use the Word add-in just like when citing ref-
erences. The basic use of the Word add-in was introduced in
the Citavi introductory course.
In the Word-Add-In the contents of your project are organized
in four tabs (Fig. 23). Using the Reference tab, you will find
the list of all sources so that you can insert references into
your work with a single click. In the Knowledge tab, you find
all quotations, comments and ideas you saved in your project.
As with references, you can now insert knowledge items into
your work with a single click or using the button Insert. The
text of the quotation or thought appears in its final form and
may be edited safely. Only field codes, which indicate the
source of a reference – cannot be changed.
Fig. 23: Word-Add-In
24 / 50Universitätsbibliothek
Technische Universität München
If you would like to add information to your citation, e.g.
page numbers, you can do this by using the button Insert
advanced (see Fig. 24). In the menu that opens, you can
add page numbers to the field Page range. Additionally,
you can change the display of your citation in your text.
You might for example want to refer to your source in an
introductory sentence as Person (Year), excluding the au-
thor’s name from the brackets.
4.2 Im-/exporting outlines
The categories in the program area Knowledge Organizer
in Citavi are well suited to reflect the outline of a scientific
paper. Whether you have created your outline in a text
document and now wish to import it to Citavi or have cre-
ated a category system in Citavi that you want to export to
your text document, both are possible.
4.2.1 Importing outlines
Fig. 24: Inserting citations and sources
In the Knowledge Organizer program area, go to the Cate- with additional information
gories view.
Click on the small cog and then on Import category system. Specify where you want to import your
category system from, e.g. a Word document, and then select the appropriate document on your
computer.
All categories that are not already in the project will
be imported. This means that existing categories will
remain in the Citavi project, and new ones will be
added at the end of the list. If you have created, ex-
ported, and changed your category system in Citavi,
and now import it again, category name changes will
not be adopted as Citavi will not recognize them as
already existing categories. The renamed category
is considered new and attached along with other
new categories at the end. For this reason, it is ad-
visable, if you want to edit a category, to do so in
Citavi and insert this category again into your Word
document.
Fig. 25: Categories in the knowledge organisation area
The prerequisite for importing a Word outline as a
category system is that headings in Word are for-
matted as headings.
25 / 50Universitätsbibliothek
Technische Universität München
4.2.2 Exporting Categories
The categories in Citavi can be exported to Word, OpenOffice Writer, ConceptDraw, Freemind and
Mind Manager for further use as an outline. To export your categories from Citavi, go to the pro-
gram area Knowledge Organizer in the Categories view. Click on the small cog and select Export
category system and e.g. ... to Word.
Via the Word-Add-In, you can insert your categories more easily into an open Word document. To
do so, go to the Reference tab and select a category. Right-click to open the context menu. In the
context menu, choose Insert categories and knowledge items All categories without selecting
any further options. Alternatively, you can export categories from Citavi directly, which automati-
cally creates a new Word document.
4.3 Creating Citavi compilations - From idea to text
You can display all collected knowledge items, or a selection of them, in a document that can, for
example, serve as a basis for your work. When suffering from writer's block, this feature can serve
as a useful way of overcoming the daunting "blank page".
To do so using the Word-Add-In open the References tab, choose a category and right click to
open the context menu. Choose Insert Categories and knowledge items All categories and one
or more of the following options: Include knowledge items, Include core statements, Exclude cate-
gories with no knowledge items (see Fig. 26).
Fig. 26: Inserting citations and sources with additional information
Another way to do so is to click the button in the knowledge organization pro-
gram area. Clicking the small black arrow next to the button you can also save your script With op-
tions ...
26 / 50Universitätsbibliothek
Technische Universität München
The document, which is now stored in the format of your choice and is – according to your catego-
ries – provided with formatted headings so that you can easily create an automatic table of con-
tents in your word processor.
4.4 Creating grouped references
If you want to divide the references in your reference list into primary
and secondary sources or list your internet sources separately, Citavi
can organize your reference list accordingly. Citavi can either group
your cited references in your Word document. Or if you prefer, Citavi
can create a grouped list of all collected references from your Citavi
project, whether they’ve been cited or not.
Grouping cited references (Citavi 5.5 and higher)
Reference lists can be grouped by the following default criteria: refer-
ence type, year, author/editor/organization, keyword, category, periodi-
cal, publishers, series, tasks, created by, modified by or custom fields
(Fig. 27). To group your reference list by a certain criterion, you need
to create a grouping.
In order to create a grouping, open the menu Citation Group bibliog-
raphy Create or edit grouping.
The following dialogue box Group bibliography opens up (Fig. 28). Use
the green plus button to create a new grouping. Name your new
grouping according to its grouping criterion e.g. by reference type if Fig. 27: Grouping criteria
you want to group your reference list by document type.
27 / 50Universitätsbibliothek
Technische Universität München
Now create a new section via the + Add section
button. Choose a grouping criterion, e.g. Refer-
ence types (Fig. 28 left). Decide whether refer-
ences of all reference types should be grouped
separately (Fig. 30 top middle) or only those of a
certain reference type, e.g. internet documents,
laws etc. (Fig. 28 bottom center).
If you want to list several – but not all - reference
types separately from the main list you add a
new section for each reference type. Use the up
and down arrows to set the order in which the
document types are displayed (Fig 28).
Beyond that, you can use saved searches or
Citavi groups as grouping criteria. If you want to
use a group or a search, you have to create
them before creating the grouping. In each Citavi
project, you can create multiple groupings. If you Fig. 28: Adding and sorting groupings
want to use a grouping in another project, you
can export it to other projects.
Fig. 29: Choosing the grouping criterion
Once you’ve created your first grouping, a new drop-down menu with the title Grouping is dis-
played in your Word-Add-In (Fig. 30). The grouping menu shows all groupings created for your cur-
rent project. After you chose a grouping, your reference list will automatically be resorted according
to this grouping.
28 / 50Universitätsbibliothek
Technische Universität München
Fig. 30: Selecting a grouping in Word
Grouping collected references
Beyond lists of cited references, you can also create a list of your collected references, a bibliog-
raphy. Bibliographies can be grouped, too. To create a grouped bibliography, go to the menu Cita-
tion Group bibliography and choose a grouping. To save the bibliography use the button Project
bibliography from the toolbar. Choose the format in which you wish to save your grouped bibliog-
raphy and click Save.
In contrast to grouped lists of cited references, where the grouping is applied in the document it-
self, this function creates a new document.
4.5 Formatting reference lists in Word
The citation style defines what is listed in the reference list and how it is formatted. When there is
no definition in the style the style sheets in Word determine how the entries are formatted. As soon
as you have entered a citation to your text via the Word add-in, you will find additional style sheets
in Word (Fig. 31): the style sheet for the Citavi Bibliography Entry, the style sheet Citavi Bibliog-
raphy Heading and the style sheet Citavi Bibliography Subheading 1-8 for up to 8 levels of subcat-
egories.
Next to the name of the style sheet you will find a little drop-down menu where there is an option to
edit the style sheet (s. Fig. 31).
29 / 50Universitätsbibliothek
Technische Universität München
Fig. 31: Modifying Citavi's Word templates
Here you can change the font, font size, line spacing or the spacing between bibliography entries
(s. Fig. 32).
Fig. 32: Editing style sheets in Word
30 / 50Universitätsbibliothek
Technische Universität München
If you want to make content-related changes, e.g. changing the heading from bibliography to refer-
ence list, you can use the Citavi options in Word (Fig. 33).
Fig. 33: Citavi options in Word
In the options menu you can choose a new heading (Fig. 34).
Fig. 34: Changing the bibliography heading
31 / 50Universitätsbibliothek
Technische Universität München
5 Modifying, creating and importing citation styles
In the sciences worldwide, there is a vast array of different citation styles. Styles vary, not only be-
tween countries or scientific fields, but often within the same faculty or from chair to chair.
The major “producers” of citation styles are on the one hand scientific publishers, who usually re-
quire writers to use a particular style, and on the other hand scientific institutions, associations, or
individual universities that have set a particular style for their publications.
If you are unsure which style you wish/need to use for your work, we recommend the following pro-
cedure:
Check with your supervisor / professor / lecturer / chair which style you should use.
Inquire about which style is required when you write for a publisher.
If in doubt, use a publication style which is prevalent in your scientific field, such as the style of
an academic journal that is relevant to your subject, or style of a well-known institution in your
field.
Three very common citation styles are APA 6th ed. (Author-Year), IEEE editorial (numeric), and
Chicago 16th ed. (notes) as a footnote citation style.
5.1 Changing citation styles
You can change the citation style at any time without further consequences. To do so, click on Ci-
tation Citation styles Browse citation styles in the menu bar. You can also access the window
opened by this command directly by clicking on the reference management program area in the
footer on the currently selected citation style.
In the list of citation styles those styles you have already used are listed. On the right side you will
see a preview of how the main document types (book, journal article, article in an anthology) are
formatted in this citation style, as well as a display of how the citation will appear in the text (Fig.
37).
To select a different citation style, click . In the next window, you can search
for a specific style or choose a style by language restriction, citation method, or scientific field. In
the bottom left you can see how many different citation styles Citavi offers. The selection of availa-
ble styles is constantly expanding and required styles can even be requested from Citavi support
team.
Please note that the selection of another citation style is only possible if you are connected to the
Internet. This ensures that you always use the current version of the citation style for your project.
32 / 50Universitätsbibliothek
Technische Universität München
Fig. 35: Change citation style
5.2 Importing customised citaton styles
Maybe your chair provides its own citation style and you need to import it to Citavi. To import a
customised citation style to Citavi, save the style file in the folder Custom Citations Styles. This
folder is usually located in your Citavi folder on your hard drive. Choose your user account and
open the Documents folder. This contains the Citavi 5 folder, where you can find the Custom Cita-
tion Styles folder (e.g. C:\Users\ga57nan\Documents\Citavi 6\Custom Citation Styles).
If you have saved your Citavi project in another location, you can easily find out where it is stored
in the Citavi Options (Tools menu Options Folders). Simply open the folder via the link Open
folder in Windows Explorer (Fig. 38).
As soon as you save your style file in the Custom Citation Styles folder, it appears in the list of cita-
tion styles and you can select the customised citation style via Browse Citation Styles.
33 / 50Universitätsbibliothek
Technische Universität München
Fig. 36: Open folder location for custamised citation styles
5.3 Modifying or creating a citation style
In some cases, it may happen that none of the available citation styles is suitable for your needs,
whether you need to use a relatively little used style, or you have your own ideas about how your
citations should appear.
In these cases Citavi offers two approaches to achieving the desired citation style:
1. You choose the citation style that comes closest to the desired style from those available and
tweak it.
2. You define a completely new citation style. We do not recommend this option as creating a ci-
tation style from scratch demands considerable work and time.
In either case, begin by clicking Citation Citation styles Edit citation style from the menu bar.
This opens a new window:
Click the button to begin creating a citation style from scratch (Fig. 39).
To customize an existing citation style to your needs, you first select the style you want to use as a
basis. To keep the workload to a minimum, the style should largely meet your expectations. Once
you have selected the style you want to change, click on . In the next window you have to
enter a name for the citation style to be created. We recommend you choose the default option,
and create a copy of the underlying citation style. Citavi citation style editor will then open in a new
window (Fig. 40). The use of this tool takes some practice and due to its complexity, this advanced
course can only address the basics:
34 / 50Universitätsbibliothek
Technische Universität München
Fig. 37: Edit citation style
1. For each of the 44 available types of documents, you must define which specific details are to
be reproduced in which form in the reference list. When creating a new citation style, you can
skip certain types of documents that you are not likely to need. Reference types for which
there is a definition already are displayed with a green dot (see Figure 40, 1).
2. In the central area you define which elements are to appear in a citation for the selected docu-
ment type and according to what principles they should be arranged. In the example given for
the type Book (Monograph), two so-called rule sets are defined (Fig. 40, 2) – once as a book
with author and once as a book with no author. The blocks can be moved by clicking and
dragging. Please note that when you move the blocks you also have to change the punctua-
tion before and after the component (Fig. 40, 4).
3. In the left column you will see a list of available components – depending on the document
type. By clicking and dragging, these may be inserted into the central area and thus into your
citation style.
4. In the lower middle area under the rule sets, you can edit each individual component (Fig. 40,
2). You should specify how the punctuation should be configured with the previous elements.
Not only must actual characters be defined (be it a period, a comma, a bracket, etc.) but
empty characters as well.
5. With the Edit component button... you also have the option, for example, of setting the font
style (italic, bold, small caps). Possible configurations of components for representation of
names (such as author, publisher, etc.) are particularly extensive. You can set, among other
things, what order, form, and with what separators people’s names are to be presented (in-
cluding special cases such as prefixes, double-barreled names, multiple first names).
35 / 50Universitätsbibliothek
Technische Universität München
6. The right column is the preview (Fig 40, 5). Here you can see how changes will actually be ex-
ecuted in your project. Please be aware that there is no preview item if there is no entry of that
document type within your project.
1
2
5
3
4
Fig. 38: Citation style editor
6 Citavi and LateX
Citavi helps you create publications with the TeX typesetting system. Use BibTeX to do this: first,
write your manuscript in a TeX editor, then set placeholders for citations (BibTeX keys) in the ap-
propriate places, and finally generate the typeset publication from the TeX file (the manuscript) and
the BibTeX file (the works cited). The TeX package you use determines the final formatting.
To use TeX features, you must first turn on support for TeX in the Citavi options: Tools menu
Options Citation and then select the LaTeX support checkbox (Fig. 40).
36 / 50Universitätsbibliothek
Technische Universität München
Fig. 39: Schematic overview of Citavi, BibTeX and LaTeX interaction
Fig. 40: Activating LaTeX support
37 / 50Universitätsbibliothek
Technische Universität München
In the drop-down menu underneath, choose your preferred LaTeX editor. As soon as you have
chosen an editor, further options are displayed. If you also want to insert image quotations from
your Citavi project into your LaTeX document, please select the folder where you store your LaTeX
documents as your LaTeX project folder.
When saving the new settings, Citavi proposes to create a BibTeX key for every reference in your
project. Accept and Continue. If you do not like the BibTeX keys generated by Citavi, you can also
enter them manually or change the generated ones later.
6.1 What is a BibTeX key?
A BibTeX key is a unique identifier for a full reference in a BibTeX file. You insert the BibTeX key in
your text to reference a citation. When your document is converted to a PDF document, the
BibTeX key is replaced so that the in-text citations meets the requirements of your citations style.
During the conversion, the reference list is created according to your style requirements as well.
Example:
Suppose your BibTeX file contains this entry:
@book{Andretta.2005
author = {Andretta, Susie},
year = {2005},
title = {Information literacy},
publisher = {Chandos},
address = {Oxford},
}
In your TeX document, you could insert the following citation command:
\cite{Andretta.2005}
Here, Andretta.2005 is the BibTeX key. It functions as link between the citation in your text and the
corresponding entry in a BibTeX file. You find the BibTeX key at the beginning of an entry in the
BibTeX file, directly after the document type.
When the document is converted, the following entry might be made in the bibliography:
Andretta, Susie (2005): Information literacy. Oxford: Chandos.
You can change the template of your BibTeX keys. While this might be helpful while you work on
your TeX document, it doesn’t have any effect on the converted final document.
6.2 Customizing BibTeX key templates
1. On the Tools menu, click Options. On the Citation tab, click Customize BibTeX keys next to
the selected LaTeX support checkbox.
2. To change the default template for all reference types, click Default (Fig. 41).
38 / 50Universitätsbibliothek
Technische Universität München
Fig. 41 Schema for the generation of customized BibTeX keys
3. Make the changes you want. You can change which fields are used to build the key, how they
are formatted, the punctuation used, and conditional exceptions. If you want the punctuation
between two elements to be hidden if an element is empty, insert the not sign (¬) before the
punctuation by typing Alt+0172.
4. If you need certain reference types to have special BibTeX keys, you can define additional
templates for each of them. Click Add template for reference type and then configure the tem-
plate.
5. When you are finished making changes, click OK. Citavi asks what you want to do with exist-
ing BibTeX keys.
Note: Citavi does not automatically update BibTeX keys in existing references to ensure that
BibTeX keys already used in TeX documents continue to be resolvable. If you want to generate
BibTeX keys again, you can always click BibTeX key on the Reference tab.
6.3 Citing with BibTeX keys
Prerequisites
1. In Citavi’s Options LaTeX support is activated.
39 / 50Universitätsbibliothek
Technische Universität München
2. Your LaTeX document is open and your curser placed where you want to insert your reference
/ BibTeX key.
Go to Citavi and select the title or knowledge item you want to insert and press the Cite button in
the toolbar (Fig. 42).
Fig. 42: Inserting selected references and quotations to LaTeX documents
In the drop-down menu you choose, whether you want to insert the reference as in-text citation (In-
sert to Texmaker) or as footnote (Fig. 43). The inserted information could look like this
\cite{Janke.2012}.
If the cursor is not in the correct position in your LaTeX document, you can choose Copy to Clip-
board instead, go to your TeX document and insert it from the clipboard in the correct place.
Fig. 43: Options to insert references in LaTeX documents
If you insert an image quotation from Citavi into the TeX file, an images subfolder will automatically
be created in the LaTeX project folder. The LaTeX project folder must be defined in the Options so
that the subfolder will be created correctly. The image file will be named according to the legend of
your image quotation.
6.4 Generating a BibTeX file
1. Select references in your Citavi project.
2. In the Reference Editor, on the File menu, click Export.
3. Select which references to export, and then select BibTeX format.
4. Click Edit BibTex export definition to change one of the export definitions: you can use the de-
fault definition, or you can use one optimized for a particular TeX package (for example, jura-
bib). You can also select Customize export definition to create your own export definition, if
necessary. Then Click Next.
5. Click Save file to set the location for the BibTeX file.
6. Click Next and set whether you want to save the settings you just used as an export preset.
7. Click Next to save the file.
40 / 50Universitätsbibliothek
Technische Universität München
8. Optional: Only export references cited in the following TeX document. Select the TeX file that
contains BibTeX keys from the current project. Citavi creates a BibTeX file that contains only
the references cited in the TeX file.
Creating a Custom Export Definition
In addition to the default, Citavi includes export definitions specifically for various TeX packages,
including jurabib and natbib. To create a custom export definition:
1. In the Reference Editor, on the File menu, click Export.
2. Select which references to export, and then select BibTeX format.
3. Click Create BibTex export filter.
4. Define the reference type mapping and then click Next.
5. Define the field mapping. To set a field as "required" in the BibTeX key, click the circle next to
it. Then click Next.
6. Set the export options for the export definition and then click Next.
7. Give the export definition a name and a description for the Quick Help area, and then click Fin-
ish.
8. Set the file name and folder you want to export your BibTeX file to and click Next.
9. Decide whether you want to save your BibTeX export filter permanently or not and finish the
export by clicking Next.
7 Task planning in Citavi
Citavi will also help the time management of your scientific work. The program thus provides a
third component in the Task planning program area. The Task planner allows you to plan
the various stages of work with regard to your sources and the production of your text, while keep-
ing deadlines in view.
In this program area, you can add new tasks using the green plus icon:
Project tasks *
These tasks are generic and serve to help plan important steps in the process of creating your
work.
Reference tasks *
This type of tasks relate to individual references. You can be reminded, for example, that you
need to return a book to the library or that you want to excerpt a reference on a certain day, to
41 / 50You can also read