LIVE STREAM CAMERA - (OPERATIONS MANUAL) - JAGER PRO
←
→
Page content transcription
If your browser does not render page correctly, please read the page content below

LIVE STREAM
  CAMERA

(OPERATIONS MANUAL)

                  Version 1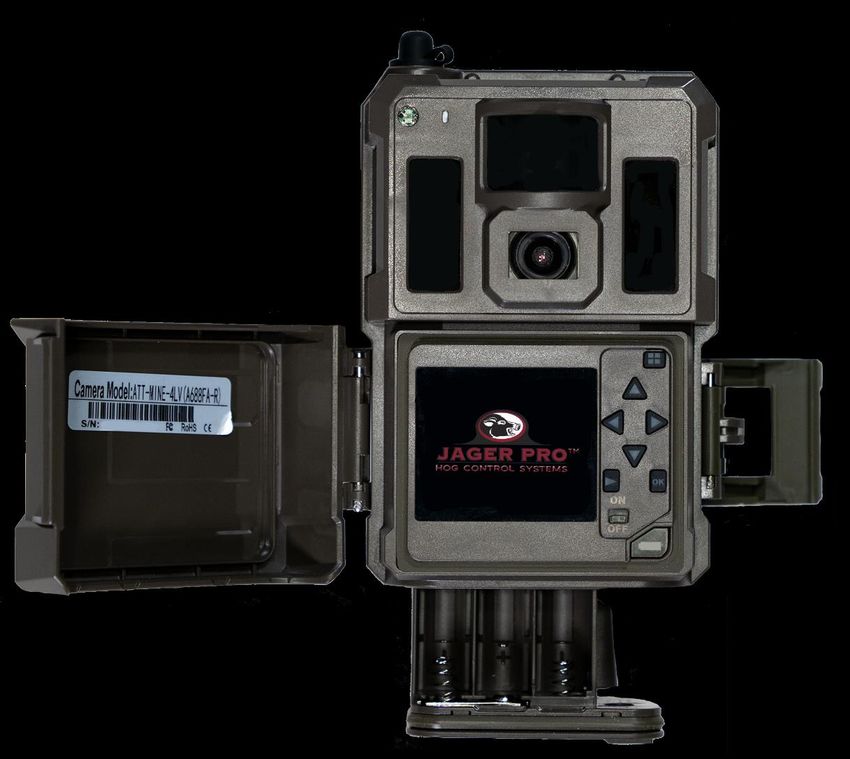
TABLE OF CONTENTS
 Camera Characteristics ………………………………………………………………………………………………….. 1
 Quick Start Programming ………………………………………………………………………………………………. 4
 Live Preview Screen …………………………………..………………………………………………………………….. 5
 Main Menu Tabs …………………………………………..…………………….………………………………………….. 6
 Camera Menu ……………………………………..………………………………..……………………………………….. 6
 Trigger Menu …………………………………………..…….……………………..……………………………………….. 7
 System Menu …………………………………………….…….…………………………………………………………….. 8
 Wireless Menu ………………………………..…………………………………………………………………………….. 9
 Activating Service ……………………………………………………………………………………..………………….. 10
 Adding Camera ……………………………………..……………….…………………………………………………….. 10
 Mobile App Setup ……………………………………………………….……………………………………………….. 11
 Manually Sending Photos ………………………………………..………………………………………………….. 11
 Command Codes …………………………………………………..…….……………………………………………….. 11
 Live Stream Functions ……………………………………………………….………………………………………….. 12
 Information Strip ………………………………………………………………………..………………………….…….. 13
 Registration …………………………………………….………….……….……………………………………………….. 13
 Firmware Updates ………………………………….……………………………………..……………….…..………… 13
 Pairing Camera Transmitter to Control Box Receiver ………………….………………………………… 14
 Camera Deployment ……………………………………………………………………………………………………. 15
 Limited Warranty …………………………………………………………………………………….…………………... 16
 Care and Maintenance ………………………………………………………………………………………………... 17
 Warnings ……………………………………….…………………………………………………………………………….. 17
 Technical Specifications…………………………………………………………..…………………………………….. 19
 Camera Accessories ………………………………………………………………………..…………………………….. 20
 Glossary ……………………………………………………………………………………………………………………….. 21

Thank you for choosing the JAGER PRO® Live Stream Camera. This manual will help you get the most out of your
new device. You will also find this manual, other technical articles and more information about your camera and
                                        service at: https://jagerpro.com/

If you experience any difficulties operating this product, please do not return it to your local dealer. Call Technical
  Support at 706-718-9789 9 AM – 5 PM EST, Monday – Friday or email us at cameradepartment@jagerpro.com.

                                                           i
CAMERA CHARACTERISTICS
This manual is intended to visually guide users through the individual steps to properly program,
operate and maintain the Verizon and/or AT&T versions of our JAGER PRO® LIVE Stream Cameras.

                           1
                                                                               1a
                                                                                          1a
                                              1
                                                                                     1a

                                          2       3
                                                          4
                                                  5            5
                                                          6
                                 3
                                      4

                                                                    7

Front View
1. Antenna: (Standard antenna shown) Receives cell tower signals.

1a. Antenna Seal: Prevents water from getting into the camera through the antenna port.

2. Ambient Light Sensor and Test Indicator: Detects surrounding light to automatically control day and
night camera functions. This sensor emits a red, blinking LED when the selector switch is moved to
SETUP. The LED will stop blinking within 30 seconds after the camera is armed indicating the camera is
operational and active.

3. Microphone: Picks up ambient sounds around the camera.

4. PIR Sensor: Passive Infrared motion detector. Senses the presence of a moving object which triggers
the camera to take a photo or record a stream.

5. IR LED Illuminator: 950nM infrared (Blackout) LEDs that illuminate the target area when camera
functions at night.

6. Camera Lens: The camera lens has a 90 degree field of view with no magnification. This enables
users to observe a 20 foot field of view measured 15 feet from the lens and a 32 foot field of view
when measured 21 feet from the lens.

7. Locking Latch: Secures the camera front cover to the main body housing so the rubber seal seated in
the groove in the main body housing meets the front cover creating a waterproof seal.
                                                      1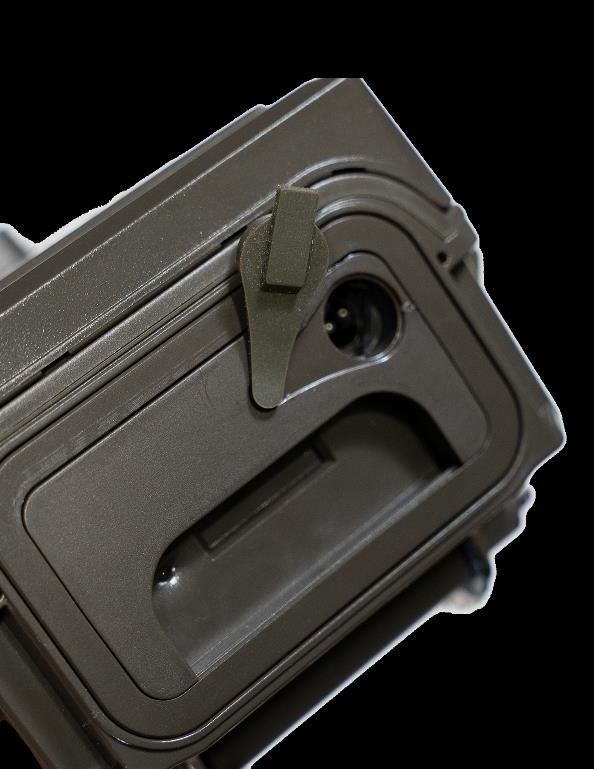
Bottom/Back View
1. Mounting Port: ¼” internal diameter (by 20) coarse threads for securing camera to a T-Post mount.
Only thread JAGER PRO® cameras two (2) complete rotations into the camera mounting port then
tighten using the mount’s adjusting nut. Warning: Forcing camera threads to the bottom will damage
mounting port and camera housing.

2. Tree gripper accessory allows the camera to be secured to a tree. (JAGER PRO® recommends
removing the tree gripper accessory when using to a M.I.N.E. ® T-post camera mount)

3. 12V DC Port Plug: Waterproof seal to protect internal components when external battery (optional
equipment) is not in use.

                                                                                       3

                       1

                           2

                                                 2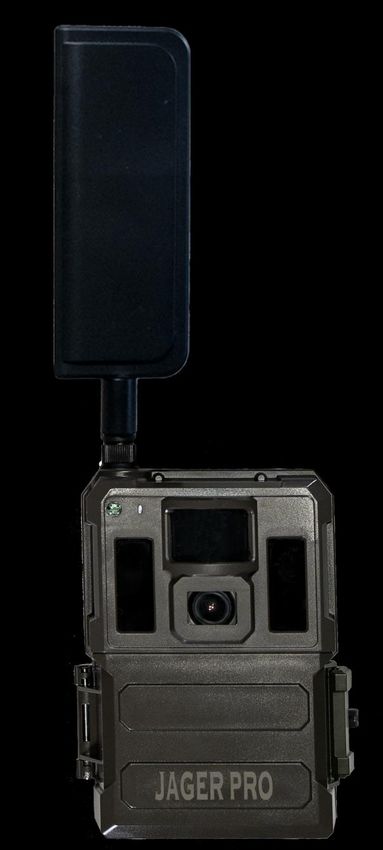
1

                    Inside View

                                                                                  4
                                                              3               5
                        2
                                                                         6        7
                                                                              8
                                                                         9        10
                                                                         11
                                                                                  12

                                                             13

1. Antenna Port: Attachment point to install various antennas depending on local cellular strength.
2. Camera Information: This sticker provides the camera model, serial number and the 15 digit IMEI
number.
3. LCD Display: Screen to observe menus, photos and settings.
4.      Menu Button: From the Live Preview Screen, press MENU to enter the Setup menus.
   In Setup menus: If in a submenu, press menu to return to the main menu. If in a main menu, press
menu to exit Setup menus.
5. Up Arrow Button: Moves from the highlighted area to a selection above.
6. Left Arrow Button: Moves from the highlighted area to a selection left.
7. Right Arrow Button: Moves from the highlighted area to a selection right.
8. Down Arrow Button: Moves from the highlighted area to a selection below.
9. Playback Button: Allows user to view pictures/video on SD card. Display the Delete menu so you can
choose to Del One or Del ALL. Press Playback again to return to the Live Preview Screen.
10. OK Button: Confirms and/or saves the highlighted item.
11. On/Off Switch: Used to power on the device.
12.         Eject button: Press to release the battery tray.
13. Battery Polarity Symbols: Located on the front of the battery block. Visual aids for proper battery
polarity installation. Use 12 (recommended), or 6 1.2 – 1.5v AA batteries. Use of 6 batteries can be placed
on either side of the battery tray. NEVER MIX BATTERY TYPES! We recommend Energizer brand AA
Ultimate Lithium batteries for your camera. Warning: Use of Alkaline batteries can result in leaking acid
and your warranty will be voided if you do so.

                                                    3
Bottom View
1. SD Card Port: Slot for receiving an SDHC card. The
camera has limited internal memory. A class 10, U1 to U3
Micro SDHC card (128GB or smaller) must be used to store
photos, live stream, video and debug data.
2. SIM Card Port: Slot for receiving a cellular SIM card
from Verizon’s or AT&T’s network provider.
3. 12-volt DC port connection for optional external battery
pack.
                                                                                   1        2
Warning: Inserting the SDHC card upside down or
backwards could damage the camera or the SDHC card.
Damage resulting from inserting the card incorrectly is
not covered under warranty.

Warning: Inserting the SIM card upside down or
backwards could damage the camera or the SIM card.
Damage resulting from inserting the card incorrectly is
not covered under warranty.

                                QUICK START PROGRAMMING
Begin programming the Live Stream camera for operation by removing the protective cap and installing
the standard antenna onto the antenna jack. Ensure the black rubber O-ring is not removed from the
antenna jack threads. Twist the antenna base snug but do not over tighten.
Warning: When installing the antenna, remove the protective cap and replace the black waterproof seal if
it comes off. Damage resulting from not having the rubber O-ring seal present is not covered under
warranty.

Unlock the latch and open the front cover. Press the eject button to remove the battery tray. Follow the
battery polarity symbols located on the front and rear of the battery tray to properly install the batteries.
We recommend all 12 batteries, although you can use 6 in either the front or rear tray. We recommend
Energizer brand AA Ultimate Lithium batteries for the best performance in the field. Rechargeable AA
batteries will not operate high-tech equipment nearly as long. We recommend the JAGER PRO® 12 volt
external power supply for extended camera use in the field which is specified for JAGER PRO® products.
The camera will operate using only the internal Lithium Ion rechargeable battery.
Warning! Do not mix battery types! Damage to the camera can result and your warranty will be voided if
you mix battery types or the batteries leak acid inside the housing.

A formatted class 10 Micro SDHC card must be used for the camera to function. You can input information
without an SDHC card present in your camera but will need the card to store any pictures taken.

The camera supports up to a 128 GB Micro SDHC card. Ensure the SDHC card is not locked and insert it into
the SD card port. Move the selector switch from OFF to ON.

                                                      4
QUICK START PROGRAMMING (Continued)
If you do not have an active SIM card, the screen will display the JAGER PRO logo. It will start with “System
Initializing”, then “Searching for Network, please wait. Please do not press any keys.” in the center of the
screen. The screen will state “SIM Not Found!” with an X in the top left for signal strength. You can make
settings changes but will not be able to function as a cellular device until an active SIM card is inserted.

If you insert an active SIM card in the camera, it will start the activation process, see page 10 for adding
the camera onto your account through the portal or mobile app.

                                      LIVE PREVIEW SCREEN
  Top Row (left to right)

  1: Live Stream camera signal strength dependent on location
  2: Carrier, Verizon or AT&T
  3: Camera mode (must be in camera mode for live stream)
  4: Selected photo size (4M or 8M)                   1                  2               3           4
  5: Signal Quality (SQ), max signal quality is 30

                                                       5

  Bottom Row (left to right)

  6: SD card, lets user know if SD card is present
  7: SD card space; used/available                        6                 7             8
  8: Battery %: You can have up to 3 different battery icons depending on the power sources used. PB
  (Power bank): external rechargeable 12V battery source. AA: internal AA battery LI: internal Lithium
  Ion rechargeable battery

                                          Voltage by battery source

                  Battery Type   3 bar (level 5)   2 bar (level 3)   1 bar (level 1)   0 (Level 0)
                  LI             >3.9v             >3.8v             >3.7v             12.4v            >11.7v            >11v              8.6v             >7.9v             >7.2v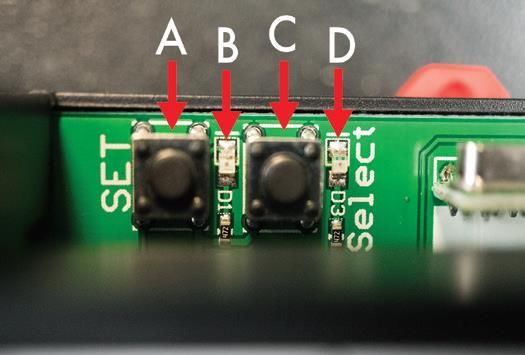
MAIN MENU TABS

Press the MENU button to access the Setup menus. **If no buttons are pressed the camera will automatically
arm itself after 3 minutes of sitting idle. Users may press any button or move the selector switch to OFF then
back to ON to restart the camera and access the MENU again.

There are four main menus; CAMERA, TRIGGER, SYSTEM and WIRELESS.

Press the left or right arrow buttons to change between the four main menus. Press the down arrow to enter the
sub menu, press up or down arrow buttons to cycle through the submenu settings. Press left or right to edit and
view choices for selected items with orange highlights.

Press OK to confirm and save any settings changes. Press up or down to view the next setting or press MENU and
return to the top MENU then move left or right to select another MENU.

                       Camera Menu:

Setting Items                                Description
                        Mode (Photo)         Photo – Must be on Photo to view Live Stream, see page 12 (We
                                             recommend Photo to transmit information to your phone).
  CAMERA                Photo Size           4MP or 8MP. This is the size it is saved on the SD card.
  Photo Options
                        Photo Burst          1, 2, or 3. Sends all photos in photo burst.

Setting Items                                Description
                        Mode (Video)         Video – Will not transmit Live Stream. (We recommend Photo to
                                             transmit information to your phone or to receive live stream.)
  CAMERA                Video Resolution     800x480, 1280x720, 1920x1080
  Video Options         Video Length         5 Sec, 10 Sec, 15 Sec, 20 Sec, 25 Sec, 30 Sec
    See page 9
                        Sound                Choose between On or Off. Turning this On will record audio.

                                                       6
Trigger Menu:

Setting Items                      Description
                Sensitivity        Off (time lapse only, not triggered)
                                   Low (temps below 10 F)
                                   Normal (10 F – 80 F)
                                   High (temps above 80 F)
                Trigger Interval   0s - 60 min: The timeout period between PIR triggers for each
                                   photo or video capture. We recommend a two (2) minute trigger
                                   interval. A one (1) minute or less selection may not allow a photo to
                                   transmit via data in low signal areas before the next PIR trigger. The
                                   photo is always saved on the SD card but may not have time to send
 TRIGGER                           via data to your phone or email.
   Page 1       Time Lapse         OFF: Camera triggers only during PIR event. (Recommended)
                                   ON: Camera automatically triggers at selected intervals.
                Start-Stop 1       OFF: Camera triggers 24 hours per day.
                                   ON: Camera only triggers between the START and STOP times
                                   programmed. Could be used to avoid high traffic from non-target
                                   species during specified times.
                                               Example:
                                   The start time is 18:00 or 6pm
                                   The stop time is 07:00 or 7am
                                   Set to the recommended 2 minute
                                   Trigger interval
                                   Time Lapse is off

Setting Items                      Description
                Start-Stop 2       OFF: Camera triggers 24 hours per day.
 TRIGGER                           ON: Camera only triggers between the START and STOP times
                                   programmed. Ensure the Start-Stop times do not overlap the START
   Page 2                          and STOP times from Start-Stop 1.

                                             7
System Menu:

Setting Items                  Description
                Clock          Enter correct Date and Time. Add in UTC for proper updates
                Arm Camera     Pressing OK will arm the camera. You can also press and hold the
                               left arrow button on the live preview screen to arm the camera.
 SYSTEM         Time Stamp     Choose ON or OFF to select the date and time stamp on the picture.
   Page 1
                Format         Formats the SD card and deletes all photos/videos.

Setting Items                  Description
                Over Write     OFF: Retains saved photos, streams and videos on SD card when
                               room is available. Camera will stop taking and sending photos when
                               the SD card is full.
                               ON: (Recommended) Camera deletes the oldest photos/videos
                               from SD card when full and continues to save newer photos/videos.
                               Camera will continue to send photos when the SD card is full.
 SYSTEM         Default        Restores camera back to factory settings.
   Page 2
                Beep           The default is ON. Choose OFF to silence key pad when making
                               selections.
                Password       The default password is 000000. Choose OFF to stop this function
                               and ON to set a six digit password. If you lose the password, you
                               must send it in to JAGER PRO® to reset it.

Setting Items                  Description
                Name Tag       Set this to name your camera.
 SYSTEM
   Page 3
                FW Update      Used only when updating the Firmware from the SD card.
                Information    Displays your camera specific information. Check our website for
                               the latest firmware version and uploading instructions.
                               Model         (VZW or ATT)-MINE-4LV
                               IMEI          (will match the number on the sticker)
                               MDN            This is your cameras phone number
                               ICCID          This is the SIM card number
                               Module Ver This is the recent module/firmware version

                                         8
Wireless Menu:
Setting Items Description
Send Mode Instant: (Recommended) The camera sends a photo immediately
when it takes a photo. Pressing the OK button while Instant is
highlighted will bring up the Max Num field. The Max Num field
indicates the maximum number of photos or texts allowed to be
sent within 24 hours. 0 is infinite (Recommended), 1-999 during a
24 hour period. The camera resets to zero each night at 0000 hours.
WIRELESS Batch: You can set the Event Type to Batch Sending for any
Page 1 scheduled event(s) from 2 to 10. Then set the time that you want
the camera to send the batch.
When there is at least one Batch Sending event, the camera will not
send any photos until the scheduled Batch time(s).
Off: Cellular function is de-activated. Photos will not be sent to the
server but will be saved to the SD card.
Live Stream ON: Camera Live Stream function is turned on. (Recommended)
OFF: Camera Live Stream function is turned off.
Hello Test Hello Test: This will verify that your camera is activated, has a signal
and can reach the internet and the Server.
Debug Use only when instructed to by support personnel. This will allow
developers to troubleshoot deeper issues a camera may have.
QUICK START PROGRAMMING (Continued)
Pressing the UP arrow key will change between modes; Photo, Live Stream and Video
Pressing and releasing the Left, then Right arrows will bring up Radio Frequency to pair or sync with your
control box. See page 14 for details.
Pressing the Right arrow will bring up the following information; Battery Power Source. Current voltage on
each battery source, Lithium, AA and DC or PB. Temperature. Pressing the down arrow will bring up the
charge state and sources. Provide you with the current GPS coordinates, Latitude and Longitude.
9ACTIVATING SERVICE
Visit our website at https://jagerpro.com/ to create an account. You can also visit https://jagerpro.com/my-
account/activate-data-plan/ to Activate Data Plan for your camera.
Select your camera model, input the camera information and Add Subscription to Cart. Purchase a Plan with your
personal information.
Please watch the 10 step instructional video https://jagerpro.com/solutions/hog-cameras/4g-camera-manual-
videos/
Add Camera to your account on https://my.jagerpro.com/home. (We will refer to this website as “Portal”)
ADDING CAMERA
1. Using a web browser on your computer or phone, go to https://my.jagerpro.com/home.
NOTE: We will highlight the separate steps for adding the camera through the portal in blue and the mobile app
in green.
2. Sign in to your account. If you don’t already have an account, register for one, then sign in.
3. Download the mobile app. From your phone or mobile device, for Android devices, visit the Google Play store,
for iPhone devices, visit the Apple App store. Search for “jagerpro camera mgmt.”. See “Mobile App Setup” on
the next page for details.
Once downloaded, you must log in using your my.jagerpro.com email address and password.
Once logged in, it will take you to the home page.
4. To add your camera:
The data plan must be active and SIM card inserted in your camera.
a. Turn the camera from Off to On. It will open with the Setup Wizard screen.
b. Verify your time zone, options are; Eastern, Central, Mountain, Pacific, Alaska, and Hawaii.
Tap OK to confirm your time zone. It will state “Update Successful!”, press OK to move to the next step.
c. Press OK to execute the command to Add to your JAGER PRO® account.
The camera will display the IMEI number and registration code.
d. On the Camera Management page, you will see Add New Camera, click this button to open the page.
d. On the Home screen of your mobile app, tap the plus icon in the top left corner.
I. Either type in the IMEI number or use your phones camera to take a picture of the IMEI bar code.
Tap Next once complete.
II. Input the registration code. Check the box that you have read the privacy policy and tap Next.
This will add your camera to your my.jagerpro.com account or through the mobile app.
5. Back on the camera, tap OK to move to the next step.
6. The next step will register the live stream, press OK. Press the menu button to exit the registration process.
7. Send a Test Picture: From the Live Preview screen, press OK to take a picture then OK again to send it. Watch
the screen to be sure the sending process completes.
a. After the Test Picture has been sent, arm the camera. Either press and hold the left arrow button, or press
Menu, right arrow two times to System Settings, down arrow two times to Arm Camera and press OK.
8. From the portal, refresh your screen, you will have a picture with an “E” coded photo (see “Information Strip”
for more information). Your mobile app will automatically download new photos.
9. Wave your hand in front of the camera or, move the camera around, wait 30 seconds.
10. Refresh your screen or click on CAMERAS > MANAGEMENT.
a. Make sure you have a new photo, it will have an “M” code and that the Status Report is updated.
11. Click on the red “Manage Camera” button and select Take a Photo. Tap on the 3 dot, 3 line menu icon and
tap on Take Photo Now. Wait 30 seconds before refreshing your screen and make sure you receive another
photo, it will have an “S” code.
12. If you can see the picture on the MY CAMERAS > CAMERA MANAGEMENT or MANAGE PHOTOS page, service
is working. Customize the setup for your particular needs by updating camera settings, adding email contacts,
etc.
10MOBILE APP SETUP
Please watch the mobile app instructional video: https://youtu.be/IwbOWmAzHQg
From your phone or mobile device, for Android devices, visit the Google Play store, for iPhone devices, visit the
Apple App store. Search for “jagerpro camera mgmt.”.
Download and install the JAGER PRO® app.
Once downloaded, you must log in using your my.jagerpro.com email address and password.
Once logged in, it will take you to the home page.
If your phone is connected to WiFi, your pictures should appear. Click on download photos if they did not
automatically download.
Check the following settings and change if appropriate:
On the second button from the bottom left, tap on Settings
Ensure “Download Only When WiFi is Available” is set to OFF (default). If the WiFi setting is
OFF, photos will download whether you are on WiFi or not, but be aware that downloads will use your device’s
data allowance if WiFi is not available. Thumbnails are typically small, but if you download a lot of them and/or a
lot of hi-res photos, this may be a consideration for you.
Set “Photos – Auto Purge Days” to your desired value. This purges photos only from your
device, not from the portal or camera.
Automatically Download, “Set Per Camera” can be ON or OFF, if it is OFF (default), then
“Automatically Download” should be ON (default). If it is on, then you can choose between cameras if
Automatically Download is on or off.
When Selecting a Single Photo, “Confirm Delete” can be ON (default) or OFF. “Confirm Hi-Res
Request” can be ON (default) or OFF. “Confirm Video Request” should be OFF (default).
Notification, “New Photo Available” should be ON (default). “Camera Status Report” can be ON
(default) or OFF. Having this option turned on will download a status report with each photo. “Live Stream”
should be on (default) to be able to start live streaming.
Notification Ringtones has several options to choose from, choose the option that best suites
your needs.
MANUALLY SENDING PHOTO (Test Photo)
Our camera is designed to test program settings and service by manually sending a photo. Move the selector
switch from OFF to ON. Allow the camera 30 seconds to search the wireless network. Verizon or AT&T will
appear in the top center of the LCD screen after connecting and have several bars in the top left corner. Pressing
the OK button will immediately capture a photo, pressing the OK button again will upload the image to the
network by following the camera program settings.
NOTE: You must have an SD card inserted in the camera to complete a manual photo.
Watch the screen to be sure the sending process completes. You should receive an alert notification on your app
and a new photo available.
COMMAND CODES
The Live Stream camera does not utilize command codes as our previous versions of cameras. The commands
are currently prompted through the portal or mobile app with the use of the Take Photo Now or Drop Gate
requests.
11LIVE STREAM FUNCTIONS
Once the JAGER PRO® app has been downloaded and the camera is registered, your live stream camera is now
ready for use.
First, ensure that the live stream camera is turned on and placed in the “armed” mode. Failure to ensure that the
camera is armed will result in the live stream function not available.
Next, open the JAGER PRO® app and locate the live stream camera.
Initially, you will see the app refresh for any pictures that need to download. Once completed, the “Live” button
will turn from grey to green. This is letting you know that the live stream function is now ready
for use. If it doesn’t change, completely close down the app and re-open it.
Tap the “green” live stream function, you will get a message that states “the camera is waking up”. This function
can take anywhere from 10 to 15 seconds depending on your cellular service.
The camera should now be streaming through the JAGER PRO® app.
1 2 3 4 5
You now have access to five functions that can be located at the bottom or right, depending on orientation, of
the live stream page. The functions are as follows from left to right;
1. “Refresh”, if you notice your app lagging or frozen, tap the refresh button to bring it back to real time.
2. “Camera icon”, if you wish to take photos while running the live stream, tap the camera icon and the camera
will take a picture and save it to your phones photo library and the cameras SD card.
3. “Arrows”, this is the drop gate function. Tap the arrows once, you will then get a “do you want to close the
gate” message. If you pressed the button in error select cancel, if you wish to proceed, press yes. If yes was
selected, you will now witness the gate drop on your JAGER PRO® app through the live stream.
4. “Record”, when the live stream is streaming, you have the option to record. This is accomplished by tapping
the record button once, the record icon will turn red to let you know recording is in use. To stop the recording,
press the record button again and the icon will turn white. You will then see a message at the bottom of your
phone that says “saving to library”. It will automatically save the stream to your phones photo library and will
also save the stream to the SD card inside the camera.
5. “Sound”, one press will mute any sound coming from the camera, you will see a slash through the sound icon.
To unmute, simply press the sound icon again and you will begin streaming sound through your phone.
Once you are completed viewing the live stream function, press the back arrow located at the top of the JAGER
PRO® app. This will take you back to the home page of the app.
*if running the live stream function longer than 180 seconds, you will receive a pop-up message that asks “would
you like to continue watching”, press yes to continue viewing or exit to exit the live stream.
12INFORMATION STRIP
Below is the information provided by the camera with each photo.
1 2 3 4 5 6 7 8
From left to right-
1. JAGER PRO® is the camera manufacturer.
2. MINE-4LV is the camera name.
3. The “M” indicates the photo was triggered by “Motion”. The letter “S” would indicate a photo triggered by
Request Photo from the portal or mobile app. “T” would indicate a photo triggered by “Time Lapse”. “E” would
indicate a manually triggered photo/video using the camera’s OK select button during SETUP or scheduled event
set up through the portal or mobile app. “F” would indicate that you formatted the SD card.
4. The date is 28 January 2021.
5. The time is 22:09:54 or 10:09:54 pm.
6. It is a full moon. Moon Phases displayed include: (new moon), (waxing crescent), (first quarter), (waxing
gibbous), (full moon), (waning gibbous), (last quarter), and (waning crescent).
7. The temperature is 41 degrees Fahrenheit.
8. The battery symbols are represented by each power source applied. PB is power bank or external 12V power,
5 is fully charged. AA is the AA batteries inside the camera, 5 is fully charged. LI is the internal Lithium Ion
battery, 3 is half way charged. If it is below P5 (P3-P0) on the PB or AA, then it is time to replace the batteries.
See page 5 for a description of the battery levels and indicators.
REGISTRATION
When you activate your data plan for the first time, your camera is automatically registered in our system. You
can still register your new equipment on the JAGER PRO® website via the camera Module ID or Serial Number so
we may provide appropriate firmware updates. These updates are necessary to ensure your equipment operates
efficiently as network wireless technology changes. Multiple cameras and control boxes may be registered on a
single submission.
FIRMWARE UPDATES
You should periodically check JAGER PRO® or my.jagerpro.com web site for firmware updates for your camera.
We periodically release firmware updates with new features and/or performance enhancements. Updating
firmware on the Live Stream Series cameras takes a few seconds, and is well worth the effort to ensure your
camera is performing at the highest level possible.
Update the camera firmware if your camera’s firmware is not the latest version:
a. On the portal, select FIRMWARE.
b. Compare the date of the firmware version listed for your camera to the date of the latest version.
c. If the latest version is more recent than the one on your camera, follow the instructions on the portal to
download and install the FW onto your camera. 13PAIRING LIVE CAMERA TRANSMITTER TO CONTROL BOX RECEIVER
The most efficient way to pair Live Stream Camera with control box receiver is to conduct
NOTICE
these steps before mounting camera in place.
(THIS STEP IS ONLY A FUNCTION OF THE M.I.N.E.® AND LIVE STREAM CAMERAS.)
The Live Stream Camera has an internal transmitter on the circuit board and must be located within 50
yards of the M.I.N.E.® Gate to operate correctly. Users must manually pair camera transmitter signal to
each control box receiver the first time they are linked together. It is not necessary to pair camera
transmitter to receiver more than one time. Pressing and holding the Pair to Transmit button for 8 seconds
will clear out the memory.
A B
C
Pairing Steps:
1. Press and release “frequency select” button (C) and red light (D) will flash either three times or five
times. Press and release “frequency select” button (C) until red light (D) only flashes three times.
2. Move camera selector switch from OFF to On.
3. Press and release “pair to transmitter” button (A) and red light (B) will illuminate for 15 seconds. Users
only have 15 seconds to complete step 4 once step 3 has been initiated.
4. Press and release camera “left arrow” (A) then press and release camera “right arrow” (B) to send a
manual RF signal to control box receiver. A message will appear “Please press OK to trigger RF”. Press OK
and you will receive a message “RF Trigger…”, your camera should now be linked to the gate transmitter.
Red receiver light (B) should flash five times then no longer illuminate.
5. Ensure M.I.N.E.® Camera and receiver are paired. Press the OK (C) button while observing green light (D)
illuminates. Test successful.
***Repeat these steps on other control box receivers if multiple gates are used at trap
enclosure.
CRUSH HAZARD: Stand clear of gate as it could cause bodily harm!
! WARNING Ensure safety clip is installed if gate is in the UP position.
14CAMERA DEPLOYMENT
Align the ¼” by 20 threads of the T-Post mounting bracket to the camera mounting port. Thread the
mounting bracket no more than three complete rotations into the camera mounting port. Then tighten
using the adjusting nut. Note: Forcing external threads to the bottom will damage the camera mounting
port and the camera housing.
Warning: Never mount the camera on the same T post securing a trap panel or severe damage may result.
Always mount the camera on a separate 8 foot long T post at least 12 to 24 inches outside the trap
enclosure. Lower the square collar at a diagonal over the T post spine and studs, then lower into position
between two studs. Insert the mounting wedge between the T post spine and square collar. Install the
thumbscrew into the ¼” by 20 threads on the mounting wedge. Tighten the thumbscrew against the T post
spine to secure the camera mount. Users are able to receive a wider field of view by mounting the camera
at a higher elevation, secure an additional t-post using straps or zip ties to extend the t-post height.
When mounting using the higher elevation method, it is easier to attach the booster antenna (if needed) to
the camera while on the ground. Remove the standard antenna from the camera’s antenna port. Carefully
thread the booster antenna cable to the antenna port and tighten. Slide the rubber waterproof boot over
the booster antenna cable connector.
Drive a second 7 foot long T post into the ground approximately 12 inches to the right and rear of the
camera T post to attach the antenna pole. Secure the 8 foot long T post with camera to the 7 foot long T
post using zip ties. The higher camera elevation will allow the booster antenna to exceed 20 feet by
elevating and securing the telescoping pole to the T post with zip ties.
Standing on a step ladder, align the camera by loosening the ball head set screw and centering the
camera’s view to the ground beneath the feeder legs. Tighten the ball head set screw to secure the
camera’s position. If possible, set up the camera so that no large trees or objects are in the main field of
view of the camera, as it can adversely affect motion detection as well as night time flash range.
Move the selector switch from OFF to SETUP. The screen will display “Searching Network”. The camera has
successfully acquired a cellular signal when the service provider’s initials appear on the display and signal
strength is showing 1 bar or more. Conduct a test photo to ensure all settings are correct, after you receive
the test photo, move the selector switch from SETUP to ON. Close and latch the camera within 30 seconds
before the Ambient Light Sensor LED stops blinking green and the PIR triggers a photo. The camera is now
operational and active.
(Optional) Secure the 12 volt external power supply to the camera mount with the battery bracket. Open
the camera DC external battery port and insert the battery cable plug into the camera for extended, long-
term operation.
.
Send a picture to your cell phone to ensure the camera is positioned and programmed correctly, the feeder
is centered and the entire gate opening is visible.
15LIMITED WARRANTY
Limited Warranty: JAGER PRO®, Inc. warrants the product to be free from malfunctions and defects in both
materials and workmanship for two (2) years from the date of purchase (“Warranty Period”). JAGER PRO®,
Inc. will repair or replace (at its option) the product if it fails to function properly during the Warranty
Period, subject to the conditions and/or limitations stated herein. Such repair or replacement is your sole
remedy under this Limited Warranty.
Limitations: Limited Warranty service will not be provided unless the product (returned in the manner set
forth below) is accompanied by a copy of your original dated sales invoice. JAGER PRO®, Inc. reserves the
right to require you to provide your original dated sales invoice. Products purchased from non-authorized
dealers may not qualify for warranty coverage.
Repair & Service: Please contact our Camera Support department at 1-706-718-9789 (EXT 1) or e-mail:
cameradepartment@jagerpro.com if this product requires repair or service. Troubleshooting may be
required prior to authorization for warranted repair services. If service is recommended for your product,
an RMA number and document will be provided. Additional terms and conditions may apply. If it is
determined that your product does not qualify for warranty coverage, the following charges may or may
not apply: Labor Hours, Parts, Materials, Estimate Services, Shipping and Handling.
This Limited Warranty does not cover the following:
a. any defect in or damage to the product that occurs due to mishandling of the product;
b. any defect in or damage to the product that occurs due to repair, modification, or other similar activity
after your purchase of the product;
c. any defect in or damage to the product that occurs due to the transport, dropping, shock, or other similar
activity after your purchase of the product;
d. any defect in or damage to the product that occurs due to careless or improper storage, or improper use
or maintenance of the product;
e. any damage, malfunction or degradation of performance resulting from improper use or connection to
incompatible batteries, power supplies or memory of the product;
f. any damage, malfunction or degradation of performance resulting from improper battery usage where
battery acid leaks inside the product;
g. any defect in or damage to the product that occurs due to foreign objects such as dirt or grime, sand,
water or liquids entering the inside of the product; and
h. any defect to the product related to your failure to follow proper operating instructions provided by
JAGER PRO®, Inc., claims made after the Warranty Period, or your failure to follow the instructions set forth
below with respect to return of the Product to JAGER PRO®, Inc..
All other express and implied warranties for the product, including the implied warranties of
merchantability and fitness for a particular purpose are hereby disclaimed. JAGER PRO®, Inc. expressly
disclaims all warranties not stated in this warranty. Any implied warranties that may be imposed by law are
limited in duration to the terms of this express limited warranty. Some jurisdictions do not allow the
exclusion of implied warranties or limitations on how long an implied warranty lasts, so the above
exclusions or limitations may not apply to you. In no event will JAGER PRO®, Inc. be liable to you, or any
third party, for any damages in excess of the purchase price of the product. In addition, JAGER PRO®, Inc.
shall in no event be liable to you, or any third party, for any direct or indirect damages or other special,
incidental, exemplary or consequential damages arising out of the use or inability to use the product. Some
jurisdictions do not allow the exclusion or limitation of incidental or consequential damages for some
products, so the exclusions or limitations may not apply to you. This limited warranty gives you specific
legal rights, and you may also have other rights which may vary from jurisdiction to jurisdiction.
Notwithstanding any terms of this Limited Warranty to the contrary, no warranty coverage shall be
provided for a Product purchased from, through, or with the assistance or involvement of any Internet
auction web site. JAGER PRO®, Inc. reserves the right to modify its warranties prospectively at any time, in
its sole discretion.
16CARE AND MAINTENANCE
1. Inspect the outside of the camera body for any cracks which may cause water or moisture to damage
electronics.
2. Check for condensation inside the camera lens.
3. Ensure the antenna is not loose, bent, broken or cracked and that the rubber grommet is present.
4. Wipe excess dirt from camera lens with a soft cloth and use a moist cotton swab with rubbing alcohol to
thoroughly clean.
5. Apply even pressure to camera face and main body housing when closing to ensure proper alignment of
waterproof seal.
6. Ensure the latch is tightly securing the camera housing.
7. Clean inside the ambient light sensor port and PIR cover.
8. Inspect the DC port cover for dry rot and damage.
WARNINGS
Avoid Strong Magnetic Fields
• Never place the camera in close proximity to electric motors or other equipment generating strong
electromagnetic fields. Exposure to strong magnetic fields may cause malfunctions or corrupt image data.
Avoid Condensation
• Moving the camera rapidly between hot and cold temperatures may cause condensation (water droplets)
to form on its external and internal surfaces. You can avoid this by placing the camera in an airtight, plastic
bag and letting it adjust to temperature changes slowly before removing it from the bag.
• If Condensation Forms Inside the Camera, stop using the camera immediately if you detect condensation
inside the camera. Continued use may damage the camera. Remove all cards and batteries from the
camera and wait until the moisture evaporates completely before resuming use.
Power source
• Always insert the batteries according to the polarity symbols, inserting batteries improperly may lead to
overheating, distortion of the equipment, fire, electrical shock or other hazards.
• Store this equipment out of the reach of children and infants. Accidental damage to the camera or
batteries by a child could result in serious injury.
• Do not allow water or other liquids to enter the interior of the camera. The interior has not been
waterproofed. If the exterior comes into contact with liquids or salt air, wipe it dry with a soft, absorbent
cloth. In the event that water or other foreign substances enter the interior, immediately turn the camera’s
power off and remove the camera batteries. Continued use of the equipment may result in fire or electrical
shock. Please contact JAGER PRO® Technical Support.
• Use of power sources not expressly recommended for this equipment may lead to overheating, distortion
of the equipment, fire, electrical shock, or other hazards. Use only the recommended power accessories.
Any use of non-JAGER PRO® power sources will void the warranty on your camera.
• Do not mix battery types. We recommend Energizer Ultimate Lithium batteries for your camera. You
should NEVER MIX BATTERY TYPES! Damage to the camera can result and your warranty will be voided if
you do so.
• Do not attempt to disassemble, alter, or apply heat to the batteries. There is serious risk of injury due to
an explosion. Immediately flush with water any area of the body or clothing that comes into contact with
the inner contents of a battery. If the eyes or mouth contact these substances, immediately flush with
water and seek medical assistance.
• Avoid dropping or subjecting the batteries to severe impacts that could damage the casings. It could lead
to leakage and injury.
• Do not short-circuit the battery terminals with metallic objects, such as key holders. It could lead to
overheating, burns, and other injuries.
• Use of batteries not expressly recommended for this equipment may cause explosions or leaks, resulting
in fire, injury, and damage to the surroundings. Use only recommended batteries and accessories.
17• Avoid using, placing, or storing the equipment in places subject to strong sunlight or high temperatures,
such as the dashboard or trunk (boot) of a car. Exposure to intense sunlight and heat may cause the
batteries to leak, overheat or explode, resulting in fire, burns or other injuries. High temperatures may also
cause deformation of the casing.
• Be careful not to bang the camera or subject it to strong impacts or shocks that could lead to injury or
damage the equipment.
• The DC Port plug must be removed before accessing camera functions. Opening the camera while the
external battery is plugged into the housing port may result in damage to both the camera and the external
battery.
Desiccant
• When using desiccant, the following precautions should be followed: Keep out of reach of children, do
not eat, and do not inhale desiccant dust. If the desiccant packet tears or breaks, wash your hands if they
come in direct contact with the desiccant. Desiccant may cause eye, skin, and mucous membrane irritation.
Prolonged inhalation may cause lung damage. Asthma can be aggravated by exposure to desiccant.
• If you know or suspect desiccant has been ingested, seek medical assistance for further treatment,
observation, and support if necessary. For eye contact, flush with water for at least 15 minutes. For skin
contact, wash affected area with soap and water. For inhalation of desiccant dust, move affected person
into an environment with fresh air. For accidental ingestion, drink at least two glasses of water.
• Check your state/local laws concerning the use of this product.
Internal components
• Removing screws from internal camera ports will damage electronic components and may void the
warranty.
NOTE: There is a warranty seal on your camera; if this seal is broken or tampered with could void your
warranty.
Repair or Replacement
Customer must obtain a Return Merchandise Authorization (RMA) number from JAGER PRO® before
returning any product(s) for repair or replacement. If JAGER PRO® concludes that a returned product is not
defective, customer will be notified, the product will be returned to the customer at their expense and may
be charged for examination and testing of the product.
This limited warranty is the sole warranty for hardware and software products offered by JAGER PRO® and
JAGER PRO® shall not be liable for any amounts for said products except in compliance with this warranty.
If during this period, through normal use, a hardware product becomes defective due to defects in
materials or workmanship, JAGER PRO® will either repair or replace the product. This warranty is void if a
product failure results from accident, abuse, improper use, disassembly, or unauthorized maintenance and
repair by customer.
Proof of Purchase or Proof of Warranty
We pride ourselves on providing top-quality scouting cameras for capturing feral swine and take quality
seriously. We are constantly evolving our designs to ensure our products do the best job possible. When
requesting warranty coverage, we may require the following:
a) Warranty registration within 30 days of the original purchase date, or online at the JAGER PRO®
website is required for warranty coverage to be valid.
b) We may require proof that the claim is valid. In this regard, we may ask you to, for example, trouble
shoot service issues via phone, e-mail or other electronic means, return your product to us for warranty
coverage verification, or provide such other proof to allow us to determine the validity of warranty
coverage on your claim. This most likely will require you to send your product in to us.
c) We may require you to provide us with your purchase receipt as proof of purchase from an authorized
dealer.
Unclaimed Items
It is the customer’s responsibility to respond to any inquiry initialized from our warranty department.
JAGER PRO® will only keep the returned goods for 6 months. Unclaimed returned item(s) will be discarded
after 6 months. If the product is beyond the warranty period, the price for repairing or replacing may vary.
Please allow 2-8 weeks for delivery.
18Technical Specifications
Image Resolution 4 MP / 8 MP
Video Resolution 5s / 10s / 15s / 20s / 25s / 30s, WVGA / 720P / 1080P
Operation Humidity 5% - 90%
Transmitted Images Thumbnail Size Options: 800 x 480 or 1376 x 768
Trigger Time Photo: 0.45s / Video: 0.5s
Lens FOV (Field of View) 90°
Night Illumination InfraRed Blackout Flash (940nM)
Display Screen 2.0” LCD (Liquid Crystal Display)
Memory Card Up to 128GB, Class 10 or higher
Trigger Motion (PIR), Timer (Time Lapse), Scheduled Events (Premium
Required)
PIR Sensitivity Adjustable (High/Normal/Low/Off)
Temperature -4° - +140° F (Operation)
-22° - +158° F (Storage)
Trigger Interval 0s – 60 min
Time Lapse Interval 30s to 24hrs
Photo Burst 1, 2, 3, Sends all photos in photo burst
Power Supply Internal: Built-in Lithium-ion cell / 12 x AA (1.2v-1.5v/ea.) / External:
12V DC / 12V Lead acid
Stand-by Current < 0.20 mA (CAMERA ACCESSORIES
JAGER PRO® offers several items for the LIVE Stream camera to increase the versatility and
function of the camera. These items may be purchased online at https://jagerpro.com/shop/.
T- Post Camera Mount
The mount fits posts up to 2.1” in diameter and
tightens in place with a large thumb screw. The
ball socket camera mount rotates 360 degrees and
tilts as much as 45 degrees up and down for
precise positioning. A high mount also keeps it out
of the sight line of both people and animals for
added security. The base EZ-Aim II unit works with
all Trail Cameras that have a standard 1/4-20 inch
threaded insert on the bottom of the camera.
SigmasTek SP12-18 NB
The genuine SigmasTek SP12-18 NB Rechargeable Sealed
Lead Acid (SLA) battery meets or exceeds the OEM SLA
battery specifications. The genuine SigmasTek SP12-18
NB SLA battery has the following characteristics:
• Absorbent Glass Mat (AGM) Technology
• Maintenance-Free Design with Spill Proof Construction
• U.L. Recognized and CE Certified
• Brand New, Factory Fresh
• 1 Year Warranty
U1 Battery Box
It features heavy-duty reinforced plastic handles
to prevent cracking during battery relocation, and
allows adequate ventilation of battery acid vapors.
This rugged battery box maintains its impact
properties down to minus 20°F, as well as,
resistant to UV, oil, gas and other contaminants.
• Designed for a single group U1 battery.
• Internal reservoir to collect battery acid.
• Impact and UV resistant, plus heavy-duty
carrying handles.
• Fully ventilated to release battery gasses safely.
20GLOSSARY
CDMA- Code Division Multiple Access is a competing cell phone service technology to GSM, which is
the world’s most widely used cell phone standard. Sprint, Verizon, and Virgin Mobile use CDMA.
GPRS- General Packet Radio Service was early technology to enable data communication on GSM
networks. It has since been replaced by better data technologies such as EDGE and 3G. It is based on
GSM and compliments SMS.
GSM- Global System for Mobile communications. Cell phones use a cellular provider’s GSM network by
searching for cellular phone towers in the nearby area. GSM has more complete global coverage due
to roaming and international roaming contracts. AT&T and T-Mobile use GSM.
ICCID- Integrated Circuit Card ID is a unique number assigned to a SIM card used on a GSM, CDMA or
LTE network.
I.C.E.®- Intelligence Collecting Equipment. The JAGER PRO® I.C.E.® cellular camera is a next-generation
scouting tool which can send motion-triggered or time-lapse pictures to email, including your cell
phone.
IMEI- International Mobile Equipment Identity is a 15- or 17-digit code that uniquely identifies mobile
phone sets.
MDN- Mobile Directory Number is the 10-digit telephone number.
MEID- Mobile Equipment Identifier is a globally unique number identifying a physical piece of
CDMA2000 mobile station equipment.
M.I.N.E.®- Manually Initiated Nuisance Elimination. This trapping system was developed during three
years of research and designed to capture the entire sounder group at one time.
MMS- Multimedia Messaging Service. Takes SMS text messaging a step further by allowing for longer
lengths beyond the traditional 160-character SMS limit.
PIR- Passive Infrared. A PIR sensor does NOT detect or measure “heat”. It detects the infrared
radiation emitted from an object to detect motion. It triggers the camera to take a photo or video
when an object passes in front of the sensor.
Portal- Designation of our camera operational website: https://my.jagerpro.com/home.
SIM- Subscriber Identity Module. A small card used in GSM and/or CDMA devices to identify your
account to the cellular carrier. Users may change SIM cards between cameras and the phone number
and data plans transfer with it.
SMS- Short Message Service. SMS is also often referred to as texting, sending text messages or text
messaging. The service allows for short messages to be sent from one cellular device to another
cellular device or from the Internet to a cellular device.
21JAGER PRO® offers a complete line of Hog
Control Products, Services and Education
View our instructional video series online at:
Like us on Facebook
www.facebook.com/JAGERPROHCS
2900-A Smith Road
Fortson, GA 31808
Phone: 706-718-9789
Email: cameradepartment@jagerpro.com
Website: https://jagerpro.comYou can also read