HARDWARE GUIDE MODEL 1NR - TOSHIBA GLOBAL COMMERCE SOLUTIONS SUREMARK 4610 PRINTERS
←
→
Page content transcription
If your browser does not render page correctly, please read the page content below
Toshiba Global Commerce Solutions
SureMark 4610 Printers

Hardware Guide
Model 1NR

                                    TC62-0012-02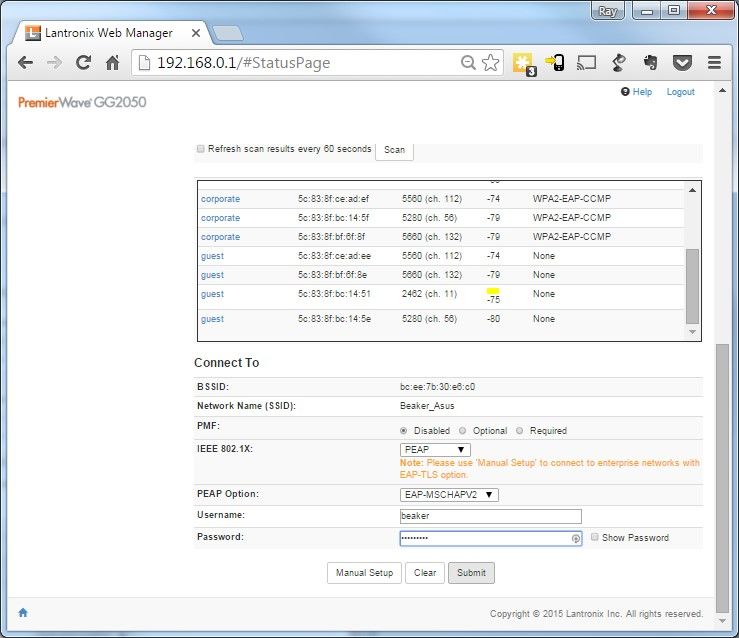
1

Note:
Before using this information and the product it supports, be sure to read Safety Information-Read This First, Warranty
Information, Uninterruptible Power Supply Information, and the information under Notices.

November 2020
This edition applies to Toshiba SureMark Printer Model 1NR.
If you send information to Toshiba Global Commerce Solutions (Toshiba), you grant Toshiba a nonexclusive right to use or
distribute whatever information you supply in any way it believes appropriate without incurring any obligation to you.
©   Copyright Toshiba Global Commerce Solutions, Inc. 2017, 2020
Contents
Figures.......................................................5                                       Logging into the printer configuration and
                                                                                                      management interface..................................................... 41
Tables.........................................................7                                      Setting printer IP parameters..........................................42
                                                                                                      Change default passwords for printer.......................... 43

Safety.........................................................9
                                                                                                 Chapter 4. Using and maintaining
About this guide..................................... 11                                         the 4610 printer.......................................45
                                                                                                 Replenishing consumable supplies...................................... 45
Who should read this guide.................................................. 11
                                                                                                    Loading and replacing the paper roll............................45
Where to find more information...........................................11
                                                                                                    Supported thermal paper................................................ 45
   Additional information................................................... 11
                                                                                                    Installing large paper rolls.............................................. 46
Notice statements....................................................................11
                                                                                                 Cleaning recommendations...................................................46
Summary of changes............................................................. 13
                                                                                                    Cleaning the thermal printhead..................................... 46
June 2017...................................................................................13
                                                                                                 Retrieving printer statistics....................................................47

Chapter 1. Introducing the 4610                                                                  Notices.....................................................49
Model 1NR............................................... 15                                      Telecommunication regulatory statement...........................50
Features and specifications....................................................15                Electronic emission notices....................................................50
Communication and power...................................................16                         Federal Communications Commission (FCC)
    Network interface adapter prerequisites...................... 20                                 statement............................................................................50
Operating system requirements........................................... 20                          FCC Radiation Exposure Statement.............................. 50
Hardware requirements.........................................................21                     Industry Canada Class A Emission Compliance
Understanding the controls and indicators........................ 22                                 statement............................................................................50
    Locating the power button..............................................23                        Avis de conformité à la réglementation
Calling for service................................................................... 24            d'Industrie Canada...........................................................51
                                                                                                     Industry Canada Radiation Exposure Statement........ 51
                                                                                                     European Union Electromagnetic Compatibility
Chapter 2. Product specifications........ 27                                                         (EMC) Directive Conformance Statement.................... 51
Physical dimensions............................................................... 27                Germany Class A statement........................................... 51
Temperature and humidity limits........................................ 28                           Australia and New Zealand Class A statement...........52
                                                                                                     Aviso para los usuarios de México................................ 52
                                                                                                     People's Republic of China Class A electronic
Chapter 3. Installing and configuring                                                                emission statement...........................................................52
                                                                                                     Russian Electromagnetic Interference (EMI) Class
the 4610 printer.......................................29                                            A statement....................................................................... 53
Before you begin......................................................................29
                                                                                                     Japanese Electrical Appliance and Material
Understanding your configuration ..................................... 29
                                                                                                     Safety Law statement.......................................................53
Verify your order.....................................................................29
                                                                                                     Japanese power line harmonics compliance
Installing the interface card................................................... 29
                                                                                                     statement............................................................................53
Routing the cash drawer and RS-485 cables....................... 30
                                                                                                     Japan Voluntary Control Council for Interference
Installing the fillers................................................................. 32
                                                                                                     Class A statement............................................................. 53
Wall (or 45-degree) mounting............................................... 32
                                                                                                     Japan Electronics and Information Technology
Configuring a WiFi adapter...................................................35
                                                                                                     Industries Association (JEITA) statement.....................54
    Before you begin...............................................................36
                                                                                                     Korean communications statement............................... 54
    Connecting to the Printer Access Point (AP)................37
                                                                                                     Taiwan Class A compliance statement.......................... 54
    Logging into the WiFi configuration and
                                                                                                     Taiwan contact information............................................ 54
    management interface..................................................... 38
                                                                                                 Cable ferrite requirement.......................................................55
    Setting up the WiFi client................................................ 39
                                                                                                 Electrostatic discharge (ESD)................................................ 55
    Setting WiFi IP parameters............................................. 40
                                                                                                 Product recycling and disposal.............................................55
    Changing default passwords for WiFi.......................... 40
                                                                                                 Battery safety........................................................................... 56
Configuring a network printer (WiFi and Ethernet)..........41
                                                                                                 Battery return program.......................................................... 57
    Before you begin...............................................................41
                                                                                                     For Taiwan:........................................................................ 57

©   Copyright Toshiba Global Commerce Solutions, Inc. 2017                                                                                                                                      3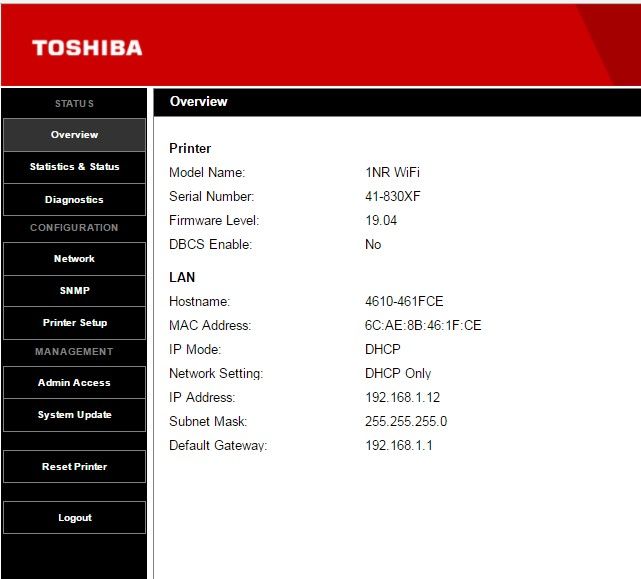
For the European Union:................................................. 57
    For California:................................................................... 58
Flat panel displays.................................................................. 58
Monitors and workstations....................................................58
Trademarks.............................................................................. 59

4     Hardware Guide for Model 1NR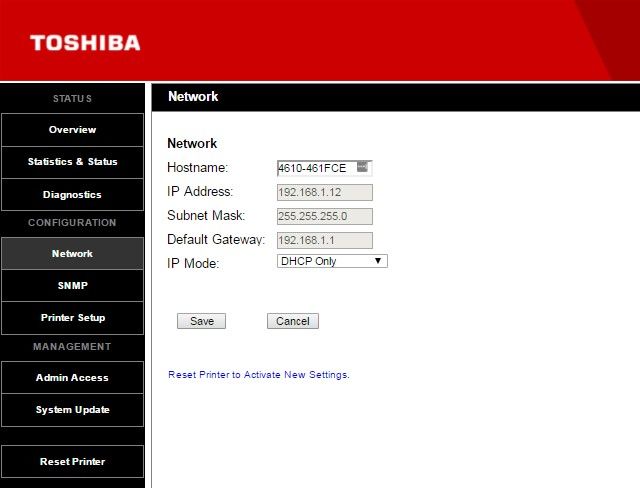
Figures
1. SureMark 4610 printer........................................................15
2. USB interface card...............................................................17
3. RS-232 interface card.......................................................... 18
4. RS-485 interface card.......................................................... 18
5. Ethernet interface card....................................................... 19
6. WiFi interface card.............................................................. 19
7. Indicators and controls.......................................................22
8. Power button........................................................................24
9. Location of serial number.................................................. 25
10. SureMark 4610 Model 1NR dimensions........................ 27
11. Installing the interface card............................................. 30
12. Cash drawer cable routing...............................................31
13. RS-485 cable routing......................................................... 31
14. Installed WiFi interface with cable routing................... 32
15. Position selector.................................................................33
16. Wall-mount slots............................................................... 34
17. Mount-release button....................................................... 35
18. Example of a test receipt.................................................. 37
19. Wireless network icon...................................................... 37
20. Select the printer network................................................38
21. Quick Setup Page.............................................................. 39
22. Overview page.................................................................. 42
23. Set printer IP parameters................................................. 43
24. Receipt showing usage statistics.....................................47

© Copyright        Toshiba Global Commerce Solutions, Inc. 2017                             5
6 Hardware Guide for Model 1NR
Tables
1. Model feature description .................................................16
2. Communication interface, rate, and power source........ 17
3. OS printer interface options.............................................. 20
4. Paper supply LED indicator.............................................. 23
5. Printer ready LED indicator ............................................. 23
6. Ethernet LED indicator...................................................... 23
7. WiFi LED indicator............................................................. 23
8. Summary of dimensions.................................................... 27
9. Example of a test/status receipt........................................ 37

©   Copyright Toshiba Global Commerce Solutions, Inc. 2017                              7
8 Hardware Guide for Model 1NR
Safety

                   Before installing this product, read Safety Information.

                   Antes de instalar este produto, leia as Informações de Segurança.

                   Pred instalací tohoto produktu si prectete prírucku bezpecnostních instrukcí.
                   Læs sikkerhedsforskrifterne, før du installerer dette produkt.
                   Lees voordat u dit product installeert eerst de veiligheidsvoorschriften.
                   Ennen kuin asennat tämän tuotteen, lue turvaohjeet kohdasta Safety Information.
                   Avant d'installer ce produit, lisez les consignes de sécurité.
                   Vor der Installation dieses Produkts die Sicherheitshinweise lesen.

                   Prima di installare questo prodotto, leggere le Informazioni sulla Sicurezza.

                   Les sikkerhetsinformasjonen (Safety Information) før du installerer dette produktet.

                   Antes de instalar este produto, leia as Informações sobre Segurança.

                   Antes de instalar este producto, lea la información de seguridad.
                   Läs säkerhetsinformationen innan du installerar den här produkten.

©   Copyright Toshiba Global Commerce Solutions, Inc. 2017                                                9
10 Hardware Guide for Model 1NR
About this guide
                   This guide contains information about installing, using, and maintaining the Toshiba®
                   SureMark™ 4610 Model 1NR printer.

Who should read this guide
                   This guide is intended for use by personnel who are installing and using the SureMark 4610
                   Model 1NR printers.

Where to find more information
                   Current versions of Toshiba publications are available on the Toshiba Global Commerce
                   Solutions website at www.toshibacommerce.com/support/publications.
                   The publications listed under the General tab are available to the public.
                   To access a specific Toshiba product publication:
                   1.   Click on the Hardware, Application, OS, Integration, or Other tab.
                   2.   Scroll to the desired product, and click on Publication Library.
                        Note: Access to the product publications requires valid user credentials. For information on
                        obtaining a user ID and password, click Learn More.
                   3.   Enter your user ID and password.
                   4.   Click Submit.

              Additional information
                   The following publications provide additional information about the SureMark 4610 Models
                   1NR printer:
                   • Click SureMark 4610 Printers: Hardware Service Guide - Models 1NR TC62-0001.
                   • SureMark 4610 Printers: Programming Guide for Models 1xR and 2xR, TC62-0005

Notice statements
                   Notices in this guide are defined as follows:

                   Notes
                           These notices provide important tips, guidance, or advice.

                   Important
                        These notices provide information or advice that might help you avoid inconvenient or
                        problem situations.

                   Attention
                         These notices indicate potential damage to programs, devices, or data. An attention notice
                         is placed just before the instruction or situation in which damage could occur.

                   CAUTION
                       These statements indicate situations that can be potentially hazardous to you. A caution
                       statement is placed just before the description of a potentially hazardous procedure step
                       or situation.

©   Copyright Toshiba Global Commerce Solutions, Inc. 2017                                                             11
DANGER
These statements indicate situations that can be potentially lethal or extremely hazardous
to you. A danger statement is placed just before the description of a potentially lethal or
extremely hazardous procedure step or situation.
12 Hardware Guide for Model 1NRSummary of changes
This section documents the changes for each revision of the SureMark 4610 Printers Hardware
Guide Model 1NR.
November 2020
This edition of the SureMark 4610 Printers Hardware Guide includes the addition of the
following information:
• Warranty statement for the thermal print head and auto cutter
June 2017
This edition of the SureMark 4610 Printers Hardware Guide includes the addition of the
following information:
• Setting up and configuring a WiFi adapter
• WiFi configuration and management
• Setting up, managing, and configuring a network printer
© Copyright Toshiba Global Commerce Solutions, Inc. 2017 1314 Hardware Guide for Model 1NR
Chapter 1. Introducing the 4610 Model 1NR
Introducing the 4610 Model 1NR

                                 The SureMark 4610 Printer Model 1NR is single-station thermal printer designed for ease use
                                 and service. With a print speed of 80 lines per second (LPS) and a 4-inch paper roll diameter, this
                                 high-speed printer lets you quickly print long receipts, monitor paper status, and gather printer
                                 usage statistics.

                                 Figure 1. SureMark 4610 printer

Features and specifications
                                 The key features of the Model 1NR include:
                                 •   Print speeds of 80 lines per second (LPS)
                                 •   One-hand paper loading with the touch of a button
                                 •   4 inch thermal paper roll
                                 •   System management sensors that alert you to:
                                     • Close the cover on the printer
                                     • Replace the receipt paper
                                     • Status of the printhead
                                     • Printer usage statistics
                                 •   Beeper
                                 •   Quiet paper cutter
                                 •   USB, RS-232, RS-485, Ethernet, and WiFi interfaces
                                 •   3 MB flash memory for storing messages, logos, code pages, and electronic journal data
                                 •   DBCS thermal font - 24x24 matrix
                                 •   Bar code generation
                                 •   Downloadable fonts and code pages
                                 •   Downloadable microcode
                                 •   Small footprint
                                 •   Wall mount

©      Copyright Toshiba Global Commerce Solutions, Inc. 2017                                                                          15
Table 1. Model feature description
Features SureMark 4610 Model 1NR
Print method Thermal
Command sets Native, Epson emulation (RS-232, and network attached), direct,
compatibility mode (Tx6/Tx7)
Communication RS-232 - 115 kbps
interface RS-485 - 187 kbps
USB 1.1 (USB 2.0 compatible)
Ethernet - 10/100 Mbps
WiFi - 802.11 a/b/g/n/ac
Paper support 58 mm or 80 mm single- or two-color, 102 mm (4 in.) maximum outer
diameter internal roll, 12 in. external supply
Print speed Up to 80 LPS (one-color)
Dot pitch 203 dpi
User memory 3 MB Flash
Ports DC In (except RS-485), USB/Powered USB or RS-232 or RS-485 (24 V or 38
V) or Ethernet (interface card-specific), OEM cash drawer (+24 V)
Power options System Unit: 24 V or 38 V (interface card-specific)
Brick: 24 V
Color Iron gray or pearl white (two-tone color not provided)
Controls and Cover Open, Paper Feed, Beeper, Status LED (bi-color), Paper Status LED,
indicators Power Switch
Mounting Integrated (Integration tray), Distributed (free standing), Wall mount
Operating POSReady 2009, POSReady 7, Windows 7, Windows 8.1, Windows 10, 4690
systems OS, Linux, iOS, Android
Drivers Native Windows, UPOS (OPOS and JavaPOS™), 4690 OS
Receipt paper Drop and load
loading
Receipt paper
Standard
cutter
Receipt tear bar Yes
Rotate print (line
Yes
by line)
DBCS thermal
font - 24x24 Yes
matrix
Communication and power
An interface card is shipped with the SureMark 4610™ printers to provide communication to the
system unit. Depending on your connectivity requirements, you will have one of the cards listed
in Table 2.
16 Hardware Guide for Model 1NRTable 2. Communication interface, rate, and power source
Device Description Power®
USB USB is 2.0 Compliant Full Speed System unit input voltage (+24 V);
HID; Bulk transfers at 12 Mbps separate power supply if standard
(Mega bits per second) USB connector is used
RS-485 Toshiba proprietary System unit input voltage +38 V or
+24 V (Japan only)
RS-232 9.6K - 115.2K (selectable using Separate power supply
offline or online configuration) Baud
rate
Ethernet 10/100 Ethernet port for connection Separate power supply
to an industry standard Ethernet
LAN
WiFi 801.11 a/b/g/n/ac Wireless LAN Separate power supply
Adapter
Figure 2 illustrates the different communications connections on the USB interface card.
A B C D
Figure 2. USB interface card
Device Description
A Cash drawer
B Powered USB
C Standard USB
D Power supply
Figure 3 illustrates the communications connections on the RS-232 interface card.
Chapter 1. Introducing the 4610 Model 1NR 17E F G
Figure 3. RS-232 interface card
Device Description
E Cash drawer
F RS-232
G Power supply
Figure 4 illustrates the communications connections on the RS-485 interface card.
H I
Figure 4. RS-485 interface card
Device Description
H Cash drawer
I RS-485
Figure 5 illustrates the communications connections on the Ethernet interface card.
18 Hardware Guide for Model 1NRJ K L M
Figure 5. Ethernet interface card
Device Description
J Cash drawer
K Ethernet
L Ethernet status indicators
M Power supply
Figure 6 illustrates the communications connections on the WiFi interface card:
• Frequency Band of 802.11 b/g/n - 2.4 Ghz, power 18.30 dBm
• Frequency Band of 802.11 a/n/ac - 5 Ghz, power 19.12dBm
N O P Q
Figure 6. WiFi interface card
Device Description
N WiFi
O WiFi status indicator
Chapter 1. Introducing the 4610 Model 1NR 19Device Description
P Cash drawer
Q Power supply
Network interface adapter prerequisites
The network interface adapters (Ethernet and WiFi) have dependencies on the level of the
printer and printer firmware.
• The printer manufacturing date must be after June 10, 2013. Printers built prior to this date
have an older level main logic card (MLC) that will not support these adapters. The
manufacturing date is located under the paper cover above the serial number label (see
“Calling for service” on page 24).
• Firmware level 14 and above is required for an Ethernet interface adapter.
• Firmware level 18 and above is required for a WiFi interface adapter. EC firmware level 17.xx
will enable basic function, but will not match the function that is described in this manual.
These firmware levels will print a message as part of a test receipt that indicates the firmware
should be upgraded.
Note: The required firmware levels referenced above will not allow back leveling to a version
that does not fully support the installed adapter.
Important: If a network interface adapter is installed in a printer and the printer has back level
firmware or a MLC that does not support it, the printer will indicate an error:
• The ready light will blink amber with the internal LED#2, which indicates that the printer
firmware is back level. If the firmware is known to be at the minimum level identified, then
this condition indicates a failed adapter or other HW problem.
• A message is printed in the receipt station that the MLC card does not support network
adapters, which indicates that the MLC is back level and cannot be used with the installed
adapter.
Operating system requirements
You can download drivers from the Toshiba Global Commerce Solutions support website:
www.toshibacommerce.com/support.
The printer provides a compatibility mode to enable use of older drivers and applications with
only minor modifications. The default operating system is referred to as "Native Mode. "Native
Mode" provides functional enhancements and is supported by the most current applications and
drivers.
Operating system requirements includes a list of the printer interface options that are supported
for each OS/Driver combination.
Table 3. OS printer interface options
Driver/API
OS JavaPOS OPOS OPOS OPOS
Drivers 1.14.0 Drivers 1.14.0 Drivers 1.14.0 Drivers 1.14.0
4690 API or later or later or later or later Direct IO
4690 USB All
RS485
20 Hardware Guide for Model 1NRDriver/API
OS JavaPOS OPOS OPOS OPOS
Drivers 1.14.0 Drivers 1.14.0 Drivers 1.14.0 Drivers 1.14.0
4690 API or later or later or later or later Direct IO
POSReady All All All USB RS232
2009 RS232 Ethernet
Ethernet WiFi
WiFi
Windows 7 All All All USB RS232
RS232 Ethernet
Ethernet WiFi
WiFi
POSReady 7 All All All USB RS232
RS232 Ethernet
Ethernet WiFi
WiFi
Windows All All All USB RS232
Embedded 8.1 RS232 Ethernet
Pro/Industry
Ethernet WiFi
(64-bits only)
WiFi
Windows 8.1 All All All USB RS232
Pro/Enterprise RS232 Ethernet
(64-bits only)
Ethernet WiFi
WiFi
Windows 10 All All All USB RS232
Pro/Enterprise RS232 Ethernet
Ethernet WiFi
WiFi
SUSE Linux All RS232
Enterprise 11 Ethernet
SP1 (SLE 11)
WiFi
PC DOS 2000 RS232
Note:
1. Toshiba 4610 Ethernet Printer iOS SDK is supported with iOS 8.x or later for use with the
Ethernet and WiFi interface adapters.
2. Toshiba 4610 Ethernet Printer Android SDK is supported with Android 4.0 or later for use
with the Ethernet and WiFi interface adapters.
3. Only those items listed are supported.
Hardware requirements
SureMark printers work with the following systems:
Chapter 1. Introducing the 4610 Model 1NR 21• 4694 systems
• 4695 systems (RS-232 connection only and with power supply)
• PC or other store controller with an RS-232, Ethernet, WiFi, or USB port
• SurePOS™ 100 Series systems
• SurePOS 300 Series systems
• SurePOS 500 Series systems
• SurePOS 700 Series systems
• Self Checkout solution
• AnyPlace™ Kiosk
• TCx™ Wave
• TCx700
• TCx300
• TCxFlight
• iOS, Android, and Windows mobile devices
Understanding the controls and indicators
This section describes the controls and indicators.
A
B
C
D
Figure 7. Indicators and controls
Device Description
A Paper feed button; press to advance the
customer receipt paper.
B Paper supply LED indicator. See Table 4
C Printer ready LED indicator. See Table 5
22 Hardware Guide for Model 1NRDevice Description
D Paper door release button
Table 4. Paper supply LED indicator
LED indicator ( B )
Amber On Paper out
Off Paper sufficient
Blinking Critically low paper supply
Table 5. Printer ready LED indicator
Printer ready ( C )
Amber Blinking (0.5s Station not ready; recoverable error - paper jam, cover open,
on / 0.5s off) cutter jam
Blipping (0.25s Offline or hardware failure: Cannot communicate with
on / 1.75s off) paper motion sensor or the thermal printhead; MLC or IFC
problem
Green On Station is ready
Table 6 describes the Ethernet LED indicators that reflect printer status.
Table 6. Ethernet LED indicator
Color State Function
Off - No link
Green On - Good link Ethernet Good Link / Activity
Blinking - Network activity
Amber Off - 10 MB mode Ethernet 10/100Mb
On - 100 MB mode
Table 7 describes the indicators that reflect the status of the WiFi connection.
Table 7. WiFi LED indicator
Color State Function
Amber Off - No link WiFi connected
On - Link up
Locating the power button
The power button ( A in Figure 8) for the 4610 Model 1NR is located under the paper door.
Chapter 1. Introducing the 4610 Model 1NR 23A
Figure 8. Power button
Calling for service
When you call Toshiba for warranty information or service, be sure to have the serial number
and model number of the printer available. The serial number and model number are located
beside the flipper door (see A in Figure 9).
24 Hardware Guide for Model 1NRA
Figure 9. Location of serial number
Chapter 1. Introducing the 4610 Model 1NR 2526 Hardware Guide for Model 1NR
Chapter 2. Product specifications
Product specifications

                         This section describes the physical specifications for models 1NR.

Physical dimensions
                         Figure 10 describes the physical dimensions.

                                   159 mm
                                   (6.26 in)

                                                                                              145 mm
                                                                                              (5.71 in)
                                                   177 mm
                                                   (6.97 in)

                                  Figure 10. SureMark 4610 Model 1NR dimensions

                         Table 8. Summary of dimensions
                         Width:                 145 mm (5.71 in.) footprint
                         Height:                Cover closed: 159 mm (6.26 in.)
                                                Cover open: 260 mm (10.24 in.)
                         Depth:                 177 mm (6.97 in.)
                         Weight:                1.4 kg (3.09 lb)

©       Copyright Toshiba Global Commerce Solutions, Inc. 2017                                            27
Temperature and humidity limits
Shipping
-40° to 60° C (-40° to 140° F) with 5% to 100% relative humidity including condensation,
but excluding rain
Storage
0° to 60° C (32° to 140° F) with 5% to 80% relative humidity
Operating
5° to 40° C (42.8° to 104° F) with 8% to 80% relative humidity
28 Hardware Guide for Model 1NRChapter 3. Installing and configuring the 4610 printer
Installing and configuring the 4610 printer
This section provides safety information and steps on installing your printer.
Before you begin
Before you install your SureMark printer, be sure to read this section and the Safety Information
guide.
Understanding your configuration
Your printer can be set up in either an integrated or distributed configuration. An integrated
configuration is one in which all parts of a system are assembled in one location. A distributed
configuration is one in which you set up parts of the system in different physical locations. In an
integrated configuration, you install the printer on the input/output tray option with the fillers to
contain the printer and display on top of the wide-footprint system units. Other tray options
include mounting the printer on the full-size cash drawer or directly on the counter.
Verify your order
Each order contains the following:
• 4610 unit
• Interface card (RS-232, RS-485, USB, WiFi, or Ethernet)
• Safety manual
• Warranty statement
• Customer options, such as fillers, cables, and power bricks (packaged separately)
Installing the interface card
The interface card (either an RS-232, RS-485, USB, Ethernet, or WiFi interface) is shipped in a
separate box with your printer. Install the interface card as follows:
© Copyright Toshiba Global Commerce Solutions, Inc. 2017 29B
A
Figure 11. Installing the interface card
1. As shown in Figure 11, place the printer unit upside down.
2. Insert the tab of the interface card ( A ) into the slot on the base of the printer ( B ).
3. Press down on the side of the interface card opposite the tab until the blue release button
slider snaps into place.
4. Connect the printer with your system unit or network (RS-232, RS-485, USB, or Ethernet
connector).
Note:
1. You might prefer to plug all cables into the interface card before installation; however,
do not plug in any power until after installation.
2. If you are using an RS-485 interface card, see “Routing the cash drawer and RS-485
cables” on page 30.
5. If you have a power cord, connect it to the printer.
Routing the cash drawer and RS-485 cables
To route the cash drawer and RS-485 cables together through the back cable slot:
1. Route the cash drawer cable through the cable slot ( A in Figure 12).
30 Hardware Guide for Model 1NRA
Figure 12. Cash drawer cable routing
2. Route the RS-485 cable (see Figure 13).
1. Place the RS485 cable completely down on the base B .
2. Route the cable under the notch C .
3. Route the RS485 cablle through the back cable slot B and C (this is the only possible
route).
B C D
Figure 13. RS-485 cable routing
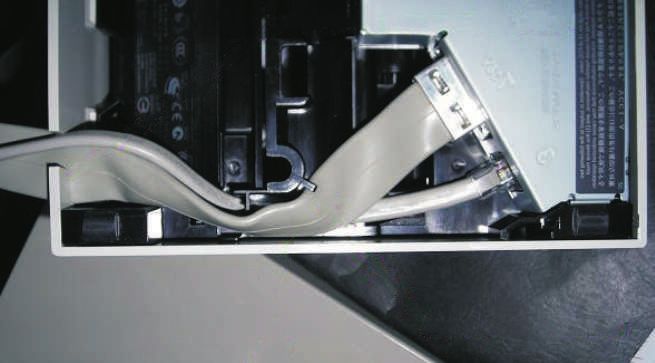
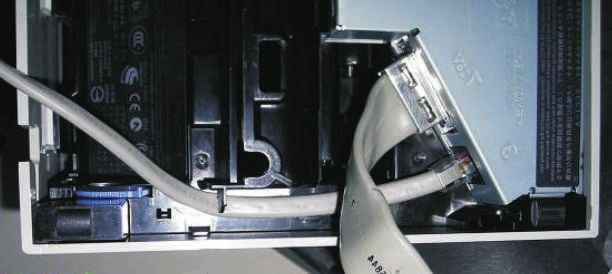
Chapter 3. Installing and configuring the 4610 printer 31Figure 14. Installed WiFi interface with cable routing
Installing the fillers
The fillers are an important part of your integrated system. They securely position your printer
into position with the system unit and other peripherals.
Refer to the installation documentation for your system unit for complete instructions.
Wall (or 45-degree) mounting
Attention: Printer must be powered off. The following ESD handling procedure is
recommended: You should touch the metal on the printer frame with the back of your hand
before making contact with the printer. Also, see “Electrostatic discharge (ESD)” on page 55.
Follow these steps to wall (or 45-degree) mount the printer unit:
1. Turn off the power to the 4610.
2. Roll the bottom position selector (part of the low-paper sensor; A in Figure 15) to the
WALL position.
32 Hardware Guide for Model 1NRA
Figure 15. Position selector
3. Align the two rounded slots on the base of the printer unit ( A in Figure 16 ) with the two
D-shaped posts on the mount. Also, ensure that the hook near the corner of the mount
aligns with the slot at the corner of the printer unit ( B ).
Chapter 3. Installing and configuring the 4610 printer 33B
A
Figure 16. Wall-mount slots
4. Slide the printer unit down (or up) until the mount-release button snaps into place.
To remove the printer unit from the wall mount:
1. Press the door-release button ( D in Figure 7) and pull (or push) the door fully open.
2. While pushing the mount-release button ( B in Figure 17) lift (or lower) the printer unit off
of the mount posts and hook.
34 Hardware Guide for Model 1NRB
Figure 17. Mount-release button
Configuring a WiFi adapter
This section provides guidance for setup of the 4610 WiFi Interface Adapter. After completion of
WiFi setup, Printer IP setup may be required. See “Configuring a network printer (WiFi and
Ethernet)” on page 41 for additional setup instructions. The Printer IP setup is common to both
the WiFi and Ethernet adapters.
Note:
1. Prior to installation of a WiFi adapter, the printer firmware must be level 18 or later. All new
product will be at this level or later. If upgrading an existing printer, see your existing
printer documentation for firmware update instructions.
2. If DHCP is used for IP address assignment, the DHCP server must support DHCP Option
61 (Client Identifier). If your DHCP server does not support Option 61, assign a static
address to the WiFi adapter. The 4610 printer with WiFi adapter requires 2 IP addresses.
Option 61 allows the DHCP server to uniquely identify the two requests. The printer IP
assignments will be allocated to the printer MAC address and the WiFi parameters to the
Client Identifier.
Chapter 3. Installing and configuring the 4610 printer 353. After completion of WiFi setup, it is highly recommended that default passwords be
changed and/or unused interfaces disabled.
The 4610 WiFi interface adapter provides a WLAN client connection for normal printer
operation and management, plus a separate local connection for setup through a built in access
point (referred to as the Printer Access Point or Printer AP). The following is a summary of the
operations necessary to setup the WiFi adapter. Details of each step are provided in the
following sections.
1. Connect to the Printer Access Point.
2. Log into the WiFi Configuration and Management interface
3. Setup the WiFi Client
4. Setup the WiFi IP Parameters and other options
Following completion of these steps see, “Configuring a network printer (WiFi and Ethernet)”
on page 41 for the Printer IP setup if not using DHCP for all IP parameter assignment.
Before you begin
The information needed for many of the setup steps is provided by the Test/Status Receipt. This
receipt should be printed prior to beginning setup.
Printing the Test/Status Receipt
Follow the steps below to print a test/status receipt.
1. Open the paper door, then press and hold the paper feed button.
2. When the printer beeps and the printer-ready indicator begins blinking, release the button
and close the paper door.
3. Press and release the paper feed button to print the receipt.
Table 9 shows part of a sample test receipt and highlights the items required for setup.
36 Hardware Guide for Model 1NRTable 9. Example of a test/status receipt
AP SSID--
The network name for the Printer
Access Point (AP). Connect to this
network to access WiFi setup functions.
Client ID--
The client identifier used by the WiFi
adapter for DHCP Option 61. This will
also be needed to derive the Printer AP
network password.
Figure 18. Example of a test receipt
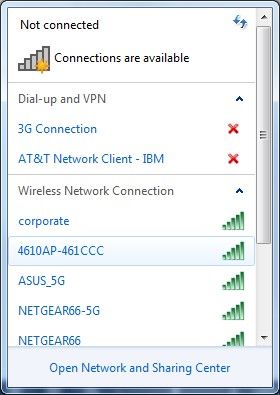
Connecting to the Printer Access Point (AP)
Perform the following steps using a personal computer (or similar device) with a WiFi interface
and an Internet browser.
Note: The details of connecting to a wireless network will vary from system to system. The
following examples and instructions are for Windows 7 without additional wireless tools.
1. Click on the Wireless Network Icon which is typically located at the right of the taskbar.
Figure 19. Wireless network icon
2. Select the Printer Network from the list of available networks and click Connect.
Chapter 3. Installing and configuring the 4610 printer 37Figure 20. Select the printer network
Once the device indicates it has established a network connection, it is ready to log into the WiFi
Configuration and Management interface.
Note: Some systems report a warning when connecting to the printer AP because there is no
internet connection provided. This warning should be ignored.
Logging into the WiFi configuration and management interface
The printer provides web pages for setup and other management. After connecting to the printer
AP network, log into the web pages for setup.
1. Open the browser and enter the AP IP address shown on the test receipt.
2. When prompted, enter the username admin and the password Admin.
The Quick Setup page should open as shown below.
Note: If the WiFi adapter had been previously configured the status page will open rather
than the Quick Setup.
38 Hardware Guide for Model 1NRFigure 21. Quick Setup Page
Setting up the WiFi client
The WiFi client setup is performed from the quick setup page shown in the previous step.
1. Select the target network from the list of available networks.
2. Enter the required information and click Submit.
The data entry screens will vary based on the target network and its security settings. The
example screen below shows the data entry screen for a network using 802.1x security.
Chapter 3. Installing and configuring the 4610 printer 39Setting WiFi IP parameters
By default IP parameters are obtained by DHCP. If this is the intended operating mode then no
further setup is required. However, if all settings are not obtained by DHCP, then IP parameters
may be set via the Quick Setup page or Wireless Network Interface Configuration page.
• To use the Quick Setup page, select or enter the required parameters and click Submit.
• To access the Wireless Network Interface Configuration page, select the Network tab and
then the Wireless Network - Interface - Configuration menu item.
Note: Host name configuration is only available on the Wireless Network Interface
Configuration page. If the default hostname is used, then the quick setup page probably
provides all the required settings.
Changing default passwords for WiFi
Default passwords must be changed to ensure that the network remains secure.
To change the Web Interface password, select the Administration tab and then the User
Management menu item.
To change the Access Point password and other settings, select the Network tab and then the
Access Point menu item
40 Hardware Guide for Model 1NRConfiguring a network printer (WiFi and Ethernet)
This section provides guidance for setup of a 4610 Network printer (WiFi or Ethernet interface
adapter installed). When using a WiFi adapter, it is assumed that WiFi configuration has been
completed. See “Configuring a WiFi adapter” on page 35 for information on configuring the
WiFi Adapter.
Note:
1. Prior to installation of an Ethernet adapter, the printer firmware must be at level 17 or later.
All new product will be at this level or later; if upgrading an existing printer, see the existing
printer documentation for firmware update instructions.
2. DHCP is the recommended method for IP configuration. If using DHCP, all settings can be
controlled by the DHCP server so no further configuration steps are typically required. The
default hostname includes the last 6 characters of the printer MAC address so that each is
unique and associated with the printer through the MAC address (which is printed on a
label attached to the adapter).
3. After completion of network printer setup, it is highly recommended that default passwords
be changed.
The following is a summary of the operations necessary to setup a network printer. Details of
each step are provided in the following sections.
1. Log into the Printer Configuration and Management interface
2. Setup the Printer IP Parameters and other options
Following completion of these steps, the printer should be fully accessible via the network.
Before you begin
If setting up a printer with a WiFi Adapter, complete the WiFi setup as described in
“Configuring a WiFi adapter” on page 35 and restart the printer before beginning.
The information needed for the setup steps is provided by the Test/Status Receipt. This receipt
should be printed prior to beginning setup. See “Printing the Test/Status Receipt” on page 36.
Note: To ensure that all required information is present on the receipt, wait for a minute or 2
following power on of the printer. Actual time will vary based on network setup and DHCP
server performance.
Logging into the printer configuration and management interface
The printer provides web pages for setup and other management. From a computer attached to
the same network as the printer, log into the web pages to use them for setup:
1. Open a browser and enter the IP address shown on the Printer Network Configuration
section of the status/test receipt.
2. When prompted, enter the username admin and the password Admin.
Note: The username and password referenced here are unique from those referenced in
“Configuring a WiFi adapter” on page 35. Changing the WiFi passwords does not affect
these.
The Overview page should be as shown in Figure 22.
Chapter 3. Installing and configuring the 4610 printer 41Figure 22. Overview page
Setting printer IP parameters
By default IP parameters are obtained by DHCP. If this is the intended operating mode then no
further setup is required; however, if all settings are not obtained by DHCP then IP parameters
may be set via the Network page.
1. Select the Network menu item to display the Network page.
2. Select the required IP Mode and enter the applicable IP parameters.
42 Hardware Guide for Model 1NRFigure 23. Set printer IP parameters
3. Click Save.
4. Navigate to other pages and complete other setup as required.
5. Reset the printer using the Reset Printer menu item to activate the settings.
Note: If the printer is powered off/on before resetting it via the menus, all settings will be
lost.
Change default passwords for printer
Default passwords must be changed to ensure the network remains secure.
To change the Printer Web Interface password, select the Admin Access menu item.
Chapter 3. Installing and configuring the 4610 printer 4344 Hardware Guide for Model 1NR
Chapter 4. Using and maintaining the 4610 printer
Using and maintaining the 4610 printer

                                              This section contains information about the proper use and maintenance of the 4610 Model 1NR.
                                              For detailed technical information, see Chapter 2, Product specifications on page 27.
                                              Attention: All covers must be installed on the SureMark printer during operation.

Replenishing consumable supplies
                                              You are responsible for replenishing consumable supplies, which include the paper rolls.
                                              Make sure that you are using the recommended supplies for the 4610 printer, which are
                                              described in the following sections.

                                              Important: Thermal Print Head Life and Auto Cutter Life are guaranteed only with the use of
                                              papers on the TGCS qualified paper list. Use of non-qualified paper sources may result in a
                                              shorter lifespan and may result in a billable service call if printer failures are determined by
                                              TGCS to be the result of using these papers, regardless of the existence of a service contract or
                                              product warranty.

                                         Loading and replacing the paper roll
                                              Ensure that you have the correct paper for the 4610. See “Supported thermal paper” on page
                                              45.
                                              1.   Press and release the blue release button to release the paper door. In a wall-mount
                                                   configuration, you must also pull the door fully open, because of the brake feature that
                                                   decelerates it from the full force of gravity.
                                              2.   If necessary, remove any unused paper or the empty paper roll core before inserting a new
                                                   paper roll.
                                                   Note: Refer to the label inside the printer for a diagram of how to load paper.
                                              3.   Place the paper roll into the paper roll bucket as shown on the diagram. The leading edge of
                                                   the paper should come from the bottom of the roll as shown in the diagram.
                                                   Note: The thermal printhead will not print on paper with glue on it. If the new paper roll
                                                   was sealed by glue, tear off the 6 to 8 inches of paper with glue on it before loading it.
                                              4.   Close the paper cover.
                                              5.   Press the customer receipt feed button to advance the paper, to verify that the paper is
                                                   feeding correctly. Feed 30 cm (about 1 ft) of paper through to test for correct alignment.
                                              Attention: Do not pull the receipt paper out of the printer with the paper access cover closed.
                                              This disengages the paper feed. The paper feed motor must then catch up before the printer can
                                              feed the paper, which causes missing lines or partial lines of print. Use the customer receipt feed
                                              button to advance the receipt and all lines will print.

                                         Supported thermal paper
                                              Attention: Using an inferior grade of paper can affect print quality as well as the life of
                                              printheads and the printer mechanism.
                                              Note: When selecting a paper, ensure that the paper's archive life meets the requirements of the
                                              tax authorities of your country for archiving tax-related data.

© Copyright                              Toshiba Global Commerce Solutions, Inc. 2017                                                               45
The paper used in the thermal receipt station must meet the following requirements:
Width
79.5 ± 0.5 mm (3.13 ± 0.02 in.) or 57.5 ± 0.5 mm (2.26 ± 0.02 in.)
Outside Diameter
102 mm (4.0 in.) maximum
Thickness
60 μm (0.00225 in.) optimal. Range: 41 μm minimum to 99 μm maximum.
Important: Paper has a significant manufacturing tolerance, and nominal paper
designations do not reflect actual measurements. The manufacturing tolerance must fall
within the published operating thickness range. Customers should test paper in their
specific configuration before use. The intent of this specification is that if any spot
measurement of the paper is outside the specified range, the paper is deemed not to meet
the specification and the customer is responsible for any problems caused by paper jams.
The paper must be wound with the printing side facing out. The paper should not be attached to
the core in any manner.
Important:
Printer reliability and performance are directly related to the quality of the supplies used by the
customer. The published parameters for printer performance are established using supplies that
meet the specifications listed above.
Thermal paper with watermarks, coupons, or advertisements printed on the front or back of the
paper is not covered by Toshiba specifications. Some inks and printing processes work
acceptably, but others do not. Printer problems that are caused by supplies that do not meet
Toshiba specifications might result in a billable service call, regardless of the existence of a
service contract.
Installing large paper rolls
The 4610 can accommodate extra-large rolls (up to 15 in.) of paper below the printer. Mounting
hardware is necessary to avoid placing undue strain on the paper feed motor. See your Toshiba
representative for additional information.
Cleaning recommendations
You should inspect your 4610 unit periodically and clean the cover as required. Use a soft, clean
cloth with warm, soapy water to clean the plastic parts. Do not use abrasives or any alkaline,
ammonia, or chloride-based cleaner.
Note: Do not apply cleaning solution directly to the cover. Always apply the cleaner to a clean
cloth and then wipe the cover with the damp cloth. Be certain that the cloth is only damp and
not dripping wet.
Cleaning the thermal printhead
The thermal printhead should be cleaned at regular intervals or when the print quality has
noticeably deteriorated. There are many factors that affect cleaning frequency. Poor paper
quality, high printer usage, or a dirty environment are all reasons to clean the thermal printhead
more often. Complete the following steps to clean the thermal printhead:
1. Open the paper cover.
46 Hardware Guide for Model 1NR2. Using a cotton swab soaked in isopropyl alcohol, gently wipe the printhead several times on
its print line and on the surrounding area.
3. Wipe off any residual alcohol with a dry swab.
If print quality does not improve after cleaning the thermal printhead, call for service to replace
the thermal printhead unit.
Note: The type of paper used and the usage rate will increase wear on the thermal printhead.
Retrieving printer statistics
The Model 4610 2CR and 2NR printers retain usage statistics to help you evaluate your printer
usage and performance. The statistics available for your printer are defined during printer
configuration. Figure 24 is an example of a printed receipt with usage statistics for the Model
1NR.
Figure 24. Receipt showing usage statistics
In addition to the Usage Statistics, the printer stores statistics on errors or unexpected events for
use in predicating problems. See the SureMark Printers: Programming Guide for Models 1xR and
2xR, GA27-5005 for commands to retrieve this data.
Chapter 4. Using and maintaining the 4610 printer 47The available statistics for the 4610 1NR printer include:
• Number of Failed Flash Writes
• Unexpected Cover Open Count
• Thermal Print Head element failure
• Printer serial number
• Manufacturing Week Code
• Number of paper cuts
• Number of characters printed on the CR (thermal) station
• Number of steps performed by the CR paper feed motor (200 steps per inch of paper)
• Number of times the customer receipt cover was opened
• Number of failed paper cuts
• Number of Flash Erase commands performed (NVRAM write count)
• Cash drawer opened successfully count
• Cash drawer failed to opened count
• Number of bar codes printed
• Number of times the max temperature of either the motors or the print heads have been
reached
48 Hardware Guide for Model 1NRNotices
This information was developed for products and services offered in the U.S.A.
Toshiba Global Commerce Solutions may not offer the products, services, or features discussed
in this document in other countries. Consult your local Toshiba Global Commerce Solutions
representative for information on the products and services currently available in your area. Any
reference to a Toshiba Global Commerce Solutions product, program, or service is not intended
to state or imply that only that Toshiba Global Commerce Solutions product, program, or service
may be used. Any functionally equivalent product, program, or service that does not infringe
any Toshiba Global Commerce Solutions intellectual property right may be used instead.
However, it is the user's responsibility to evaluate and verify the operation of any non-Toshiba
Global Commerce Solutions product, program, or service.
Toshiba Global Commerce Solutions may have patents or pending patent applications covering
the subject matter in this document. The furnishing of this document does not give you any
license to these patents. You can send license inquiries, in writing, to:
Toshiba Global Commerce Solutions
Attn: General Counsel
3901 South Miami Blvd.
Durham, NC 27703
United States of America
The following paragraph does not apply to the United Kingdom or any other country where
such provisions are inconsistent with local law: TOSHIBA GLOBAL COMMERCE SOLUTIONS
PROVIDES THIS PUBLICATION "AS IS" WITHOUT WARRANTY OF ANY KIND, EITHER
EXPRESS OR IMPLIED, INCLUDING, BUT NOT LIMITED TO, THE IMPLIED WARRANTIES
OF NON-INFRINGEMENT, MERCHANTABILITY, OR FITNESS FOR A PARTICULAR
PURPOSE. Some states do not allow disclaimer of express or implied warranties in certain
transactions, therefore, this statement may not apply to you.
This information could include technical inaccuracies or typographical errors. Changes are
periodically made to the information herein; these changes will be incorporated in new editions
of the publication. Toshiba Global Commerce Solutions may make improvements and/or
changes in the product(s) and/or program(s) described in this publication at any time without
notice.
Toshiba Global Commerce Solutions may use or distribute any of the information you supply in
any way it believes appropriate without incurring any obligation to you.
Any references in this information to non-Toshiba Global Commerce Solutions Web sites are
provided for convenience only and do not in any manner serve as an endorsement of those Web
sites. The materials at those Web sites are not part of the materials for this Toshiba Global
Commerce Solutions product and use of those Web sites is at your own risk.
Information concerning non-Toshiba Global Commerce Solutions products was obtained from
the suppliers of those products, their published announcements or other publicly available
sources. Toshiba Global Commerce Solutions has not tested those products and cannot confirm
the accuracy of performance, compatibility or any other claims related to non-Toshiba Global
Commerce Solutions products. Questions on the capabilities of non-Toshiba Global Commerce
Solutions products should be addressed to the suppliers of those products.
This information is for planning purposes only. The information herein is subject to change
before the products described become available.
© Copyright Toshiba Global Commerce Solutions, Inc. 2017 49Telecommunication regulatory statement
This product is not intended to be connected directly or indirectly by any means whatsoever to
interfaces of public telecommunications networks, nor is it intended to be used in a public
services network.
Electronic emission notices
When you attach a monitor to the equipment, you must use the designated monitor cable and
any interference suppression devices that are supplied with the monitor.
Federal Communications Commission (FCC) statement
This equipment has been tested and found to comply with the limits for a Class A digital device,
pursuant to Part 15 of the FCC Rules. These limits are designed to provide reasonable protection
against harmful interference when the equipment is operated in a commercial environment. This
equipment generates, uses, and can radiate radio frequency energy and, if not installed and used
in accordance with the instruction manual, may cause harmful interference to radio
communications. Operation of this equipment in a residential area is likely to cause harmful
interference, in which case the user will be required to correct the interference at his own
expense. There is no guarantee that interference will not occur in a particular installation. If this
equipment does cause harmful interference to radio or television reception, which can be
determined by turning the equipment off and on, the user is encouraged to try to correct the
interference by one or more of the following measures:
1. Reorient or relocate the receiving antenna.
2. Increase the separation between the equipment and receiver
3. Connect the equipment into an outlet on a circuit different from that to which the receiver is
connected.
4. Consult the dealer or experienced radio TV technician for help.
Properly shielded and grounded cables and connectors must be used in order to meet FCC
emission limits. Toshiba Global Commerce Solutions is not responsible for any radio or
television interference caused by using other than recommended cables and connectors or by
unauthorized changes or modifications to this equipment. Unauthorized changes or
modifications could void the user's authority to operate the equipment.
This device complies with part 15 of the FCC Rules. Operation is subject to the following two
conditions:
1. This device may not cause harmful interference, and
2. This device must accept any interference received, including interference that may cause
undesired operation.
FCC Radiation Exposure Statement
To comply with the FCC RF exposure compliance requirements, the separation distance between
the antenna and the body of all persons must be at least 20 cm (8 inches).
Industry Canada Class A Emission Compliance statement
This Class A digital apparatus complies with Canadian ICES-003 and RSS247.
Operation is subject to the following two conditions:
1. This device may not cause interference.
2. This device must accept any interference, including interference that may cause undesired
operation of the device.
50 Hardware Guide for Model 1NRAvis de conformité à la réglementation d'Industrie Canada
Cet appareil numérique de la classe A est conforme aux normes NMB-003 et RSS247 du Canada.
Le fonctionnement est soumis aux conditions suivantes :
1. Ce périphérique ne doit pas causer d’interférences;
2. Ce périphérique doit accepter toutes les interférences reçues, y compris celles qui risquent
d’entraîner un fonctionnement indésirable.
Industry Canada Radiation Exposure Statement
This equipment complies with IC radiation exposure limits set forth for an uncontrolled
environment. This equipment should be installed and operated with a minimum distance of 20
cm (8 inches) from the body of all persons.
European Union Electromagnetic Compatibility (EMC) Directive
Conformance Statement
This product is in conformity with the protection requirements of EU Council Directive
2004/108/EC on the approximation of the laws of the Member States relating to electromagnetic
compatibility. Toshiba Global Commerce Solutions cannot accept responsibility for any failure to
satisfy the protection requirements resulting from a non-recommended modification of the
product, including the fitting of non-Toshiba Global Commerce Solutions option cards.
This product has been tested and found to comply with the limits for Class A Information
Technology Equipment according to CISPR 32/European Standard EN 55032. The limits for Class
A equipment were derived for commercial and industrial environments to provide reasonable
protection against interference with licensed communication equipment.
Attention: This is a Class A product. In a domestic environment this product may cause radio
interference, in which case the user may be required to take adequate measures.
Responsible manufacturer:
Toshiba Global Commerce Solutions
3901 South Miami Blvd.
Durham, NC 27703
United States of America
European Community contact:
Toshiba Global Commerce Solutions, Inc.
Brand Manager - Europe, Middle East & Africa
Toshiba Court, Weybridge Business Park, Addlestone Road, Weybridge, Surrey, KT15 2UL, UK
Germany Class A statement
Deutschsprachiger EU Hinweis: Hinweis für Geräte der Klasse A EU-Richtlinie zur
Elektromagnetischen Verträglichkeit
Dieses Produkt entspricht den Schutzanforderungen der EU-Richtlinie 2004/108/EG zur
Angleichung der Rechtsvorschriften über die elektromagnetische Verträglichkeit in den EU-
Mitgliedsstaaten und hält die Grenzwerte der EN 55032 Klasse A ein.
Um dieses sicherzustellen, sind die Geräte wie in den Handbüchern beschrieben zu installieren
und zu betreiben. Des Weiteren dürfen auch nur von der Toshiba Global Commerce Solutions
empfohlene Kabel angeschlossen werden. Toshiba Global Commerce Solutions übernimmt keine
Verantwortung für die Einhaltung der Schutzanforderungen, wenn das Produkt ohne
. Notices 51You can also read