MAIN OPERATIONS MANUAL - FS2Crew: Wilco Feelthere Airbus Special Edition
←
→
Page content transcription
If your browser does not render page correctly, please read the page content below

Version
                                                    1.0

FS2Crew: Wilco Feelthere Airbus Special Edition

  MAIN OPERATIONS MANUAL

                 COPYRIGHT 2008, FS2CREW.COM

                             1
Table of Contents:                                                       Version
                                                                           1.0

Vista Users Important Info                   .....                  3

Introduction                                 .....                  4

System Requirements                          .....                  5

Getting Help & Support                       .....                  5

Airbus Models Supported                      .....                  5

Notes for Previous Owners                    .....                  6

Rules & Troubleshooting                      .....                  7

SFO to LAX Tutorial Flight                   .....                  9

Miscellaneous Procedures                     .....                  37

Crew Flow Summary                            .....                  39

                             Dan Nieto, FS2Crew Airbus Consultant

                                   COPYRIGHT 2008, FS2CREW.COM

                                               2
Vista Users Important Info:                                                                                Version
                                                                                                             1.0

                                                                         How to enable/disable
ALL VISTA FS2CREW WILCO-FEELTHERE AIRBUS                                 DEP globally in Vista:

USERS PLEASE READ!!!!                                                    1. Make sure you are logged
                                                                         onto Vista in Admin mode.
You MUST disable DEP in Vista or you will get a crash after
attempting to load the Wilco Feelthere Airbus.                           2. From the start menu, select
                                                                         "All Programs", then
Data Execution Prevention (DEP) is a security feature which,             "Accessories".
at times, can arbitrarily prevent a program from functioning,
                                                                         3. Right-click on the "Command
usually crashing it.                                                     Prompt" shortcut and choose
                                                                         "Run as Administrator".
FS2Crew Wilco-Feelthere Airbus users running under Vista
must manually disable DEP globally prior to loading the                  4. Enter the following command
simulation for the first time.                                           (Copy and Paste is
                                                                         recommended to avoid typos):
Failure to disable DEP globally will result in a crash after
selecting the Wilco Airbus.                                               bcdedit.exe /set
                                                                         {current} nx AlwaysOff

                                                                         5. Reboot your System.
Disable DEP:
                                                                         6. Load Flight Simulator.
bcdedit.exe /set {current} nx AlwaysOff
                                                                         To reverse this setting perform
                                                                         steps

Enable DEP:                                                              1-3 from above and use the
                                                                         following command:
bcdedit.exe /set {current} nx AlwaysOn
                                                                           bcdedit.exe /set
                                                                         {current} nx AlwaysOn

                                           COPYRIGHT 2008, FS2CREW.COM

                                                       3
Introduction:                                                                                        Version
                                                                                                       1.0

FS2Crew Wilco-Feelthere Special Edition is a continuation of FS2Crew’s step into the realm of
Airbus specific flight crew simulations. The Special Edition expands on the initial FS2Crew
Wilco-Feelthere A320 version, which was released in the summer of 2007, so that it may
function with the major models from the recently released Wilco-Feelthere Volume Two.

While there is a large degree of continuity between the various airbus models from the vantage
point of cockpit procedures (which is the way Airbus intends it!), a lot of “under the hood” work
was required to make the pre-existing FS2Crew Edition for the A320 series work with the A330
and A340 models.

If this is your first FS2Crew product, you should know that what FS2Crew attempts to do is
simple: We take the best FS add-on aircraft, and develop custom designed crew simulations
that are tailored to match the nuances of the host aircraft and its operating procedures.

Complete customization from scratch is necessary to achieve the level of detail demanded not
only by FS users, but also by ourselves.

A significant challenge for FS2Crew is to take something that is essentially quite complex –
airline flying in a multi-crew environment- and reduce it to something that is palatable for the
average user without sacrificing detail (or requiring weeks of solid study).

That being the case, this manual includes a detailed, step-by-step tutorial flight which all users
would do well to follow.

Following the tutorial flight is the only way to properly learn how to use FS2Crew. Once you get
the hang of it, though, it will become second nature.

Have an enjoyable flight!

Bryan York
Developer – FS2Crew

                                      COPYRIGHT 2008, FS2CREW.COM

                                                  4
System Requirements:                                                                                       Version
                                                                                                             1.0
        Wilco Feelthere Airbus Volume 1 or Volume 2
        It can be purchased via the Wilco website:
        http://www.wilcopub.com

        FS9 or FSX

Airbus Models Supported:
The Special Edition works with the following models from Volume 1 and Volume 2:

• A319 CFM
• A319 CJ
• A319 IAE
• A320 CFM
• A320 IAE
• A321 CFM
• A321 IAE
• A333 RR
• A343 CFM
• A346 RR

*Please note that the A332 models are not currently supported. Please watch the FS2Crew Support
forum for information on when the A332 models will be supported.

* When you install FS2Crew, the panel.cfg file for each model listed above will automatically be updated
with the required FS2Crew entries.

Getting Help and Support:
FS2Crew FAQs page:

www.fs2crew.com/faqs.htm

FS2Crew Support Forum:

http://forums.avsim.net/dcboard.php?az=show_topics&forum=212&page=

                                        COPYRIGHT 2008, FS2CREW.COM

                                                    5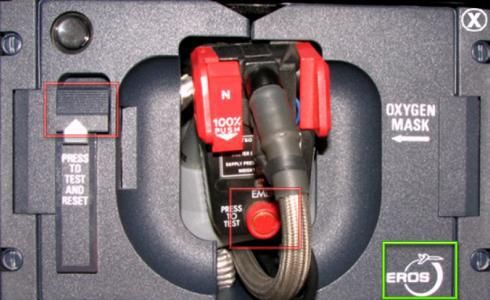
Notes for Previous FS2Crew Owners: Version
1.0
If you owned the A320 version, a new sub-tab is now available in the FS9 and FSX Start Centers
for the Special Edition.
Interface method: For joystick and keyboard buttons, FS2Crew now uses DirectX. This
represents an improvement from the previous method, which required users to assign a joystick
button or key command to an available FS event.
Keyboard commands: While they are available in the Wilco Feelthere Airbus aircraft, FS2Crew
does not make use of them for a variety of reasons, some technical, some practical.
Airbus procedures are different from Boeing procedures. For example, a significant difference is
that according to Airbus SOP, the crew is required to call all boxed FMA mode changes (not just
abnormals).
For 747 users, the Flight Planning page is gone. A lot of the data that the user was required to
enter of the Flight Planning page has been dispersed in the A320 Edition, or is now read
automatically by FS2Crew (such as ATC call sign and flight number.)
If your experience with FS2Crew is limited to the 737 or ATR Editions, please note that you no
longer need to load the default Cessna prior to loading the Airbus.
The Departure and Approach Briefing pages feature a new interface method.
The Pre-Flight section (with associated events) now needs to be manually selected. In other
words, the simulation does not start by default in the pre-flight section.
COPYRIGHT 2008, FS2CREW.COM
6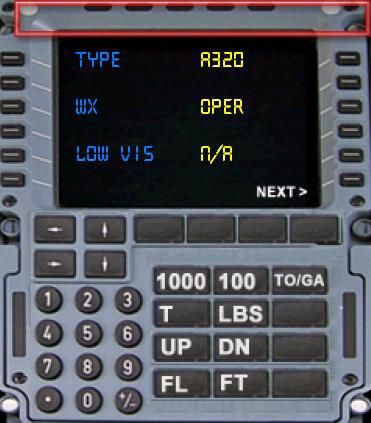
Important Rules, Troubleshooting:                                                                      Version
                                                                                                         1.0

    Read the Tutorial Flight! You cannot jump and fly with FS2Crew!

    If using Vista, you must disable DEP globally or you will get a CTD after selecting the Airbus
    model.

    Never load the Airbus from a Virtual Cockpit, Spot or Tower view. In FSX, you must make the
    following selection to ensure the cockpit loads in the 2D cockpit:

    FS2Crew consists of gauge and window entries that are added to the panel.cfg of the host
    aircraft. If you do not want FS2Crew to load when you load the host aircraft, you will need to
    restore the original panel.cfg file.

    In FS2Crew, you are the Pilot Flying (PF). However, some of the FO’s duties (PNF) you must do
    on his behalf (such as setting up the MCDU).

    If using FS9, please ensure that the pushback type is set to “Standard,” not “PPU” via the Wilco
    Feelthere A320 Configurator Utility:

                                     COPYRIGHT 2008, FS2CREW.COM

                                                 7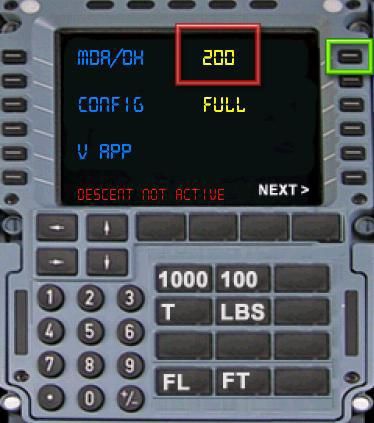
Version
                                                                                                        1.0

When you install FS2Crew for the first time, FS2Crew will attempt to automatically update your
Airbus panel.cfg’s with the appropriate FS2Crew entries.

If you uninstall FS2Crew, the uninstaller should automatically restore your panel.cfg files for the
Airbus models back to their original state.

If it appears that FS2Crew has not been added to the panel.cfg file (for example, you load the
Airbus but don’t see the FS2Crew Checklist Panel on the screen), the FS2Crew installer may have
been unable to locate FS9 or FSX in your registry because the registry entry has been corrupted.
In that case, please press “REG CHECK” on the Start Center to check the status of your FS
registry entry. After fixing your registry, please re-install FS2Crew.

If you get an unexplained CTD, try restoring the GaugeSound.dll as it may have been overwritten
by an older version when you installed another 3rd party add-on.

                                 COPYRIGHT 2008, FS2CREW.COM

                                             8
SFO to LAX Tutorial Flight                                                                                   Version
                                                                                                               1.0
This tutorial flight will take you on a short hop from San Francisco (KSFO) to Los Angeles (KLAX), but you
can use any two airports you like; it makes no difference.

This tutorial assumes that you are familiar with operating the Wilco/Feelthere A320 or A340. You do not
need to be an expert, but you should know how to program the MCDU and operate the FCU (autopilot).

Note: If you want a printed checklist to use as a reference, use the checklist from your Wilco Feelthere
A320 or A340.

If you require clarifications, please post your question in the FS2Crew Support Forum.

Create your Flight

1. From the FS9 or FSX main menu, create a flight using an A320 or A340 model.

2. Using the following parameters:

        i) Start-up location:    KSFO

        ii) Gate:                Your discretion

        iii) Weather:            Clear

        iv) Aircraft Livery:     Your discretion

        v) ATC Flight #:         Your discretion

        vi) Cruise FL:           FL330

Important: Make sure the Wilco Feelthere Airbus loads by default so you start in the 2D cockpit only. (FSX
has an option to select this). Never load the Airbus from a spot or tower view or from another aircraft’s
virtual cockpit (VC), or you may get a CTD or experience other problems. If you want to use the VC, switch
to the VC after the 2D cockpit loads.

3. Set the fuel load. With full tanks, you’ll be over-weight. To keep things simple, reduce the fuel
quantity in the center tank to 10 percent. If you want to use a more exact figure, there are several fuel
calculator utilities available on the internet.
                                         COPYRIGHT 2008, FS2CREW.COM

                                                     9
Version
                                                                                                              1.0

4. Route to LAX: Porte2 Avenal Transition off runway 28 Left. Sadde6 Arrival at KLAX landing 24 Right.

For detailed flight planning information and charts, please visit:

www.simroutes.com

At the Gate
1. You should now be sitting at a gate location at KSFO in the 2D cockpit.

2. Note the FS2Crew Checklist panel in the top-left hand corner. It will be open by default. You can drag
it to a new position if desired.

3. Open the Wilco Feelthere Airbus options menu via the Aircraft sub-menu.

4. FS9 users: Select ‘Reset Flight,’ then select ‘Cold and Dark.’

5. FSX users: Using the A320 Wilco Feelthere Configuration Manager, please select ‘Cold and Dark.’
(Note: The FSX Cold and Dark feature can be a bit tricky. If it doesn’t work for you, manually configure
the aircraft to be cold and dark, and ensure the engines are turned off).

6. Important: please ensure the external lights are off (beacon, strobes, taxi light).

FS2Crew Checklist Panel Notes

1. The FS2Crew Checklist Panel loads by default in the open position in the top-left hand corner.

Red Box: Click to close Checklist panel.

Green Box: Restarts current checklist from the beginning.

                                           COPYRIGHT 2008, FS2CREW.COM

                                                      10
2. The text display returns the current active checklist or mode.
Version
3. The left and right arrows can be used to manually cycle the checklists or modes forward and 1.0
backward; however, under normal circumstances, the modes will automatically cycle to the next mode
at the appropriate time.
4. The Checklist Panel does not need to be open or visible if using joystick or keyboard buttons to run
the checklists.
5. The Checklist Panel can be opened and closed by left-clicking the areas depicted below:
2D Cockpit (Side Stick Priority Button):
“Left-Click to toggle (open and close) the Checklist panel”
VC Cockpit (Standby Altimeter) – (A319, A320, A321, A333 Models)
VC Cockpit (RMI) – (A340 Models)
COPYRIGHT 2008, FS2CREW.COM
11Pre-Departure Setup Version
1.0
1. Switch to the VC cockpit if desired.
2. Open the overhead panel.
3. Turn on both batteries.
4. If starting from a Gate position, ensure all external lights are off except for the Nav and Logo lights if
required. Make sure that taxi light and strobes are off!
5. Turn on the fuel pumps.
6. Set the Seatbelts and No Smoking Signs to On and Auto respectively.
7. Turn on the APU (APU Master On then Start).
8. When the APU is running, set the APU bleed switch to on.
9. Make sure both Engine Generator switches are in the on position (if they’re off, turn them on now).
10. Setup the FCU as required.
Running the Pre-Flight Events (Optional)
1. It’s optional, you do not have to do it, but for the sake of example let’s run the pre-flight events.
2. First, we need to open the Panel Selector. We’ll use the same click spot areas used to open the
Checklist panel, but this time we’ll use a right click instead of a left click.
2D Cockpit (Side Stick Priority Button):
“Right-Click to toggle (open and close) the Selector panel”
COPYRIGHT 2008, FS2CREW.COM
12VC Cockpit (Standby Altimeter) – (A319, A320, A321, A333 Models)
Version
1.0
VC Cockpit (RMI) – (A340 Models)
“Right-Click to toggle (open and close) the Selector panel”
3. The Panel Selector will then pop open:
Panel Selector Buttons:
PF: Pre-Flight
O2: Oxygen Panel
OPS: Operations Page
TDC: Takeoff Data Card
DB: Departure Briefing
FO: FO Commands
AB: Approach Briefing
COPYRIGHT 2008, FS2CREW.COM
13Version
4. Left-click ‘PF’. PF stands for Pre-Flight. 1.0
5. If you left-click ‘PF’ again the Pre-Flight panel will close. You can also close the Panel Selector panel by
left clicking on the Panel Selector text (top middle portion of the graphic).
6. Press the Start button. Note: You are not ‘starting’ FS2Crew as a whole per se by pressing Start, you
are merely starting the pre-flight events portion of the simulation.
7. The outer doors will automatically open. If using other programs that attempt to control the doors
such as FS Passengers, be sure to disable their ability to control the doors.
8. You can fast forward the time to departure down by pressing the Fast Forward button. You are not
expected to sit in front of your computer for 30 minutes! It is strongly suggested that you pause a few
moments between each click to help prevent multiple, time-based events from occurring
simultaneously.
9. If you want to pause the countdown timer, use the default FS pause command.
10. When the time reaches +2 minutes to departure, the Pre-Flight panel will self-close automatically
and the outer doors will close.
11. During the Pre-Flight sequence, you will have conversations with the FA, Gate Agent and Engineer.
The dialogue panels associated with them are self-explanatory.
COPYRIGHT 2008, FS2CREW.COM
14Version
1.0
12. A couple of minutes after starting the Pre-Flight events, the engineer will enter the cockpit and hand
you the fuel docket. The Station number, flight number, AC registration and EZFW will be pre-filled out
for you by the Gate Agent, but you need to fill out the rest of the document.
13. The values displayed on the Fuel Docket are read out the FS2Crew Start Center and the Aircraft.CFG
file.
14. To fill out the Fuel Docket, simply left click in the empty fields (where you see blue text in the
example screenshot). You can alter the Trip Fuel, STD and Trip Time values by using the left and right
mouse buttons.
15. ATA is the time the aircraft arrived from the last flight. STD is the scheduled departure time.
16. When you’re finished filling out the form, you will leave it on the pedestal and the engineer will
pickup it up a few moments later.
COPYRIGHT 2008, FS2CREW.COM
15Running the Pre-Flight Events (Continued) Version
1.0
1. In reality, the FO would fill out the MCDU. Obviously in Flightsim this cannot be simulated, so you will
need to prep the MCDU for him.
2. Since we do not have the load sheet yet, we cannot completely fill-out the MCDU since we lack the
required data for the speeds, etc. We can however fill out the routing and INIT A and B page.
3. Program the MCDU for the flight to LAX.
4. Routing is: PORTE3.AVE.SADDE6.
5. Use runway 28L at KSFO and 24R at KLAX.
6. When you’re ready, you should perform your oxygen test.
Red Boxes (There are two of them): Hold the left mouse button down to test.
Green Box: Click to warn the ground engineer that you’re about to perform an oxygen test.
COPYRIGHT 2008, FS2CREW.COM
16Performing the Departure Brief Version
1.0
Red Box: Closes Departure Brief page.
1. At some point during the pre-flight events you should run the Departure Briefing. Typically, the
Departure Brief should be broken into two sections: Do the first half before you get the load sheet, and
complete the remaining section after the load sheet has arrived and the FO has handed you the Takeoff
Data Card. By dividing the brief in two, there is less likelihood that you will have to rush the brief after
receiving the load sheet.
2. The Departure Briefing page depicted above can be opened by opening the FS2Crew Panel selector
and then by clicking ‘DB’. (See Page 14, step 3).
3. Running the whole Departure Brief is purely optional; if you do not want to play the sounds
associated with the brief, the simulation will not be adversely affected.
4. Many of the selections in the right column (the yellow text) can be changed using the left or right
mouse button.
5. Click the blue text in the left column to play the associated part of the brief. Much of the brief
involves flipping through the various pages on the ECAM and MCDU, and reading the displayed values.
To announce a value (such a V1), you would click V1 to say “V1”, and then you would use the keypad on
the briefing page to articulate the actual V1 speed.
6. You can use the NEXT or left and right arrow keys to cycle through the various briefing pages.
7. The remaining buttons (such as FL or FT, etc.) can be used to articulate precise values for the various
items to be briefed.
8. Note: the takeoff Config (CONF) setting can only be changed via the Takeoff Data Card.
COPYRIGHT 2008, FS2CREW.COM
17The Takeoff Data Card Version
1.0
1. The FO will fill out the Takeoff Data Card after the load sheet Arrives and he’s had time to compute
the numbers. After accepting and making any final changes to the Takeoff Data Card, you can complete
the remaining portion of the Departure Brief.
2. Important: As Captain, you can change most of the blue values by left/right clicking on them. For
example, if you decide that you want to use Config 2 for takeoff, you would right click over the 1 + F
text. You can change the V Speeds and FLEX temp the same way.
3. Displayed takeoff V-Speeds and Trims are very rough estimates. If you want an accurate V-Speed
takeoff calculator, FS2Crew recommends t his free calculator:
http://www.flightxpress.de/files/0604/Tools/TPC.exe
COPYRIGHT 2008, FS2CREW.COM
18Understanding the new buttons FS2Crew adds to the Version
1.0
Audio Control Panel
FS2Crew adds new functionality to the Audio Control Panel (ACP) located on the pedestal.
Red Box: Will flash when the FA calls the cockpit. Click the CAB button to answer her call.
Green Box: Toggles open/close the Public Address Page.
Yellow Box: Used to monitor the FA’s PA’s (i.e., the cabin safety brief). Right clicking turns the knob to
the on position. Left clicking sets it to the off position. Note: The position of this knob will vary slightly
from model to model.
The Public Address (PA) Page
COPYRIGHT 2008, FS2CREW.COM
191. Most buttons are self-explanatory.
Version
2. Use a right/left mouse click to cycle the CITY, RIDE and TIME selections. Press CRZ MSG when ready 1.0
to make a Cruise PA.
3. CREW STNS and CREW CNCL are used for Rejected Takeoffs. Please see the RTO section for detailed
information.
4. T/O SEQ (Takeoff Sequence) can be modified using right/left mouse clicks.
Running the Before Start Checklist
1. Let’s run the Before Start checklist.
2. You can run the checklists by:
i) Pressing the minus key on your numeric keypad (that’s the default assignment, you can
change if desired via the FS2Crew Start Center); or,
ii) Left clicking the green button located on the Checklist Panel; or,
iii) Pressing the Joystick button assigned to the Green Button (Default is Button # 3).
3. Run the Before Start checklist all the way to the end (including the section that is “Below the Line”).
4. Note: turning on the beacon is your responsibility.
5. The FO will call for the push and start clearance after you’ve completed the Before Start checklist. The
FO will use the airline name and flight number as selected in the FS aircraft menu.
Pre-Pushback Events Summary
Approximate Time to Departure:
+ 30: Crew Enters Cockpit. Capt checks maintenance & journey log, as well as gear pins, escape rope,
safety/emergency equipment and floatation devices are there.
+25: Capt starts walk around.
(Note: In FS2Crew, Capt performs the FO’s flow described below):
FO starts flow, gets ATIS and starts setting up MCDU.
COPYRIGHT 2008, FS2CREW.COM
20FO will enter the INIT A page, enter the Fplan info for the departure and arrival, including the expected
SID, STAR and APP, and then arrival to Alternate, including route and expected SID/STAR/App. Any step Version
1.0
altitudes as per operational flight plan will be entered. He will also enter RADNAV page (NDBs, VORs,
Radials required for Engine out, SID, approach back to airport in case of emergency). Usually the Engine
out is on the PNF side, and the SID on the PF side. Enter the performance page info that is available
(ThrRed/Acc/EOACC, any speed for the climb if it is to be preset, any derated climb.) Enter the
secondary Fplan (usually the Engine out SID or and alternate SID or runway if it is foreseen, as well as
the Sec Fplan performance page to include the data from ATIS in case of a return to the Dep airport).
Then insert the INIT B data, preliminary from the Operational Flight Plan (OFP) to make sure the
information is somehow accurate. After all of that, the FO will put in the average wind on INIT B and
compare the distance on the Fplan page with the OFP, and then check the optimum and maximum
recommended altitudes on the progress page, as well the fuel on the Init B page against the OFP. All that
is left to do is correct/confirm the weights on init b once the load sheet arrives and then calculate and
enter the V1/VR/V2/Flex/Config and THS.
+ 20: Capt comes back. FO finishing setting up MCDU
+18: FA comes in, says cabin checks compete. Mentions any inop items such as a broken seat back. She
will ask the Capt if he’s ready for boarding.
+17: FO says “MCDU Preparation complete”. Capt asks FO to hand over flight plan. Capt checks flight
plan against the MCDU.
+16: Captain performs instrument x-check, then oxygen test. Says “Ground cockpit, watch your ears,
oxygen test.”
+15: FO (Capt in FS2Crew) gets clearance.
+14: Any MCDU changes made and Capt performs 1st half of the departure brief.
+ 12: Engineer calls Cockpit. Asks if fuel is okay “we have xxx fuel uploaded, confirm fuel sir.”
+11: Fuel bill comes in.
+10: Load sheet arrives.
+9: Capt reads # of pax, total on board, ZFWCG, ZFW, Fuel, actual TO weight, TO CG from the W and B
sheet.
FO (Capt in FS2Crew) inputs info into MCDU. After inputting the info into the MCDU, he uses the LPC or
TO analysis book to define V1, VR, V2, flex-toga, config.
After computing these things, FO writes them down and gives them to Capt.
FO (Capt in FS2Crew) enters this info on the Perf page in the MCDU.
COPYRIGHT 2008, FS2CREW.COM
21After entering the info on the MCDU, captain says, “To complete the briefing,
V1/V2/Vr/Flex/Config/THS, and we have a weight of XX.X which is below/above the max landing Version
1.0
weight.”
Capt: Before Start checklist to the line.
+7: Ops person arrives to the cockpit and picks up a copy of the WB for the station, then let’s the captain
know the boarding status.
+5: FA comes into the cockpit and says “Captain, all passengers on board, may we close the doors?”
+4: Capt makes “Welcome” PA.
+2: All doors (cargo, bulk and passenger doors) are closed, and the passenger doors start to be armed,
video/demonstration/welcome starts to be played on the PA, the FO/Capt can hear this if they click on
the PA button on the ACP.
+1: Capt calls for the Before Start Checklist “Below the Line”. If doing a pushback, the FO will call for the
push and start clearance. Captain then calls the Start Crew by pressing the MECH button on the
overhead panel.
Pushback and Engine Start
1. Okay, we’re ready to push. Please ensure the parking brake is set and the beacon is on. Also make
sure the APU is running and the APU bleed is on.
2. Open the overhead panel and hold down the MECH button using the left mouse button.
3. You will hear a horn sound. This is how you will call the Start Crew in FS2Crew.
4. The Start Crew pop up panel will then appear.
COPYRIGHT 2008, FS2CREW.COM
22Version
1.0
5. Leave the Angle and Distance selections where they are. Generally you rarely need to touch them.
Adjust the Tail Left/Right selection as required depending on where you are at the airport. Remember
that to cycle many of the selections you need to use the right and/or left mouse button. If, in the
Departure Brief you selected ‘no’ for pushback, the Dist, Tail and Angle fields will show dashes.
6. When you’re ready to push, press the Contact button.
7. If you need to close the Start Crew panel early, left click in the top right hand corner of the panel.
8. If you do not want to use FS2Crew’s pushback capability because you’re using AES, do not click
Contact.
9. The Start Crew will ask you to release the brakes and then you will start the push.
10. When the Start Crew clears you to start your engines, press the ENG 2 button on the FS2Crew Start
Crew panel to announce that you’re about to Start Engine 2. (Usual engine start sequence is 2 then 1).
11. Next, open the A320 pedestal and start engine 2 normally. Remember that the Captain starts the
engines; the FO does not touch a thing!
12. When engine 2 has stabilized, repeat the process to start engine 1.
13. When the Start Crew tells you to set the brakes, set the brakes.
14. Do not close the Start Crew panel yet! (The Start Crew panel will close automatically after you call
“Clear to the Left.”
COPYRIGHT 2008, FS2CREW.COM
23After Start Version
1.0
1. After you’ve set the parking brake and the engines have stabilized, press Disconnect (DISC) on the
FS2Crew Start Crew panel.
2. Next, run the After Start flow. As Captain, you will: Set the Engine Mode Switch to Norm, and then
turn off the APU bleed on the overhead.
3. The FO will then perform his flow: Flaps to the takeoff position as defined on the Takeoff Data Card,
ground spoiler to arm, and set the WAI/EAI as required.
4. Note: The FO should arm the ground spoiler, but if he doesn’t, do it for him. (Sometimes internal
interference in FS will prevent the FO from arming the ground spoilers).
5. The FO will then ask you if you want the APU on or off.
6. Answer: “Off” (See the Packs off/Packs on APU procedure at the end of the manual for information on
when you’d leave the APU on). If you select ‘off’, a mini copy of the overhead panel will open in the
lower right hand portion of the screen, and a simulated mouse click will be used to turn off the APU).
7. Next, run the After Start Checklist.
8. After you’ve completed the After Start Checklist, the checklist mode will automatically switch to
Before Takeoff. Now you need to perform the flight control check.
9. To perform the flight control check, check press “CTRL” in the window located in the lower right hand
column of the Start Crew panel. The controls check needs to be done in the following exact order:
10. Move your joystick full back. The FO will announce “full up.”
11. Next, move your joystick full down. The FO will announce “full down.”
12. Next, you must center your joystick. The FO will announce “neutral.” Important: The FO must call
“neutral.” If you center your joystick and he doesn’t call “neutral,” press the 5 key on your numeric
keypad. That should force your joystick to the neutral position, thus triggering the call.
13. Next, move your joystick full left. The FO will announce “full left.”
14. Next, move your joystick full right. The FO will announce “full right.”
COPYRIGHT 2008, FS2CREW.COM
2415. Next, center your joystick. The FO will announce “neutral.” (You may need to press the 5 key on your
numeric keypad to force the joystick to neutral. Version
1.0
16. Finally, we need to check the rudder, so click the “RUDDER” text in the bottom window.
17. Move your rudder full left. The FO will make the associated call. The move the rudder full right, then
center the rudder. Like before, the FO must announce neutral.
18. When that is complete, the FO will then perform his control check. He does that silently; there are
no calls.
19. When the FO has finished his control check, manually call for taxi clearance if you so desire, then
turn on the taxi light. Next, press the “CLEAR” text to call “Clear to the Right.” The Start panel will then
auto-close.
20. Note: The FO will set the auto brake to max after the controls check has been completed and after
the taxi light has been turn on.
21. Important: You must turn on the taxi light as that acts as trigger for certain events, such as the FA
calling the cockpit to tell you that the cabin is ready for departure.
Taxi
1. If you haven’t done so yet, turn on the taxi light! Never forget to turn on the taxi light as it is a
necessary trigger for the FA to call the cabin during taxi.
2. Start taxiing to the runway.
3. It’s time to do the brake check, so tap the brakes to call “Brake Check”.
4. A short while later, the FA will phone the flight deck to you that that the cabin is ready for departure.
5. After being notified that the cabin is secure, the FO will press the TO Config button.
6. When that is done, you can call for and run the Before Takeoff checklist “to the line.”
COPYRIGHT 2008, FS2CREW.COM
25Takeoff & Initial Climb Version
1.0
1. When you taxi onto the runway, turn on your strobes by pressing the ‘O’ key on your keyboard (‘O’ is
the default key assignment for the strobe light; if you’ve changed the default key assignment, you’ll
need to use your new assignment. You could also manually move the strobe switch to the on position).
2. The strobe lights coming on is the FO’s trigger to run his Before Takeoff flow: TCAS to TARA and
inform the FAs to be seated for departure.
3. As the Captain, you are responsible for setting the exterior lights. Set the Runway Turn-Off and Taxi
Light to On/Takeoff.
4. Since flipping to the overhead panel can be a bit cumbersome, FS2Crew added a click spot that can be
used to turn on/off the landing lights when using the 2D panel:
“While on the ground, click in the red box as shown above to toggle the landing lights. This click area
only works in the 2D cockpit, not the VC.”
5. After the FO completes his flow, run the Before Takeoff Checklist “below the line” and line-up with
the runway.
6. The mode will automatically change to Takeoff Roll.
7. Press the Green button to announce “Takeoff.” Do not forget to announce “Takeoff” or the takeoff
calls will not play!
8. Set the throttles to 50% N1, let the engines stabilize, and then move the throttles to the Flex (or
TOGA) detent position.
9. Important: Make sure you do not accidently trigger the reverse thrusters during takeoff or you will
put FS2Crew into RTO mode (Rejected Takeoff).
COPYRIGHT 2008, FS2CREW.COM
2610. Complete the takeoff. The FO will automatically raise the gear, set the taxi and runway turnoff lights
and disarm the ground spoiler. (Note: Runway turnoff and Taxi light must be in the On/Takeoff position Version
1.0
during takeoff or the FO may incorrectly position these switches during his after takeoff flow).
11. The checklist mode will change to INIT CLB – FLAPS.
12. 100 feet above the ground, engage the autopilot (I like to use the ‘Z’ key on my keyboard).
13. When above ‘S’ speed on your PFD, press the Green button to call “Flaps Up”.
Announcing FMA mode changes (Optional)
1. If you fly an Airbus the way it’s meant to be flown, you will announce all mode changes on the
FMA. To open and close the FMA call out box, click in the red box area as depicted below.
2. To make a call, simply left click the associated text:
COPYRIGHT 2008, FS2CREW.COM
27Version
1.0
3. Calling all mode changes in FS2Crew is optional. You do not need to do it if so desired. However, you
should announce ALT CRZ as that is a necessary condition for some of the random in-flight scenarios.
After Takeoff Checklist
1. Once the flaps are up, call for the After Takeoff checklist (The active mode will auto-change to After
Takeoff when the flaps are up).
2. Only run the After Takeoff checklist “to the line”. We’ll call for the section below the line after the
Transitional Altitude (18,000 feet in the US) has been passed.
3. Turn off the taxi and runway turnoff lights when able. The FO will turn off the landing lights at 10,000
feet.
COPYRIGHT 2008, FS2CREW.COM
28The FO Commands Page Version
1.0
During the climb, you may enter icing conditions. If that happens, you will want to ask the FO to turn on
the Engine or Wing Anti Ice as the case may be. To do that, open the FO Commands panel via the
Selector panel.
FO COMMANDS
PACKS OFF: FO turns off packs*
A.BLD: FO turns APU bleed on/off*
PACK1: FO turns on Pack 1*
PACK2: FO turns on Pack 2*
APU OFF: FO turns off APU*
EAI: FO turns on/off Engine Anti Ice
WAI: FO turns on/off Wing Anti Ice
CONT: Pass control to/from FO
COMM: Pass communications to/from FO
FLAPD: Instructs FO to leave flaps down after landing due to contaminated runway.
FLAP1: Instructs FO to leave flaps at position 1 after landing.
RUNUP: Informs FO you’ll be running up the during taxi to shed any possible ice off the blades.
BIRD STRIKE: Bird Strike QRH
*Only used during a Packs Off or Packs on APU takeoff.
COPYRIGHT 2008, FS2CREW.COM
29Passing the Transition Altitude Version
1.0
1. When we pass the Transition Altitude (18,000 feet in the US), we need to make the “Pull Standard”
call.
2. Due to technical reasons, the click spot areas used to make this call vary depending on if you are in
the 2D cockpit or if you are in the VC cockpit.
2D Cockpit:
VC Cockpit (Standby Airspeed Indicator gauge – Volume 1 Aircraft only and A330 Models only):
VC Cockpit (Rain Repellant button on VC Overhead – A340 Models only):
3. Next, complete the After Takeoff checklist. Press the Green Button to call for the After Takeoff
checklist “below the line.” When the After Takeoff checklist is complete, the active checklist mode will
auto-change to Approach.
COPYRIGHT 2008, FS2CREW.COM
30Cruise Version
1.0
1. Let’s assume we’re in cruise now. There is not much to do in cruise, but there is a random chance that
you may encounter an air rage or passenger smoking in the lavatory situation. A necessary condition for
any of these random events to play is that you must have clicked “ALT CRZ” on the FMA page.
2. We’re thirsty, so let’s call the FA and ask her for a drink. To call the FA, left-click the FWD button on
the overhead.
3. When you press the FWD button, the FA will call the cockpit. When the FA calls you, the CAB button
will flash on the Audio Control Panel a few moments later. Press the CAB button to open the FA dialogue
screen.
“The ATT Button will illuminate and flash and you will hear a chime when the FA calls the cockpit. Left
click the ATT button to open the FA Dialog panel.”
COPYRIGHT 2008, FS2CREW.COM
31Approach Briefing Version
1.0
1. Prior to the TOD (about 80NM), you should setup the MCDU and brief for the arrival.
2. To open the Approach Brief page, open the Panel Selector panel, then press the AB button.
3. Like it was for the Departure Briefing, doing the full brief is optional. If you do not do not play the
brief, the simulation will still run fine. However, you must still manually put FS2Crew into Descent Mode.
That can be accomplished by left clicking on the red Descent Mode Not Active text. The will change the
text to: Descent Mode Active.
4. The Approach Briefing page is run the same way as the Departure Briefing.
Red Box: Closes Descent Brief page.
5. Setting the auto brake is your job as the captain. You should set the auto brake when you announce
the auto brake setting during the approach brief.
COPYRIGHT 2008, FS2CREW.COM
32Inputting the Decision Altitude or Decision Height Version
1.0
Red Box: Increment MDA/DH +/-10 (Left/Right mouse button)
Green Box: Increment MDA/DH +/-100 (Left/Right mouse button)
1. While you do not need to play any sections of the approach brief, you do need to tell FS2Crew what
the MDA/DH is going to be. To do that, click on the right arrow or ‘NEXT’ text to move to the page that
says MDA/DH. Use your left/right mouse button over the MDA/DH to change its value. You can hold
down the mouse button as required to rapidly change the selections.
2. Important: If shooting a CATIII or CATII approach, enter the DH as a barometric altitude only, not as a
value derived off the Radar Altimeter (i.e., 100 or 50 feet). It is recognized that technically you would
enter a RA for CATII/III approaches, but for the purposes of FS2Crew enter a barometric altitude.
Descent
1. At the TOD, start your descent.
2. Passing the Transition Level (FL180), left click the alt setting window as shown below if using the 2D
cockpit (or the associated VC click spot) to call “Push QNH”, then “push” the PULL STD button manually
to change the altitude reference from STD to local pressure.
COPYRIGHT 2008, FS2CREW.COM
332D Cockpit:
Version
1.0
VC Cockpit (Standby Airspeed Indicator gauge – Volume 1 and A330 Models only.
VC Cockpit (Rain Repellant button on VC Overhead – A340 Models only):
3. Passing 10,000 feet, the FO will turn the landing lights on. (Descent Mode on the Approach Brief Page
must be active for this to happen!)
4. The FA will call the cockpit and you will see the ATT button flash on the pedestal. Press that button to
answer the FA’s call. She’ll tell you the cabin is ready for landing.
5. Run the Approach checklist.
COPYRIGHT 2008, FS2CREW.COM
346. Note: If flying outside the US with a low Transition Level (for example, FL50) the approach checklist
would be run similar to the After Takeoff checklist. This means that, if you start the Approach checklist Version
1.0
while you are above the Transition Level, you would only run the Approach checklist down to the line.
Once below the Transition Level and the altimeter has been set to QNH, you will call for the Approach
checklist “below the line” to complete the Approach checklist.
Final Approach
1. Press the Green button to command the FO to bring out the flaps. Each flap call will require a
separate push of the Green button. Flaps are dropped in sequence: Config 1, Config 2, Config 3 and, if
you selected Config Full on the Approach Brief page, Config Full.
2. Press the Red button to command the FO to drop the gear.
3. When the FO drops the gear, he will perform his Before Landing flow: he will arm the ground spoilers
and turn on the taxi and runway turnoff lights.
4. After the flaps are in the landing configuration (as determined by your selection on the Approach
Brief), press the Green Button to run the landing checklist.
5. When the FO calls “Minimums” press the Green button to call “Landing” or press the Red button to
call “Go Around, Flaps”.
After Landing
1. Land the plane normally.
2. Important: The trigger for the FO to start his After Landing flow is when the speed brakes are in the
up position. You may need to manually cycle the spoilers to get the FO to start his After Landing flow.
3. The FO will perform his After Landing flow silently.
COPYRIGHT 2008, FS2CREW.COM
35Version
1.0
4. He will: Bring the flaps up, turn on the APU, sets TCAS to standby and turn off the FD’s.
5. Note: During the day, the FO will turn off the landing and strobes lights. However, during night (with
the panel lights on), you as Captain must turn off the exterior lights.
6. Approaching the gate, you can press the Red Button to ask the FO to turn off the taxi light if it is on.
The taxi lights switch will not move, but the taxi light will extinguish (this is due to an interface
limitation).
At the Gate
1. Press the Green Button to command the FO to turn on the APU bleed in preparation for engine shut
down.
2. Note: The engines need three minutes to cool down. If three minutes have not elapsed yet, the FO
will let you know.
3. Shut down the engines, and then turn off the beacon and the seatbelt signs.
4. The FO will then perform his Shutdown flow, but he will leave one fuel pump on for the APU.
5. The ground engineer will contact you.
6. Run the Shutdown checklist.
7. If you want to terminate the flight, you could then run the Securing Aircraft checklist. Each item in
that checklist is read-and-do.
COPYRIGHT 2008, FS2CREW.COM
36Flying another leg Version
1.0
1. If you want to fly another leg, you do not need to reload the aircraft. Instead, click the right arrow
button on the Checklist Panel to cycle the active checklist/mode back to Before Start. It’s that simple!
Miscellaneous Procedures
Packs on APU Takeoff
1. During his After Start flow, the FO will ask you if you want the APU on or off. Usually you would
answer “off,” but this time answer “On”.
2. Turn off the APU bleed as you would normally during your After Start flow.
3. Prior to takeoff and before running the Before Takeoff Checklist below the line, ask the FO turn on the
APU bleed on via the FO Commands Page.
4. Once the flaps are retracted after takeoff, ask the FO to turn off the APU bleed, and then ask the FO
to turn off the APU.
Packs Off Takeoff
1. During his After Start flow, the FO will ask you if you want the APU on or off. Answer: “Off.”
2. Prior to takeoff and before running the Before Takeoff checklist below the line, ask the FO to turn off
the packs via the FO Commands Page.
3. Passing the acceleration altitude, ask the FO to turn on Pack 1.
4. After the flaps are up, ask the FO to turn on Pack 2.
Rejected Takeoffs
1. To reject the takeoff, bring the throttle all the way to idle and engage the reverses. You will call
“Stop!” and the active mode will auto-change to RTO.
COPYRIGHT 2008, FS2CREW.COM
372. After the aircraft has stopped, engage the parking brake.
Version
3. Make a PA instructing the FA to go to their stations (CREW STNS). 1.0
4. After you’ve determined that you do not need to evacuate, you can make a PA instructing the FAs to
“Cancel Crew Stations”. You can then taxi back to the gate or try another takeoff. Use the arrow keys to
change the active checklist mode on the Checklist panel.
Go Arounds
1. To Go Around during landing, press the “Red Button” (You need to be in the landing configuration
first).
2. The Go Around procedure and profile is the same as the takeoff profile.
COPYRIGHT 2008, FS2CREW.COM
38Captain and FO’s Flow Summary: Version
1.0
In FS2Crew, you are the Captain and the PF. The following briefly summaries the switches for which you
and the FO are responsible. Note: the Wilco Feelthere A320 does not model all possible Airbus switches
(such as the Anti Skid N/W Steering or Brake fans), so only the switches that are relevant to FS2Crew
within the context of the Wilco Feelthere A320 will be mentioned.
Also note that in real-life the FO would perform some of the functions FS2Crew delegates to the
Captain, such as the MCDU setup. This is because it is not possible to program an FO capable of setting
up the MCDU.
Phase:
Pre Pushback
Capt:
External lights: Off (make sure all off except for the Nav and Logo lights as required).
Seatbelts: On.
No Smoking: Auto.
MCDU: Setup.
FCU: Setup.
Fuel Pumps: On.
Parking Brake: Set.
Engine Generators: On.
COPYRIGHT 2008, FS2CREW.COM
39After Start
Version
Capt: 1.0
Engine Mode Selector: Norm.
APU Bleed: Off.
FO (Trigger is when you press DISC on the Start Crew panel to disconnect the Start Crew):
Flaps: Takeoff setting as indicated on the Takeoff Data Card.
Ground Spoilers: Arm (Double check that the FO sets the spoiler to arm… sometimes FS misses the
command sent from FS2Crew, so you may need to do it manually).
EAI/WAI: As required.
APU: Ask Capt if he wants it on or off.
Flight controls check: After Capt completes the rudder check on his side.
Taxi
Capt:
Taxi Light: On (Never forget to turn the taxi light on).
FO (Necessary Trigger: Taxi light must be positioned on):
Autobrake: Max (Flight control check should be performed first).
TO Config Test: Tested (Conducted after the FA informs the cockpit that the cabin is ready for
departure).
COPYRIGHT 2008, FS2CREW.COM
40Takeoff Version
1.0
Capt:
External lights: On (Turnoff/Taxi/Landing) (Turning on the strobe lights is the FO’s takeoff flow trigger).
FO (Necessary Trigger: Strobe light must be on):
Cabin crew: Informed.
TCAS: TA/RA.
After Takeoff
Capt:
External lights: Taxi and Runway Turnoff lights off when able.
FO:
Ground Spoilers: Disarmed.
Runway and Taxi Lights: Off
10,000 Feet (Climb)
Capt:
Seatbelts: As required.
FO :
Landing lights: Off.
Cruise
Capt:
Autobrake: Set (You would set it during the Approach brief).
COPYRIGHT 2008, FS2CREW.COM
41Version
1.0
10,000 Feet (Descent)
Capt:
Seatbelts: On.
FO :
Landing lights: On.
Final Approach
FO :
Ground Spoilers: Arm (Trigger: Gear down call).
After Landing
Capt:
External lights: As required (Night Only. During the day -panel lights must be off- the FO will turn off the
landing and strobe lights).
FO (Trigger: Spoiler in ‘off’ position… you may need to cycle the spoiler with back slash key):
Flaps: Retracted.
FD: Offs.
TCAS: STBY.
Anti Ice: As required.
APU: Start.
COPYRIGHT 2008, FS2CREW.COM
42Version
1.0
Parking
Capt:
External lights: As required.
Parking brake: On (until Engineer says chocks are in).
Engine Master 1, 2: Off.
Beacon Light: Off.
Seatbelt signs: Off.
FO (Trigger: Beacon off):
Anti Ice: Off.
APU Bleed: Off (done on Captain’s command prior to engine shutdown. Engines must have had 3
minutes to cool down first).
Fuel Pumps: Off (Will leave one pump on for the APU).
-MANUAL END-
COPYRIGHT 2008, FS2CREW.COM
43You can also read