MINIKRIMP CRIMPING MACHINE TECHNICAL MANUAL - PARKER ...
←
→
Page content transcription
If your browser does not render page correctly, please read the page content below
MiniKrimp™
Crimping Machine Technical Manual
When operating this machine, always exercise
         !     basic safety precautions to minimize the
               possibility of injury, including the following:
    1.        When using a power unit, use only Parker recommended power units to
              hydraulically operate Parker crimpers.
    2.        When using a power unit, connect the power unit to a grounded, properly rated,
              protected and sized power-supply circuit to prevent electrical shock and to avoid
              electrical overload.
    3.        DO NOT OPERATE MINIKRIMP™ OVER MAXIMUM RATED WORKING
              PRESSURE OF 10,000 PSI.
    4.        Wear safety glasses. Make sure that the valve connecting the hose or tube assembly
              and other components are protected from any external source of damage, such as:
              excessive heat, flame, moving machine parts, sharp edges, falling objects, corrosive
              chemicals, dropping the crimper and other hazards.

                                                      !     WARNING
         FAILURE OR IMPROPER SELECTION OR IMPROPER USE OF THE PRODUCTS AND / OR
         SYSTEMS DESCRIBED HEREIN OR RELATED ITEMS CAN CAUSE DEATH, PERSONAL INJURY
         AND PROPERTY DAMAGE.

         Before selecting or using any Parker hose or fittings or related accessories, it is important that
         you read and follow Parker Safety Guide for Selecting and Using Hose, Fittings, and Related
         Accessories (Parker Publication No. 4400-B.1)

         This document and other information from Parker Hannifin Corporation, its subsidiaries and
         authorized distributors provide product and/or system options for further investigation by
         users having technical expertise. It is important that you analyze all aspects of your application
         and review the information concerning the product or system in the current product catalog.
         Due to the variety of operating conditions and applications for these products or systems, the
         user, through its own analysis and testing, is solely responsible for making the final selection of
         the products and systems and assuring that all performance, safety and warning requirements
         of the application are met.

         The products described herein including without limitation, product features, specifications,
         designs, availability and pricing, are subject to change by Parker Hannifin Corporation and
         subsidiaries at any time without notice.

2                                  Parker Hannifin Corporation | Parflex Division | Ravenna, Ohio | parker.com/pfd
Table of Contents
MiniKrimp™ Hand Pump - Overview ................................................................................................................. 4
MiniKrimp™ Air Over Hydraulic - Overview...................................................................................................... 4
Accessories ........................................................................................................................................................6-7
Assembling the MiniKrimp Air Over Hydraulic Pump Upgrade Kit.............................................................. 5
MiniKrimp Assembly Detail and Parts List (Hand Pump)............................................................................... 8
MiniKrimp Assembly Detail and Parts List (Air Over Hydraulic)................................................................... 9
Crimping Instructions......................................................................................................................................... 10
Trouble Shooting Guide...................................................................................................................................... 12
Frequently Asked Questions.............................................................................................................................. 13
ENERPAC Warranty Policy................................................................................................................................. 14
Help us help you . . .
Read this guide carefully before using.
This Technical Manual is designed to help you operate and maintain your MiniKrimp.
If you need more information or further assistance, please contact us:
Call: Technical Services Department
Parker Hannifin Corporation
Parflex Division
Phone: 330.296.2871
Fax: 330.296-8433
Receiving Instructions:
UNPACKING — Carefully remove all documents and components from shipping containers.
INSPECTION— Visually inspect all components for shipping damage. If any shipping damage is found,
notify the carrier at once. The carrier is responsible for all repair and replacement costs resulting from
such damage. Shipping damage is not covered by the Parker warranty.
Parker Hannifin Corporation | Parflex Division | Ravenna, Ohio | parker.com/pfd 3MiniKrimp™
Hand Pump and Air Over Hydraulic
Weighing in at a light 42 pounds,
the strongest portable crimper
on the market.
Features
• Lightweight, portable, compact all-in-one unit
• Hand unit with pump weighs only 42 pounds; Air unit weighs 45 pounds
• 10,000 psi and 30+ tons of force
• No gauges to set - exclusive Parkalign™ feature positions the fitting correctly every time
• Removable pusher design for easy die change
• Hand pump easily removed for use with jumper hose for bench-mounted units (Part No. 015309)
• Air pump utilizes a rugged activation and release lever for greater durability with no additional power source required for operation
and can operate with as little as 60 psi air pressure (60-100 psi, 9 CFM recommended)
• Capable of crimping a majority of thermoplastic, rubber, PTFE and specialty hoses up to 3/4" I.D.
• For use with 56, 91, 91N, 92, 93N, CG, CY, MS, SF, 43 and HY Series fittings
• Do not use this machine to assemble any size 56, CG, 93N or 43 series Stainless Steel fitting. Use a minimum of a 60 ton crimp
machine such as the KarryKrimp II
Hand Pump Specifications Air/Hydraulic Pump Specifications
PN 94C-001-PFD PN 94C-002-PFD
• Dimensions: 6" Deep, 13" Wide, 15" High • Dimensions: 6" Deep, 12" Wide, 15" High
• Weight: 42 lbs with hand pump • Weight: 45 lbs with air/hydraulic pump
• Rating: 30 tons force@10,000 psi maximum • Rating: 30 tons force@10,000 psi maximum
• Full Cycle Time: Approximately 30 seconds • Full Cycle Time: Approximately 30 seconds
Note: Hydraulic Fluid - Enerpac HF oil only Note: Hydraulic Fluid - Enerpac HF oil only
Notes
• Reference CrimpSource on-line for detailed crimp specifications - www.parker.com/crimpsource
Minikrimp Standard Equipment
Part Number Description Individual
Part Number
94C-001-PFD 94C-002 -PFD
Ä Ä Base unit 94C-080-PFD
Ä Hand pump 015301
Ä Air over hydraulic pump 025399
Ä Ä Silver die ring 82C-R01-PFD
4 Parker Hannifin Corporation | Parflex Division | Ravenna, Ohio | parker.com/pfdAssembling the MiniKrimp
Air Over Hydraulic Pump Upgrade Kit, Part #025411
1. (IF APPLICABLE) Relieve pressure from attached pump. Remove the hand pump and bent tube assem-
bly from the body of the crimper. Do not remove the adapter (6-6 CTX-S) from the cylinder. This adapter
will be used, with an orientation change, with the Air Over Hydraulic Pump.
2. Screw (or reorient) the 6-6 CTX-S adapter into the cylinder port and tighten until the fitting is facing in
the upward direction. Do not loosen the adapter to reach the correct orientation as this may cause leak-
age.
3. Apply appropriate thread sealant to taper pipe thread of 6-2 CTX-S adapter and screw into pump (2-3
turns) so that the fitting (male JIC connection) is facing the direction of the fill cap.
4. Mount the pump 025399 to the right side of the crimper as shown in the image to the left using two 1/4”
bolt holes on the top of the crimper. Note that only the top two bolt holes are used.
5. Attach the 025349 bent tube assembly to the two adapters. The longer of the two ends of the tube will
attach to the pump. Tighten the nuts of bent tube to a minimum of 20 ft.-lbs or 2-1/2 Flats from Wrench
Resistance.
6. MiniKrimp is ready for operation. Reference the Enerpac pump manual for operating
instructions.
Minikrimp Air Over Hydraulic Pump Upgrade Kit 025411
Description Individual
Part Number
Air over Hydraulic Pump 25399
Stainless Steel Tube Connector 25349
Adapter 6-6 CTXS-PFD
Adapter 6-2 CTXS-PFD
Refer to Catalog 4300 of the Parker Tube Fittings Division
for Detail Assembly Instructions for the CTX Port
Adapters referenced in Steps 2 and 3.
Parker Hannifin Corporation | Parflex Division | Ravenna, Ohio | parker.com/pfd 5Accessories
MiniKrimp
Upright Vise Mount Part No. 015307
Material - High Strength Steel
Mount connects to the bottom of the MiniKrimp using (4) 3/8-16 18-8 SS SHCS 2.5" long
bolts (not included)
Once connected, the MiniKrimp can be clamped into a vise for operation
Side Vise Mount Part No. 015736
Material - High Strength Steel
Mount connects to the side of the MiniKrimp using (4) 1/4-20 18-8 SS SHCS
1" long bolts (not included)
Once connected, the MiniKrimp can be clamped into a vise for operation
Table Mount Part No. 015306
Material - High Strength Steel
Mount connects to the bottom of the MiniKrimp using (4) 3/8-16 18-8 SS SHCS
2.5" long bolts (not included)
Once connected, the MiniKrimp can be mounted to a table using the (4) 3/8” clearance holes
on the opposite side of the plate (bolts not included)
High Pressure Hose Assembly Part No. 045234
Parker 10,000 psi, 1/4” ID hose assembly with bend restrictors and 3000 series quick
disconnects (PN - 2022N0101060404-36BR with 3050-2/3010-2 coupler and nipple)
Designed to be used when mounting a hand pump (015301) to the MiniKrimp stand
(94C-MKS) base
High Pressure Hose Assembly Part No. 015309
Parker 10,000 psi, 1/4” I.D. hose assembly with 3/8” female JIC connections and bend
restrictors on both ends (PN - 2022N0606060604-72BR)
Used when a flexible connection is required between the MiniKrimp and a hydraulic
pressure source
Folding Stand Part No.94C-MKS (compatible with all models)
Lightweight folding stand designed exclusively for the MiniKrimp portable crimper
Fold up design is easy to store
Mounting hardware and safety instructions are included
Patented design
6 Parker Hannifin Corporation | Parflex Division | Ravenna, Ohio | parker.com/pfdAccessories
MiniKrimp
Hand Pump Replacement Connector Part No. 015308
Replacement stainless-steel bent tube rigid connector
For use with 94C-001-PFD (MiniKrimp Hand Pump Model)
Air Over Hydraulic Replacement Connector Part No. 025349
Replacement stainless-steel bent tube rigid connector
For use with 94C-002-PFD (MiniKrimp Air Over Hydraulic Model)
MiniKrimp with Hand Pump Hand Pump MiniKrimp
Note: The hydraulic connectors
shown on these pages are
designed exclusively for use
with the MiniKrimp. No other
connectors are approved for
use with the MiniKrimp without
expressed written consent
from Parker Parflex Division’s
technical support. Any worn
connectors should be replaced
immediately.
Air Over Hydraulic MiniKrimp
and Folding Stand
Parker Hannifin Corporation | Parflex Division | Ravenna, Ohio | parker.com/pfd 7Minikrimp Model Details
MiniKrimp Hand Pump
Hand Pump Model Details & Part List
Part No. Description Qty.
015301 2 Speed Light Weight Hand Pump 1
015302 Hardened Steel Sleeve 1
015303 Custom Cylinder 1
015304 Aluminum Frame 1
015305 Cup Pusher 1 PART # 015301
015306 Bent Tube Assembly 1 MOUNTS WITH
015310 3/8" x 3/8" Shoulder Bolt 1 PART # 015304 4-015412
015415 Spring Plunger 1 2-015413
6 CTX-S 3/8" 37° to 1/4" NPT Elbow 1 2-015414
6-6 CTX-S 3/8" 37° to 3/8" NPT Elbow 1
822011 Die Separator 1
PART #
822012 Spring 1 6-6 CTX-S
822031 Retention Ring 1
82C-R01-PFD Silver Die Ring 1
015411 3/8-16 18-8 SS SHCS 2.5" Long 2
015413 1/4-20 18-8 SS Lock Washer 2
015414 1/4-20 18-8 SS Flat Washer 2 PART #
015308
015412 1/4-20 18-8 SS SHCS .75" Long 4
PART # 6 CTX-S
PART # 015303
MOUNTS WITH
2-015411 PART # 015415
PART # 015310 PART # 015305
PART # 82C-R01-PFD
PART # 015302
PART # 822011
PART # 822012 PART # 822031
MiniKrimp™ Serial Number
8 Parker Hannifin Corporation | Parflex Division | Ravenna, Ohio | parker.com/pfdMinikrimp Model Details
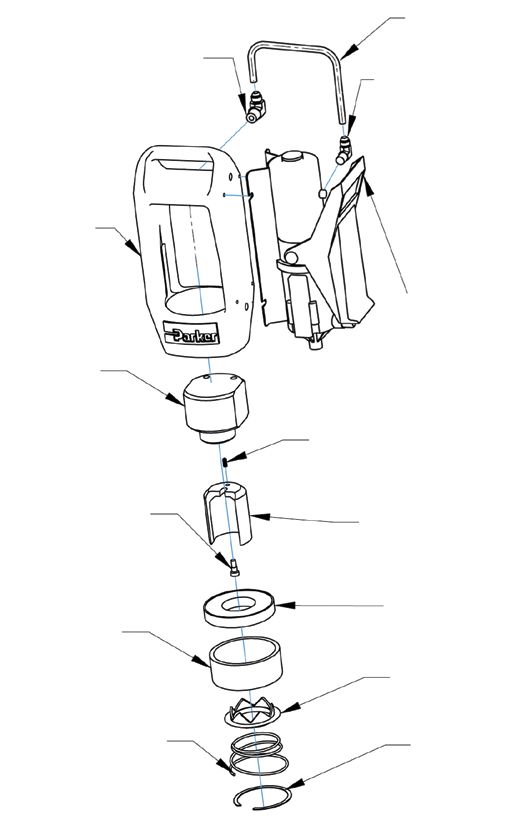
MiniKrimp Air Over Hydraulic
PART # 025349
PART # 6-6 CTX-S
PART # 6-2 CTX-S
Hand Pump Model Details & Part List
Part No. Description Qty.
015302 Hardened Steel Sleeve 1
015303 Custom Cylinder 1
015304 Aluminum Frame 1
PART # 015304
015305 Cup Pusher 1
015310 3/8" x 3/8" Shoulder Bolt 1
015415 Spring Plunger 1
6-2 CTX-S 3/8" 37° to 1/8" NPT Elbow 1
6-6 CTX-S 3/8" 37° to 3/8" NPT Elbow 1
822011 Die Separator 1
PART # 025399 822012 Spring 1
MOUNTS WITH 822031 Retention Ring 1
PART # 015303 2-015412 82C-R01-PFD Silver Die Ring 1
MOUNTS WITH 2-015413 015411 3/8-16 18-8 SS SHCS 2.5" Long 2
2-015411 2-015414 015413 1/4-20 18-8 SS Lock Washer 2
015414 1/4-20 18-8 SS Flat Washer 2
PART # 015415 015412 1/4-20 18-8 SS SHCS .75" Long 2
025349 Bent Tube Assembly 1
025399 Air Powered Pump 1
PART # 015310
PART # 015305
PART # 82C-R01-PFD
PART # 015302
PART # 822011
PART # 822012 PART # 822031
MiniKrimp™ Serial Number
Parker Hannifin Corporation | Parflex Division | Ravenna, Ohio | parker.com/pfd 9MiniKrimp Fitting Assembly Procedures
Permanent Crimp Series 56
1
Inspection
Hose – Visually inspect both Fittings – Verify fitting series
ends of hose for square cut. corresponds to the selected
Remove any burrs, loose fibers hose. Visually inspect fitting(s)
or wires. for a through-hole, threads and
damage.
2
Assembly Prep
Insertion Depth – Mark hose Lubrication (as required) – Using an
end with proper insertion SAE 20 weight lubricating oil, lightly
depth line. Shown is a 56 lubricate inside of hose end.
Series fitting. See Hose Fitting
Insertion Values, pg. E-10 Warning Do not use lubricating oil
for insertion depths of fitting when installing fittings on hose used
series that do not incorporate in breathing air systems.
an insertion depth. When installing fittings on hose used
in breathing air systems, lubricate
with a non-oil based soap solution as
failure to do so may result in
personal injury.
3
Assembly
Assemble Hose – Push hose Using Parker VBS or VBL (vise
into fitting all the way to depth blocks) and a rubber mallet,
insertion mark. tap fitting onto hose until bot-
tom of fitting shell is aligned
If fitting does not readily slide with depth insertion mark.
onto hose, perform the next
step.
4 5
Die Selection Lubricate Bowl
Select proper Parkrimp die set. Remove pusher from
shoulder bolt.
Reference Crimp Die
Selection at Crimpsource Using a premium, quality,
online. lithium-based grease, apply
www.parker.com/crimpsource a thin layer of grease on
bowl of crimper baseplate.
10 Parker Hannifin Corporation | Parflex Division | Ravenna, Ohio | parker.com/pfdMiniKrimp Fitting Assembly Procedures
Permanent Crimp Series 56
6
Die and Spacer Ring
Crimp Die – Place die set into Die Ring – Place applicable die ring on
bowl. top of crimp die. Position die ring so it
is centered on the crimp die. Parflex
utilizes the Silver die ring (8XC-R01)
Replace pusher onto shoulder with limited exception.
bolt. Reference proper tooling (crimp die and
die ring) at Crimpsource on-line. www.
parker.com/crimpsource
7
Crimp
Assemble Hose – Insert hose While holding hose and fitting in posi-
and fitting from bottom of tion on die step, crimp fitting onto hose
crimper and up through die until die ring contacts base plate.
set. Position fitting so bottom Parkalign® Feature
of fitting skirt rests on die step Note - Pump on crimper must not ex-
(PARKALIGN® feature). ceed the rated pressure of the crimper
being used. Parker Hannifin will not
accept responsibility for the operation
of or provide warranty coverage for
a crimper that is operated by a power
unit other than equipment supplied
by Parker Hannifin for the express
purpose of operating
Warning Keep fingers and hands
away from die-pusher area. Failure to
do so may result in personal injury.
8
Measure & Inspect
Measure and verify hose Measure crimp diameter of each fitting
assembly length. at the top, middle and bottom of the
crimp shell. Take measurements at a
Inspect insertion depth mark minimum of three (3) places around the
at fitting ends. Insertion mark shell circumference.
must be visible but not exceed
1/8" from end of crimped fit- Crimp acceptance is based on the
ting shell. middle measurement average with a
maximum taper of 0.010" between the
top and bottom crimp averages. No
single measurement outside the specifi-
cation is permissible.
Parker Hannifin Corporation | Parflex Division | Ravenna, Ohio | parker.com/pfd 11Troubleshooting
Parflex MiniKrimp
If you have a problem with your MiniKrimp Portable Crimping Machine:
First, check that the proper tooling, hose and fitting combinations are being used. Then check the
following recommendations. If the following suggestions do not remedy the problem, call the Parflex
Technical Service Department at 330.296.2871.
Symptoms Possible Causes What to Do
Incorrect fitting crimp diameter Wrong fitting style being used.
Refer to Parker hose manufacturer’s catalog and/or CrimpSource Online. www.
Wrong die ring being used.
parker.com/crimpsource
Pusher is not bottomed out on die Lubricate die cavity with Factran EP-2 lithium grease, Dow Corning GN assembly
ring and base plate completely. paste, or equivalent to prevent dies from sticking in bowl. Bottom out the pusher
on the die ring completely. Also check for proper bottoming by placing a piece of
paper between die ring and base plate. If properly bottomed, you should not be
able to remove paper.
Low on oil. Refill oil reservoir to 1/2” from top of opening with ENERPAC recommended oil.
Do not overfill.
Crimp dies, die rings damaged, Visually inspect all wear surfaces for raised metal dents or gouges. Replace
worn, or faulty. damaged or worn die sets and die rings.
Lubricate the die cavity in the base plate frequently with Factran EP-2 lithium
grease, Dow Corning GN assembly paste, or equivalent to prevent wear.
Die cavity in base plate If all crimp diameters are out of specification by the same amount, the die cavity
worn, or faulty. in the base plate may be out of specification. Contact Parflex Technical Service
Dept. at 330.296.2871 for repair.
Lubricate the die cavity in base plate frequently with Factran EP-2 lithium grease,
Dow Corning GN assembly paste, or equivalent to prevent wear.
Insufficient air pressure If pump does not operate properly, it may have lost its prime. Follow the proce-
Air inlet pressure at the dure below to prime your pump, if necessary.
pump must be 60–100 psi
(9 CFM recommended) 1. Fill pump with ENERPAC hydraulic oil, if necessary.
2. Place pump on horizontal surface.
3. Set air supply pressure to 30 – 40 psi (2.1 – 2.7 bar)
4. Move pump treadle to RELEASE position.
5. Depress the button under the treadle to activate
the pump. Operate pump in RELEASE position
momentarily several times to allow oil to flow back
into pump and fill passage ways.
6. To verify that pump is primed, operate as normal with cylinder
attached. If cylinder does not advance, repeat step 5.
If pump does not deliver oil, contact Parflex Technical Services Department.
Hand pump, air/hydraulic pump,
electric pump, pump hose Contact: Technical Services Department, Parker Hannifin Corporation, Parflex
assembly, quick disconnect Division at 330.296.2871 - Fax: 330.296.8433.
problems
12 Parker Hannifin Corporation | Parflex Division | Ravenna, Ohio | parker.com/pfdFrequently Asked Questions
Parflex MiniKrimp
Where is the serial number located on my MiniKrimp machine?
The first place to look is on the top surface of the Hardened Steel
Sleeve (Part # 015302).
No disassembly is required but you may need to remove the Die Ring
and Die to read it.
MiniKrimp™ Serial Number
Where do I purchase replacement parts and components for my MiniKrimp machine?
Not all MiniKrimp parts and components are sold by Parflex Division for field repair. All questions about
replacement parts and components (excluding the Enerpac parts listed below) should be directed to
the Technical Services Department of the Parflex Division. For details regarding Accessories, Trouble
Shooting, Warranty Policy and Safety Guide refer to the MiniKrimp Technical Manual (Bul. 4660-MKD).
Where do I purchase Enerpac Replacement Oil for my MiniKrimp machine?
The Parker Parflex Division does not offer Enerpac Replacement Oil as one of our products. Refer to
the chart below for ordering options:
Supplier 1 Quart Part # 1 Gallon Part # Contact Number Website
Enerpac HF-100 HF101 1-800-558-0530 www.enerpac.com
Grainger 3KD75 3KD76 1-888-361-8649 www.grainger.com
Note: In order to comply with the Enerpac warranty policy Enerpac Replacement Oil must be used in all
Enerpac Products.
Who do I contact for quality or warranty repairs?
For warranty or repairs on any of the components listed below, please contact A&A Hydraulics, the pre-
ferred authorized Enerpac Service Center, at (216)362-4000.
MiniKrimp Model Component Description Parflex Part # Enerpac Part #
Cylinder 015303 RSM301U001
94C-001-PFD
Hand Pump 015301 P142
Cylinder 015303 RSM301U001
94C-002-PFD
Air/Hydraulic Pump 025399 025399
For warranty or repairs on any other MiniKrimp parts or components please contact the Quality Control
Department of the Parker Parflex Division to request an Authorization to Return (ATR) number.
Parker Hannifin Corporation | Parflex Division | Ravenna, Ohio | parker.com/pfd 13ENERPAC Warranty Policy
For those ENERPAC items sold as part of the Parker Parflex Division
product offering, the following warranty applies.
ENERPAC products are warranted to be free of defects in The remedy of repair, replacement or refund is cus-
materials and workmanship under normal use for as long tomer's exclusive remedy in the event of breach of this
as they are owned by the original purchaser, subject to warranty.
the exclusions and limitations described below. This war-
ranty does not cover ordinary wear and tear, overload-
SELLER SHALL NOT BE SUBJECT TO AND DISCLAIMS:
ing, alterations, (including repairs or attempted repairs
by parties other than ENERPAC or its authorized service
representatives), improper fluid, use in a manner for (a) ANY OTHER OBLIGATIONS OR LIABILITIES
which they are not intended or use which is contrary to ARISING OUT OF BREACH OF CONTRACT
instructions for the products. OR OF WARRANTY,
THIS WARRANTY IS LIMITED TO NEW PRODUCTS SOLD (b) ANY OBLIGATIONS WHATSOEVER ARISING FROM
THROUGH ENERPAC AUTHORIZED DISTRIBUTORS, TORT CLAIMS (INCLUDING NEGLIGENCE AND
ORIGINAL EQUIPMENT MANUFACTURERS OR OTHER STRICT LIABILITY) OR ARISING UNDER THEORIES
DESIGNATED CHANNELS OF DISTRIBUTION. NO AGENT, OR LAW WITH RESPECT TO PRODUCTS SOLD
EMPLOYEE, OR OTHER REPRESENTATIVE OF ENERPAC OR SERVICES RENDERED BY SELLER OR ANY
HAS THE AUTHORITY TO IN ANY WAY CHANGE OR UNDERTAKINGS, ACTS OR OMISSIONS RELATING
AMEND THIS WARRANTY. THERETO, AND
Electronic products and components are warranted (c) ALL CONSEQUENTIAL, INCIDENTAL AND
against defects in material and workmanship for a CONTINGENT DAMAGES WHATSOEVER.
period of two years from the date of purchase.
ENERPAC’s liability in all cases is limited to, and shall
The following items supplied with ENERPAC not exceed, the purchase price paid.
products are excluded from this warranty:
Components not manufactured by ENERPAC, For the nearest authorized ENERPAC SERVICE
including air motors, electric motors, gasoline CENTER, please call ENERPAC at 1-800-558-0530 or
engines, and diesel engines. Such items are visit the ENERPAC web site at www.Enerpac.com.
warranted to the extent of the warranty provided
by the manufacturers of such items.
If the customer believes a product is defective,
the product must be delivered, or shipped freight
prepaid, to the nearest ENERPAC Authorized
Service Center. The customer should contact
ENERPAC to locate and Authorized Service Center
in the customer's area.
Products that do not conform to this warranty will be
returned by ground transportation, freight prepaid.
THE FOREGOING WARRANT IS EXCLUSIVE AND IS IN
LIEU OF ALL OTHER EXPRESS AND IMPLIED WARRAN-
TIES, INCLUDING BUT NOT LIMITED TO THE IMPLIED
WARRANTIES OF MERCHANTABILITY AND FITNESS FOR
A PARTICULAR PURPOSE.
14 Parker Hannifin Corporation | Parflex Division | Ravenna, Ohio | parker.com/pfdNotes
Parker Hannifin Corporation | Parflex Division | Ravenna, Ohio | parker.com/pfd 15CERTIFIED
ISO 9001
Accredited by the Dutch Council
for Certification for certification
and registration activities.
© 2007-2022 Parker Hannifin Corporation BUL. 4660-MKD 2/2022
Parker Hannifin Corporation
Parflex Division
1300 North Freedom St.
Ravenna, OH 44266
phone (330) 296 2871
fax (330) 296 8433
www.parker.com/parflexYou can also read