Module 2 Introduction to tools, the grooming room and your set up
←
→
Page content transcription
If your browser does not render page correctly, please read the page content below
Module 6

                  Module 2
   Introduction to tools, the grooming room
               and your set up

©Creedons College 2014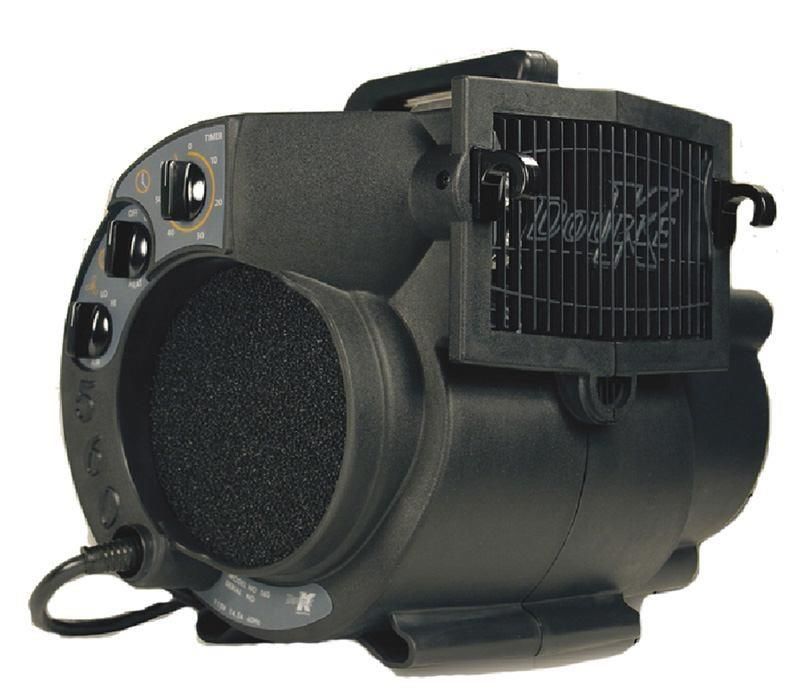
Module 6

                                      Welcome!
This module will introduce you to all the different types of dog grooming tools, and boy
there's a lot of them!

It's vital to understand the correct use of each tool before going forward, as well as be
able to recognise each piece of equipment when it is presented to you.

We also recommend that, if you intend on becoming a professional dog groomer, you
begin putting together your own collection of grooming tools, more realistically tools such
as those that you can use on your own dog(s) for practice.

©Creedons College 2014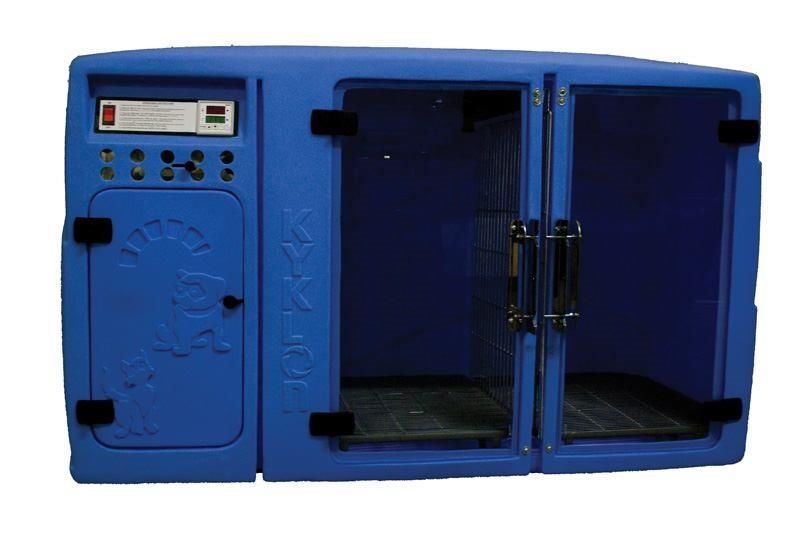
Module 6

                               Stainless Steel Bath

Description

The stainless steel bath is the common go-to bath for many grooming parlours, though
many other durable baths are coming on stream to give this bath a run for its money.

There are many different varieties, some with steps, some without, some with built in H-
frames (the bar across the top to attach the dog restraint to) some without, and some
with built in showers, some without.

Stainless steel baths come with a smooth base so it is important to install grip in the
base of the bath to give the dogs a comfortable holding.

The legs of many stainless steel baths are adjustable to allow some flexibility when
establishing the height of the bath.

Stainless steel baths have a flat base so it is a good tip to adjust the legs with the leg
furthest from the drain very slightly higher to ensure water runs out of the bath so that
the dogs aren't sitting in stagnant water.

Use

The stainless steel bath is used when washing dogs. Those with steps can also be used
for large dogs that cannot be lifted.

The stainless steel bath is also used as a safe holding area for dogs undergoing flea
treatment, as many flea treatments require to remain on the dog for several minutes.

©Creedons College 2014
Module 6

Your stainless steel bath can also be used as a holding area when using a blaster drier
(high power drier) to blast off heavy water as it will keep a lot of the water in the bath,
where it can run down the drain instead of all over your floors.

Caution

Never ever leave a dog unsupervised in the bath. Ensure your bath is disinfected
between dogs, and inspect regularly for wear and tear.

©Creedons College 2014
Module 6

                         Stainless Steel Hydraulic Bath

Description

These baths would be very similar to our standard stainless steel baths, though with on
obvious difference. These baths raise and drop in height, usually adjusting between 35-
70cm.

The benefits of this are pretty clear, by lowering the bath, a large dog can easily walk in,
and you can then wash that dog at a comfortable height, instead of having to strain your
back by reaching high, or bend down low to wash a smaller dog.

Use

Similar to the use of a standard bath.

Caution

It is not advisable to adjust the height of the bath once the dog is already in the bath
unless this dog is familiar with this experience.

©Creedons College 2014
Module 6

                                      Spa Baths

Description

Spa baths are a new feature to the grooming parlour. They are similar to human Jacuzzi
baths, where the dog is submerged in water to shoulder height and bubbles relax
muscles. There are usually warm water options.

This new approach to bathing can have both positive and negative effects. Dogs that do
not enjoy the jet of water from a shower head, along with the noise that comes with, will
benefit from being submerged in water during washing. However, the bubbles and rapid
movement of the bath water can distress some dogs.

Use

Use when bathing dogs. Some will wash and rinse the dog prior to using the spa bath,
and simply use it as a luxury relaxing experience, while other groomers will add
shampoo to the dog while submerged in water, then empty and refill the bath to rinse.

Caution

Many dogs will react in a fearful manner in this bath so take care to slowly introduce
any new dog to a spa bath.

©Creedons College 2014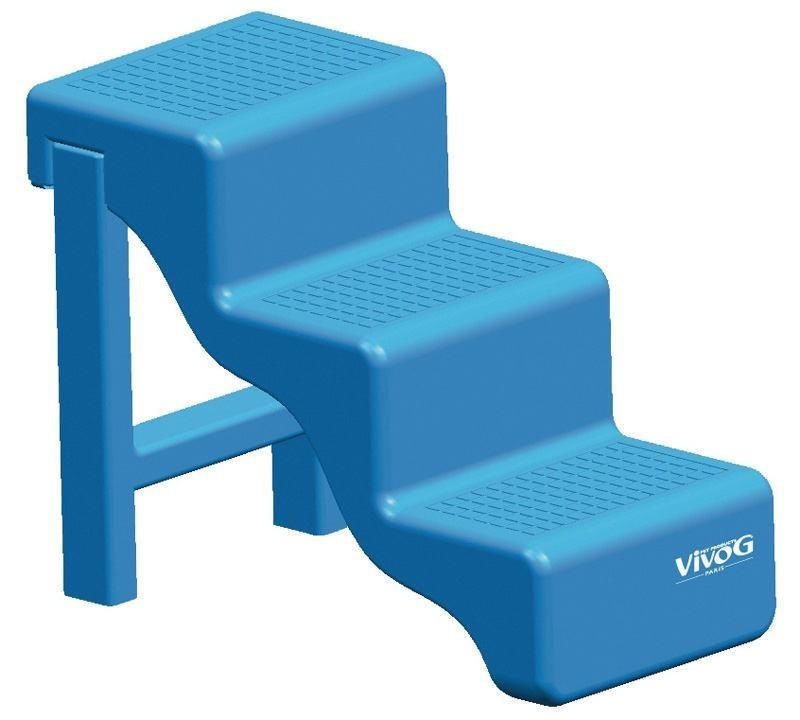
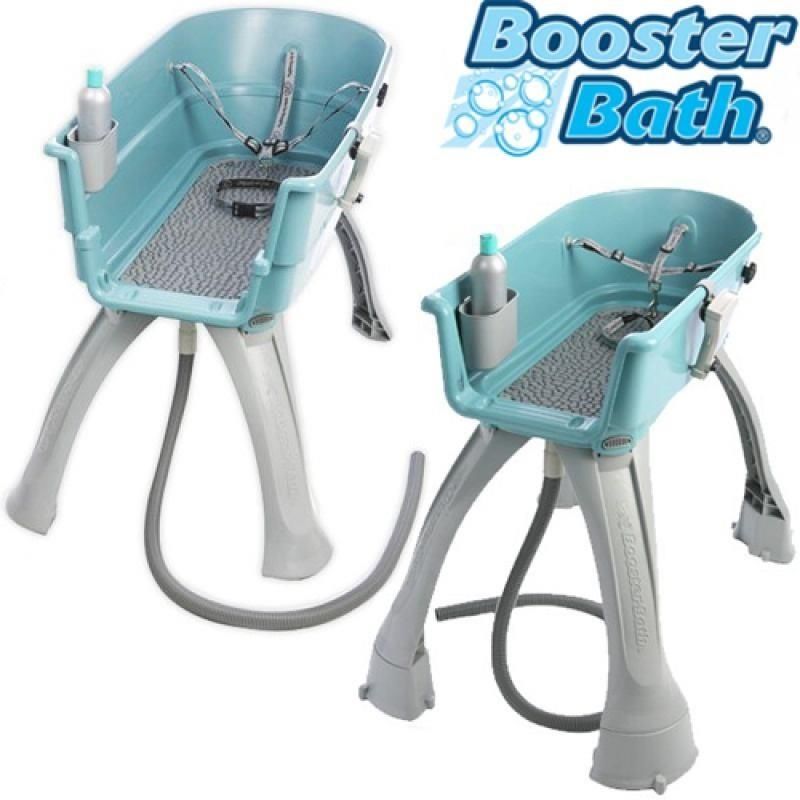
Module 6

                                    Booster Bath

Description

Booster Baths were originally designed for at-home grooming for pet dogs, but their
durability and relatively low cost has made them a popular addition to any grooming
room.

Booster Baths some as a standard bath, though are available in mini and extra-large.
Add on's can be purchased, such as steps or a ramp to allow the dog to walk up into the
bath, and height boosters so that the bath height can be increased to facilitate more
comfortable grooming.

Use

Used as a standard bath. The booster bath cannot be used with a H-frame to attach the
dog to. It does come with an internal harness for the dog, though, as it is not very
durable, a tip would be to set the bath up beside a wall and have hooks secured to the
wall that can act as an anchor for restraint.

Caution

The booster bath has very low walls which can encourage some dogs to attempt to jump
out, and wet, soapy dogs can be slippy, so the use of a secure anchor is a must with the
booster bath.

©Creedons College 2014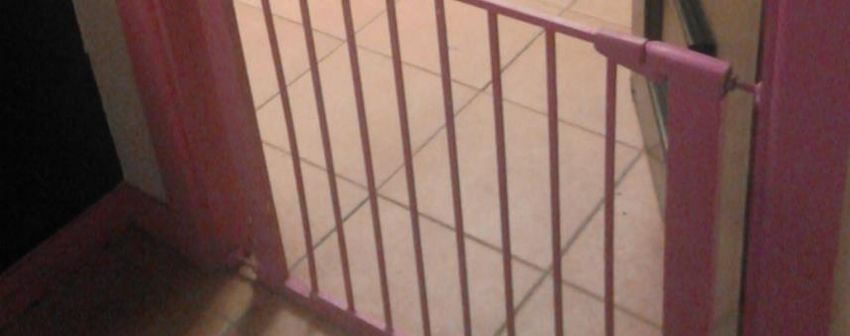
Module 6

                                  Grooming Steps

Description

Steps, or ramps, are available to buy for a grooming parlour for the dogs to use. They are
usually plastic, as wood could rot quite quickly in this damp environment. They will
usually have a high quality grip to avoid slipping.

Use

Steps or ramps can be used to assist large dogs into baths or onto tables. They are also
useful for any dog that does not like to be lifted.

Some nervous dogs benefit greatly from having choice, and using a tasty treat as a
'carrot on a stick' to encourage such dogs onto high surfaces will help you gain this dogs
trust.

Caution

You must ensure that you remain close to the dog when using steps to avoid falling. It is
recommended that you place steps against the wall so that as the dog walks up, you only
need to block one side to avoid the dog from jumping off or falling which could cause
injury.

©Creedons College 2014
Module 6

                                     Puppy Bath

Description

Small basin-like bath. Usually there is no drainage hole. Usually made of durable
plastic.

Use

Often small dogs or puppies are groomed in puppy baths as it is less frightening, and is
more flexible. It can be used on top of a grooming table, in the garden, or inside in a
standard larger bath.

This is a relatively inexpensive addition to the grooming room to make the grooming of
such smallies more enjoyable and less intimidating for the dog.

Caution

This bath is made of light plastic. Allowing the dog climb on the edges risks the dog
toppling the bath over, both frightening the dog and flooding your grooming room.

As always, the dog must always be fully supervised while in the bath.

©Creedons College 2014
Module 6

                               Rubber Bath Brush

Description

A rubber durable tangle-free brush. Many different types available.

Use

Use during bath to ensure the dog is thoroughly shampooed all over. This brush will help
to distribute the shampoo or conditioner throughout the whole body.
Rubber brushes also help to remove large quantities of loose hair during the bathing
process.

Caution

Ensure you clean brushes thoroughly between uses. Always ensure you have fully
inspected the dogs coat and skin before using any brush to avoid sensitive areas.

©Creedons College 2014
Module 6
Canine Shower Cap
Description
Adjustable plastic shield to keep shampoo and water out of the dogs face. The face can
then be washed with a cloth or sponge.
Use
Attach securely around the dogs head and chin. This shield will keep most of the water
out of the dogs face, though you still need to take care that you don't aim the jet of water
at the dogs face.
Caution
Take care when attaching the shield for the first time as some dogs may not feel
comfortable wearing such an item.
©Creedons College 2014Module 6
Bath Grip
Description
Grip device for base of bath made of rubber, plastic or steel.
Use
This is to provide the dog with some grip for comfort. Also, the raised nature of the grip
device allows the water to drain without the dog sitting in the water.
Caution
Personal tip from experience - take care when selecting a grip device. A steel grid which
came with a professional dog grooming bath purchased had gaps large enough to allow a
dogs toe slip between the grids. Once the dog twisted it could not get it's toe out and
panicked. The dog was ok but this could have caused a much more serious injury so we
would recommend you select a rubber flexible grip mat over the steel or hard plastic
option.
©Creedons College 2014Module 6
Mixing Bottle
Description
A bottle with measurements to ensure you mix the right quantity of product : water.
Use
Initially determine the ratio of product to water. Almost all products, even from the same
line, have different mixing quantities so it is important to get the right concentration.
Tip - when using a mixing bottle, always add the water before the product. If you add the
product first, the water will simply cause the product to bubble and you will be unable to
get enough water into the bottle due to lather filling the bottle.
Caution
Take care when purchasing, in the past we have purchased such bottles and the
measurements rubbed off immediately when wet. Measuring in a measuring jug and
pouring into a sports bottle may be a cheaper alternative.
©Creedons College 2014Module 6
Bath Restraint
Description
Also called dog noose or bath choker, though bath restraint sounds less murderous.
Use
A restraint is a vital safety device in modern grooming, though I have heard of two cases
of faulty restraints killing dogs, so it is vital that you use a restraint correctly.
There are many types of restraints, nylon nooses, rubber loop nooses, plastic nooses and
so on. It's important not to select a noose that tightens when the dog struggles (like the
one in the picture) as this noose is likely to injure a panicking dog.
©Creedons College 2014Module 6 A restraint can be gently looped around the dog’s neck, and also could be used around the dog’s waist if you are restraining the dog from both ends, and more often than not, once the dog realises that they cannot move, they will not move. Should the dog panic or become distressed in the bath you must remove the restraint and release the dog immediately? Many restraints have a buckle at the top that you attach to a H-frame, or a hook secured to the wall. The strength of the buckle and H-frame / wall hook must be able to take the dogs strength. Caution You must always always always have a scissors to hand when using a restraint on the dog. Should that dog become tangled, whether the restraint has malfunctioned and tightened, or the restraint has gotten caught in the dog, you need to be able to free that dog instantly before it panics. ©Creedons College 2014
Module 6

                                         Blaster

Description

A blaster is a heavy duty machine that pumps out high volumes of air through a narrow
nozzle.

Some can be used with warm as well as cool air. The volume of air can almost always be
adjusted.

Use

The blaster is used post-towel drying a dog to get a lot of the heavy bulk of water off the
coat.

Caution

As always with using warm air do not allow the air flow to blow on one area for longer
than 2-3 seconds.

©Creedons College 2014
Module 6
Cabinet Drier
Description
A cabinet drier is similar to a solid crate with a wind machine. These cabinet driers can
usually have adjustable timers, temperatures, and wind speed controls. They usually
have a grid at the base so that the dog is not sitting in water. They have a secure door so
that the dog cannot exit.
Use
Cabinet driers are used in busy grooming parlours to save time and minimise the
physically taxing chore of drying the dog. A dog that is nervous of having the drier in its
face may be less anxious inside the cabinet, though a dog that is nervous of being crated
may become more anxious.
Caution
Dogs die in cabinet driers. It happens quite a bit. Dogs can overheat quite quickly, even
though the temperature is low. If a dog is panting, it should not be in a cabinet drier. If
the dog is lying too close to the fan, it should not be in the cabinet drier.
It goes without saying that a dog should never ever be unsupervised while in the drier,
and by that I mean that you should watch that dog for a 10second period every 2
minutes to assess their well-being.
©Creedons College 2014Module 6
Cage Drier
Description
A motor fan that attached to a crate. The temperature and speed can be controlled, and a
timer can be set to ensure the drier doesn't run indefinitely.
The air comes through a wider opening than a typical opening.
Use
The cage drier can be attached to a crate and is very beneficial for dogs that are nervous
of standard hand held driers. It’s important to get the bulky water off the dog first,
either through towel drying, allowing the dog shake, or blasting the water off the dog.
It is important that the opening of the cage drier is not too close to the dog’s skin as the
dog can overheat quite quickly.
Caution
The crate you use this cage drier on must be carefully selected. It would be the
recommendation of this college that you never use a cage crier on a crate with solid steel
edges as it can become a very hot environment very quickly.
©Creedons College 2014Module 6
Handheld Drier
Description
A handheld drier, similar to a human hair drier.
Use
This handheld drier is useful to use on the dog’s face, and as a final finishing dry or to
dry slightly damp areas on long haired dog without using a powerful drier which may
disrupt the entire coat.
Caution
As always, this item blows hot air so ensure the flow is not focused on one area for more
than 2-3 seconds before moving away.
©Creedons College 2014Module 6
Finishing Drier
Description
Stand-alone drier which blows warm air. There is a fixed arm attached to direct the
airflow.
Use
The finishing drier is used once the bulk of hair has been removed. It is used to complete
the dry while the groomers hands are free to fluff dry the coat.
Caution
As always, manage air flow.
©Creedons College 2014Module 6
Adjustable Table
Description
Grooming table where the height can be adjusted, normally between 21 - 100cm. Some
can also be adjusted with a foot pump, though this often leads to jerky movement. The
more expensive tables are adjusted either hydraulically or electrically.
Use
The adjustable table can be lowered to allow a large dog walk on to the table, and then
raised to a height which makes grooming physically comfortable.
The table can be adjusted to cater for dogs of all sizes without taxing the groomers back.
The adjustable table is also used to heighten and lower the same dog during grooming to
make it easier to groom the top and the bottom of the dog.
Caution
Initially avoid adjusting the table with the dog on it until they are comfortable with this.
To help make them comfortable with this offer the dog treats or a stuffed kong while
moving the table so they pair the sensation of the table moving with getting treats.
©Creedons College 2014Module 6
Trolley Tables
Description
This is a grooming table which is easily transported - usually used in showing as it is
easy to transport and pop up to groom while preparing to go into the ring.
Use
This table could be used as a grooming room table, though it is unlikely to be as durable
as your heavy duty table.
Caution
Ensure the table has been set up correctly each time after opening before you put the dog
on the table.
©Creedons College 2014Module 6
Standard Table
Description
There are many types of standard dog grooming tables, as well as many sizes. Almost all
have stainless steel legs and a rubber surface.
Use
The standard table is used to put the dog on when drying, brushing and clipping.
Caution
Ensure you are aware of the maximum weight instructions when using a table.
©Creedons College 2014Module 6
Holding Frame
Description
Holding frames can be H-bar, long arm, or short arm frames. H-bar frames would be by
far the sturdiest.
Use
Holding frames are used to attach the restraint to when securing the dog in place.
Caution
Whenever using a restraint for a dog, have a scissors to hand so that you can cut the
restraint should the dog become distressed.
©Creedons College 2014Module 6
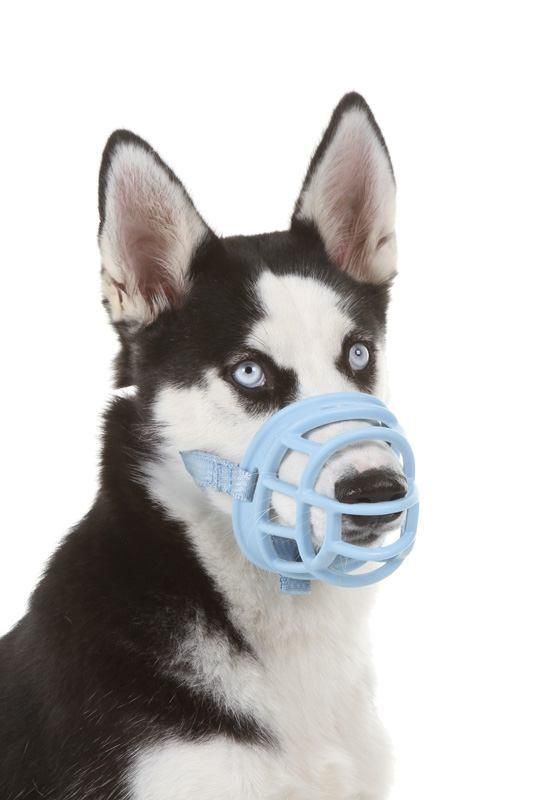
Muzzle
Description
A facial shield to stop the dog from being able to bite the groomer.
Use
Muzzles are used when there is a threat that the dog may bite. They usually have a
fastener, either belt like or buckle, that close at the back of the dog’s head.
Caution
Creedons College strongly object to any fabric muzzle that does not allow the dog to pant.
These muzzles can kill a dog in a grooming room, as a stressed dog that cannot panic will
overheat in a very short time.
We do not recommend muzzling dogs excessively as in most cases a muzzle is not
necessary.
We believe that any dog biting in a grooming room is doing so out of fear. If the dog is
trying to bite, that dog is so afraid they feel they need to 'save their lives', we would
recommend not grooming that dog but instead referring to a dog trainer for behaviour
work first.
©Creedons College 2014Module 6
The only dog we recommend muzzling are dogs that either calm down and allow
grooming calmly when muzzled or the dog that is happy to be groomed for most
processes, but, for example, snap if you snag at a mat.
Grooming Stool
Description
Similar to a hairdresser’s stool, a comfortable, adjustable stool on wheels to fly around
the dog when grooming, and save standing all day.
Use
Use your stool as often as you can. You will find that you may forget to use the tool quite
often, but it's important to remember to use the stool as much as you can as dog
grooming can be very physically demanding.
Caution
Ensure you are aware of where your stool is at all times so you do not trip over it.
©Creedons College 2014Module 6
Grooming Trolley
Description
Storage for your grooming equipment.
Use
Having your grooming trolley within reach at all times will eliminate the need to leave
your grooming station, and save time from taking dogs off the table to go and grab a
forgotten brush.
Caution
Ensure you return your sharp items back in to the trolley so that the dog doesn't stand
on a sharp brush or scissors.
©Creedons College 2014Module 6
Slicker Brush
This brush usually has a handle with grip, and a soft rectangular or triangular pad with
very thin pins emerging.
These pins are curved on the top.
The slicker comes in a variety of sizes and pin types. Some slickers have very soft flexible
pins to use on sensitive puppy coats, some have firmer pins to use on thick coats.
Some slicker brushes have plastic pins which would again be for a softer coat.
Use
The slicker is used for brushing a matt free coat both pre- and post-bath. The slicker will
separate the hairs and help make the coat look smooth and healthy.
The slicker will only snag on matts so this is why the slicker is used after de-matting.
Caution
The pins on the slicker can be quite sharp. Never leave a slicker brush with pins facing
upward on a grooming table or near a dog as if a dog were to stand on the slicker it
would be quite painful.
Take extreme care when using a clicker, it cannot be used roughly or with pressure on a
dog. Slicker burn is an injury that can arise if you brush excessively or with a lot of
pressure, where the dogs skin becomes raw and scratched from the use of the slicker.
Always first use the slicker brush on your own arm to realise how much pressure you can
/ cannot use on the dog.
©Creedons College 2014Module 6
Pin Brush
Description
Plastic or wooden brush with soft pad and many metal or hard plastic vertical pins.
Use
Used for separating hairs on longer coated dogs after bathing and drying, before
presenting the dog.
Caution
Do not use on matts or with a lot of pressure.
©Creedons College 2014Module 6
Boar Brush
Description
Wooden or plastic brush with clusters of very stiff
Use
Used to bring up shine on short to medium length coats. Can also be used to remove dead
hair from the coat.
Caution
Do not apply excessive pressure.
©Creedons College 2014Module 6
Palm Pad
Description
Flexible pin type brush often with a strap over the back to hold the palm pad in your
palm.
Usually rubber base and short steel or plastic pins.
Use
Used on dog pre-bath to remove dead hair and dirt. used in bath to thoroughly distribute
product and get through thick coat. Used post bath to tidy coat.
Caution
Do not use with excessive force. Ensure the palm pad is rinsed and dried thoroughly post
bath (we use the blaster to dry) to avoid rusting.
©Creedons College 2014Module 6
Rake
Description
Plastic or wooden. Teeth can be plastic. Variety of teeth distances. Some have a
combination of short and long teeth.
Use
Used to remove dead hair and dirt pre-bath, distribute product in bath, and separate and
tidy coat post bath.
Caution
Ensure dried thoroughly post bath. Do not use on matts. Do not use with excessive force.
©Creedons College 2014Module 6
Combs
Description
Almost always stainless steel. Different tooth distances for fine / coarse coats. Different
handle types for personal preference.
Use
Used to tidy and separate hairs, usually when scissoring and styling the coat.
Caution
Sharp. Do not use on skin with force. Take care around eyes.
©Creedons College 2014Module 6
Coat King
Description
Wooden or plastic handle on steel head. Different widths. Curved sharp steel plates.
Sharp edge hidden in curve.
Use
Used to remove dead hair and break hair without obvious lines. The sharp edge will cut
hair subtly when the dogs coat is brushed with the coat king.
Great on wiry coats or thinning out bulky coats.
Caution
Take care to avoid removing too much hair.
©Creedons College 2014Module 6
Matt Breaker
Description
Plastic or wooden handle. Similar to coat king as there are many metal plates with very
sharp edges on the inside curve.
Use
Used to break matts into small removable pieces. Held close to the matt and the matt is
fed through the sharp edges to cut the matt while keeping as much of the hair as
possible.
Caution
The internal edges are dangerously sharp, and with many matts it is difficult to identify
what is skin and what is hair. You must take time to ensure you are only using the matt
breaker on hair as you can do serious damage if you cut skin.
©Creedons College 2014Module 6
Dematting Comb
Description
Similar to matt breaker as the long teeth are jagged and sharp.
Use
use similar to the matt breaker. The benefit of the dematting comb is the length of the
teeth. By keeping the smooth underside against the skin, in many matts you can get the
teeth in under the matt against the skin, then in side to side movements slowly break
through the matt.
Caution
Again, this tool is super sharp. Do not cut yourself or your canine client. This should
never be left on the grooming table.
©Creedons College 2014Module 6
Matt Splitter
Description
Very small hand held tool Rubber grip area for your fingers. Long sharp pointy plastic
tooth. Razor sharp blade in curve as seen above.
Use
Similar to our other dematting tools, though this is your go to tool for very big matts. The
matt splitter will break a giant matt into smaller, easier to deal with pieces.
Like the dematting comb, the matt splitter uses the long plastic tooth to get in under the
matt, then the razor blade will do the splitting.
Caution
Take GREAT care to only ever bring the matt splitter away from the dog’s body,
perpendicular to the skin. Often matts pull skin out of normal position so please take
great care to ensure you are only splitting hair and not skin as this will slice through
skin with ease.
Take care when handling this tool, yourself and do not leave loose in a drawer where it
could cut someone unsuspectingly.
©Creedons College 2014Module 6
Shedding Blade / De-Shedder
Description
Plastic or wooden handle. Stainless steel looped blade. Zigzag little teeth on the blade.
Usually one side has finer teeth than the other.
Use
Used on short and smooth coats, such as a Labrador. Removes dead hair without
damaging or removing healthy hair.
Caution
Use with very light pressure as these tools are sharp, especially when brand new.
©Creedons College 2014Module 6
Scissors Nail Clippers
Description
Usually grip handle. Two sharp blades like a scissors. Groove to position nail in. Often
have a nail stopper - a metal flap that is placed to the front of the nail to ensure the paw
doesn't move and too much nail is cut.
Different sizes available for different size nails.
Use
Place the tip of the dogs nails in the scissors. Apply light pressure. If the dog is
unresponsive, apply full pressure swiftly to remove nail tip.
Caution
Nail clipping is a skill. Take time to learn from a trained groomer how to clip nails safely
before attempting to do so yourself, supervised.
©Creedons College 2014Module 6
Guillotine Nail Clipper
Description
Sharp blade with loop area to place nail in. Once handles are squeezed together, the
blade will cut through the loop.
Use
Place the tip of the dogs nails in the scissors. Apply light pressure. If the dog is
unresponsive, apply full pressure swiftly to remove nail tip.
Caution
Nail clipping is a skill. Take time to learn from a trained groomer how to clip nails safely
before attempting to do so yourself, supervised.
©Creedons College 2014Module 6
Styptic Powder
Description
Sulphur based powder which clots minor bleeds quickly.
Use
If you cut the blood vessel when clipping a nail, take a pinch of styptic powder and hold
firmly against the bleed for 15 seconds. This will allow a clot to form. Keep dry and don't
allow the dog to walk about or lick the wound.
Caution
Can only be used on very minor nail nicks. Any major wounds or flesh wounds need to be
kept as clean as possible. Applying styptic powder on flesh wound can do further
damage.
©Creedons College 2014Module 6
Straight Scissors
Description
Stainless steel sharp scissors available in different lengths.
Use
Used to cut hair in a straight line when styling, for example, cutting the hair under the
belly in a straight line.
Caution
Scissors are sharp. Take extreme care on the dog. Do not leave on the grooming table or
loose in drawers
©Creedons College 2014Module 6
Safety Scissors
Description
Steel scissors, usually very short. There is a blunt rounded end.
Use
Used when cutting the hair around the eyes.
Caution
Scissors are sharp. Even though they have the rounded end, the actual blades are still
very sharp. Take extreme care on the dog. Do not leave on the grooming table or loose in
drawers
©Creedons College 2014Module 6
Thinning Scissors & Double Thinning Scissors
Description
Steel scissors. One or both blades are jagged like a comb.
Use
Used when cutting the hair where an obvious blunt straight line is not wanted. For
example, when cutting around the head the single or double thinning scissors will allow
the hair be shortened without obvious layers.
Caution
Thinning scissors are almost as sharp as standard. Take extreme care on the dog. Do not
leave on the grooming table or loose in drawers
©Creedons College 2014Module 6
Curved Scissors
Description
Scissors blades are at an angle and curved.
Use
When cutting the hair, you get a curved cut instead of a straight one. Used for example
when cutting the hair on the tail of a Retriever to leave a smooth angle, or when cutting
the jaw line into a West Highland to leave an angled smooth cut.
Caution
Scissors are sharp. Take extreme care on the dog. Do not leave on the grooming table or
loose in drawers
©Creedons College 2014Module 6
Grooming Clippers
Description
This clipper is used to clip (we do not say cut) the dogs coat. Clippers are available in
plug in or cordless forms. The cordless means that the cable will not get in your way,
though the plug in option ensures you never lose power.
Use
The clippers have adjustable clipper blade heads. The clippers are held flat against the
dog’s coat and moved in the direction of the coat growth.
Caution
Of course the clippers are very sharp and could cut the skin so take great care when
clipping the coat.
Also ensure you inspect the cord and plug regularly to inspect for wear and tear to avoid
electrical burns. Keep away from water at all times.
©Creedons College 2014Module 6
Clipper Blades
Description
Blades come in a variety of forms, some with a narrow surface area for clipping small
areas, some come with jagged teeth to get through denser coats, some come with a fine
finish to leave coat smooth.
Use
The blade is selected then attached to the clippers. The clippers are run through the coat
to remove hair. Different lengths of hair can be left depending on length of clipper blade
chosen.
Caution
It needs to be checked regularly for temperature as they can over heat quickly and cause
clipper burn.
©Creedons College 2014Module 6
Medicated Ear Powder
Description
A hygienic powder that is used to put a light sprinkle of powder on any hair growing in
the ear canal
Use
Place a coat of powder into the ear. The hair can then be gripped and plucked out of the
ear with ease.
Caution
Do not put too much powder in the ear as it could clog it. Allow the dog to shake out
excess powder.
©Creedons College 2014Module 6
Ear Wash
Description
Clean hygienic fluid to dislodge built up ear wax and dirt.
Use
Pour several drops into the ear canal and massage to loosen particles. Allow the dog to
shake their head to move deep down dirt then use a large cotton bud to remove
remaining dirt.
Caution
Do not use on sore, inflamed, red or cracked ears.
©Creedons College 2014Module 6
Designing a Parlour
Setting up a dog grooming parlour is more than moving a few tables and chairs around.
There are so many aspects that need to be considered, most importantly the health and
safety of the groomer, staff, and customers both human and canine.
So, when you picture your ideal grooming parlour, what do you see? There are so many
aspects to designing and setting up your parlour that you may not have thought of so
let’s get thinking!
First and foremost, double door. Most dogs will dislike the grooming experience and will
attempt to escape at any opportunity. The very last thing you want to do is lose a
customer’s dog so any entrance or exit point must have multiple doors or gates that a dog
must get through without leaving.
It goes without saying that of course these doors must always be closed behind a person,
but failing to provide these buffers in the first place is asking for trouble.
Ideally you would like a small space between buffers to ensure that a person can enter
and close one door before opening the next.
There are two more doors to come through prior to meeting this door and two gates
©Creedons College 2014Module 6 Next we want to look at windows. The same rules apply when it comes to opening windows. There must be some sort of prevention in place to ensure a dog cannot get through an open window. Perhaps child safe equipment will prevent the window from being opened wide enough, or maybe there are cage bars on the outside of the windows. A stressed dog is likely to find a way out even when you think that window is too high, or the gap is too small, so take care. Even if your parlour is up flights of stairs, that dog won't think of the drop when panicking. It is vital that the window glass is durable and strong so that the paw, or head! of a large Great Dane will not smash the glass and cause injury and escape. Non-slip flooring is an absolute must in the grooming parlour. Lifting a heavy dog across a slippy floor is a recipe for disaster and as your floor is likely to be wet 90% of the day, and slippy tiles or vinyl flooring would be a health and safely nightmare. Non-slip bathroom tiles, or specialist commercial kitchen flooring is an investment worth making - and avoid solid colours as they will just show up the hair! Power sockets. Speaking of wetness! Your power sockets should be set up as outdoor sockets with covers to avoid them getting wet. All sockets should be located 3-4 feet above the floor to ensure any dogs on the floor do not tamper with these sockets, or even worse, pee in them! When thinking about moisture, it is important to protect your walls. Drywall will soak up moisture quite quickly and soon you will begin to see mould in your lovely new parlour. Tiles, or PVC cladding a minimum of 3foot up your walls will protect them from the moisture and will be easy to wipe clean. ©Creedons College 2014
Module 6

When positioning your bath and table, ideally they should be immediately beside each
other so when carrying a wet dog, you do not have to cross a large area. This will
decrease your chance of slipping or dropping the dog.
Your equipment storage shelves or drawers should also be near to your table.
Preparation will ensure you don't need to leave your table once your dog is on it, but
having equipment to hand will avoid having to take the dog off the table every time you
need a piece of equipment you have forgotten about.

Your grooming parlour is likely to become very warm during busy days especially with
blasters and driers on the go. Also, there will be a high likelihood of strong odours, from
shampoos, smelly dogs and without fail an indoor pooper.
Ensure that your parlour has great ventilation, ideally with a window on either side of
the room to allow for a draught. Again, ensure these windows are covered with bars to
prevent inmate escape.

Your tables should be placed against a flat wall to minimise the likelihood of the dog
attempting to jump off the table.

Dog cages are an essential element to a parlour to ensure that dogs are safe when they
inevitably show up early or their owner is late for collection. However, the positioning of
these crates or holding areas is critical. You want the dogs to remain in view so that if
they become distressed you will see this, but it's also vital that the experience is as stress
free as possible and that the dogs are not face to face, or cage to cage with another dog.

Even dogs from the same household can turn on each other so it's important that your
crates are dispersed throughout the parlour, and that you never ever ever crate two dogs
together, even from the same household.

You should have comfortable adjustable stools available while grooming, but it is also
important to have anti fatigue mats at areas you are likely to be standing for long

©Creedons College 2014
Module 6

periods of time. These will help to protect your feet and back as grooming can be a
physically demanding task.

Ideally you should have a reception area. You may wish to sell stock, or want to keep
human customers out of your working parlour area. A high solid counter will ensure an
element of division and discourage loose dogs from jumping over into the reception area.
If you do have a reception area, ensure that it is cleaned several times per day to remove
flying hair that lands.

Your parlour will need to be very well lit to ensure high visibility and also have many
light sources to avoid dark areas or shadows that limit your visibility while clipping.

©Creedons College 2014
Module 6

                         A)

                         B)

                         C)

©Creedons College 2014
Module 6
D)
E)
F)
©Creedons College 2014Module 6
G)
H)
I)
©Creedons College 2014You can also read