ONBASE GUIDE - UNITY FORM - SHARING FOR PUBLIC USE (PORTAL)
←
→
Page content transcription
If your browser does not render page correctly, please read the page content below
OnBase Guide - Unity Form - Sharing
      for Public Use (Portal)
Goal: To share a Unity Form such that department and
campus users can access and fill out the form from
within the portal (or after using portal authentication).
The portal authentication can then provide information
to fill form fields.
Complexity Level: Departmental Administrative
Users, Departmental Unity Form Developers

                         4/28/2021
Table of Contents
Background ............................................................................................................... 3
Prerequisites.............................................................................................................. 3
Unity Form Integrations: Pre-filling keywords from the PeopleSoft portal .................. 3
Adding an Auto-fill to your Unity Form ..................................................................... 14
Creating the URL ..................................................................................................... 16
In the OnBase Configuration Client ......................................................................... 20
Testing ..................................................................................................................... 22

                                                                                                                              2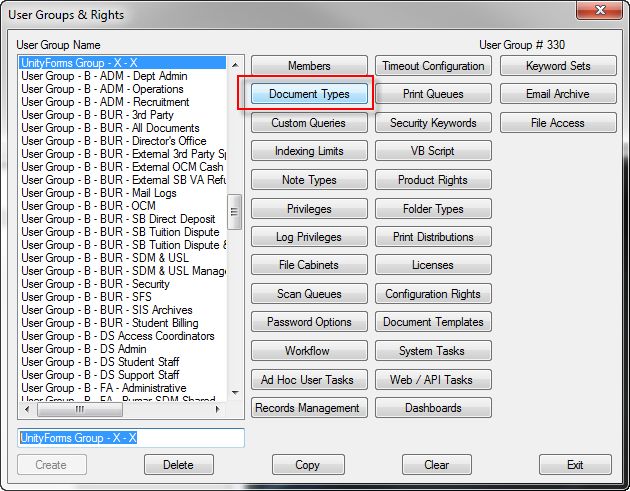
Background
Unity forms can be accessed and utilized from within the OnBase Unity and web
clients, but they can also be “shared” such that users outside of OnBase can fill
them out as well. Below are the steps to setup that external use case.

Prerequisites
The Unity client must be installed and your user account must be in the Functional -
Developer - Unity Forms user group. If you do not see the Forms Designer menu
option, please contact one of the OnBase Certified Department Administrators to
grant that access.

The document type used to store the Unity form must already be created in
Configuration, with any desired keyword types assigned to the document type, prior
to creating the Unity form template.

The Unity form template must be created, tested, published and ready for public use
before the integration or URL are created. This guide does not cover creation of
Unity Forms. Please refer to the Unity Client MRG and various Unity Form training
videos, including Unity Forms: Introduction (34 mins). Contact
UIS_DM_Support@cu.edu for assistance.

Unity Form Integrations: Pre-filling keywords from the
PeopleSoft portal
Once you have created the Unity Form, you can create the “Integrations” for the
form that will allow certain keyword values to be filled in by the PeopleSoft portal (or
any other Identity management system that can authenticate users and process
JavaScript code).

Please keep in mind that you will need to create the integration BEFORE you create
the share URL, as the integration will add additional fields that need to be populated
on the Share URL screen.

Additionally, at this time, you will only be able to pull in one of the following fields for
pre-population from portal data:
          a. Employee ID
          b. Student ID

To automatically fill the name and DOB data based on the Employee ID or Student
ID, you will need to add an auto-fill to the form.

                                                                                           3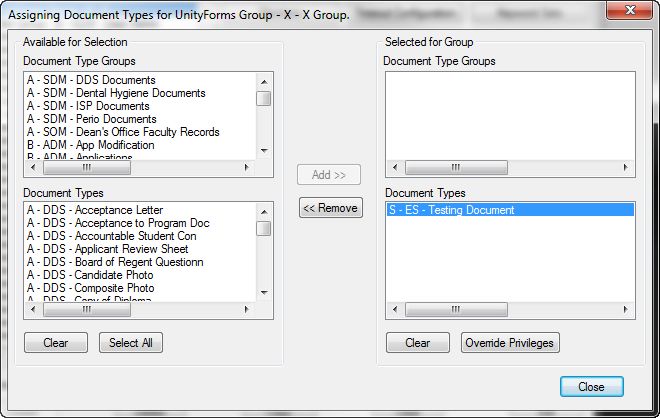
We strongly recommend using the following naming convention on the form fields so
that the portal teams will have consistent coding to implement. You can change the
form field names without modifying anything else of the form.

       EmployeeID_pre
       StudentID_pre

This is configured as the ID for the field element in the Properties panel:

You will also need to mark those fields as Read-Only by checking the box in the
Properties panel.

If any value that is being pre-filled on the form exceeds the maximum character
length for the form field/keyword type, this will cause the integration to fail.

Please keep in mind that each portal link will have to be hand crafted/coded by the
portal team so it is important to get this correct up front. Additionally, you will need to
build the integration in all environments (DEV, TST, STG, and PRD) for the portal
team.

1. Log into the Unity client with an account that has the Functional - Developer -
   Unity Forms group permission tied to it so that you can access the Forms
   Designer.

2. Click File, go to the Administration menu option, and then select Forms
   Designer.

                                                                                          4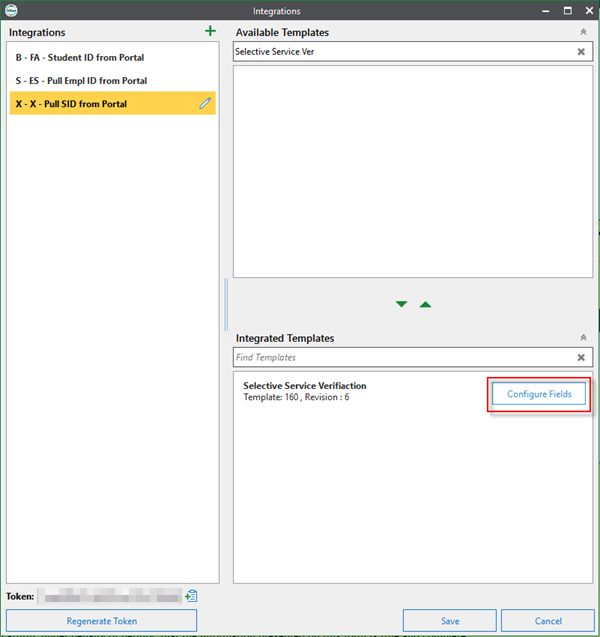
3. Open the desired template from the list. Integrations should only be created for
   “document” Unity forms (not “workflow” Unity forms).

4. Click the Integrations button on the Sharing tab of the menu.

5. A new window will open. NEVER click the Regenerate Token button at the
   bottom.

                                                                                      5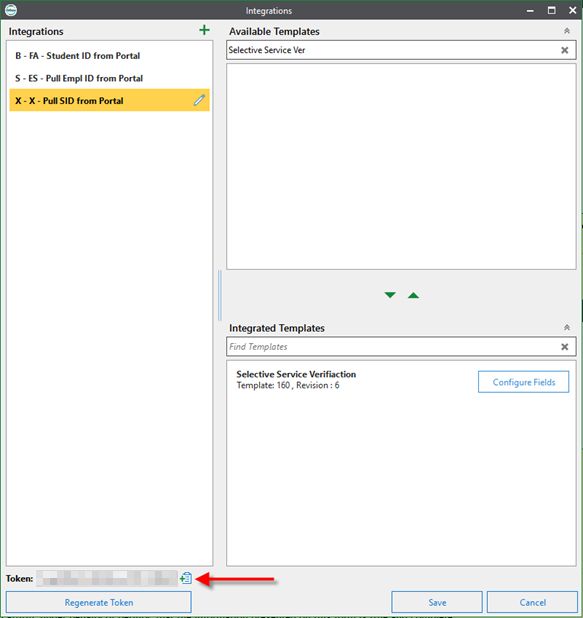
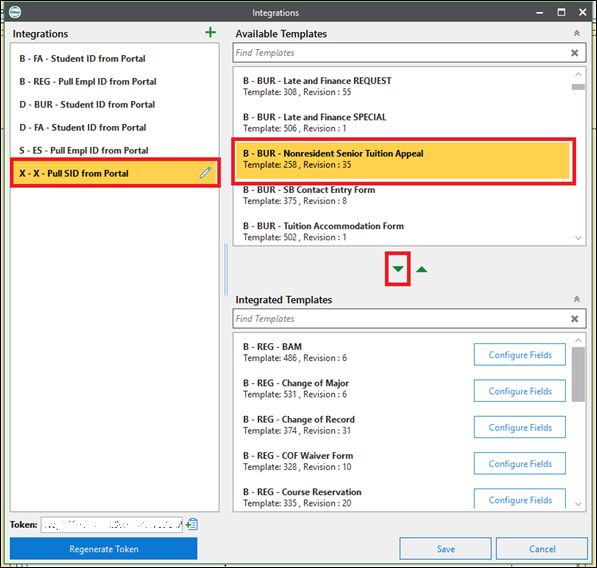
6. If an integration already exists, select it from the list at the left.

7. If the integration does not already exist, click the plus (+) button next to the
   Integrations section header.

   Click the pencil icon next to the new “Untitled Integration”. This will allow you to
   rename it as needed.

8. Locate the form template in the list of Available Templates and use the arrow
   button to move the form into the list of Integrated Templates. You can use the
   search bar above the list of available templates to narrow down the list.

                                                                                          6
9. Next to your form in the list of Integrated Templates, click the Configure Fields
button.
710. Select the field (Student ID or Employee ID) you wish to pre-populate in the
Available Form Fields column, and add it to the Pre-populated Form Fields
column by clicking the indicated right arrow.
811. Click OK on the Form Fields dialog, then click Save in the Integrations dialog.
12. Open the Integrations window again from the menu, as you did to start the
process.
913. Click the Copy Token button to copy the token. Paste the token in another place,
as you will need to give it to the portal team.
1014. Click Save.
15. Click the Share Form button on the Designer tab of the menu.
A share form dialog will appear and include a new “Integration” field.
1116. Fill out the form as described below but also check the Use Integration box and
select the integration from the drop-down menu.
1217. Provide the information below to your campus portal team by emailing
portalhelp@cu.edu. You can use the following example as a template.
Information Needed by
Example Values
Portal Team
Requesting Campus CUBLD
Requesting Office UCB Bursar
Requested Completion Date 02/28/2021
Description Change of Record Adjustment Request/Detail account
adjustments to a student bill due to retroactive enrollment
change.
• DEV: https://dm-
devunityform.dev.cu.edu/UnityForms/UnityForm.aspx?d1=AUy
csuCoekNPI3hyIzBySDFHR3IrfCntCuQwfvdXr%2fulBf2yyzrpbVlKb
RVKHBJHNrbe%2fiaBUSeKmsdwvN03TIRtcnQ%2fz0LgKwh5IlPDHj8UZ
lDJVbgucEulQeOoqw0i9VxxHJBSKzhklRwGJNx4j
• TST: https://dm-
tstunityform.qa.cu.edu/UnityForms/UnityForm.aspx?
d1=AUycsuCoekNPI3hyIzBySDFHR3IrfCntCuQwfvdXr%2fulBf2yyzr
pbVlKbRVKHBJHNrbe%2fiaBUSeKmsdwvN03TIRtcnQ%2fz0LgKwh5IlP
Share URL DHj8UZlDJVbgucEulQeOoqw0i9VxxHJBSKzhklRwGJNx4j
(DEV, TST, STG, PRD) • STG: https://dm-
stgunityform.qa.cu.edu/UnityForms/UnityForm.aspx?
d1=AUycsuCoekNPI3hyIzBySDFHR3IrfCntCuQwfvdXr%2fulBf2yyzr
pbVlKbRVKHBJHNrbe%2fiaBUSeKmsdwvN03TIRtcnQ%2fz0LgKwh5IlP
DHj8UZlDJVbgucEulQeOoqw0i9VxxHJBSKzhklRwGJNx4j
• PRD: https://dm-
unityform.prod.cu.edu/UnityForms/UnityForm.aspx?
d1=AUycsuCoekNPI3hyIzBySDFHR3IrfCntCuQwfvdXr%2fulBf2yyzr
pbVlKbRVKHBJHNrbe%2fiaBUSeKmsdwvN03TIRtcnQ%2fz0LgKwh5IlP
DHj8UZlDJVbgucEulQeOoqw0i9VxxHJBSKzhklRwGJNx4j
Token • DEV: pfGd]q*Ejycasdfas8qtgszc{sf+237huxbM?jZ7zJzbujs
(DEV, TST, STG, PRD) • TST: pfGd]q*Ejycasdfas8qtgszc{sf+237huxbM?jZ7zJzbujs
• STG: pfGd]q*Ejycasdfas8qtgszc{sf+237huxbM?jZ7zJzbujs
• PRD: pfGd]q*Ejycasdfas8qtgszc{sf+237huxbM?jZ7zJzbujs
Form Field(s) StudentID_pre
Intended Audience Students
(Students or Staff)
Needed in Portal Yes / No (only need Portal URL)
- If the Above is “Yes”
- Which Portal MyCUinfo / UCD Access / MyUCCS / System (CU Resources)
- Location in Portal Homepage name
- Name in Portal (30-character limit)
NOTE: If configuring URLs and integrations in non-production for items created
since the last refresh, these will need to be reconfigured after the next refresh from
production in order to continue to work properly.
13Adding an Auto-fill to your Unity Form
Adding an auto-fill to your form is fairly simple. This will allow for the First Name,
Middle Name, Last Name and Date of Birth values to fill based on the Student ID or
Employee ID.
1. Select the triggering field (either Student ID or Employee ID). Under the
“Field” section in the field’s properties, click the Edit button next to the
“Autofill” box.
142. Select the appropriate Autofill Keyword Set from the dropdown menu.
3. Leave the Create Autofill record on create box unchecked.
154. Click Finish.
Creating the URL
1. Log into the Unity client with an account that has the Functional - Developer -
Unity Forms group permission tied to it so that you can access the Forms
Designer.
Click File, go to the Administration menu option, and then select Forms
Designer.
2. Open the desired template from the list. Creating the share URL should only
be done for “document” Unity forms (not “workflow” Unity forms).
3. Click the Share Form button on the Designer tab of the menu.
164. A new dialog will appear with a number of fields to complete.
5. Enter the appropriate value for the current environment in the Server field.
DEV dm-devunityform.dev.cu.edu/UnityForms
TST dm-tstunityform.qa.cu.edu/UnityForms
STG dm-stgunityform.qa.cu.edu/UnityForms
PRD dm-unityform.prod.cu.edu/UnityForms
6. The Data Source field does not need to be filled out as the Web server will
handle this element.
177. Check the Use Fixed Credentials box and use these credentials for our
standard service account. These credentials will be used to log into an
OnBase account when the shared URL is used to submit the form, so that
users without an OnBase account do not need to authenticate to access the
form.
While users are logging into their portal account, they are not logging in to
their OnBase account (if they even have one). They are essentially borrowing
this account for purposes of submitting the form, while the other steps in this
guide allow their portal account to pass information to the form so we have
some idea who was logged in even though we don’t get any OnBase account
information for them.
User Name S_UNITYFORMS
Password ABCRT12394HHTS
This account will have only the most basic privileges in OnBase and will on
exist in a special group called UnityForms Group - X - X that will have the
permissions and document types tied to it.
8. Enter the desired Target URL. This is the page that will load after the form is
submitted.
You can use the following address, or another page of your choosing.
https://www.cusys.edu/EP/EPPRODSHARED/Singularity/thankyou.html
9. In most cases, the Embed Form options are not used.
1810. This is what the “Share Form” should look like when completed.
11. At the bottom of the form is a small “Copy” button next to the URL (indicated
by the arrow above). This is the URL that can be entered into a browser to
submit the form. Please save these URLs in a place you can keep track of
(such as a spreadsheet), as they are not stored in OnBase in any way.
19In the OnBase Configuration Client
If you are using the above fixed credentials, please make sure that the UnityForms
Group - X - X user group has access to the document type where the Unity form is
configured. If using other fixed credentials, the same concept applies but will need to
be adapted to grant the user account being used access to the appropriate
document type.
Not all form developers will have the permissions necessary to perform this step. If
you do not have access to User Groups/Rights in Configuration, contact your
certified departmental administrator or UIS_DM_Support@cu.edu for assistance.
1. Log into the OnBase Configuration Client.
2. Select Users then User Groups/Rights.
3. Find the UnityForms Group - X - X group and select Document Types.
204. Add the appropriate document type to the group by finding it in the “Available”
list and moving it to the “Selected” list using the Add button or double clicking.
21Testing
You will want to test this Unity Form to make sure it can be processed correctly.
Enter the URL in a browser, fill out the form, and submit it.
NOTE: Only the Production Unity Forms URI can be accessed off campus. All of the
Unity Forms URIs can be accessed on campus networks.
22You can also read