How to check your email via the Internet - For More Information, please contact: Administrative Office of the Courts Technology Help Desk (615) ...
←
→
Page content transcription
If your browser does not render page correctly, please read the page content below
GroupWise Web Access 8.0
How to check your email via the Internet

                      For More Information, please contact:
                      Administrative Office of the Courts
                      Technology Help Desk
                      (615) 532 – 9503 or (800) 448 - 7980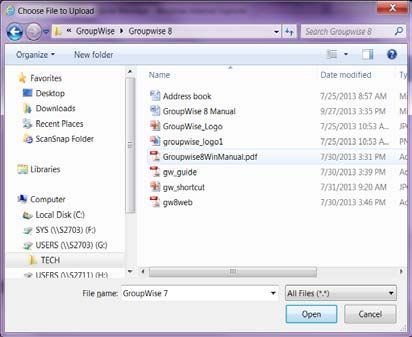
Table of Contents

Logging into GroupWise WebAccess ............................................................................................................ 3

   Logging out of your Account ..................................................................................................................... 5

Checking Your Mail ....................................................................................................................................... 5

   Deleting Messages .................................................................................................................................... 6

Composing a Message .................................................................................................................................. 6

   Message Attachments .............................................................................................................................. 8

   Account Options ........................................................................................ Error! Bookmark not defined.

                                                                             2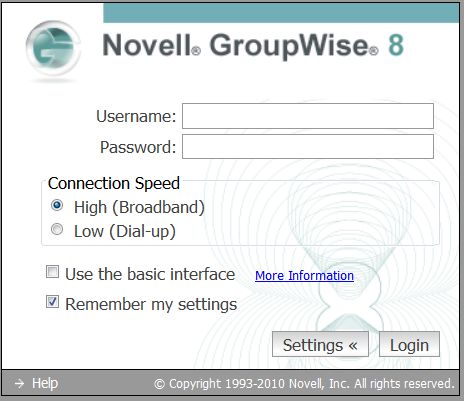
Logging into GroupWise WebAccess
You may use most browsers like Internet Explorer or Firefox. However, adjustments may need to be
made in new versions of Internet Explorer version 10+.

Proceed to the website that will allow you to login to your email account. It is from this login you will
gain access to read, write, and respond to emails as well as perform other GroupWise functions. Please
type the following address in the address bar of your browser (please note that you will have to type the
“https”:

                                https://webacc.tncourts.gov/gw/webacc

This will navigate you to the following screen:

                                                  Type the IB number here
                                                  Type your GroupWise password

                                                                                    Click Login

In the Username please type your “IB…” or “TN…”number (i.e. IB271T99) and normal GroupWise
password. The remainder selections of the Login box are optional, and may be hidden from view by
clicking on the [Settings] button. Click the [Login] button.

                                                       3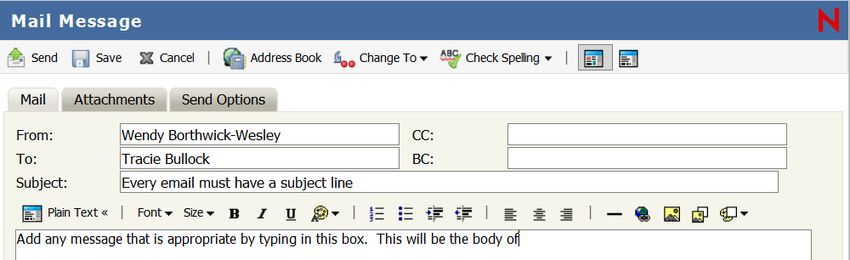
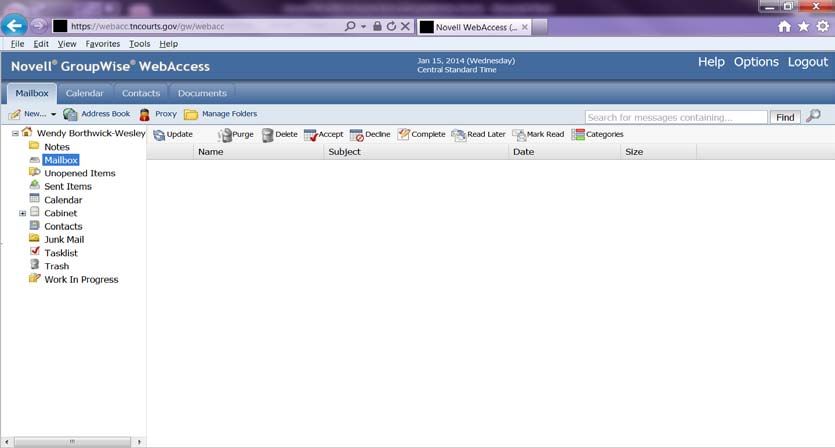
Once you have successfully logged into your account, the window should be similar to:

The main WebAccess window is very similar to the desktop version of GroupWise 8.0, and is easier to
navigate than previous versions. Please note that the folder list is available to the far left of the window:

                           This folder list allows you to view not only the mailbox items, but your
                           account’s Calendar, Work in Progress, Cabinet, and Trash. To navigate to any
                           of the objects in the folder list, merely click on the desired folder and the
                           screen will update to that location.

                           One of the more obvious changes in the environment is the addition of file
                           folder tabs located at the top portion of the screen. These are labeled:
                           Mailbox, Calendar, and Documents. You may navigate to your calendar by
                           clicking “Calendar in the folder list, or by clicking on the “file tab” labeled
calendar. Each File tab will update the screen with an appropriate toolbar for the screen just below the
tab’s name. In the example to the right, the Mailbox tab has the toolbar buttons: New, Address Book,
Proxy and Manage Folders. These options would be different if the Calendar tab was navigated to.

                                                      4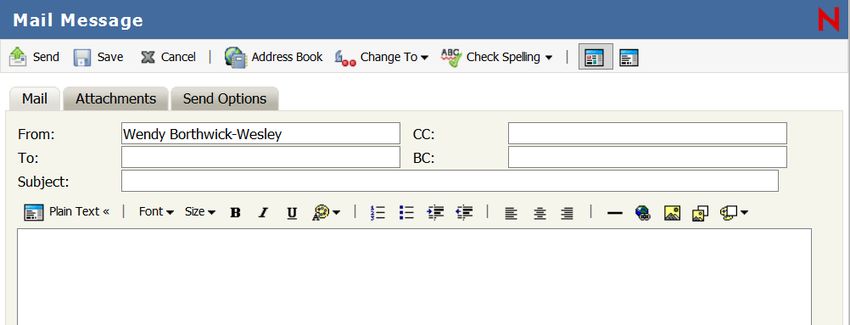
Logging out of your Account
To log out of your account click on the [Logout] option at the top right hand side of the window. This
will close the session. It is strongly advised to always Logout to close the session. This is for security
purposes.

Checking Your Mail
To view messages in your inbox, select either the Mailbox Tab or Mailbox from the folder list. Your
inbox will be shown. Some of the messages may be read, and others may be new and unread.

    •   To check for new messages, select Update or Refresh.
    •   New messages will show the envelope icon as sealed and the message will be in bold.
    •   To view (open) a message, double click on the sender’s name.

Once the email is open, you are able to:
    1. close       ,
    2. reply               ,
    3. reply all               ,
    4. forward             ,
    5. move        ,
    6. mark to read later                  ,
    7. view the next or previous email               ,

    8. delete          ,
    9. print       ,

    10. or change the view of the email to HTML or plain text               .

To view messages in a different folder, select that folder. For example, if you have a folder in your
cabinet that you would like to view: Click on the + sign next to Cabinet. This will expand your selection
to allow you to view the folders in your cabinet.

                                                         5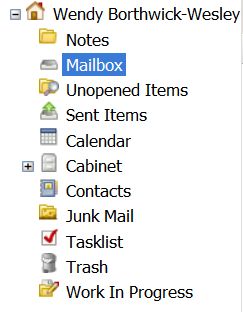
Deleting Messages
If messages are deleted from either the main Mailbox window or in the message window, they are
moved to the Trash folder. Clicking on the Trash folder in the folder list will display a list of deleted
messages. When the Trash folder becomes full, messages are permanently deleted from the trash
folder. Therefore, items that need to be kept should never be stored in the Trash folder.

Composing a Message
To compose an email message, navigate to the Mailbox tab, or click on the
Mailbox link in the Folder list. From the toolbar, click on the [New…] button.
This will open the compose message form.

You may type either type the email address into the [To], [CC], or [BC] fields or you may click on the
Address book button to look up email addresses that are stored in your GroupWise Account. The
address book web access has been given enhanced capability in this version of WebAccess. By clicking
on the Address book dropdown, you may select which address book contains the entry you are
searching for. Once the address book has been selected, you may search by first or last name, or even
department. Enter what to search for in the blank box after the “begins with” dropdown. Click the
[Search] button to begin the search.

                                                      6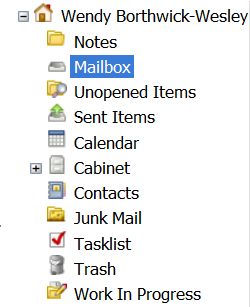
The list of entries that match the search criteria will appear in the results pane at the bottom of the
address book. Click to check the desired entries and click the appropriate field for it to appear in (To, CC
or BC). Each entry will appear in the appropriate list to the right side of the window.

You may click the red [X] to the right of any entry that needs to be deleted from the email. Once the
recipients’ lists are complete, click the [OK] button, and return to the Compose Email window. In this
window, click in the Subject line and type the subject of the email. Finally, click in the body area and
type the email message.

The top of the Compose Message window has the Check Spelling button, which comes highly
recommended before sending out any email.

Another feature allows for Send Options to be set right in the
Compose Email Window. By clicking on the tab at the top of the
window, the sender can set the priority or even have a return
receipt for same network recipients.

That completes the steps of composing the email, now you may
either Send the email by pressing the [Send] button, or [Save] the
email for further editing as needed. Once the email has been sent,
the Compose window will close. Sent emails may be referenced in
the Sent Items folder in the folder navigation pane, by clicking on
that folder.
                                                     7
Message Attachments – Opening an Attachment
If a message contains an attached file, proceed with caution. Attached files can contain viruses that
execute upon opening the file. For this reason, if you do not expect an attachment, or do not know the
person who has sent the attachment, do not open it. However, if the message and attachment are
trusted, then perform the following steps.
1. Open the message. At the top of the message, under the Subject line, the attachments line will
list the attachments by name and size.
2. Decide on whether to view, open, or save the attachment. For each attachment a decision will
need to be made.
3. Clicking the [View] button allows you to see the information in the attachment but does not
open it in another application. The downside to this is that formatting and some features may
be ‘off’. Clicking the [Open] button will allow for the correct program (i.e. Word, Excel, etc) to
open the file in a normal view. This allows for proper formatting and the option to save the file
to your computer. The [Save As] link allows for the attachment to be saved to the computer
without opening it.
4. If you select either [Open] or [Save As] the File Download dialog box will appear to verify that
downloading the document is what is correct. Click the appropriate button.
Message Attachments – Sending an Attachment
To attach a file, or files, to an email, first compose the email. From the compose email window click on
the Attachments tab.
Click on the Browse… button. This will
open the “Choose File to Upload” dialog
box.
From this box, navigate to the file that you
want to attach. Click the file one time to
select it, and then click the [Open] button
at the bottom of the dialog box.
8This will return you to the Attachments tab. Click the
Attach button and the selected file will be attached the
email.
Continue with the process if additional attachments need
to be added. If finished, then click the Mailbox tab to
return to the email. Attachments will be listed under the
Subject line.
Account Options
To view the account options click on the Options link to the right of the time zone display.
Calendar
“Publish my free/busy information” functionality is not implemented for security reasons.
Compose
The Compose tab you will be able to Enable auto save, Check spelling before sending, choose your
compose view, and enable a signature.
General
The General tab you will be able to Enable Last, First name sort order, Enable name completion and
choose whether or not you are warned about HTML external images.
Password
The Password tab allows you to change your GroupWise password.
9Proxy Access
Allows you to grant various levels of access to your email account to other GroupWise users. Please
contact the Help Desk if you would like to enable proxy access.
Rules
Rules, also known as away messages, allow a return message to be sent automatically by those who will
be away, say on vacation. Away messages answer that specific sender the first time they send an email,
if they send multiple emails only the first email will get the reply. To set an automatic reply, you will first
create a rule, then create the away message, and finally activate and deactivate it, as needed.
The Rules section will display any existing rules, check boxes for displaying which rules are currently
applied to the account, and buttons (to the right) that allow for deleting rules from the account.
When creating a new Rule, click the Create button. In the New Rule window type a name for the rule.
Next type the Subject and then a message. Click the Save button to save the Rule.
After clicking Save, you will be returned to the Rules tab. The rule that you created will have a check in
the check box. If you would like the rule to be activated immediately, and then click save to activate the
rule. If you do not want the rule to be activated immediately, uncheck the check box next to the rule.
Then click save to activate your choice.
Remember: When the box is checked the rule is activated, when the box is unchecked it is de-activated.
10Send Options
The Send Options tab is where you can change your email send options. Included are email
Classification, Priority of the message, Reply Requested, Return Notification. Changing any item will
change your send option for every e-mail that is sent.
Time Zone
On the main menu at the top of the window, the Date and time zone are located. This should reflect the
time zone that is your “home” time zone. This will not update to Pacific time if you were to travel to the
west coast. However, if the time zone displayed is not your “home” time zone for the account, it can be
updated.
To change your time zone setting, click on the Time Zone tab of the dialog box and select the correct
“home” time zone.
After setting the time zone click the Save button and then the Red [X] at the top of the window to close
the window.
This concludes the brief overview of Novell GroupWise WebAccess.
Please contact the Technology Help Desk if you need further assistance at (800) 448-7980.
11You can also read