Opsi MacOS client manual - uib gmbh
←
→
Page content transcription
If your browser does not render page correctly, please read the page content below
opsi MacOS client manual
                   uib gmbh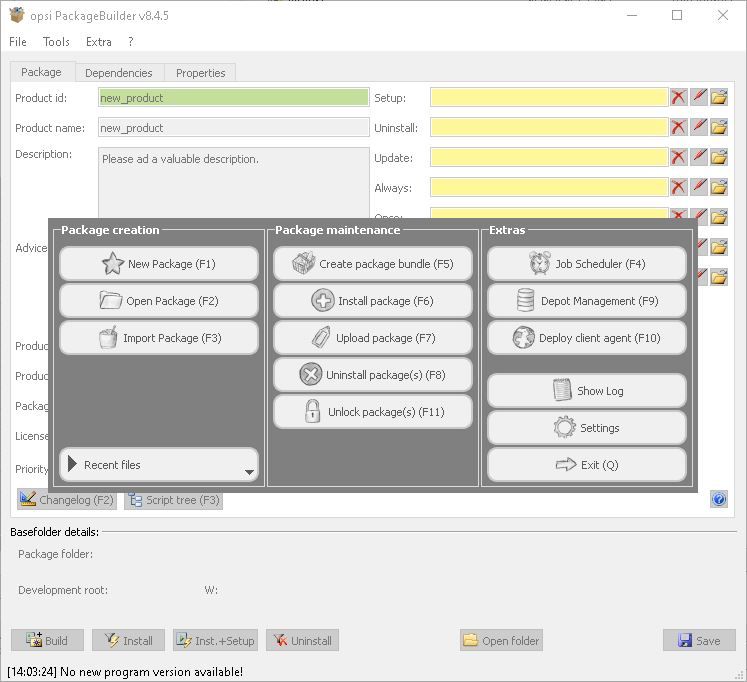
Copyright                                                                                       1 / 61

Copyright
The Copyright of this manual is held by uib gmbh in Mainz, Germany.

This manual is published under the creative commons license
'Attribution - ShareAlike' (by-sa).

A description of the license can be found here:
https://creativecommons.org/licenses/by-sa/3.0/

The legally binding text of the license can be found here:
https://creativecommons.org/licenses/by-sa/3.0/legalcode

Most parts of the opsi software is open source.
Not open source are the parts of the source code which contain new extensions, that are still under
cofunding, which have not been paid off yet. See also: opsi cofunding projects

All of the open source code is published under the AGPLv3.

The legally binding text of the AGPLv3 license can be found here: http://www.gnu.org/licenses/agpl-
3.0-standalone.html

Information about the AGPL: http://www.gnu.org/licenses/agpl-3.0.en.html

For licenses to use opsi in the context of closed source software, please contact uib gmbh.

The names 'opsi', 'opsi.org', 'open pc server integration' and the opsi logo are registered trademarks of
uib gmbh.
Introduction MacOS Clients in opsi                                                             2 / 61

Introduction MacOS Clients in opsi
This manual describes the operation of MacOS clients in opsi.

It’s assumed that the installation and startup of an {opsi server} has already been performed.

Essential topics of this manual:

1. Adding and integrating Mac computers in opsi (Installation of the opsi-mac-client-agent)

2. Deployment of opsi standard software for Mac on the opsi-server .

3. Installation of standard software on Mac clients

4. opsi standard software for Mac under opsi

5. Packaging of own software

6. Creation of opsi packages

7. Notes about Mac clients

    a. Special commands for MacOS

    b. Directories you may use

     c. The pseudo user opsisetupadmin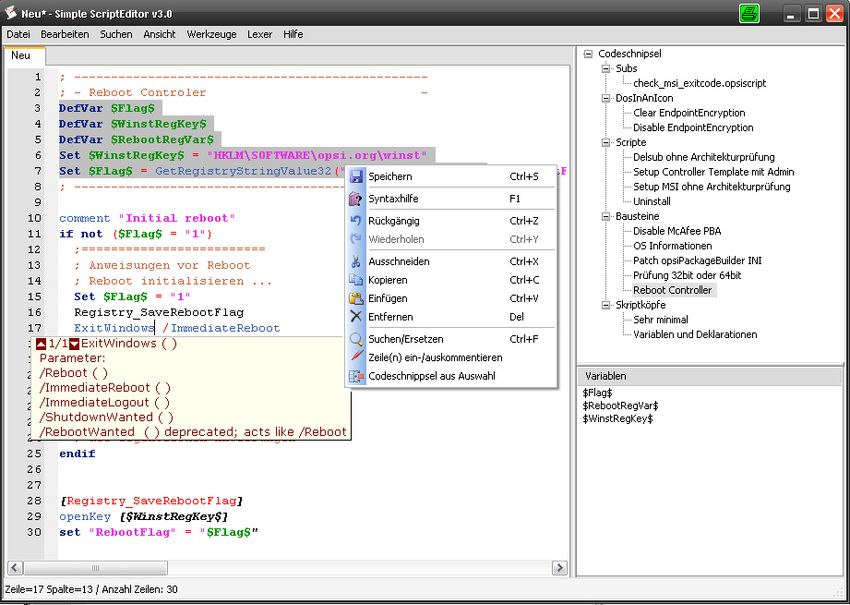
Conventions of this document                                                             3 / 61

Conventions of this document
Commands are highlighted separately:

  this is a command

As part of the installation and configuration process, you can copy and execute the commands from
these fields in order by copy & paste from this document.

This is an opsi-script code:

  Message "Installing "+ $ProductId$ +" ..."

Chapters containing the name of a particular platform are specific to that platform. The supported
platforms are:

 • Windows

 • Linux

 • MacOS
Requirements for MacOS Clients                                                                  4 / 61

Requirements for MacOS Clients
In the following the requirements for the management of MacOS clients under opsi are described.

The opsi-mac-client-agent is a co-funded opsi extension.
This means that you need an unlock file to use it. You get this unlock file when you buy the extension.
For evaluation purposes we also provide a time limited unlock file for free ( → mail to info@uib.de).
Further details can be found in
https://download.uib.de/opsi_stable/doc/html/opsi-manual/opsi-manual.html#opsi-manual-modules

Technical requirements is an opsi-server with opsi 4.1.

The supported Mac-Clients are:

 • MacOS versions from 10.13 to 11.0
   (High Sierra to Big Sur) in the intel x64 architecture

 • When using the arm64 architecture (Apple Silicon, M1), it’s currently necessary to install the opsi-
   client-agent of the 'Dynamic Binary Translators' called rosetta2. You can install this with:
   softwareupdate --install-rosetta --agree-to-license You can verify the successful installation
   with:
   pkgutil --pkgs | grep Rosetta
   com.apple.pkg.RosettaUpdateAuto.

Native support for the arm64 architecture (Apple silicon) is planned. The necessary reference devices
have been ordered for this purpose. To disclose when the deployment for this platform will take place
cannot be made at this time (January 2021).
Installing the minimal MacOS opsi products.                                                   5 / 61

Installing the minimal MacOS opsi products.
For the distribution of software with opsi ready products are available for installation. These contain
among other things the agent ('opsi-client-agent'), which must be installed for the management on
clients.

There is an automated and a manual way to perform this. The automated way is recommended.

opsi standard software for macOS under opsi.
The following products are provided by opsi for macos as standard:

 • opsi-mac-client-agent

 • swaudit

 • hwaudit

 • m-homebrew (also check: the opsi product m-homebrew

 • m-system-update

 • opsi-configed

 • opsi-logviewer

 • opsi-auto-update

 • m-javavm

Automatic installation of the minimal MacOS opsi
products.
For the automatic installation of the opsi products there is the tool opsi-package-updater, which is
configured in /etc/opsi/opsi-package-updater.conf or /etc/opsi/package-updater.repos.d/ also
automatically fetches the current packages from the opsi repository and installs them on the server.

The configuration of the opsi repositories for Mac clients can be found in the directory
/etc/opsi/package-updater.repos.d/ in the files uib-mac-testing.repo and uib-mac.repo.

If you do not have these files installed yet, you can find them under:

Activate the desired repos by setting the entry active = true in the choosen *.repo file.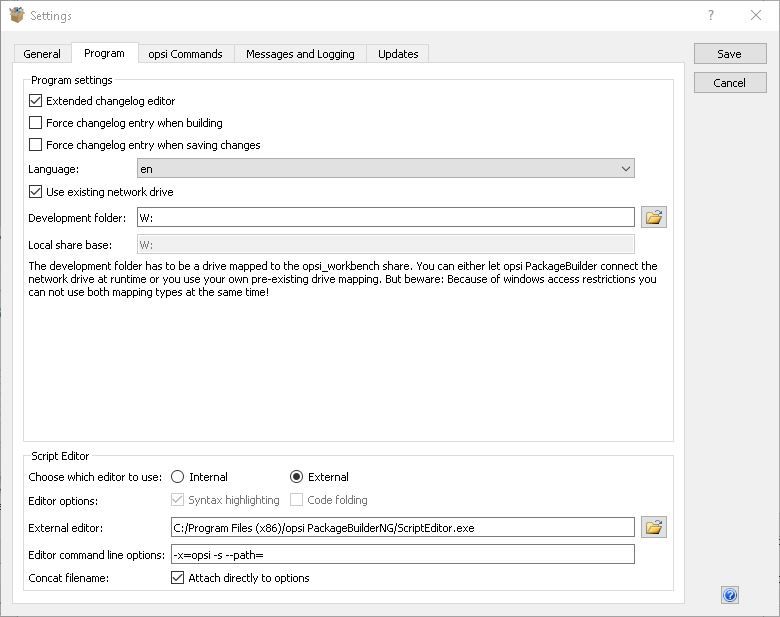
Installing the minimal MacOS opsi products.                                                  6 / 61

/etc/opsi/package-updater.repos.d/uib-mac-testing.repo

  ; This repository provides testing of opsi products to manage MacOS
  ; clients with opsi.

  [repository_uib_macos_testing]
  description = opsi macos packages in testing
  active = true
  baseUrl = http://download.uib.de
  dirs = opsi4.1/testing/packages/macos/localboot/
  autoInstall = false
  autoUpdate = true
  autoSetup = false
  ; Set Proxy handler like: http://10.10.10.1:8080
  proxy =

/etc/opsi/package-updater.repos.d/uib-mac.repo

  ; This repository provides table opsi roducts for managing MacOS
  ; clients with opsi.

  [repository_uib_macos_stable]
  description = opsi macos packages in stable
  active = true
  baseUrl = http://download.uib.de
  dirs = opsi4.1/stable/packages/macos/localboot/
  autoInstall = false
  autoUpdate = true
  autoSetup = false
  ; Set Proxy handler like: http://10.10.10.1:8080
  proxy =

Install the packages on the server by running the command as root:

  opsi-package-updater -v --repo uib_macos_stable install

or,

  opsi-package-updater -v --repo uib_macos_testing install

After a successful installation you have to reload all data on the opsi-configed to make the new
products become visible there.

If the connection has to be routed through a proxy to access the Internet, this must be entered as the
value for proxy in the .repo configuration files under /etc/opsi/package-updater.repos.d/. As of
Installing the minimal MacOS opsi products.                                                    7 / 61

version 4.1.1.33 of opsi-utils, a global proxy can be configured in /etc/opsi/opsi-package-updater.conf.

  [repository_uib_macos_stable]
  …
  proxy =

Should packages installed be updated later, this can be done with the following command:

  opsi-package-updater -v update

More information about opsi-package-updater can be found in the manual.

Manual installation of the MacOS opsi products.
Is also the possible to manually download and install the packages.

Get the latest opsi packages in the .opsi package format. You can find the packages at
https://download.uib.de/opsi4.1/stable/packages/macos/localboot       or   at   https://download.uib.de/
opsi4.1/testing/packages/macos/localboot.

We recommend saving the .opsi files to /var/lib/opsi/repository. To ensure that opsiconfd can access
the files, opsi-set-rights /var/lib/opsi/repository should be run.

After downloading, you need to install the packages on the server using the command opsi-package-
manager -i .opsi.
Integration of existing MacOS clients into opsi.                                                    8 / 61

Integration of existing MacOS clients into
opsi.
To include existing MacOS clients in opsi, the opsi-client-agent must be installed on them. This can be
performed in several ways. After you have installed the opsi-client-agent, as described below, the
client will also appear in the client list of the opsi-configed, in the case you had not already added it
there previously.

Basically, is possible to run on the client or from the server to trigger the installation of the agent.

Running the installation directly on the client is appropriate for individual machines. For a mass
deployment of the agent, the opsi-deploy-client-agent is generally more suitable. If the necessary
unlocks are available on the Mac clients.

If there is already another way to deploy software, it’s also possible to deploy the opsi-client-agent and
run the silent_setup.sh script included in the package.

Once the agent is installed, existing opsi products can be installed on these clients.

Using service_setup.sh on macOS
Using service_setup.sh on macOS (initial installation).

Due to MacOS security restrictions, the ability to run scripts from mounted shares is limited. Trying to
do the following with a share mounted via Finder to /Volumes (or similar) will therefore fail
(depending on the MacOS version).

 • Log in to the client.

 • Start the terminal program

 • For the following commands you need to replace the following placeholders:

      ◦  with your login name.

      ◦  with a directory name that does not exist yet e.g. 'mnt'.

      ◦  with a username that is known on the opsi-server.

      ◦  with the password of the . You can also omit :
        together with the mount option -N, then you will be prompt to input the password

      ◦  the name or IP number of the opsi-server.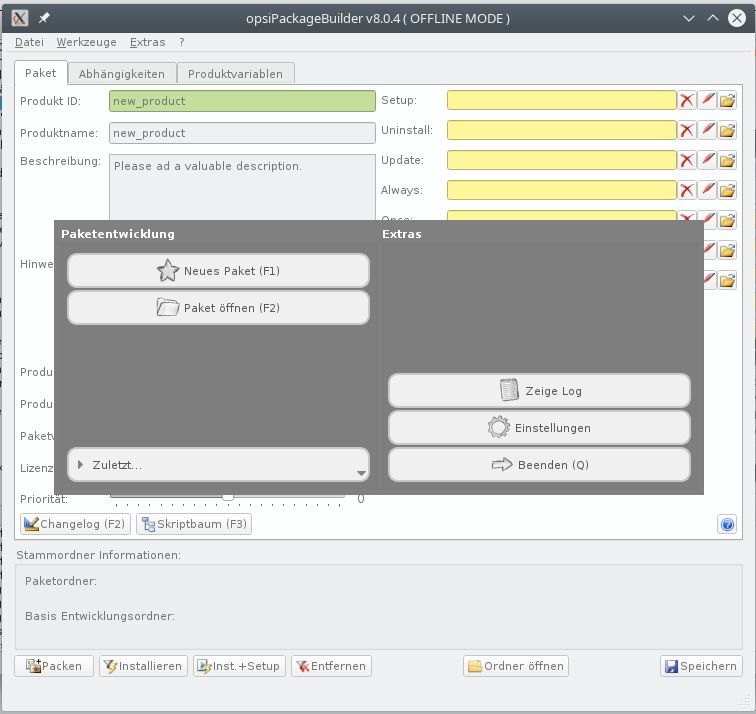
Integration of existing MacOS clients into opsi. 9 / 61 sudo su cd /Users/ mkdir mount_smbfs //@/opsi_depot /Users// cd /Users///opsi-mac-client-agent ./service_setup.sh cd umount /Users// without password query sudo su cd /Users/ mkdir mount_smbfs -N //:@/opsi_depot /Users// cd /Users///opsi-mac-client-agent ./service_setup.sh cd umount /Users// Example: sudo su cd /Users/uib mkdir mnt mount_smbfs //adminuser@sepia/opsi_depot /Users/uib/mnt cd /Users/uib/mnt/opsi-mac-client-agent ./service_setup.sh cd umount /Users/uib/mnt 1. Start from the mounted share the script opsi-mac-client-agent\service_setup.sh +. Confirm with 2 x Enter 2. The script copies the necessary files into a temporary local directory and then starts opsi-script for the actual installation. 3. The script contacts the server via opsi webservice to create the client on the server side and to find out the pckey. This is done first with the user/password combination entered in config.ini. If this fails, a login window appears with service URL (opsi-config-server), user name and password. Here is needed a user whom is a member of the group 'opsiadmin'. It is possible to also operate with a user which is only allowed to execute the method host_createOpsiClient. The client reboots after the installation.
Integration of existing MacOS clients into opsi. 10 / 61
Using service_setup.sh on macOS (repair installation).
• Log in to the client.
• Start the terminal program
• For the following commands you need to replace the following placeholders:
◦ with a username known on the opsi-server.
◦ with the password of the . You can also omit :, then
you will be asked for the password
◦ with the name or IP number of the opsi server.
• During the first installation opsi created a hidden pseudo user named opsisetupadmin, in whose
home directory /var/opsisetupadmin is also the mount directory.
sudo su
mount_smbfs -N //:@/opsi_depot
/var/opsisetupadmin/opsi_depot
cd /var/opsisetupadmin/opsi_depot/opsi-mac-client-agent
./service_setup.sh
cd
umount /var/opsisetupadmin/opsi_depot
Example:
sudo su
mount_smbfs -N //adminuser:linux123@sepia/opsi_depot /var/opsisetupadmin/opsi_depot
cd /var/opsisetupadmin/opsi_depot/opsi-mac-client-agent
./service_setup.sh
cd
umount /var/opsisetupadmin/opsi_depot
1. Start the script opsi-mac-client-agent\service_setup.sh
Confirm with 2 x Enter
2. The script copies the necessary files into a temporary local directory and then starts the opsi-script
for the actual installation.
3. The script contacts the server via opsi webservice to create the client on the server side and to
find out the pckey. This is done first with the user/password combination entered in config.ini. If
this fails, a login window appears with the corresponding service URL (opsi-config-server), user
name and password. Here is needed a user whom is a member of the group 'opsiadmin'. Is also
possible to utilize a user, which is only allowed to execute the method host_createOpsiClient.
The client needs a reboot after the installation to become active.
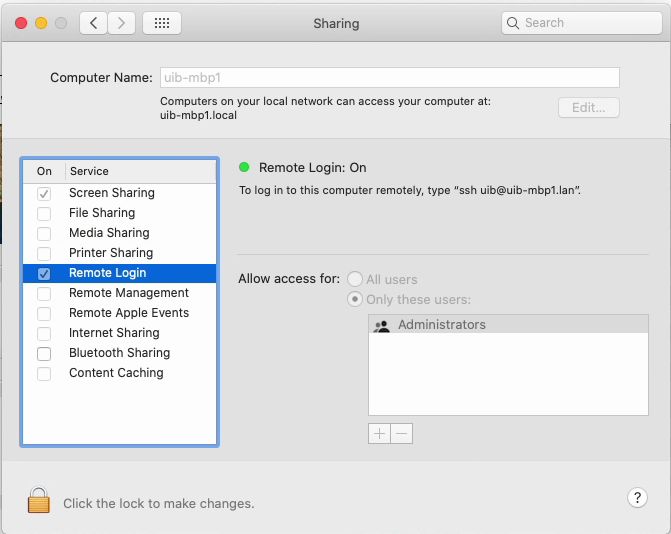
The reboot is not triggered automatically.Integration of existing MacOS clients into opsi. 11 / 61 Using opsi-deploy-client-agent for macOS. The opsi-deploy-client-agent script deploys the opsi-client-agent directly from the opsi-server to the clients. It’s easy to integrate a large number of clients from the server into an opsi environment. As a prerequisite for the clients is needed: • an activated ssh access Unfortunately on MacOS the ssh accesses are deactivated by default. To use the opsi-deploy-client- agent command these accesses must be first activated. This can be performed interactively in the 'System preferences / sharing': On the command line, this can be done as follows: sudo launchctl load -w /System/Library/LaunchDaemons/ssh.plist A checkup of the current status of the ssh access is possible with the command: sudo systemsetup -getremotelogin Disabling ssh access on the command line looks like this: sudo launchctl unload /System/Library/LaunchDaemons/ssh.plist The opsi-deploy-client-agent script can be found at /var/lib/opsi/depot/opsi-client-agent Run the script with 'root' privileges. If the script is not executable, you can fix this problem with the following command: opsi-set-rights /var/lib/opsi/depot/opsi-client-agent/opsi-deploy-client-agent The script creates the client on the server side, copies the installation files and configuration information, such as the pckey, to the client and starts the installation there.
Integration of existing MacOS clients into opsi.                                             12 / 61

The installation runs in the background without any interaction from user and transparently.

The command opsi-deploy-client-agent has several call parameters.
All following examples assume that you have switched to the root directory of the opsi-client-agent
product:

  cd /var/lib/opsi/depot/opsi-mac-client-agent

Typical calls are:

 • For a single client:

  ./opsi-deploy-client-agent -v --user=uib uib-mmini1

Results in the following output:

  Password is required for deployment.
  Password:
  [5] [2021-02-04 16:43:43.121] [                    ] Starting deployment to host uib-
  mmini1.uib.local   (posix.py:84)
  [5] [2021-02-04 16:43:43.121] [                    ] Querying for ip address of host uib-
  mmini1.uib.local   (common.py:158)
  [5] [2021-02-04 16:43:43.122] [                    ] Got ip address 192.168.10.70 from
  syscall   (common.py:167)
  [5] [2021-02-04 16:43:43.123] [                    ] Pinging host 192.168.10.70 ...
  (common.py:183)
  [5] [2021-02-04 16:43:44.146] [                    ] Host 192.168.10.70 is up
  (common.py:194)
  [5] [2021-02-04 16:43:44.153] [                    ] Patching config.ini   (posix.py:91)
  [5] [2021-02-04 16:43:44.157] [                    ] Copying installation scripts...
  (posix.py:107)
  [5] [2021-02-04 16:43:48.316] [                    ] Running installation script...
  (posix.py:147)
  [5] [2021-02-04 16:43:53.382] [                    ] opsi-client-agent successfully installed
  on uib-mmini1.uib.local    (posix.py:176)
  [5] [2021-02-04 16:43:53.395] [                    ] Restarting opsiclientd service on
  computer: uib-mmini1    (posix.py:331)
  [5] [2021-02-04 16:43:55.620] [                    ] 1/1 deployments successfully
  (__init__.py:210)

 • For a list of clients:

  ./opsi-deploy-client-agent -v --user=uib --hosts-from-file HOSTFILE.TXT         --skip-existing
  -clients
Integration of existing MacOS clients into opsi.                                        13 / 61

Here HOSTFILE.TXT is a file with one client name (FQDN) per line. As long as the clients are not
known to the opsi-server, it tries to install the opsi-mac-client-agent on this machine

 • Display all command line parameters:

  ./opsi-deploy-client-agent --help
Rollout of existing products to MacOS.                                                             14 / 61

Rollout of existing products to MacOS.
For the deployment of software to clients, the 'opsi-client-agent' must be installed on them. This can be
rolled out on existing-machines.

Subsequently, the opsi-configed management interface is used to deploy software to clients.

Inventory with the localboot products hwaudit and
swaudit.
In 'opsi-configed', 'Client configuration' mode, under the 'Clients' tab, select the client under
consideration.

If not already performed, update the opsi-configed’s dataset using 'Reload File/Data' or clicking the
corresponding icon.

Go to the 'Product configuration' tab, click in the 'Requested' column for the hwaudit product, this will
open a list/dropdown menu and there select the 'setup' action. Repeat this for the swaudit product.

The check mark in the icon menu bar should change its color to red. If you click it, the new settings
will be transmitted to the {opsi server}, afterwards its color will be green again.

Then restart the client. It should now start the opsi-client-agent and install the hwaudit and swaudit
products. With hwaudit and swaudit, hardware and software information, respectively, is collected
and transmitted to the {opsi server}. The collected information is displayed under the 'Hardware
Information' and 'Software Inventory' tabs, respectively.

Distribution of opsi standard products: m-homebrew.
This product installs the package management program homebrew which is used by several other opsi
products for MacOS, e.g. to install Java.

See also: The opsi product m-homebrew.

In 'opsi-configed', 'Client configuration' mode, select the client in question under the 'Clients' tab.

Switch to the 'Product Configuration' tab, click in the 'Requested' column for the m-homebrew
product, this will open a list/dropdown menu and there select the 'setup' action.

The check mark in the icon menu bar should change its color to red. If you click on it, the new settings
will be transmitted to the {opsi server}, afterwards its color will be green again.

Then restart the client or push the installation via 'on_demand'. It should now start the opsi-client-
agent and install the m-homebrew product.
Rollout of existing products to MacOS. 15 / 61
Distribution of opsi standard products: m-javavm
This product installs the Java Runtime Environment which is used by several other opsi products for
MacOS, e.g. opsi-configed, opsi-logviewer.
In 'opsi-configed', mode 'Client configuration', select the client under the tab 'Clients'.
Switch to the 'Product Configuration' tab, click in the 'Requested' column for the m-javavm product,
this will open a list/dropdown menu and there please select the 'setup' action.
The check mark in the icon menu bar should change its color to red. If you click on it, the new settings
will be transmitted to the {opsi server}, afterwards its color will be green again.
Then restart the client or push the installation via 'on_demand'. It should now start the opsi-client-
agent and install the m-javavm product.
Distribution of opsi standard products: opsi-configed.
Attention: m-homebrew and m-javavm must be already installed!
To the standard products belongs the product opsi-configed which installs the opsi management
interface as application on a computer. Because this application is a Java application, a JavaRE is
included.
In the 'opsi-configed', mode 'Client configuration', under the tab 'Clients' select the concerning client.
If not already done, update the opsi-configed’s dataset using 'Reload File/Data' by clicking the
corresponding icon.
Switch to the 'Product configuration' tab, click in the 'Requested' column for the opsi-configed
product, this will open a list/dropdown menu and there select the 'setup' action.
The check mark in the icon menu bar should change its color to red. If you click it, the new settings
will be transmitted to the {opsi server}, afterwards its color will be green again.
Then restart the client. It should now start the opsi-client-agent and install the opsi-configed product.
After the installation is finished you should find the item opsi-configed under Applications.Integration of own software into the software distribution of opsi. 16 / 61
Integration of own software into the software
distribution of opsi.
The installation of software in opsi is performed by the opsi-client-agent and specially by the script
controlled setup program opsi-script. Therefore a opsi-script script must be created for each opsi
product. Afterwards this script, as well as the installation files and metadata are packed into an opsi
product, which can finally be installed on the {opsi server}.
A small tutorial on how to create a opsi-script script.
Introduction
This tutorial cannot replace training or studying of the manuals. It only serves as an introduction.
Therefore as first the reference to further sources:
trainings:
The uib GmbH offers opsi trainings in Mainz and in-house trainings:
https://uib.de/de/support-schulung/schulung/
manuals:
https://uib.de/de/opsi-dokumentation/dokumentationen/
Specially important:
opsi-winst-Reference-Card and opsi-script-Manual
wiki (scripts, tips, links):
https://forum.opsi.org/wiki
support forum:
check https://forum.opsi.org
Methods of non-interactive software installation on macOS.
Apple (unlike Microsoft) standardized its software installation methods very early on. In essence,
there are two methods:
• application Directory:
This is a directory according to the pattern: .app However, such a directory is
not displayed in the Finder as a directory, but as an application. Inside this directory, according to
a pattern, the files of the application must be located. A typical structure would be:Integration of own software into the software distribution of opsi. 17 / 61
opsi-script-gui.app
|--Contents
|-Info.plist
|-PkgInfo
|-MacOS
| |-opsi-script-gui
|
|-Resources
|- (....)
Such a directory must only be copied into the path /Applications for installation. Possible files in the
directory MacOS must be made executable.
Such *.app directories are usually offered packed for download.
• PKG file:
These files contain software which need to be installed by a special command.
In both cases an unattended (i.e. non-interactive) installation is not an issue.
Often MacOS software is offered in packed formats like *.zip, *.dmg or also *.tgz.
All variants mentioned so far can be installed directly by opsi-script, except *.tgz which must be
unpacked before.
Structure of an opsi-script script
First an example for a simple opsi-winst script:
[Actions]
WinBatch_tightvnc_silent_install
[WinBatch_tightvnc_silent_install]
"%ScriptPath%\tightvnc-1.3.9-setup.exe" /silent
An opsi-winst script consists of primary and secondary sections. Sections are introduced with a
section name in square brackets, as known from the ini files.
The true software installation work takes place in the secondary sections, which are called by the
primary sections.
The secondary sections are "theme specific" and each has a special syntax.
The section name of a secondary section starts with its type, followed by a freely determinable name.
In the shown example, the primary section [Actions] calls a secondary section
[WinBatch_7z_silent_install].
The secondary section is of the type WinBatch. The content of a WinBatch section is executed via the
Windows API.Integration of own software into the software distribution of opsi. 18 / 61
So in this case the setup program 7z.exe is started with the parameter /S.
Primary Sections
Actions
The [Actions] section is the actual main program. This is where the script processing begins.
Sub-sections
Program sections that are required constantly can be redistributed to sub sections (subroutines).
It’s possible to source sub sections to external files.
The primary sections are the main program in which the script flow is controlled. For this there are:
• Variables: Strings and string lists
• if else endif statements
• for loops over string lists
• Functions
Figure 1. Avoiding duplicate code via distributed sub
Important secondary sections
Files
File operations, such as:
• copy (with version control, recursive …).
• delete
• create directories
• …Integration of own software into the software distribution of opsi. 19 / 61 WinBatch Used to call programs via the Windows API. For example, invokes to setup programs in silent mode are made in these sections. ShellInAnIcon The content of this section is passed to the operating system on the typical 'shell' for execution. This 'shell' is the 'cmd.exe' for Windows, for Linux and for MacOS the 'bash'. As such, normal batch scripts can be stored here. Name variants of ShellInAnIcon with identical behavior are Shellbatch, DOSBatch and DOSInAnIcon. ExecWith The contents of these sections are passed to an external program such as an (interpreter) for execution. For example, 'ExecWith' can be used to integrate AutoIt scripts http://www.autoitscript.com directly into the opsi-winst script. Registry The 'Registry sections' are used to edit the registry. LinkFolder 'LinkFolder sections' are used to create and remove shortcuts. For example, such shortcuts can be created on the desktop or in the start menu. Global constants Global constants are text placeholders that can be used in primary and secondary sections and are textually replaced by their values at runtime. The use of placeholders can be utilized to ensure that paths are set correctly in different environments (in the case of systems with different languages or operating system versions for example). Examples: %ProgramFiles32Dir% c:\Program Files (x86) %Systemroot% c:\windows %System% c:\windows\system32 %opsiTmpDir% c:\ %Scriptpath%
Integration of own software into the software distribution of opsi.                               20 / 61

Second example: tightvnc

For clarification purposes, now a simple script for the installation of 'tightvnc'. As a matter of fact this
script would get on with the call of the silent installation in the Winbatch section. However, during a
repeated installation an interactive dialog appears here (because of the restart of the running
service). This dialog window is closed (if it appears) with the help of 'AutoIt'.

  [Actions]
  Message "Installing tightvnc 1.3.9 ..."
  ExecWith_autoit_confirm "%ScriptPath%\autoit3.exe" WINST /letThemGo
  WinBatch_tightvnc_silent_install
  KillTask "autoit3.exe"

  [WinBatch_tightvnc_silent_install]
  "%ScriptPath%\tightvnc-1.3.9-setup.exe" /silent

  [ExecWith_autoit_confirm]
  ; Wait for the confirm dialog which only appears if tightvnc was installed before as
  service
  ; Waiting for the window to appear
  WinWait("Confirm")
  ; Activate (move focus to) window
  WinActivate("Confirm")
  ; Choose answer no
  Send("N")

Elementary commands for primary sections

String-Variable

Variable declaration
   'DefVar '

Variable assignment
   'Set  = '

Example:

  DefVar $ProductId$
  Set $ProductId$ = "firefox"
Integration of own software into the software distribution of opsi. 21 / 61
String variables are handled differently in primary and secondary sections. In
primary sections, string variables are independent objects. Only here they can be
declared and assigned values. Accordingly, the connection of variables and strings to
a string expression is to be performed with a "+" operator.
Example: "Installing "+ $ProductId$ +" …"
In secondary sections, string variables are replaced with the contents of the variable
before the section is executed.
For example: "Installing $ProductId$ …"
This should be taken into consideration when the corresponding string expressions
are cut and pasted in the script.
The advantage of this construction is that in sections that are executed outside the
'opsi-winst' (DosBatch / Execwith) opsi-winst variables can be manipulated at ease.
Message / ShowBitmap
Text output during installation:
Message
Example:
Message "Installing "+ $ProductId$ +" ..."
To output a graphic during the installation:
ShowBitmap
Example:
ShowBitmap "%ScriptPath%\python.png" "Python"
if [else] endif
Syntax:
if
;statement(s)
[
else
;statement(s)
]
endif
FunctionsIntegration of own software into the software distribution of opsi. 22 / 61
HasMinimumSpace
Checks for free space on the hard disk.
FileExists
Checks for the existence of a file or directory.
Errors, logging and comments
Comment characters ';'
Lines that start with a semicolon (';') are not interpreted.
Comment
Writes a comment message to the log file.
LogError
Writes an error message to the log file.
IsFatalError
Cancels the execution of the running script and reports the installation as failed.
Condition for execution
requiredWinstVersion
specifies the (minimum) required opsi-winst version.
Other important opsi-winst functions
An overview of the opsi-winst functions is given by the reference card
https://download.uib.de/opsi_stable/doc/opsi-winst-reference-card.pdf
A detailed documentation can be found in the opsi-winst manual:
https://download.uib.de/opsi_stable/doc/opsi-manual-stable-en.pdf
Here are a few more notes on particularly important elements:
Stringlists:
String lists are very powerful, especially for evaluating output from external programs. Read the opsi-
winst docs for more information.
ExitWindows:
Reboot/Shutdown the system and finish the opsi-winst.
• ExitWindows /Reboot
Computer restart after completion of the running script.
• ExitWindows /ImmediateReboot
Immediate reboot.Integration of own software into the software distribution of opsi. 23 / 61
• ExitWindows /ImmediateLogout
Immediately stop script editing and terminate opsi-winst.
product properties:
For some products it’s necessary to provide options. These are specifically evaluated per client at
runtime. How such properties are created is described in the chapter Creation of opsi product
packages
The access to the values of the properties is done via the function GetProductProperty:
if GetProductProperty("example-property", "no") = "yes"
Files_copy_extra_files
endif
Encoding:
Write your scripts in UTF-8 encoding and set the line
encoding=utf8 At the beginning of the file
Special commands for MacOS
• GetOS // returns: Linux or Windows_NT or macos [W/L/M]
• getMacosVersionInfo [M]
• getMacosVersionMap [M]
See also:
http://bonifax.uib.local/opsidoc/git-stable/html/opsi-winst-manual/opsi-winst-manual.html#opsi-winst-
macos-functions
In the following chapters special opsi MacOS commands to install software are presented, which
come from the opsi-script library uib_macosinstalllib. This documentation is in English because it
was automatically generated directly from the source code.
Documentation of opsi library: uib_macosinstalllib.opsiscript
• Email: d.oertel@uib.de
• Version: 1.0
• Copyright: AGPLv3
Documentation of local function install_macos_app
Definition
install_macos_app($myapp$ : string) : stringIntegration of own software into the software distribution of opsi. 24 / 61
Description
try to install the app given by $myapp$
• Parameter: $myapp$
◦ Type: String - Calltype: CallByValue
◦ Parameter $myapp$ Description:
string with path to app to install
• Returns: Returns string "true" if all is ok
• OnError: Returns string "false"; error counter increased ; Error messages in the log
• References: [install_macos_pkg] [install_macos_dmg] [install_macos_zip]
[install_macos_generic]
• Author: detlef oertel
• Date: 28.12.2020
• Email: d.oertel@uib.de
• Version: 1.0
• Copyright: AGPLv3
Example:
[Actions]
importlib "uib_macosinstalllib"
DefVar $installfile$
DefVar $installresult$
comment "we have a *.app (directory) and install with install_macos_app"
set $installfile$ = "%scriptpath%/files/my_macos_app.app"
set $installresult$ = install_macos_app($installfile$)
if stringtobool($installresult$)
comment "installation succseeded"
else
LogError "installation failed"
endif
Documentation of local function install_macos_pkg
Definition
install_macos_pkg($mypkg$ : string) : stringIntegration of own software into the software distribution of opsi. 25 / 61
Description
try to install the pkg file given by $mypkg$
• Parameter: $mypkg$
◦ Type: String - Calltype: CallByValue
◦ Parameter $mypkg$ Description:
string with path to pkg file to install
• Returns: Returns string "true" if all is ok
• OnError: Returns string "false"; error counter increased ; Error messages in the log
• References: [install_macos_app] [install_macos_dmg] [install_macos_zip]
[install_macos_generic]
• Author: detlef oertel
• Date: 28.12.2020
• Email: d.oertel@uib.de
• Version: 1.0
• Copyright: AGPLv3
Example:
[Actions]
importlib "uib_macosinstalllib"
DefVar $installfile$
DefVar $installresult$
comment "we have a *.pkg and install with install_macos_pkg"
set $installfile$ = "%scriptpath%/files/my_macos_app.pkg"
set $installresult$ = install_macos_pkg($installfile$)
if stringtobool($installresult$)
comment "installation succseeded"
else
LogError "installation failed"
endif
Documentation of local function install_macos_dmg
Definition
install_macos_dmg($mydmg$ : string) : stringIntegration of own software into the software distribution of opsi. 26 / 61
Description
try to install the dmg file given by $mydmg$
• Parameter: $mydmg$
◦ Type: String - Calltype: CallByValue
◦ Parameter $mydmg$ Description:
string with path to dmg file to install
• Returns: Returns string "true" if all is ok
• OnError: Returns string "false"; error counter increased ; Error messages in the log
• References: [install_macos_app] [install_macos_pkg] [install_macos_zip]
[install_macos_generic]
• Author: detlef oertel
• Date: 28.12.2020
• Email: d.oertel@uib.de
• Version: 1.0
• Copyright: AGPLv3
Example:
[Actions]
importlib "uib_macosinstalllib"
DefVar $installfile$
DefVar $installresult$
comment "we have a *.dmg and install with install_macos_dmg"
set $installfile$ = "%scriptpath%/files/my_macos_app.dmg"
set $installresult$ = install_macos_dmg($installfile$)
if stringtobool($installresult$)
comment "installation succseeded"
else
LogError "installation failed"
endif
Documentation of local function install_macos_zip
Definition
install_macos_zip($myzip$ : string) : stringIntegration of own software into the software distribution of opsi. 27 / 61
Description
try to install the zip file given by $myzip$ unzips the file and try to find a installable part (*.app,
*.pkg, *.dmg) and try to install this
• Parameter: $myzip$
◦ Type: String - Calltype: CallByValue
◦ Parameter $myzip$ Description:
string with path to zip file to install
• Returns: Returns string "true" if all is ok
• OnError: Returns string "false"; error counter increased ; Error messages in the log
• References: [install_macos_app] [install_macos_dmg] [install_macos_pkg]
[install_macos_generic]
• Author: detlef oertel
• Date: 28.12.2020
• Email: d.oertel@uib.de
• Version: 1.0
• Copyright: AGPLv3
Example:
[Actions]
importlib "uib_macosinstalllib"
DefVar $installfile$
DefVar $installresult$
comment "we have a *.zip and install with install_macos_zip"
set $installfile$ = "%scriptpath%/files/my_macos_app.zip"
set $installresult$ = install_macos_zip($installfile$)
if stringtobool($installresult$)
comment "installation succseeded"
else
LogError "installation failed"
endif
Documentation of local function install_macos_generic
Definition
install_macos_generic($myfile$ : string) : stringIntegration of own software into the software distribution of opsi. 28 / 61
Description
try to install the file given by $myfile$ Checks if the file is a well known installable (*.app, *.pkg,
*.dmg, *.zip) and try to install this
• Parameter: $myfile$
◦ Type: String - Calltype: CallByValue
◦ Parameter $myfile$ Description:
string with path to pkg file to install
• Returns: Returns string "true" if all is ok
• OnError: Returns string "false"; error counter increased ; Error messages in the log
• References: [install_macos_app] [install_macos_dmg] [install_macos_zip] [install_macos_pkg]
• Author: detlef oertel
• Date: 28.12.2020
• Email: d.oertel@uib.de
• Version: 1.0
• Copyright: AGPLv3
Example:
see: install_macos_generic
[Actions]
importlib "uib_macosinstalllib"
DefVar $installfile$
DefVar $installresult$
comment "we have a *.* and install with install_macos_generic"
set $installfile$ = "%scriptpath%/files/opsi-script.app"
set $installresult$ = install_macos_generic($installfile$)
if stringtobool($installresult$)
comment "installation succseeded"
else
Error "installation failed"
endif
Third example: MacOS template 'm-opsi-template'.
You can create this template with the opsi-setup-detector.
setup.opsiscript: Installationsscript
; ----------------------------------------------------------------Integration of own software into the software distribution of opsi. 29 / 61
; Copyright (c) uib gmbh (www.uib.de)
; This sourcecode is owned by uib
; and published under the Terms of the General Public License.
; ----------------------------------------------------------------
encoding=utf8
[Actions]
requiredWinstVersion >= "4.12.0.28"
ScriptErrorMessages = false
DefVar $ProductId$
DefVar $InstallDir$
DefVar $MinimumSpace$
DefVar $ExitCode$
DefVar $ErrorString$
DefVar $LicenseRequired$
DefVar $LicenseKey$
DefVar $LicensePool$
DefVar $OS$
DefVar $oldProgFound$
DefVar $installSuccess$
; import complete file !
importlib "uib_exitcode.opsiscript"
importlib "%scriptpath%\osd-lib.opsiscript"
importlib "%scriptpath%\uib_macosinstalllib.opsiscript"
; ----------------------------------------------------------------
; $ProductId$ is the name of the product in opsi, only lower letters, no umlauts, no
white spaces, use '-' as a seperator
Set $ProductId$ = "m-opsi-template"
Set $MinimumSpace$ = "1 MB"
; the path were we find the product after the installation
;Set $InstallDir$ = "/Applications/"
Set $InstallDir$ = "/Applications/"
Set $LicenseRequired$ = "false"
Set $LicensePool$ = ""
; ----------------------------------------------------------------
set $OS$ = GetOS
if not(($OS$ = "macos"))
logError "Installation aborted: wrong OS version: only MacOS"
isFatalError "wrong OS"
endif
comment "Show product picture"Integration of own software into the software distribution of opsi. 30 / 61
ShowBitmap "%ScriptPath%\" + $ProductId$ + ".png" $ProductId$
if FileExists("%ScriptPath%\delsub.opsiscript")
comment "Start uninstall sub section"
Sub "%ScriptPath%\delsub.opsiscript"
endif
Message "Installing " + $ProductId$ + " ..."
if $LicenseRequired$ = "true"
comment "Licensing required, reserve license and get license key"
set $LicenseKey$ = get_licensekey_byPool($LicensePool$)
endif
comment "Start setup "
ChangeDirectory "%SCRIPTPATH%/files1"
;----------------------------------------------
set $installSuccess$ = install_macos_generic("%SCRIPTPATH%/files1/")
;----------------------------------------------
Sub_check_installSuccess
comment "Copy files"
Files_install
[Sub_check_installSuccess]
if $installSuccess$ = "false"
LogError "Installation failed"
isfatalerror "Installation failed"
else
Comment "Installation success"
endif
[Files_install]
; Example of recursively copying some files into the installation directory:
;
; copy -s "%ScriptPath%\files\*.*" "$InstallDir$"Integration of own software into the software distribution of opsi. 31 / 61
delsub.opsiscript: Ausgelagerte Deinstallations-Sub-Sektion
; Copyright (c) uib gmbh (www.uib.de)
; This sourcecode is owned by uib gmbh
; and published under the Terms of the Affero General Public License v3.
; ----------------------------------------------------------------
encoding=utf8
Message "Check for existing installation of " + $ProductId$ + " ..."
comment "Start the Uninstall check:"
set $oldProgFound$ = "false"
if directoryExists($InstallDir$)
set $oldProgFound$ = "true"
endif
if $oldProgFound$ = "true"
Message "Uninstalling " + $ProductId$ + " ..."
if not(($InstallDir$ = '') or ($InstallDir$ = 'unknown') or ($InstallDir$ =
'/Applications/'))
Files_uninstall
endif
endif
[Files_uninstall]
del -sf "$InstallDir$\"
;-----------------------------------------------------
[Linkfolder_remove_desktop_icon]
; check delete_element
set_basefolder common_desktopdirectory
set_subfolder ""
delete_element $productId$
;-----------------------------------------------------
uninstall.opsiscript: Deinstallations-Skript
; ----------------------------------------------------------------
; Copyright (c) uib gmbh (www.uib.de)
; This sourcecode is owned by uib
; and published under the Terms of the Affero General Public License v3.
; ----------------------------------------------------------------
encoding=utf8Integration of own software into the software distribution of opsi. 32 / 61
[Actions]
requiredWinstVersion >= "4.12.0.28"
ScriptErrorMessages = false
DefVar $ProductId$
DefVar $InstallDir$
DefVar $MinimumSpace$
DefVar $ExitCode$
DefVar $ErrorString$
DefVar $LicenseRequired$
DefVar $LicenseKey$
DefVar $LicensePool$
DefVar $OS$
DefVar $oldProgFound$
; import complete file !
importlib "uib_exitcode.opsiscript"
importlib "%scriptpath%\osd-lib.opsiscript"
; ----------------------------------------------------------------
; $ProductId$ is the name of the product in opsi, only lower letters, no umlauts, no
white spaces, use '-' as a separator
Set $ProductId$ = "m-opsi-template"
; the path were we find the product after the installation
;Set $InstallDir$ = "/Applications/"
Set $InstallDir$ = "unknown"
Set $LicenseRequired$ = "False"
Set $LicensePool$ = ""
; ----------------------------------------------------------------
set $OS$ = GetOS
if not(($OS$ = "macos"))
logError "Installation aborted: wrong OS version: only macos"
isFatalError "wrong OS"
endif
comment "Show product picture"
ShowBitmap "%ScriptPath%\" + $ProductId$ + ".png" $ProductId$
Message "Uninstalling " + $ProductId$ + " ..."
if FileExists("%ScriptPath%\delsub.opsiscript")
comment "Start uninstall sub section"Integration of own software into the software distribution of opsi. 33 / 61
Sub "%ScriptPath%\delsub.opsiscript"
endif
if $LicenseRequired$ = "true"
comment "Licensing required, free license used"
Sub_free_license
endif
[Sub_free_license]
comment "License management is enabled and will be used"
comment "Trying to free license used for the product"
DefVar $result$
Set $result$ = FreeLicense($LicensePool$)
; If there is an assignment of a license pool to the product, it is possible to use
; Set $result$ = FreeLicense("", $ProductId$)
;
; If there is an assignment of a license pool to a windows software id, it is possible
to use
; DefVar $WindowsSoftwareId$
; $WindowsSoftwareId$ = "..."
; set $result$ = FreeLicense("", "", $WindowsSoftwareId$)
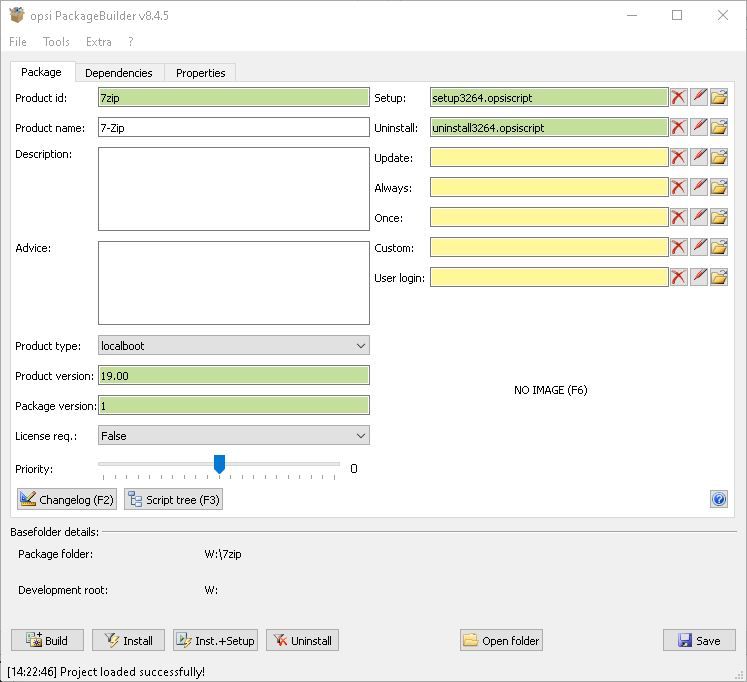
Create an opsi product package
Installation of the opsi-setup-detector, opsi PackageBuilder and opsi-
logviewer
Installation des opsi PackageBuilder
The opsi PackageBuilder is currently available for Windows and Linux and MacOS.
The installation files / packages of the opsi-package-builder can be found here:
https://forum.opsi.org/viewtopic.php?p=32473#p32473
Dort findet sich im oberen Teil die Links auf die Installationspakete für Windows, Linux und MacOS.
The opsi PackageBuilder is not made by 'uib' but by Holger Pandel from the opsi-community (thank
you!)..
Der opsi PackageBuilder unterliegt einer OpenSource Lizenz:
https://github.com/pandel/opsiPackageBuilder/blob/master/LICENSE_DE
Der opsi PackageBuilder hat eine eigene Dokumentation welche mit installiert wird.
Installation of the opsi-setup-detector
The opsi-setup-detector is currently available for Windows and Linux.Integration of own software into the software distribution of opsi. 34 / 61 You can install the opsi-setup-detector via opsi: The package opsi-setup-detector belongs to the opsi standard products and should be installed on your opsi-server. If not, use: opsi-package-updater install opsi-setup-detector to install it on the opsi-server. A setup program to install the opsi-setup-detector without opsi can be found at : https://download.uib.de/opsi4.1/misc/helper/ The functionality of the Linux version is limited, since certain programs for analyzing setup programs from certain frameworks are not available for Linux: • Detailed analysis of Inno-Setups due to the lack of innounpack.exe for Linux • Detailed analysis of wix-setups due to the lack of dark.exe for Linux The opsi product opsi-setup-detector has a dependency on the opsi product opsi-package-builder. The opsi-setup-detector uses the opsi-package-builder if available, but can for the most part also work without it. The installation of the opsi-package-builder is recommended. Installation of the opsi-logviewer The opsi-logviewer is currently available for Windows, Linux and MacOS. You can install the opsi-logviewer via opsi: The package opsi-logviewer is part of the opsi standard products and should be installed on your opsi- server. If not, with: opsi-package-updater install opsi-logviewer You can install it on the opsi-server. A setup program to install the opsi-setup-detector on Windows even without opsi can be found at : https://download.uib.de/opsi4.1/misc/helper/ The opsi product opsi-logviewer has a stated dependency to the opsi product javavm. The opsi-setup-detector program to create a MacOS script. Opsi-setup-detector Start and necessary configurations The opsi-setup-detector can be started from the programs menu and can be found there under opsi.org. Under Windows the opsi-setup-detector is also integrated into the context menu of the
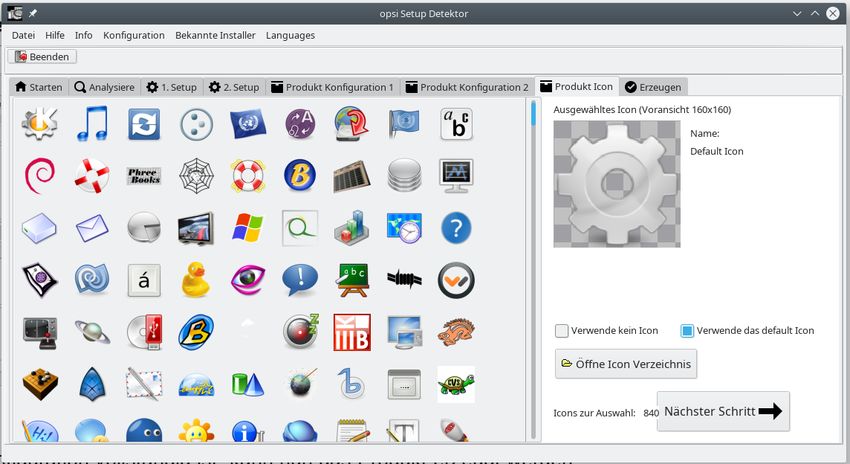
Integration of own software into the software distribution of opsi.                            35 / 61

explorer in order to call the setup program directly for analysis with the right mouse button.

Figure 2. opsi-setup-detector Necessary configuration on first startup

After the first start of the opsi-setup-detector a configuration mask appears. The following
information is required here:

 • fullname: (Used for entries in the changelog.txt)

 • email_address: (Used for entries in the changelog.txt)

 • workbench_path: : Path to the directory in which the opsi packages are going to be created. This
   is ideally the path to the place where the opsi_workbench of your opsi-server is mounted.

After all needed configurations has be done and saved, you will see the startpage.
Integration of own software into the software distribution of opsi.                           36 / 61

Figure 3. opsi-setup-detector Start

On the main window, select the desired task and follow the dialogs or select the 'Next step' button.

The offered tasks are grouped by:

 • Windows

 • Linux

 • MacOS

 • multi platform

The offered tasks for MacOS:

1. Analyze single MacOS Installer file and generate an opsi package
    Here it starts from a MacOS installer file and then goes through the whole process to create an
    opsi package. This process is described in the next chapter.

2. Create an opsi package template for MacOS
    This point does not ask for a setup file, but creates a template comparable to the opsi product
    opsi-template with the exception that here the specifications from the product configuration are
    already taken over.

The following screenshots show the use of Windows installer files, but they look similar when using
MacOS installer files like *.app, *.dmg, *.zip.

Opsi-setup-detector: Analyze single setup file and create an opsi package

The workflow is here described using Analyze single setup file and create an opsi package as an
example.
Integration of own software into the software distribution of opsi. 37 / 61 Figure 4. opsi-setup-detector Start After you selected the task, you will get a file selection dialog. Selct now the setup file that has to be analyzed. The analyze will start directly after the selection is done. Opsi-setup-detector: Analyze Figure 5. opsi-setup-detector analysis If the anlyze found no result, you will get here a Sorry unknown Installer. If we have a successful analyze, you will see the result page.
Integration of own software into the software distribution of opsi.                          38 / 61

Figure 6. opsi-setup-detector Result of the analysis

 • Detected Setup Type: Type of detected Installer

 • MST allowed:

 • Link with information about the installer

 • Setup file: Path and name of the analyzed setup file

 • MST file: For MSI installers or installers which contain MSI, an MST file can be specified here
    which will be integrated into the MSI call.

 • MsiId: For MSI installers or installers that contain MSI in the form of product code

 • Software version: The version of the software to be installed if determinable.

 • Setup file size MB: Size of the setup file in MB

 • Required space MB: This value is an estimate of six times the size of the setup file and can be
    adjusted if necessary

 • InstallDir: As far as detected the directory where the software will be installed.

 • Unattended installation command: The determined command for a non-interactive installation.

 • Unattended deinstallation command: The determined command for a non-interactive
    deinstallation.

 • Deinstallations program: The determined deinstallations program

The values determined here can now be corrected or supplemented if necessary. The button Next Step
leads to the first page of the product configuration. The metadata of the opsi product to be created is
entered here.
Integration of own software into the software distribution of opsi. 39 / 61
The values determined here can be incorrect and are probably incomplete!
After an initial installation, you should definitely check the values of InstallDir,
Check deinstallation program and software version and adjust them in your
script if necessary.
Opsi-setup-detector: Product configuration 1
Figure 7. opsi-setup-detector Product configuration 1
• opsi Product ID: this is the name of the opsi package to be generated and is generated from the
product name below, where spaces and other invalid characters are replaced by a '-'. The
proposed opsi Product ID can of course be changed.
• Product Name: the name of the software to install. This may have to be corrected manually.
• Product Version: The version number determined from the name of the setup file must probably
be corrected manually. It may only contain numbers and periods, since it’s used for the versioning
of the opsi package.
• Description: In this field the product name is given as default and should be completed with
further hints, which are then set as product description of the opsi package.
• License required: If this checkbox is set, '$LicenseRequired$=true' will be set when patching the
opsiscript.
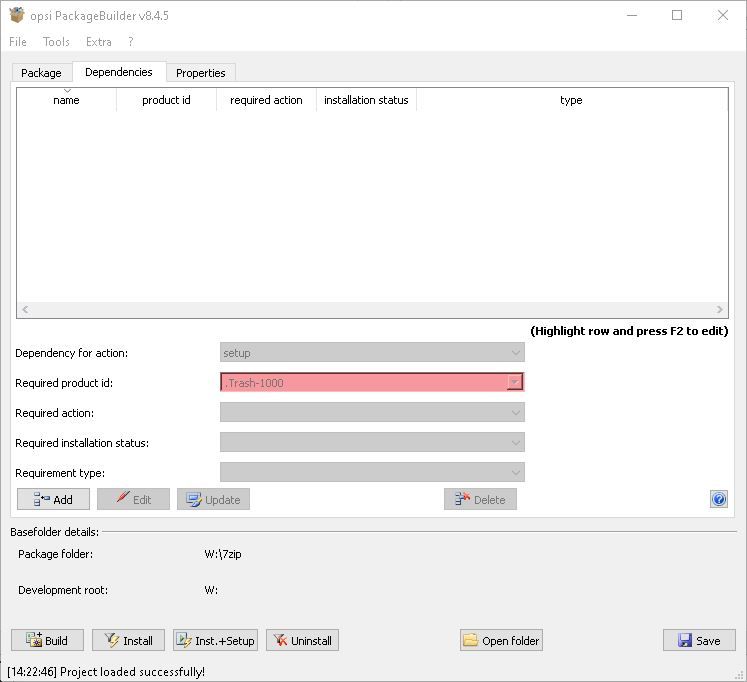
Opsi-setup-detector: Priority and dependenciesIntegration of own software into the software distribution of opsi. 40 / 61 Figure 8. opsi-setup-detector Product configuration 2 For normal application software you don’t have to do anything here, due to the fact that the default settings 'fit'. You can press the Next Step button. Otherwise, here is an explanation of the settings that are possible: Priority affects the installation order. Recommended for application software: 0 Possible values are between 100 (at the very beginning) and -100 (at the very end). If product dependencies also exist, these will also additionally influence the installation sequence. Dependencies Here you can define the dependencies between products. Figure 9. opsi-setup-detector Dependency Editor
Integration of own software into the software distribution of opsi.                         41 / 61

Productid
   Productid (identifier) of the product to which a dependency exists.

Dependency Mode
   You can either request the Action setup or (see below) the Status (installed).

Action or Status
   For Status: Status that the product to which a dependency corresponds, should have (installed). If
   there is another status, the product is set to setup.
   For Action: Action request, which should be set on the product, whereupon there is a dependency
   (setup).

Dependency type
   Installation order. If the product for which there is a dependency must be installed before the
   installation of the current product, then this is before. If it must be installed after the current
   product, this is after. If the order doesn’t matter then nothing has to be entered here.

Hint:

Unfortunately there is currently no generic mechanism for uninstalling product dependencies. The
Product Dependency mechanism is only reliable for action: setup and the (before- or after-) setup
actions to be triggered and installed status, in the case of a requiredAction: uninstall this leads
unfortunately to errors.

Another hint:

The actual installation order is determined by a combination of product dependencies and product
prioritization. Details about this can be found in the opsi manual in the chapter 'Manipulating the
installation sequence by priorities and dependencies'.

Opsi-setup-detector: Poperties

Here, editable properties (product variables) can be defined for the product.
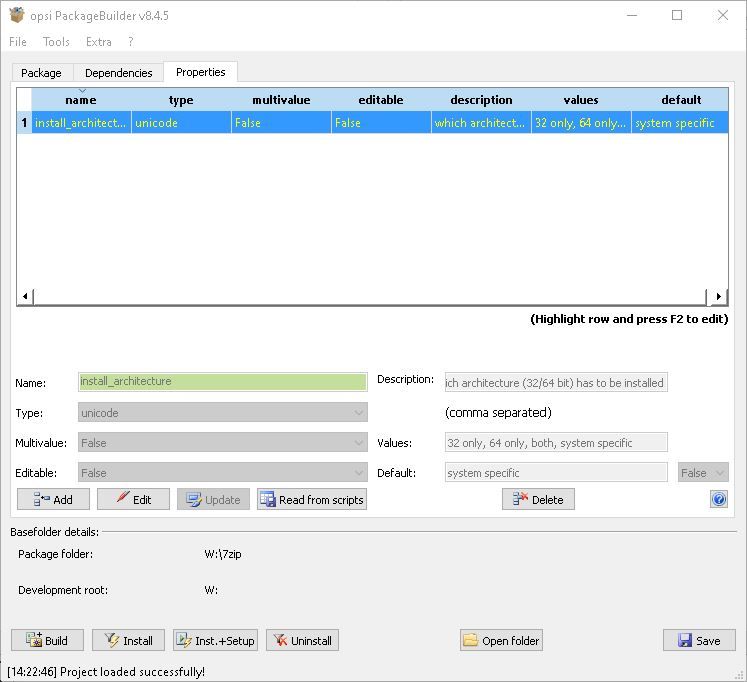
Integration of own software into the software distribution of opsi.                                       42 / 61

Figure 10. opsi-setup-detector Property Editor

Field / Function        Description                                     Notes

Property Name           Name of the product variable                    This identifier is displayed in the
                                                                        product configuration in opsi-configed
                                                                        and can be read within the scripts with
                                                                        the function GetProductProperty.

Property Type           Variable type                                   Possible values: Text / bool

Multivalue              Determines whether the product                  Only available for type Text
                        variable can take only exactly one or
                        multiple values

Editable                Determines whether the default values Only available for type Text
                        can be overwritten with new or
                        additional values or not

Description             Variable function description                   Displayed as tooltip in opsi-configed

Possible values         Comma separated list of possible input          If editable is set to “True”, the list can
                        values                                          be added later within opsi-configed.
                                                                        Only available for type Text

Default value           Default value                                   Selection list; Only available for type
                                                                        text: Free text field. Only available for
                                                                        type 'Multivalue': Multiple selection
You can also read