SPHERE ZIMPOL Polarimetry Reflex Tutorial - FTP Directory ...
←
→
Page content transcription
If your browser does not render page correctly, please read the page content below

European Organisation for Astronomical Research in the Southern
    Hemisphere

                                          Programme: VLT

                                 Project/WP: Back-End Operations

       SPHERE ZIMPOL Polarimetry Reflex Tutorial
                                         Document Number:

                                        Document Version: 1.3

                                    Document Type: Manual (MAN)

                                            Released On:

                                    Document Classification: Public

Prepared by:    Sabine Moehler

Validated by:   Wolfram Freudling

Approved by:    Martino Romaniello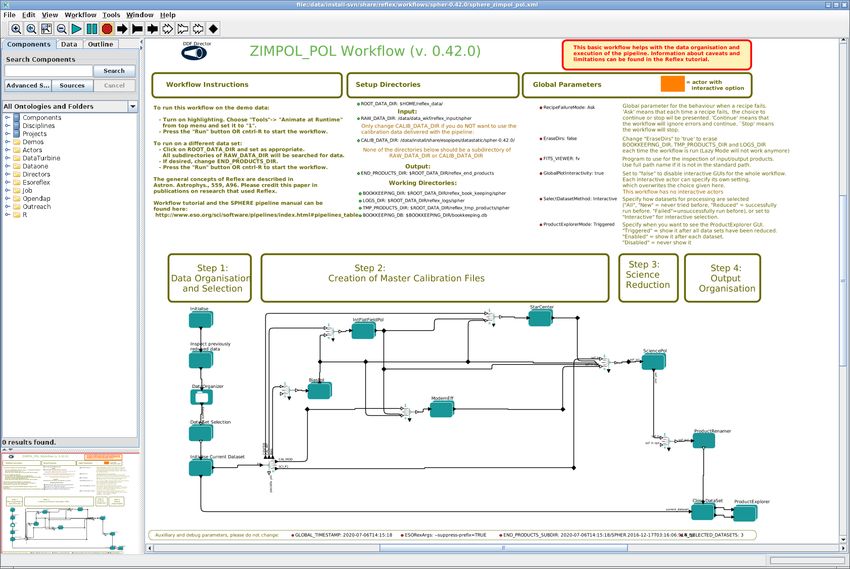
Doc:
            SPHERE ZIMPOL Polarimetry Reflex   Issue:          Issue 1.3
 ESO
                      Tutorial                 Date:    Date 2021-05-03
                                               Page:             2 of 36

Authors
 Name                   Affiliation
 S. Moehler             ESO
 Lars Kristian Lundin   ESO
This page was intentionally left blank
Doc:
         SPHERE ZIMPOL Polarimetry Reflex                    Issue:                         Issue 1.3
ESO
                   Tutorial                                  Date:                   Date 2021-05-03
                                                             Page:                            2 of 36

                                          Change record
      Issue/Rev.      Date      Section/Parag. affected   Reason/Initiation/Documents/Remarks
      1.0          31/01/2017   All                       First public release
      1.1          16/04/2018   Sect. 6.4                 updated information on limitations
      1.2          02/06/2020   All                       updated common sections
      1.3          03/05/2021   Figs 3.3, 3.4, 6.1        updated screenshots
This page was intentionally left blank
Doc:
             SPHERE ZIMPOL Polarimetry Reflex                       Issue:                              Issue 1.3
    ESO
                       Tutorial                                     Date:                        Date 2021-05-03
                                                                    Page:                                 4 of 36

Contents

1   Introduction to EsoReflex                                                                                      7

2   Software Installation                                                                                          8
    2.1   Installing Reflex workflows via macports . . . . . . . . . . . . . . . . . . . . . . . . . . . .         8
    2.2   Installing Reflex workflows via rpm/yum/dnf         . . . . . . . . . . . . . . . . . . . . . . . . .    8
    2.3   Installing Reflex workflows via install_esoreflex . . . . . . . . . . . . . . . . . . . . .              9
    2.4   Demo Data . . . . . . . . . . . . . . . . . . . . . . . . . . . . . . . . . . . . . . . . . . . . . 10

3   Quick Start: Reducing The Demo Data                                                                           11

4   About the main esoreflex canvas                                                                               15
    4.1   Saving And Loading Workflows . . . . . . . . . . . . . . . . . . . . . . . . . . . . . . . . . . 15
    4.2   Buttons . . . . . . . . . . . . . . . . . . . . . . . . . . . . . . . . . . . . . . . . . . . . . . . 15
    4.3   Workflow States . . . . . . . . . . . . . . . . . . . . . . . . . . . . . . . . . . . . . . . . . . . 15

5   The SPHERE Workflow                                                                                           16
    5.1   Workflow Canvas Parameters       . . . . . . . . . . . . . . . . . . . . . . . . . . . . . . . . . . . 16
    5.2   Workflow Actors . . . . . . . . . . . . . . . . . . . . . . . . . . . . . . . . . . . . . . . . . . 17
          5.2.1   Simple Actors    . . . . . . . . . . . . . . . . . . . . . . . . . . . . . . . . . . . . . . . 17
          5.2.2   Composite Actors     . . . . . . . . . . . . . . . . . . . . . . . . . . . . . . . . . . . . . 17
          5.2.3   Recipe Execution within Composite Actors . . . . . . . . . . . . . . . . . . . . . . . . 18
          5.2.4   Lazy Mode . . . . . . . . . . . . . . . . . . . . . . . . . . . . . . . . . . . . . . . . . 21

6   Reducing your own data                                                                                        22
    6.1   The esoreflex command . . . . . . . . . . . . . . . . . . . . . . . . . . . . . . . . . . . . 22
    6.2   Launching the workflow . . . . . . . . . . . . . . . . . . . . . . . . . . . . . . . . . . . . . . 22
    6.3   Workflow Steps . . . . . . . . . . . . . . . . . . . . . . . . . . . . . . . . . . . . . . . . . . . 24
          6.3.1   Data Organisation And Selection . . . . . . . . . . . . . . . . . . . . . . . . . . . . . . 24
          6.3.2   DataSetChooser . . . . . . . . . . . . . . . . . . . . . . . . . . . . . . . . . . . . . . . 25
          6.3.3   The ProductExplorer . . . . . . . . . . . . . . . . . . . . . . . . . . . . . . . . . . . . 26
          6.3.4   Creation Of Master Calibration Files    . . . . . . . . . . . . . . . . . . . . . . . . . . . 28
Doc:
SPHERE ZIMPOL Polarimetry Reflex Issue: Issue 1.3
ESO
Tutorial Date: Date 2021-05-03
Page: 5 of 36
6.3.5 Science Reduction . . . . . . . . . . . . . . . . . . . . . . . . . . . . . . . . . . . . . 28
6.3.6 Output Organization . . . . . . . . . . . . . . . . . . . . . . . . . . . . . . . . . . . . 29
6.4 Limitations, Non-default Parameters and Tips for Improvement . . . . . . . . . . . . . . . . . . 29
7 Frequently Asked Questions 31
8 Troubleshooting 34Doc:
SPHERE ZIMPOL Polarimetry Reflex Issue: Issue 1.3
ESO
Tutorial Date: Date 2021-05-03
Page: 6 of 36Doc:
SPHERE ZIMPOL Polarimetry Reflex Issue: Issue 1.3
ESO
Tutorial Date: Date 2021-05-03
Page: 7 of 36
1 Introduction to EsoReflex
This document is a tutorial designed to enable the user to to reduce his/her data with the ESO pipeline run under
an user-friendly environmet, called EsoReflex, concentrating on high-level issues such as data reduction
quality and signal-to-noise (S/N) optimisation.
EsoReflex is the ESO Recipe Flexible Execution Workbench, an environment to run ESO VLT pipelines
which employs a workflow engine to provide a real-time visual representation of a data reduction cascade,
called a workflow, which can be easily understood by most astronomers. The basic philosophy and concepts of
Reflex have been discussed by Freudling et al. (2013A&A...559A..96F). Please reference this article if you use
Reflex in a scientific publication.
Reflex and the data reduction workflows have been developed by ESO and instrument consortia and they are
fully supported. If you have any issue, please contact usd-help@eso.org for further support.
A workflow accepts science and calibration data, as downloaded from the archive using the CalSelector tool1
(with associated raw calibrations) and organises them into DataSets, where each DataSet contains one science
object observation (possibly consisting of several science files) and all associated raw and static calibrations
required for a successful data reduction. The data organisation process is fully automatic, which is a major
time-saving feature provided by the software. The DataSets selected by the user for reduction are fed to the
workflow which executes the relevant pipeline recipes (or stages) in the correct order. Full control of the various
recipe parameters is available within the workflow, and the workflow deals automatically with optional recipe
inputs via built-in conditional branches. Additionally, the workflow stores the reduced final data products in a
logically organised directory structure employing user-configurable file names.
The ZIMPOL Polarimetry Reflex workflow described in this tutorial supports the reduction of ZIMPOL
polarimetric observations. The user is referred to the SPHERE user manual (Girard et al. 2016 2 ) for more
information on the instrument itself, and the SPHERE pipeline user manual (Möller-Nilson et al. 2016 ) for the
details of the ZIMPOL pipeline recipes. There are also other tutorials that guide you through the other SPHERE
workflows, which can be found at the ESO pipeline main webpage (http://www.eso.org/sci/software/pipelines/ ).
The quick start section (see Section 3) describes the minimum effort to get started, and it makes up only two
pages of text in this tutorial.
1
http://www.eso.org/sci/archive/calselectorInfo.html
2
available at
http://www.eso.org/sci/facilities/paranal/instruments/sphere/doc/Doc:
SPHERE ZIMPOL Polarimetry Reflex Issue: Issue 1.3
ESO
Tutorial Date: Date 2021-05-03
Page: 8 of 36
2 Software Installation
Esoreflex and the workflows can be installed in different ways: via package repositories, via the
install_esoreflex script or manually installing the software tar files.
The recommended way is to use the package repositories if your operating system is supported. The macports
repositories support macOS 10.11 to 10.14, while the rpm/yum repositories support Fedora 26 to 29, CentOS
7, Scientific Linux 7. For any other operating system it is recommended to use the install_esoreflex
script.
The installation from package repository requires sudo privileges, as it install files in the root directory. If you
want a local installation, or you do not have sudo privileges, or if you want to mange different installations on
different directories, then use the install_esoreflex script. Note that the script installation requires that
your system fulfill several software prerequisites, which might also need sudo privileges.
Reflex 2.10 needs java JDK 11 is be installed.
Please note that in case of major or minor (affecting the first two digit numbers) Reflex upgrades, the user should
erase the $HOME/KeplerData, $HOME/.kepler directories if present, to prevent possible aborts (i.e. a
hard crash) of the esoreflex process.
2.1 Installing Reflex workflows via macports
This method is supported for the macOS operating system. It is assumed that macports
(http://www.macports.org) is installed. Please read the full documentation at
http://www.eso.org/sci/software/pipelines/installation/macports.html.
2.2 Installing Reflex workflows via rpm/yum/dnf
This method is supported for Fedora 26 to 29, CentOS 7, Scientific Linux 7 operating systems, and requires
sudo rights. To install, please follow these steps
1. Configure the ESO repository (This step is only necessary if the ESO repository has not already been
previously configured).
• If you are running Fedora 26 or newer, run the following commands:
sudo dnf install dnf-plugins-core
sudo dnf config-manager --add-repo=ftp://ftp.eso.org/pub/dfs/
pipelines/repositories/stable/fedora/esorepo.repo
• If you are running CentOS 7, run the following commands:
sudo yum install yum-utils ca-certificates yum-conf-repos
sudo yum install epel-release
sudo yum-config-manager --add-repo=ftp://ftp.eso.org/pub/dfs/
pipelines/repositories/stable/centos/esorepo.repoDoc:
SPHERE ZIMPOL Polarimetry Reflex Issue: Issue 1.3
ESO
Tutorial Date: Date 2021-05-03
Page: 9 of 36
• If you are running SL 7, run the following commands:
sudo yum install yum-utils ca-certificates yum-conf-repos
sudo yum install yum-conf-epel
sudo yum-config-manager --add-repo=ftp://ftp.eso.org/pub/dfs/
pipelines/repositories/stable/sl/esorepo.repo
2. Install the pipelines
• The list of available top level packages for different instruments is given by:
sudo dnf list esopipe-\*-all # (Fedora 26 or newer)
sudo yum list esopipe-\*-all # (CentOS 7, SL 7)
• To install an individual pipeline use the following (This example is for X-Shooter. Adjust the pack-
age name to the instrument you require.):
sudo dnf install esopipe-xshoo-all # (Fedora 26 or newer)
sudo yum install esopipe-xshoo-all # (CentOS 7, SL 7)
• To install all pipelines use:
sudo dnf install esopipe-\*-all # (Fedora 26 or newer)
sudo yum install esopipe-\*-all # (CentOS 7, SL 7)
For further information, please read the full documentation at
http://www.eso.org/sci/software/pipelines/installation/rpm.html.
2.3 Installing Reflex workflows via install_esoreflex
This method is recommended for operating systems other than what indicated above, or if the user has no sudo
rights. Software dependencies are not fulfilled by the installation script, therefore the user has to install all the
prerequisites before running the installation script.
The software pre-requisites for Reflex 2.11 may be found at:
http://www.eso.org/sci/software/pipelines/reflex_workflows
To install the Reflex 2.11 software and demo data, please follow these instructions:
1. From any directory, download the installation script:
wget ftp://ftp.eso.org/pub/dfs/reflex/install_esoreflex
2. Make the installation script executable:
chmod u+x install_esoreflex
3. Execute the installation script:Doc:
SPHERE ZIMPOL Polarimetry Reflex Issue: Issue 1.3
ESO
Tutorial Date: Date 2021-05-03
Page: 10 of 36
./install_esoreflex
and the script will ask you to specify three directories: the download directory , the
software installation directory , and the directory to be used to store the demo data
. If you do not specify these directories, then the installation script will create them in the
current directory with default names.
4. Follow all the script instructions; you will be asked whether to use your Internet connecteion (recom-
mended: yes), the pipelines and demo-datasets to install (note that the installation will remove all previ-
ously installed pipelines that are found in the same installation directory).
5. To start Reflex, issue the command:
/bin/esoreflex
It may also be desirable to set up an alias command for starting the Reflex software, using the shell com-
mand alias. Alternatively, the PATH variable can be updated to contain the /bin
directory.
2.4 Demo Data
Together with the pipeline you will also receive a demo data set, that allows you to run the Reflex ZIMPOL
Polarimetry workflow without any changes in parameters. This way you have a data set to experiment with
before you start to work on your own data.
Note that you will need a minimum of ∼0.7 GB, ∼0.8 GB and ∼9.3 GB of free disk space for the directories
, and 3 , respectively. Processing all demo data will cre-
ate ∼6.5 GB of temporary products and ∼3.5 GB of final products. The SPHERE demo data have been retrieved
with the CalSelector tool4 .
3
The demo data contain data for all SPHERE observing modes.
4
http://www.eso.org/sci/archive/calselectorInfo.htmlDoc:
SPHERE ZIMPOL Polarimetry Reflex Issue: Issue 1.3
ESO
Tutorial Date: Date 2021-05-03
Page: 11 of 36
3 Quick Start: Reducing The Demo Data
For the user who is keen on starting reductions without being distracted by detailed documentation, we describe
the steps to be performed to reduce the science data provided in the SPHERE demo data set supplied with the
esoreflex 2.11 release. By following these steps, the user should have enough information to perform a
reduction of his/her own data without any further reading:
1. First, type:
esoreflex -l
If the esoreflex executable is not in your path, then you have to provide the command with the
executable full path /bin/esoreflex -l . For convenience, we will drop the
reference to . A list with the available esoreflex workflows will appear, showing
the workflow names and their full path.
2. Open the ZIMPOL Polarimetry by typing:
esoreflex sphere_zimpol_pol&
Alternatively, you can type only the command esoreflex the empty canvas will appear (Figure 3.1)
and you can select the workflow to open by clicking on File -> Open File. Note that the loaded
workflow will appear in a new window. The ZIMPOL Polarimetry workflow is shown in Figure 3.2.
3. To aid in the visual tracking of the reduction cascade, it is advisable to use component (or actor) highlight-
ing. Click on Tools -> Animate at Runtime, enter the number of milliseconds representing the
animation interval (100 ms is recommended), and click OK .
4. Change directories set-up. Under “Setup Directories” in the workflow canvas there are seven parameters
that specify important directories (green dots).
By default, the ROOT_DATA_DIR, which specifies the working directory within which the other directo-
ries are organised. is set to your $HOME/reflex_data directory. All the temporary and final products
of the reduction will be organized under sub-directories of ROOT_DATA_DIR, therefore make sure this
parameter points to a location where there is enough disk space. To change ROOT_DATA_DIR, double
click on it and a pop-up window will appear allowing you to modify the directory string, which you may
either edit directly, or use the Browse button to select the directory from a file browser. When you have
finished, click OK to save your changes.
Changing the value of RAW_DATA_DIR is the only necessary modification if you want to process data
other than the demo data
5. Click the button to start the workflow
6. The workflow will highlight the Data Organiser actor which recursively scans the raw data di-
rectory (specified by the parameter RAW_DATA_DIR under “Setup Directories” in the workflow can-
vas) and constructs the datasets. Note that the raw and static calibration data must be present eitherDoc:
SPHERE ZIMPOL Polarimetry Reflex Issue: Issue 1.3
ESO
Tutorial Date: Date 2021-05-03
Page: 12 of 36
in RAW_DATA_DIR or in CALIB_DATA_DIR, otherwise datasets may be incomplete and cannot be
processed. However, if the same reference file was downloaded twice to different places this creates a
problem as esoreflex cannot decide which one to use.
7. The Data Set Chooser actor will be highlighted next and will display a “Select Datasets” window
(see Figure 3.3) that lists the datasets along with the values of a selection of useful header keywords5 . The
first column consists of a set of tick boxes which allow the user to select the datasets to be processed. By
default all complete datasets which have not yet been reduced will be selected. A full description of the
options offered by the Data Set Chooser will be presented in Section 6.3.2.
8. Click the Continue button and watch the progress of the workflow by following the red highlighting
of the actors. A window will show which dataset is currently being processed.
9. Once the reduction of all datasets has finished, a pop-up window called Product Explorer will appear,
showing the datasets which have been reduced together with the list of final products. This actor allows
the user to inspect the final data products, as well as to search and inspect the input data used to create
any of the products of the workflow. Figure 3.4 shows the Product Explorer window. A full description
of the Product Explorer will be presented in Section 6.3.3.
10. After the workflow has finished, all the products from all the datasets can be found in a directory under
END_PRODUCTS_DIR named after the workflow start timestamp. Further subdirectories will be found
with the name of each dataset.
Well done! You have successfully completed the quick start section and you should be able to use this knowledge
to reduce your own data. However, there are many interesting features of Reflex and the SPHERE workflow
that merit a look at the rest of this tutorial.
Figure 3.1: The empty Reflex canvas.
5
The keywords listed can be changed by double clicking on the DataOrganiser Actor and editing the list of keywords in the sec-
ond line of the pop-up window. Alternatively, instead of double-clicking, you can press the right mouse button on the DataOrganiser
Actor and select Configure Actor to visualize the pop-up window.Doc:
SPHERE ZIMPOL Polarimetry Reflex Issue: Issue 1.3
ESO
Tutorial Date: Date 2021-05-03
Page: 13 of 36
Figure 3.2: ZIMPOL Polarimetry workflow general layout.
Figure 3.3: The “Select Datasets” pop-up window.Doc:
SPHERE ZIMPOL Polarimetry Reflex Issue: Issue 1.3
ESO
Tutorial Date: Date 2021-05-03
Page: 14 of 36
Figure 3.4: The Product Explorer shows all datasets reduced in previous executions together with the full
reduction chain for all the pipeline products.Doc:
SPHERE ZIMPOL Polarimetry Reflex Issue: Issue 1.3
ESO
Tutorial Date: Date 2021-05-03
Page: 15 of 36
4 About the main esoreflex canvas
4.1 Saving And Loading Workflows
In the course of your data reductions, it is likely that you will customise the workflow for various data sets, even
if this simply consists of editing the ROOT_DATA_DIR to a different value for each data set. Whenever you
modify a workflow in any way, you have the option of saving the modified version to an XML file using File
-> Export As (which will also open a new workflow canvas corresponding to the saved file). The saved
workflow may be opened in subsequent esoreflex sessions using File -> Open. Saving the workflow
in the default Kepler format (.kar) is only advised if you do not plan to use the workflow with another computer.
4.2 Buttons
At the top of the esoreflex canvas are a set of buttons which have the following functions:
• - Zoom in.
• - Reset the zoom to 100%.
• - Zoom the workflow to fit the current window size (Recommended).
• - Zoom out.
• - Run (or resume) the workflow.
• - Pause the workflow execution.
• - Stop the workflow execution.
The remainder of the buttons (not shown here) are not relevant to the workflow execution.
4.3 Workflow States
A workflow may only be in one of three states: executing, paused, or stopped. These states are indicated by the
yellow highlighting of the , , and buttons, respectively. A workflow is executed by clicking the
button. Subsequently the workflow and any running pipeline recipe may be stopped immediately by clicking the
button, or the workflow may be paused by clicking the button which will allow the current actor/recipe
to finish execution before the workflow is actually paused. After pausing, the workflow may be resumed by
clicking the button again.Doc:
SPHERE ZIMPOL Polarimetry Reflex Issue: Issue 1.3
ESO
Tutorial Date: Date 2021-05-03
Page: 16 of 36
5 The SPHERE Workflow
The SPHERE workflow canvas is organised into a number of areas. From top-left to top-right you will find
general workflow instructions, directory parameters, and global parameters. In the middle row you will find five
boxes describing the workflow general processing steps in order from left to right, and below this the workflow
actors themselves are organised following the workflow general steps.
5.1 Workflow Canvas Parameters
The workflow canvas displays a number of parameters that may be set by the user. Under “Setup Directories” the
user is only required to set the RAW_DATA_DIR to the working directory for the dataset(s) to be reduced, which,
by default, is set to the directory containing the demo data. The RAW_DATA_DIR is recursively scanned by the
Data Organiser actor for input raw data. The directory CALIB_DATA_DIR, which is by default within the
pipeline installation directory, is also scanned by the Data Organiser actor to find any static calibrations
that may be missing in your dataset(s). If required, the user may edit the directories BOOKKEEPING_DIR,
LOGS_DIR, TMP_PRODUCTS_DIR, and END_PRODUCTS_DIR, which correspond to the directories where
book-keeping files, logs, temporary products and end products are stored, respectively (see the Reflex User
Manual for further details; Forchì (2012)).
There is a mode of the Data Organiser that skips the built-in data organisation and uses instead the data or-
ganisation provided by the CalSelector tool. To use this mode, click on Use CalSelector associations
in the Data Organiser properties and make sure that the input data directory contains the XML file down-
loaded with the CalSelector archive request (note that this does not work for all instrument workflows).
Under the “Global Parameters” area of the workflow canvas, the user may set the FITS_VIEWER parameter to
the command used for running his/her favourite application for inspecting FITS files. Currently this is set by
default to fv, but other applications, such as ds9, skycat and gaia for example, may be useful for inspecting
image data. Note that it is recommended to specify the full path to the visualization application (an alias will
not work).
By default the EraseDirs parameter is set to false, which means that no directories are cleaned before
executing the workflow, and the recipe actors will work in Lazy Mode (see Section 5.2.4), reusing the previous
pipeline recipe outputs if input files and parameters are the same as for the previous execution, which saves
considerable processing time. Sometimes it is desirable to set the EraseDirs parameter to true, which
forces the workflow to recursively delete the contents of the directories specified by BOOKKEEPING_DIR,
LOGS_DIR, and TMP_PRODUCTS_DIR. This is useful for keeping disk space usage to a minimum and will
force the workflow to fully re-reduce the data each time the workflow is run.
The parameter RecipeFailureMode controls the behaviour in case that a recipe fails. If set to Continue,
the workflow will trigger the next recipes as usual, but without the output of the failing recipe, which in most
of the cases will lead to further failures of other recipes without the user actually being aware of it. This mode
might be useful for unattended processing of large number of datasets. If set to Ask, a pop-up window will ask
whether the workflow should stop or continue. This is the default. Alternatively, the Stop mode will stop the
workflow execution immediately.
The parameter ProductExplorerMode controls whether the ProductExplorer actor will show its win-
dow or not. The possible values are Enabled, Triggered, and Disabled. Enabled opens the Product-Doc:
SPHERE ZIMPOL Polarimetry Reflex Issue: Issue 1.3
ESO
Tutorial Date: Date 2021-05-03
Page: 17 of 36
Explorer GUI at the end of the reduction of each individual dataset. Triggered (default and recommended)
opens the ProductExplorer GUI when all the selected datasets have been reduced. Disabled does not display
the ProductExplorer GUI.
5.2 Workflow Actors
5.2.1 Simple Actors
Simple actors have workflow symbols that consist of a single (rather than multiple) green-blue rectangle. They
may also have an icon within the rectangle to aid in their identification. The following actors are simple actors:
• - The DataOrganiser actor.
• - The DataSetChooser actor (inside a composite actor).
• - The FitsRouter actor Redirects files according to their categories.
• - The ProductRenamer actor.
• - The ProductExplorer actor (inside a composite actor).
Access to the parameters for a simple actor is achieved by right-clicking on the actor and selecting Configure
Actor. This will open an “Edit parameters” window. Note that the Product Renamer actor is a jython
script (Java implementation of the Python interpreter) meant to be customised by the user (by double-clicking
on it).
5.2.2 Composite Actors
Composite Actors have workflow symbols that consist of multiple-layered green-blue rectangles. They gen-
erally do not have a icon within the rectangle. A Composite Actor represents a combination of more Simple
or Composite Actors which hides over-complexity from the user in the top-level workflow. In the ZIMPOL
Polarimetry workflow, the following actors are composite actors:
• - The Initialise actor.
• - The Initialise Current DataSet actor.Doc:
SPHERE ZIMPOL Polarimetry Reflex Issue: Issue 1.3
ESO
Tutorial Date: Date 2021-05-03
Page: 18 of 36
• - The BiasPol actor.
• - The IntFlatFieldPol actor.
• - The ModemEff actor.
• - The StarCenter actor.
• - The SciencePol actor.
• - The Close DataSet actor.
Composite Actors may also be expanded for inspection. To do this, right-click on the actor and select Open
Actor, which will expand the Composite Actor components in a new Reflex canvas window. If the Com-
posite Actor corresponds to a pipeline recipe, then the corresponding RecipeExecuter actor will be present
as a Simple Actor, and its parameters are accessible as for any other Simple Actor. Alternatively you may still
find Composite Actors, on which you need to repeat the first step to access the Recipe Executer.
5.2.3 Recipe Execution within Composite Actors
The ZIMPOL Polarimetry workflow contains Composite Actors to run pipeline recipes. This is in the most
simple case due to the SoF Splitter/SoF Accumulator6 , which enables the processing of calibration
data from different settings within one given DataSet. More complex Composite Actors contain several actors
(e.g. Recipe Executer).
Figure 5.1: This is the window you get when you choose Open Actor for the Composite Actor
BiasPol. This is the most simple case for a Composite Actor. Using Configure Actor on
sph_zpl_master_bias_1 gives you Fig. 5.2.
6
SoF stands for Set of Frames, which is an ASCII file containing the name (and path) of each input file and its category (e.g. BIAS).Doc:
SPHERE ZIMPOL Polarimetry Reflex Issue: Issue 1.3
ESO
Tutorial Date: Date 2021-05-03
Page: 19 of 36
Table 5.1: The ZIMPOL Polarimetry workflow actors and their contents
actor recipes description
BiasPol sph_zpl_master_bias create master bias
IntFlatFieldPol sph_zpl_intensity_flat create master instrument flat field
ModemEff sph_zpl_modem_efficiency determine modulation efficiency
StarCenter sph_zpl_star_center_pol determine the field centre to be used for derotation
SciencePol sph_zpl_science_p1 reduce ZIMPOL P1 polarimetric data
sph_zpl_science_p23 reduce ZIMPOL P2 polarimetric data
The central elements of any Reflex workflow are the RecipeExecuter actors that actually run the recipes.
One basic way to embed a RecipeExecuter in a workflow is shown in Fig 5.1, which is the most simple
version of a Composite Actor. The RecipeExecuter is preceded by an SofSplitter, and followed by
an SofAccumulator. The function of the SofSplitter is to investigate the incoming SoFs, sort them
by “purpose”, and create separate SoFs for each purpose. The RecipeExecuter then processes each of
the SoFs independently (unless they are actually the same files). Finally, the SofAccumulator packs all
the results into a single output SoF. The direct relation between the SofSplitter and SofAccumulator
is used to communicate the number of different SoFs created by the SofSplitter. A workflow will only
work as intended if the purpose of all the files a recipe needs as input is identical. The only exception to this
rule is that a purpose can also be “default”. In this case, the file is included in any output SoF created by the
SoFsplitter and SofAccumulator.
The reason for this scheme is best explained by an example. For a complex DataSet, the Data Organizer
might have selected a large number of individual raw bias frames. The different bias frames are to be used to
calibrate different frames, e.g. the science frames and the flat field frames. The Data Organizer determines
and records this “purpose” of each bias frame, and this information is included in the DataSet and each SoF
created from this DataSet. The FitsRouter directs all raw bias frames to the BiasPol Composite Actor.
The SofSplitter then creates SoFs, one for the bias frames to be used for the science frames, and (possibly)
separate ones for the flat field frames. The sph_zpl_master_bias recipe creates one master bias for each
SoF, and the SofAccumulator then creates a SoF that contains all the products.
A RecipeExecuter actor is used in the workflow to run a single pipeline recipe (e.g: in the BiasPol actor
the recipe sph_zpl_master_bias is executed). In order to configure the RecipeExecuters, one has to
first use Open Actor to get to the level of the recipe executers (see Fig. 5.1).
In Figure 5.2 we show the “Edit parameters” window for a typical RecipeExecuter actor, which can be
displayed by right-clicking on the actor and selecting Configure Actor. In the following we describe in
more detail the function of some of the parameters for a RecipeExecuter actor:
• The “recipe” parameter states the pipeline recipe which will be executed.
• The “mode” parameter has a pull-down menu allowing the user to specify the execution mode of the actor.
The available options are:
– Run: The pipeline recipe will be executed, possibly in Lazy Mode (see Section 5.2.4). This option
is the default option.Doc:
SPHERE ZIMPOL Polarimetry Reflex Issue: Issue 1.3
ESO
Tutorial Date: Date 2021-05-03
Page: 20 of 36
Figure 5.2: The “Edit parameters” window for a typical RecipeExecuter actor, the
sph_zpl_master_bias_1 actor which runs the sph_zpl_master_bias pipeline recipe.
– Skip: The pipeline recipe is not executed, and the actor inputs are passed to the actor outputs.
– Disabled: The pipeline recipe is not executed, and the actor inputs are not passed to the actor
outputs.
• The “Lazy Mode” parameter has a tick-box (selected by default) which indicates whether the RecipeExecuter
actor will run in Lazy Mode or not. A full description of Lazy Mode is provided in Sect. 5.2.4.
• The “Recipe Failure Mode” parameter has a pull-down menu allowing the user to specify the behaviour
of the actor if the pipeline recipe fails. The available options are:
– Stop: The actor issues an error message and the workflow stops.
– Continue: The actor creates an empty output and the workflow continues.
– Ask: The actor displays a pop-up window and asks the user whether he/she wants to continue or
stop the workflow. This option is the default option.
To have all Recipe Executers use the global setting their internal “Recipe Failure Mode” should be
set to $RecipeFailureMode.Doc:
SPHERE ZIMPOL Polarimetry Reflex Issue: Issue 1.3
ESO
Tutorial Date: Date 2021-05-03
Page: 21 of 36
• The set of parameters which start with “recipe param” and end with a number or a string correspond to the
parameters of the relevant pipeline recipe. By default in the RecipeExecuter actor, the pipeline recipe
parameters are set to their pipeline default values. If you need to change the default parameter value for
any pipeline recipe, then this is where you should edit the value. For more information on the ZIMPOL
pipeline recipe parameters, the user should refer to the SPHERE pipeline user manual (Möller-Nilson et
al. 2016) or to the command line help available via esorex −−man .
The description of the remainder of the RecipeExecuter actor parameters are outside the scope of this tuto-
rial, and the interested user is referred to the Reflex User Manual for further details (Forchì 2012). Any changes
that you make in the “Edit parameters” window must be saved in the workflow by clicking the Commit button
when you have finished to have them used for processing.
5.2.4 Lazy Mode
By default, all RecipeExecuter actors in a pipeline workflow are “Lazy Mode” enabled. This means that
when the workflow attempts to execute such an actor, the actor will check whether the relevant pipeline recipe
has already been executed with the same input files and with the same recipe parameters. If this is the case,
then the actor will not execute the pipeline recipe, and instead it will simply broadcast the previously generated
products to the output port. The purpose of the Lazy Mode is therefore to minimise any reprocessing of data by
avoiding data re-reduction where it is not necessary.
One should note that the actor’s Lazy Mode depends on the contents of the directory specified by the parameter
BOOKKEEPING_DIR and the relevant FITS file checksums. Any modification to the directory contents and/or
the file checksums will cause the corresponding actor to run the pipeline recipe again when executed, thereby
re-reducing the input data.
The re-reduction of data at each execution may sometimes be desirable. To force a re-reduction of data for
any single RecipeExecuter actor in the workflow, right-click the actor, select Configure Actor, and
uncheck the Lazy mode parameter tick-box in the “Edit parameters” window that is displayed. For many work-
flows the RecipeExecuter actors are actually found inside the composite actors in the top level workflow.
To access such embedded RecipeExecuter actors you will first need to open the sub-workflow by right-
clicking on the composite actor and then selecting Open Actor.
To force the re-reduction of all data in a workflow (i.e. to disable Lazy mode for the whole workflow), you must
uncheck the Lazy mode for every single RecipeExecuter actor in the entire workflow. It is also possible to
change the name of the bookkeeping directory, instead of modifying any of the Lazy mode parameters. This will
also force a re-reduction of the given dataset(s). A new reduction will start (with the lazy mode still enabled),
but the results of previous reduction will not be reused. Alternatively, if there is no need to keep any of the
previously reduced data, one can simply set the EraseDirs parameter under the “Global Parameters” area of
the workflow canvas to true. This will then remove all previous results that are stored in the bookkeeping,
temporary, and log directories before processing the input data, in effect, starting a new clean data reduction
and re-processing every input dataset. Note: The option EraseDirs = true does not work in esoreflex
version 2.9.x and makes the workflow to crash.Doc:
SPHERE ZIMPOL Polarimetry Reflex Issue: Issue 1.3
ESO
Tutorial Date: Date 2021-05-03
Page: 22 of 36
6 Reducing your own data
In this section we describe how to reduce your own data set.
First, we suggest the reader to familiarize with the workflow by reducing the demo dataset first (Section 3), but
it is not a requirement.
6.1 The esoreflex command
We list here some options associated to the esoreflex command. We recommend to try them to familiarize
with the system. In the following, we assume the esoreflex executable is in your path; if not you have to
provide the full path /bin/esoreflex
To see the available options of the esoreflex command type:
esoreflex -h
The output is the following.
-h | -help print this help message and exit.
-v | -version show installed Reflex version and pipelines and exit.
-l | -list-workflows list available installed workflows and from
~/KeplerData/workflows.
-n | -non-interactive enable non-interactive features.
-e | -explore run only the Product Explorer in this workflow
-p | -list-parameters
lists the available parameters for the given
workflow.
-config allows to specify a custom esoreflex.rc configuration
file.
-create-config if is TRUE then a new configuration file is
created in ~/.esoreflex/esoreflex.rc. Alternatively
a configuration file name can be given to write to.
Any existing file is backed up to a file with a ’.bak’
extension, or ’.bakN’ where N is an integer.
-debug prints the environment and actual Reflex launch
command used.
6.2 Launching the workflow
We list here the recommended way to reduce your own datasets. Steps 1 and 2 are optional and one can start
from step 3.
1. Type: esoreflex -n ZIMPOL Polarimetry to launch the workflow non interac-
tively and reduce all the datasets with default parameters.Doc:
SPHERE ZIMPOL Polarimetry Reflex Issue: Issue 1.3
ESO
Tutorial Date: Date 2021-05-03
Page: 23 of 36
allows you to specify the workflow parameters, such as the location of your raw data
and the final destination of the products.
For example, type (in a single command line):
esoreflex -n
-RAW_DATA_DIR /home/user/my_raw_data
-ROOT_DATA_DIR /home/user/my_reduction
-END_PRODUCTS_DIR $ROOT_DATA_DIR/reflex_end_products
sphere_zimpol_pol
to reduce the complete datasets that are present in the directory /home/user/my_raw_data and that
were not reduced before. Final products will be saved in /home/user/my_reduction/reflex_
end_products, while book keeping, temporary products, and logs will be saved in sub-directories of
/home/user/my_reduction/. If the reduction of a dataset fails, the reduction continues to the next
dataset. It can take some time, depending on the number of datasets present in the input directory. For
a full list of workflow parameters type esoreflex -p ZIMPOL Polarimetry. Note that this command
lists only the parameters, but does not launch the workflow.
Once the reduction is completed, one can proceed with optimizing the results with the next steps.
2. Type:
esoreflex -e sphere_zimpol_pol
to launch the Product Explorer. The Product Explorer allows you to inspect the data products already re-
duced by the ZIMPOL Polarimetry esoreflex workflow. Only products associated with the workflow
default bookkeeping database are shown. To visualize products associated to given bookkeeping database,
pass the full path via the BOOKKEEPING_DB parameter:
esoreflex -e BOOKKEEPING_DB sphere_zimpol_pol
to point the product explorer to a given , e.g., /home/username/reflex/
reflex_bookkeeping/test.db
The Product Explorer allows you to inspect the products while the reduction is running. Press the button
Refresh to update the content of the Product Explorer. This step can be launched in parallel to step 1.
A full description of the Product Explorer will be given in Section 6.3.3
3. Type:
esoreflex sphere_zimpol_pol &
to launch the ZIMPOL Polarimetry esoreflex workflow. The ZIMPOL Polarimetry workflow window
will appear (Fig. 3.2). Please configure the set-up directories ROOT_DATA_DIR, RAW_DATA_DIR,
and other workflow parameters as needed. Just double-click on them, edit the content, and press OK .
Remember to specify the same as for the Product Explorer, if it has been opened
at step #2, to synchronize the two processes.
4. (Recommended, but not mandatory) On the main esoreflex menu set Tools –> Animate at
Runtime to 1 in order to highlight in red active actors during execution.
5. Press the button to start the workflow. First, the workflow will highlight and execute the Initialise
actor, which among other things will clear any previous reductions if required by the user (see Section 5.1).Doc:
SPHERE ZIMPOL Polarimetry Reflex Issue: Issue 1.3
ESO
Tutorial Date: Date 2021-05-03
Page: 24 of 36
Secondly, if set, the workflow will open the Product Explorer, allowing the user to inspect previously re-
duced datasets (see Section 6.3.3 for how to configure this option).
Figure 6.1: The “Select Frames” window with a single file from the current Data Set highlighted in blue, and the
corresponding FITS header displayed in the text box on the right. Hidden partially behind the “Select Frames”
window is the “Select DataSets” window with the currently selected DataSet highlighted in blue.
6.3 Workflow Steps
6.3.1 Data Organisation And Selection
The DataOrganiser (DO) is the first crucial component of a Reflex workflow. The DO takes as input
RAW_DATA_DIR and CALIB_DATA_DIR and it detects, classifies, and organises the files in these directories
and any subdirectories. The output of the DO is a list of “DataSets”. A DataSet is a special Set of Files (SoF).
A DataSet contains one or several science (or calibration) files that should be processed together, and all files
needed to process these data. This includes any calibration files, and in turn files that are needed to process
these calibrations. Note that different DataSets might overlap, i.e. some files might be included in more than
one DataSet (e.g., common calibration files).Doc:
SPHERE ZIMPOL Polarimetry Reflex Issue: Issue 1.3
ESO
Tutorial Date: Date 2021-05-03
Page: 25 of 36
A DataSet lists three different pieces of information for each of its files, namely 1) the file name (includ-
ing the path), 2) the file category, and 3) a string that is called the “purpose” of the file. The DO uses the
OCA7 rules to find the files to include in a DataSet, as well as their categories and purposes. The file category
identifies different types of files, and it is derived by information in the header of the file itself. A category
could for example be RAW_CALIBRATION_1, RAW_CALIBRATION_2 or RAW_SCIENCE, depending on
the instrument. The purpose of a file identifies the reason why a file is included in a DataSet. The syntax is
action_1/action_2/action_3/ ... /action_n, where each action_i describes an intended
processing step for this file (for example, creation of a MASTER_CALIBRATION_1 or a MASTER_CALIBRATION_2).
The actions are defined in the OCA rules and contain the recipe together with all file categories required to exe-
cute it (and predicted products in case of calibration data). For example, a workflow might include two actions
action_1 and action_2. The former creates MASTER_ CALIBRATION_1 from RAW_CALIBRATION_1,
and the later creates a MASTER_CALIBRATION_2 from RAW_CALIBRATION_2. The action_2 action
needs RAW_CALIBRATION_2 frames and the MASTER_ CALIBRATION_1 as input. In this case, these
RAW_CALIBRATION_1 files will have the purpose action_ 1/action_2. The same DataSet might also
include RAW_CALIBRATION_1 with a different purpose; irrespective of their purpose the file category for all
these biases will be RAW_CALIBRATION_1.
The Datasets created via the DataOrganiser will be displayed in the DataSet Chooser. Here the users
have the possibility to inspect the various datasets and decide which one to reduce. By default, DataSets that
have not been reduced before are highlighted for reduction. Click either Continue in order to continue with
the workflow reduction, or Stop in order to stop the workflow. A full description of the DataSet Chooser
is presented in Section 6.3.2.
Once the Continue is pressed, the workflow starts to reduce the first selected DataSet. Files are broadcasted
according to their purpose to the relevant actors for processing.
The categories and purposes of raw files are set by the DO, whereas the categories and purpose of products
generated by recipes are set by the RecipeExecuter. The file categories are used by the FitsRouter
to send files to particular processing steps or branches of the workflow (see below). The purpose is used
by the SofSplitter and SofAccumulator to generate input SoFs for the RecipeExecuter. The
SofSplitter and SofAccumulator accept several SoFs as simultaneous input. The SofAccumulator
creates a single output SoF from the inputs, whereas the SofSplitter creates a separate output SoF for each
purpose.
6.3.2 DataSetChooser
The DataSetChooser displays the DataSets available in the “Select Data Sets” window, activating vertical
and horizontal scroll bars if necessary (Fig. 3.3).
Some properties of the DataSets are displayed: the name, the number of files, a flag indicating if it has been
successfully reduced (a green OK), if the reduction attempts have failed or were aborted (a red FAILED), or if
it is a new dataset (a black "-"). The column "Descriptions" lists user-provided descriptions (see below), other
columns indicate the instrument set-up and a link to the night log.
7
OCA stands for OrganisationClassificationAssociation and refers to rules, which allow to classify the raw data according to the
contents of the header keywords, organise them in appropriate groups for processing, and associate the required calibration data for
processing. They can be found in the directory /share/esopipes//reflex/,
carrying the extension.ocaDoc:
SPHERE ZIMPOL Polarimetry Reflex Issue: Issue 1.3
ESO
Tutorial Date: Date 2021-05-03
Page: 26 of 36
Sometimes you will want to reduce a subset of these DataSets rather than all DataSets, and for this you may
individually select (or de-select) DataSets for processing using the tick boxes in the first column, and the buttons
Deselect All and Select Complete at the bottom, or configure the “Filter” field at the bottom left.
Available filter options are: "New" (datasets not previously reduced will be selected), "Reduced" (datasets
previously reduced will be selected), "All" (all datasets will be selected), and "Failed" (dataset with a failed or
aborted reduction will be selected).
You may also highlight a single DataSet in blue by clicking on the relevant line. If you subsequently click on
Inspect Highlighted , then a “Select Frames” window will appear that lists the set of files that make
up the highlighted DataSet including the full filename8 , the file category (derived from the FITS header), and a
selection tick box in the right column. The tick boxes allow you to edit the set of files in the DataSet which is
useful if it is known that a certain calibration frame is of poor quality (e.g: a poor raw flat-field frame). The list
of files in the DataSet may also be saved to disk as an ASCII file by clicking on Save As and using the file
browser that appears.
By clicking on the line corresponding to a particular file in the “Select Frames” window, the file will be high-
lighted in blue, and the file FITS header will be displayed in the text box on the right, allowing a quick inspection
of useful header keywords. If you then click on Inspect , the workflow will open the file in the selected FITS
viewer application defined by the workflow parameter FITS_VIEWER.
To exit from the “Select Frames” window, click Continue .
To add a description of the reduction, press the button ... associated with the field "Add description to the
current execution of the workflow" at the bottom right of the Select Dataset Window; a pop up window will
appear. Enter the desired description (e.g. "My first reduction attempt") and then press OK . In this way, all the
datasets reduced in this execution, will be flagged with the input description. Description flags can be visualized
in the SelectFrames window and in the ProductExplorer, and they can be used to identify different
reduction strategies.
To exit from the “Select DataSets” window, click either Continue in order to continue with the workflow
reduction, or Stop in order to stop the workflow.
6.3.3 The ProductExplorer
The ProductExplorer is an interactive component in the esoreflex workflow whose main purpose is to list the
final products with the associated reduction tree for each dataset and for each reduction attempt (see Fig. 3.4).
Configuring the ProductExplorer
You can configure the ProductExplorer GUI to appear after or before the data reduction. In the latter case you
can inspect products as reduction goes on.
1. To display the ProductExplorer GUI at the end of the datareduction:
• Click on the global parameter “ProductExplorerMode” before starting the data reduction. A configuration
window will appear allowing you to set the execution mode of the Product Explorer. Valid options are:
8
keep the mouse pointer on the file name to visualize the full path name.Doc:
SPHERE ZIMPOL Polarimetry Reflex Issue: Issue 1.3
ESO
Tutorial Date: Date 2021-05-03
Page: 27 of 36
– "Triggered" (default). This option opens the ProductExplorer GUI when all the selected datasets
have been reduced.
– "Enabled". This option opens the ProductExplorer GUI at the end of the reduction of each individual
dataset.
– “Disable”. This option does not display the ProductExplorer GUI.
• Press the button to start the workflow.
2. To display the ProductExplorer GUI “before” starting the data reduction:
• double click on the composite Actor "Inspect previously reduced data". A configuration window will
appear. Set to "Yes" the field "Inspect previously reduced data (Yes/No)". Modify the field "Continue
reduction after having inspected the previously reduced data? (Continue/Stop/Ask)". "Continue" will
continue the workflow and trigger the DataOrganizer. "Stop" will stop the workflow; "Ask" will prompt
another window deferring the decision whether continuing or not the reduction after having closed the
Product Explorer.
• Press the button to start the workflow. Now the ProductExplorer GUI will appear before starting the
data organization and reduction.
Exploring the data reduction products
The left window of the ProductExplorer GUI shows the executions for all the datasets (see Fig. 3.4). Once you
click on a dataset, you get the list of reduction attemps. Green and red flags identify successfull or unsucessfull
reductions. Each reduction is linked to the “Description” tag assigned in the “Select Dataset” window.
1. To identify the desired reduction run via the “Description” tag, proceed as follows:
• Click on the symbol at the left of the dataset name. The full list of reduction attempts for that dataset will
be listed. The column Exec indicates if the reduction was succesful (green flag: "OK") or not (red flag:
"Failed").
• Click on the entries in the field "Description" to visualize the description you have entered associated to
that dataset on the Select Dataset window when reducing the data.
• Identify the desired reduction run. All the products are listed in the central window, and they are organized
following the data reduction cascade.
You can narrow down the range of datasets to search by configuring the field "Show" at the top-left side of the
ProductExplorer (options are: "All", "Successful", "Unsuccessful"), and specifying the time range (Last, all,
From-to).
2. To inspect the desired file, proceed as follows:Doc:
SPHERE ZIMPOL Polarimetry Reflex Issue: Issue 1.3
ESO
Tutorial Date: Date 2021-05-03
Page: 28 of 36
• Navigate through the data reduction cascade in the ProductExplorer by clicking on the files.
• Select the file to be inspected and click with the mouse right-hand button. The available options are:
– Options available always:
* Copy full path. It copies the full name of the file onto the clipboard. Shift+Ctr+v to past it into
a terminal.
* Inspect Generic. It opens the file with the fits viewer selected in the main workflow canvas.
* Inspect with. It opens the file with an executable that can be specified (you have to provide the
full path to the executable).
– Options available for files in the TMP_PRODUCTS_DIR directory only:
* command line. Copy of the environment configuration and recipe call used to generate that file.
* Xterm. It opens an Xterm at the directory containing the file.
– Options available for products associated to interactive windows only:
* Display pipeline results. It opens the interactive windows associated to the recipe call that
generated the file. Note that this is for visualization purposes only; the recipe parameters cannot
be changed and the recipe cannot be re-run from this window.
6.3.4 Creation Of Master Calibration Files
In this step of the workflow, the following ZIMPOL recipes are executed in the order listed below. Please refer
to the SPHERE pipeline user manual (Möller-Nilson et al. 2016) for the details of each recipe and the algorithms
employed:
1. The BiasPol actor will execute the pipeline recipe sph_zpl_master_bias in order to create a
master bias frame (needed only for FastPolarimetry readout)
2. The IntFlatField actor will execute the pipeline recipe sph_zpl_intensity_flat in order to
create a combined master flat frame from the set of raw flat frames
3. The ModemEff actor will execute the pipeline recipe sph_zpl_modem_efficiency in order to
create a master modulation/demodulation(modem) efficiency product
4. The StarCenter actor will execute the pipeline recipe sph_zpl_star_center_pol in order to
determine the position of the central target.
6.3.5 Science Reduction
The SciencePol actor will execute the ZIMPOL pipeline recipes sph_zpl_science_p1 or
sph_zpl_science_p23, depending on the input data. Please refer to the SPHERE pipeline user manual
(Möller-Nilson et al. 2016) for the details of these recipes.Doc:
SPHERE ZIMPOL Polarimetry Reflex Issue: Issue 1.3
ESO
Tutorial Date: Date 2021-05-03
Page: 29 of 36
6.3.6 Output Organization
After having processed the input data for a DataSet, the workflow highlights and executes the Product
Renamer actor, which, by default, will copy the defined final products of the Science actor to the direc-
tory specified by END_PRODUCTS_DIR and rename them with names derived from the values of certain FITS
header keywords. Specifically, final products are renamed by default with names of the form
_.fits, with
and representing the values of the corresponding FITS header keywords
( is the name of the OB and is the cate-
gory of the product file). These names are fully configurable by right-clicking on the Product Renamer
actor, selecting Configure Actor, and then editing the string as appropriate. In some cases the keyword
(target name) may be more useful than .
The following actors in this step of the workflow are concerned with the termination of the data flow for the
current DataSet and will be highlighted briefly as they are executing.
Finally, the Product Explorer window will appear as shown in Fig. 3.4 with a list of datasets on the left
menu. By unfolding the menu under each dataset, all the renamed products appear, and if one is interested
in the files, including all intermediate steps, that are used to produce that final product, just click on it and a
dependency tree will show the whole reduction chain.
6.4 Limitations, Non-default Parameters and Tips for Improvement
Below we provide a list of known limitations of the pipeline as it was delivered to ESO in October 2016 as well
as known data problems:
sph_zpl_modem_efficiency The products of this recipe introduce a sign change in the Q and U frames created
by sph_zpl_science_p1 and sph_zpl_science_p23. If you want to determine the polarization
angle from those products you therefore have to use −Q and −U.
sph_zpl_star_center_pol If no coordinates are determined increasing the value of the recipe parameter
zpl.star_center_pol.unsharp_window (for instance from 4 to 8) may help. The recipe now
accepts also data with NAXIS=2 (i.e. NDIT=1).
charge traps For longer exposure times charge traps may appear, where small errors in the charge transfer
accumulate over time. Fig. 6.2 (p. 30) shows such an example for a science exposure with DET.DIT1
= 50 sec. The accumulation starts at shorter exposure times for FastPolarimetry data and may be
present also in FLAT,LAMP or FLAT,POL100 calibrations.
While the ZIMPOL pipeline is rather robust in some cases recipe parameters may need to be changed to improve
the results:
sph_zpl_star_center_pol This recipe looks for the waffle spots to determine the position of the target behind
the coronagraph. In some cases the detection threshold of 10 σ is too high and the recipe cannot identify
the target’s position. In such a case sph_zpl_science_imaging will rotate the frames around an
incorrect position which will smear out the signal. If you see such behaviour you may try to reduce
star_center_img.sigma to 5 and rerun the 2 recipes.Doc:
SPHERE ZIMPOL Polarimetry Reflex Issue: Issue 1.3
ESO
Tutorial Date: Date 2021-05-03
Page: 30 of 36
Figure 6.2: The vertical pairs of bright and dark pixels marked in cyan are the charge traps discussed in the
text..Doc:
SPHERE ZIMPOL Polarimetry Reflex Issue: Issue 1.3
ESO
Tutorial Date: Date 2021-05-03
Page: 31 of 36
7 Frequently Asked Questions
• The error window fills the whole screen - how can I get to the Continue / Stop buttons?
Press the Alt key together with your left mouse button to move the window upwards and to the left. At
the bottom the Continue / Stop buttons will be visible. This bug is known but could not yet be fixed.
• I tried to Open (or Configure) an Actor while the workflow is running and now it does not react
any more. What should I do?
This is a limitation of the underlying Kepler engine. The only way out is to kill the workflow externally.
If you want to change anything while a workflow is running you first need to pause it.
• After a successful reduction of a data set, I changed this data set in some way (e.g. modified or
removed some files, or changed the rules of the Data Organizer). When I restart Reflex, the Data
Set Chooser correctly displays my new data set, but marks it as “reduced ok”, even though it was
never reduced before. What does this mean?
The labels in the column “Reduced” of the Data Set Chooser mark each dataset with “OK”, “Failed” or
“-”. These labels indicate whether a data set has previously successfully been reduced at least once, all
previous reductions failed, or a reduction has never been tried respectively. Data sets are identified by
their name, which is derived from the first science file within the data set. As long as the data set name is
preserved (i.e. the first science file in a data set has not changed), the Data Organizer will consider it to
be the same data set. The Data Organizer recognizes any previous reductions of data sets it considers to
be the same as the current one, and labels the current data set with “OK” if any of them was successful,
even if the previously reduced data set differs from the current one.
Note that the Product Explorer will list all the previous reductions of a particular data set only at the
end of the reduction. This list might include successful and/or unsuccessful reduction runs with different
parameters, or in your case with different input files. The important fact is that these are all reductions
of data sets with the same first raw science file. By browsing through all reductions of a particular raw
science file, the users can choose the one they want to use.
• Where are my intermediate pipeline products? Intermediate pipeline products are stored in the direc-
tory (defined on the workflow canvas, under Setup Directories) and organised
further in directories by pipeline recipe.
• Can I use different sets of bias frames to calibrate my flat frames and science data? Yes. In fact this
is what is currently implemented in the workflow(s). Each file in a DataSet has a purpose attached to it
(Forchì (2012)). It is this purpose that is used by the workflow to send the correct set of bias frames to the
recipes for flat frame combination and science frame reduction, which may or may not be the same set of
bias frames in each case.
• Can I run Reflex from the command line? Yes, use the command:
esoreflex -n /.xml
The -n option will set all the different options for Kepler and the workflows to avoid opening any GUI
elements (including pipeline interactive windows).
It is possible to specify workflow variables (those that appear in the workflow canvas) in the command
line. For instance, the raw data directory can be set with this command:You can also read