OptiPlex 7090 Ultra Setup and specifications guide
←
→
Page content transcription
If your browser does not render page correctly, please read the page content below

OptiPlex 7090 Ultra
Setup and specifications guide

Regulatory Model: D13U
Regulatory Type: D13U002
January 2021
Rev. A00
Notes, cautions, and warnings

     NOTE: A NOTE indicates important information that helps you make better use of your product.

     CAUTION: A CAUTION indicates either potential damage to hardware or loss of data and tells you how to avoid
     the problem.

     WARNING: A WARNING indicates a potential for property damage, personal injury, or death.

© 2021 Dell Inc. or its subsidiaries. All rights reserved. Dell, EMC, and other trademarks are trademarks of Dell Inc. or its subsidiaries. Other
trademarks may be trademarks of their respective owners.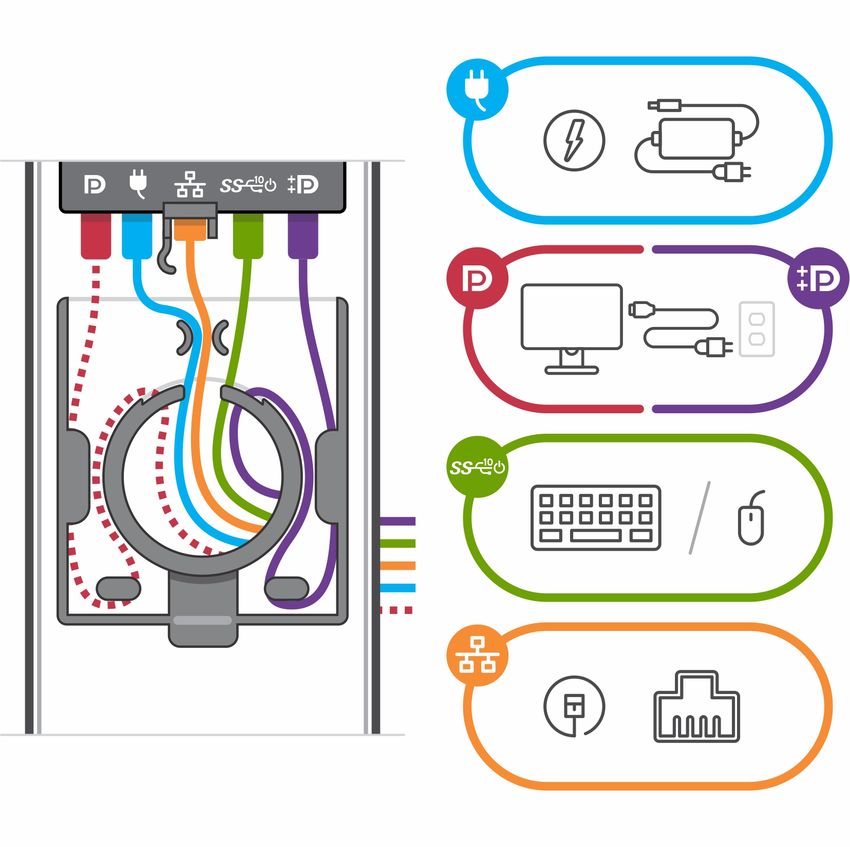
Contents

Chapter 1: Set up your OptiPlex 7090 Ultra................................................................................... 5
  Installing the device on a fixed stand............................................................................................................................. 5
     Monitor tilt angle.......................................................................................................................................................... 14
  Installing the device on a Pro 1 height-adjustable stand.......................................................................................... 14
     Stand tilt, pivot, and swivel images.........................................................................................................................23
  Installing device on offset VESA mount...................................................................................................................... 23
  Installing the device on a Pro 2 height-adjustable stand.........................................................................................30
     Stand tilt, pivot, and swivel images........................................................................................................................ 46
  Installing device on Wall Mount..................................................................................................................................... 49

Chapter 2: Create a USB recovery drive for Windows.................................................................. 65

Chapter 3: View of OptiPlex 7090 Ultra....................................................................................... 66
  Top........................................................................................................................................................................................66
  Bottom................................................................................................................................................................................. 67
  Left....................................................................................................................................................................................... 68
  Right..................................................................................................................................................................................... 69
  Front and back...................................................................................................................................................................69
  Stands view......................................................................................................................................................................... 71
  System board layout......................................................................................................................................................... 79

Chapter 4: Specifications of OptiPlex 7090 Ultra........................................................................ 80
  Dimensions and weight.................................................................................................................................................... 80
  Processor............................................................................................................................................................................. 81
  Chipset..................................................................................................................................................................................81
  Operating system............................................................................................................................................................... 81
  Commercial platform Windows 10 N-2 and 5yrs OS supportability ......................................................................81
  Memory................................................................................................................................................................................82
  Intel Optane Memory H10 with Solid State Storage.................................................................................................82
  External ports.....................................................................................................................................................................83
  Internal slots....................................................................................................................................................................... 83
  Ethernet...............................................................................................................................................................................84
  Wireless module................................................................................................................................................................. 84
  Audio.....................................................................................................................................................................................84
  Storage................................................................................................................................................................................ 84
  Power adapter................................................................................................................................................................... 85
  GPU—Integrated.............................................................................................................................................................. 86
  Powering the system........................................................................................................................................................86
  Type-C display settings....................................................................................................................................................87
  Dell power button sync.................................................................................................................................................... 87
  Data security...................................................................................................................................................................... 88
  Computer environment.................................................................................................................................................... 88
  Energy Star and Trusted Platform Module (TPM)................................................................................................... 89
  Smart power enablement................................................................................................................................................ 89

                                                                                                                                                                  Contents                   3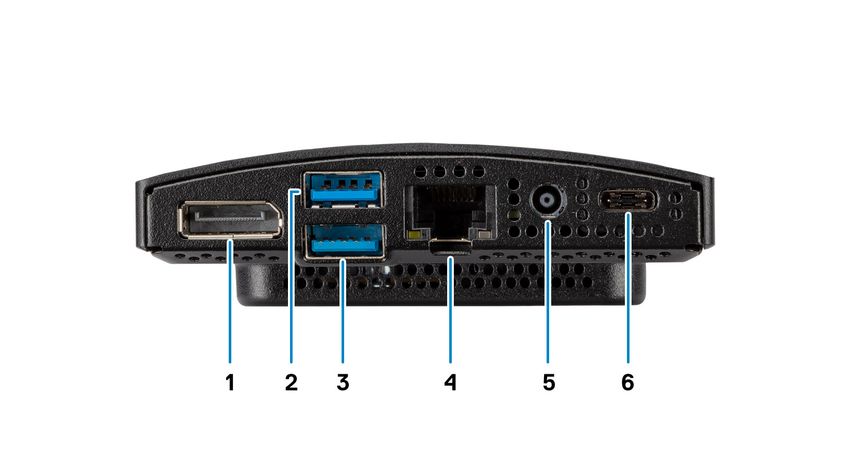
Chapter 5: Getting help...............................................................................................................90
      Contacting Dell.................................................................................................................................................................. 90

4   Contents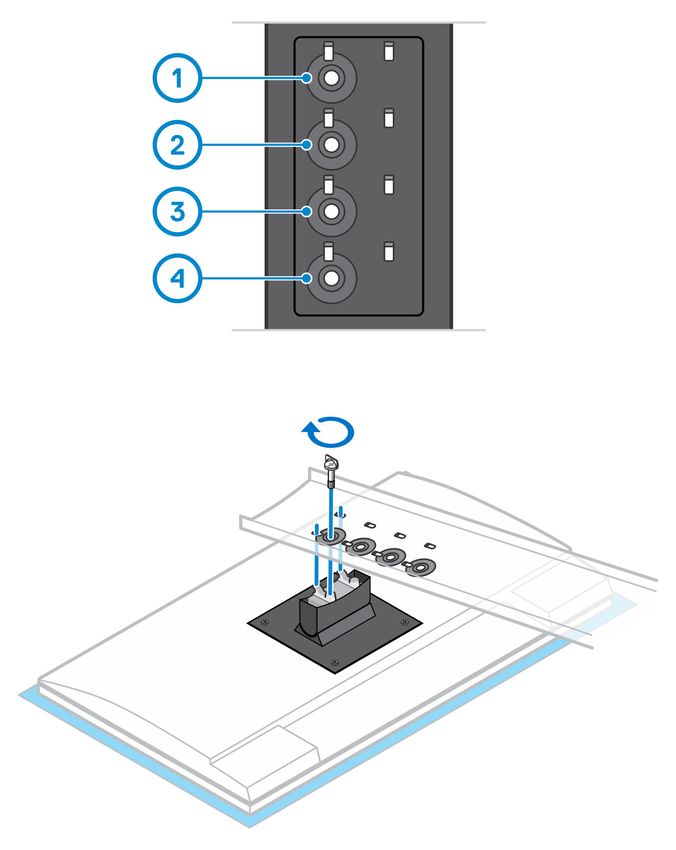
1
                                         Set up your OptiPlex 7090 Ultra
Topics:
•   Installing   the device on a fixed stand
•   Installing   the device on a Pro 1 height-adjustable stand
•   Installing   device on offset VESA mount
•   Installing   the device on a Pro 2 height-adjustable stand
•   Installing   device on Wall Mount

Installing the device on a fixed stand
1. Align and insert the slots on the fixed stand into the tab on the stand base.
2. Lift and tilt the stand base.
3. Tighten the captive screw to secure the stand to the base.

4. Slide the release latch on the stand, until you hear a click, to release the stand cover.
5. Slide and lift the cover to release it from the stand.

                                                                                        Set up your OptiPlex 7090 Ultra   5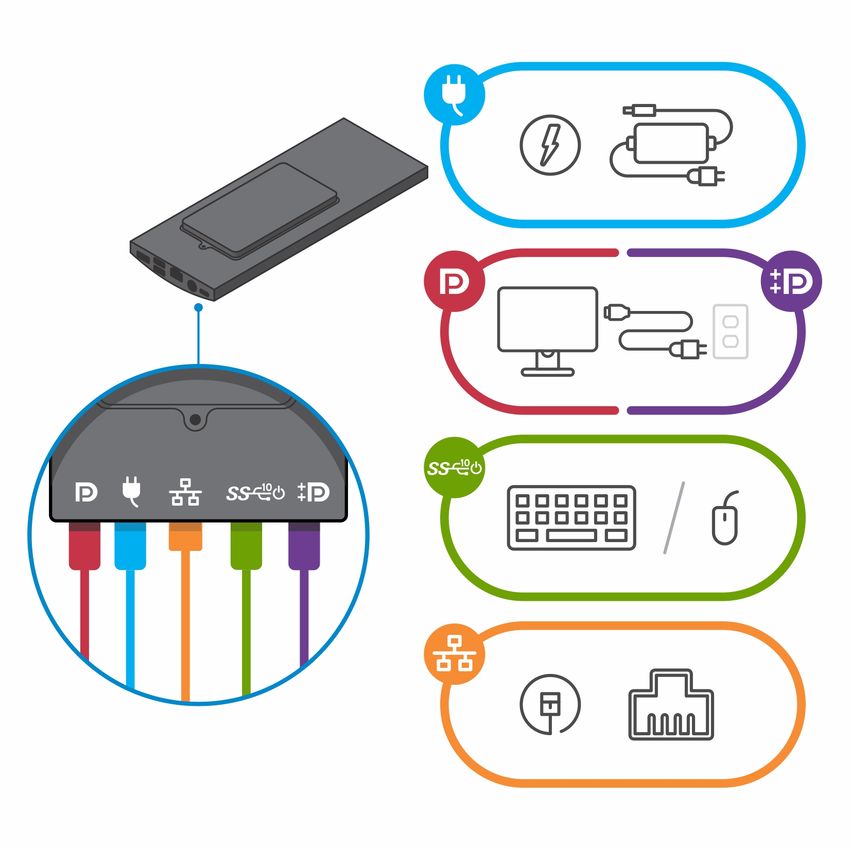
6. Remove the screw that secures the stand mounting bracket to the stand.
7. Lift the mounting bracket to release the hooks on the bracket from the slots on the stand.

6       Set up your OptiPlex 7090 Ultra

8. To avoid any damage to the monitor, ensure that you place the monitor on a protective sheet.
9. Align the screws on the mounting bracket with the screw holes on the monitor.
10. Tighten the four captive screws to secure the mounting bracket to the monitor.

                                                                                     Set up your OptiPlex 7090 Ultra   7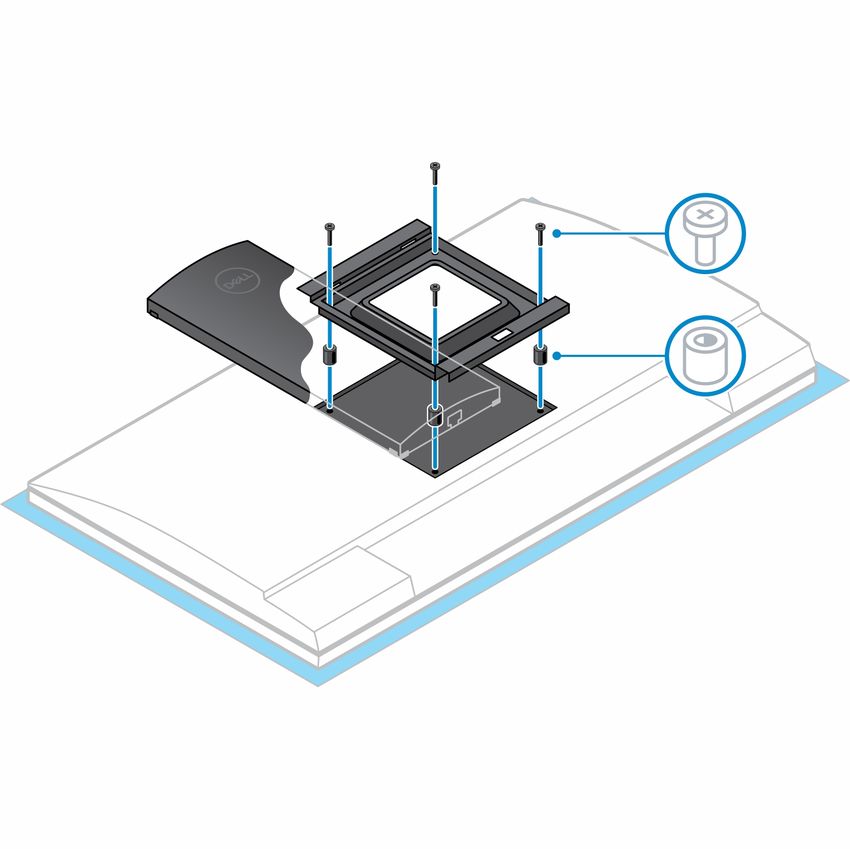
11. Select the height at which you want to mount the monitor and align the hooks on the mounting bracket with the slots on the
    stand.
12. Replace the screw to secure the fixed stand to the monitor.

8       Set up your OptiPlex 7090 Ultra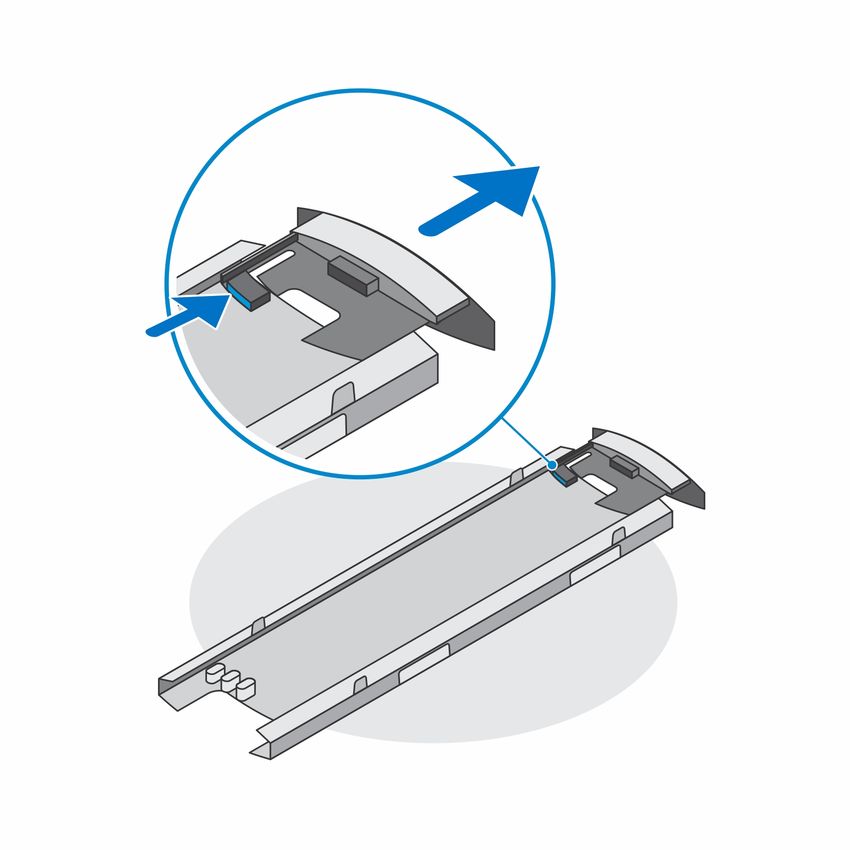
13. Align the vents on the device with the vents on the stand cover.
14. Lower the device in the stand until you hear a click.

15. Connect the power, network, keyboard, mouse, and display cables to the device and to the power outlet.
        NOTE: To avoid any pinching or crimping of the cables while closing the stand cover, it is recommended that you route
        the cables as indicated in the image.

                                                                                   Set up your OptiPlex 7090 Ultra              9
NOTE: All the cables and ports are used depending on the peripherals chosen and the configuration of the computer.

16. Slide the back cover, along with the device, into the stand until you hear a click.

10      Set up your OptiPlex 7090 Ultra
17. Lock the device and the stand cover.

                                           Set up your OptiPlex 7090 Ultra   11
18. Press the power button to turn on the device. 12 Set up your OptiPlex 7090 Ultra
Set up your OptiPlex 7090 Ultra 13
Monitor tilt angle

Installing the device on a Pro 1 height-adjustable
stand
1. Align and insert the slots on the height-adjustable stand into the tab on the stand base.
2. Lift and tilt the stand base.
3. Tighten the captive screw to secure the stand to the base.

14      Set up your OptiPlex 7090 Ultra
4. To avoid any damage to the monitor, ensure that you place the monitor on a protective sheet.
5. For installing the height-adjustable stand to the monitor:
   a. Align and insert the hooks on the mounting bracket on the stand into the slots on the monitor, until you hear a click.

                                                                                     Set up your OptiPlex 7090 Ultra           15
6. For installing QR to VESA bracket for E-Series monitor:
a. Align the screw holes on the QR to VESA bracket with the screw holes on the monitor.
b. Install the four screw spacers and the screws to secure the QR to VESA bracket to the monitor.
c. Align and insert the QR tabs on the stand into the slots on the QR to VESA bracket on the monitor.
d. Tighten the thumb screw to secure the stand to the QR to VESA bracket.
16 Set up your OptiPlex 7090 Ultra7. To release the stand cover, slide the release latch until you hear a click.
8. Slide and lift the cover to release it from the stand.
9. Align the vents on the device with the vents on the stand cover.
10. Lower the device in the stand until you hear a click.
Set up your OptiPlex 7090 Ultra 1711. Connect the power, network, keyboard, mouse, and display cables to the device and to the power outlet.
NOTE: To avoid any pinching or crimping of the cables while closing the stand cover, it is recommended that you route
the cables as indicated in the image.
NOTE: All the cables and ports are used depending on the peripherals chosen and the configuration of the computer.
18 Set up your OptiPlex 7090 Ultra12. Slide the back cover, along with the device, into the stand until you hear a click.
Set up your OptiPlex 7090 Ultra 1913. Lock the device and the stand cover. 20 Set up your OptiPlex 7090 Ultra
14. Press the power button to turn on the device.

                                                    Set up your OptiPlex 7090 Ultra   21
22 Set up your OptiPlex 7090 Ultra
Stand tilt, pivot, and swivel images

Installing device on offset VESA mount
1. Align the screw holes on the device with the screw holes on the offset VESA mount.
2. Install the four screws to secure the device to the offset VESA mount.

                                                                                  Set up your OptiPlex 7090 Ultra   23
3. To avoid any damage to the monitor, ensure that you place the monitor on a protective sheet. 4. Align the screw holes on the offset VESA mount with the screw holes on the monitor. 5. Install the four screw spacers and the screws to secure the offset VESA mount to the monitor. 24 Set up your OptiPlex 7090 Ultra
6. Insert the hooks on the mounting bracket of the monitor arm stand into the slots on the offset VESA mount on the monitor.
7. Lower the monitor on the monitor arm stand until you hear a click.

                                                                                  Set up your OptiPlex 7090 Ultra         25
8. To install the offset VESA mount on a Dell E-Series monitor:
a. Align and install the four screws to secure the device to the offset VESA mount.
26 Set up your OptiPlex 7090 Ultrab. Remove the VESA cover from the back of the monitor and secure the offset VESA mount along with the device to the
monitor.
Set up your OptiPlex 7090 Ultra 2728 Set up your OptiPlex 7090 Ultra
Set up your OptiPlex 7090 Ultra 29
NOTE: While orienting the monitor horizontally, route the security lock cable to
           the right side of the device to avoid any impact to WLAN performance.

Installing the device on a Pro 2 height-adjustable
stand
1. Align and insert the slots on the height-adjustable stand into the tab on the stand base.
2. Lift and tilt the stand base.
3. Tighten the captive screw to secure the stand to the base.

30      Set up your OptiPlex 7090 Ultra
NOTE: For the large height adjustable stand, replacing the screw to the unlock icon screw hole in the stand base
ensures the rotation of the 30-inch - 32-inch monitor.
Set up your OptiPlex 7090 Ultra 314. To avoid any damage to the monitor, ensure that you place the monitor on a protective sheet.
5. For installing the height-adjustable stand to the monitor:
a. Align and insert the hooks on the mounting bracket on the stand into the slots on the monitor, until you hear a click.
32 Set up your OptiPlex 7090 UltraSet up your OptiPlex 7090 Ultra 33
6. For installing QR to VESA bracket for E-Series monitor:
     a.   Align the screw holes on the QR to VESA bracket with the screw holes on the monitor.
     b.   Install the four screw spacers and the screws to secure the QR to VESA bracket to the monitor.
     c.   Align and insert the QR tabs on the stand into the slots on the QR to VESA bracket on the monitor.
     d.   Tighten the thumb screw to secure the stand to the QR to VESA bracket.

34         Set up your OptiPlex 7090 Ultra
Set up your OptiPlex 7090 Ultra 35
7. To release the stand cover, press the button on the side of the stand chassis.
8. Slide and lift the cover to release it from the stand.

36      Set up your OptiPlex 7090 Ultra
9. Slide and release the inner bar on the lower edge of the stand cover.

                                                                           Set up your OptiPlex 7090 Ultra   37
10. Align the vents on the device with the vents on the stand cover and slide the device in the cover. 38 Set up your OptiPlex 7090 Ultra
11. Slide the inner bar back to the lower edge of the stand cover to lock the device to the cover.

                                                                                      Set up your OptiPlex 7090 Ultra   39
12. Connect the power, network, keyboard, mouse, and display cables to the device and to the power outlet. 40 Set up your OptiPlex 7090 Ultra
13. To avoid any pinching or crimping of the cables while closing the stand cover, it is recommended that you route the cables as
    indicated in the image.
       NOTE: All the cables and ports are used depending on the peripherals chosen and the configuration of the computer.

   Standard Height Adjustable Stand

                                                                                     Set up your OptiPlex 7090 Ultra          41
Large Height Adjustable Stand 42 Set up your OptiPlex 7090 Ultra
14. Slide the stand cover, along with the device, into the stand until you hear a click.

                                                                                           Set up your OptiPlex 7090 Ultra   43
15. Lock the device and the stand cover. 44 Set up your OptiPlex 7090 Ultra
16. Press the power button to turn on the device.

                                                    Set up your OptiPlex 7090 Ultra   45
Stand tilt, pivot, and swivel images For 19-inch to 27-inch monitor (Standard height adjustable stand): 46 Set up your OptiPlex 7090 Ultra
For 30-inch to 32-inch monitor (Large height adjustable stand):

                                                                  Set up your OptiPlex 7090 Ultra   47
For monitors > 32-inch (Large height adjustable stand): 48 Set up your OptiPlex 7090 Ultra
Installing device on Wall Mount
1. Full Function
   a. Press the release button to open the cable cover.

   b. Align the screw holes on the wall mount in the wall and mark them against the wall using a pencil.

                                                                                    Set up your OptiPlex 7090 Ultra   49
c. Drill the screw marks on the wall and insert the three screw anchors into the screw holes in the wall. 50 Set up your OptiPlex 7090 Ultra
d. Align the screw holes on the wall mount with the screw holes on the wall and install the three screws to secure the wall
   mount in the wall.

                                                                                 Set up your OptiPlex 7090 Ultra          51
e. Align the screw holes on the device with the screw holes on the wall mount bracket.
f. Install the four screws to secure the device to the wall mount bracket.
52 Set up your OptiPlex 7090 Ultrag. Insert the hooks on the mounting bracket of the wall mount into the slots on the wall mount bracket module.
h. Align and insert the hooks on the wall mount bracket module into the slots on the wall mount until it clicks into place
Set up your OptiPlex 7090 Ultra 53i. Connect the power, network, keyboard, mouse, and display cables to the device and to the power outlet. 54 Set up your OptiPlex 7090 Ultra
j.   To avoid any pinching or crimping of the cables while closing the stand cover, it is recommended that you route the
     cables as indicated in the image.
         NOTE: All the cables and ports are used depending on the peripherals chosen and the configuration of the computer.

                                                                                  Set up your OptiPlex 7090 Ultra          55
k. Close the stand cover. 56 Set up your OptiPlex 7090 Ultra
l.   Lock the device and the stand cover.

                                            Set up your OptiPlex 7090 Ultra   57
2. Simple Function
a. Align the screw holes on the wall mount in the wall and mark them using a pencil.
58 Set up your OptiPlex 7090 Ultrab. Drill the screw marks on the wall and insert the two screws into the screw holes in the wall.
Set up your OptiPlex 7090 Ultra 59c. Align the screw holes on the device with the screw holes on the wall mount bracket.
d. Install the four screws to secure the device to the wall mount bracket.
60 Set up your OptiPlex 7090 Ultrae. Connect the power, network, keyboard, mouse, and display cables to the device and to the power outlet.
Set up your OptiPlex 7090 Ultra 61f. Align the screws on the wall with the retention clips on the wall mount bracket module.
g. Mount the wall mount bracket module in the screws on the wall.
62 Set up your OptiPlex 7090 Ultrah. Press the power button to turn on the device.
Set up your OptiPlex 7090 Ultra 6364 Set up your OptiPlex 7090 Ultra
2
            Create a USB recovery drive for Windows
Create a recovery drive to troubleshoot and fix problems that may occur with Windows. An empty USB flash drive with a
minimum capacity of 16 GB is required to create the recovery drive.

    NOTE: This process may take up to an hour to complete.

    NOTE: The following steps may vary depending on the version of Windows installed. Refer to the Microsoft support site for
    latest instructions.
1. Connect the USB flash drive to your computer.
2. In Windows search, type Recovery.
3. In the search results, click Create a recovery drive.
   The User Account Control window is displayed.
4. Click Yes to continue.
   The Recovery Drive window is displayed.
5. Select Back up system files to the recovery drive and click Next.
6. Select the USB flash drive and click Next.
   A message appears, indicating that all data in the USB flash drive will be deleted.
7. Click Create.
8. Click Finish.
   For more information about reinstalling Windows using the USB recovery drive, see the Troubleshooting section of your
   product's Service Manual at www.dell.com/support/manuals.

                                                                            Create a USB recovery drive for Windows        65
3
View of OptiPlex 7090 Ultra
Topics:
• Top
• Bottom
• Left
• Right
• Front and back
• Stands view
• System board layout
Top
1. Fan vent
2. Power button
66 View of OptiPlex 7090 UltraBottom
1. DisplayPort 1.4 + + HBR2
2. 1 USB 3.2 Gen 2 Type-A ports with SmartPower On
3. 1 USB 3.2 Gen 2 Type-A ports with SmartPower On
4. RJ45 Ethernet port
5. DC-in port
6. 1 USB 3.2 Gen 2 Type-C port with Display Port Alt Mode/Power delivery
View of OptiPlex 7090 Ultra 67Left 1. Headset/Universal Audio Jack 2. Fan vent 3. Hard-drive status LED 4. 1 Thunderbolt 4 port with DisplayPort Alt Mode/USB4 5. 1 USB 3.2 Gen 2 Type-A port with PowerShare 68 View of OptiPlex 7090 Ultra
Right

1. Kensington lock slot
2. Security screw lock slot
3. Air vents

Front and back
Front

                              View of OptiPlex 7090 Ultra   69
Back 70 View of OptiPlex 7090 Ultra
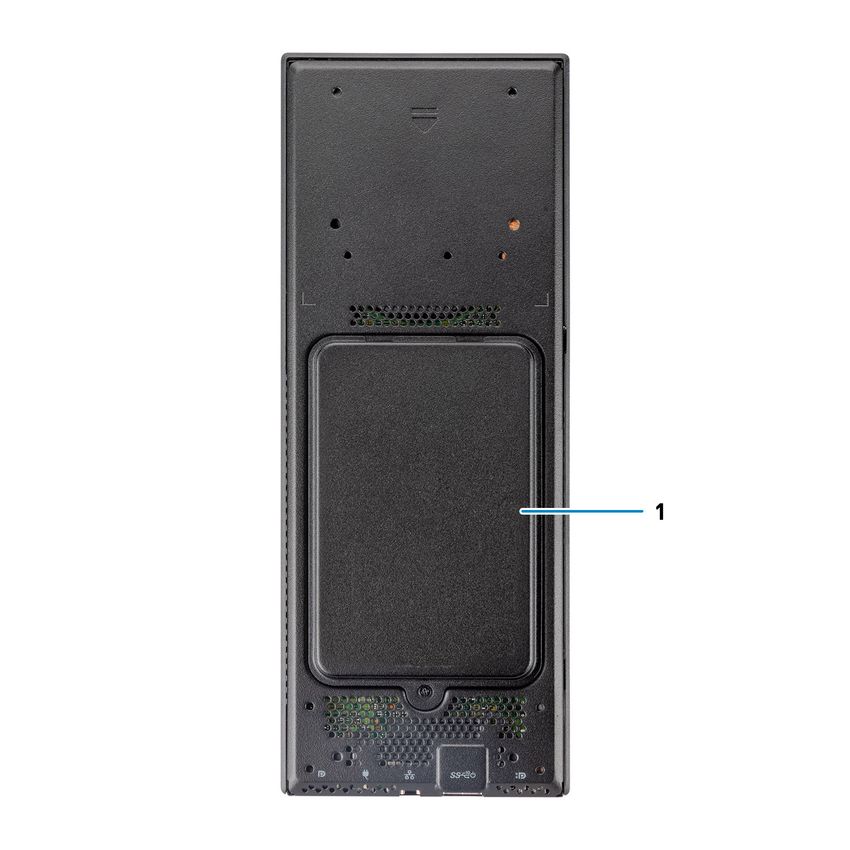
1. Hard drive cover/ M.2 Solid-state drive cover

Stands view
Fixed stand:

                                                   View of OptiPlex 7090 Ultra   71
Pro 1.0 Height-adjustable stand: Pro 2.0 Height Adjustable Stand Standard: 72 View of OptiPlex 7090 Ultra
Pro 2.0 Height Adjustable Stand Large:

                                         View of OptiPlex 7090 Ultra   73
Offset VESA Mount: 74 View of OptiPlex 7090 Ultra
VESA Adapter for Pro2.0 Height Adjustable Stand:

                                                   View of OptiPlex 7090 Ultra   75
VESA Adapter for Pro1.0 Height Adjustable Stand: 76 View of OptiPlex 7090 Ultra
Wall Mount:

              View of OptiPlex 7090 Ultra   77
78 View of OptiPlex 7090 Ultra
System board layout

1.   System fan connector
2.   Power button connector
3.   Coin-cell battery connector
4.   Hard-drive connector
5.   Daughter board connector
6.   CPU
7.   M.2 SSD PCIe Gen4 connector
8.   M.2 WLAN connector
9.   Memory-module slots

                                   View of OptiPlex 7090 Ultra   79
4
Specifications of OptiPlex 7090 Ultra
Topics:
• Dimensions and weight
• Processor
• Chipset
• Operating system
• Commercial platform Windows 10 N-2 and 5yrs OS supportability
• Memory
• Intel Optane Memory H10 with Solid State Storage
• External ports
• Internal slots
• Ethernet
• Wireless module
• Audio
• Storage
• Power adapter
• GPU—Integrated
• Powering the system
• Type-C display settings
• Dell power button sync
• Data security
• Computer environment
• Energy Star and Trusted Platform Module (TPM)
• Smart power enablement
Dimensions and weight
Table 1. Dimensions and weight
Description Values
Height: 256.20 mm (10.09 in.)
Width 96.10 mm (3.78 in.)
Depth ● Without hard drive: 19.70 mm (0.78 in.)
● With hard drive: 27.74 mm (1.09 in.)
Weight ● Maximum 0.65 kg (1.43 lb)
● Minimum 0.51 kg (1.13 lb)
NOTE: The weight of your computer depends on the configuration
ordered and the manufacturing variability.
80 Specifications of OptiPlex 7090 UltraProcessor
The following table lists the details of the processors supported by your OptiPlex 7090 Ultra.
Table 2. Processor
Description Option one Option two Option three
Processor type 11 th Generation Intel Core 11 th Generation Intel Core 11 th Generation Intel Core
i3-1115G4 i5-1145G7 vPRO i7-1185G7 vPRO
Processor wattage 28 W 28 W 28 W
Processor core count 2 4 4
Processor thread count 4 8 8
Processor speed 3.0 GHz to 4.1 GHz 2.6 GHz to 4.4 GHz 3.0 GHz to 4.8 GHz
Processor cache 6 MB 8 MB 12 MB
Integrated graphics Intel UHD Graphics Intel IrisXe Graphics at 80EU Intel IrisXe Graphics at 96EU
Chipset
Table 3. Chipset
Description Values
Chipset Tiger Lake PCH-LP (Integrated with the processor)
Processor 11 th Generation Intel Core i3/i5/i7
DRAM bus width 64-bit
Flash EPROM 32 MB
PCIe bus Up to Gen4
Operating system
● Windows 10 Pro, 64-bit
● Windows 10 Home, 64-bit
● Windows 10 Pro Education, 64-bit
● Windows 10 CMIT Government Edition (CMGE) v10
● Windows 10 IoT Enterprise 2019, LTSC (OEM only)
● Ubuntu Linux 20.04 LTS, 64-bit
Commercial platform Windows 10 N-2 and 5yrs OS
supportability
All newly introduced 2020 and later commercial platforms (Latitude, OptiPlex, and Precision) will qualify and ship with the most
current factory installed Semi-Annual Channel Windows 10 version (N) and qualify (but not ship) the previous two versions (N-1,
N-2). This device platform, OptiPlex 7090 Ultra will RTS with Windows 10 version (20H2, 20H1, 19H2) at the time of launch,
and this version will determine the N-2 versions that are initially qualified for this platform.
Specifications of OptiPlex 7090 Ultra 81For future versions of Windows 10, Dell will continue to test the commercial platform with coming Windows 10 releases during
device production and for five years post-production, including both fall and spring releases from Microsoft.
Please reference the Dell Windows as a Service (WaaS) website for additional information on N-2 and 5 year Windows OS
supportability. Website can be found at this link: https://www.dell.com/support/article/us/en/04/qna44484/dell-windows-as-
a-service-waas-supported-products?lang=en.
This website also includes a matrix of other platforms qualified on specific versions of Windows 10.
Memory
Table 4. Memory specifications
Description Values
Slots Two SODIMM slots
Type Dual-channel DDR4
Speed 3200 MHz
Maximum memory 64 GB
Minimum memory 4 GB
Memory size per slot 4 GB, 8 GB, 16 GB, 32 GB
Configurations supported ● 4 GB, 1 x 4 GB, DDR4, 3200 MHz, dual-channel
● 8 GB, 1 x 8 GB, DDR4, 3200 MHz, dual-channel
● 8 GB, 2 x 4 GB, DDR4, 3200 MHz, dual-channel
● 16 GB, 1 x 16 GB, DDR4, 3200 MHz, dual-channel
● 16 GB, 2 x 8 GB, DDR4, 3200 MHz, dual-channel
● 32 GB, 1 x 32 GB, DDR4, 3200 MHz, dual-channel
● 32 GB, 2 x 16 GB, DDR4, 3200 MHz, dual-channel
● 64 GB, 2 x 32 GB, DDR4, 3200 MHz, dual-channel
Intel Optane Memory H10 with Solid State Storage
Intel Optane Memory technology utilizes 3D XPoint memory technology and functions as a non-volatile storage cache/
accelerator and/or storage device depending on the Intel Optane Memory installed in your computer.
Intel Optane Memory H10 with Solid State Storage functions as both a non-volatile storage cache/accelerator (enabling
enhanced read/write speeds for hard-drive storage) and a solid-state storage solution. It neither replaces nor adds to the
memory (RAM) installed on your computer.
Table 5. Intel Optane Memory H10 with Solid State Storage specifications
Description Values
Interface PCIe 3 x4 NVMe
● One PCIe 3 x2 for Optane memory
● One PCIe 3 x2 for solid-state storage
Connector M.2
Form factor 2280
Capacity (Intel Optane memory) 32 GB
Capacity (solid-state storage) 512 GB
82 Specifications of OptiPlex 7090 UltraNOTE: Intel Optane Memory H10 with Solid State Storage is supported on computers that meet the following requirements:
● 9 th Generation or higher Intel Core i3/i5/i7 processors
● Windows 10 64-bit version or higher (Anniversary Update)
● Intel Rapid Storage Technology driver version 15.9.1.1018 or higher
External ports
The following table lists the external ports of your OptiPlex 7090 Ultra.
Table 6. External ports
Description Values
Network port 1 RJ-45 Ethernet port
USB ports ● 1 USB 3.2 Gen 2 Type-A port with PowerShare (side)
● 1 Thunderbolt 4 port with DisplayPort Alt Mode/USB4
(side)
● 2 USB 3.2 Gen 2 Type-A with SmartPower On (rear)
● 1 USB 3.2 Gen 2 Type-C port with Display Port Alt Mode/
Power delivery (rear)
Audio port 1 Headset/Universal Audio Jack
Video port 1 DisplayPort 1.4 + + HBR2 port
Media-card reader Not supported
Power-adapter port 4.50 mm x 2.90 mm DC-in port
Security-cable slot ● 1 Kensington lock slot
● 1 Security screw hole
● Chassis Intrusion Switch
Internal slots
Table 7. Internal slots
Description Values
Internal:
M.2 ● 1 M.2 2230 slot for WiFi and Bluetooth card
● 1 M.2 2280 or 2230 slot for PCIe solid-state drive /Optane
(Option bay configuration : M.2 SSD Option)
● 1 M.2 2230 slot for PCIe solid-state drive
NOTE: To learn more about the features of different
types of M.2 cards, see the knowledge base article
SLN301626.
SATA 1 SATA 3.0 FFC connector for hard drive
Specifications of OptiPlex 7090 Ultra 83Ethernet
Table 8. Ethernet specifications
Description Values
Model number Intel i219LM
Transfer rate 10/100/1000 Mbps
Wireless module
The following table lists the Wireless Local Area Network (WLAN) modules supported on your OptiPlex 7090 Ultra.
Table 9. Wireless module specifications
Description Option one Option two
Model number Qualcomm QCA61x4A Intel Wi-Fi 6 AX201
Transfer rate Up to 867 Mbps Up to 2.4 Gbps
Frequency bands supported 2.4 GHz, 5 GHz 2.4 GHz, 5 GHz
Wireless standards ● Wi-Fi 802.11 a/b/g ● Wi-Fi 802.11 a/b/g
● Wi-Fi 4 (WiFi 802.11n) ● Wi-Fi 4 (Wi-Fi 802.11n)
● Wi-Fi 5 (WiFi 802.11ac) ● Wi-Fi 5 (Wi-Fi 802.11ac)
● Wi-Fi 6 (Wi-Fi 802.11ax)
Encryption ● 64-bit/128-bit WEP ● 64-bit/128-bit WEP
● AES-CCMP ● AES-CCMP
● TKIP ● TKIP
Bluetooth Bluetooth 5.0 Bluetooth 5.1
Audio
Table 10. Audio specifications
Description Values
Controller Realtek ALC3204-CG
Stereo conversion Supported
Internal interface High definition audio interface
External interface Universal Audio Jack
Speakers Not applicable
Storage
This section lists the storage options on your OptiPlex 7090 Ultra.
Your computer supports the following configuration:
84 Specifications of OptiPlex 7090 Ultra● One M.2 2230 solid-state drive
● One M.2 2230 solid-state drive and One M.2 2230 solid-state drive
● One M.2 2230 solid-state drive and One M.2 2280 solid-state drive
● One M.2 2230 solid-state drive and One 2.5-inch, 7 mm hard drive
● One M.2 2280 solid-state drive
● One 2.5-inch, 7 mm hard drive
● One M.2 2230 solid-state drive and One Intel Optane Memory H20 with Solid State Storage, 512 GB, M.2 2280, PCIe NVMe
Gen3 x4
● One Intel Optane Memory H20 with Solid State Storage, 512 GB, M.2 2280, PCIe NVMe Gen3 x4
● 32/64 GB eMMC - supported on Ubuntu only
Table 11. Storage specifications
Storage type Interface type Capacity
2.5-inch 5400 RPM hard drive SATA AHCI, upto 6 Gbps (SATA 3.0) Up to 2 TB
2.5-inch 7200 RPM hard drive SATA AHCI, upto 6 Gbps (SATA 3.0) Up to 1 TB
2.5-inch 7200 RPM FIPS Self Encrypting FIPS, upto 6 Gbps (SATA 3.0) Up to 500 GB
Opal 2.0 hard drive
M.2 PCIe NVMe Class 35 solid-state Gen 3 PCIe x4 NVMe Up to 512 GB
drive
M.2 PCIe NVMe Class 35 Self Encrypting Gen 3 PCIe x4 NVMe Up to 256 GB
Opal 2.0 solid-state drive
M.2 PCIe NVMe Class 40 solid-state ● Gen 3 PCIe x4 NVMe ● Up to 1 TB
drive ● Gen 4 PCIe x4 NVMe ● 2 TB
M.2 PCIe NVMe Class 40 Self Encrypting Gen 3 PCIe x4 NVMe Up to 1 TB
Opal 2.0 solid-state drive
eMMC eMMC Upto 64 GB
Power adapter
The following table lists the power adapter specifications of your OptiPlex 7090 Ultra.
Table 12. Power adapter specifications
Description Values
Type 90 W
Connector dimensions:
External diameter 4.50 mm
Internal diameter 2.90 mm
Input voltage 100 VAC-240 VAC
Input frequency 50 Hz-60 Hz
Input current (maximum) 1.50 A
Output current (continuous) 4.62 A
Rated output voltage 19.50 VDC
Specifications of OptiPlex 7090 Ultra 85Table 12. Power adapter specifications (continued)
Description Values
Temperature range:
Operating 0°C to 40°C (32°F to 104°F)
Storage -40°C to 70°C (-40°F to 158°F)
GPU—Integrated
The following table lists the specifications of the integrated Graphics Processing Unit (GPU) supported by your OptiPlex 7090
Ultra.
Table 13. GPU—Integrated
Controller External display support Memory size Processor
Intel UHD Graphics ● Up to four Shared system memory 11 th Generation Intel Core i3
displays supported processor
via DisplayPort Multi-
Streaming Technology
(MST)
● One DisplayPort 1.4
support over USB 3.2 Gen
2 Type-C port
● One Thunderbolt 4 port
with DisplayPort Alt
Mode/USB4
● One DisplayPort 1.4 ++
HBR2 support over rear
standard DP port
Intel IrisXe Graphics ● Up to four Shared system memory 11 th Generation Intel Core
displays supported i5/i7 processor
via DisplayPort Multi-
Streaming Technology
(MST)
● One DisplayPort 1.4
support over USB 3.2 Gen
2 Type-C port
● One Thunderbolt 4 port
with DisplayPort Alt
Mode/USB4
● One DisplayPort 1.4 ++
HBR2 support over rear
standard DP port
NOTE: For 8K60P video playback support, we recommend to use 128-bit (dual channel) DDR4-3200 memory, at least 16
GB with dual channel (8 GB + 8 GB) memory sizes.
Powering the system
This system can be powered using a 90 W adapter (4.5 mm input power source) or through the USB Type-C cable connected
to a display capable of providing power delivery of 90 W or greater. During normal operation, when the device is connected
with a single power source (primary power source), connecting a second power source and disconnecting the primary power
source will shut down the device. However, if the secondary power source is disconnected while the primary power source is
connected, the system continues to operate normally.
86 Specifications of OptiPlex 7090 UltraWhen the device is powered with both the power sources—AC adapter and USB Type-C cable, the AC adapter is the primary
power source and USB Type-C is the secondary power source. Disconnecting the AC adapter will shut down the system. If the
secondary power source is disconnected, the system continues to operate normally.
NOTE: Hotswap between the AC adapter and USB Type-C power source is not supported.
Table 14. Powering the system
Primary Power Source Secondary power source Power source disconnected Operation
connected
AC Adapter Rear Type-C AC Adapter Shut down
AC Adapter Rear Type-C Rear Type-C Normal operation
Rear Type-C AC Adapter AC Adapter Normal operation
Rear Type-C AC Adapter Rear Type-C Shut down
Type-C display settings
When using a Dell USB Type-C display to power on your OptiPlex 7090 Ultra, to avoid any power loss to the device when the
display is turned off or on Standby mode, ensure that the Always on USB-C Charging setting on the display is enabled.
When turning on the Dell USB Type-C display for the first time, the Easy initial setup is displayed. Click Yes, to enable the
Always on USB-C charging option.
If you miss enabling the option on Easy Initial setup window, then you can enable the setting using the on-screen display menu
available on the display. For more information on enabling the option, see the documentation that is shipped with your display.
NOTE: The "USB-C Always On Charging" firmware option may not be present on all Dell USB Type-C displays. You can
enable the USB-C Always On charging feature only after you update the firmware. Download the Dell display firmware, at
Dell.com/support.
NOTE: Type-C display settings will be applicable only with the monitors of CY20. The C-series or CY21 monitors are enabled
with Dell Power Button Sync and therefore do not require this setting.
Dell power button sync
The C-series or CY21 monitors are enabled with Dell power button sync feature to control computer power state from monitor
power button. This feature is compatible with Dell OptiPlex 7090 Ultra platform, and is only supported over USB Type-C
interface. The user needs to establish a sync between the computer and the Dell power button sync enabled monitor by
configuring the control panel of the computer for the first time.
To setup the Dell power button sync for the first time, follow the below instructions in the control panel of Dell OptiPlex 7090
Ultra computer.
1. Open Control Panel.
2. Select Hardware and Sound option.
3. Select Power Options from the list.
4. In the Systems Settings page, you can choose the power settings required for the computer.
5. For the option When I press the power button:, you can select Sleep/Hibernate/Shut down.
NOTE: Do not select the option "Do nothing" from the drop down. This will prevent the monitor power button to sync with
the computer power state.
NOTE: Re-configuring the control panel settings is not required when connecting the computer and the monitor for the
next time, as the computer will automatically contract and sync with the monitor.
Specifications of OptiPlex 7090 Ultra 87Data security
Table 15. Data security
Features Specifications
Dell Encryption Personal Optional
Dell Encryption Enterprise Optional
Dell Encryption External Media Optional
Dell Data Guardian Optional
Dell Data Protection | Bitlocker Manager (DDP | BLM) Optional
Dell Data Protection | Endpoint Security Suite or Dell Endpoint Optional
Security Suite Pro
Dell Data Protection | Endpoint Security Suite Enterprise or Optional
Dell Endpoint Security Suite Enterprise
Dell Threat Defense Optional
RSA SecureID Optional
RSA NetWitness Endpoint Optional
Microsoft Windows Bitlocker Manager Optional
Windows 10 Device Guard and Credential Guard Optional
Intel Secure Boot (TXT + TPM) - Launch control policy Optional
Intel Identity Protection (IPT) Optional
Intel Guard Technologies & Secure Key Optional
McAfee Small Business Security subscription, Digitally Optional
Delivered
SafeGuard and Response (powered by Secureworks) Optional
SafeData: includes Dell Data Guardian, Dell Encryption, Dell Optional
Endpoint Security Services
Computer environment
Airborne contaminant level: G1 as defined by ISA-S71.04-1985
Table 16. Computer environment
Description Operating Storage
Temperature range 0°C to 35°C (32°F to 95°F) -40°C to 65°C (-40°F to 149°F)
Relative humidity (maximum) 10% to 90% (non-condensing) 0% to 95% (non-condensing)
Vibration (maximum) * 0.66 GRMS 1.30 GRMS
Shock (maximum) 110 G† 160 G†
Altitude (maximum) -15.2 m to 3048 m (-49.87 ft to 10000 -15.2 m to 10668 m (-49.87 ft to 35000
ft) ft)
* Measured using a random vibration spectrum that simulates user environment.
† Measured using a 2 ms half-sine pulse when the hard drive is in use.
88 Specifications of OptiPlex 7090 UltraEnergy Star and Trusted Platform Module (TPM)
Table 17. Energy star and TPM
Features Specifications
Energy Star ENERGY STAR 8.0 qualified Compliant
TPM ● Hardware trusted Platform Module (Discrete TPM
Enabled)
● Firmware Trusted Platform Module only (Discrete TPM
Disabled)
Environmental, Ergonomic and Regulatory standards Environmental Standards (eco-labels): ENERGY STAR, EPEAT
Registered, TCO Certified, CEL, WEEE, Japan Energy Law,
South Korea E-standby, South Korea Eco-label, EU RoHS,
China RoHS.
Please see your local representative or www.dell.com for
specific details.
Smart power enablement
Deep sleep is enabled in the BIOS by default. If the system is connected to a USB keyboard and Deep sleep is enabled in the
BIOS, the system will not power on or wake from hibernation when a key is pressed on the USB keyboard.
Enable USB Wake support:
1. Press when the Dell logo appears to initiate a one-time boot menu. Go to BIOS Setup.
2. Select Power Management.
3. Navigate to USB Wake Support
4. Turn on Enable USB Wake Support
5. Navigate to Deep Sleep control
6. Disable Deep Sleep
Specifications of OptiPlex 7090 Ultra 895
Getting help
Topics:
• Contacting Dell
Contacting Dell
NOTE: If you do not have an active Internet connection, you can find contact information on your purchase invoice, packing
slip, bill, or Dell product catalog.
Dell provides several online and telephone-based support and service options. Availability varies by country and product, and
some services may not be available in your area. To contact Dell for sales, technical support, or customer service issues:
1. Go to Dell.com/support.
2. Select your support category.
3. Verify your country or region in the Choose a Country/Region drop-down list at the bottom of the page.
4. Select the appropriate service or support link based on your need.
90 Getting helpYou can also read